
 Sign in
 How to download the latest Python flask SMS library from Github
This article is about how you can make changes to the Python Flask SMS API, located on GitHub, from your computer. This solution will only take about 20 minutes to perform. You will learn how to install Git for windows and tortoisegit. It will start with downloading Git, and will end with the changes you made visible on GitHub. We assume that you are familiar with GitHub and Python. The video is easy to follow and detailed so you will have no problem understanding the process. Don’t waste any time! Let’s go!
How to download the Python Flask SMS API from GitHub (Quick steps)
To download the Python Flask SMS API from GitHub:
- Create a GitHub account
- Setup GitHub Desktop
- Browse to github.com/ozekisms/python-flask-send-sms-http-rest-ozeki
- Click Code to copy the link
- Clone the Python Flask SMS API in Github Desktop
- Paste the copied link on URL tab to Clone
- Launch Ozeki SMS Gateway
- Run the Python SMS API using the command prompt

Download Github Desktop
To get the latest Python SMS library, you hav to download it from Github.
To do that, you will need a Github account, and the desktop version of Github.
In the following video I'm going to show you how to download the desktop version
of Github.
You might want to use this link:
https://desktop.github.com/ to download Github Desktop.
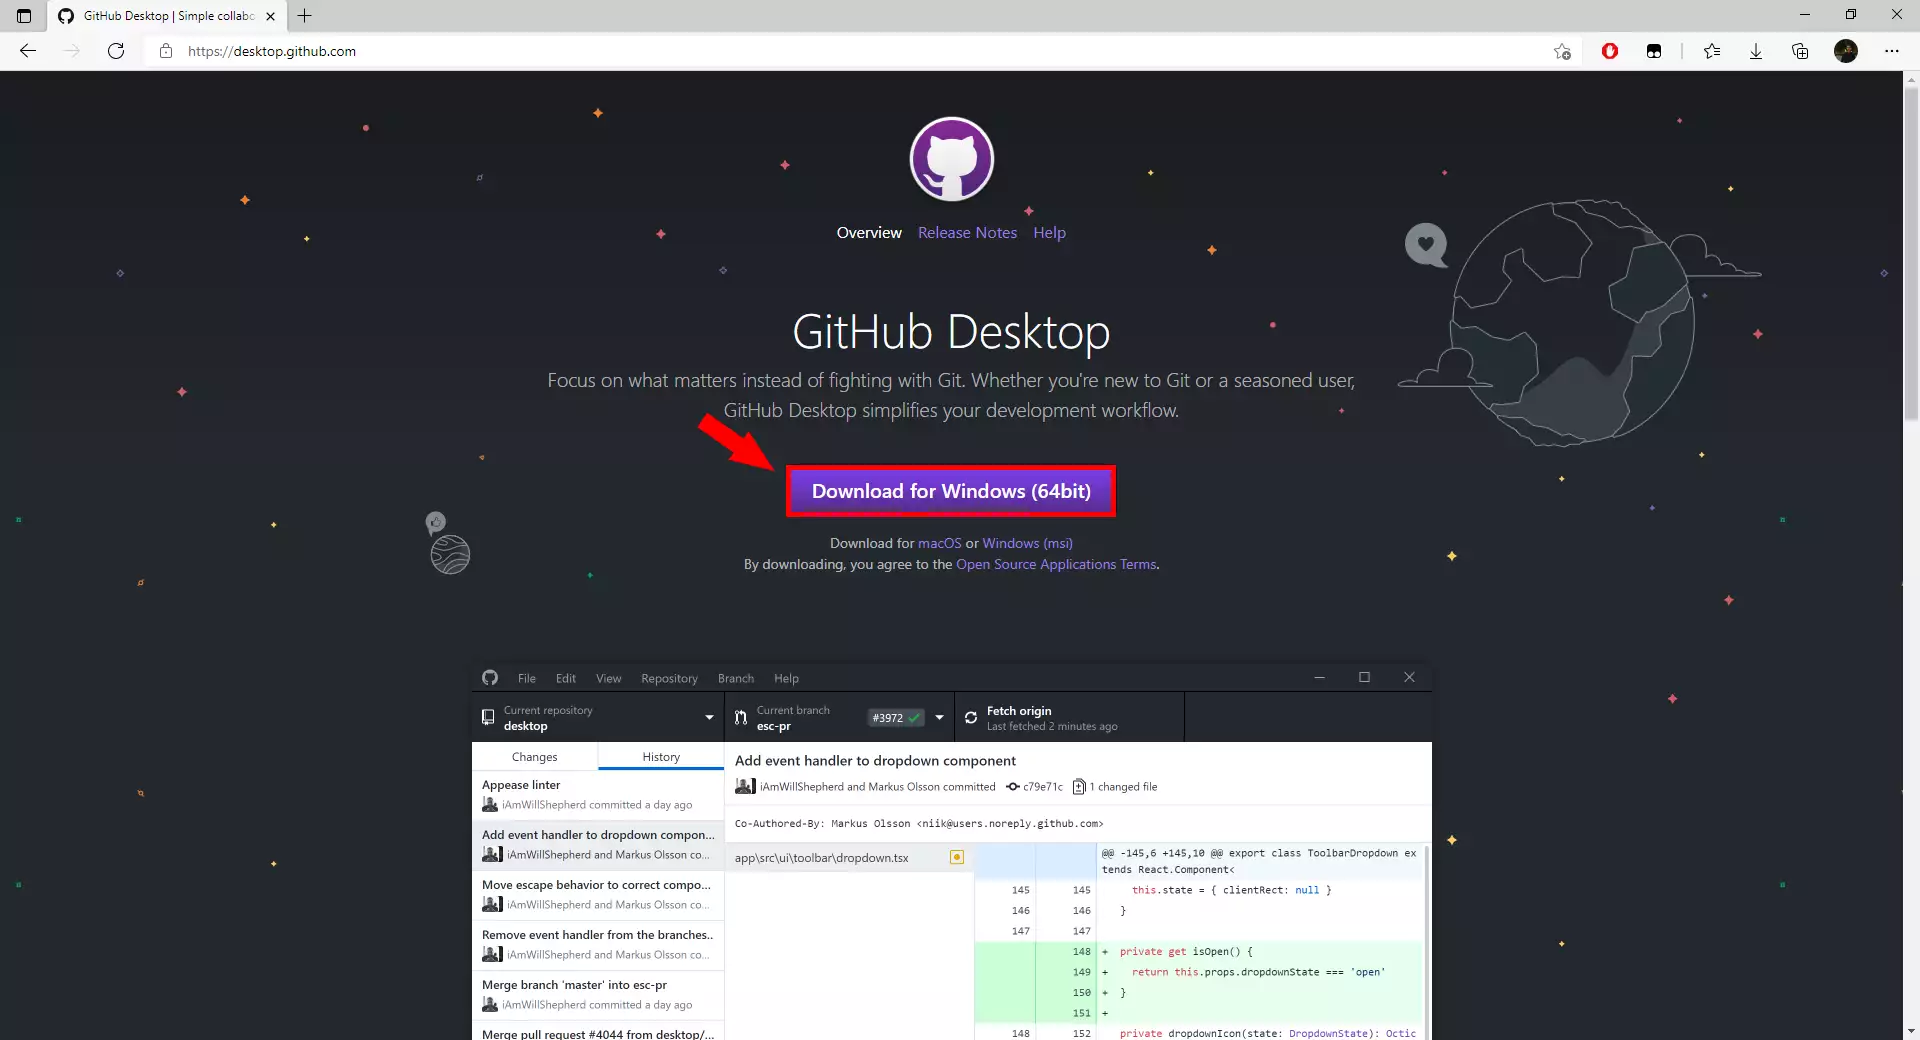
The download page of GitHub Desktop
To download the GitHub Desktop installer, you need to visit the following page : https://desktop.github.com/ On this page, you will see a purple Download for Windows button (Figure 2). Press it and your browser will start the downloading process. After it, you will have a copy of the installer on your computer.
Install Github Desktop
In order to use Github Desktop we have to install it, and login into our
account. If you you have an account yet, you can use the following link to
register:
https://github.com/join?source=login
In the following video I'm going to show to how to install Github Desktop
and howt to login into your account.
Clone the python-flask-send-sms-http-rest-ozeki repository
After you have finished the installation you can go forward with the
cloning process.
In the following video I'm going to show you, how to clone the python-flask-send-sms-http-rest-ozeki
repository from Github.
To clone the repository you might want to use this link:
https://github.com/ozekisms/python-flask-send-sms-http-rest-ozeki
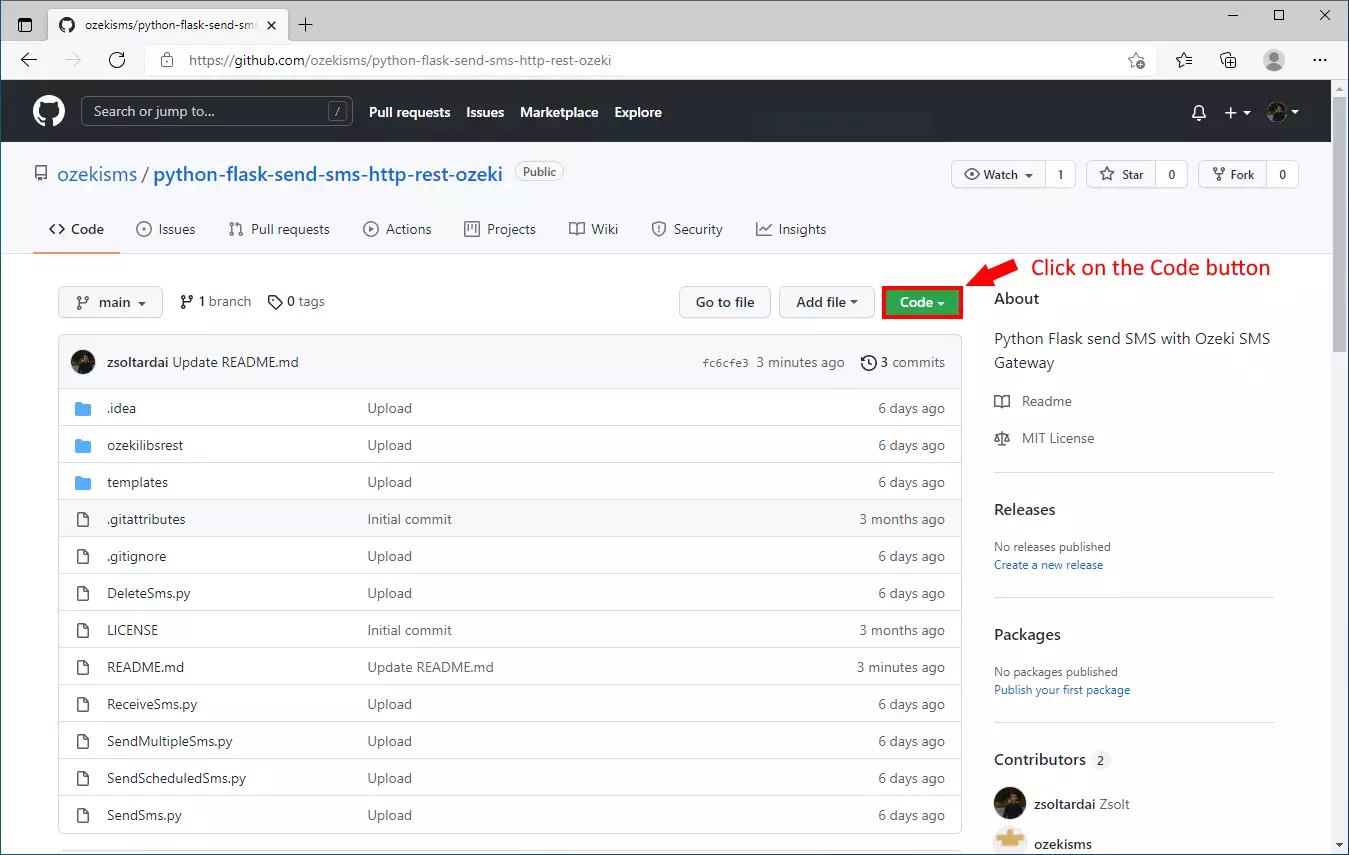
Open the Code sub-menu
The first thing you need to do is open the GitHub page of the repository. There you will find a Code button above the file list and on the right side of the window (Figure 3). Click it to open a sub-menu where you will find the button to copy the URL.
Copy the URL
Now that you see the sub-menu, you can start searching for the 'Copy' button. It is located next to the text bar where the URL is (Figure 4). Click it and the URL will be copied to your clipboard. From there, you can copy it anywhere.

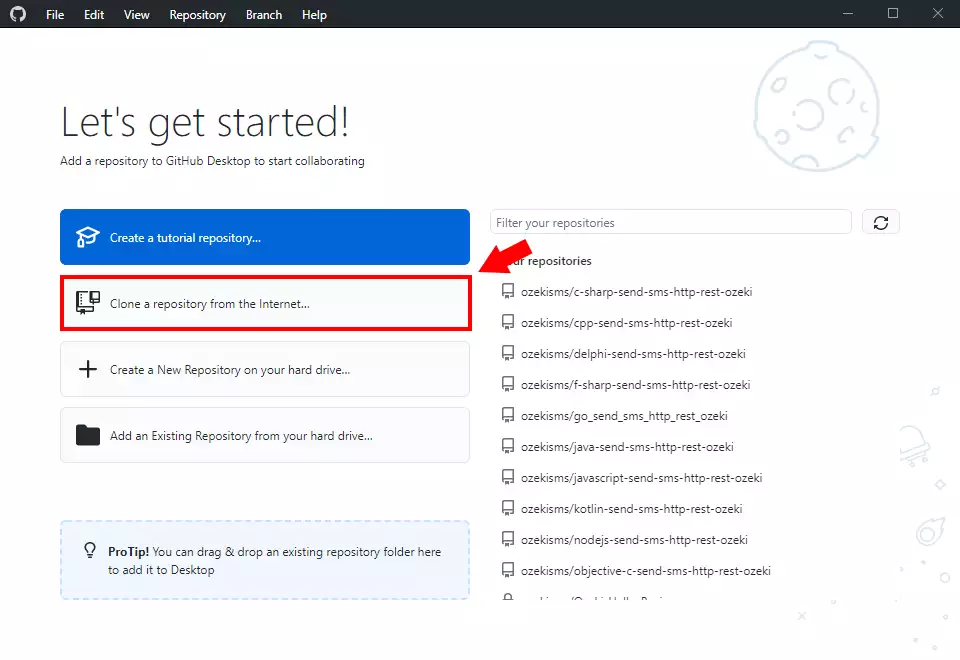
Choose the 'Clone a repository from the Internet...' option
Now open the GitHub Desktop application. On the Home page, you will find a 'Clone a repository from the Internet..' option. This will open a page where you can paste the URL and start the downloading process of the files. The button is the second on the list of buttons. It is located under the 'Create a tutorial repository..' option.
Clone the repository
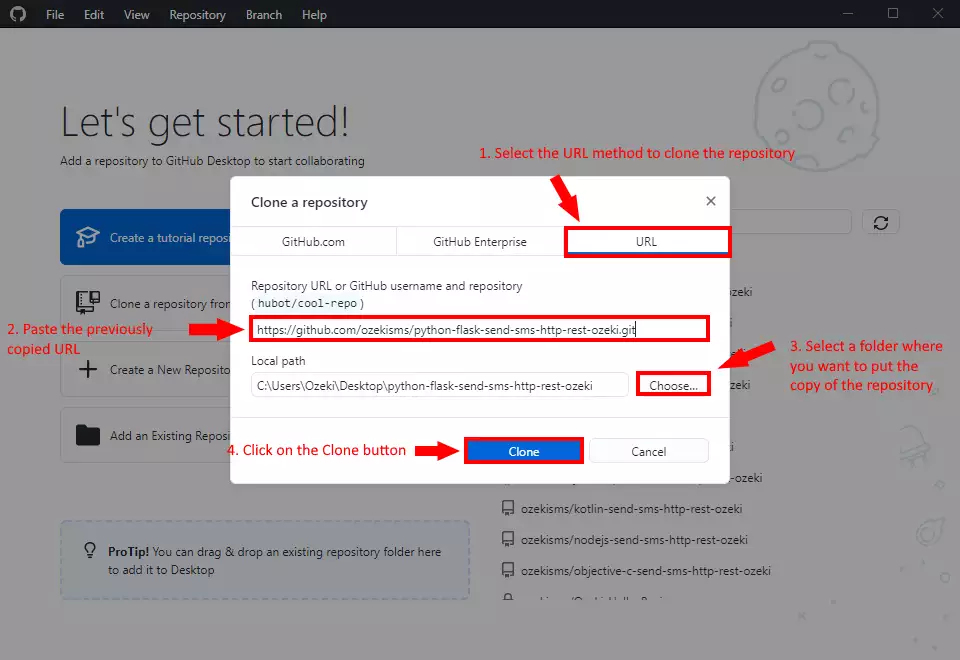
In this step, you need to specify the cloning method GitHub Desktop should use. In this case, choose the URL option. Then you need to paste in the URL of the repository you just copied. The final step is to choose the directory you wish to download the files to (Figure 6). Make sure that there is enough space available for that. If you are finished with the setup, click the Clone button. this way the download procedure should start.
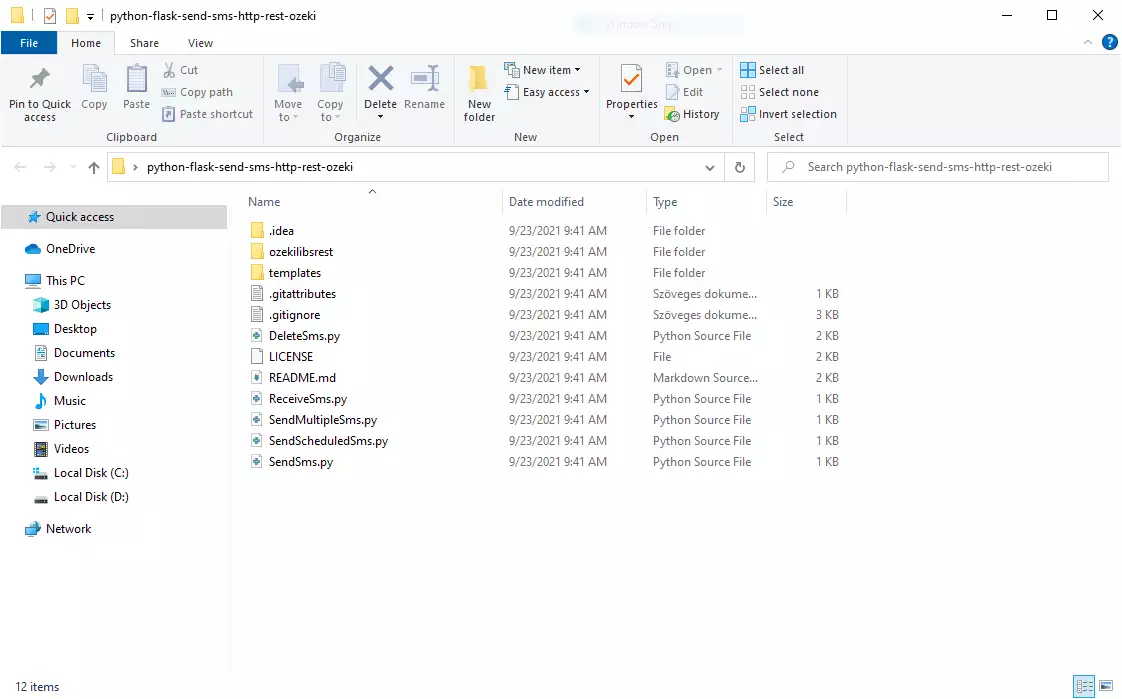
How to use the repository
You can see the downloaded files from the repository on Figure 6. You can see that we have provided 5 example projects that you can start using. If we make changes in the files of the repository, you can always update the files, so you have the up-to-date version of the repository.
Requests and the ozekilibsrest packages
There are some packages that you have to install before running any of the python flask example applications.
requests
Before you start sending messages, you have to install the requests python package. This package will make you able to send HTTP requests with python. To install the requests package you have top use the following command:
pip install requests
ozekilibsrest
You can also install the ozekilibsrest package. This will install the requests package too, and if you install the ozekilibsrest package globally, you can reach it from anywhere.
pip install ozekilibsrest
flask
In order to build a flask web application we aslo have to install the flask package. To do that we will use the following command:
pip install flask
How to use the repository (Video tutorial)
To use the content of the python-flask-send-sms-http-rest-ozeki repository, you will need
a text editor just like the windows notepad.
In the following video, I'm going to show you, how to use the content of the
python-flask-send-sms-http-rest-ozeki repository in windows notepad.
Do not forget! To run a python script you have to use the python keyword followed by the name of the script you want to execute. For example, this is how you execute the SendSms.py file:
Running a python script
python SendSms.py
Why should you clone the repository?
The answer is easy, if you simply download the content of the
python-flask-send-sms-http-rest-ozeki repository, you will have to download the
freshest version every time it gets updated. But if you clone
the repository, you can get the freshest version of it, by just
clicking the fetch button in the Github Desktop application.
In the followig video, I'll show you what happens if the content of the
repository got updated, and how you can get the freshest version.
Final thoughts
Now, you can take a rest. We hope this guide was as simple as hard we worked to give you the best. By following the above tutorial steps you can create the solution in a short period of time. Now you can use the Python Flask SMS API to send SMS messages. If you have already completed the steps you can enjoy a well deserved latte or some other treat you have in mind. Let me mention that Ozeki SMS Gateway allows you to provide an SMS service to your customers, employees or business applications, and it can help you control the messaging activity of these users. If you would like to discover more valuable information about the benefits of other smiliar solutions, please open ozeki-sms-gateway.com. I hope this page will be useful to all the readers and especially to beginners.
More information
- Python flask send SMS with the HTTP rest API (code sample)
- Python flask send multiple SMS with the HTTP rest API (code sample)
- Python flask schedule SMS with the HTTP rest API (code sample)
- Python flask receive SMS with the HTTP rest API (code sample)
- Python flask delete SMS with the HTTP rest API (code sample)
- How to download the latest Python flask SMS library from Github