How to configure the Ozeki SMS MCP Server in OpenClaw
This guide walks you through adding the Ozeki SMS MCP Server to your OpenClaw configuration so that OpenClaw can send and receive SMS messages on your behalf. By following this tutorial, you will learn how to edit the OpenClaw configuration file, add the Ozeki SMS MCP Server and verify the connection.
What is an MCP server?
An MCP (Model Context Protocol) server exposes tools that an AI model can call during a conversation. In this setup, the Ozeki SMS MCP Server provides SMS tools such as sending messages and listing incoming SMS. OpenClaw connects to the MCP server over HTTP and communicates with it directly using the configured URL and API key, making it straightforward to add mobile messaging capabilities to any OpenClaw workflow.

This diagram illustrates how OpenClaw communicates with the Ozeki SMS MCP Server over HTTP to enable SMS messaging capabilities. OpenClaw sends requests to the MCP server using the configured URL and API key, and the server processes these requests through the Ozeki SMS Gateway. This architecture allows OpenClaw to send and receive SMS messages seamlessly within any AI-powered workflow.
OpenClaw MCP server configuration
# OpenClaw configuration file location:
C:\Users\{User}\.openclaw\openclaw.json

# Add the following block inside the "mcp" property in openclaw.json
# Replace the URL with your Ozeki SMS Gateway address and the Bearer token with your API key
  "Ozeki SMS Gateway": {
    "url": "http://{address}:9529/mcp",
    "transport": "streamable-http",
    "headers": {
      "Authorization": "Bearer your-bearer-token"
    }
  }
}
Steps to follow
We assume Ozeki SMS Gateway is already installed on your system and you have already created an MCP user account with an API key. You will also need OpenClaw installed on your system. If you have not set it up yet, follow our OpenClaw installation guide.
Video tutorial
Step 1 - Modify OpenClaw config file
Navigate to your user directory at C:\Users\{User}\ and open the
.openclaw\openclaw.json file in a text editor such as Notepad.
This file stores all OpenClaw configuration, including any MCP servers that
OpenClaw should connect to on startup. Opening this file is the first step
to registering the Ozeki SMS MCP Server with OpenClaw.

Inside the file, locate the mcp property and add the Ozeki SMS
Gateway entry with the correct URL pointing to your Ozeki SMS Gateway address
and the Bearer token set to your API key. Replace the default values with your
actual gateway address and the API key you generated for your MCP user account.
Save the file after making the changes so OpenClaw can load the updated
configuration.

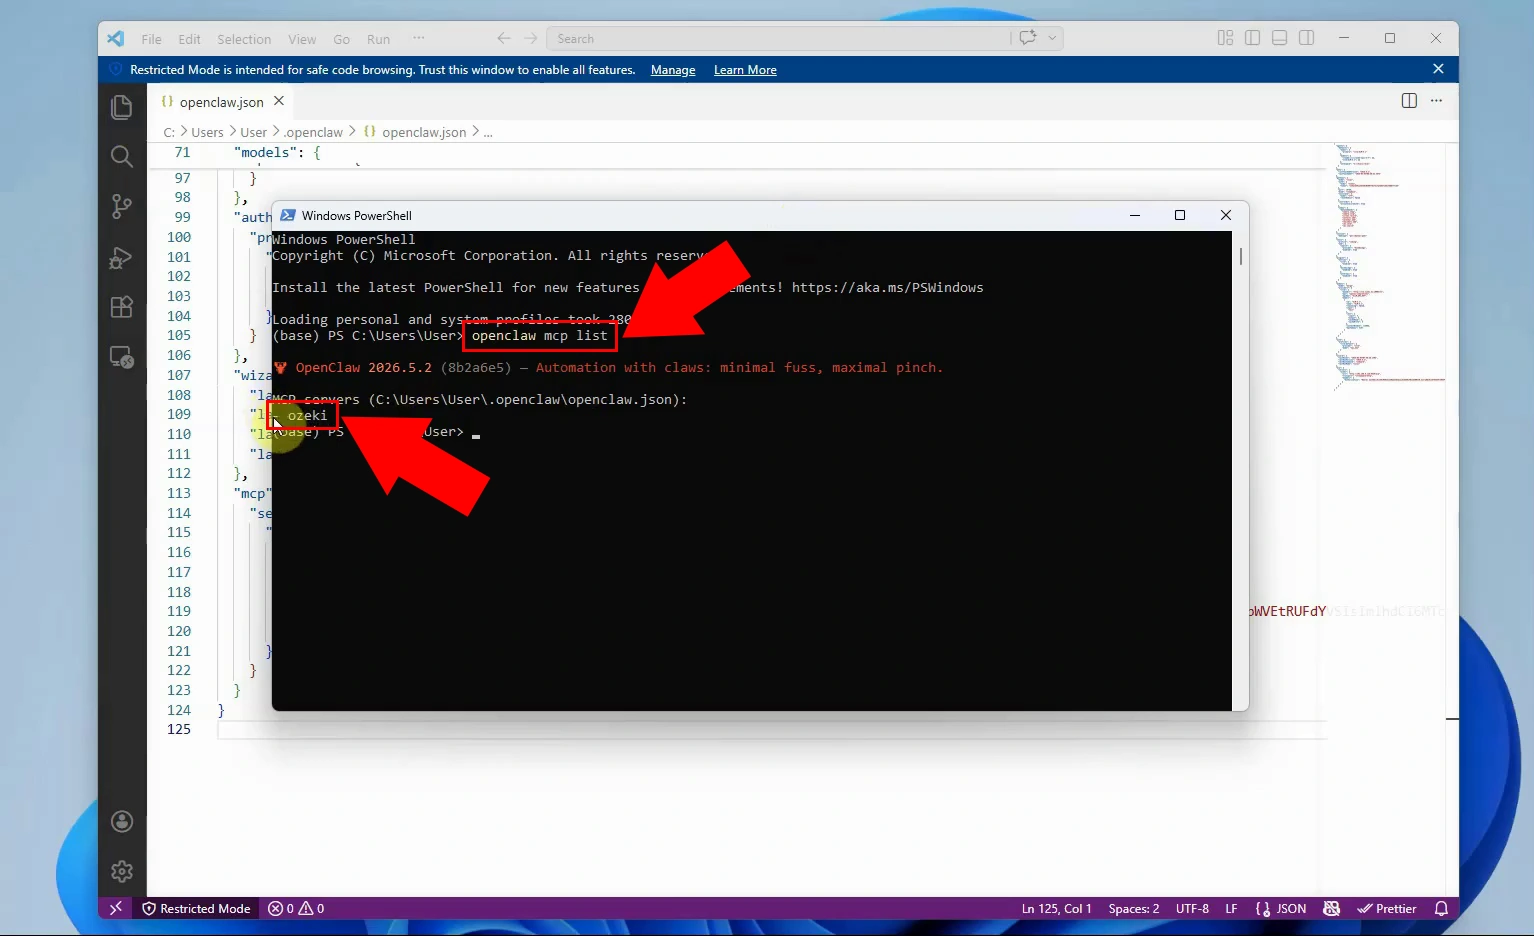
Step 2 - Verify the MCP server connection
Open a new PowerShell window by searching for PowerShell in the Start menu and clicking on the application. It is important to open a new PowerShell session after editing the configuration file so that OpenClaw loads the updated settings when it starts. This ensures the newly added MCP server entry is recognized by OpenClaw.

Once OpenClaw has started, check the MCP server connection status to verify that the Ozeki SMS Gateway appears and is successfully connected. Confirm that the status shows a successful connection, which means OpenClaw has reached your gateway using the configured URL and API key. This verification step ensures that OpenClaw can now send and receive SMS messages through your Ozeki SMS Gateway.
Summary
You have successfully configured the Ozeki SMS MCP Server in OpenClaw. OpenClaw can now send and receive SMS messages through your gateway using plain language prompts. This makes it straightforward to add mobile messaging capabilities to any OpenClaw workflow.