
How to Migrate from Kannel to Ozeki SMS Gateway: Step-by-Step Guide
A Kannel migration is mostly gateway side work. Because Ozeki SMS Gateway implements the Kannel sendsms HTTP API, your applications keep calling the same interface with the same parameters, so no application code has to be rewritten. The effort concentrates on four areas: recreating your SMSC connections, your user accounts, your routing rules, and your delivery report handling. This guide walks through each of them, from collecting your current configuration to a controlled cutover with a rollback plan. For an overview of why users switch, see our Kannel alternative page.
Overview
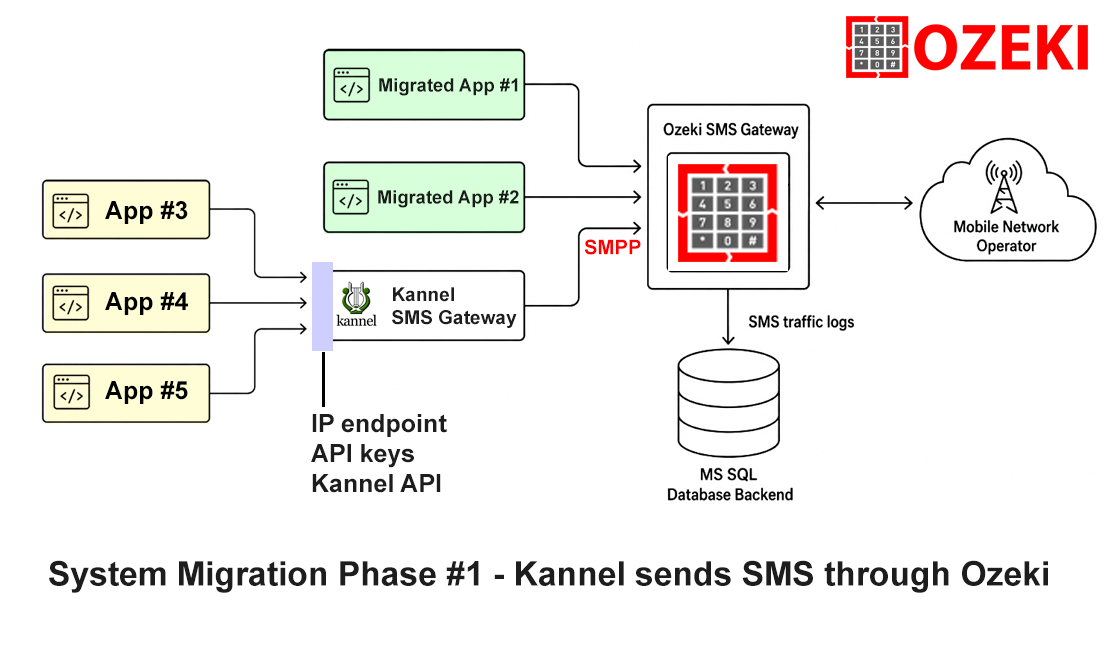
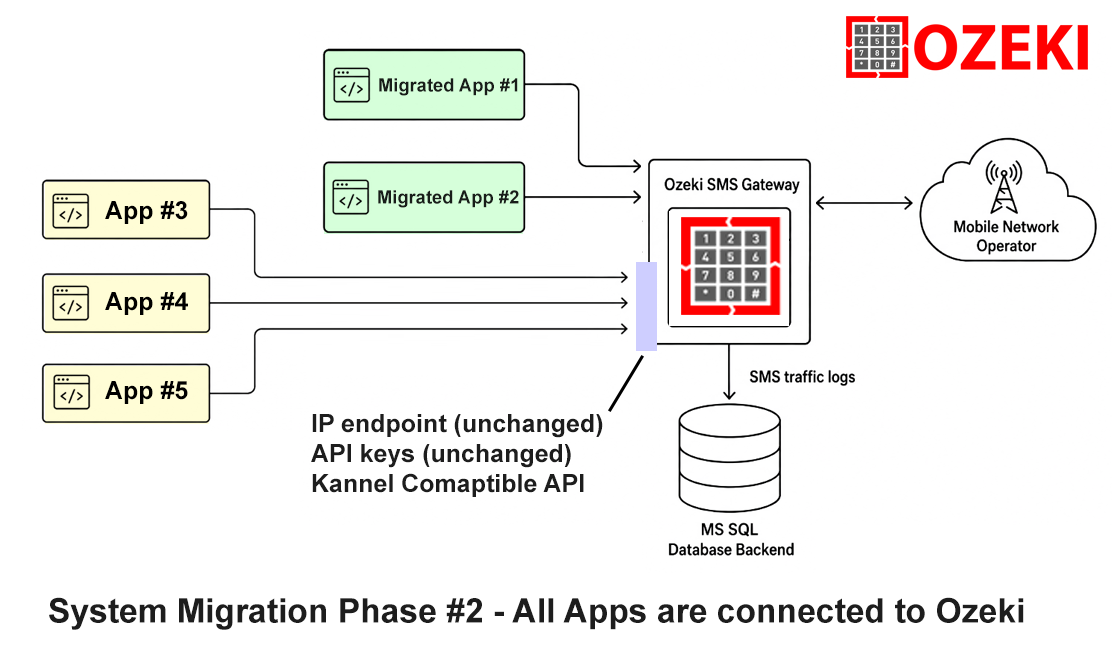
We recommend a two phase Migration procedure from the existing system (Kannel) to the new (Ozeki):
Phase #1: Mobile Network Connection migration (Figure 1). Kannel is kept in operation, but the mobile network connections are migrated to Ozeki SMS Gateway. In this phase Kannel is reconfigured to connect to Ozeki SMS Gateway through SMPP. Kannel sees Ozeki SMS Gateway as it’s primary mobile network link, and the traffic is routed through Ozeki SMS Gateway. In this pase some apps, that are easy to configure, can be configured to connect to Ozeki’s APIs directly
Phase #2: App migration. Kannel is switched off, and the built Kannel compatible API of Ozeki SMS Gateway is used to serve the current apps. The API keys and network endpoints (IP address, port) are moved to the Ozeki SMS Gateway system. The apps do not notice, that a new SMS gateway is serving them. The Apps do not need to be changed.
Pre-Migration Checklist
Start by documenting your current Kannel deployment. Everything you need lives in kannel.conf. Collect the following before you install anything:
- All group = smsc blocks: connection type (smpp, at, http), host, port, credentials, bind mode, and throughput limits
- All group = sendsms-user blocks: username, password, forced-smsc, default-sender, and max-messages
- Routing configuration: smsbox-route entries and any allowed-prefix or denied-prefix rules
- Delivery report setup: the dlr-storage setting and the dlrurl values your applications pass
- global-sender and unified-prefix settings
- The exact sendsms URL your applications call, including host, port, and path
- Any SMPP TON/NPI or alt-charset settings required by your operators
These commands extract the relevant blocks from your config file:
grep -n -A 12 "group = smsc" /etc/kannel/kannel.conf
grep -n -A 8  "group = sendsms-user" /etc/kannel/kannel.conf
grep -n -A 6  "group = smsbox-route" /etc/kannel/kannel.conf
Keep a backup of kannel.conf. You will use it as the reference during every step below.
Step 1: Install Ozeki SMS Gateway
Download Ozeki and install it on Windows, where it runs as a native service, or on Linux. After installation, open the web based management GUI in your browser. There are no config files to edit and no syntax errors that can stop the gateway from starting. All further configuration happens in the GUI.
Step 2: Recreate Your SMSC Connections
In the Ozeki GUI, open the connections menu and add a new connection for each group = smsc block in your Kannel config. For SMPP, map the settings as follows:
| kannel.conf setting | Ozeki SMPP connection |
|---|---|
| smsc = smpp | Connection type: SMPP |
| host | SMSC host address |
| port | SMSC port |
| smsc-username | Username (system_id) |
| smsc-password | Password |
| system-type | System type |
| transceiver-mode = 1 | Bind type: transceiver |
| transceiver-mode = 0 | Bind type: transmitter and receiver |
| throughput, max-pending-submits | Throughput and window size limits |
If your Kannel SMPP blocks set source-addr-ton, source-addr-npi, or dest-addr-ton, enter the same values in the advanced options of the Ozeki connection. For GSM modem connections (smsc = at), the Ozeki modem wizard detects the device or COM port and reads the modem settings automatically. For HTTP based connections, select the HTTP client connection type and copy the URL template from your Kannel system-type configuration.
Step 3: Recreate Your User Accounts
Every group = sendsms-user block becomes a user account in Ozeki. Create the accounts with the same username and password as in Kannel, so your applications do not need new credentials:
| kannel.conf setting | Ozeki user account |
|---|---|
| username, password | Username and password (keep identical) |
| forced-smsc | Default route for the user |
| default-sender | Default sender address |
| max-messages | Concatenated message length limit |
| allowed-prefix, denied-prefix | Destination prefix restrictions on the user |
Step 4: Set Up Routing Rules
In Kannel, message routing is defined by smsbox-route entries and prefix rules spread across several groups. In Ozeki, routing is a single rules table. Create one rule for each route you documented in the checklist, matching on destination prefix or sender address and directing traffic to the correct SMSC connection. Routing rules are evaluated in order, just like in Kannel, and you can test them immediately by sending a message from the GUI.
Step 5: Configure Delivery Reports
Kannel requires a dlr-storage engine, often MySQL with a separate connection group, to track delivery reports. Ozeki stores every message and its status internally, so there is nothing extra to install. If your applications receive callbacks through the dlrurl parameter, keep using them: Ozeki forwards delivery reports to your callback URL in the same name value pair format, including the %d status code. You can also browse per-message delivery status in the GUI or write reports to your own SQL database. Details are on our Kannel DLR alternative page.
Step 6: Test with Your Existing sendsms URL
Take the exact request your applications send today and change only the host and port to point at your Ozeki server. The path and parameters stay the same:
http://ozeki-server.example.com:PORT/cgi-bin/sendsms?username=myuser&password=secret&to=%2B36201234567&
    from=MyApp&text=Migration+test&dlrmask=3&dlrurl=http%3A%2F%2Fapp.example.com%2Fdlr%3Fstatus%3D%25d
Verify three things: the success response is returned, the message arrives on a test phone, and the delivery report callback fires with the expected status. Repeat the test with a long concatenated message and a UTF 8 message containing special characters, since these exercise UDH and encoding handling. The full parameter reference is on the Kannel compatible API page.
Cutover Strategies and Rollback Plan
Choose one of two cutover approaches:
Parallel run (recommended)
Keep Kannel running while Ozeki runs alongside it. Point test and low risk applications at Ozeki first, watch both gateways for a few days, then move production traffic. The simplest way to flip traffic is to place a DNS name or reverse proxy in front of the sendsms endpoint. Cutover then becomes a single DNS or proxy change instead of edits in every application.
Direct switch
For smaller deployments, stop the Kannel bearerbox, redirect the sendsms port to Ozeki, and run a verification pass with your test URL. This takes minutes but leaves less room for observation before traffic flows.
Rollback
Because the original Kannel installation is untouched during a parallel run, rollback means pointing the DNS name or proxy back to the old gateway. No application changes are required on either side, which is the main benefit of the compatible API approach.
Common Pitfalls and How to Avoid Them
Several common pitfalls can arise during the migration, and knowing how to handle them will make the cutover smoother. If operators reject sender IDs after the switch, compare the TON and NPI settings on the Ozeki SMPP connection with your old Kannel values. Similarly, if your SMSC required alt-charset in Kannel, you will need to set the equivalent character encoding in the Ozeki connection options. Throughput is another area to watch: match your old throughput and max-pending-submits values, otherwise the SMSC may reject submits under load. Firewall rules also need attention, since Kannel used ports 13000 to 13013, so update your firewall and application configurations for the ports your Ozeki installation uses. If delivery reports seem to disappear, confirm that your application URL is reachable from the Ozeki server and test with dlrmask=3 to receive both submit and delivery status. Finally, before going live, check every allowed-prefix and denied-prefix rule from the checklist against your new routing table to eliminate any prefix routing gaps.
The result
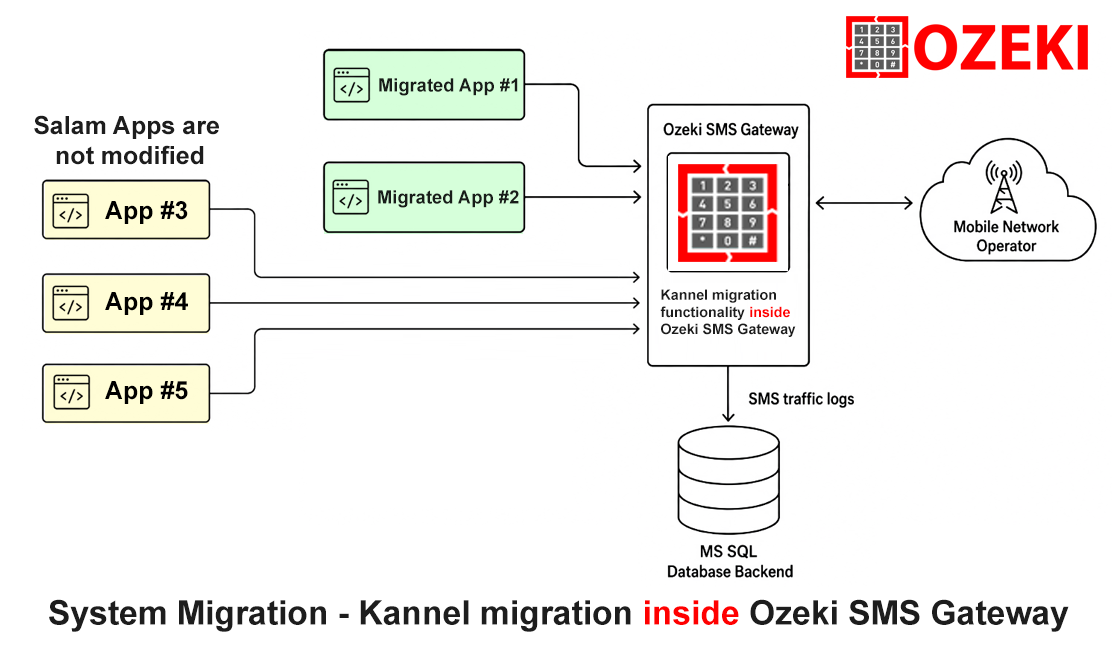
Once the migration is done, your apps will be served by Ozeki SMS Gateway through the built in Kannal compatible api (Figure 3).
Get Help with Your Migration
Most teams complete this migration in a single day, and you can evaluate the entire process with the free trial. If you prefer assistance, our engineers offer migration consulting, including a review of your kannel.conf and a prepared Ozeki configuration.