
Kannel SMPP Alternative: How to move your SMPP connections from Kannel to Ozeki
This guide shows how to migrate an existing SMPP connection from Kannel to Ozeki SMS Gateway without changing your SMS provider. You will verify the working Kannel configuration, reproduce its SMPP settings in Ozeki, test message delivery, and use connection logs to confirm a reliable transition before moving production traffic.
Prerequisites for the migration
Before you begin, make sure you have administrative access to both the Kannel server and your Ozeki SMS Gateway installation. You will also need the SMPP provider details from your current setup, including the host, port, system ID, password, and bind type. Finally, prepare a test recipient number and a maintenance window for the final cutover, so live SMS traffic is never at risk during the migration.
How to setup Kannel to send SMS through SMPP
The first stage of the migration is to verify that your existing Kannel SMPP connection works correctly. You will open the Kannel configuration file, review the SMSC settings, and send a controlled test message through the gateway. Checking the SMPP logs at this point gives you a known-good baseline that every later step in Ozeki can be compared against.
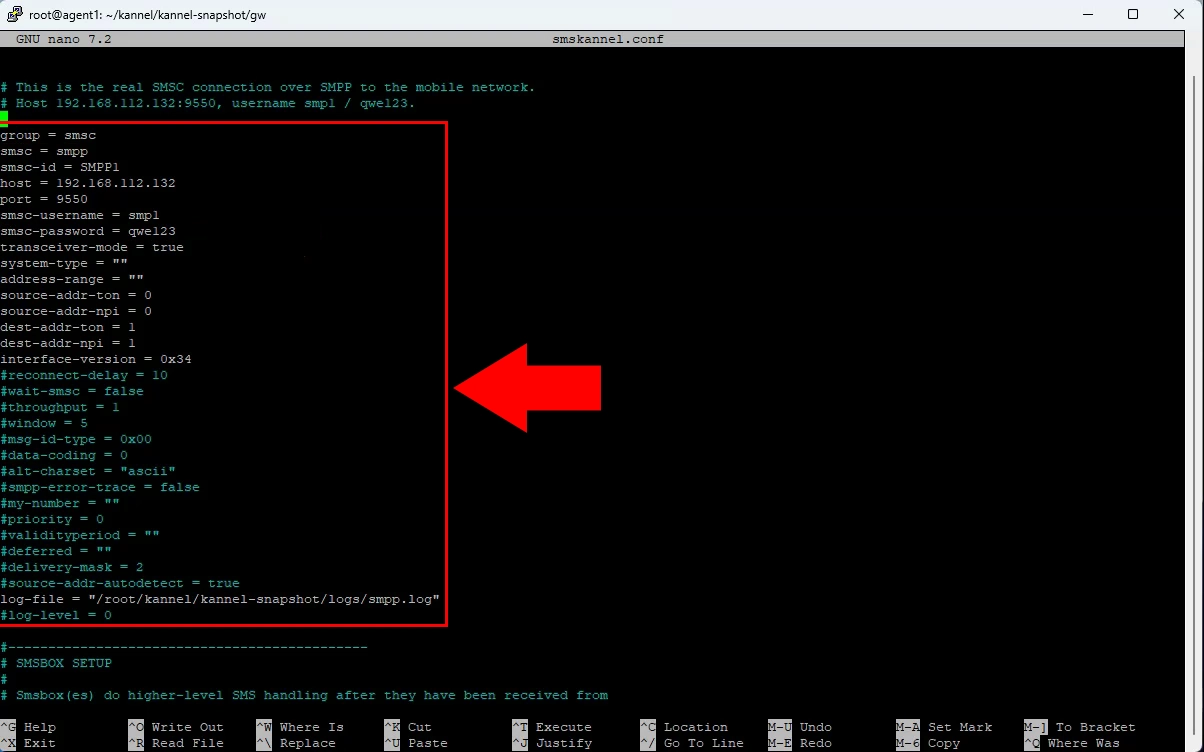
Open the Kannel configuration file on the current gateway server. Locate the SMSC connection section that defines the existing SMPP provider connection. Record the host, port, system ID, password, and any routing parameters before migration.
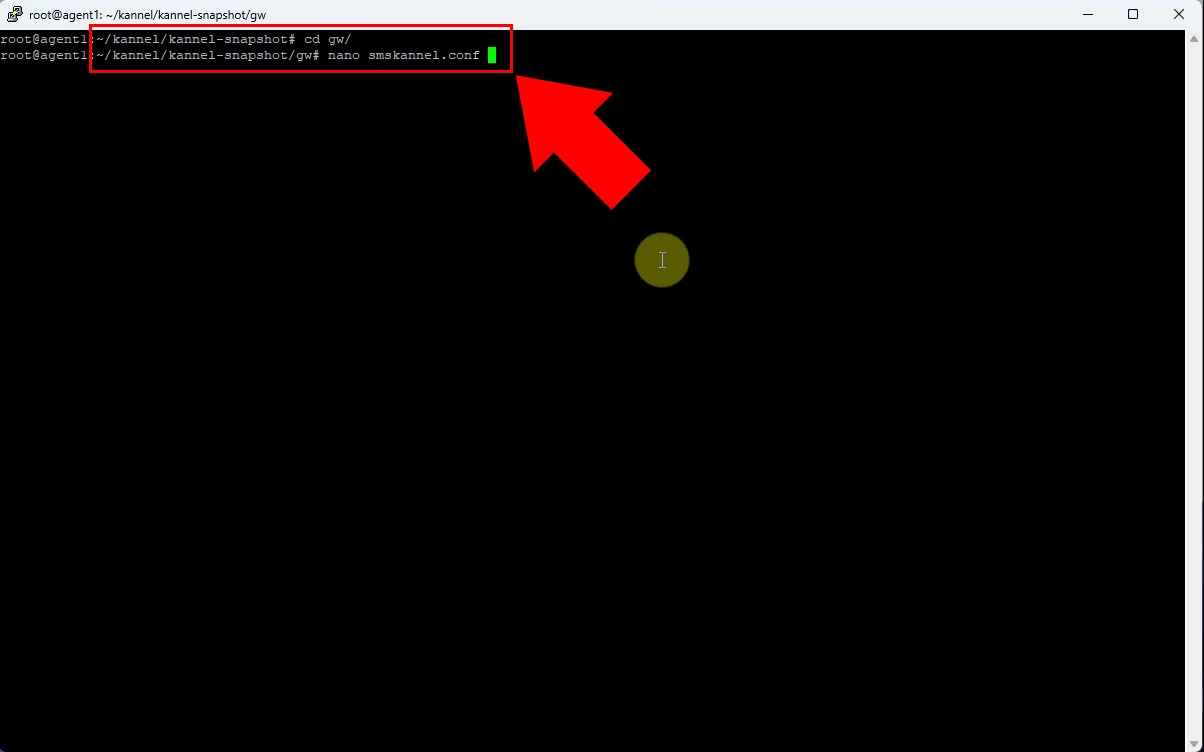
Configure the Kannel SMPP connection using the provider’s endpoint and authentication credentials. Confirm that the connection mode, source address, and destination-address settings match the provider requirements. Save the configuration and reload or restart Kannel to apply the changes.
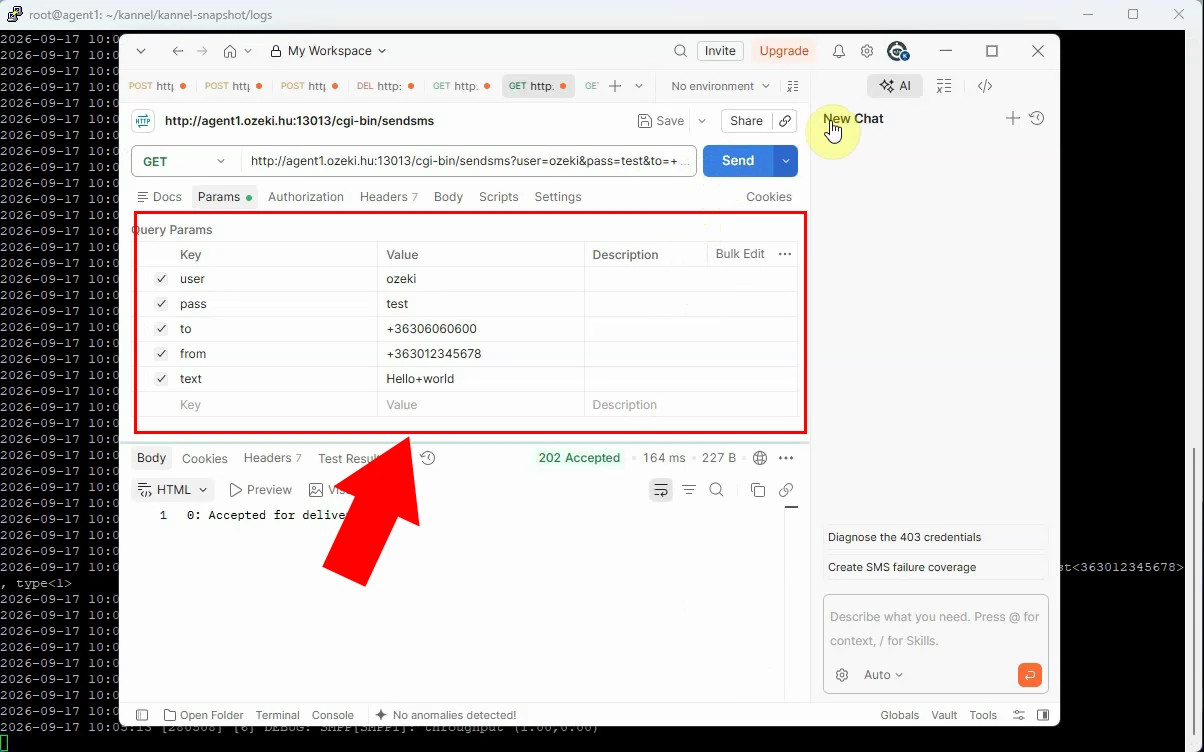
Submit a test SMS through the configured Kannel route to a controlled destination number. Use a known sender ID and a short, identifiable message body for straightforward tracing. Verify that Kannel accepts the message and assigns it to the intended SMPP connection.
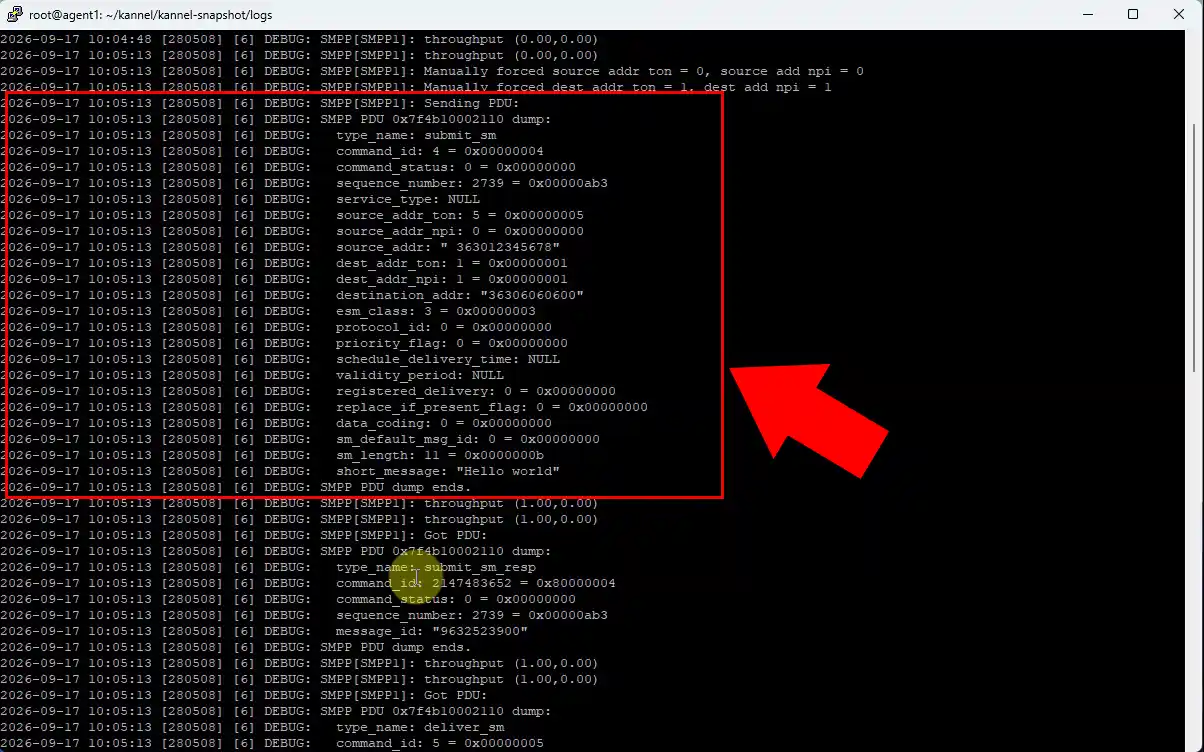
Review the Kannel logs after the test submission. Confirm successful SMPP binding, message submission, and the provider response code or message ID. Resolve authentication, network, or routing errors before reproducing the configuration in Ozeki.
How to setup Ozeki to send SMS through SMPP
In this section you will rebuild the proven Kannel connection inside Ozeki SMS Gateway as an SMPP Client connection. You will transfer the provider settings collected earlier, enable detailed logging, and confirm that Ozeki binds successfully to the SMSC. A successful test SMS through Ozeki proves that the new gateway is ready to take over from Kannel.
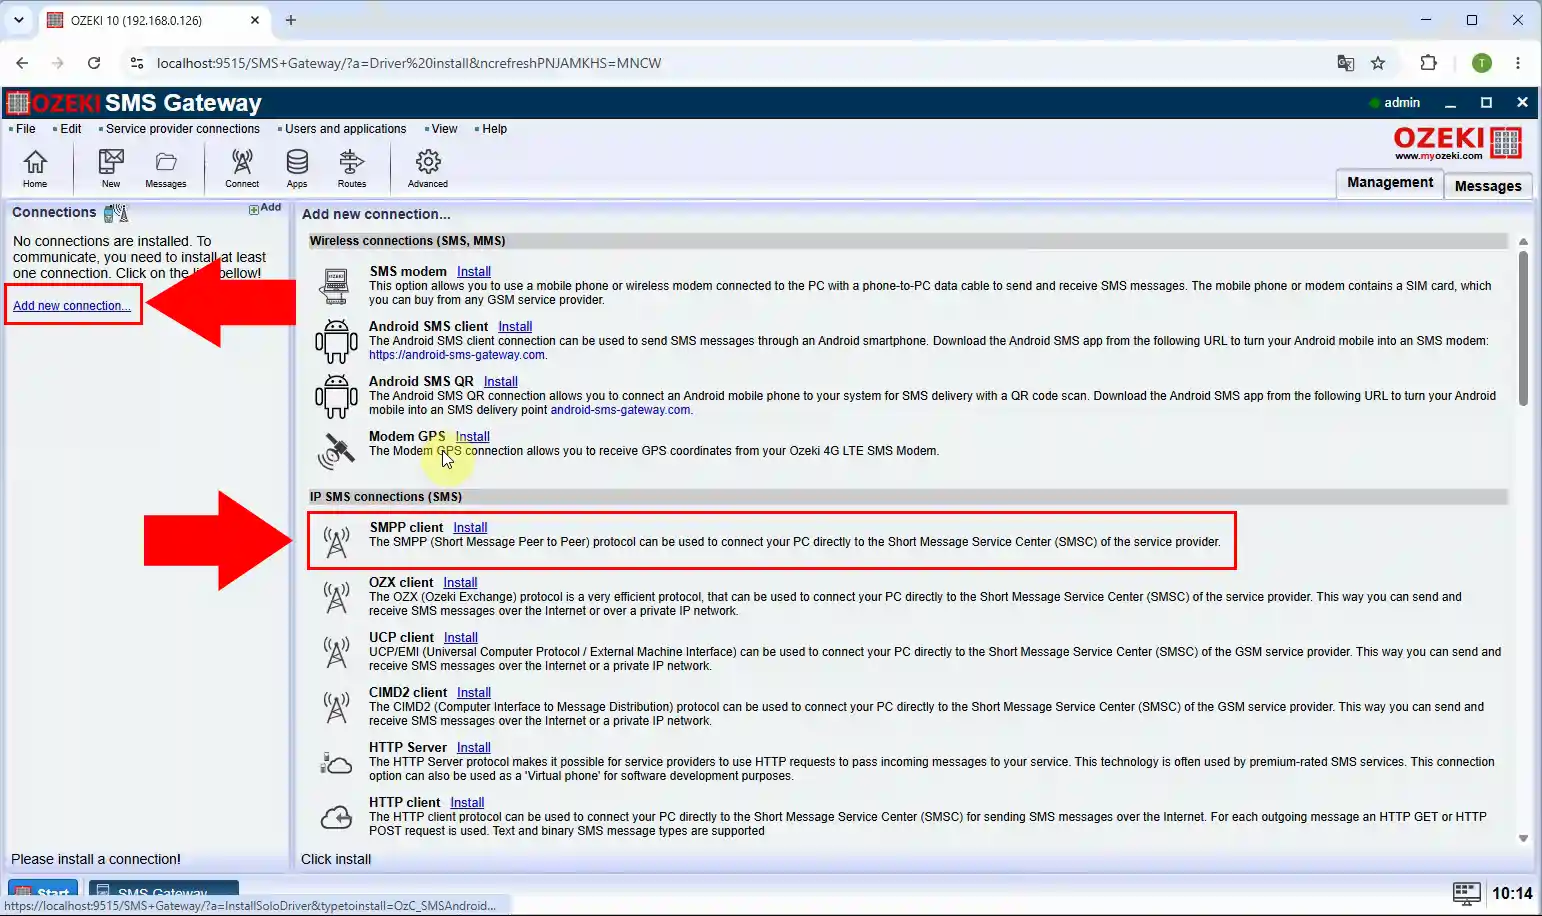
Log in to Ozeki SMS Gateway and add a new SMPP Client connection. This connection will replace Kannel’s outgoing SMPP SMSC configuration. Choose the SMPP client option so Ozeki initiates the bind to your provider.
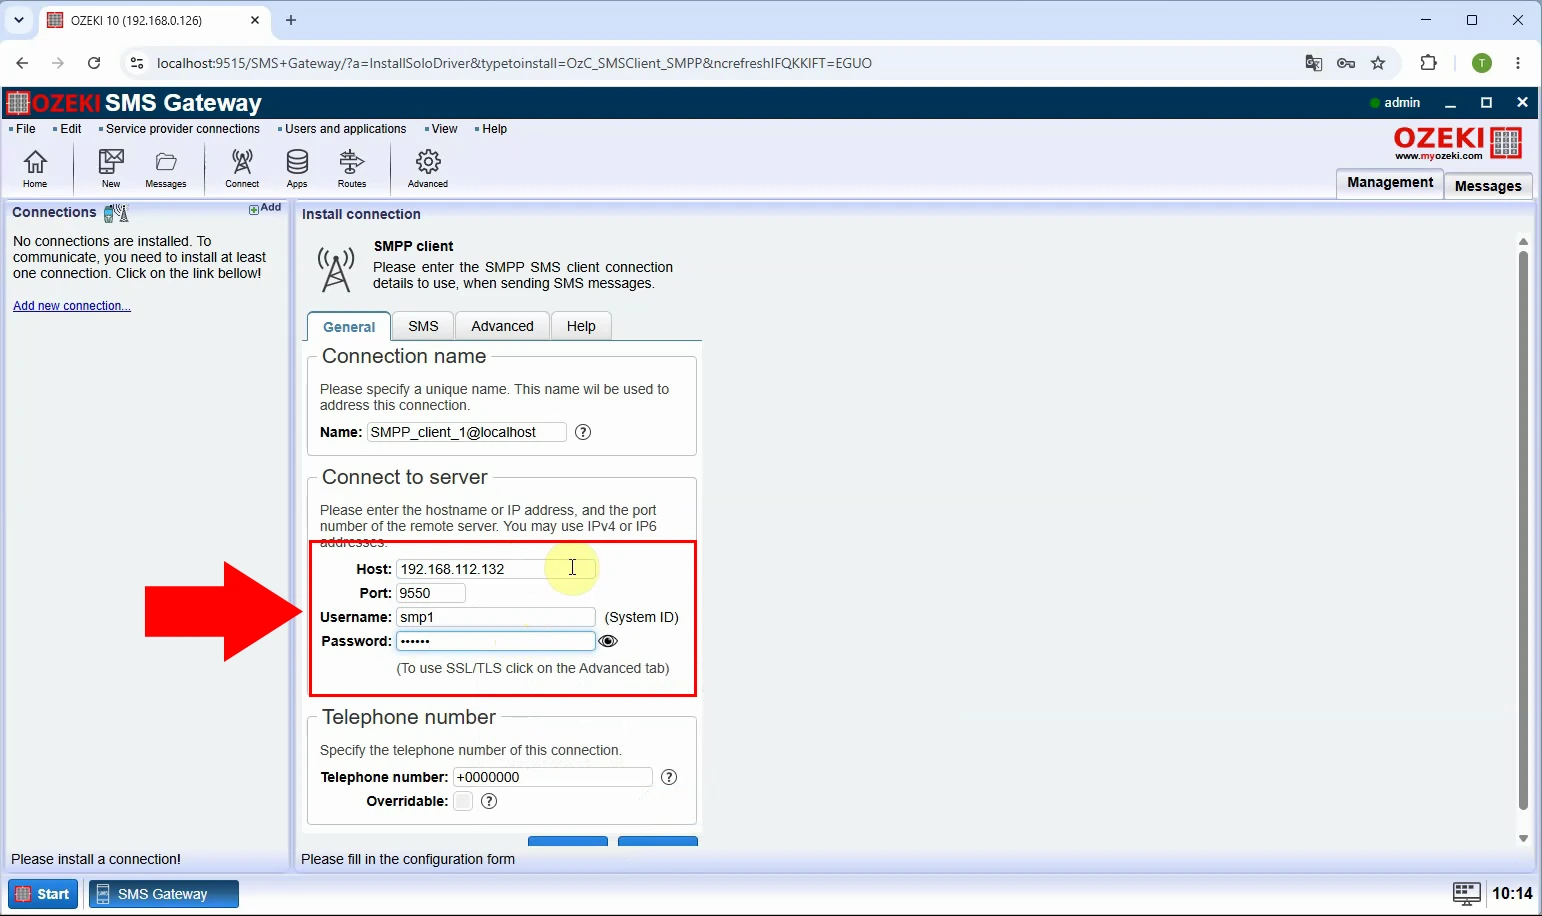
Enter the SMPP provider hostname, TCP port, system ID, password, and bind type in Ozeki. Transfer relevant settings from Kannel, including TON/NPI values, source address, and optional TLS settings. Save the connection and verify that the selected parameters match the provider’s SMPP specification.
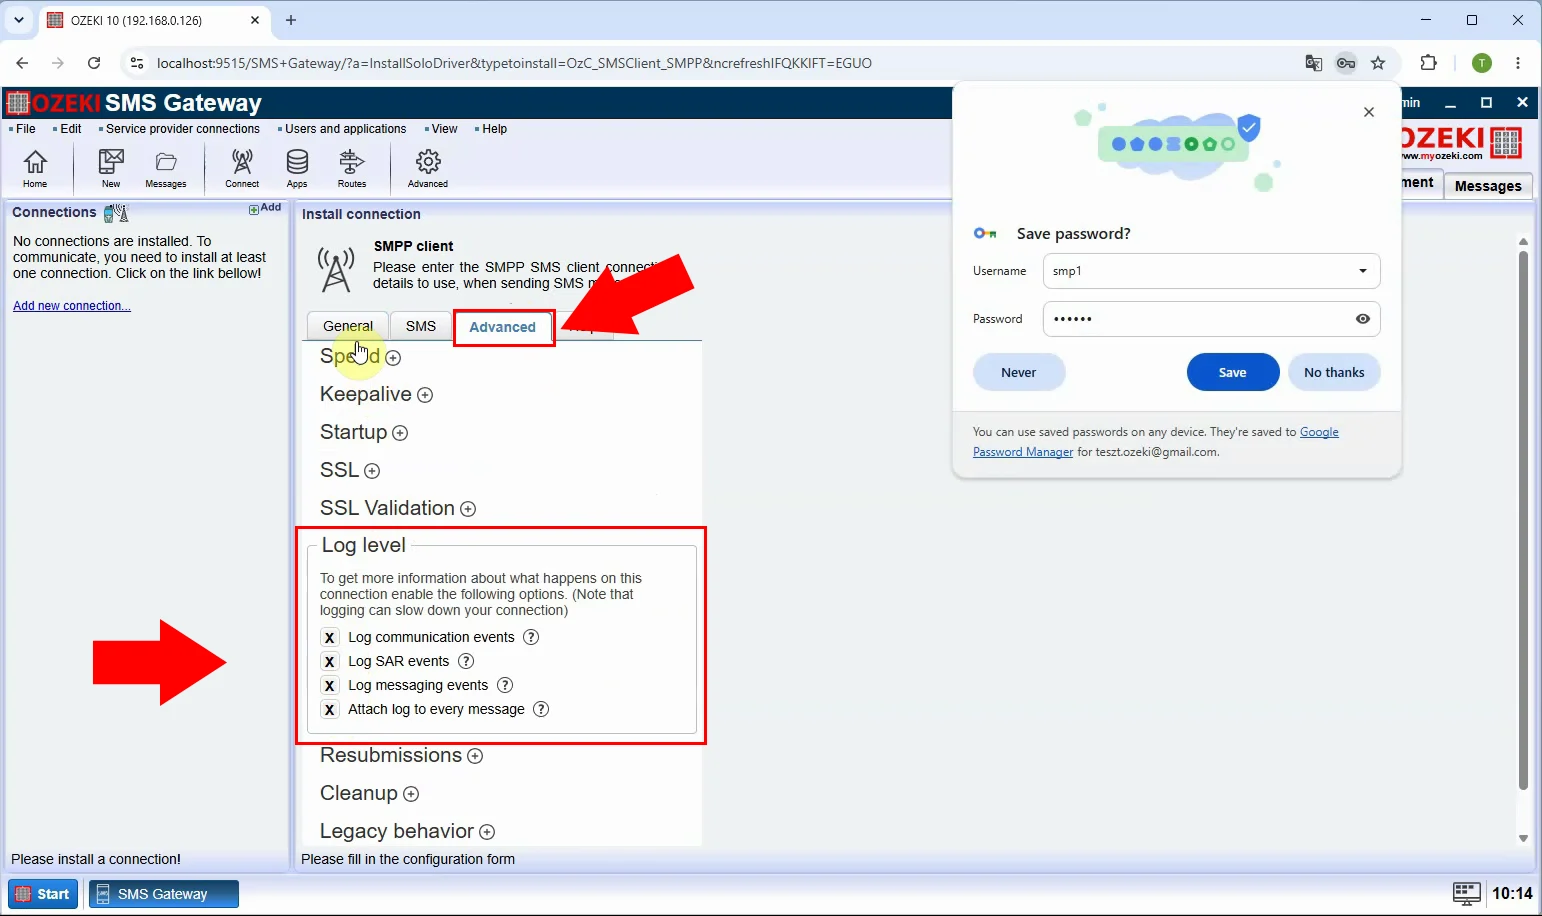
Enable detailed logging for the Ozeki SMPP Client connection before testing. Logging makes the SMPP bind, submit_sm requests, provider responses, and delivery-report traffic visible. Use it to compare Ozeki behavior with the successful Kannel test and diagnose any differences.
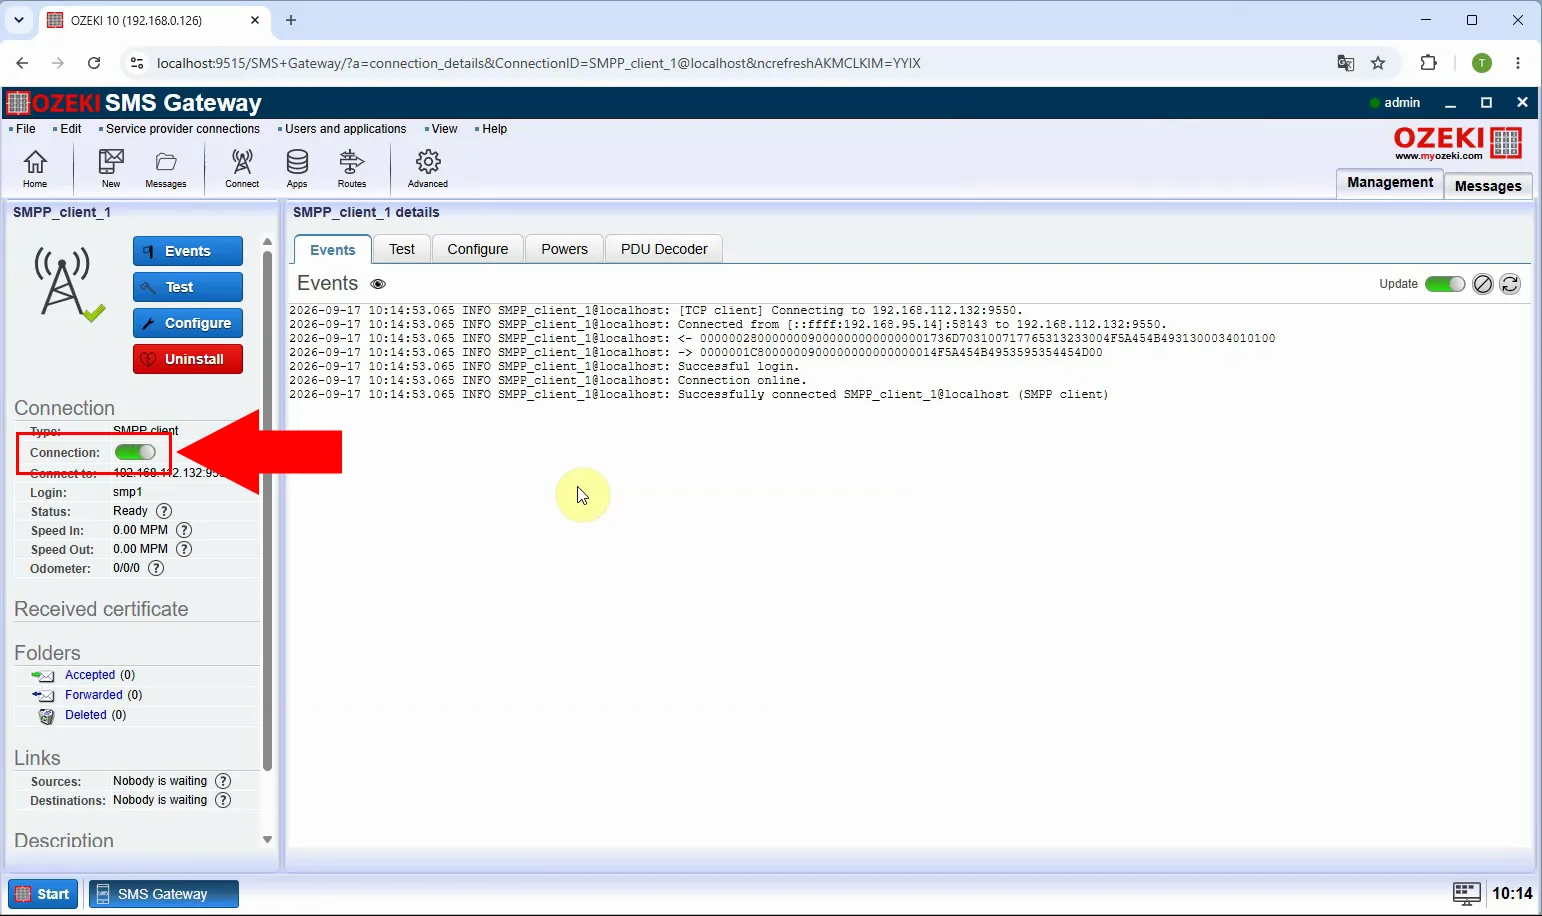
Enable the configured SMPP Client connection in Ozeki SMS Gateway. Wait until its status confirms that the gateway has successfully connected and bound to the SMSC. If the bind fails, check network reachability, firewall rules, credentials, and provider IP restrictions.
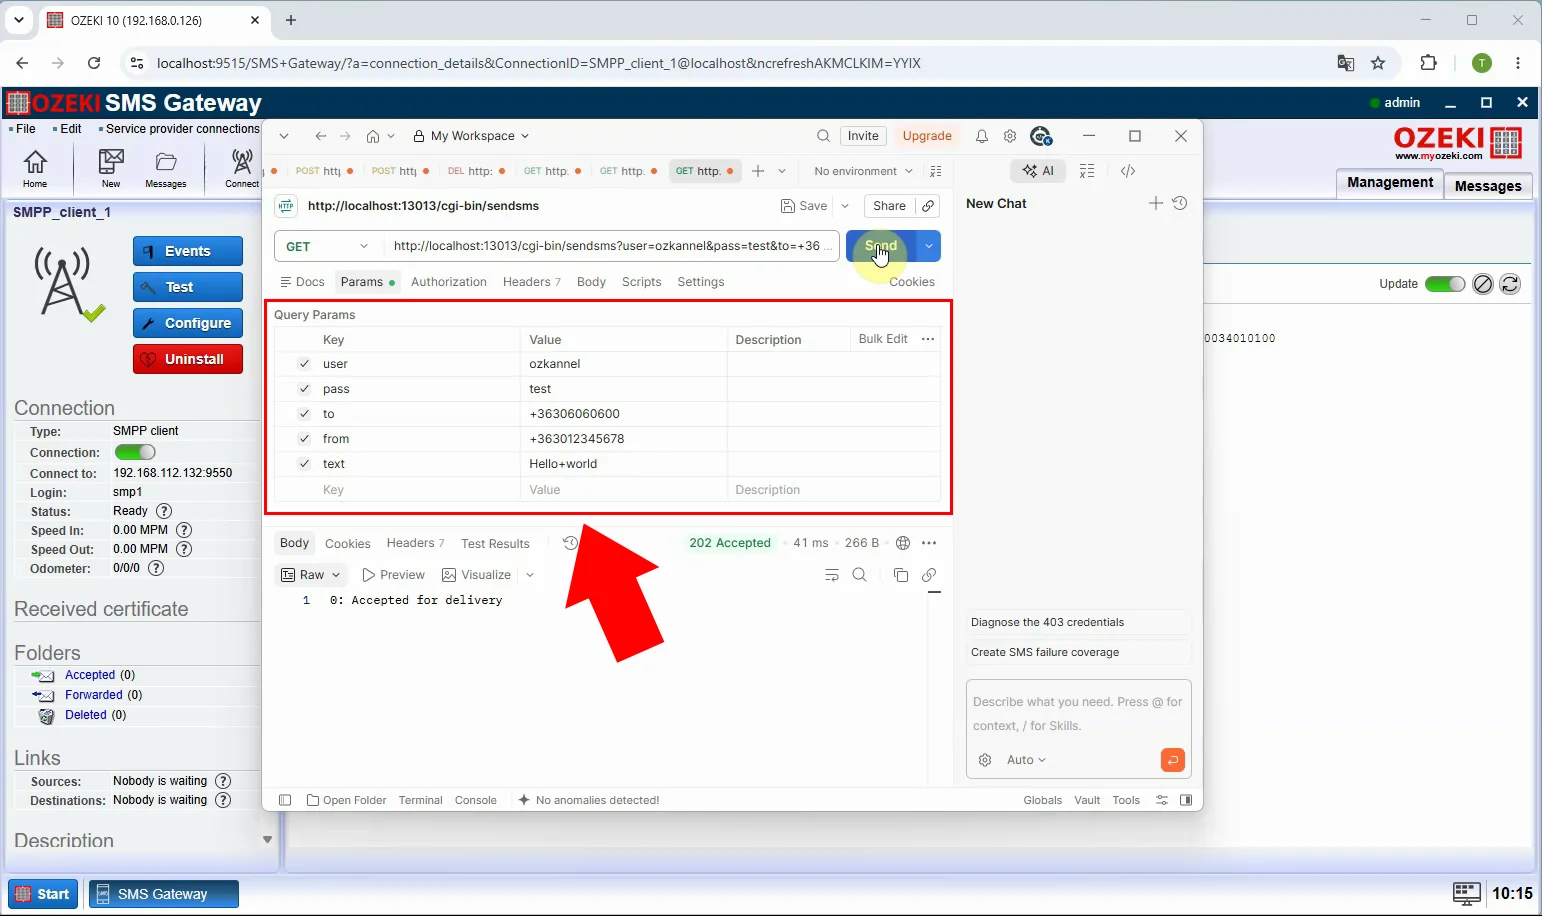
Send a test SMS from Ozeki through the new SMPP Client connection. Use the same test recipient and comparable sender settings used during the Kannel validation. Confirm that the provider accepts the submission and that the recipient receives the message.
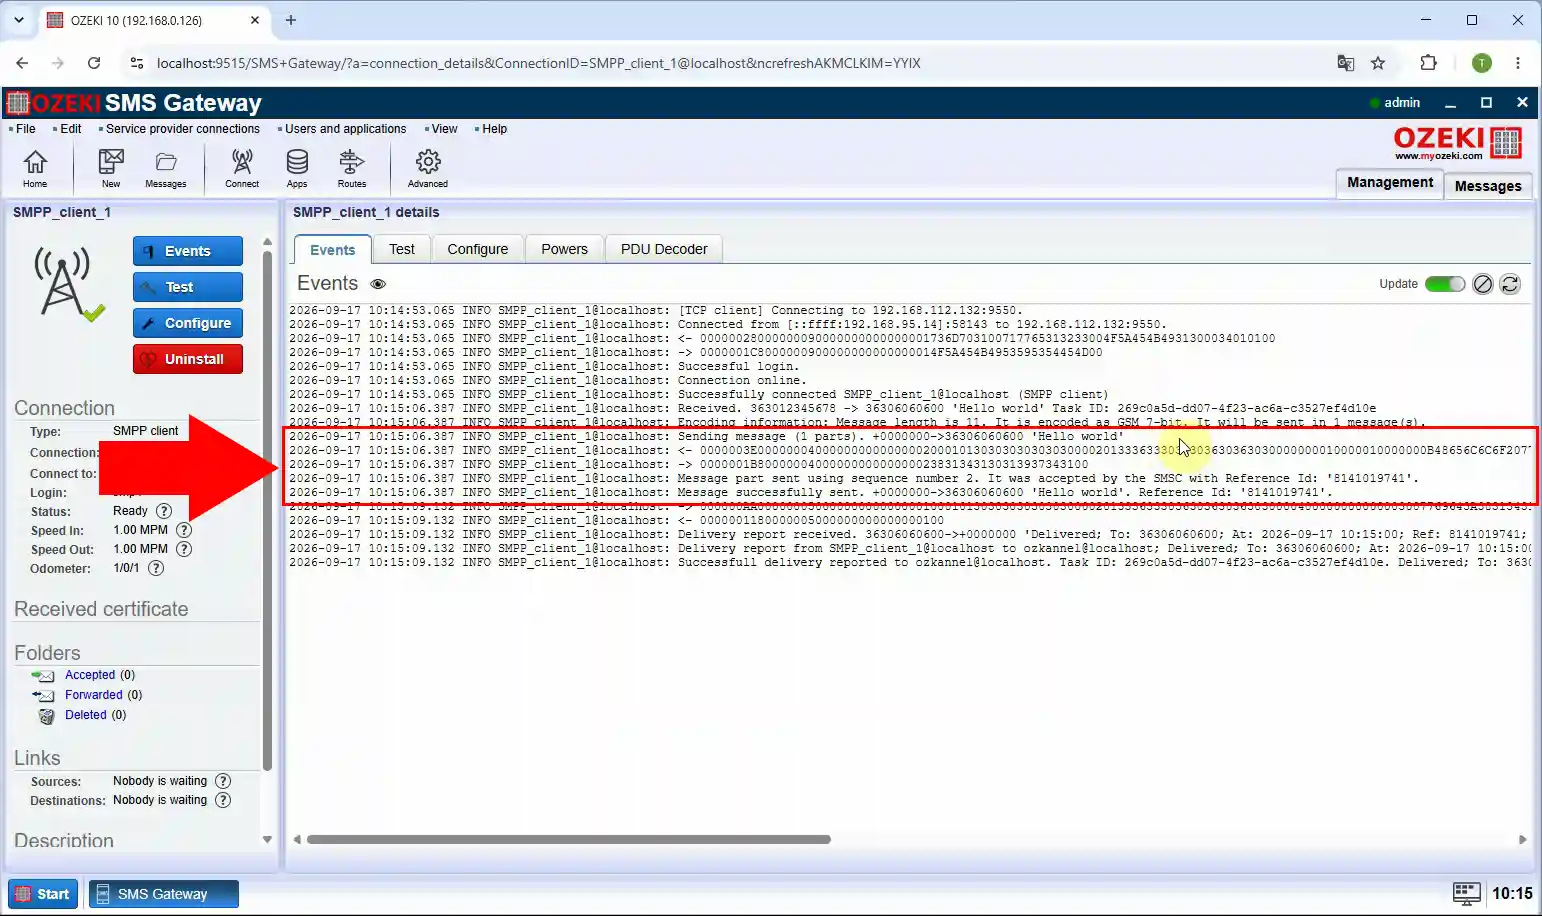
Open the Ozeki SMPP logs and inspect the complete transaction for the test message. Verify the bind result, submitted message ID, provider acknowledgement, and any available delivery report. After successful validation, redirect production SMS routes from Kannel to Ozeki and monitor the first live traffic closely.
Switch production traffic from Kannel to Ozeki
When the Ozeki SMPP Client has passed every validation test, you are ready to move your live SMS traffic to the new gateway. The safest approach is to pause or disable the Kannel SMSC connection, enable the Ozeki connection, and watch the first production messages closely. Keep both gateways available during the first hours of live traffic, so you can roll back to Kannel immediately if anything unexpected happens.
Conclusion
This guide has covered the complete path from a working Kannel SMSC configuration to a fully validated Ozeki SMPP Client connection. The same method applies to any SMPP provider, because the migration only depends on accurately transferring connection settings and verifying them with logs. If you follow each check in order, the final switch of production traffic becomes a low-risk and easily reversible operation.
Migrating your SMPP connection from Kannel to Ozeki SMS Gateway is a straightforward process when you follow a careful, step-by-step approach. By first verifying the working Kannel configuration, reproducing the same SMPP settings in Ozeki, and validating delivery with test messages and connection logs, you can confirm that the new gateway behaves identically to the old one before any production traffic is affected. Once the Ozeki SMPP Client connection has proven reliable with a successful bind, accepted submissions, and confirmed delivery reports, you can confidently switch your SMS routes to Ozeki and enjoy its modern interface, detailed logging, and flexible messaging features without disrupting your existing provider relationship.