Quick start guide: Send your first SMS
This quick start guide takes you through the steps of installing Ozeki SMS Gateway on Windows and sending SMS messages through an Android Mobile phone. In order for the Android phone to work with Ozeki SMS Gateway, the Ozeki SMS App needs to be installed on it. In this guide, you will learn how to pair your Android phone with the Windows Ozeki SMS Gateway system using a QR code scan.
Overview
The quickest way to send SMS is to hook up an Android mobile phone to your PC and send an SMS. In this quick start guide, this is what we are going to present. If you wish to send SMS using other methods, such as SMPP, HTTP, GSM modems, check out the "How to connect to mobile networks" guide.
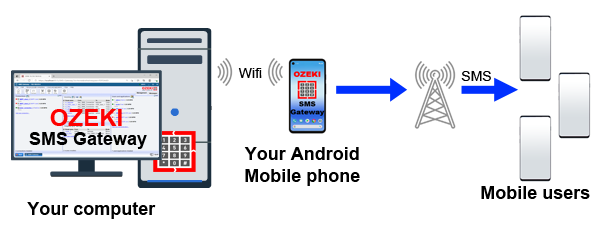
To send SMS from your PC using an Android mobile read on:
Prerequisites
- Windows PC
- Android mobile phone*
*We recommend you to use a dedicated Android phone for production systems, because in order for the Ozeki Android SMS App to operate well it should be set as the Default SMS handler on the mobile device, and it should always be connected to your Windows SMS Gateway system.
Quick steps
- Step 1 - Download and Install Ozeki 10 SMS Gateway for Windows
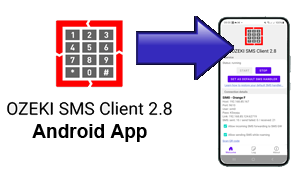
- Step 2 - Download and Install Ozeki SMS App for Android
- Step 3 - Connect the Android by scanning a QR code
- Step 4 - Send a test SMS from Windows
Step 1 - Setup Ozeki SMS Gateway on your Windows PC
To install the Ozeki SMS Gateway on Windows, download the .zip file from the Download page, extract it, run the .exe installer, and follow the on-screen instructions. Open the SMS Gateway within Ozeki 10 following installation.
Download URL:
https://ozeki-sms-gateway.com/p_727-download-sms-gateway.html
Video tutorial:
The following video shows you how you can download and install Ozeki SMS Gateway on Windows.
Step 2 - Install the Android App on your mobile phone
You can install the Android app by scanning the following QR code or by clicking on the link below it. You can also take a look at the video that shows how you can setup the Ozeki Android app, and how you can configure it by scanning a QR code shown in Ozeki SMS Gateway. The video also shows how to send a message to ensure the connection is successfully established.
Android App installation QR code:
Scan this QR code to install the Ozeki Android SMS App on your Android mobile (use Android 9 or newer).

Video tutorial:
How to install the Android App on your Android mobile.
Step 3 - Connect the Android by scanning a QR code
Once Ozeki SMS Gateway is installed on Windows, click Add new connection on the left panel of the main page, as illustrated in Figure 1.

Next, click on Install next to Android SMS QR, highlighted in red in Figure 2.

Enter the phone number of your Android phone into the corresponding textbox, then hit OK, as shown in Figure 3.

If you have not already done so, this is the time to install the Ozeki Android App on your mobile phone. (If QR code installation does not work, you can install the Android app manually by downloading the installation file (APK) from the android-sms-gateway.com website, enable 'Unknown sources' in device settings, use a file manager to locate and tap the APK, then follow on-screen instructions to complete installation and grant necessary permissions.)
Scan this QR code to install the Ozeki Android SMS App on your Android mobile (use Android 9 or newer).
Once the Ozeki App is running on the Android phone, you need to connect the phone to your Windows PC. In Windows, click on the QR code tab located near the middle in the upper half of the screen of your Android QR connection's details page. You should see a QR code similar to the one in Figure 4.

Video tutorial:
The next short video takes you through the steps of starting the Ozeki SMS App by connecting it to the SMS Gateway by scanning the QR code.
In order for the Ozeki SMS client app to operate seamlessly, it must be set as the default SMS handler (see Figure 5 and 6). This is a very important step. The Android OS puts apps that are not opened by the user regularly into sleep or deep sleep to save battery power. It also often removes the permissions granted to apps when they are put into deep sleep. By setting the Ozeki SMS client as your default SMS handler, you can prevent it from being disabled by Android. This is required to be able to provide a reliable SMS gateway service for your PC, that is able to operate for months and years without interruption.


Inside the Android app, tap the Start button, like in Figure 7.

Then, tap on the link that says Scan QR code. It is highlighted in Figure 8.

The camera should open. Point it at the QR code on your screen to scan it, similar to Figure 9.

If done correctly, the row that previously said 'Link: not connected', should have turned to 'Link: Connected.' in the Android SMS Client (Figure 10).

The Events tab of the freshly created connection should also tell you that the connection was successful, as seen in Figure 11.

Step 4 - Send your first SMS
Now that everything is setup you are ready to send a test SMS. Click on New in the toolbar. This will take you to the message composer page (Figure 12). Enter a phone number and your message text and hit Ok to send it.

If successful, both the web GUI and the Android app should tell you the message was sent out (Figure 13).

To make sure you have done everything correctly, head to the new connection's Events page, where you should see logs similar to Figure 14.

Are there other ways to connect my Android phone and my PC?
Yes, you may choose to have the two devices on the same local network, and connect via local IP and port. If you wish to find out more about that solution, click here.