HTTP SMS client connection
This page is about to demonstrate how to set up an HTTP SMS Client connection in Ozeki 10 SMS Gateway. The guide shows all steps that you have to follow to create the connection, how to configure it, and most importantly, how you can send SMS messages using this connection. The guide itself does not require any specific knowledge, you can easily complete it by just following the steps and it does not take more than ten minutes to successfully complete the guide. So, let's begin right now!
What is HTTP?
HTTP is a protocol, the foundation of any data exchange on the global network. It uses client-server protocol which the client and the server communicate with each other by exchanging individual messages.
What is an SMS?
SMS is stands for 'Short Message Service'. It is used to send text messages to mobile phones. It was originally created for phones that use GSM communication, but now all the major cell phone systems support it.
How to send SMS with HTTP SMS client connection
To send SMS with HTTP SMS client connection:
- Browse 'https://localhost:9515'
- Select the SMS Gateway application
- Click on 'Add new connection...'
- Select the HTTP client connection
- Configure the HTTP client connection
- Enable SMS forwarding for the connection
- Send test message
- Check the Event to see if the connection is working
How to send SMS through a HTTP SMS Client
This architecture diagram shows how the system works. It consists of 3 parts. A computer, an HTTP SMS service provider and recipient mobile devices. Your computer sends information containing your message to a server using an HTTP SMS client through Ozeki SMS Gateway. This HTTP SMS server then sends the text message to your configured recipients. (Figure 1)

How to send SMS through a HTTP SMS Client (video tutorial)
In this short video you will learn how to set up an HTTP SMS client in Ozeki SMS Gateway, as well as use it to send text messages. First, we configure and install a new HTTP SMS client connection. Then we use this connection to send SMS to a phone number. We can also monitor our actions using the event log, to see if it has been sent successfully.
Step 1 - Create a new connection
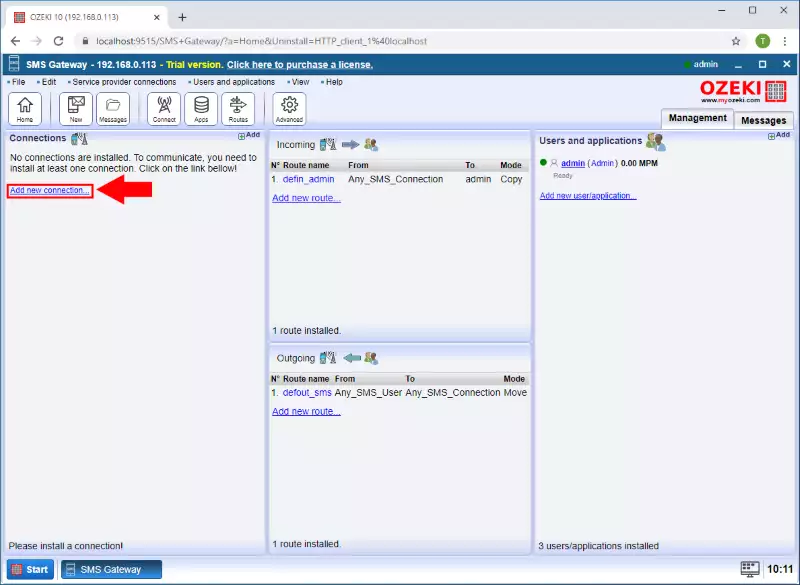
The first step that you have to fulfil is to connect to the HTTP service provider. For that, you need to create the HTTP client connection. So, open the SMS Gateway in your browser by typing 'https://localhost:9515' in your browser and hit Enter. Then, open the SMS Gateway application from the Ozeki desktop. By doing this, the main menu of the SMS Gateway shows up as you can see it in Figure 2. Here at this point, click on the 'Add new connection...' to create a new connection.
Step 2 - Select HTTP client connection
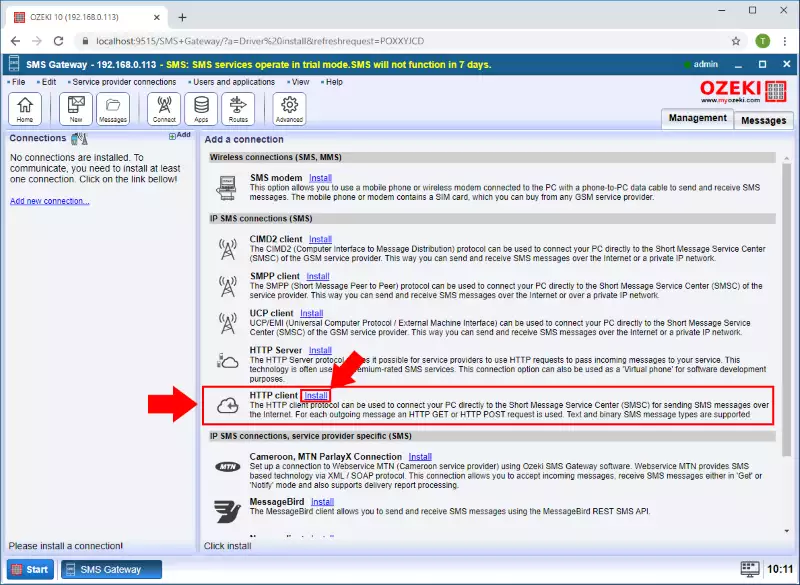
The next menu contains every connection that can be created in the SMS Gateway. Each of these connections has got a short description to inform you which case you need to use them. In this list, you need to find the HTTP client connection, and as Figure 3 shows that, click on its 'Install' button to create it.
Step 3 - Configure the HTTP client connection
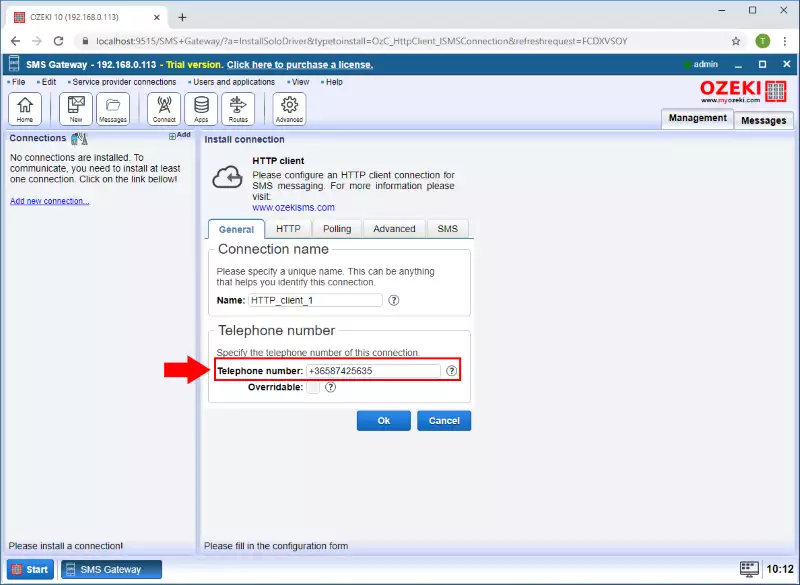
In the configuration menu, you need to specify some details for the connection. First of all, just give a name for the connection or you can leave the default name if you wish. Next, as Figure 4 demonstrates that, specify a phone number for the HTTP client connection. This phone number will be used to identify the connection if it sends or receives an SMS message.
Step 4 - Enable SMS forwarding
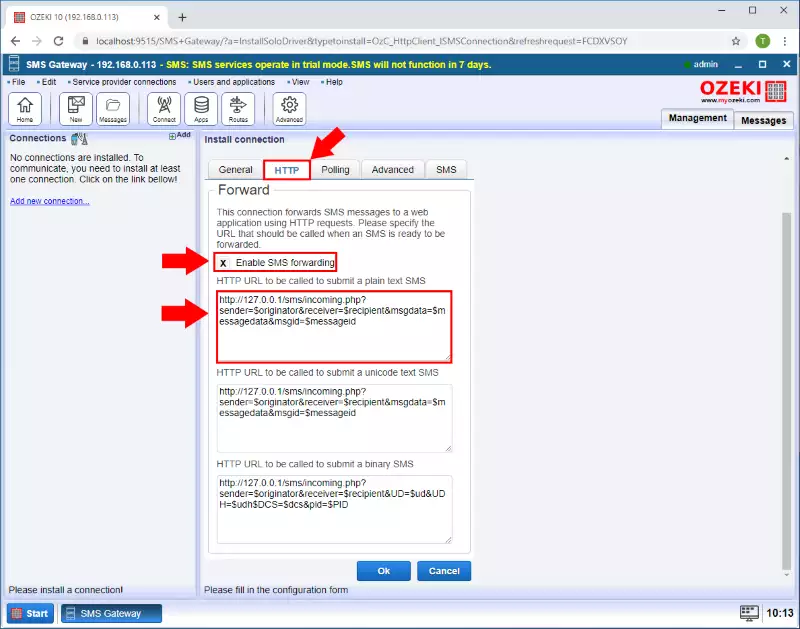
At last configuration step, that you need to perform is to enable the SMS forwarding for that connection. To do this, select the HTTP tab in the configuration menu. Here, in the first step, check the 'Enable SMS forwarding' option as Figure 5 shows that. Then, you can configure the HTTP URL that will be called to submit the SMS messages. If you finished with all the configuration, just click OK to create the HTTP client connection.
Step 5 - Check the Events menu of the connection
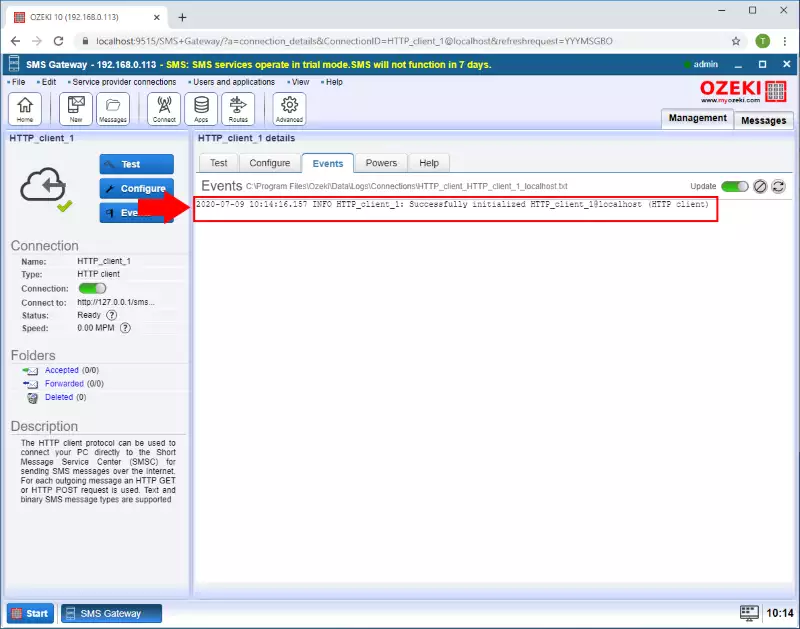
Now, your HTTP client connection is created and ready to use. To check that, you can go to the Event menu of the connection. In this menu, you will be able to see every event that occurred with the connection. Figure 6 shows the event that informs you about that connection is successfully initialized and ready to use.
Step 6 - Send a test message
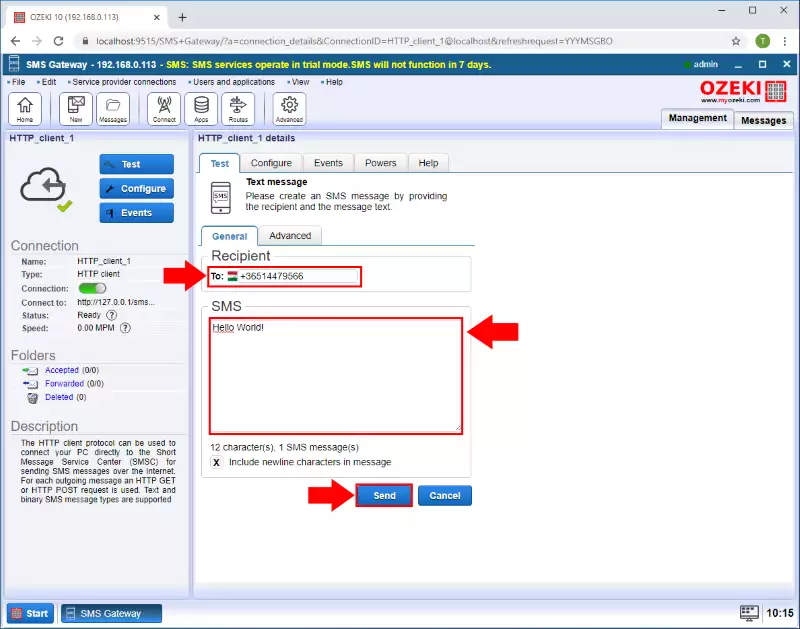
The HTTP client connection is capable of sending and receiving SMS messages. To test the connection, you can simply send a message using the connection. For that, go to the menu of the connection, and select the 'Test' tab. Here you can compose a new message. So, as you can see it in Figure 7, set a recipient and the text of the message. If you have done it, just click on 'Send' to send the message.
Step 7 - Check if the connection is working
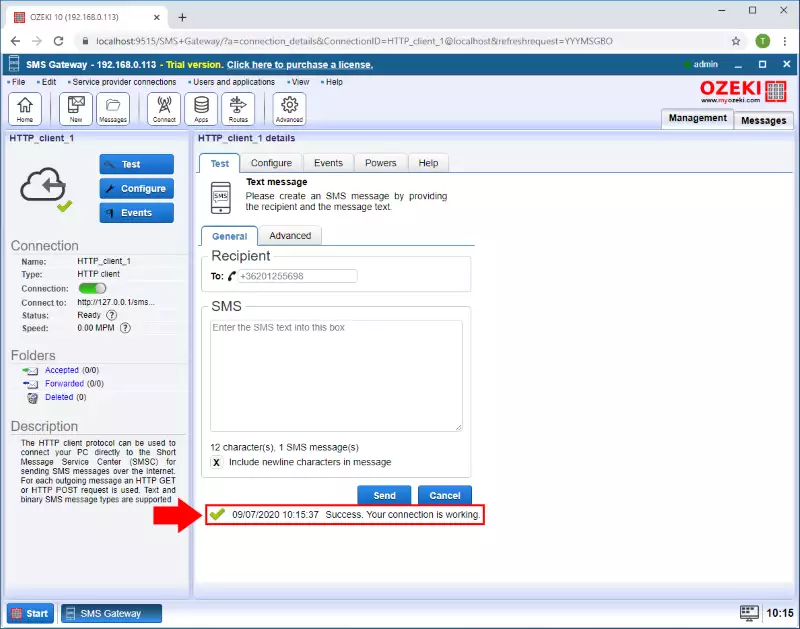
As soon as you sent the message, the connection is going to give you feedback about the delivery of the message was successful or not. Figure 8 demonstrates it below, that if the connection is working and able to send messages, it displays it with an event message.
Summary
In the guide above, we showed you how to configure and use HTTP SMS client connection with Ozeki SMS Gateway. If you are interested in sending SMS from computers, this solution can be really useful. Ozeki has experience in SMS technologies and Ozeki SMS Gateway is an application with the ability of sending SMS using different protocols, giving you the opportunity to choose between them based on your needs. Ozeki SMS Gateway also offers excellent logging capabilities, so errors can be tracked easily and quickly.
Since you have finished this article, you have the knowledge to send messages with HTTP SMS client. This technology can be used to reach out to mobile using customers from your computer, making the information sharing faster.
Expand your knowledge and continue reading on Ozeki's tutorial pages, where you find articles about similar topics, like SMPP connection and SMS modem.
Now make sure that you download Ozeki SMS Gateway and start working!
