SMPP Client Connection
This guide is about SMPP client connection setup. It defines what an SMPP client connection is, what does SMPP stand for and how you can use an SMPP client connection to connect your Ozeki SMS gateway system directly to the Short Message Service Centre (SMSC) of a mobile network operator over the Internet.
What does SMPP stand for?
SMPP stands for Short Message Peer-to-Peer Protocol. This is an industry standard protocol designed to deliver SMS messages over TCP/IP connections through the Internet. This protocol is implemented by Ozeki SMS Gateway.
What is an SMPP client?
An SMPP client is a software that allows you to connect to an SMS service provider on the Internet. An SMPP client, such as Ozeki SMS Gateway, uses the SMPP protocol to send and receive SMS text messages.
How to connect an SMPP Client
To connect an smpp client to an SMS service provider in order to send and receive SMS, please follow these steps:
- Open https://localhost:9515 in your browser
- Login using your username and password
- Click on "Add new connection"
- Select "SMPP client"
- Enter the smpp host name and port
- Enter the telephone number
- Click ok to connect the smpp client
- Check the smpp logs
- Send a test sms
The SMPP client provides a standardized way for applications to programmatically send and receive SMS messages in bulk to the SMPP Server. The SMPP client initiates a TCP/IP connection to the server. This makes SMPP clients essential for applications like marketing platforms, notification systems, and two-factor authentication services.
How to send SMS through an SMPP client
This system works in a way that the user gives their computer instructions on sending a message (Figure 1). The computer forwards this information to an SMS Centre. This is done through an SMPP (Short Message Peer-to-Peer Protocol) client connection. The SMSC then sends the text message to the recipients' mobile devices.

How to setup an SMPP client connection using Ozeki SMS Gateway (video tutorial)
The following short video shows the steps you need to take to setup an SMPP client connection in Ozeki SMS Gateway what works in any country. The video starts with the login form and takes you all the way to sending your first text message as a test over the newly created SMPP client connection.
Detailed smpp setup instructions
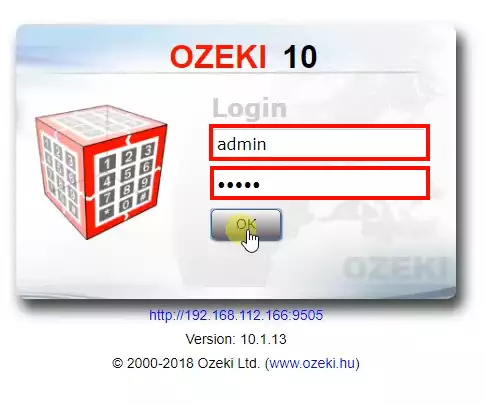
Setting up an smpp SMS connection in Ozeki SMS Gateway is a relatively simple procedure. You need to login to the SMS gateway using a web browser as administrator, and you need to perform a few simple steps. For configuration we recommend to login using the administrator account. The administrator account username is "admin", and the password is the one you provided during install. (Figure 2)
How to create a new SMPP client connection
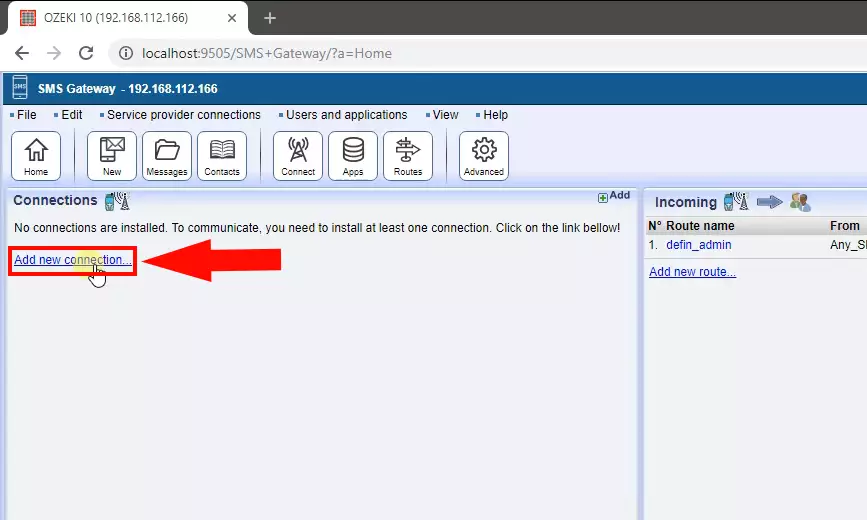
To create a new SMPP client connection after login, you need to click on the 'Add new connection' link in the management console of the Ozeki 10 SMS Gateway app. This link is located in the Connections panel below the text "No connections are installed..." (Figure 3). This link will bring up a list of available protocols. Note that SMPP is an SMS protocol that can be used to send SMS messages.
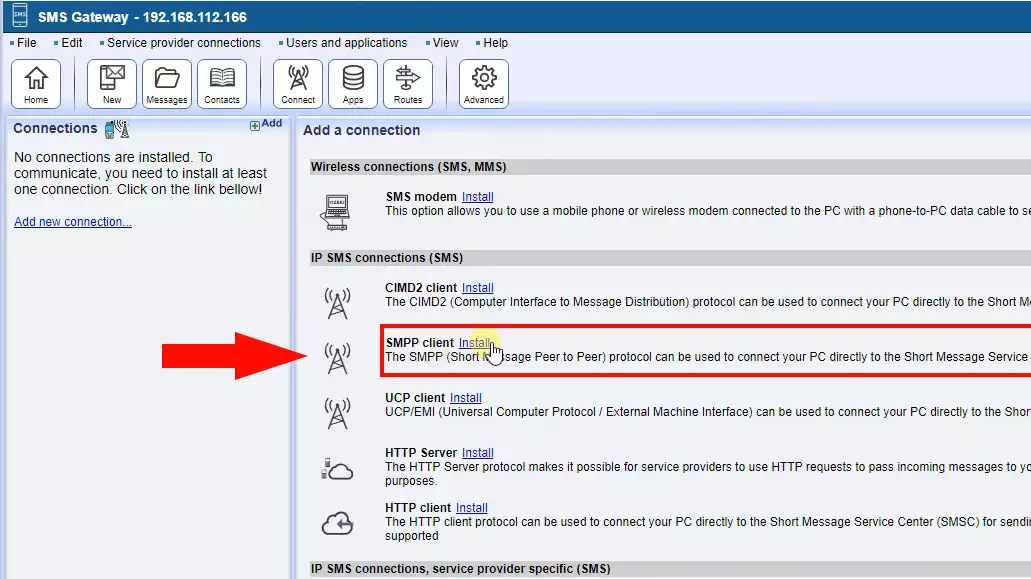
To install the SMPP client connection, you will have to select SMPP client from the available connections list. The SMPP client can be found in the IP SMS Connections section (Figure 4). You need to click install to install the SMPP client. You will use a client connection because you wish to connect the SMS gateway to an SMS service provider over the Internet. (If you wish to provide an SMS service, and you want your customers to connect to your SMS gateway over SMPP, you need to setup an SMPP user account and you need to configure an SMPP service.)
Select the 'SMPP client' from the list and click on install.
Configure your SMPP client connection
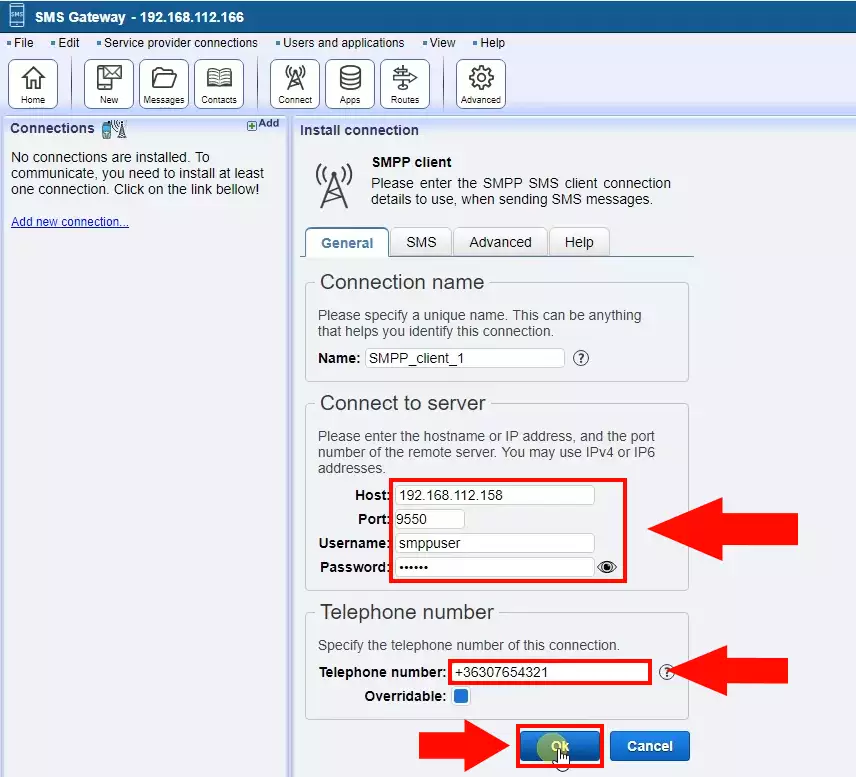
In order to configure your SMPP client connection, you need to provide the host name and port number of the SMPP service, your SMPP credentials and your must specify telephone number associated with this connection. There could be more than one phone numbers associated with this connection. In this case provide the first one and check the overridable checkbox. If this checkbox is checked, you will be able to use all phone numbers as sender IDs.
To configure an smpp client (Figure 5):
- Select the General tab
- Scroll to the smpp client config form
- Give a name to this smpp client connection
- Enter the smpp hostname
- Set the smpp port number
- Provide your smpp username
- Type your password
- Assign a sender id to this smpp client
- Click OK
It is important to mention that the SMPP hostname and port plus the username and password are provided by your SMS service provider. For example, if you contact Vodafone, and ask for an SMPP SMS service, you will sign a contract with them, and often an attachment of this contract will contain the connection following information. If you subscribe to an SMS service on-line, you will likely find this information in the on-line control panel of your SMS service provider. Of course, you can always ask your SMS service provider in e-mail and ask what the SMPP server connection details are.
Smpp host:
The smpp host is the host name of the IP address the SMPP client uses to connect to the SMPP server. This is the IP address (or host name) of the SMPP server.
Smpp port number:
The smpp port number is the TCP IP port number of the SMPP client uses to connect to the SMPP server. This port number is where the server is listening for incoming SMPP connections.
Smpp username:
The smpp username is the smpp system id. This identifier is provided by the SMPP server operator when you sign up to their service.
Smpp password:
The smpp password is the password that is used to authenticate your smpp account on the SMPP server. This password is provided to you by the SMPP server operator (or SMPP service provider) when you sign up to their service.
Smpp telephone number:
The smpp telephone number is the smpp sender ID. This is the phone number that is displayed on the mobile phone as the sender address, when your SMS messages is received.
Check the SMPP log
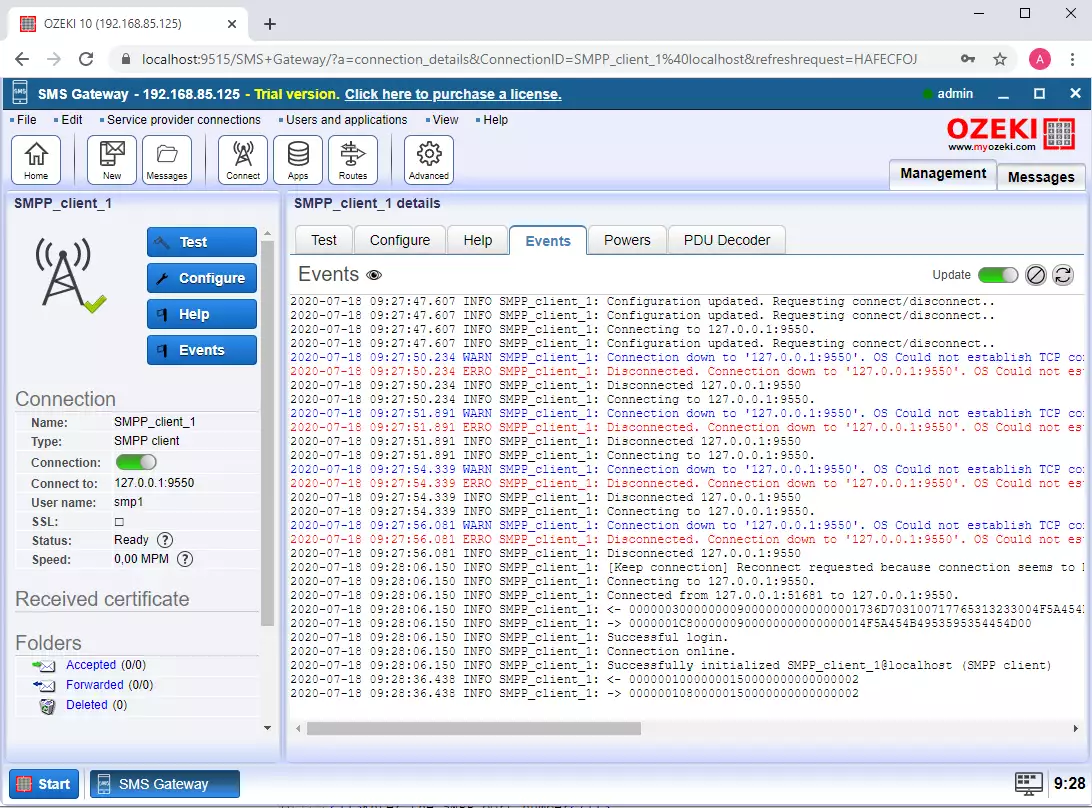
Once the SMPP client connection is configured, you should check the SMPP client connection log to see if the system connected properly to your SMS service provider. If the system connected properly, you would see the "Connection online" log entry. The SMS connection logs can be found in the following directory in Windows: C:\Program Files\Ozeki\Data\Logs\Connections\. In this Event tab of the SMPP client connection's details page, you can see a preview of the log. This page contains the last 100 log entries. Note that the SMPP log files are rotated to save disk space.
How to view the SMPP client connection log (Figure 6):- Open the SMPP client connection's details page
- Click on the Events tab
- Click on the eye icon next to the Events title
- Copy the file name next to the Events title
- Open notepad
- Paste the filename into the File/Open dialog in notepad
- Click OK to open the SMPP log file
- Use F3 to find the date you are interested in
- Search for "ERRO" to find errors in the log
Send a test SMS message
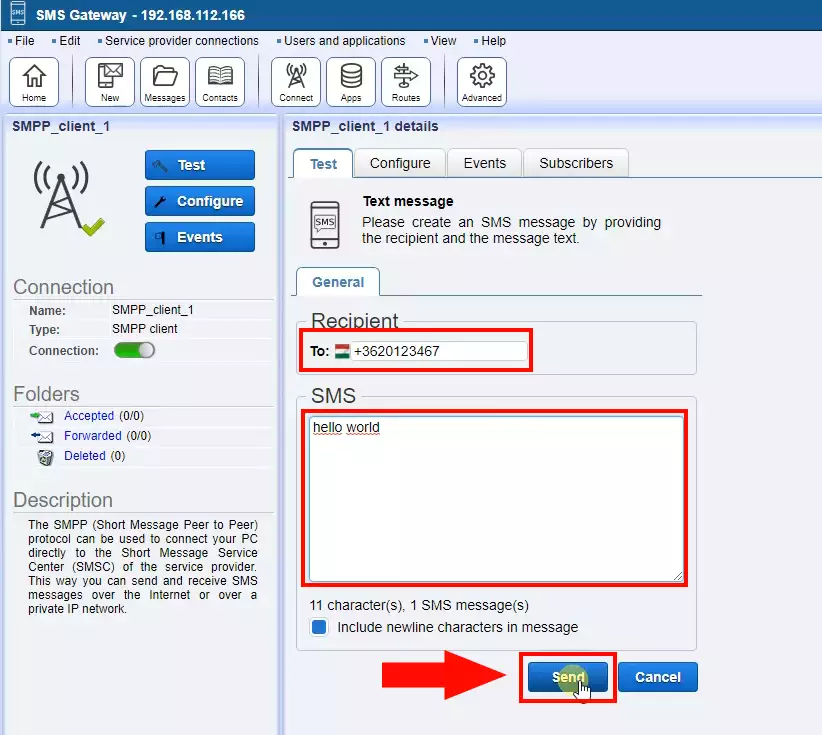
Once your connection is connected, you can check to see if it is ready to deliver SMS messages by sending a test SMS. To send a test SMS message, you need to open the Test tab, and you need to enter the phone number and message text. It is recommended to provide the phone number in international format. This means the phone number should start with a plus sign followed by a country code. If your local phone number starts with a 0, it is likely that you will need to drop the 0 prefix. For example, if your UK phone number 07958663698, you would send the test SMS to +447958663698.
How to send a test SMPP message (Figure 7):- Navigate to the SMPP client connection's details page
- Select the Test tab
- Enter the recipient phone number
- Make sure the phone number is in international format
- Enter the message text
- Make sure the message text is less than 160 characters
- Click on the Send button
- Check the SMPP logs
The sms is sent using the smpp submit_sm pdu over the SMPP link established between the SMPP client and the SMPP server. This PDU carries the sender id, the recipient address, the message text and all the necessary flags and smpp parameters needed to display the sms properly on the recipient mobile phone.
You might ask why the message text should be less than 160 characters. This is because GSM system was designed to send 160-character-long text messages. If a message is longer, it will be split into multiple message segments, and will be delivered in more than one SMS message.
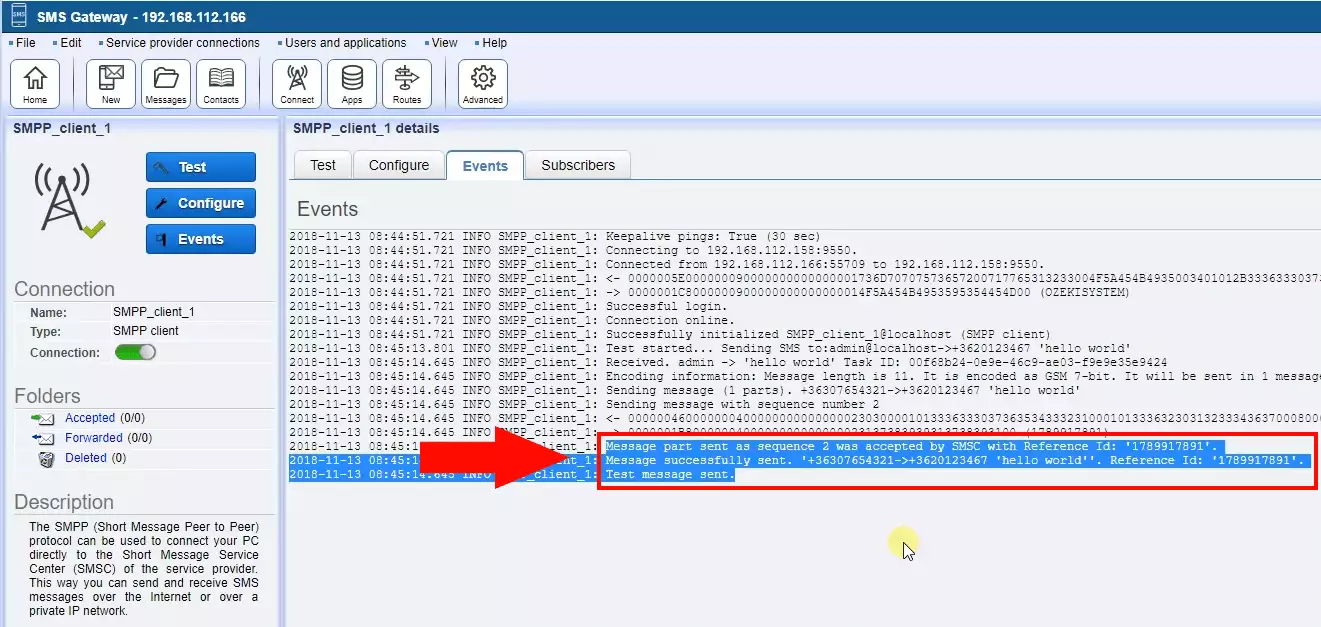
After the message is successfully sent, you should check the SMPP logs. The SMPP logs will reveal the low level SMPP messages, that are used to pass the message content to the SMS service provider. These messages are also called an SMPP PDU (SMPP protocol data unit). If there is a problem with message submission, your SMS service provider will ask for the SMPP logs. In this case, you need to send the SMPP PDUs to them. For every SMS submission, two SMPP PDUs will appear in the log. One is the SMPP SUBMIT_SM pdu, which passes the message to the SMS service provider's over, and the SMPP SSUBMIT_SM_RESP, which returns a reference ID, that can be used for tracking a message, and for finding the delivery reports returned to you when the message is delivered to the recipient handset. (Figure 8)
SMPP protocol specification
The SMPP protocol specification can be used to understand each SMPP PDU you see in the logs. You will see that there are several operations in this protocol specifications. For example, there is an operation for keeping the SMPP client connection alive using keep alive messages, and there are multiple operations for submitting and receiving SMS messages and SMS delivery reports.
SMPP protocol specification:Download: smpp-protocol-specification-v3.4.pdf
SMPP protocol versions
The SMPP standard is an evolving protocol. The first widely adopted version was v3.3. Currently the most common version you will find is v3.4, but there is also a newer version v5.0 which is rarely used in SMS services.
SMPP 3.3 the oldest version supports GSM SMS messages only. It generates an immediate response for each message sent. In most cases this version is not supported over SSL connections. The problem with SMPP 3.3 is that it requires two SMPP links: an SMPP transmitter and an SMPP receiver link to the SMS service provider. When you setup an SMPP v3.3 link in Ozeki SMS Gateway, you will have to create two SMPP client connections, and configure on as SMPP transmitter and the other as SMPP receiver.
The SMPP 3.4 protocol is similar to SMPP 3.3, but it has a strong advantage: it allows you to send and receive SMS messages over a single TCP/IP link. In Ozeki SMS gateway you will only have to setup on SMPP client connection if you wish to use this protocol. SMPP v3.4 also adds optional Tag-Length-Value (TLV) parameters, to the SMS message, which allows the user to work with non-GSM SMS technologies, such as SMS messaging in CDMA networks.
SMPP 5.0 is the latest version of SMPP. It extends v3.4 by adding support for cell broadcasting, smart flow control. Not many SMS service providers use this protocol. We recommend you to setup SMPP v3.4 connections in Ozeki SMS gateway.
SMPP client testing
To test your SMPP client connection, it is a good idea to setup another SMPP gateway as an SMPP Simulator. This way you can do performance testing and test all the aspects of SMS messaging. To see how we have used this SMPP simulator method to test the performance of our SMS gateway by sending 1 000 000 SMS through it, check out the SMPP performance testing page.
FAQs
What kind of parameters do I need to connect to an SMPP service provider?
These are the essential details required to configure an SMPP connection for your Ozeki SMS Gateway:
- Server Address/Hostname: Specifies the location of the SMSC server (either its IP address or hostname) for the gateway to connect to.
- Port Number: Defines the specific TCP/IP port on the SMSC server that the gateway should use for communication.
- Username (System ID): Identifies your account on the SMSC server.
- Password: The password associated with your username for secure authentication.
- SMPP Version: Select the compatible version of the SMPP protocol supported by your SMSC server (Ozeki supports v3.3 and v3.4).
- System Type (Optional): Only required if the SMSC server mandates it. This value, often "SMPP," will be provided by your SMPP system administrator.
- Sender Address: The default phone number that appears as the sender for outbound SMS messages.
- Address Range (Optional): Primarily used for receiving messages. This information, sent to the SMSC after login, is relevant when managing multiple phone numbers on a single SMPP link.
What is an SMPP transmitter connection?
An SMPP transmitter connection is designed specifically for sending SMS messages. It acts like a one-way street, allowing your Ozeki SMS Gateway to transmit messages outward to the SMSC (Short Message Service Centre). This type of connection is ideal when you only need to send SMS messages and don't require receiving functionality.
What is an SMPP receiver connection?
An SMPP receiver connection functions solely for receiving incoming SMS messages. It operates like a dedicated mailbox, allowing the SMSC (Short Message Service Centre) to deliver messages to your Ozeki SMS Gateway. This type of connection is suitable when you only need to receive incoming messages and don't plan on sending any.
What is an SMPP transceiver connection?
An SMPP transceiver connection offers a versatile option for both sending and receiving SMS messages. It functions like a two-way street, enabling your Ozeki SMS Gateway to transmit messages outward and receive incoming messages from the SMSC (Short Message Service Centre) over a single TCP/IP connection. This type of connection is ideal for most scenarios where you require both sending and receiving SMS capabilities.
Summary
This guide provided all the necessary information on how to setup SMPP client connection in Ozeki SMS Gateway. SMPP is great because it allows you to send SMS messages to the SMSC over the Internet and Ozeki SMS Gateway provides excellent speed for delivery. If you wish to setup an efficient SMS notification service in your business, SMPP is the way to go.
The information you have obtained is valuable, there are further useful documents in this guide, so keep on reading. It is a good idea to check out the UCP protocol setup guide and the CIMD client connection tutorial, because these protocols offer similar, high speed SMSC connectivity.
Now download Ozeki SMS Gateway and let the work begin!
