How to send SMS over HTTPS API
This article demonstrates how to send sms from HTTP API. It will start with defining what HTTP API is and will continue with the explanation of how it can be used. HTTP request is a great tool to send sms, it can be used in various environments. Maybe the biggest benefit of this HTTP API solution is that all you have to do is perform some basic configuration and you will be ready to send texts in a short time. This solution uses Ozeki SMS Gateway, so you can take advantage of that fact that it allows you to manage SMS costs and to keep track of SMS traffic. We assume you have already used HTTP request and can perform basic operations with it. You will be presented with some important information and well-structured step-by-step instructions. We hope you will find the presented instructions beneficial.
How to send SMS over HTTPS API (Step by step guidelines)
To send SMS over HTTPS API:
- Launch Ozeki SMS Gateway
- Install HTTP user
- Open HTTP API service Details
- Provide ports
- Write HTTP API request
- Copy HTTP API SMS request
- Send SMS over HTTP API from browser
- Check the Events
- Upload .pfx certificate file for HTTPS
How to create a new user/application (video tutorial)
Click the Install button next to HTTP user
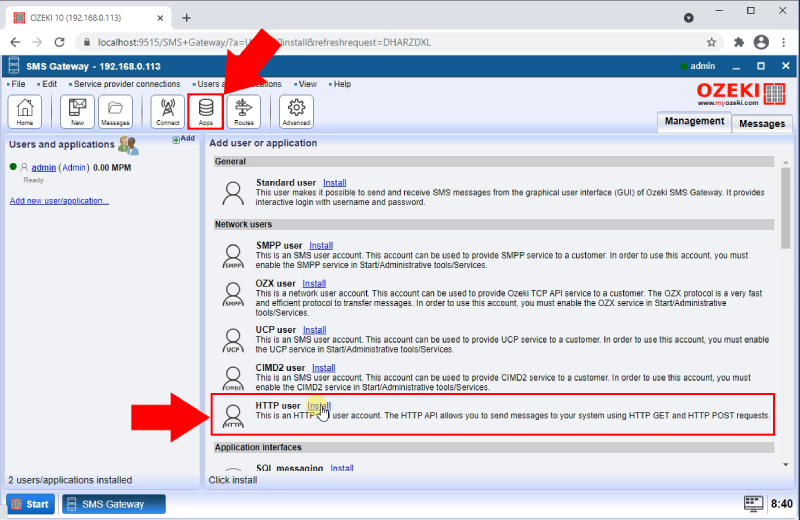
To install a new HTTP user, you need to open the Add user or application install list. To do so, find the Apps button located on the toolbar of the Ozeki SMS Gateway (Figure 1). In the list, there is a Network users' section. There, you need to find the HTTP user list item. Click the Install link to begin the installation procedure.
Provide login information
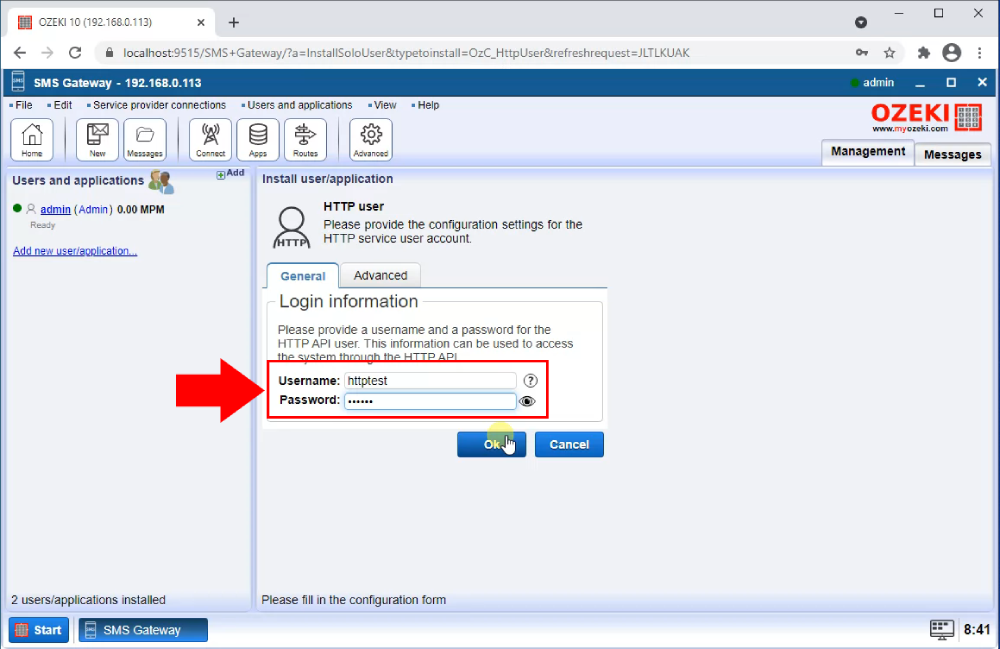
In the HTTP user’s detail page, you will see a group box with the title of Login Information (Figure 2). Here you need to provide a username and a password for HTTP API user. Make sure to provide both and click the Ok button. To get more information about the login credentials, you can use the question mark icon located next to the Username textbox.
Open service details
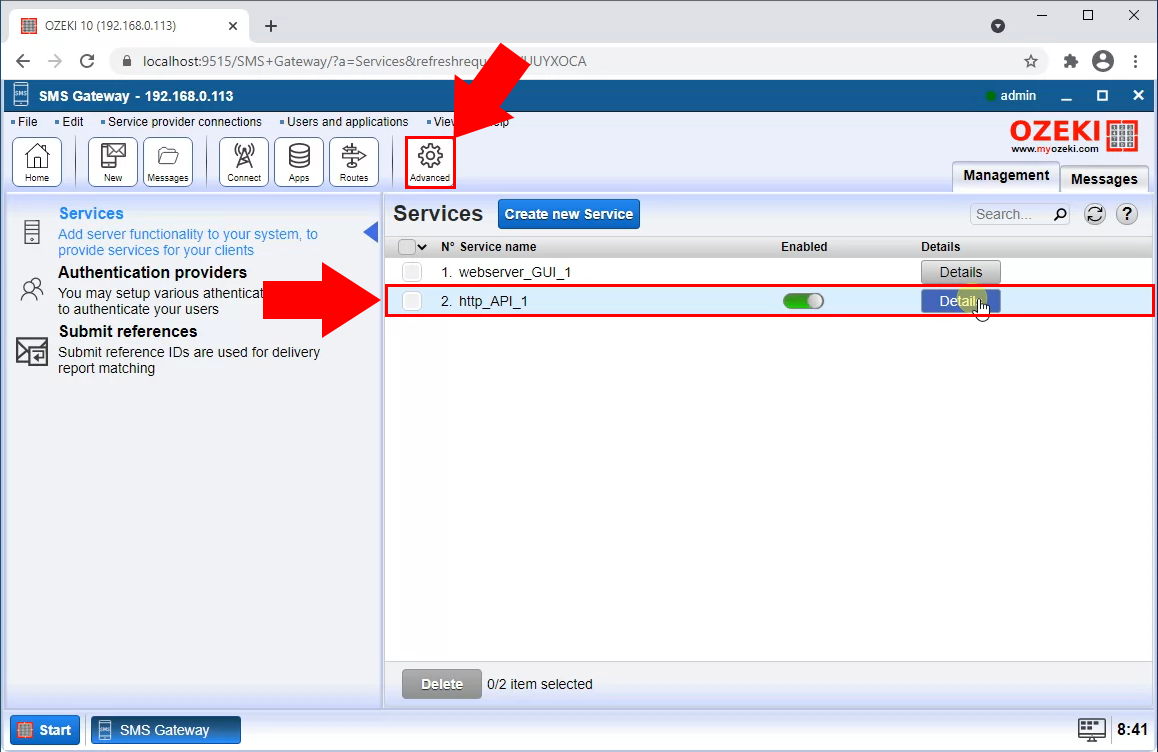
The next step is to open the details panel of the HTTP API user. Click the Advanced button on the Toolbar of the Ozeki SMS Gateway (Figure 3). It will take you to the services list. There you will see all the services that you are currently working with. Find the HTTP API service that you just created and click the Details button. It will open a page where you could modify the properties or view the events.
Check the Events tab
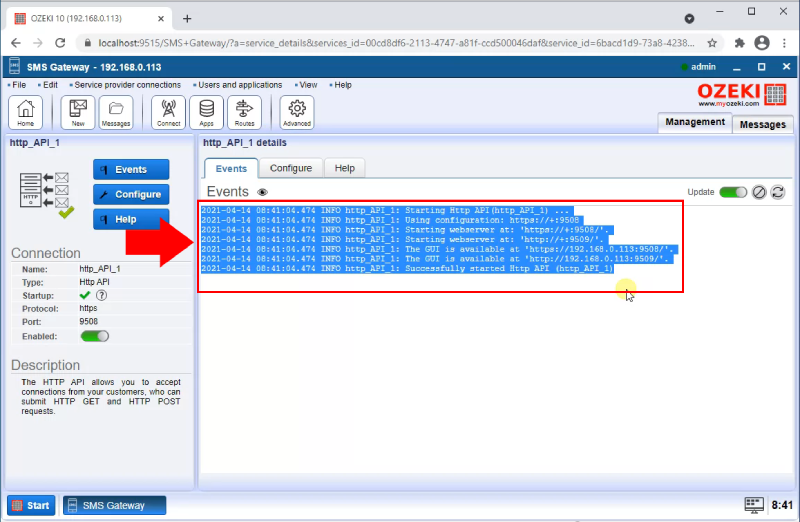
Here in the Events tab, you can see that the Ozeki SMS Gateway successfully created the HTTP API. It started a webserver and configured it for user connection. In this log, you have the access information of the HTTP API (Figure 4). First, you will need the HTTPS port number and the IP address where the GUI is available. We provided you a copy of the event log of our example. Highlighted with red, you can see the important information about the API.
2021-04-02 07:57:22.570 INFO http_API_1: Starting Http API(http_API_1) ...
2021-04-02 07:57:22.570 INFO http_API_1: Using configuration: https://+:9508
2021-04-02 07:57:22.570 INFO http_API_1: Starting webserver at: 'https://+:9508/'.
2021-04-02 07:57:22.570 INFO http_API_1: Starting webserver at: 'http://+:9509/'.
2021-04-02 07:57:22.570 INFO http_API_1: The GUI is available at 'https://192.168.93.6:9508/'.
2021-04-02 07:57:22.570 INFO http_API_1: The GUI is available at 'http://192.168.93.6:9509/'.
2021-04-02 07:57:22.570 INFO http_API_1: Successfully started Http API (http_API_1)
How to send the test SMS (video tutorial)
Open the service details
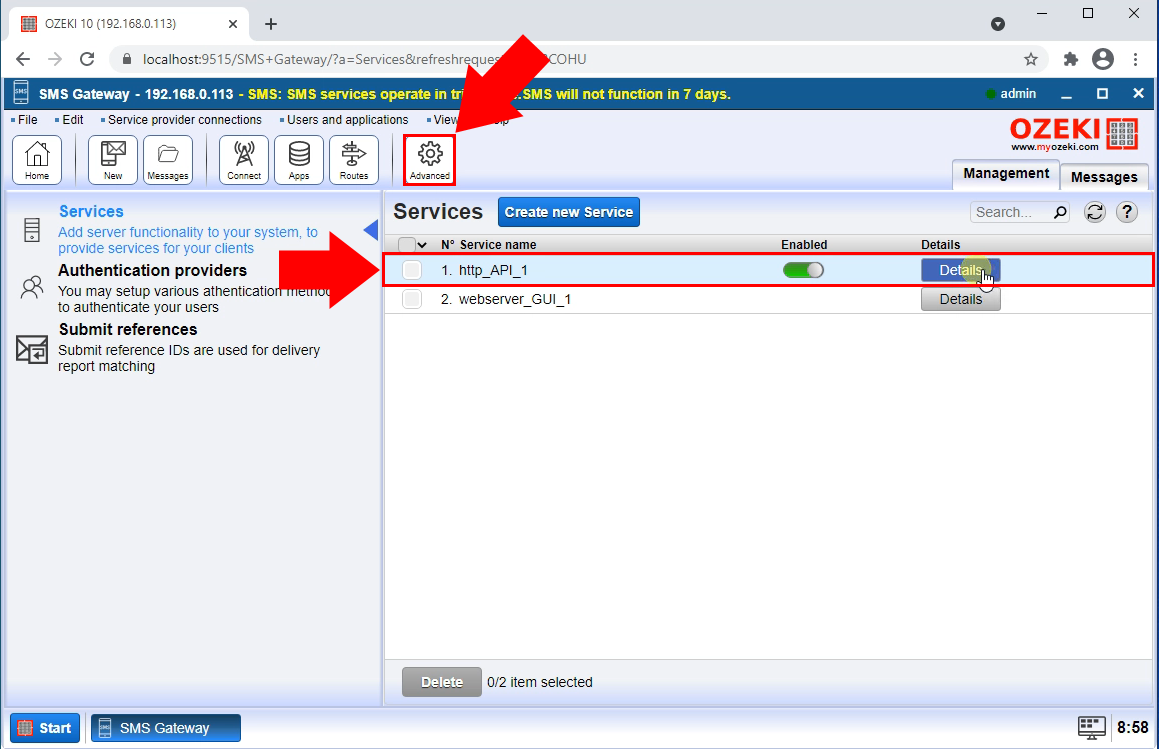
To configure the HTTP API to accept HTTP POST and HTTP GET requests, you need to provide the correct port numbers for the HTTPS and HTTP connection. To do so, open the advanced menu with the Advanced button located on the Toolbar (Figure 5). This will open the list of your services. Click the Details button next to the HTTP API service to open the configuration page.
Change the port number
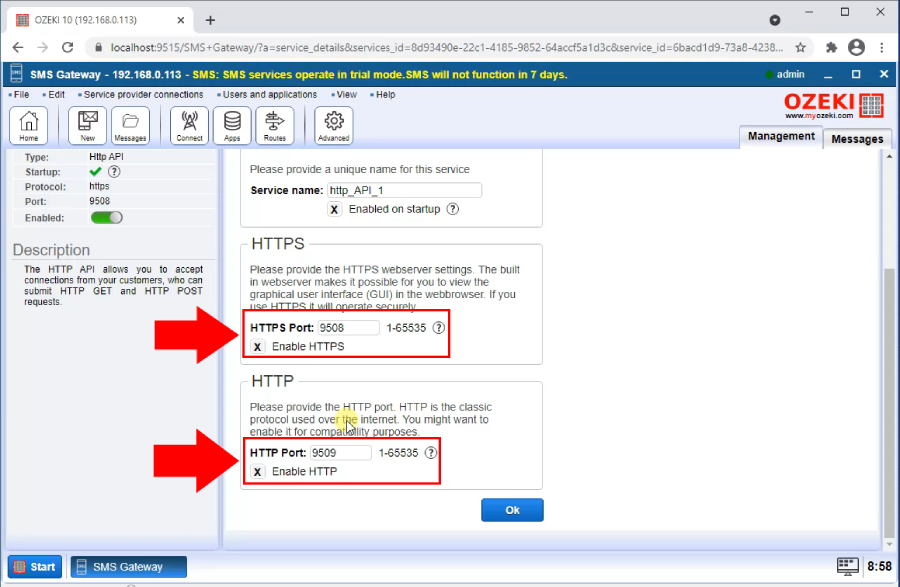
You can get the correct port number from the event log that you copied from the start of the API. The number after the HTTPS:// is the correct number for the HTTPS port textbox and the number after the HTTP:// is the correct number for the HTTP port textbox. You can find these textboxes in the Configure tab page (Figure 6).
Write the HTTP request
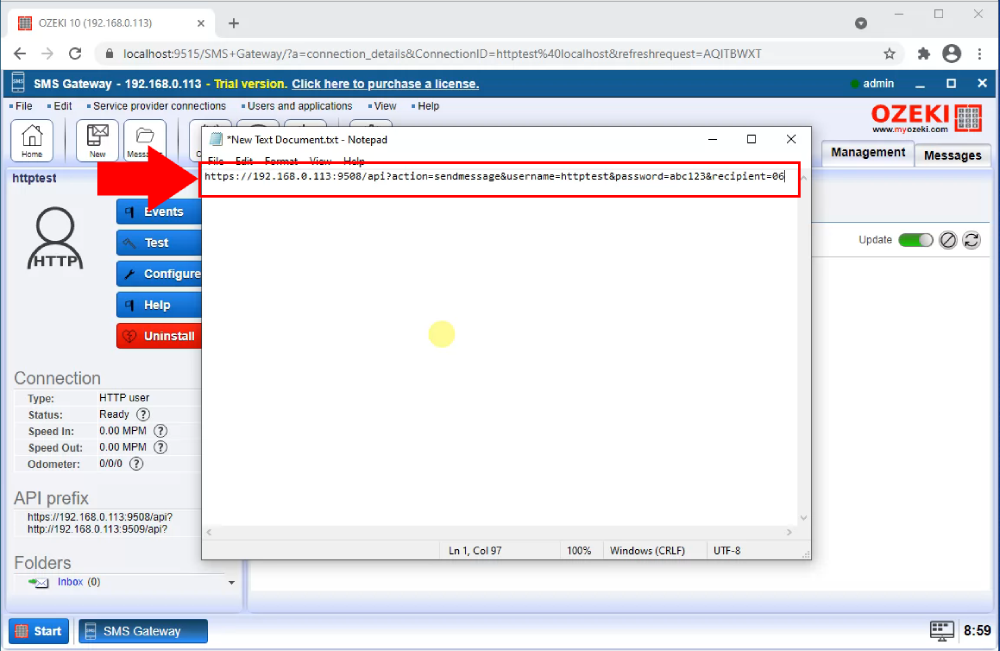
The next step is to write the HTTP API request. For this part, you need basic understanding of the HTTP technology. Make sure to send the request with the password and the username you provided when you were configuring the API. On Figure 7, you can see an example HTTP code. This code will send a message to the phone number after the recipient part. It contains the username and the password for the API.
Send the request
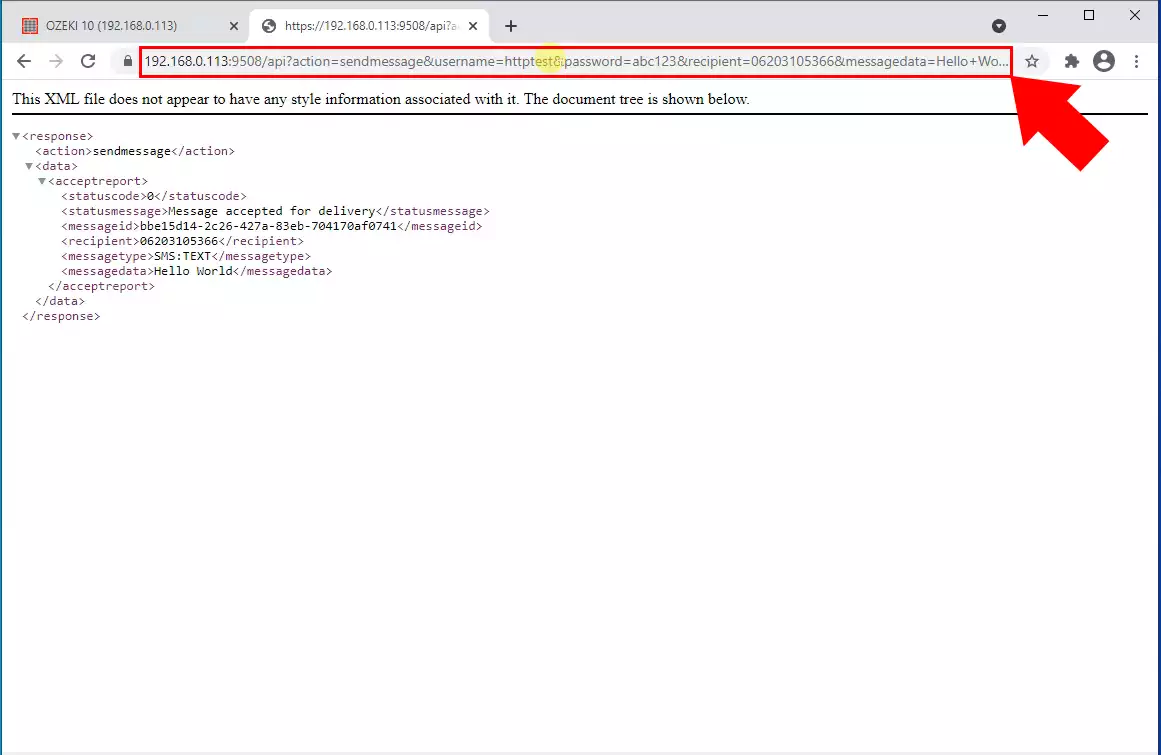
Paste the request to a now page of your browser. This will reach the webserver reserved for the API requests. You will get feedback about your request in a form of an xml code. On Figure 8, you can see how the XML file looks in case of an accepted message. This means that the gateway will now try to send your message. Here you can see the timestamp when the message was sent and the body of the message you sent.
Check the sent message
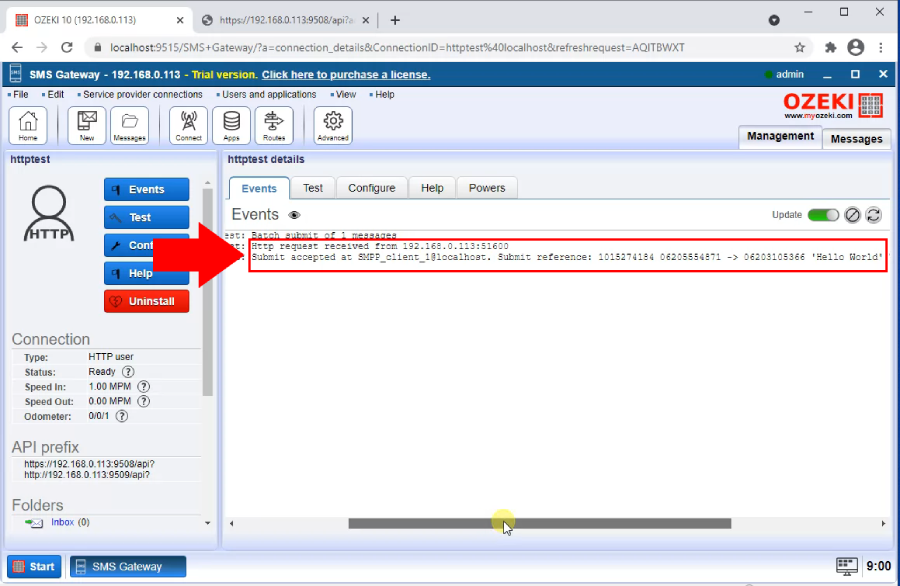
In the Event tab of the Ozeki SMS Gateway, you can see that the API reached the gateway and tried to send the message. You can see here whether it was accepted or denied. To reach the Events tab, open the Ozeki SMS Gateway and search for the user that you sent the test message to. Click the Events tab and you will be presented with the logs of the user. (Figure 9)
Upload the certificate
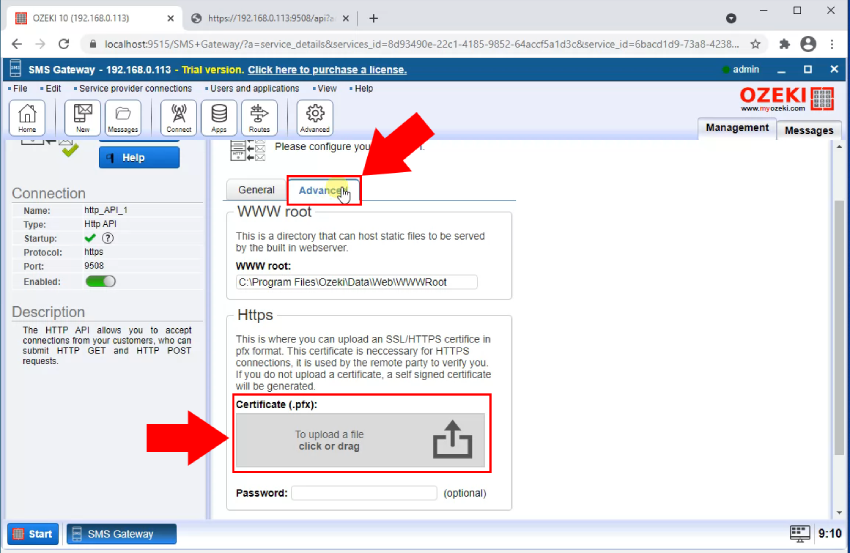
To have a secured HTTP, you need to upload a certificate. This will be seen by the remote party and will verify you. If you do not provide any certificate, a generated certificate will be sent. With the certificate, you will be able to use HTTPS protocol instead of HTTP. HTTPS is more secure and more stable than HTTP. (Figure 10)
Summary
This article explained how you can send SMS using HTTPS API. You will learn about a HTTPS API, and we will show you how to use it. Using a HTTPS API means that you will be able to send SMS messages using a web page. This way you can be anywhere and still use the Ozeki SMS Gateway to send SMS messages. This combined with the performance of the Ozeki SMS Gateway, will result in a flexible and easy to use SMS communication solution.
Make sure to not stop here with learning. We offer you more articles about this subject and some other subject like using the Ozeki SMS Gateway with other programming languages. Start with learning how you can use the Ozeki SMS Gateway with PHP or Python.
The one last thing you need to do is to download the Ozeki SMS Gateway and start developing now!
FAQs
Why sometimes do I get a message from my HTTP client user that says it could not resolve the name corresponding to the URL it is calling?
- Internet Outage: The most common culprit might be a simple internet outage. Try opening a website in your web browser. If nothing loads, it suggests a broader issue with your internet connection. In this case, the best course of action is to contact your internet service provider (ISP) for assistance. They can help diagnose the problem and restore your connection.
- DNS Server Issues: Another possibility is a problem with the Domain Name System (DNS) server. The DNS acts like a phonebook for the internet, translating website names (like "[invalid URL removed]") into numerical IP addresses that computers can understand. If your DNS server isn't responding, your computer might struggle to find the websites you're trying to access, leading to connection problems.
I am using the HTTP Client user. Some SMS request messages are served by HTTP queries which are very slow. We see that if the reply from the website takes to long the reply is an empty message. Is there a way of increasing the time for the http client user to wait longer for a reply from the website?
Absolutely! Ozeki allows you to customize the time it waits for a response from a webpage after forwarding an SMS message via HTTP. Here's how to adjust this setting:
- Access the HTTP User Configuration Form: Locate the configuration form for the specific HTTP user you want to modify within Ozeki.
- Navigate to the HTTP Connection Tab: Look for a tab labelled "HTTP Connection" or similar within the configuration form.
- Modify the HTTP Timeout Value: This tab will typically contain a setting named "HTTP Submit Response Timeout" (or similar). The default value is usually 30 seconds, meaning Ozeki attempts to receive a response from the webpage for 30 seconds after forwarding the SMS message.
- Set Your Desired Timeout: Increase the timeout value if you need Ozeki to wait longer for a response from the webpage. This might be useful if you anticipate delays on the receiving end.
