How to setup an SQL to SMS gateway
The following guide provides you information about how you can send and receive messages from an SQL database server with the help of Ozeki SMS Gateway. This document divided into 3 main segments: First the supported database servers are listed. Second, the procedure of sending SMS from a database server is demonstrated using MySQL. Third, an autoresponding SMS service is created with the help of a database trigger. To complete this guide successfully, you need to set up a database server as a prerequisite and you must have some basic understanding of SQL. The completion of the steps in this guide takes about 10 to 15 minutes. So, let's start!
How receiving SMS with a database works
This 'Receiving SMS with a database' solution makes it possible to store all the incoming messages in a database. The solution consists of a phone, a PC with Ozeki SMS Gateway running, an SQL database server, and your application.
You can learn how this system works from the following: An android phone, running the Ozeki SMS Gateway android app, will send the information to the Ozeki SMS Gateway application running on a PC. It will then store it using a database server. Your application could obtain the messages from the database server. To have a better understanding, look at Figure 1.

How sending SMS from a database works
The 'Send SMS from a database' solution enables you to send the information, stored in a database, to a phone using the Ozeki SMS Gateway. This solution consists of your application, a database server, a PC running the Ozeki SMS Gateway application, and a phone that also runs the Ozeki SMS Gateway.
The system works the following way: Your application stores the SMS information on a database server. The Ozeki SMS Gateway will obtain the info from the database server and wil send the SMS to the predefined address. To understand the system in a better way, look at Figure 2.

Database servers supported by Ozeki SMS Gateway

You can use an Microsoft SQL database for SMS messaging. Follow these pages to send or receive SMS messages through Ozeki SMS Gateway's Database User. All you have to do is insert or read data rows from the appropriate SQL table by setting INSERT INTO and SELECT statements.
See how to send SMS from an Microsoft SQL database

You can use a MSSQL Express database for SMS messaging. Follow these pages to send or receive SMS messages through Ozeki SMS Gateway's Database User. All you have to do is insert or read data rows from the appropriate SQL table by setting INSERT INTO and SELECT statements.
See how to send SMS from an MSSQL Express database

The connection between Oracle Database and Ozeki SMS Gateway is a perfect solution for SMS messaging. Ozeki SMS Gateway's Database User makes sure that incoming SMS messages can be inserted while outgoing SMS messages can be selected from database tables.
See how to send SMS from an Oracle SQL database

You can combine Ozeki SMS Gateway with a MySQL database to send, receive and store SMS messages. On these pages you can see how to install and configure the connection with the proper connection string and how to create the recommended database structure.
See how to send SMS from a MySQL database

This chapter gives you great opportunity to see how to send and receive SMS messages through pre-created PostgreSQL database tables. You just need to connect to them with a Database User of Ozeki SMS Gateway. Do not forget to provide the ODBC driver connection string for the user.
See how to send SMS from a PostgreSQL database

See how to send and receive SMS messages through an SAP SQL Anywhere server with the Database User of Ozeki SMS Gateway. Here you can find a connection string and short CREATE TABLE statements to get started. You can send messages by inserting new message records.
See how to send SMS from a SAP SQL Anywhere database

You can simply start to send and receive SMS messages through Ozeki SMS Gateway's Database User by using Microsoft Access database tables. All you have to do is insert or read data rows from the appropriate SQL table by configuring INSERT INTO and SELECT statements for the user.
See how to send SMS from a Microsoft Access database

This chapter gives you great opportunity to see how to send and receive SMS messages through ODBC connection. You just need to connect ODBC database connection with a Database User of Ozeki SMS Gateway. Do not forget to provide the ODBC driver connection string for the user.
See how to send SMS from an ODBC database connection

This chapter gives you great opportunity to see how to send and receive SMS messages through OleDB connection. You just need to connect OleDB database connection with a Database User of Ozeki SMS Gateway. Do not forget to provide the OleDB driver connection string for the user.
See how to send SMS from an OleDB database connection

See how to send and receive SMS messages through an SQLite server with the Database User of Ozeki SMS Gateway. Here you can find a connection string and short CREATE TABLE statements to get started. You can send messages by inserting new message records.
See how to send SMS from an SQLite database
Step 1 - Setup a database connection
The first thing you need to do is to setup a database connection in Ozeki SMS Gateway. To do this, first, open the SMS Gateway, and select the Apps icon from the toolbar. Next, from the list of applications (Figure 2), you have to select SQL messaging by clicking on the Install button.

After you selected SQL messaging, you can see all available options that you can create in SMS Gateway. By following this guide, you will be able to see how you can create an SQL connection with a MySQL database, so to follow that guide, just click on the Install button of the MySQL option as you can see it in Figure 3.

The last step of the creation of the database application is to connect it to your database server by filling the fields of the Connection Settings (Figure 4). Here you have to give all details about the database that you want to connect to. The first two fields are about to identify the database server. If you left them to default when setting up the database server, you can leave the values here default as well. Then you have to type the name of the database that you want to connect to and your user ID with a password that you use within the database server. If you filled all fields, you could just click OK to create the database application.

Step 2 - Setup an SMPP connection
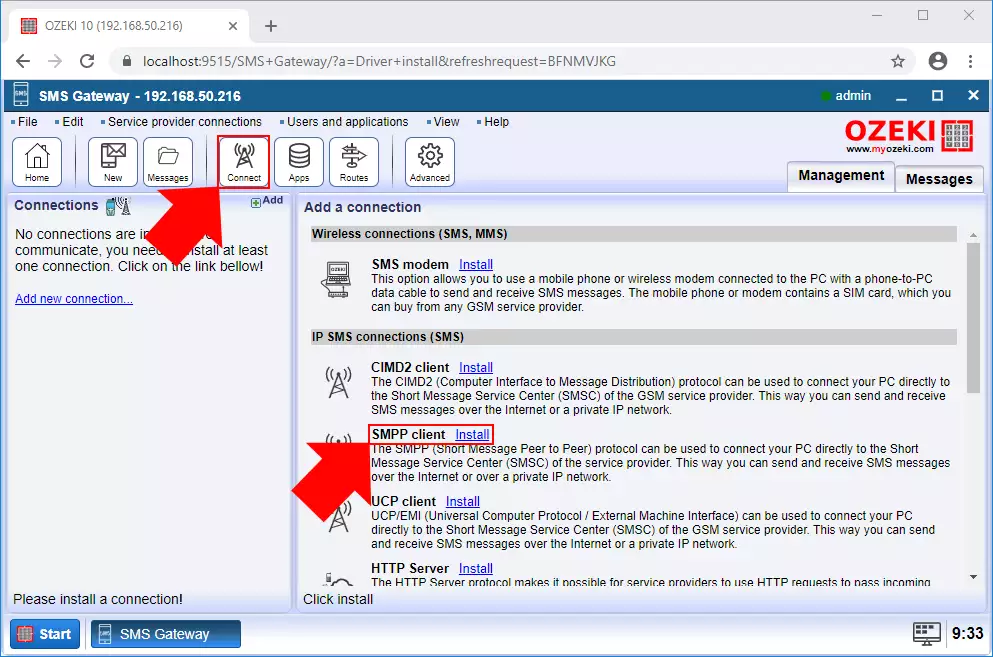
At this point, you have got a database application, but you also need a service provider connection to handle the SMS messages. In this guide, you will be able to create an SMPP client connection. For that, you just have to click on Connect on the toolbar and select SMPP client (Figure 5) from the list of all available service provider connections.
Before establishing the connection, you need to provide some details regarding the connection. First, you have to type a name for the connection, then you have to define the server that you want to connect to as Figure 6 demonstrates it. To finish the creation of the service provider connection, just click on OK.

Step 3 - Send SMS from a database

With all connections set up properly in Ozeki SMS Gateway, now you can start managing SMS messages from a database. First, you will be able to see, how you can send an SMS message by using only one SQL command. By default, SMS Gateway uses ozekimessageout table to send messages. You do not have to worry if you have not got this table in your database, you can create this table easily. Just open your SQL application in SMS Gateway and as you can see it on Figure 8, you can select a SQL command to create the ozekimessageout table. So, just select it, and click on Execute to create the table. (Figure 8)

Sending a message can be done by simply just inserting the message into the ozekimessageout table. The SMS Gateway periodically checks this table and sends the newly added messages. To insert a message into this table, just select the corresponding INSERT command as you can see it in Figure 9. In the textbox, you can change the values which represent the receiver and the message itself. When you finished with writing the message, just click on Execute and your message is about to be sent.
If you don't know the basic SMS SQL commands learn more about SQL SMS templates.

To modify the setting of sending SMS messages, you only have to select the Configure tab in the menu of the database application, and here, select the Send tab. Here, you will be able to see the settings that define, how the outgoing messages are handled. As Figure 10 shows, here you can modify the SQL statement that queries and processes the outgoing messages. You can also set the maximum number of outgoing messages per query and the interval of polling.

Step 4 - Receive SMS from a database

When you created the database application, not only the application was created, but the SMS Gateway also created a routing rule as well, which defines that all incoming SMS messages will be copied into the database. This rule can be found in the list of routing rules as you can see it in Figure 12.

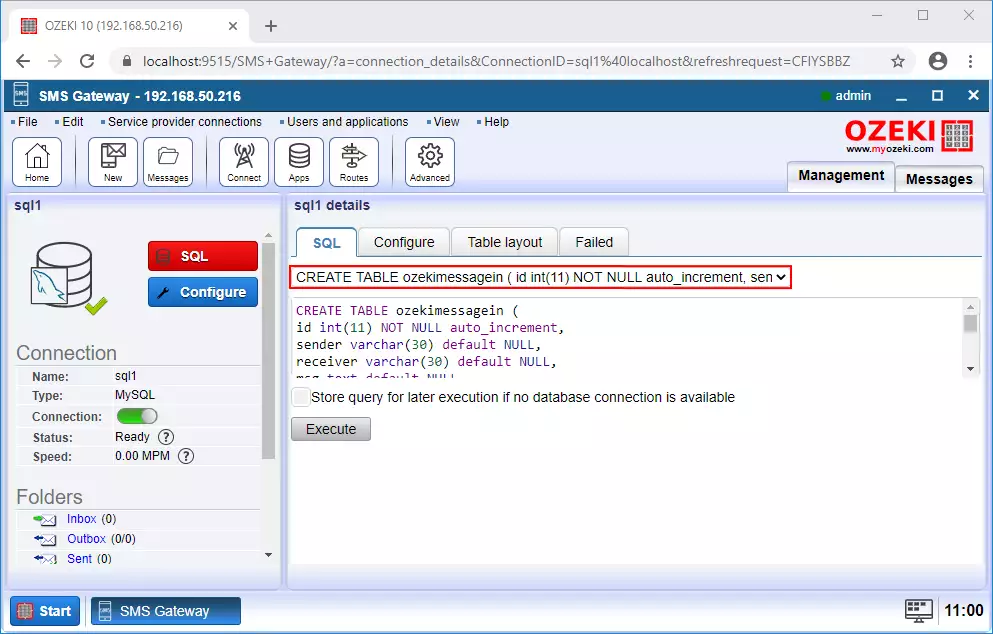
The incoming messages from any SMS connection will be routed into the ozekimessagein table by default. You can create this table easily by opening your database application and in the SQL menu, select the SQL command from the list (Figure 13) which will create the ozekimessagein table in your database after executing that command.
After you created the ozekimessagein table, all received messages will be inserted into that table. To check these messages, you can start a query in the database application. So, open the application, and in the SQL tab, select the command that will query the incoming messages (Figure 14) and click on Execute. If the execution was successful, you will be able to see the incoming messages.

To modify the settings of receiving messages, you can just select Configure tab and here, click on Receive as Figure 15 demonstrates it. In this menu, you can set a SQL command, that inserts the incoming messages into a table. In the command, you can also set the values which will be inserted into the table.

Summary
The article above is about how you can send and receive messages from an SQL database server with the help of the Ozeki SMS Gateway. An SQL to SMS solution like this fits well with your existing infrastructure if you already stash data in a database using a database driver business application. SMS messages stored in a database can be easily linked to users, customers, and other business data, which allows you to use custom queries and take advantage of SQL triggers.
You may find more information about this technology and the Ozeki SMS Gateway. Continue your studies with the tutorial titled How to send SMS from MS SQL Server.
Let's get to work, first of all, download the Ozeki SMS Gateway now!
FAQs
What is an SQL database?
SQL (Structured Query Language) is a specialized language used to interact with relational databases. It allows for efficient data retrieval, manipulation, schema management (creation and modification), and access control.
Can I save incoming SMS messages (sender address, message text, timestamp) in a database server (MySQL/MSSQL)?
This software offers two methods for saving your SMS messages:
- Database User: Store messages directly within a database using a configured database user account.
- SQL Logging: Enable SQL logging to write messages to a designated SQL database table.
We would like to specify different sender mobile numbers for outgoing messages. Is it possible to do it in the SQL tables to assign the sender mobile number?
Yes, you can definitely send SMS messages with a custom sender number! This
software allows you to override the default sender number with your desired one.
Here's how to configure it:
- Access the SQL User Configuration Form: Locate the form within the software for configuring your database user settings.
- Navigate to the Advanced Tab: Look for a tab labelled "Advanced" or similar within the configuration form.
- Enable Sender Number Override: In the "Sender Address" section of the advanced tab, find a checkbox labelled "Overrideable" (or similar). Make sure this checkbox is enabled.
- Specify Your Sender Number: Once "Overrideable" is enabled, you can define the custom sender number you want to use for your outgoing messages in the designated field.