How to send sms from MS SQL Server
This article as a detailed tutorial on how to send SMS from MS SQL Server. Ozeki SMS Gateway allows you to create an MS SQL Server connection and send text messages from a database using SQL code. You will also learn how to create a database and tables for storing incoming and outgoing messages. This feature is incredibly useful for mass SMS sending. It can send messages to thousands of users at the same time based on certain conditions. We hope you find this article informative and let's get started!
What is MS SQL
Microsoft SQL Server is a relational database management system developed by Microsoft. As a database server, it is a software product with the primary function of storing and retrieving data as requested by other software applications which may run either on the same computer or on another computer across a network (including the Internet). Microsoft markets at least a dozen different editions of Microsoft SQL Server, aimed at different audiences and for workloads ranging from small single-machine applications to large Internet-facing applications with many concurrent users.
What is Ozeki SMS Gateway
Ozeki SMS Gateway is a communication software that routes messages between real world entities. It allows you to build up simple communication between shared hardware and software resources of your system. It offers real time information and provides various configuration options to route messages.
How to send SMS from MS SQL (Quick steps)
To send SMS from MS SQL:
- Create database and tables
- Launch the Ozeki SMS Gateway app
- Add new SQL messaging application
- Install MS SQL Server
- Configure Connection settings
- Enable MS SQL Server connection
- Insert a message into the database
- Check the SMS message in the Sent folder
- Inspect the database for the new SMS
How to send SMS from MS SQL database
This SMS sending system makes it possible to send SMS using an MS SQL database. This system consists of a phone that will be used to receive the messages, a computer with Ozeki SMS Gateway installed, a database server, and your application. The procedure works the following way: Your application will send the message to the MS SQL Database Server. It will store your message and the Ozeki SMS Gateway will be able to acquire it using an SQL Query. The message will be sent to the phone after it was acquired. (Figure 2)

How to receive SMS with MS SQL database
This SMS receiving system makes it possible to receive SMS using an MS SQL database. This system consists of a phone that will be used to send messages, a computer with Ozeki SMS Gateway installed, a database server, and your application. The procedure works the following way: The phone sends the message. The computer with the Ozeki SMS Gateway will store the message in an MS SQL Database Server. Your application could get the messages using an SQL Query. (Figure 1)

How to send sms from MS SQL Server (video tutorial)
In this video you will learn how to send SMS using MS SQL Server. First, we are going to create an MS SQL Server connection in Ozeki SMS Gateway. Then, we use this connection to send SMS via SQL code. This is done through executing commands in the SQL tab.
In order for the SMS campaign to be successful, it is important that the SMS database contains the phone numbers of customers who are motivated to receive SMS messages from your company. SMS content can include a range of information, like informative messages, shopping discounts, delivery updates, reopening schedules, coupons, or new products that your customers will be interested in.
Create table definition for SMS
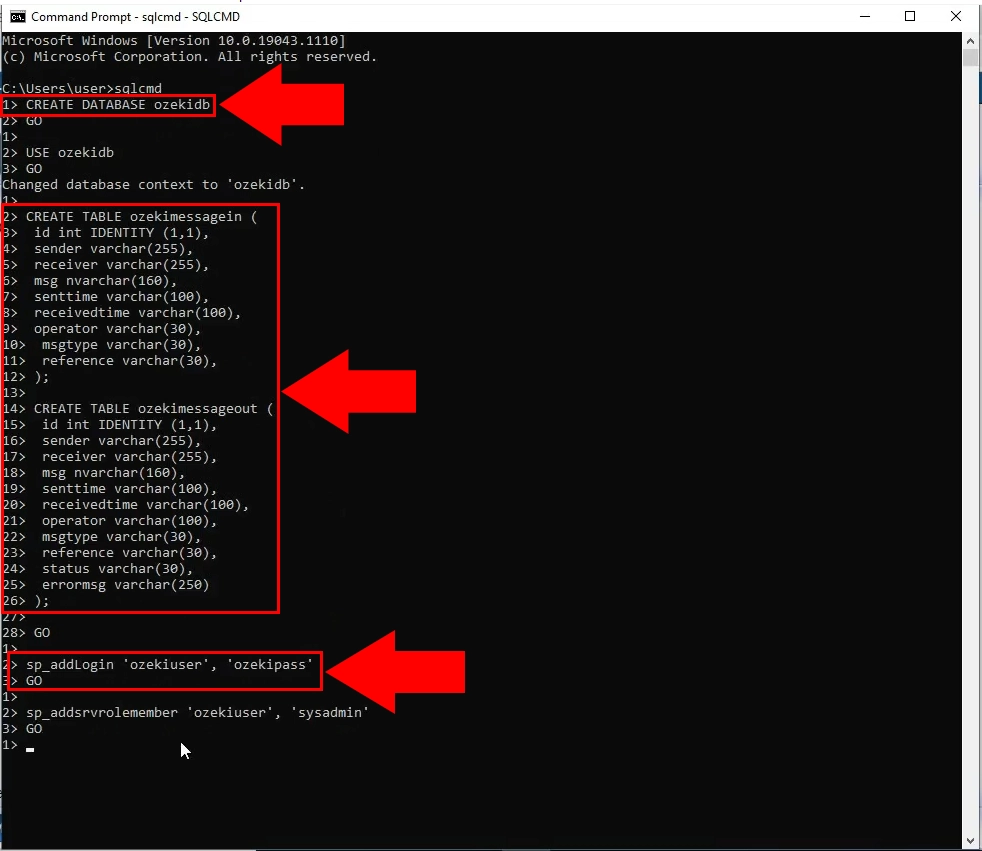
Before you can start sending SMS using SQL you must create a database and tables first. This can be done by entering certain lines of code into the command prompt. The CREATE DATABASE command adds the new database itself. The two CREATE TABLE commands add two tables. One for incoming and one for outgoing messages to be stored in. Lastly, the sp_addLogin lets you create a username and a password for authentication purposes for your database.
CREATE DATABASE ozekidb
GO

USE ozekidb
GO

CREATE TABLE ozekimessagein (
 id int IDENTITY (1,1),
 sender varchar(255),
 receiver varchar(255),
 msg nvarchar(160),
 senttime varchar(100),
 receivedtime varchar(100),
 operator varchar(30),
 msgtype varchar(30),
 reference varchar(30),
);

CREATE TABLE ozekimessageout (
 id int IDENTITY (1,1),
 sender varchar(255),
 receiver varchar(255),
 msg nvarchar(160),
 senttime varchar(100),
 receivedtime varchar(100),
 operator varchar(100),
 msgtype varchar(30),
 reference varchar(30),
 status varchar(30),
 errormsg varchar(250)
);

GO

sp_addLogin 'ozekiuser', 'ozekipass'
GO

sp_addsrvrolemember 'ozekiuser', 'sysadmin'
GO
Create database and tables
To get started with sending SMS using MS SQL, you must first create a database and tables. This is done through the command prompt. Open the command prompt and enter the sequence of code above. The CREATE DATABASE command creates the database itself (Figure 3). Then, we create the ozekimessagein and ozekimessageout tables using the CREATE TABLE command. Finally, we add username and a password using the sp_addLogin command. The database is now set up for sending SMS in MS SQL.
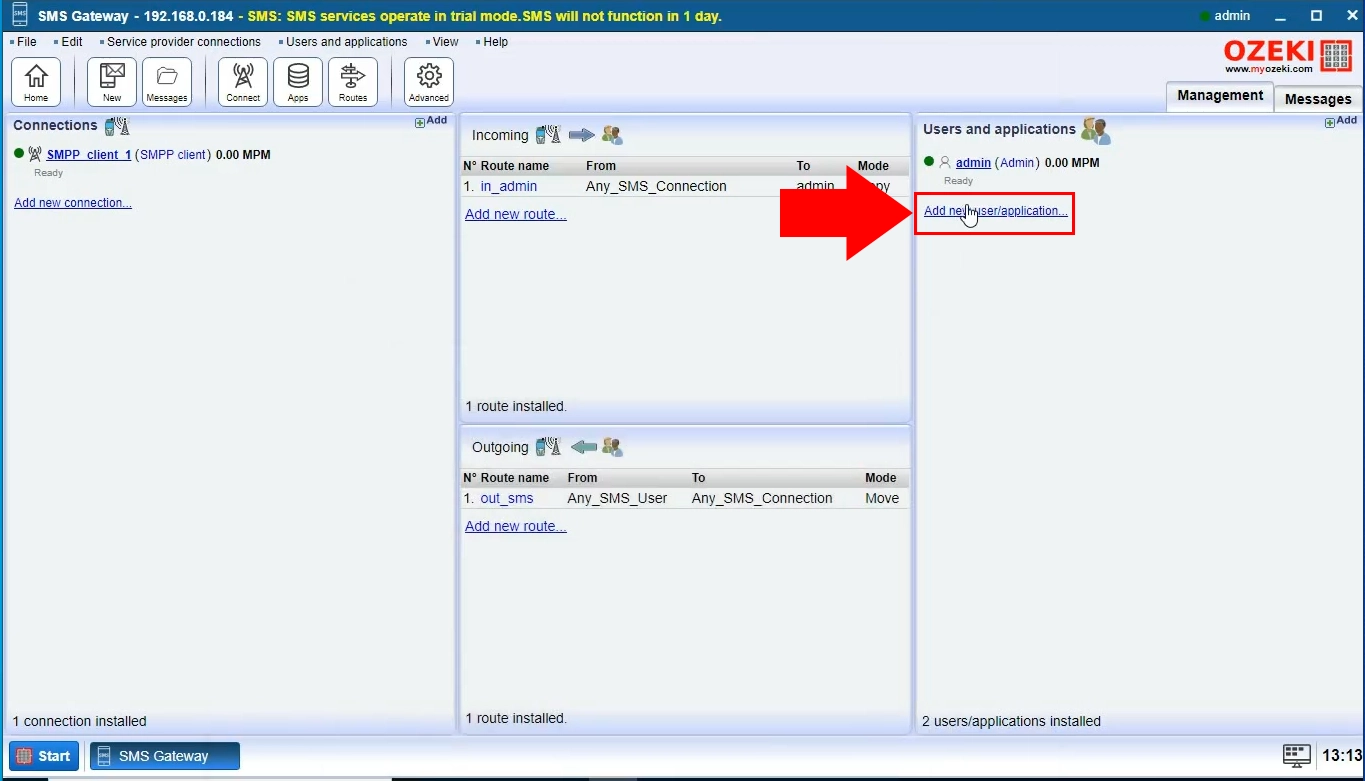
Select 'Add new user or application'
With the database successfully created, you may now start configuring your SQL messaging application. First, open Ozeki SMS Gateway. Click on Add new user/application on the right-side menu (Figure 4). This will take you to another menu where you are able to select what type of application you wish to add.
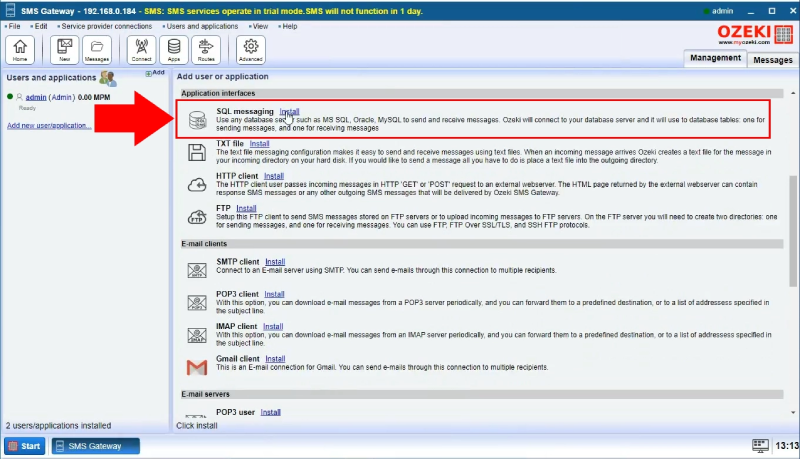
Install SQL Messaging User
Under "Application interfaces", locate SQL Messaging. Click Install next to it (Figure 5). This will take you to another screen, where you can select the type of SQL messaging application.
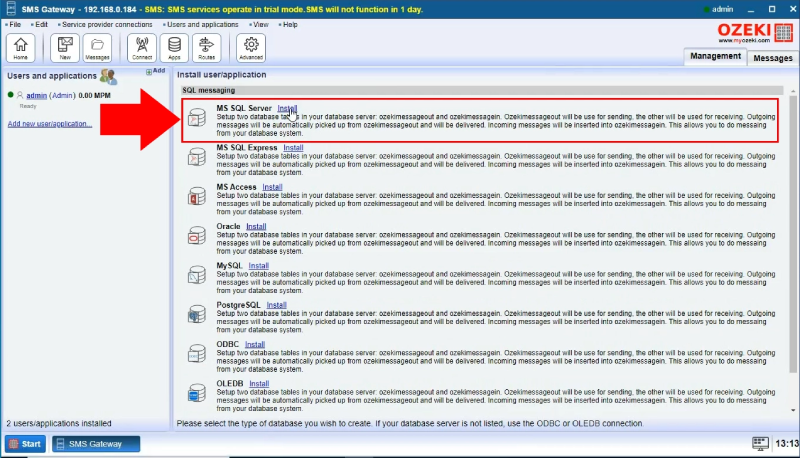
Install MS SQL Connection
For this operation, you need to create an MS SQL Server connection. Find MS SQL Server under SQL Messaging. Click Install next to it (Figure 6). Clicking on Install will bring up a configuration screen, where you need to provide details for your new connection.
Define the MS SQL database connection details
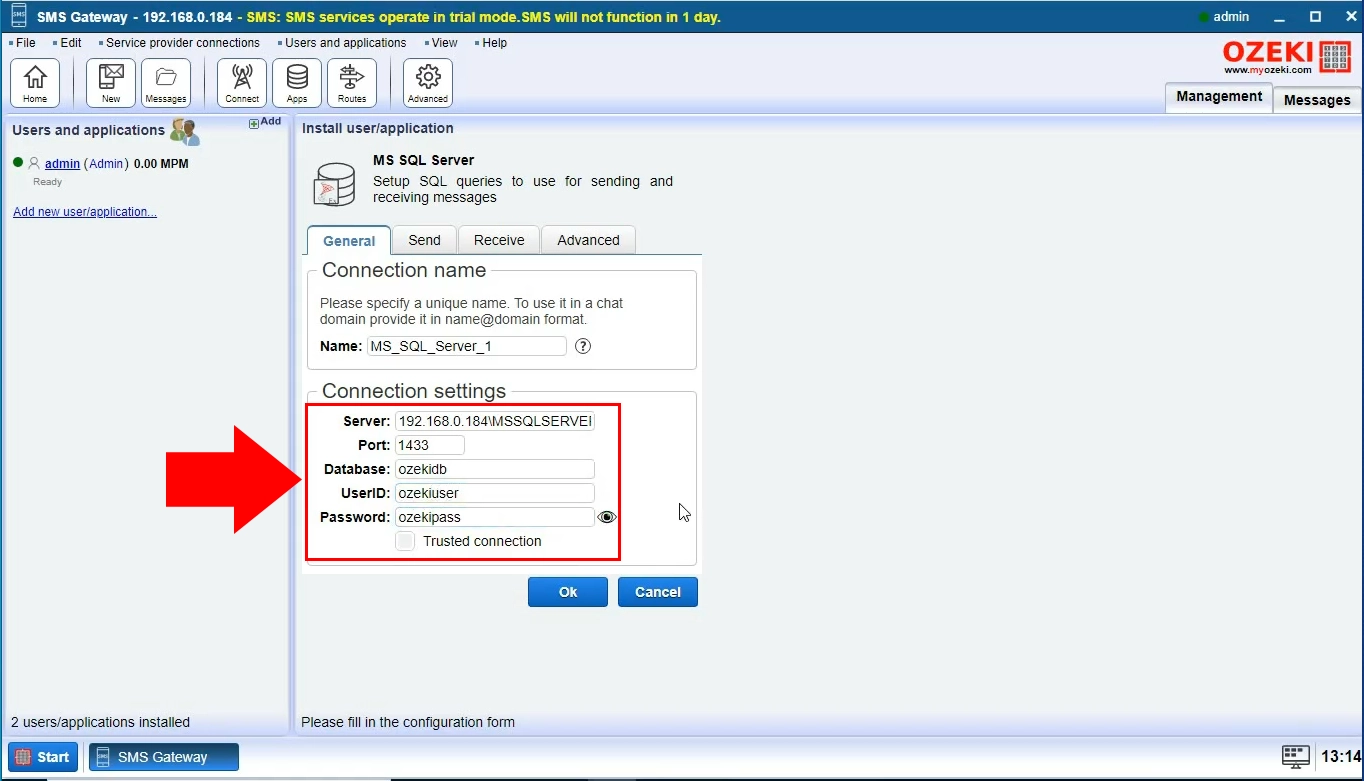
After selecting MS SQL Server, you must enter the details of your new connection (Figure 7). First you need to enter your server's IP address and Port into the first checkboxes. Enter the name of your database you previously created next to Database. Finally enter your username and password, which you have also created in the command prompt. Click on OK to continue. Your MS SQL connection is now successfully configured.
Enable MS SQL connection
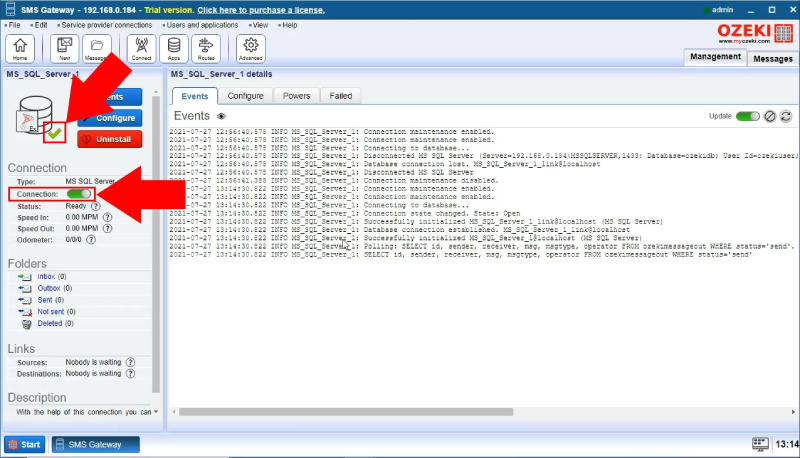
After configuring your MS SQL connection, you must turn it on. Click on the switch button next to connection (Figure 8). The switch will turn green to indicate that the connection has been turned on. A green checkmark next to the icon of the connection also appears to show the user that the connection is on.
Insert message to the database table
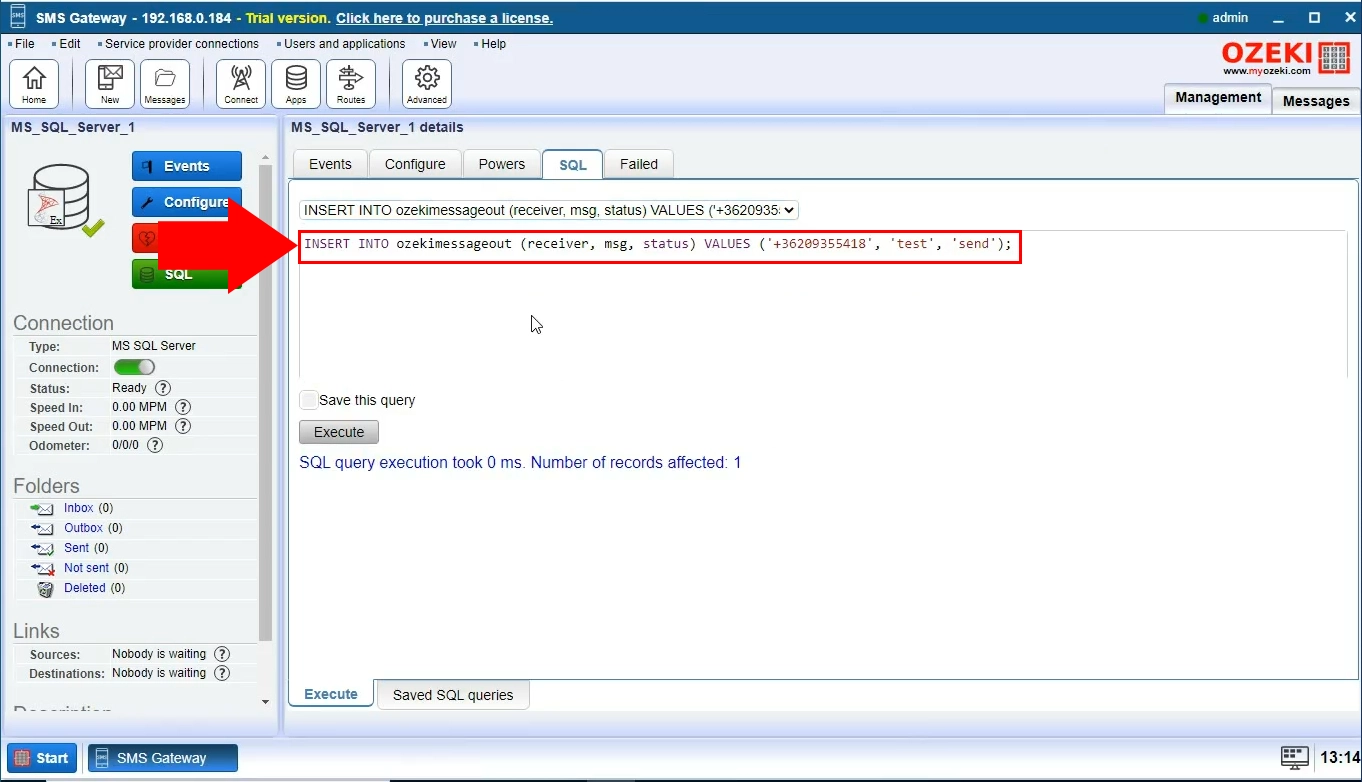
The MS SQL connection is now set up. Now you may proceed to insert a message into the database table. First, switch to the SQL tab of your connection. Enter the command in Figure 9 into the textbox. Click on the Execute button to run the command. This will insert the message into the ozekimessageout table.
Message sent from database
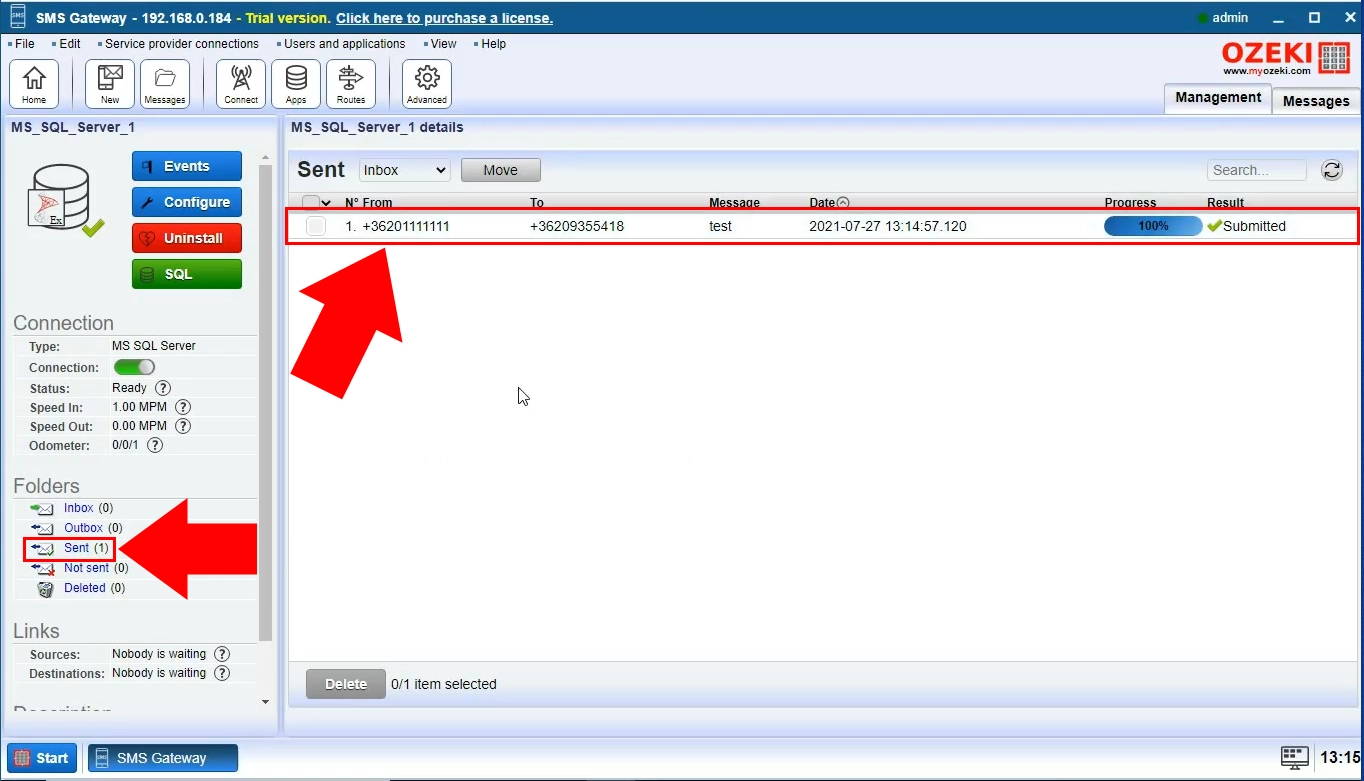
You can view sent messages by clicking on the Sent folder. In this folder you can find your previously sent message (Figure 10).
Sent message in database
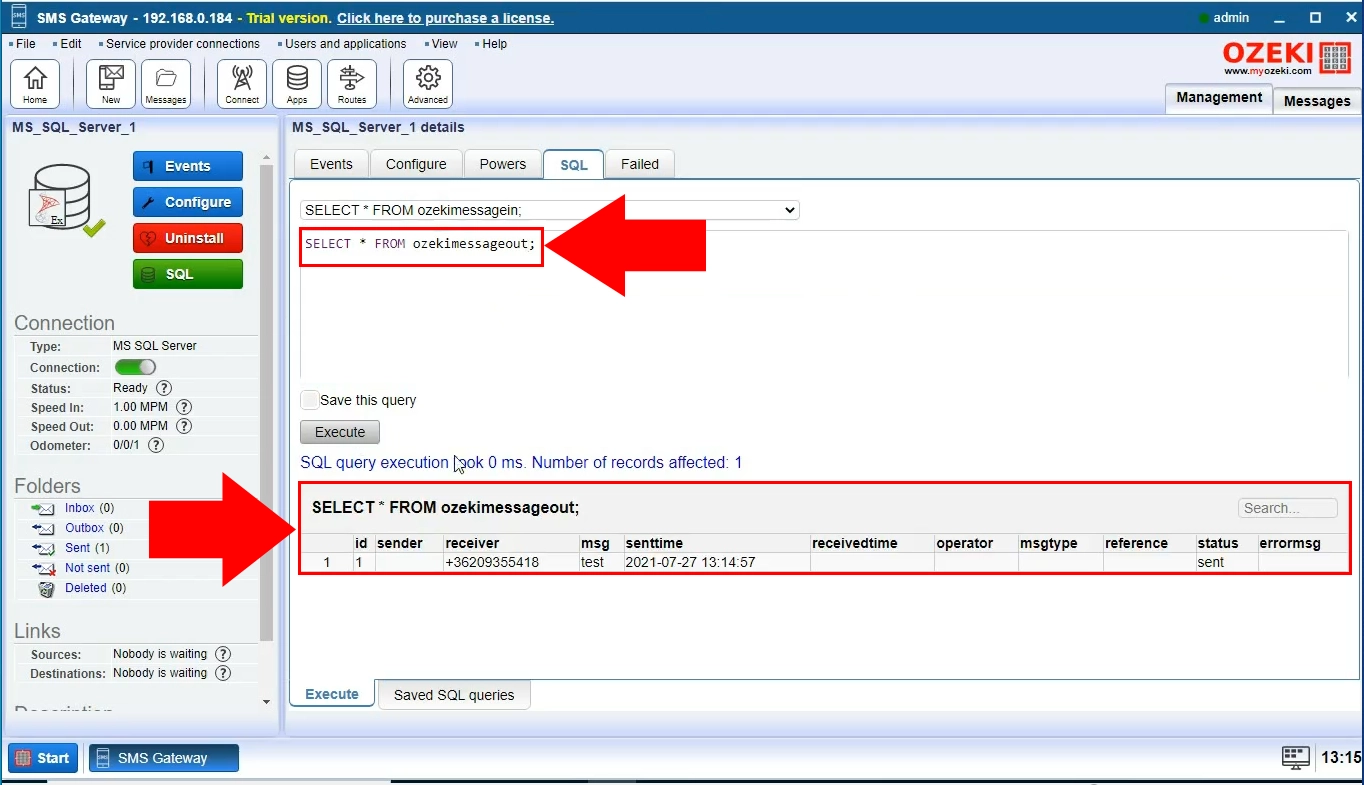
You are also able to view the message inside the database. To do this, you need to enter the SQL code above into the text editor in the SQL tab (Figure 11). Click Execute to run the command. The SELECT * command returns all records from a certain table. This query returns everything from the ozekimessageout table, therefore your message will appear.
Received message inserted into database
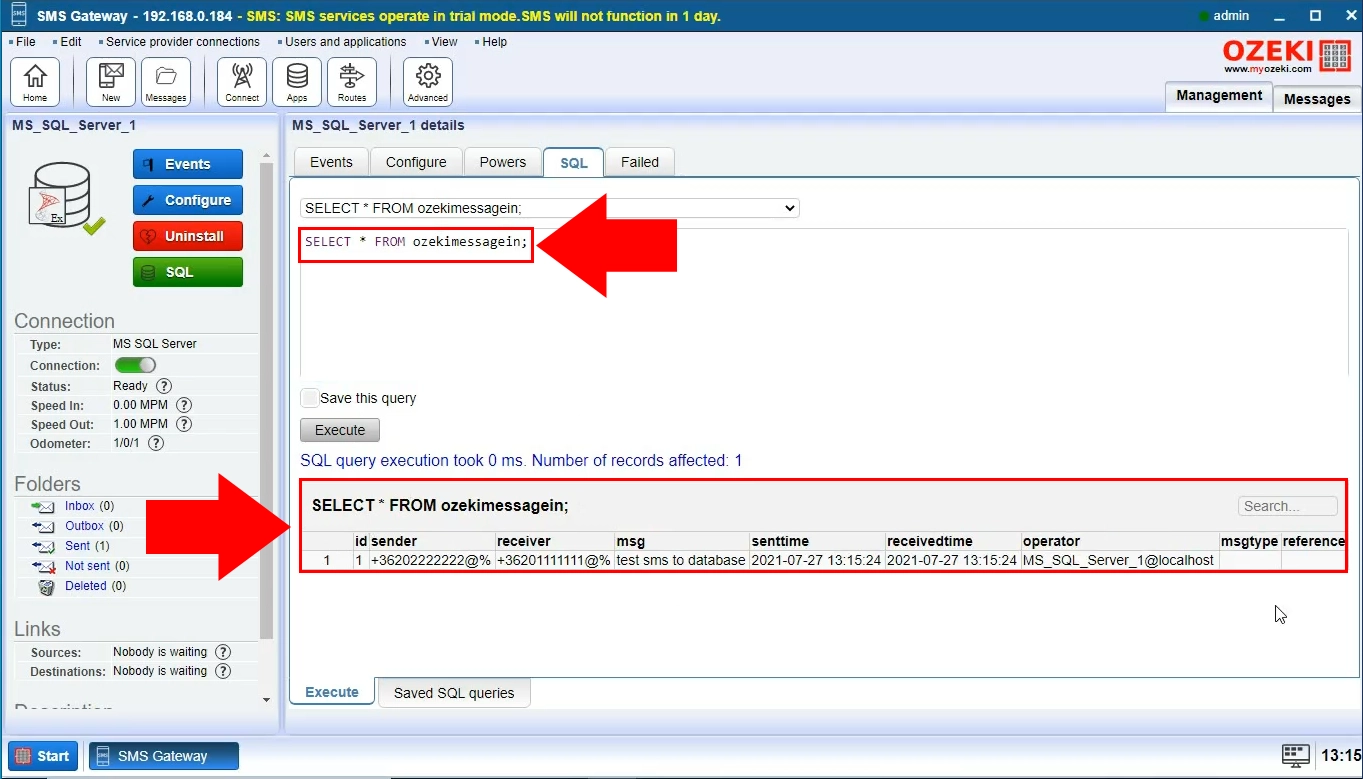
You may also do the same for the ozekimessagein table (Figure 10) Enter the code found in Figure 12 into the text editor. Then click Execute. You can find your message in the result of the query.
Summary
Now you are able to set up an MS SQL Server connection in Ozeki SMS Gateway and send text messages via SQL code. We hope you found this tutorial helpful and thank you for choosing Ozeki SMS Gateway. For more information on sending SMS using databases, make sure to check out our other articles.
