How to send SMS from SQLite
This article is a detailed guide on how to set up an environment for sending SMS from SQLite. The process itself requires the SQLite ODBC driver and Ozeki SMS Gateway installed on your device. Sending and storing text messages in databases is incredibly useful for mass SMS Sending. This way you can send, receive and monitor a large number of messages at once. The tutorial below lists all the required steps for you to get started with sending SMS from SQLite. Let's get into it!
What is SQLite
SQLite is an in-process library that implements a self-contained, serverless, zero-configuration, transactional SQL database engine. The code for SQLite is in the public domain and is thus free for use for any purpose, commercial or private. SQLite is the most widely deployed database in the world with more applications than we can count, including several high-profile projects.
What is Ozeki SMS Gateway
Ozeki SMS Gateway is a communication software that routes messages between real world entities. It allows you to build up simple communication between shared hardware and software resources of your system. It offers real time information and provides various configuration options to route messages.
How to send SMS from SQLite (Quick steps)
To send SMS from SQLite:
- Setup SQLite ODBC driver
- Add new SQL messaging app
- Install ODBC connection
- Configure connection settings
- Custom ODBC connection string
- Enable logging for ODBC
- Create tables
- Construct SMPP client connection
- Send SMS from the database
- Check the SMS sent from SQLite
How to receive SMS with SQLite database
This system will make it possible to receive SMS messages using an SQLite Database Server. The system consists of the following components. A phone, a computer running the Ozeki SMS Gateway, an SQLite Database Server, and your application. The phone will send a message to the address of the Ozeki SMS Gateway running on the computer, which will then store it on an SQLite Database Server. Then your application can easily download all the messages from the server. (Figure 1) It is that simple!

How to send SMS from SQLite database
This database system will make it possible to receive messages using an SQLite database. The system consists of a phone, a computer running the Ozeki SMS Gateway application, an SQLite Database Server, and your application. Your application will send a message to the SQLite Database Server, which will store it. The Ozeki SMS Gateway will then download the message from the server and forward it to the predefined phone number. (Figure 2)

How to send SMS from SQLite (video tutorial)
In this video tutorial you will learn how to send SMS from SQLite. We are first going to create a new ODBC and SMPP client connection in Ozeki SMS Gateway. Then we create tables inside the database to store messages. Finally, we can send SMS using SQL code in our database.
Install SQLite ODBC driver
Before you can start using SQLite, you must first install the SQLite ODBC driver. Open the installer and complete the installation process (Figure 3). After the driver has been successfully installed, SQLite is now ready to use.

Install SQL messaging user
To get started with sending SMS in SQLite, you need to install an SQL messaging connection first. Start by opening Ozeki SMS Gateway. Click on Add new user/application in the left side menu (Figure 4). Under Application interfaces, find SQL messaging. Click Install to be taken to the configuration screen.

Add ODBC connection
Find OBCD in the SQL messaging section (Figure 5). Click on Install next to it highlighted in blue. You will then be taken to a configuration screen where you are able to set up your new ODBC connection.

Set ODBC connection name
First you need to assign a name to your new connection (Figure 6). Type your desired name next to Name:. Now head over to the Advanced tab, where you need to provide the custom connection string.

Provide the custom Connection string
Open the custom connection string option inside the Advanced tab (Figure 7). Click on the checkbox next to "Use custom connection string" to enable this option. Paste your custom connection string into the textbox below.
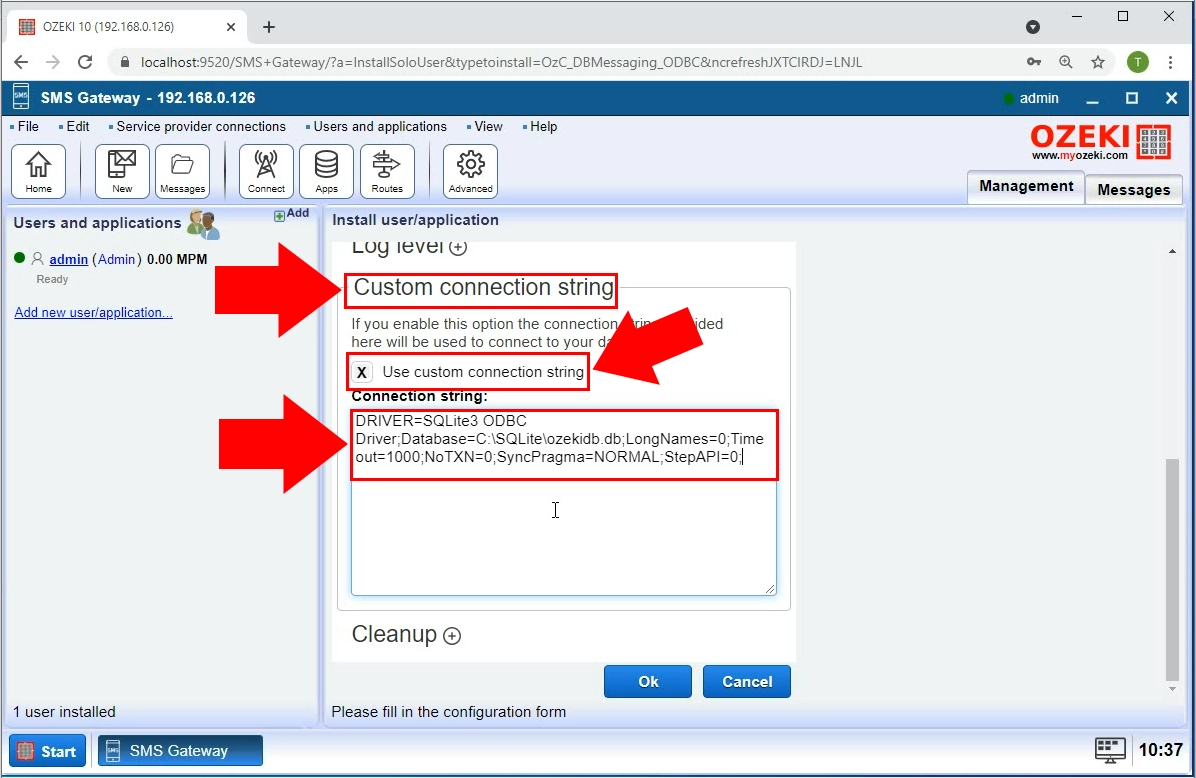
DRIVER=SQLite3 ODBC Driver;Database=C:\sqlite\ozeki.db;LongNames=0;Timeout=1000;NoTXN=0;SyncPragma=NORMAL;StepAPI=0;
Provide database file location
Your custom connection string must contain the file path to the database on your computer (Figure 8).

Enable logging
The next step is to enable logging. This is useful for monitoring your SMS traffic. Click on the advanced tab, then enable every single option under Log level (Figure 9). This is done by clicking on the checkboxes next to them. Click on the OK button to continue. Logging is now enabled for all types of traffic.

Database connection established
Turn your connection on by clicking on the switch button (Figure 10). The button turns green to indicate that it has been enable. You also get notified in forms of log messages, that the database connection has been established. These messages can be viewed in the Events tab.

Create ozekimessagein table
With the connection established, you may now proceed to create the tables that contain the messages inside the database. Switch over to the SQL tab of your connection and paste the following code in the text editor (Figure 11). Click Execute to run this piece of SQL code. This creates the "ozekimessagein" table. This acts like an inbox and contains incoming messages.

CREATE TABLE ozekimessagein (
	id INTEGER PRIMARY KEY,
  	sender varchar(255) default NULL,
  	receiver varchar(255) default NULL,
  	msg text default NULL,
  	senttime varchar(100) default NULL,
  	receivedtime varchar(100) default NULL,
  	operator varchar(100) default NULL,
  	msgtype varchar(160) default NULL,
  	reference varchar(100) default NULL
  	);
Create ozekimessageout table
In the SQL tab, clear the text editor. Now paste the code below into it (Figure 12). Click Execute again to run the SQL code. This creates the "ozekimessageout" table. This acts like an outbox and contains outgoing messages.

CREATE TABLE ozekimessageout (
  	id INTEGER PRIMARY KEY,
  	sender varchar(255) default NULL,
  	receiver varchar(255) default NULL,
  	msg text default NULL,
  	senttime varchar(100) default NULL,
  	receivedtime varchar(100) default NULL,
  	reference varchar(100) default NULL,
  	status varchar(20) default NULL,
  	msgtype varchar(160) default NULL,
  	operator varchar(100) default NULL,
  	errormsg varchar(250) default NULL
  	);
Create SMPP client connection
Now that the tables have been created, we need to install a new SMPP connection to test if SMS Messages get inserted into the database. Click on Add new user/application in the left side menu (Figure 13). Under IP SMS Connections, find SMPP client. Click Install to be taken to the configuration screen.

Configure SMPP client connection
Next you must provide the details for your new connection (Figure 14). First, enter the IP address and Port of your connection. Then, type your username and password into the respective textboxes. Click on the OK button to continue.

SMS message received
Head over to the details page of your SMPP client connection. Click on the Events tab to view SMS traffic logs. Here you can see that the message has been received (Figure 15).

Message inserted into database
By opening the details of your ODBC connection, you can make sure that the message has been inserted into the database. Click on the Events tab to view the logs. Here you can see that the insert command has been executed for the message (Figure 16). This action has placed the message into a table in the database.

Check message in database
You are also able to view the contents of the database as well. Do this by opening the SQL tab of your ODBC connection. Enter the code shown in Figure 17 and click Execute. This will return everything the table contains. You can see that the message is in the result of the query.

Send SMS from the database
The SQL tab may also be used to send SMS messages through the use of SQL code. Enter the code found in Figure 18 into the text editor. Click on Execute to run this code and send the text message from the database.

Message sent from the database
To view your SMS message sent via SQL, you need to open the Sent folder found in the left side menu. Here you can see that the message was placed inside of this folder, indicating that it has been successfully sent (Figure 19).

Summary
Now you are able to set up an ODBC and SMPP client connection, as well as send SMS using SQL. For more information on Ozeki SMS Gateway, make sure to check out our other articles. We hope you found this tutorial helpful and informative.