SMS from/to PostgreSQL
This chapter gives you great opportunity to see how to send and receive SMS messages through pre-created PostgreSQL database tables. You just need to connect to them with a Database User of Ozeki SMS Gateway. Do not forget to provide the ODBC driver connection string for the user. Using the Ozeki SMS Gateway in this system is beneficial because it can reach up to a 1000 SMS/second speed. We assume you have already used the PostgreSQL and can perform basic operations with it. You will be provided some useful information and detailed step by step instructions. We hope you will find this example easy to understand. Begin now!
What is PostgreSQL?
PostgreSQL is an open-source database system that is used as the primary data store for many web or mobile applications
How to send SMS from PostgreSQL
PostgreSQL Installation (![]() Video guide)
Video guide)
Create Database Tables (![]() Video guide)
Video guide)
Configure Database User (![]() Video guide)
Video guide)
Send Test Message (![]() Video guide)
Video guide)
Please install two important programs. A simple PostgreSQL database server and an Ozeki SMS Gateway, which is capable to create a Database User and connect to the PostgreSQL database using the connection string. Check how to install a SMS Database User. Do not forget to create a separate table for the outgoing and incoming messages. These tables are called 'ozekimessagein' and 'ozekimessageout' in the current example. Send and receive SMS messages by using simple SELECT and INSERT SQL statements on the tables.
How to receive SMS with PostgreSQL database
This system will make it possible to receive SMS messages and store them in a PostgreSQL Database Server. The system consists of your application, a PostgreSQL Database Server, a computer with the Ozeki SMS Gateway installed and an Android phone with the Ozeki SMS gateway running. Your phone will send the SMS message, which will be forwarded to the Database server by the Ozeki SMS Gateway. Then your application will download the messages from the PostgreSQL database server. (Figure 1)

How to send SMS from PostgreSQL database
This system enables you to send SMS messages from a Postgre SQL Database Server. This system consists of an application, a PostgreSQL Database Server, a computer with Ozeki SMS Gateway installed, and an android phone with the Ozeki SMS Gateway app. Your application will send the message with some information to the PostgreSQL Database Server to store it. The Ozeki SMS Gateway software on the PC will check the Database Server periodically and send the message to the predefined address. Then the phone will receive the message. (Figure 2)

SMS from/to PostgreSQL (Video tutorial)
In this video, you will see the process of connecting PostgreSQL to the Ozeki SMS Gateway. It will start with launching the pgAdmin tool and will end with the sent folder that contains the test message. You will learn how to create a database in pgAdmin and how to create a user application. The process is easy to do and the video is very detailed. Plus the Ozeki SMS Gateway offers a very intuitive interface, so you will have no hard time following the tutorial.
Create a new user
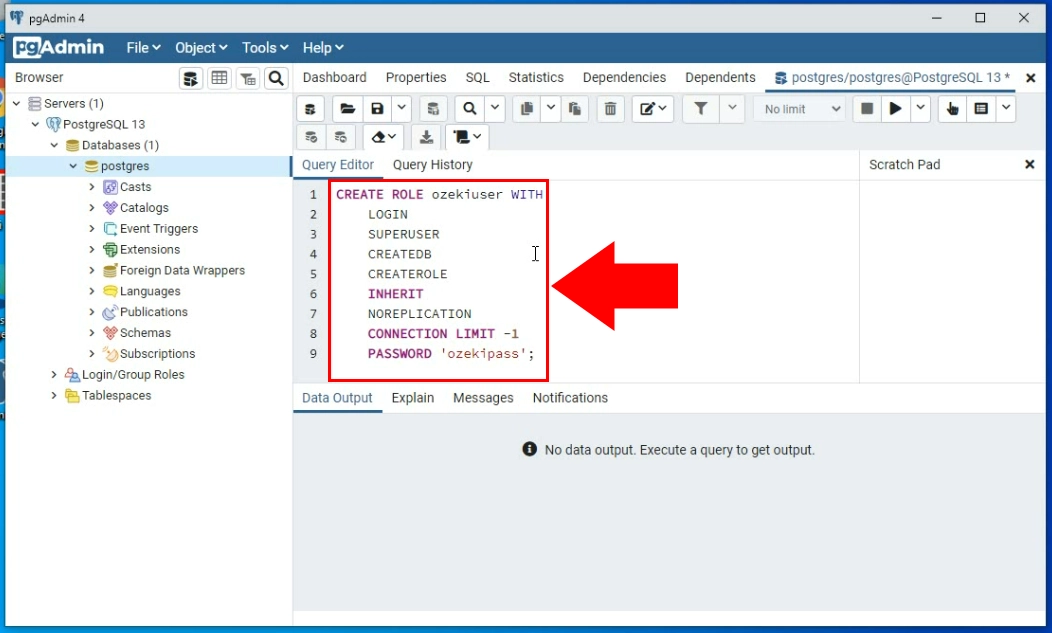
On Figure 3, you can see the statement that you need to provide in pgAdmin to create a user that can be used to connect to the Ozeki SMS Gateway. This statement will create a user with all the privileges already set and ready to use. Next, you need to create a database that can be used by the user.
Create the database
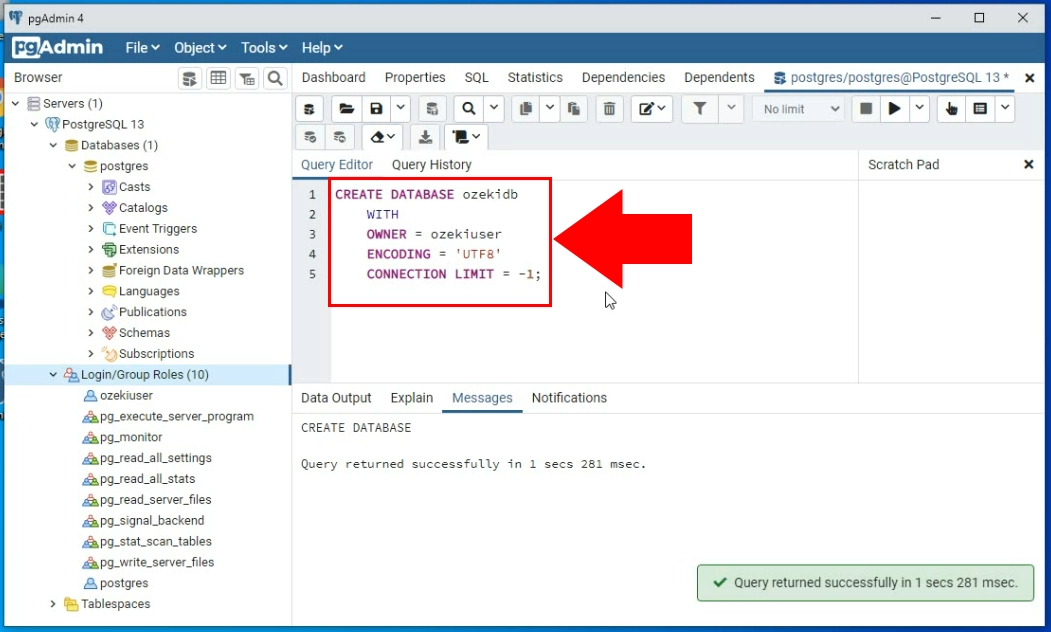
Now that you have the user created, you just need a database to work with. You can see the statement you need to provide on Figure 4. This will create a database that is owned by the previously created user with the correct 'UTF8' encoding. This database can easily be connected to the Ozeki SMS Gateway.
Create the 'ozekimessagein' table
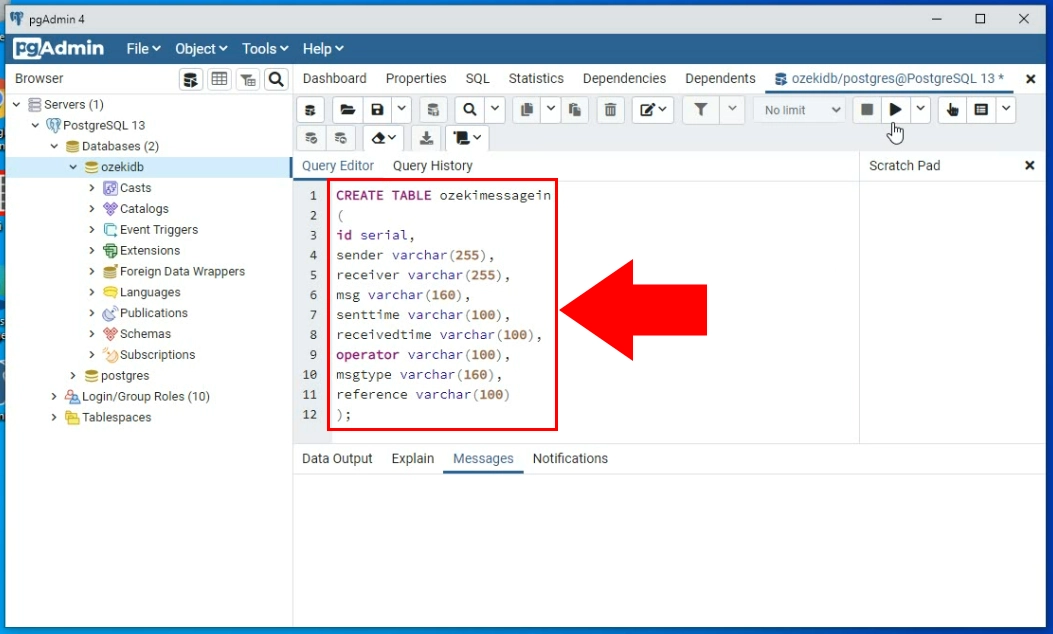
To store your incoming messages, you need to create the 'ozekimessagin' table. You can see the code you need to provide on Figure 5. This code will create a perfect table that can be used to store the incoming messages. You can find the statement below the tutorial. You can copy it and just paste it into pgAdmin.
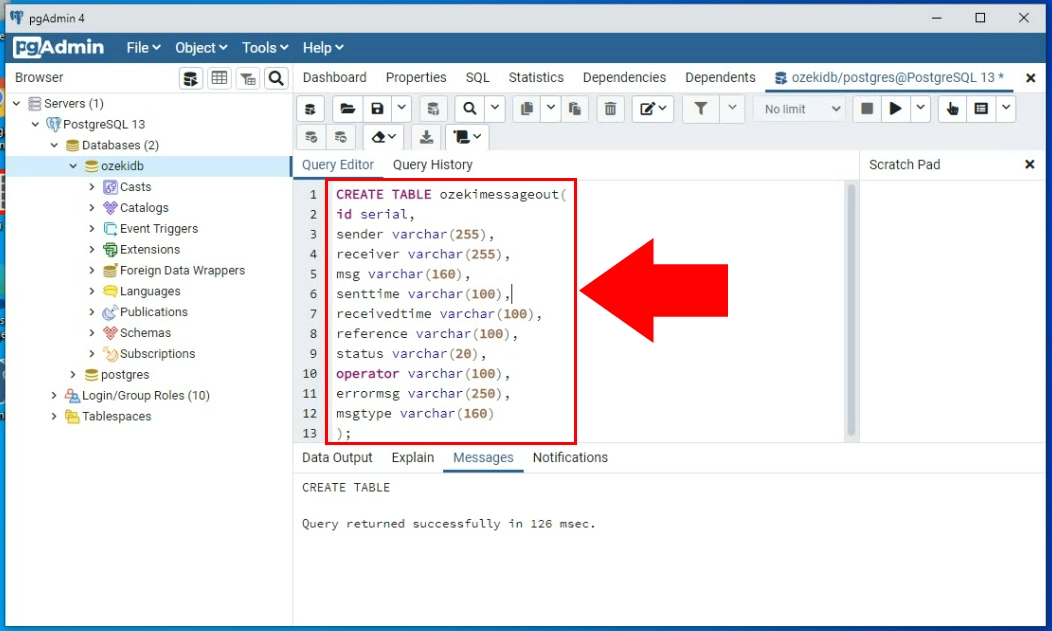
You need to create another table titled 'ozekimessageout'. This table will be used to store the message that the user sends. The SMS gateway will periodically check the table and send all the messages that are yet to send. You can see the statement that you need to send on Figure 6. See the whole code below the tutorial, where you can copy-paste it to pgAdmin.
Install an SQL messaging application interface
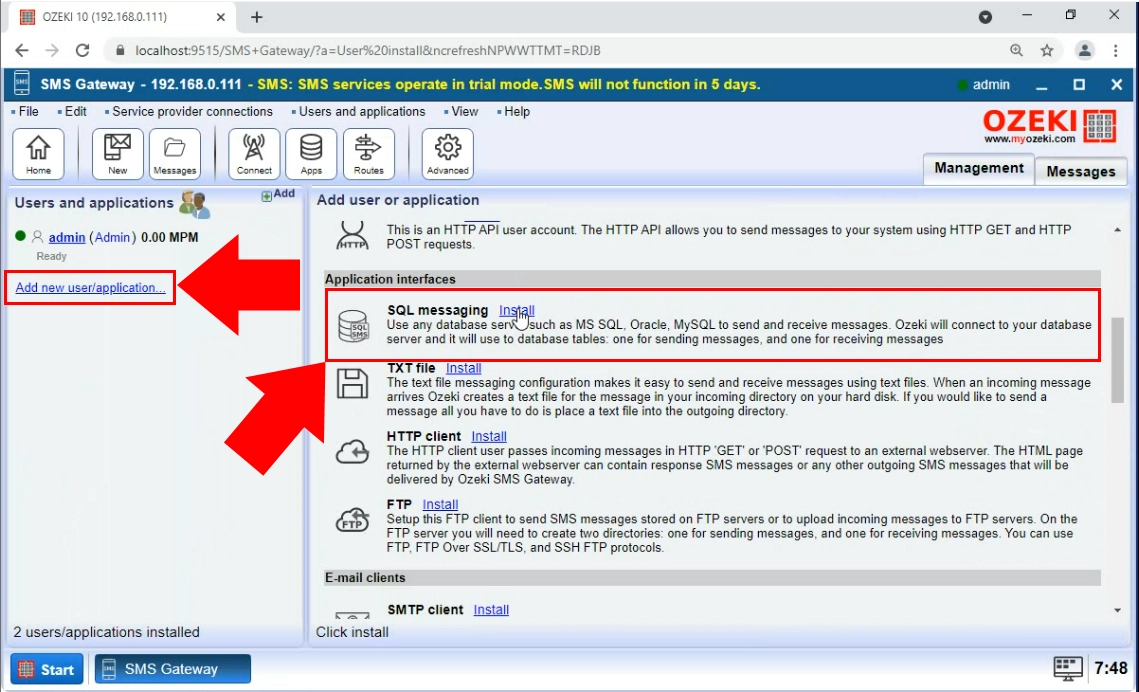
Now you need to start working in the Ozeki SMS Gateway. The first thing you need to do is to search for the 'Add new user/application' button. Press it to get to the new user or application install list. There you need to find the Application interfaces section. Search for the SQL messaging option in the section. Click the Install button next to it to start the installation process. (Figure 7)
Choose the PostgreSQL option
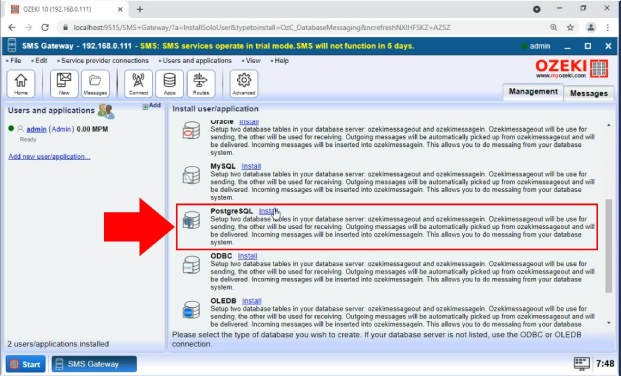
In this install list, you can see all the SQL tools that the Ozeki SMS Gateway can work with. In this case, please choose the PostgreSQL option. Find it and click the Install button next to it, as you can see on Figure 8. It will start the new application interface installer.
Provide connection details
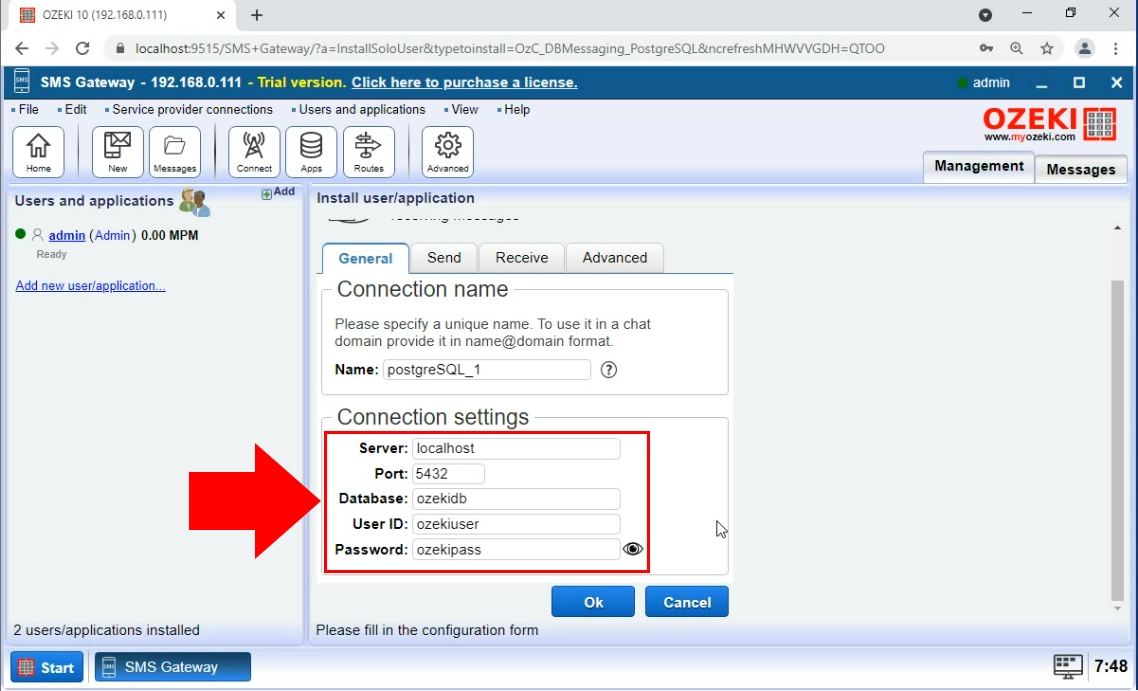
To have a working connection between the Ozeki SMS Gateway and PostgreSQL, you need to provide connection details to the gateway. Open the General tab of the application interface and search for the 'Connection settings' group box. There you will find 5 textboxes to be completed. You need to provide a server address, a port number, a database name, and login credentials for the database, like on Figure 9. If you are finished, click the 'Ok' button and you are finished with the setup of the application.
Enable the PostgreSQL connection
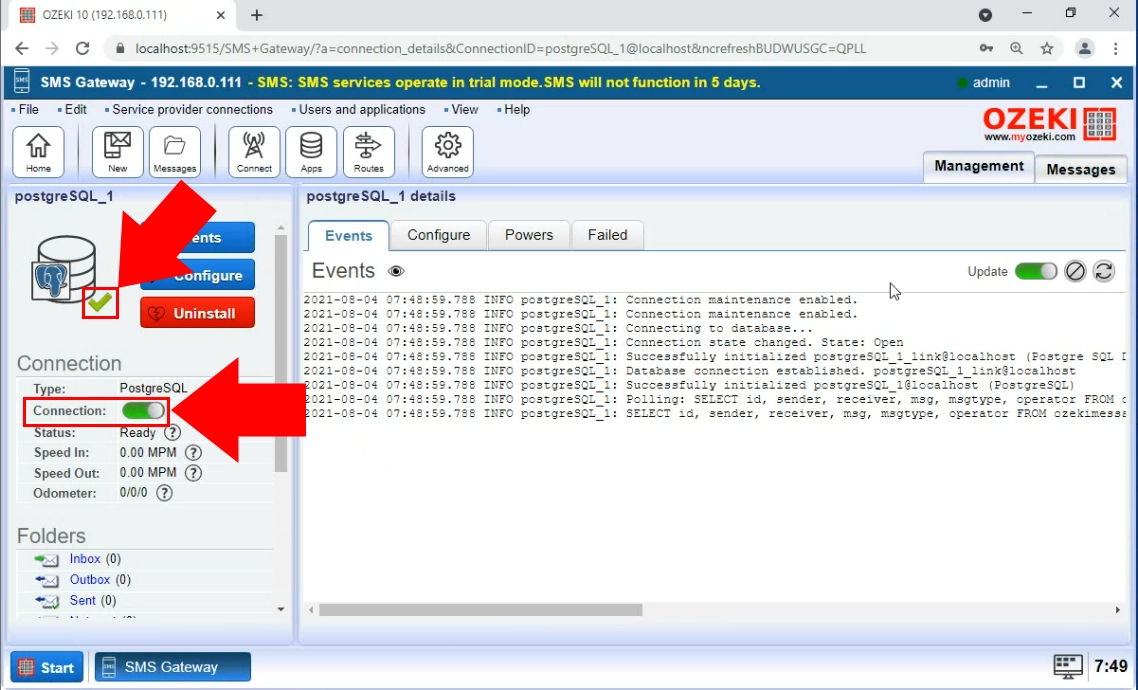
Now you have a working application interface. All you need to do is turn it on. You can do this with the 'connection' switch button. If it is green and you can see a green tick next to the PostgreSQL logo, it means that the connection is active and working (Figure 10). You can see the details of the connecting process in the Events tab.
Run an INSERT statement
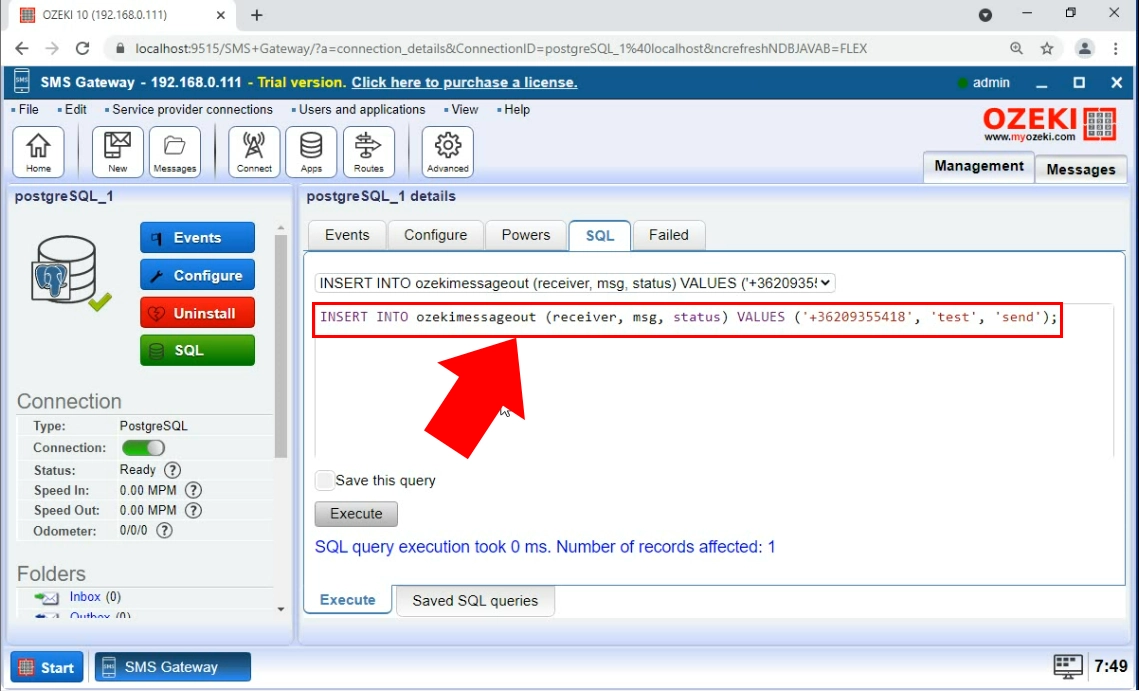
Now you have a working connection between the Ozeki SMS Gateway and PostgreSQL. This means that now you can send and receive SMS messages. To test the system, you need to try the INSERT statement visible on Figure 11. Copy the statement into the SQL tab of the application interface and 'Execute' it. You can find the code at the end of the tutorial with the table creating commands. This command will create a field in the 'ozekimessageout' table. The gateway will scan the table and send the message to the destination.
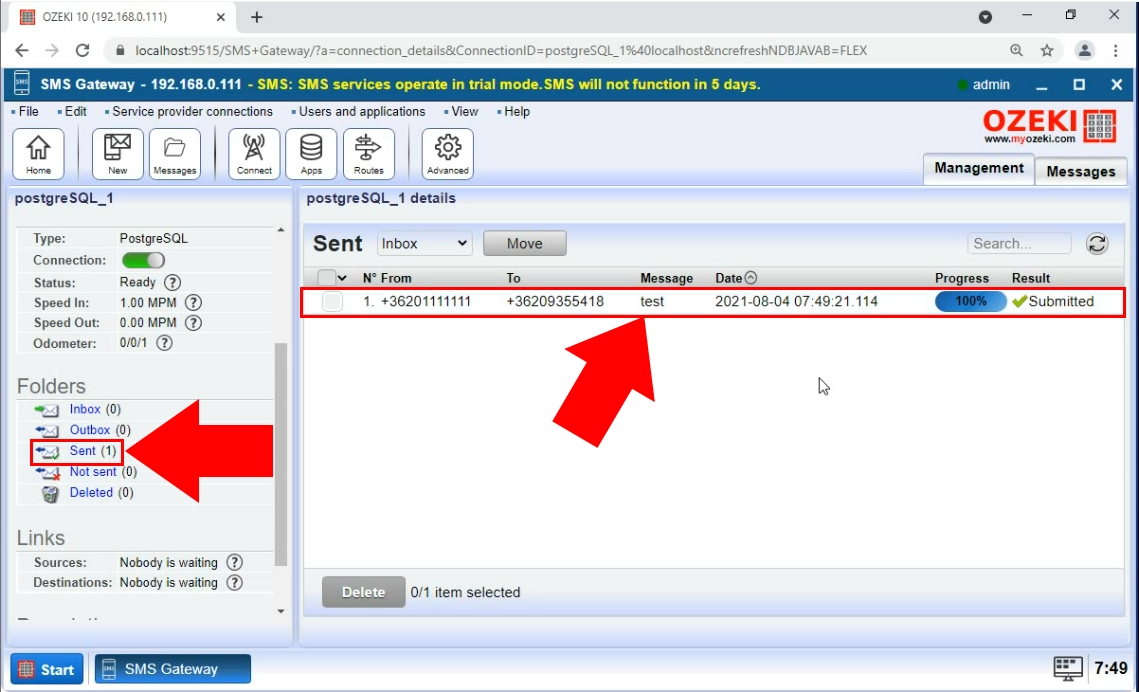
The sent folder
Don't forget to check the Sent folder (Figure 12). The message inserted into the 'ozekimessageout' table should be visible in the folder. You can get more information about the message here, like the text of the message, the time of sending, and the result of the sending process.
Use Ozeki SMS Gateway's browser GUI to install a Database User and provide a connection details similarly as you would do it for other databases (e.g. MSSQL, Oracle, MySQL etc.)
It works if you modify the variables by using the information of your PostgreSQL database server (Figure 3).
INSERT statement
You can see how to use this code on Figure 11.
The CREATE TABLE script in PostgreSQL:
INSERT INTO ozekimessageout (receive, msg, status) VALUES ('+36209355418', 'test', 'send');
CREATE tables in PostgreSQL
PostgreSQL accepts simple SQL statements. You can see how to CREATE two separate tables for incoming and outgoing messages in Figure 13.
The CREATE TABLE script in PostgreSQL:
CREATE TABLE ozekimessagein
(
id serial,
sender varchar(255),
receiver varchar(255),
msg varchar(160),
senttime varchar(100),
receivedtime varchar(100),
operator varchar(100),
msgtype varchar(160),
reference varchar(100)
);

CREATE TABLE ozekimessageout
(
id serial,
sender varchar(255),
receiver varchar(255),
msg varchar(160),
senttime varchar(100),
receivedtime varchar(100),
reference varchar(100),
status varchar(20),
operator varchar(100),
errormsg varchar(250),
msgtype varchar(160)
);
Figure 14 - These statements CREATE two tables in your PostgreSQL database
You can always increase the size of the 'msg' field above 160 characters. You can also change it's data type as well.
It is strongly suggested to maintain the 'id' attribute in all tables. 'id' is basically the index of each record.
Conclusion
Congratulations, you have completed this task of connecting PostgreSQL to the O zeki SMS Gateway. You can be proud of yourself!
Now you can create this connection anytime you want. This solution is great because you can enjoy the speed and reliability of the Ozeki SMS Gateway and the cost efficiency of PostgreSQL. If you wish to learn more about the software solutions that Ozeki offers, make sure to visit ozeki-sms-gateway.com.