PostgreSQL Installation
In this tutorial, you will learn how to send SMS form a PostgreSQL database server. PostgreSQL is used as the primary data store or data warehouse for many web, mobile and analytics applications. PostgreSQL can store structured and unstructured data. By reading this article, you will know how to combine the resources of PostgreSQL and the versatility of the Ozeki SMS Gateway. You will learn how to install PostgreSQL, how to create and configure a database and how to test it. We assume that you are familiar with the PostgreSQL and the SMS communication technology. In this page, the installation step is presented in detail. This step will only take about 10 minutes to perform.
What is PostgreSQL?
PostgreSQL is an open-source database system that uses and extends the SQL language supplemented with many features that safely store and scale the most complicated data workloads
Video content1. Download PostgreSQL
2. Install PostgreSQL
3. Install PostgreSQL's ODBC Driver
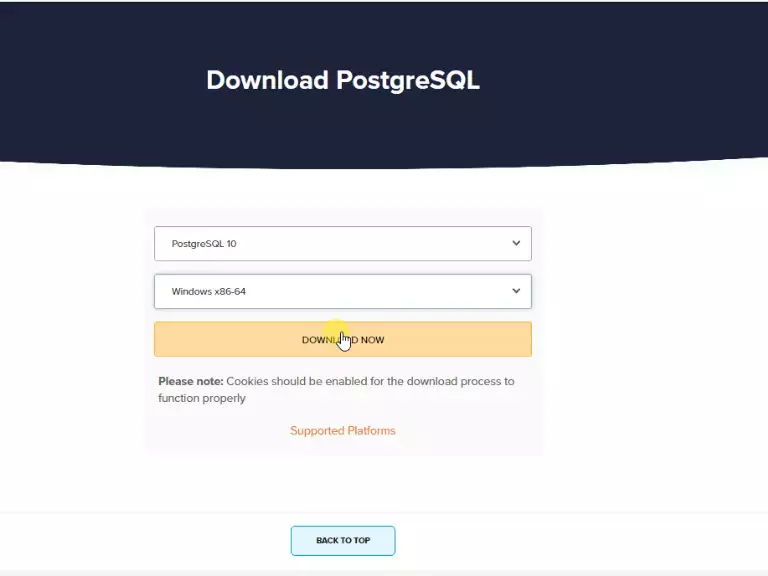
Download PostgreSQL
The first step is to head over to the download page of PostgreSQL. Here you need to choose which PostgreSQL you wish to download and what OS you are currently using. Provide that information and click the download now button, as you can see on Figure 1. This will start the downloading process.
Open the Downloaded File
If your browser is finished downloading the installer, click it to start the installing section (Figure 2). You can find the downloaded .exe file at the bottom of your browser window or at the downloads folder on your pc by default.

Provide installation directory
Now you need to provide a folder where the installer will copy the necessary files. Make sure that there is enough space on the drive that you are installing PostgreSQL on. If you have your destination selected, click the Next button to proceed to the next step (Figure 3).

Select components
In this section, you need to choose which components of PostgreSQL you wish to install. To have the most versatile software possible, please check all the checkboxes and click the next button located on the bottom-left corner of the window (Figure 4).

Select data directory
Now you need to choose a folder which will be used to store all your data. The folder you are choosing now will be filled with all your user data as well as the data used by PostgreSQL (Figure 5). Make sure that you have plenty of free space on the drive you are choosing to use here.

Provide a password
In this step, you need to provide a password in both fields visible on this page (Figure 6). Having a password protected database means that only people with permission will be able to access the database. Choose a password that is hard to guess but easy to remember.

Type in the Port number
In the Port field, you need to type in the port number that the server should listen on. In this case the correct number is 5432. This means that the port 5432 will be only used for your porstgreSQL. If you have your port number provided, click the Next button to proceed (Figure 7).

Choose the default locale
In the Locale drop-down menu, you get to choose the locale which specifies the language, territory, and code set that the database server needs to use. To use the default local, which is POSIX, leave the drop-down menu on default locale option (Figure 8).

Check the pre-installation summary
In the pre installation summary page, you will be able to check all the settings you made in the previous steps. You can confirm the installation directory, the data directory, and the port you will use. If you find everything correct, click the Next button to proceed (Figure 9).

Wait for the installation to finish
In the next step, all you need to do is wait for the installation process to finish. If you can see the green progression bar moving, it means that the PostgreSQL in installing (Figure 10).

Finish the installation and open Stack Builder
If the progression bar is filled, it means that your software is installed. The base PostgreSQL system is a good database management tool, but to use it at full potential, you need modules. To install modules, install the stack builder for PostgreSQL which simplifies the process of downloading and installing modules. It provides a graphical interface where you can choose the modules to install. Check in the checkbox for stack builder and click the finish button located on the bottom of the window (Figure 11).

Choose the installed PostgreSQL version
In this step, from the drop-down menu, you need to choose which version of the PostgreSQL is installed on your computer, and which port it uses. In this case, choose the PostgreSQL 10 on port 5432. This way the Stack Builder will install modules for the correct version and port. Click the next button if you are finished (Figure 12).

Choose the psqlODBC option
From the application install list, choose the Database Drivers option. Now you can see the 4 possible application you can install. Check the checkbox for the psqlODBC (64bit) option and click the Next button to start the download and installation process (Figure 13).

Start the package downloading process
In this step, you get to choose the download directory for the packages. Make sure to have enough free space on the drive you are downloading the packages to. Click the Next button and the Stack Builder will start downloading the required files (Figure 14).

Setup the psqlODBC
You can see on Figure 15, that the main page of the psqlODBC is now opened. Click the Next button to start the installation process.

Choose an installation directory
In the Installation Directory textbox, choose the installation directory where the installer should move the required files. Make sure that there is enough free space on the drive you are installing the packages to. Click the Next button to proceed to the next step. (Figure 16).

Start the installation process
If you see this page, it means that you are finished with the settings. Click the Next button to start the installation procedure (Figure 17).

Wait for the installation process to finish
Now the installer will move the required files to the folder you chose. Wait for the progression bar to fill, so your software is installed (Figure 18). After it, you will have a working copy of the software.

Close the installer window
If you see the screen visible on Figure 19, it means that the PostgreSQL and the psqlODBC module is installed correctly. Close the installer page with the Finish button located on the bottom of the window.

Create Database Tables
On Figure 20, you can see the icon you need to look for called pgadmin. Click it to launch the app where you can start setting up the database structure and start connecting to the PostgreSQL server.

Create Ozeki user and database
The following SQL commands can be used to create a user called 'ozekiuser', with a password of 'ozekipass'. This is a PostgreSQL user account. You can use this user account to connect to the ozeki database. (Figure 21)

CREATE ROLE ozekiuser WITH
	LOGIN
	SUPERUSER
	CREATEDB
	CREATEROLE
	INHERIT
	NOREPLICATION
	CONNECTION LIMIT -1
	PASSWORD 'ozekipass';
Figure 22 - Copy CREATE ROLE statements
Now please copy the code, you can see on Figure 5. You can see that we have pasted the code, and it has created our database, on Figure 23.

CREATE DATABASE ozekidb
    WITH
    OWNER = ozekiuser
    ENCODING = 'UTF8'
    CONNECTION LIMIT = -1;
Figure 24 - Copy CREATE DATABASE statementsCREATE TABLE statements to use on your PostgreSQL server
The code
CREATE TABLE ozekimessagein
(
id serial,
sender varchar(255),
receiver varchar(255),
msg varchar(160),
senttime varchar(100),
receivedtime varchar(100),
operator varchar(100),
msgtype varchar(160),
reference varchar(100)
);

CREATE TABLE ozekimessageout
(
id serial,
sender varchar(255),
receiver varchar(255),
msg varchar(160),
senttime varchar(100),
receivedtime varchar(100),
reference varchar(100),
status varchar(20),
operator varchar(100),
errormsg varchar(250),
msgtype varchar(160)
);
Figure 24 - Copy CREATE TABLE statements
Copy the code
On Figure 25, you can see that how you can copy the provided code. This code will build the database so the Ozeki SMS Gateway could work with it. Right-click the highlighted code and choose the copy option.

Paste the code
To build your database, you need to paste the copied code into the query editor section of pgadmin. Paste it and run the code. It will build a usable database that you can work with. You can see the pasted code on Figure 26.
