How to send SMS from unixODBC
This article provides a comprehensive guide on how to install and configure Ozeki ODBC, a powerful tool for sending and receiving SMS messages using an ODBC database. With detailed step-by-step instructions, accompanying screenshots, and an informative video tutorial, to ensure a seamless learning experience for users of all levels. Whether you're a beginner or an experienced user, this page will equip you with the necessary knowledge and skills to effectively utilize Ozeki ODBC for your SMS messaging needs. Unlock the potential of the Ozeki SMS gateway with unixODBC in just 15 minutes, install, configure, and start sending SMS seamlessly!
What is unixODBC?
UnixODBC is an open-source project that provides a standardized interface for database connectivity on Unix-like operating systems.
When and why do we use unixODBC?
We use unixODBC when we need a standardized interface for connecting Unix-based applications to different relational databases. This is particularly helpful for achieving cross-platform compatibility and facilitating integration with various middleware solutions.
What is ODBC connector?
ODBC connector allows standardized database connectivity on various platforms.
How to send SMS from unixODBC (Quick steps)
Send SMS from unixODBC:
- Install UnixODBC
- Download MySQL ODBC driver
- Unzip ODBC Driver
- cd to driver folder
- Copy driver files
- Install Unicode driver
- Install ANSI driver
- List installed drivers
- Install ODBC database connection
- Configure connection string
- Congratulations! ODBC connection established
How to set up Ozeki SMS gateway using unixODBC (Video Tutorial)
In this quick 4-minute video, we'll guide you through the process of setting up the Ozeki SMS gateway using unixODBC. Starting from the installation of unixODBC and downloading the MySQL ODBC driver, we'll walk you through extracting and copying the driver files. Watch as we install both Unicode and ANSI drivers, listing them to ensure correct installation. The video takes you through the installation of the ODBC module in the Ozeki SMS Gateway app and setting up the connection string. We'll guide you through the process of successfully establishing the connection.
Step 1 - Install UnixODBC
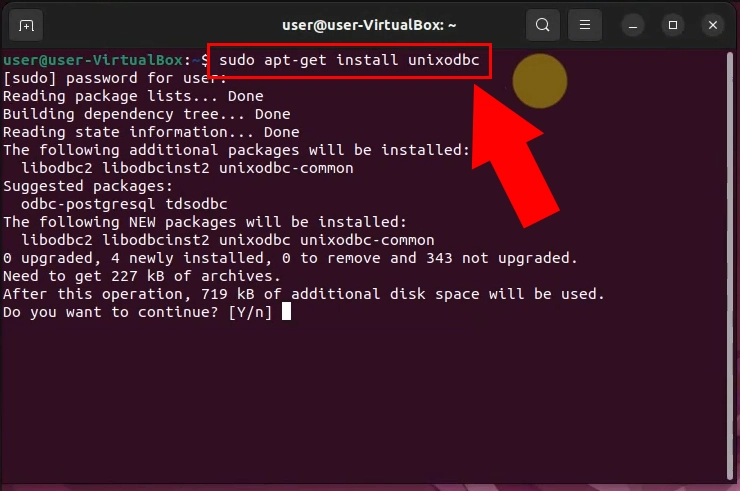
To install UnixODBC, open a terminal window and type the following command (see Figure 1):
sudo apt-get install unixodbcYou will be prompted to enter your password. Once you have done this, the installation process will begin. Once the installation process is complete, you will be able to use UnixODBC to connect to ODBC data sources.
Step 2 - Download MySQL ODBC driver
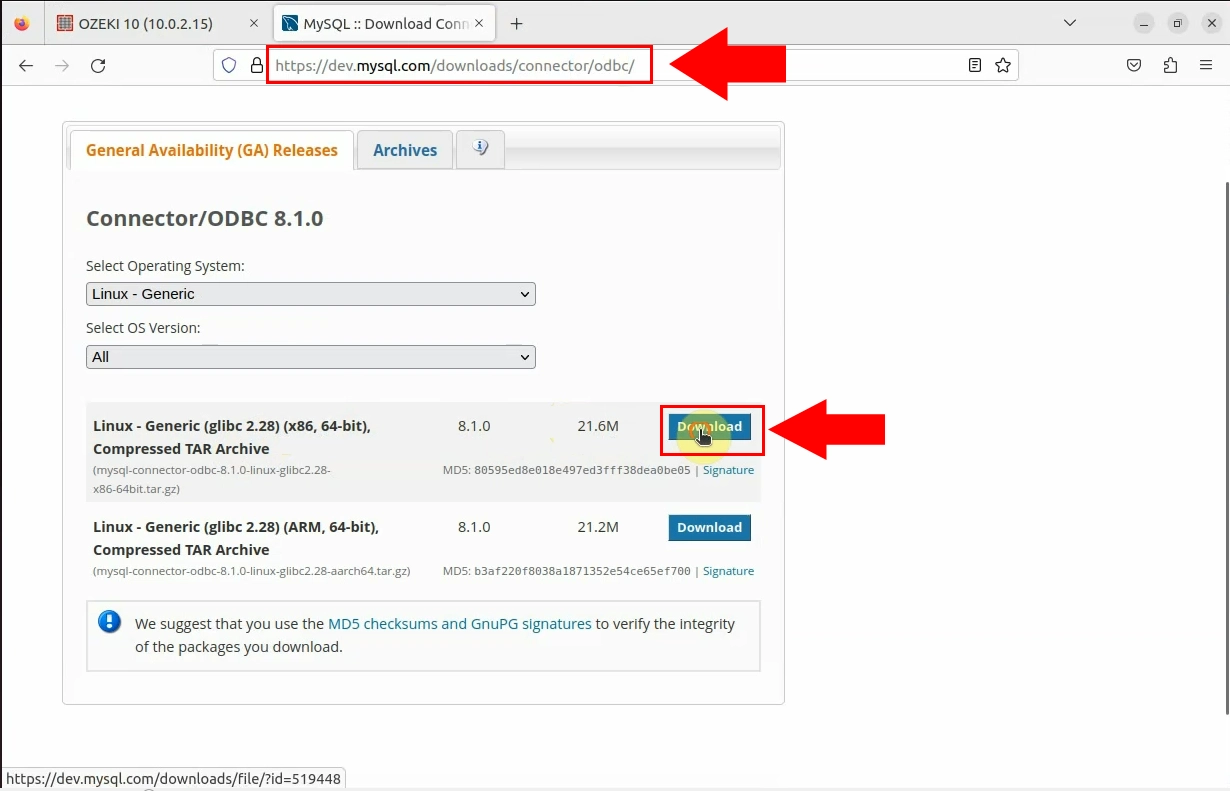
To download the MySQL ODBC connector, first navigate to https://dev.mysql.com/downloads/connector/odbc/ From the provided drop-down menus, select your operating system and version under "Select Operating System" and "Select OS Version.", in our case it is the Linux - Generic and all. Click the "Download" button, next to the release that you want to download, in our case, it is the x86 version (see Figure 2). This will download MySQL ODBC driver to your computer, in a compressed file.
Step 3 - Extract the ODBC driver from the compressed file
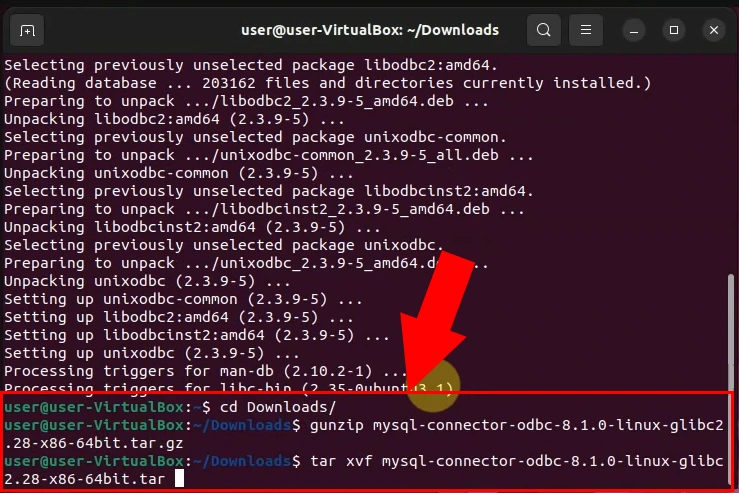
Inside the terminal window, navigate to the directory where the compressed file is located, using the cd command. Here type in the following commands (see Figure 3):
gunzip mysql-connector-odbc-8.1.0-linux-glibc2.28-x86-64bit.tar.gz

tar xvf mysql-connector-odbc-8.1.0-linux-glibc2.28-x86-64bit.tar
The ODBC driver will be extracted to the current directory as a directory with the same name as the compressed file, without the .tar.gz extension.
Step 4 - Navigate to the driver folder
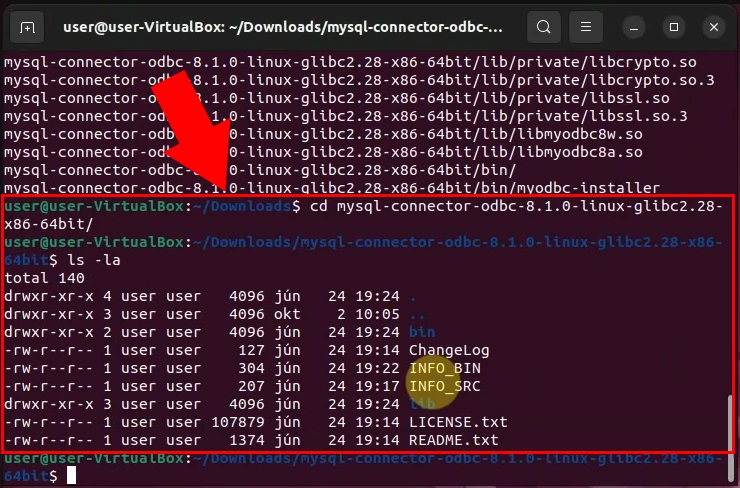
Inside the terminal window, type in the following command (see Figure 4):
cd mysql-connector-odbc-8.1.0-linux-glibc2.28-x86-64bitThe terminal window will change to the driver folder. You can then view the contents of the driver folder by typing the ls -la command and pressing Enter.
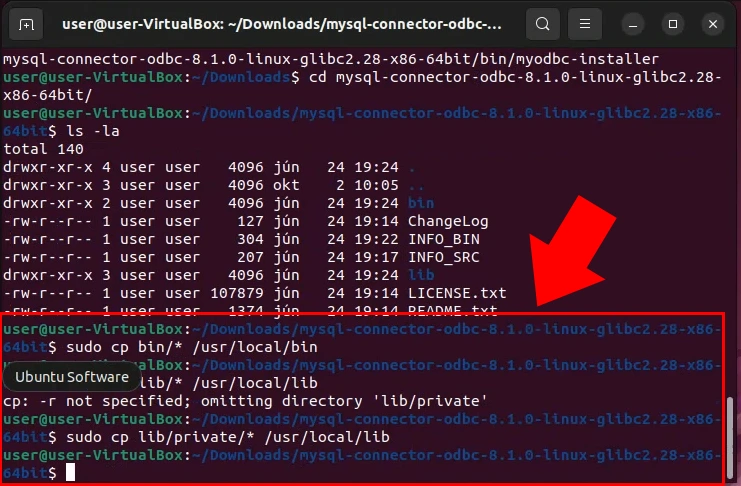
Step 5 - Copy driver files
Within the terminal window, enter the following commands (see Figure 5):
sudo cp bin/* /usr/local/bin

sudo cp lib/* /usr/local/lib

sudo cp lib/private/* /usr/local/lib
This will result in the copying of the driver files to the /usr/local/bin and /usr/local/lib directories. After the copying process is complete, you can utilize these files to establish connections to ODBC data sources from your applications.
Step 6 - Install Unicode driver
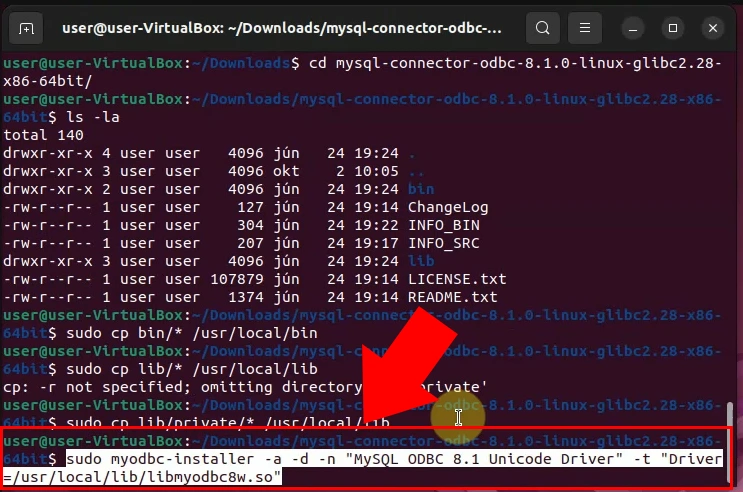
To install the Unicode driver, enter the following command into the terminal (see Figure 6):
sudo myodbc-installer -a -d -n "MySQL ODBC 8.1 Unicode Driver" -t "Driver=/usr/local/lib/libmyodbc8w.so"The Unicode driver will be installed on your computer. Once the driver is installed, you will be able to use it to type and display Unicode characters.
Step 7 - Install ANSI driver
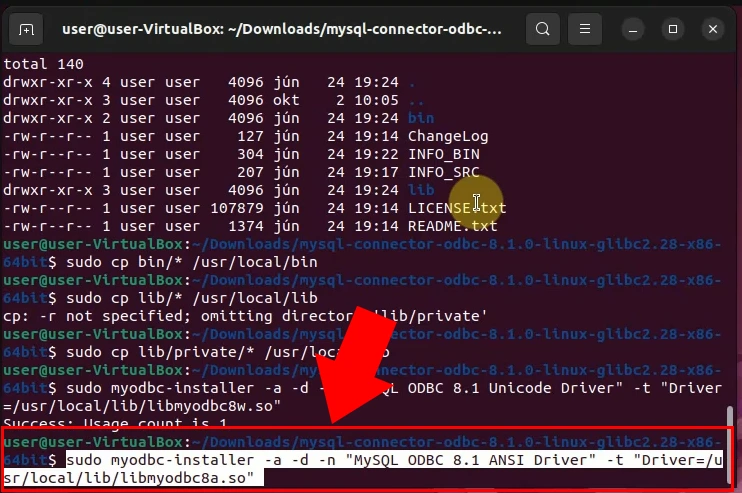
Install the ANSI driver by inputting the following command in the terminal (see Figure 7):
sudo myodbc-installer -a -d -n "MySQL ODBC 8.1 ANSI Driver" -t "Driver=/usr/local/lib/libmyodbc8a.so"After the installation process, the ANSI driver will be accessible on your computer. Later, you can utilize the installed driver to input and showcase ANSI characters.
Step 8 - Display a list of installed drivers
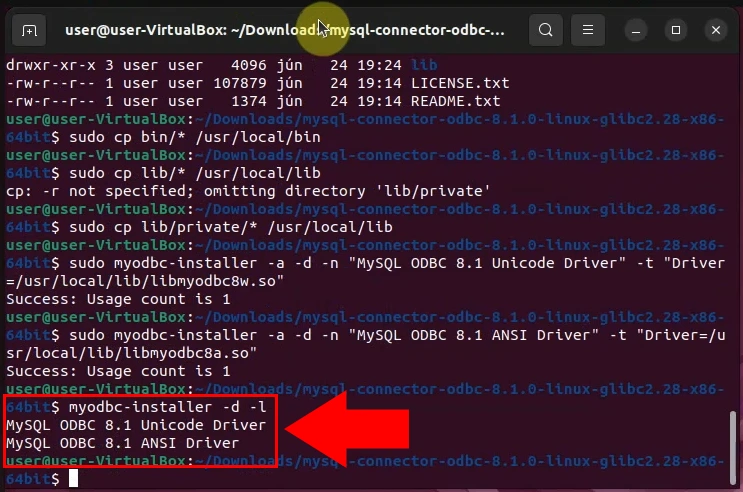
To display a list of installed drivers, input the following command in the terminal and press Enter (see Figure 8):
myodbc-installer -d -lA list of all installed drivers on your computer will be displayed in the command prompt window. The list will include the name and version of the driver.
Step 9 - Install ODBC database connection
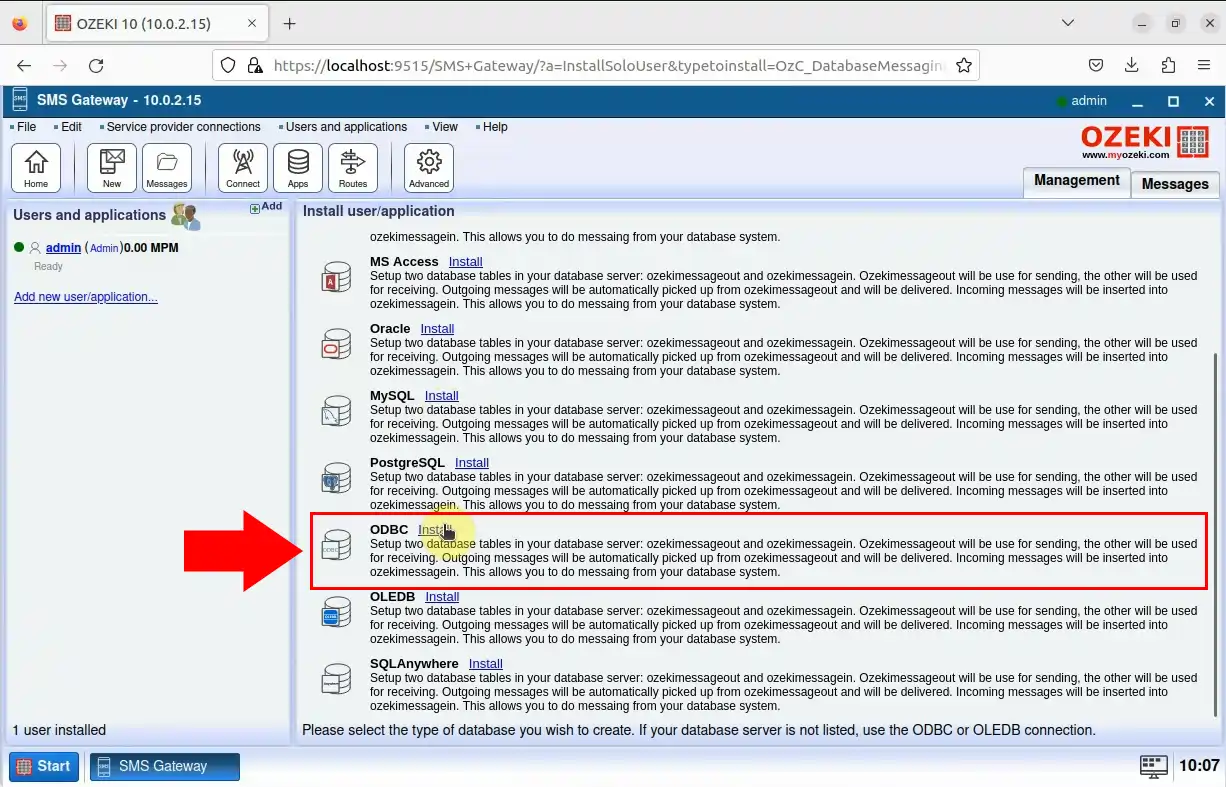
On the Ozeki SMS Gateway homepage, navigate to the Users and Applications on the right-side Panel and click "Add new user/application." Scroll down to "Application interfaces" and click on "Install" next to SQL messaging. Continue scrolling down and install ODBC (see Figure 9). This simple process will set up the ODBC connection service in the Ozeki SMS Gateway.
Step 10 - Configure connection string
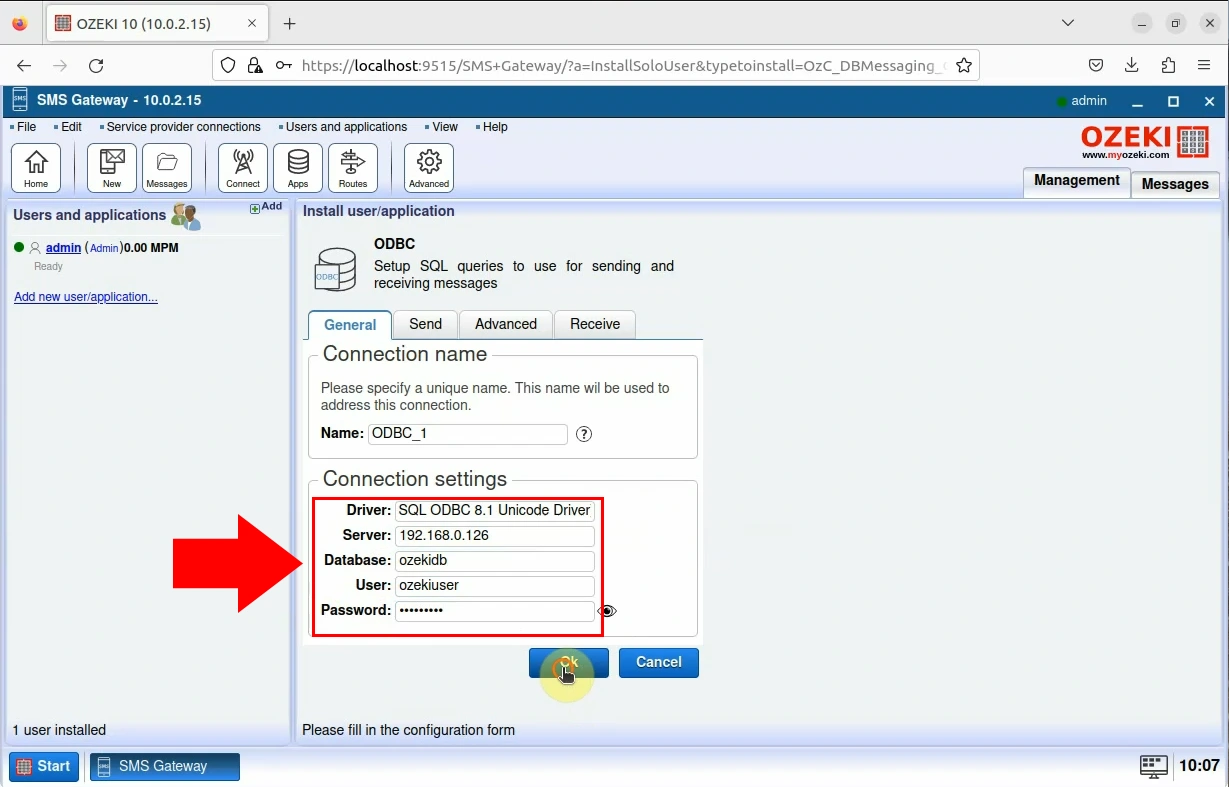
To configure ODBV connection fill out the form inside the General tab (see Figure 10).
- Driver: SQL ODBC Driver, what we displayed before (see Figure 8). In our case: {MySQL ODBC 8.1 Unicode Driver}
- Server: IP address of the SQL server. In our case: 192.168.0.126
- Database: Name of the Database. In our case: ozekidb
- User: Username. In our case: ozekiuser
- Password: password of the User. In our case: *********
Successful ODBC connection
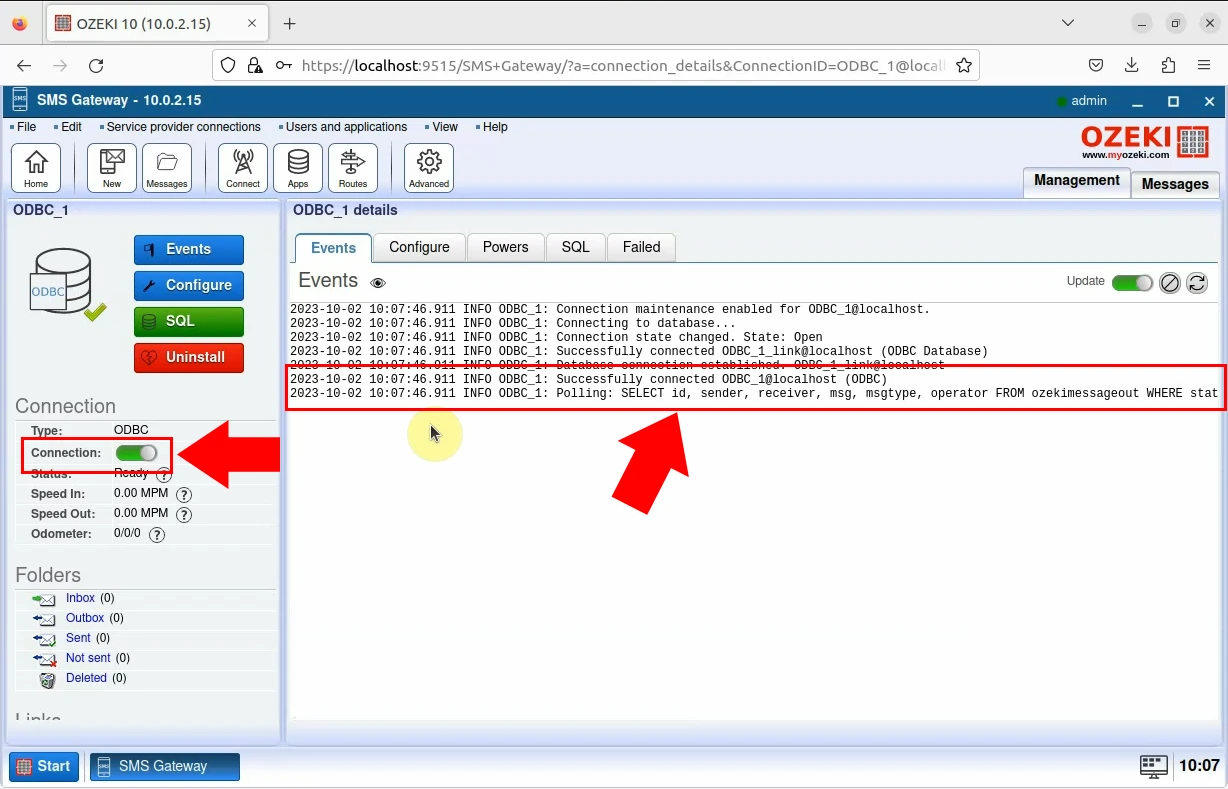
If you've completed the 10 steps, you're ready to launch the application (see Figure 11). To start the application, click the slide button located in the left panel. Check the Events tab to confirm a successful connection.
Summary
If you have followed the steps closely, you should be able to send texts using the unixODBC with Ozeki SMS Gateway without any problems. Our goal was to make it easy for you to understand all the details and avoid getting lost in the explanations. To ensure sustained success, concentrate on efficiently managing your SMS business. If you would like to discover more information about the advantages of other similar solutions, please open ozeki-sms-gateway.com. We hope this guide will be useful to all the readers and especially to beginners.
