How to use Postman to test the Ozeki SMS Gateway API
This tutorial demonstrates how to use Postman to test the various HTTP/JSON/REST API calls offered by Ozeki SMS Gateway. By following the steps in this guide, you will download the Postman API testing tool, create sample API requests, and send a test SMS using Postman. You will also see the response returned by Ozeki SMS Gateway for the API request.
What is an SMS Gateway?
An SMS Gateway is a service that allows computers to send and receive SMS (Short Message Service) transmissions to and from SMS-capable devices over a telecommunications network. SMS Gateways can facilitate communication between applications and mobile networks, enabling automated, high-volume, and often bidirectional messaging.
What is an API?
An API, or Application Programming Interface, is a set of rules and protocols for building and interacting with software applications. APIs enable different software systems to communicate with each other, making it possible for developers to use predefined functions and procedures to interact with a system, application, or service.
How to use Postman to test the Ozeki SMS Gateway API (Quick steps)
To use Postman to test the Ozeki SMS Gateway AP
- Install Ozeki SMS Gateway
- Download Postman API Platform
- Open Ozeki SMS Gateway
- Install an HTTP user in Ozeki SMS Gateway
- Launch Postman
- Create a Postman account
- Add a new request in Postman
- Enter the request URL
- Click send
- View the received response in Postman
- Check the events tab in Ozeki SMS Gateway to see the received request
- View the message in the 'Sent' folder in Ozeki SMS Gateway
Step 1 - Create an HTTP API user in Ozeki SMS Gateway
How to create the HTTP API user (Video tutorial)
This short, easy to understand 25 seconds long video will show you in great detail, how to create an HTTP API user in Ozeki SMS Gateway. The video starts with Ozek SMS Gateway already open. By completing the steps in the video you will have created a HTTP user. This video will also give you a glimpse of how easy it is to set up Ozeki SMS Gateway, and you will see that it offers a very powerful dashboard, that allows you to reach the most important functionality with a single click.
How to add a user/application
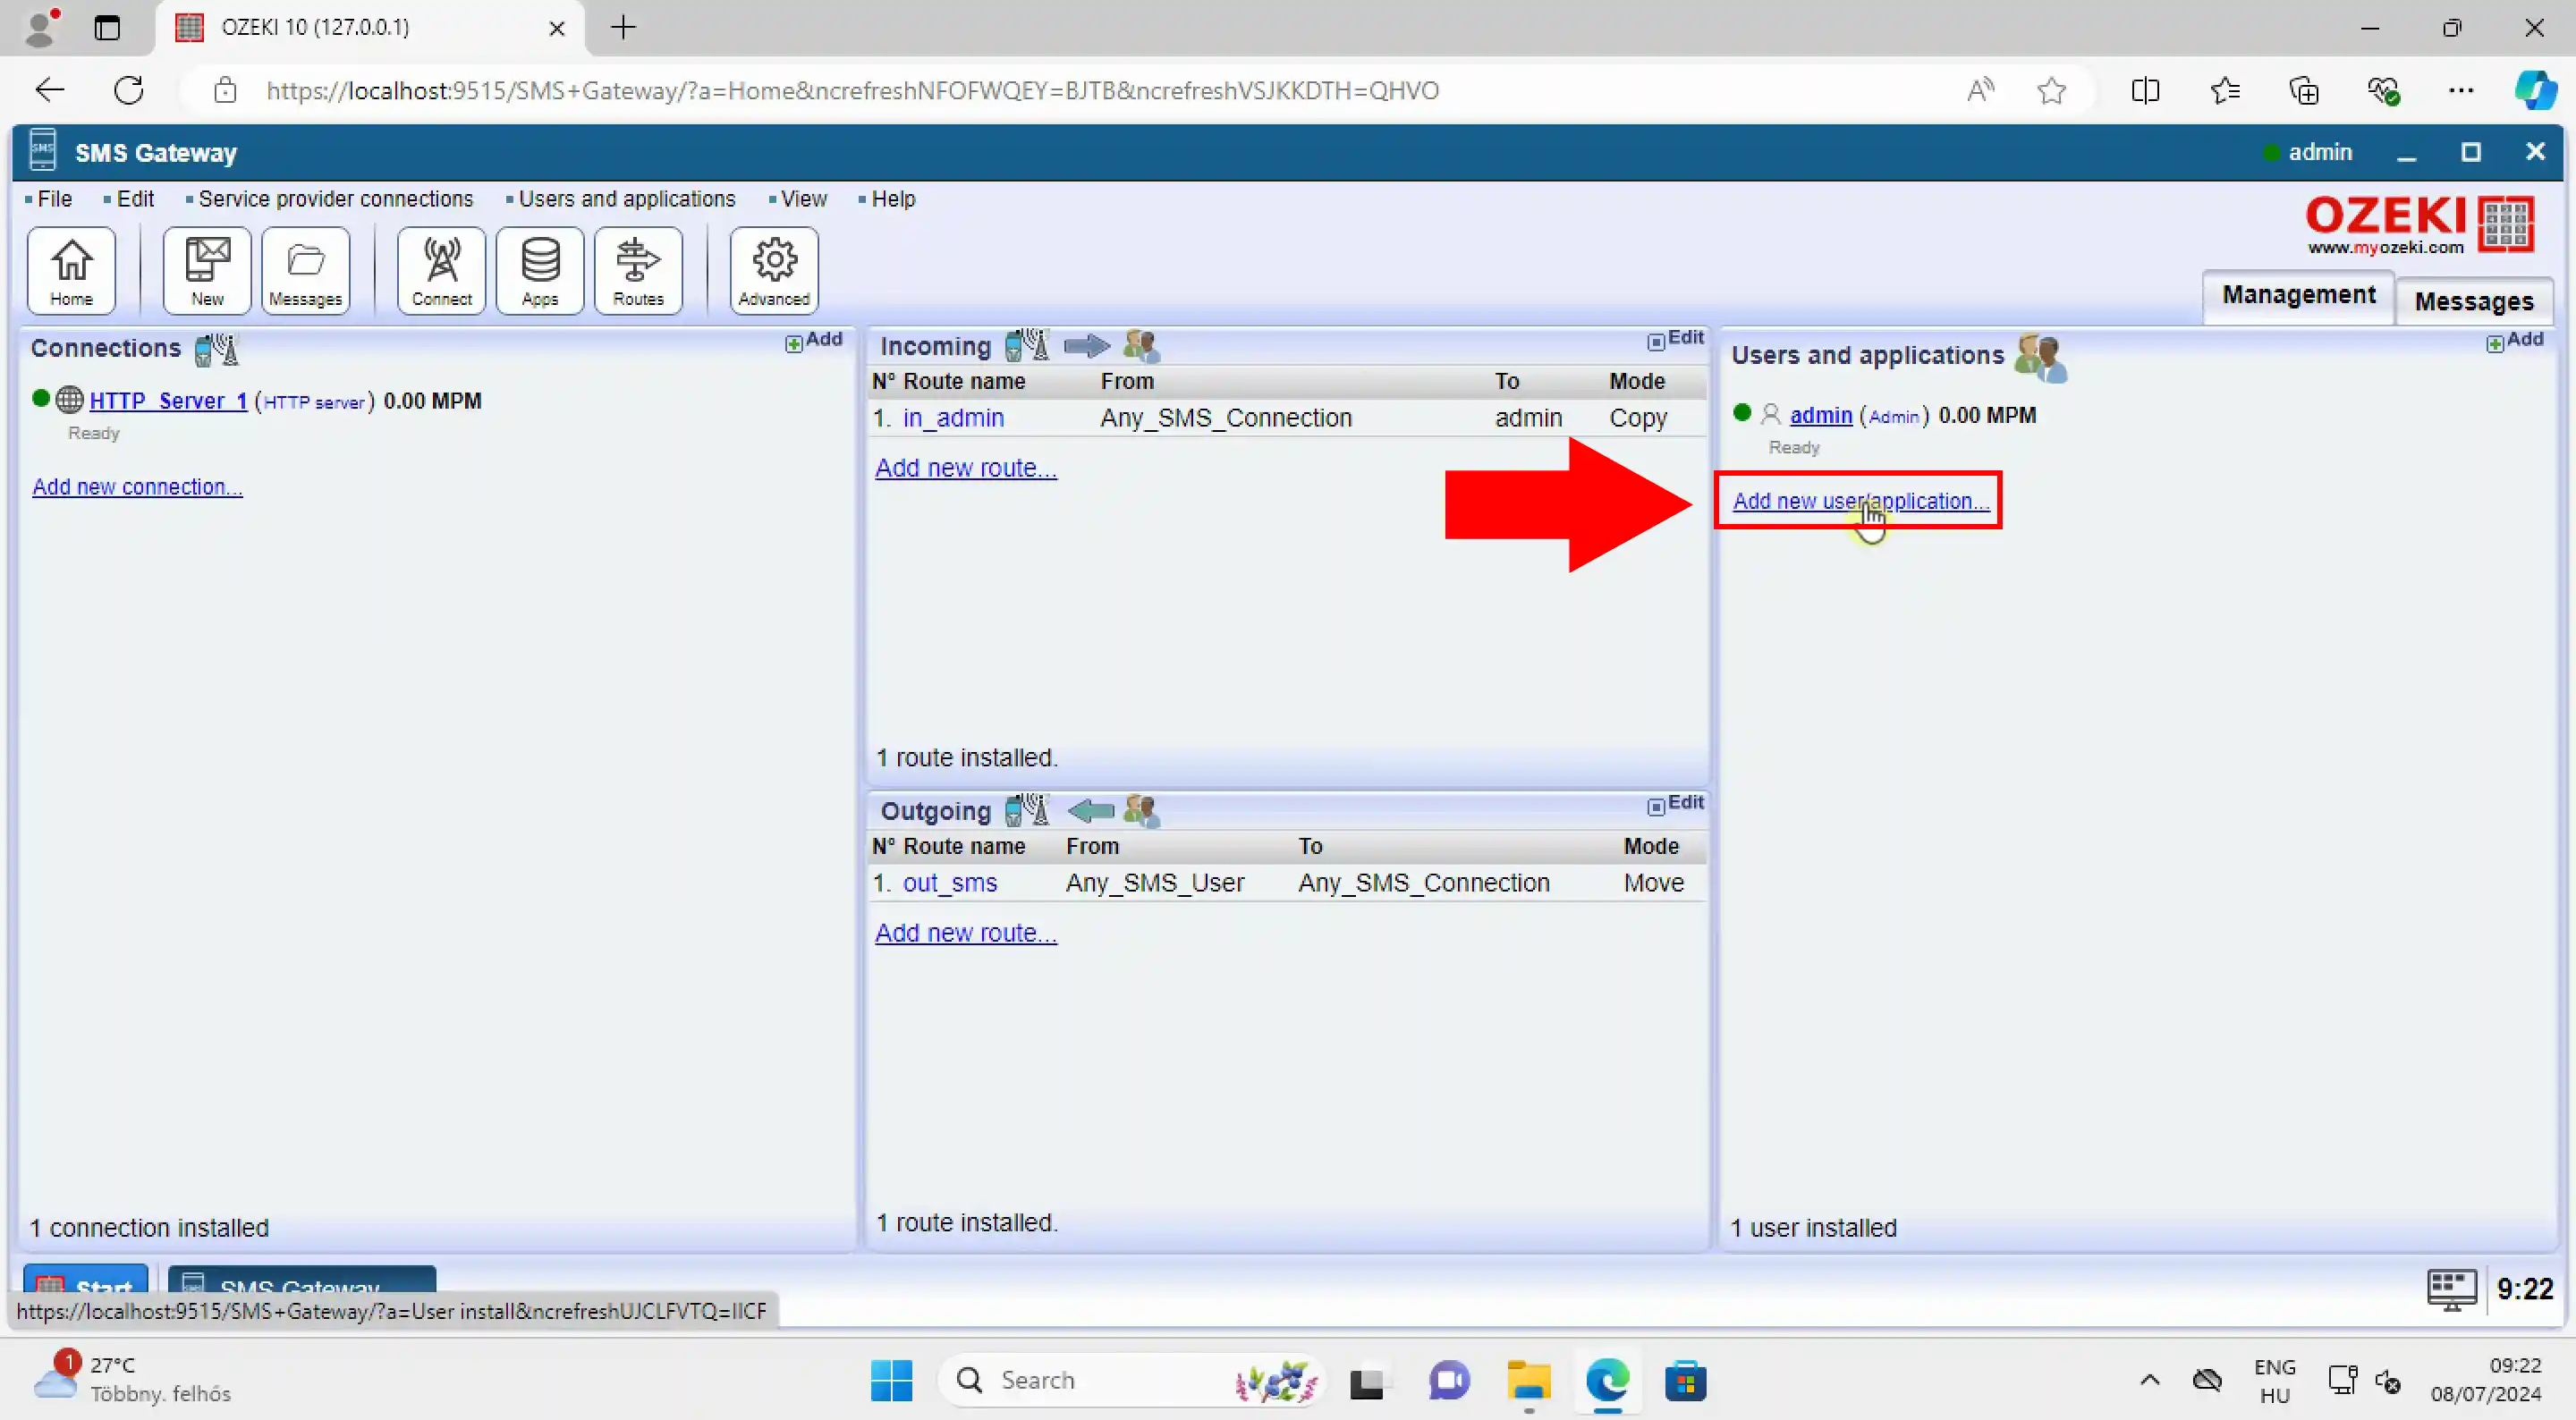
In the Ozeki Home Page, navigate to the 'Users and applications' panel located on the right side of the screen. Click on 'Add new user/application', highlighted by the red arrow in the image (Figure 1). This action will open a menu where you can enter the necessary details to create a new user or application. Adding an HTTP user is crucial for testing the Ozeki SMS Gateway API.
How to install HTTP user
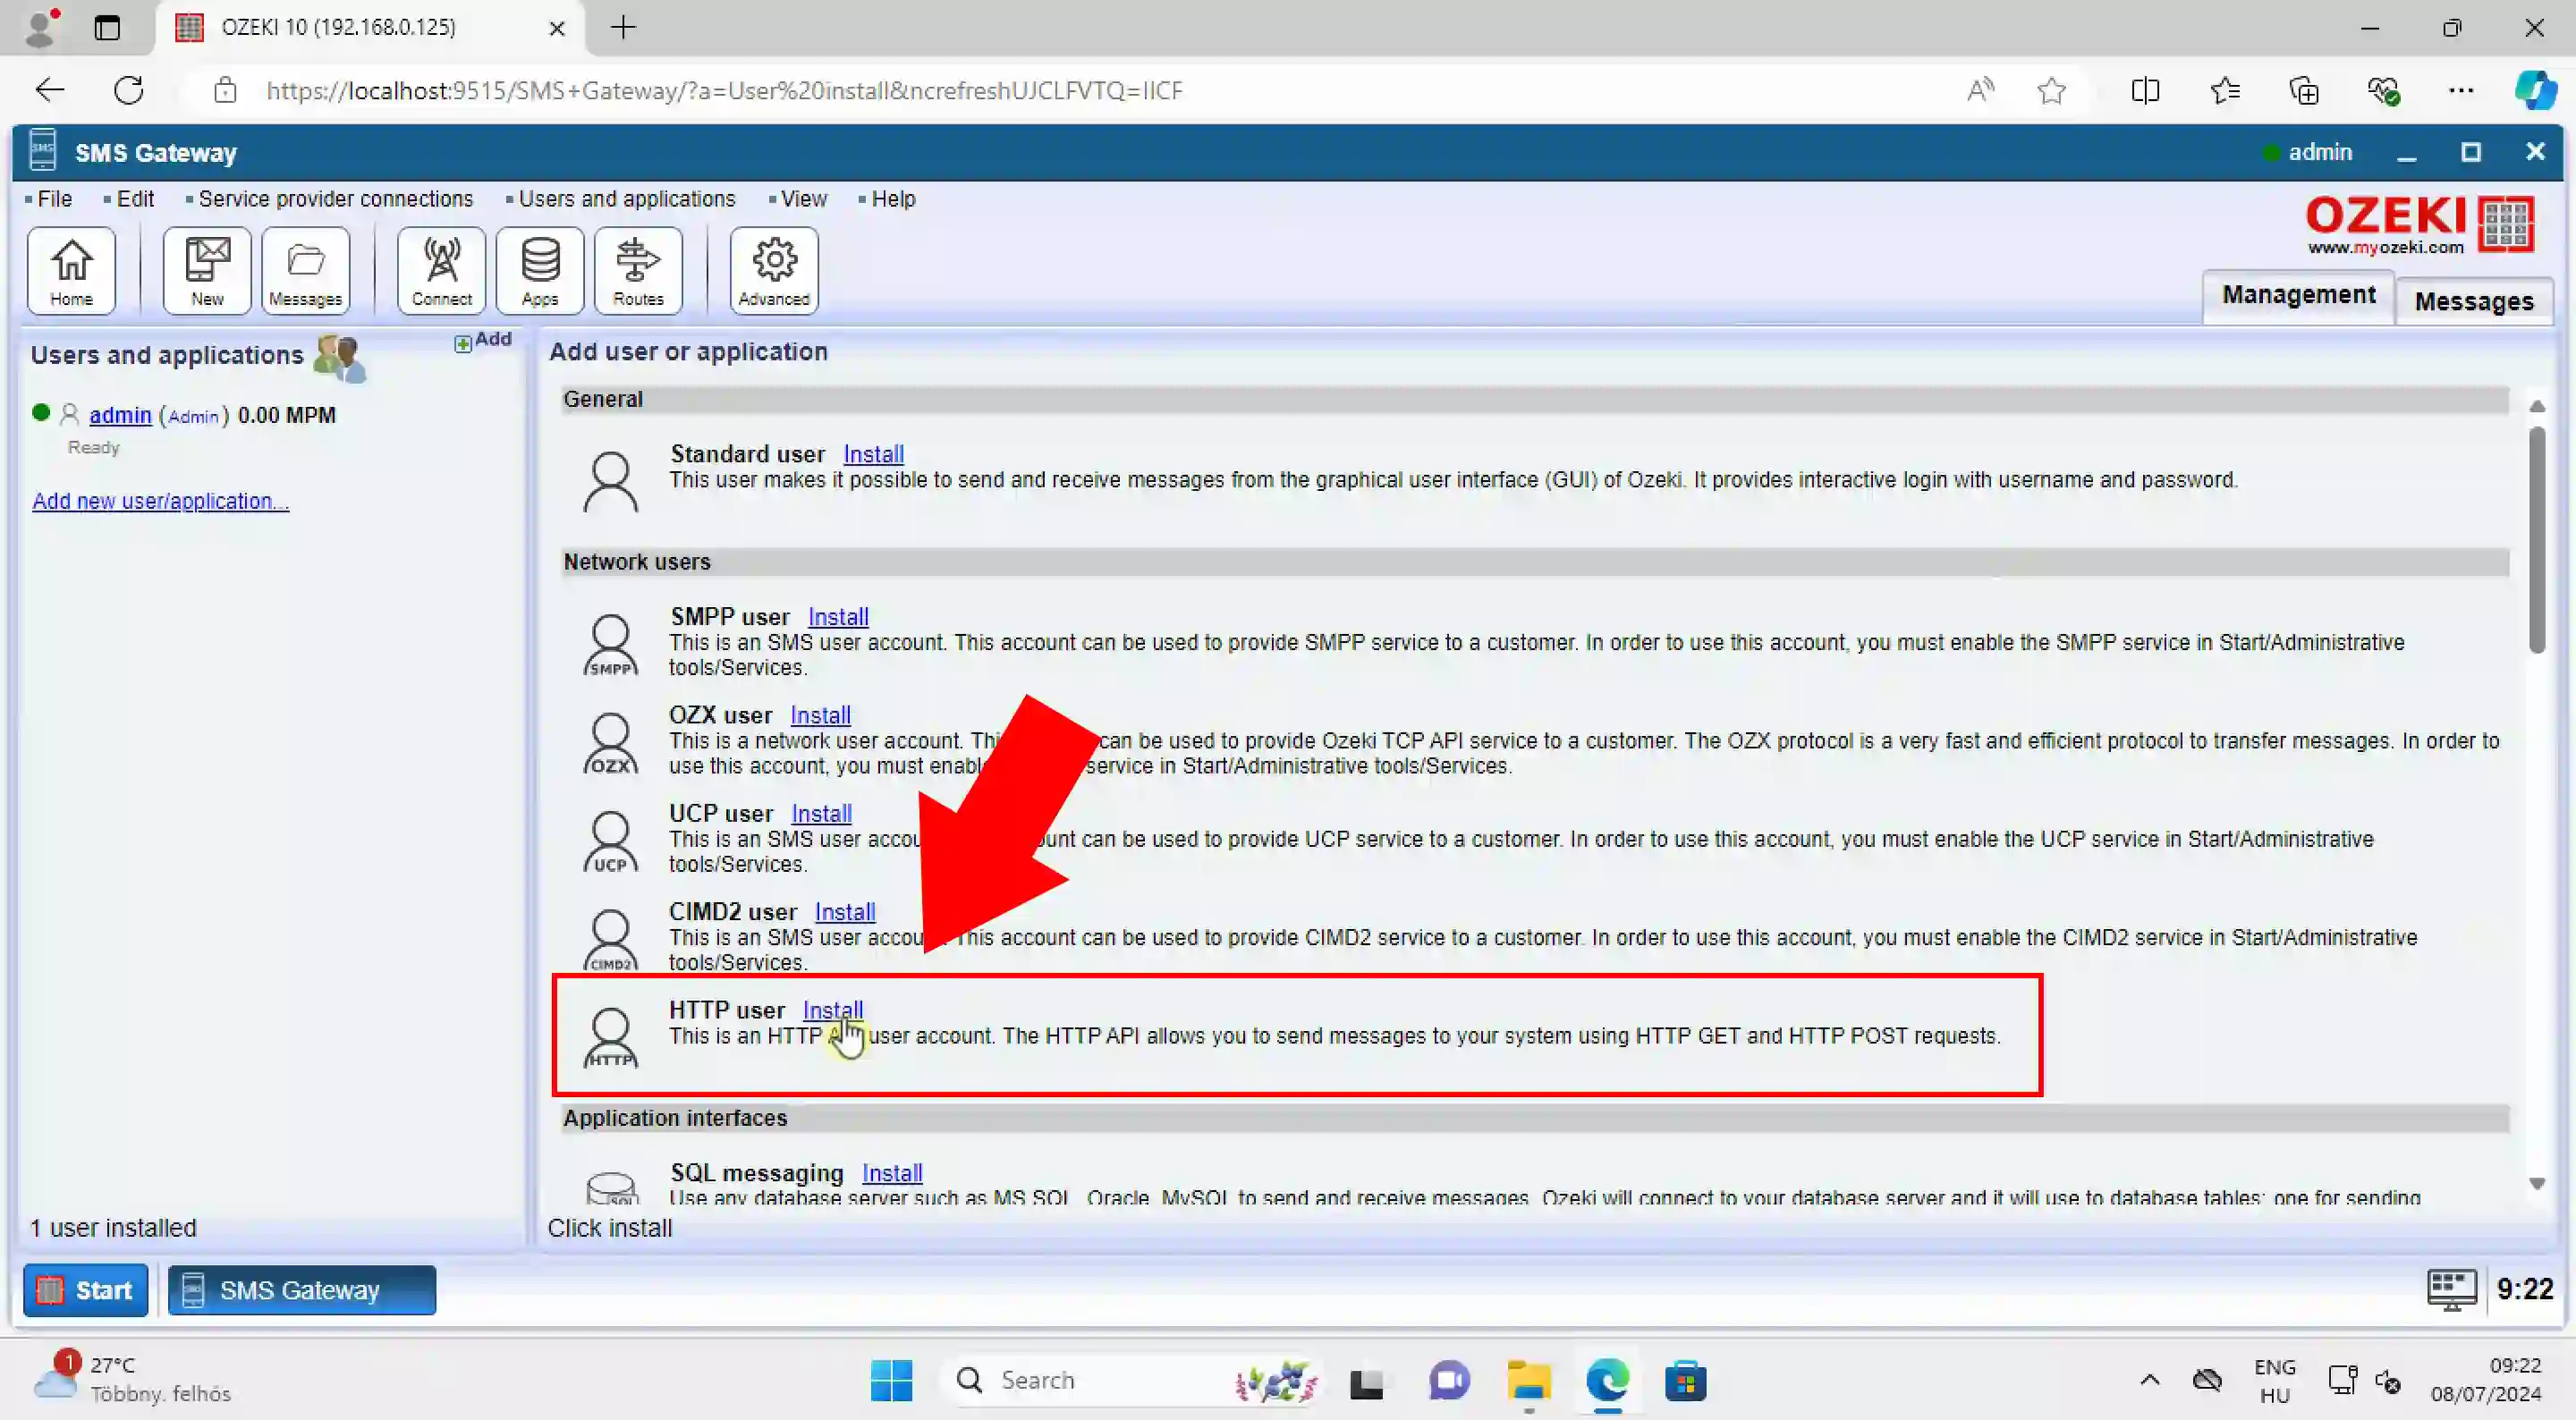
You will see a list of user types, look for the 'HTTP user' install item in the Network users installation list. Click on the Install link next to the HTTP user install item (Figure 2). This will initiate the installation process for the HTTP user account, enabling you to send messages to your system using HTTP GET and HTTP POST requests.
Set the username and password
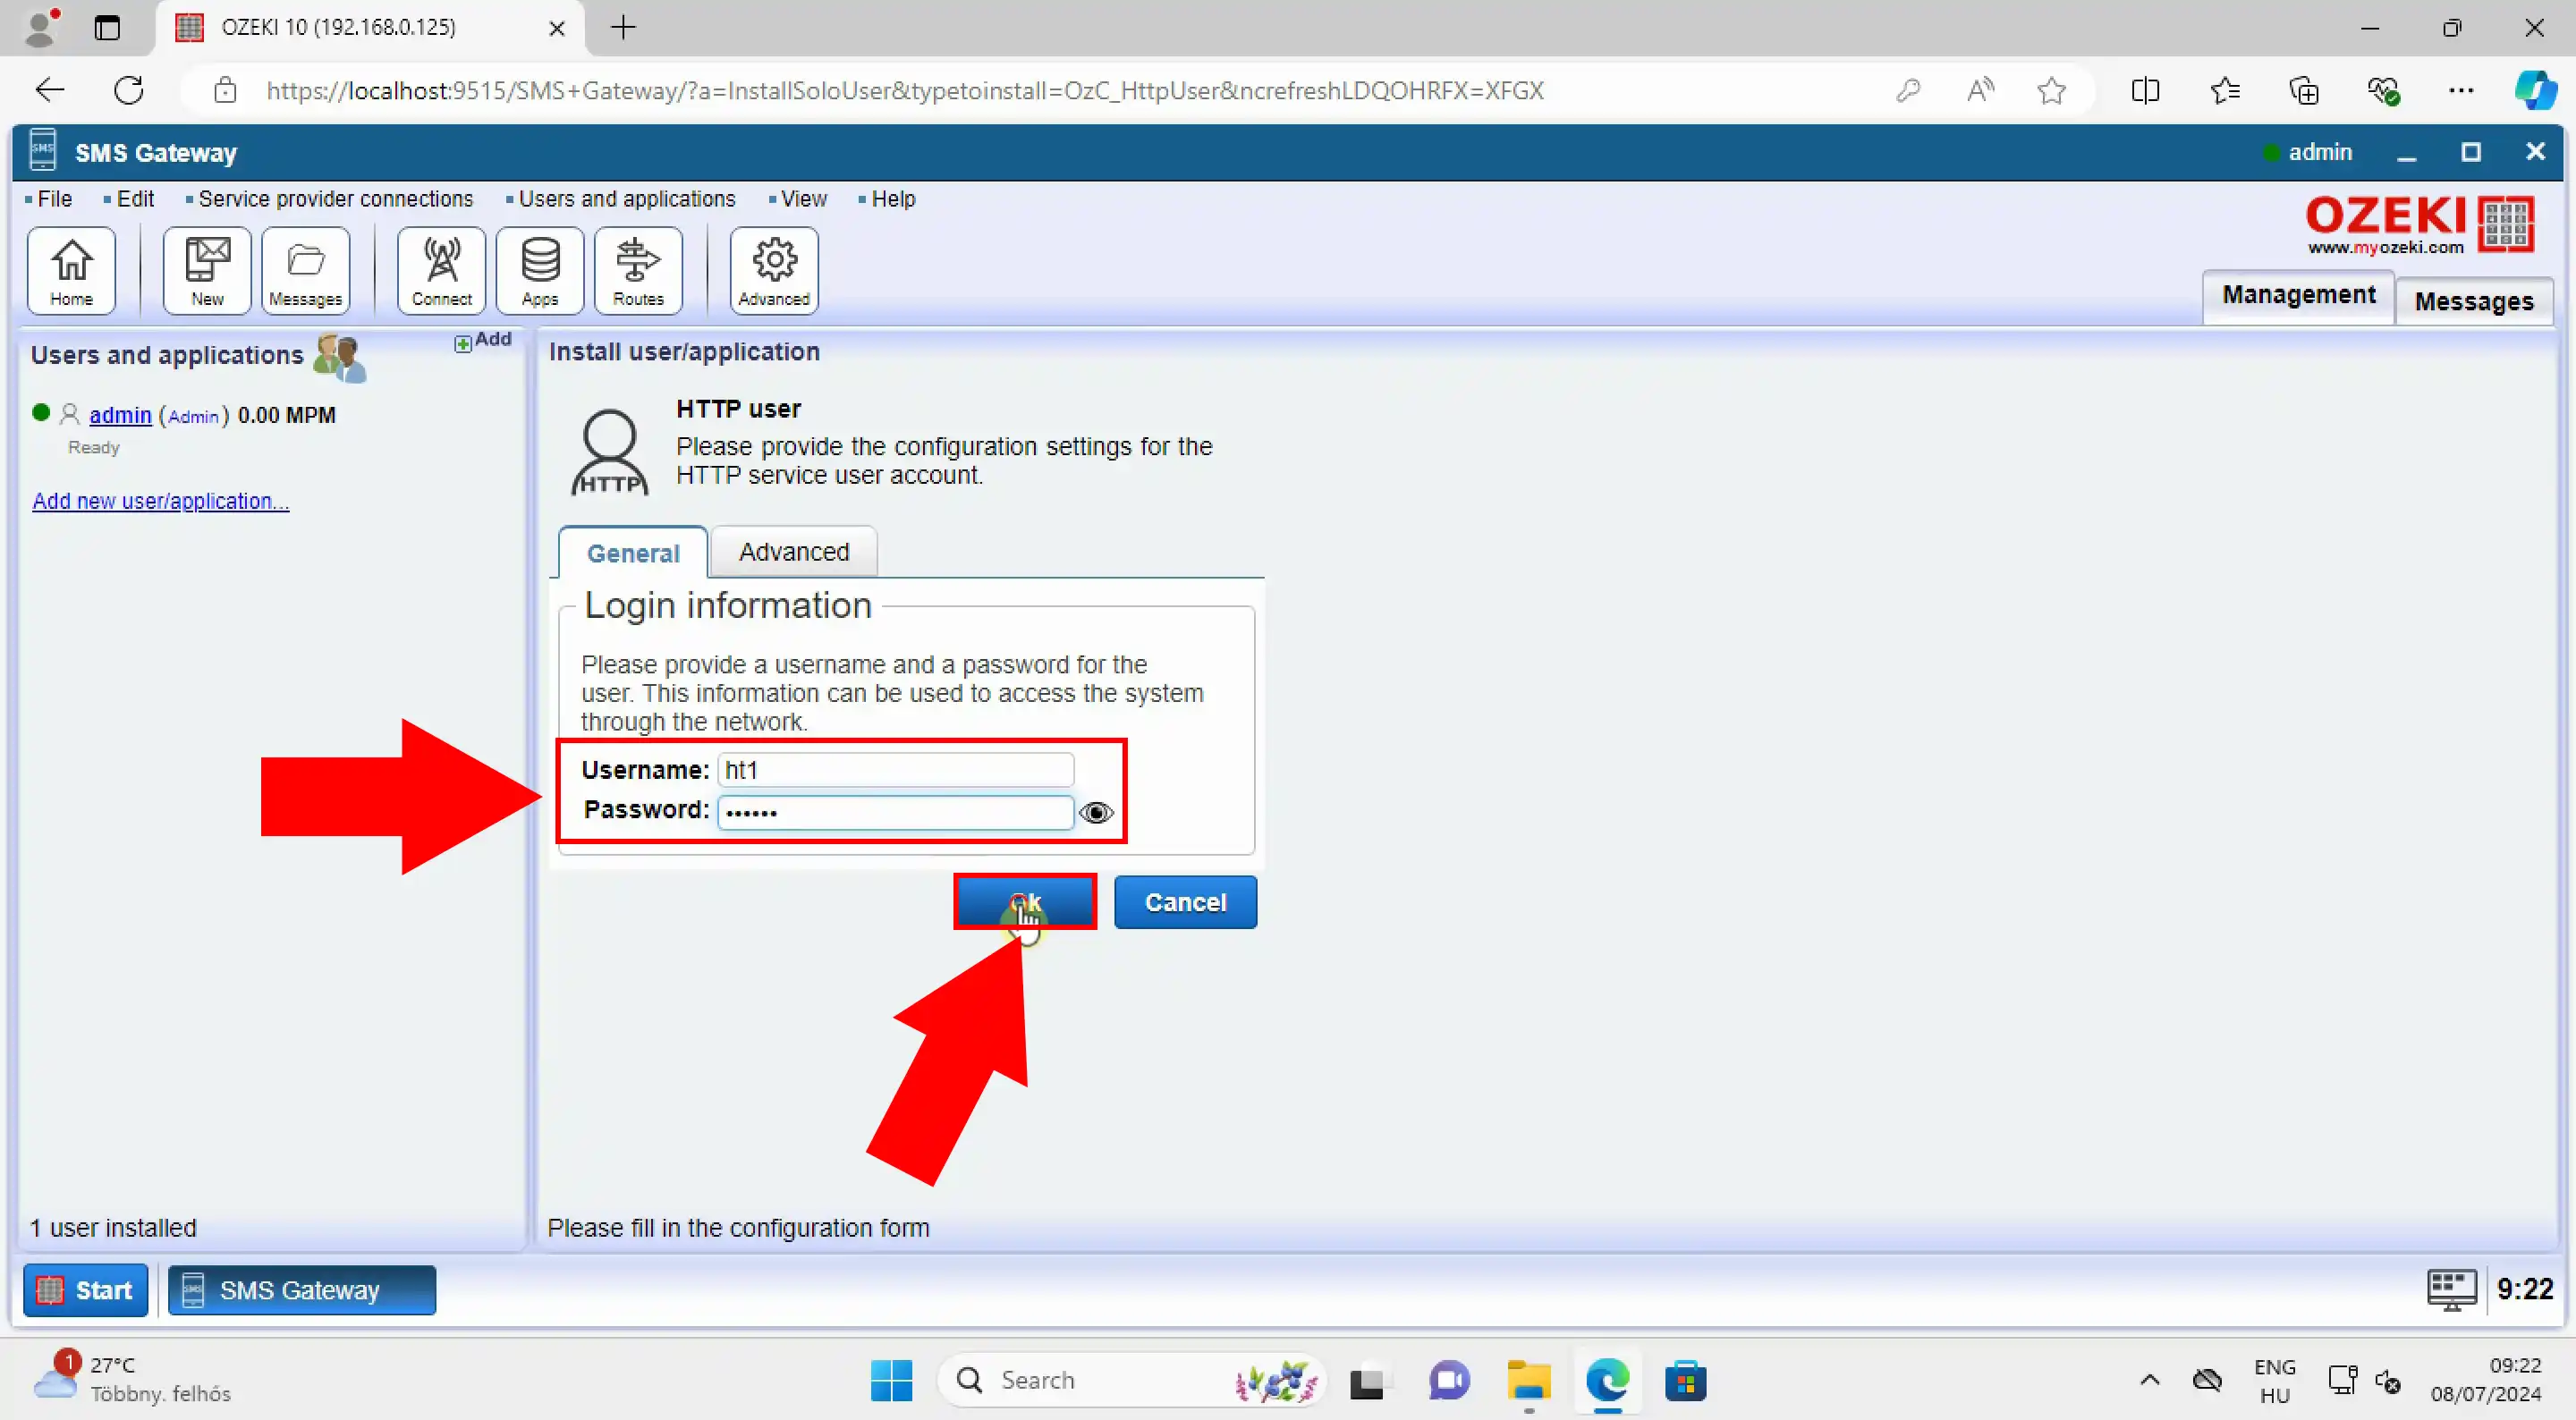
Next, under the 'General' tab enter the desired username and password for the new HTTP user (Figure 3). After confirming that the username and password are correct, click the 'Ok' button to proceed with the creation of the user account. This action will finalize the setup and install the new HTTP user in the system.
Check the created HTTP API user
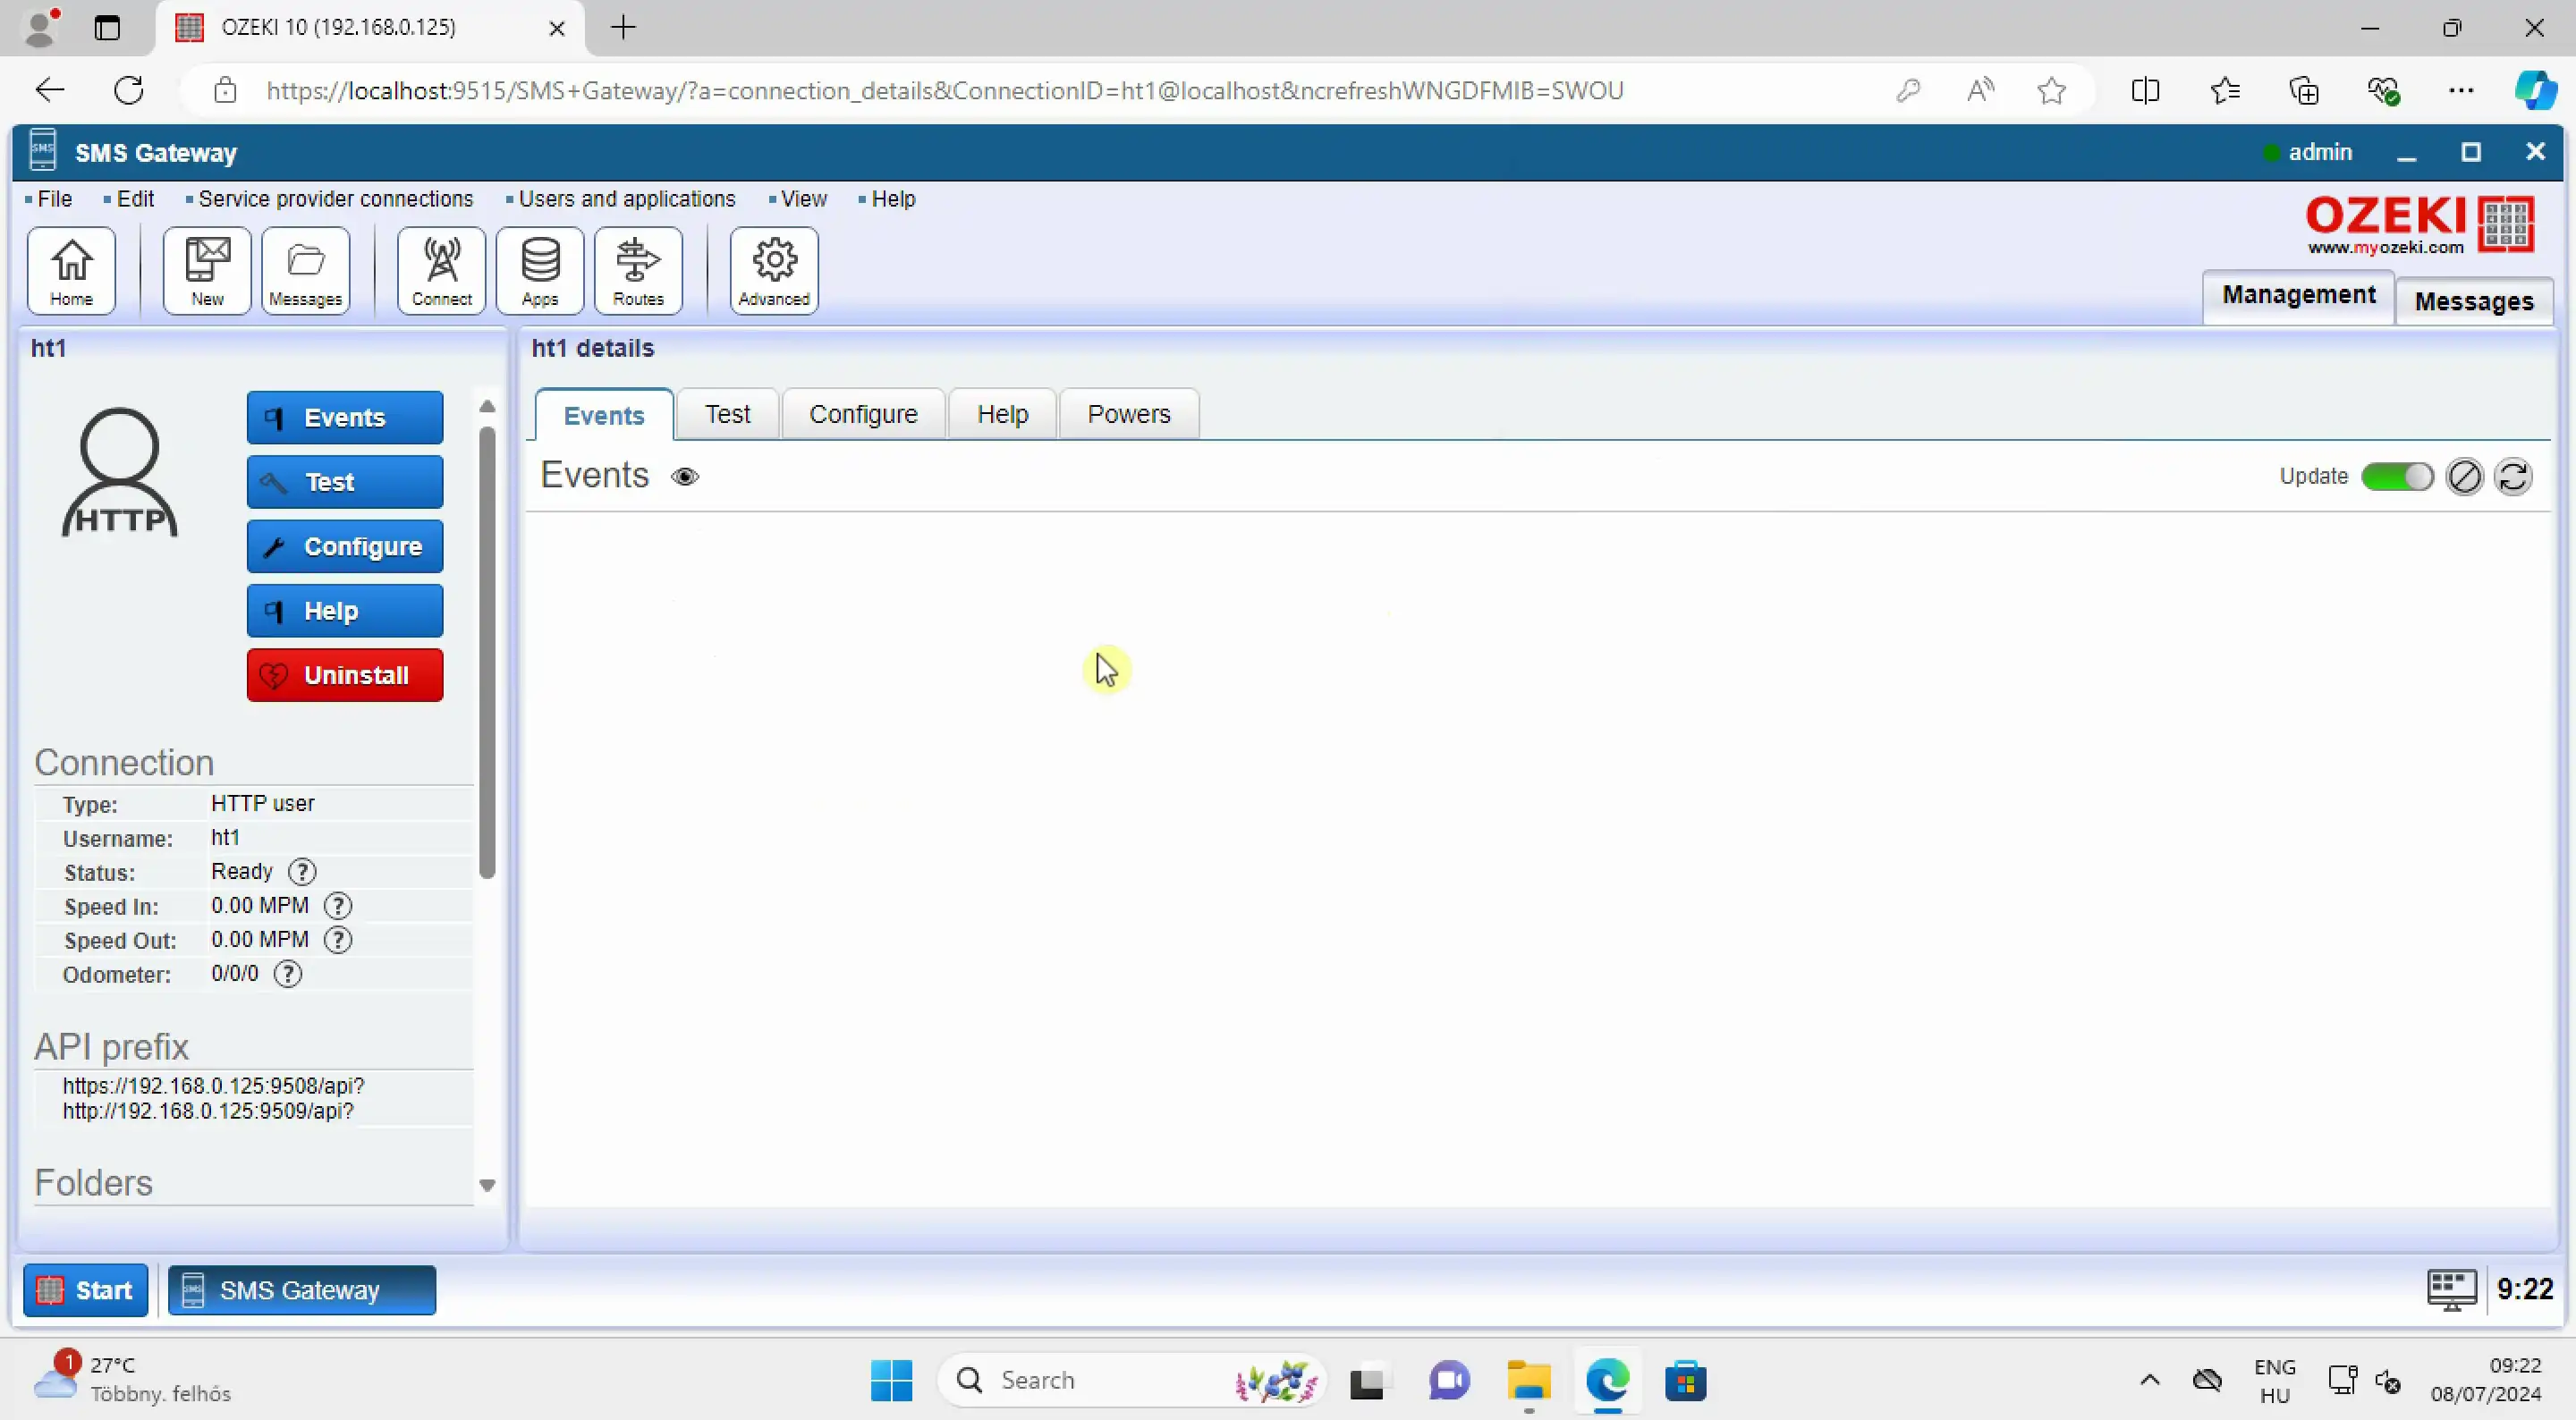
Once you create the HTTP user, you are redirected to the user's details page where you can view various information about the user as seen in Figure 4. For instance, you can check Events, test with HTTP Post requests, change the user's username and password, read the documentation, and view incoming and outgoing SMS messages.
Step 2 - Download and Install Postman
Download URL:
https://www.postman.com/downloads/
How to install Postman and create an account (Video tutorial)
In the following video tutorial, we will present you the steps you need to take to install the Postman API Platform, create a free account, and navigate the main dashboard. We provide a step-by-step guide, so it will not cause any problems. The video begins with accessing the Postman website and takes you through the registration process, ensuring you have a fully functional Postman setup by the end. This video will give you a glimpse of how user-friendly the Postman API Platform is, demonstrating its straightforward installation and account setup.
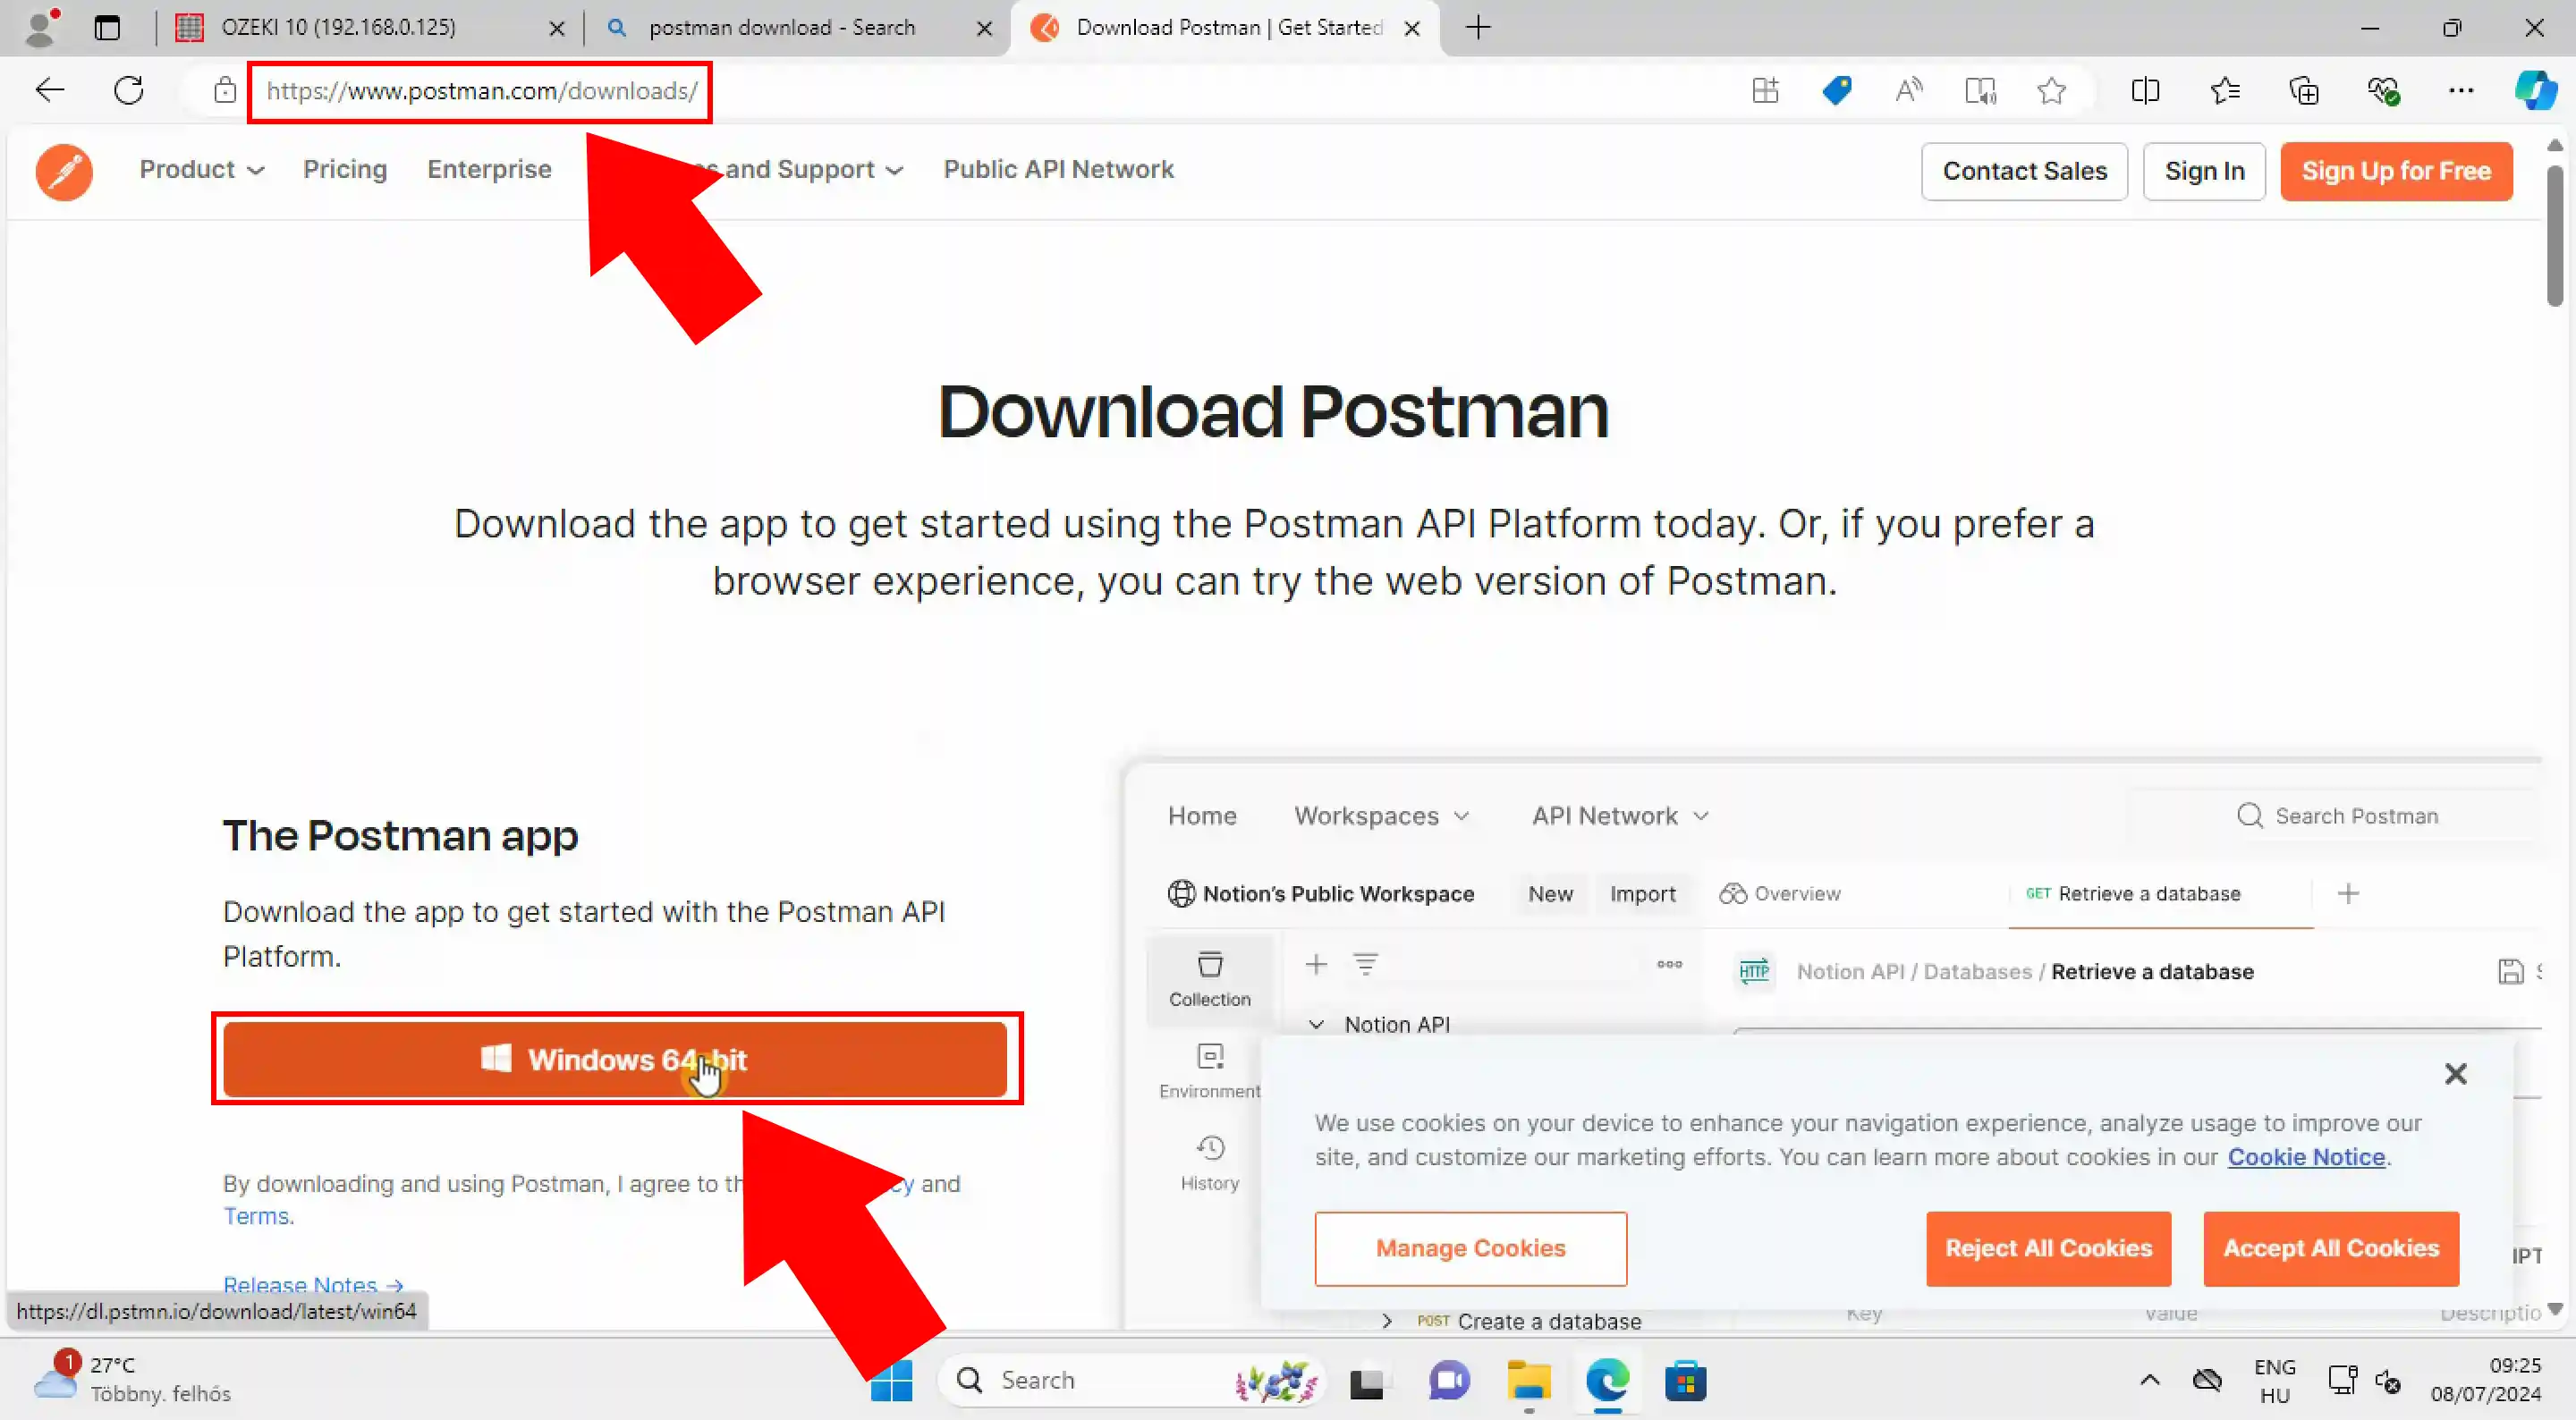
How to download the Postman installer
To begin the installation of the Postman software, open your web browser and enter the download link into the URL bar. Once the page loads, scroll down to find the Windows 64-bit installer on the left side. Click on the link to initiate the download of the software installer as seen in Figure 5.
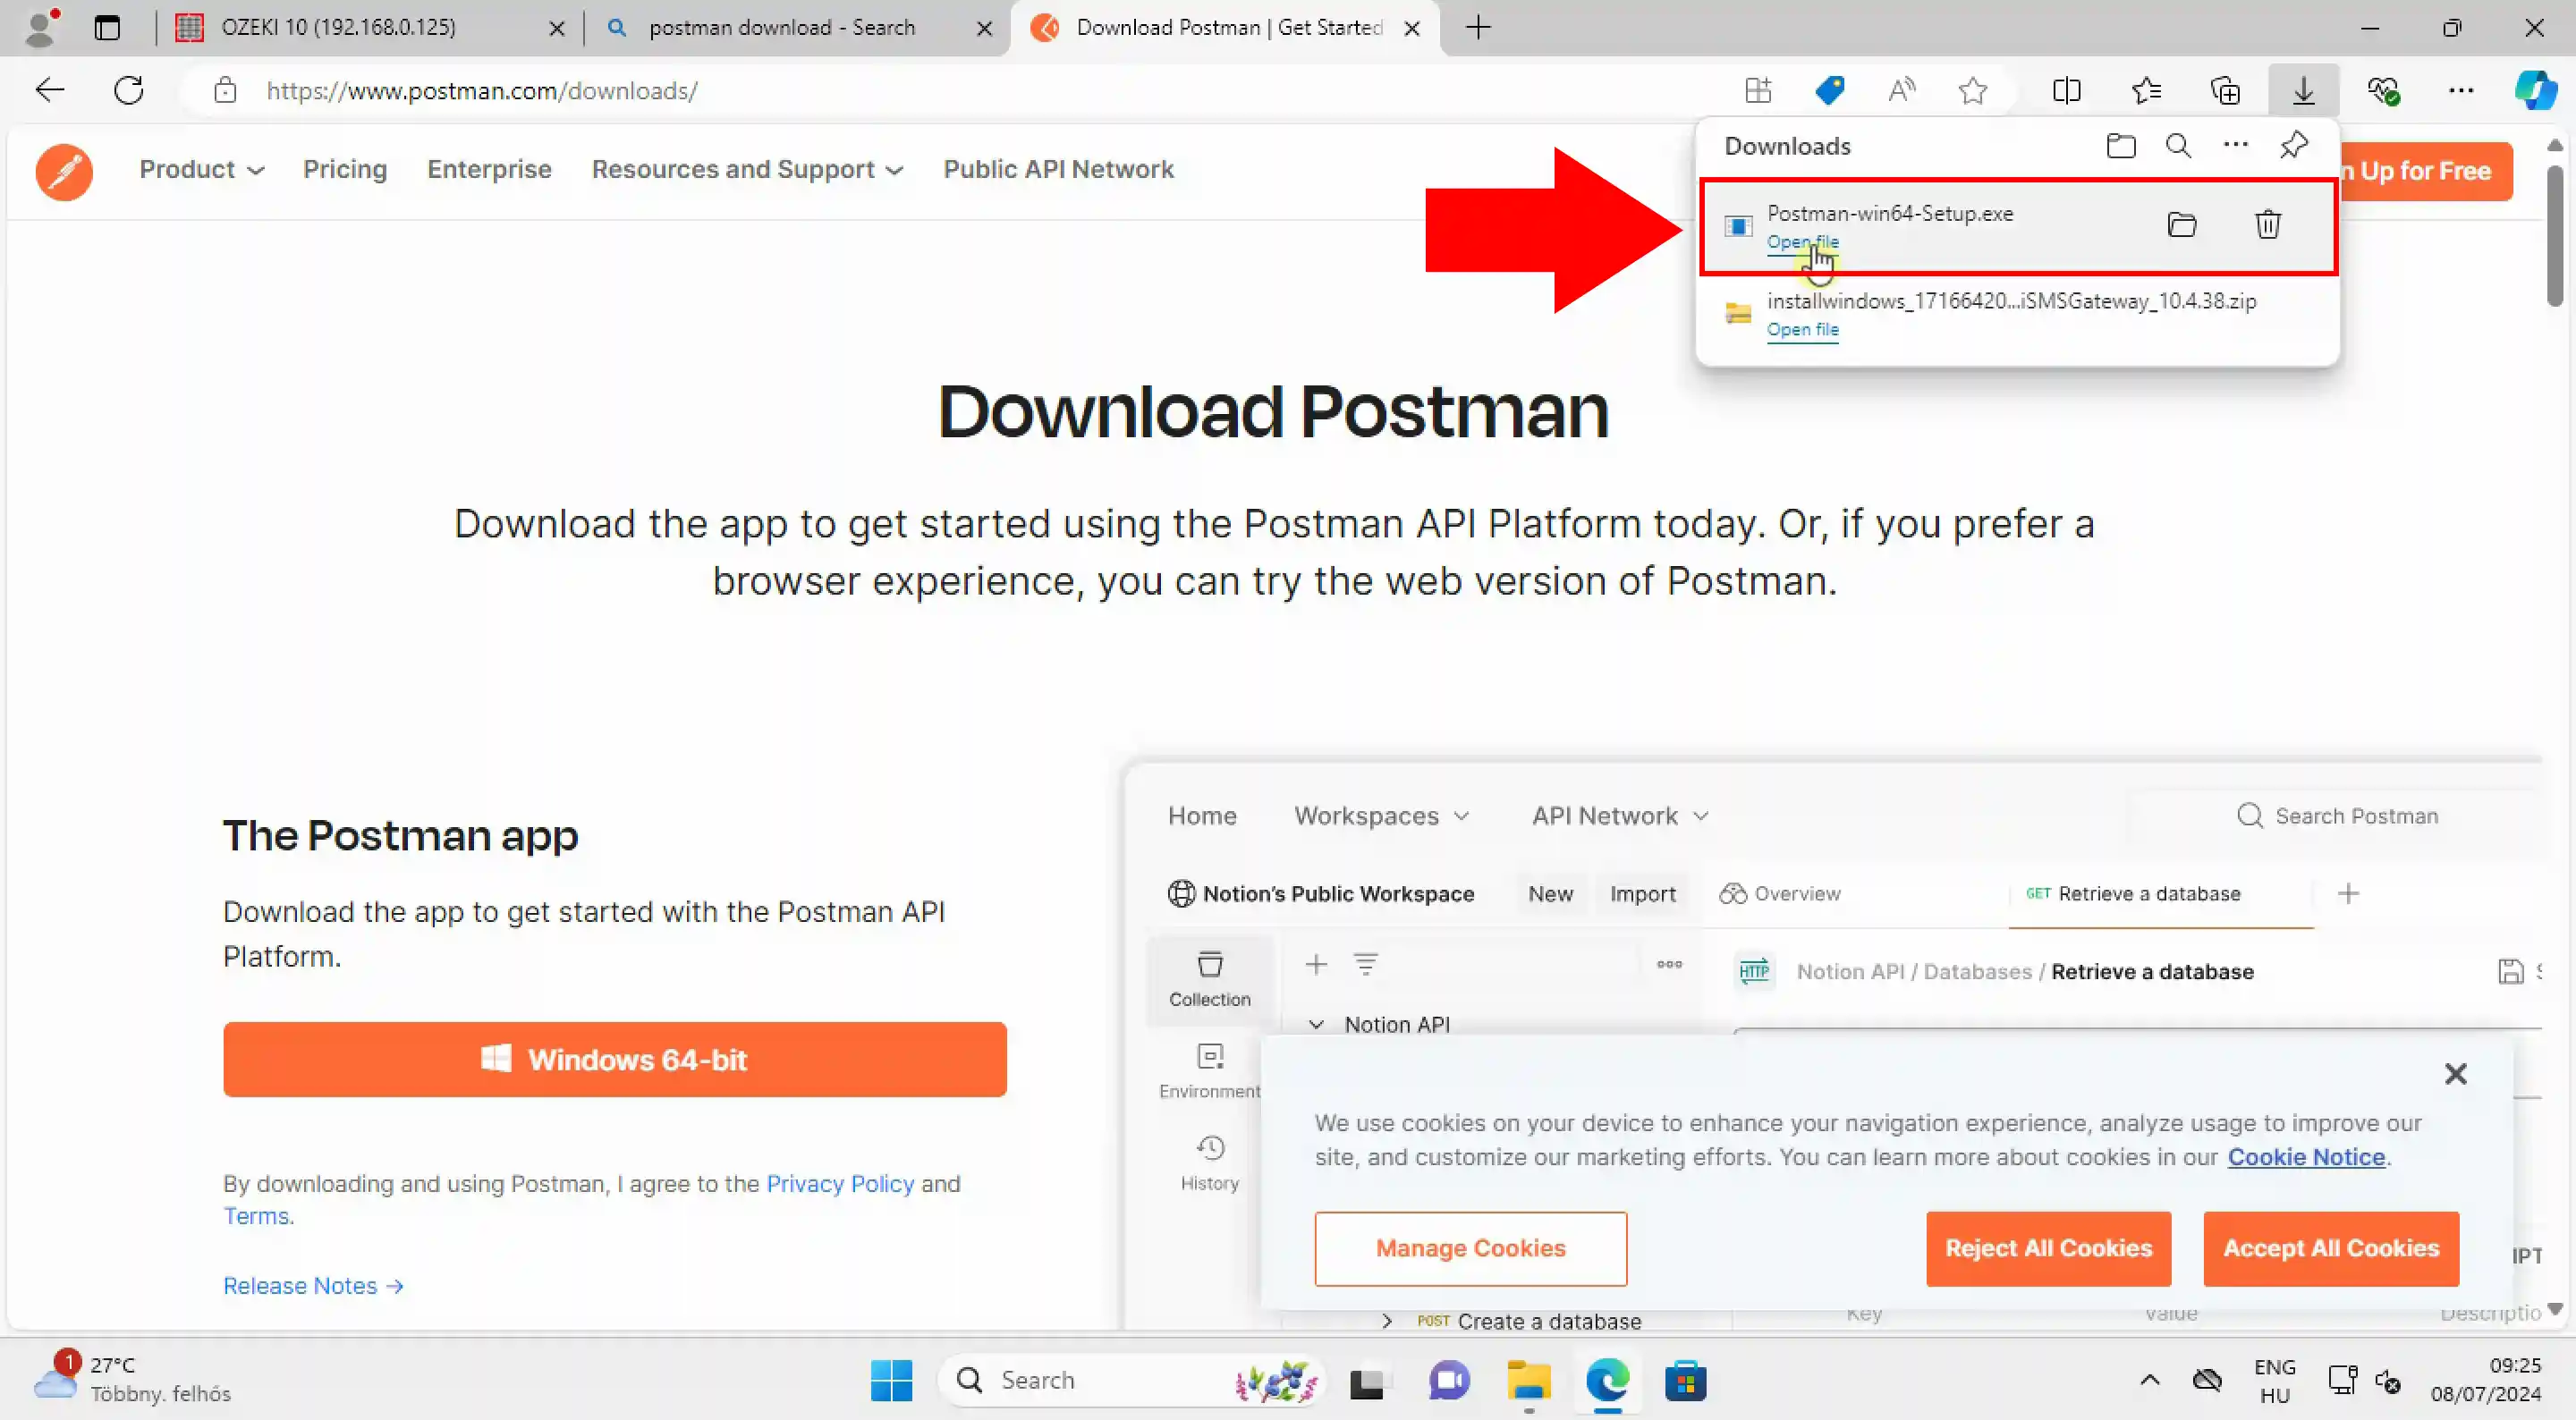
How to open the installer file
After the download has finished, locate your browser's downloads section (usually a little downward pointing arrow found in the top right corner), this is where you will find the installer file for Postman. Click on the 'Open file' button to start the Postman API Platform installation.
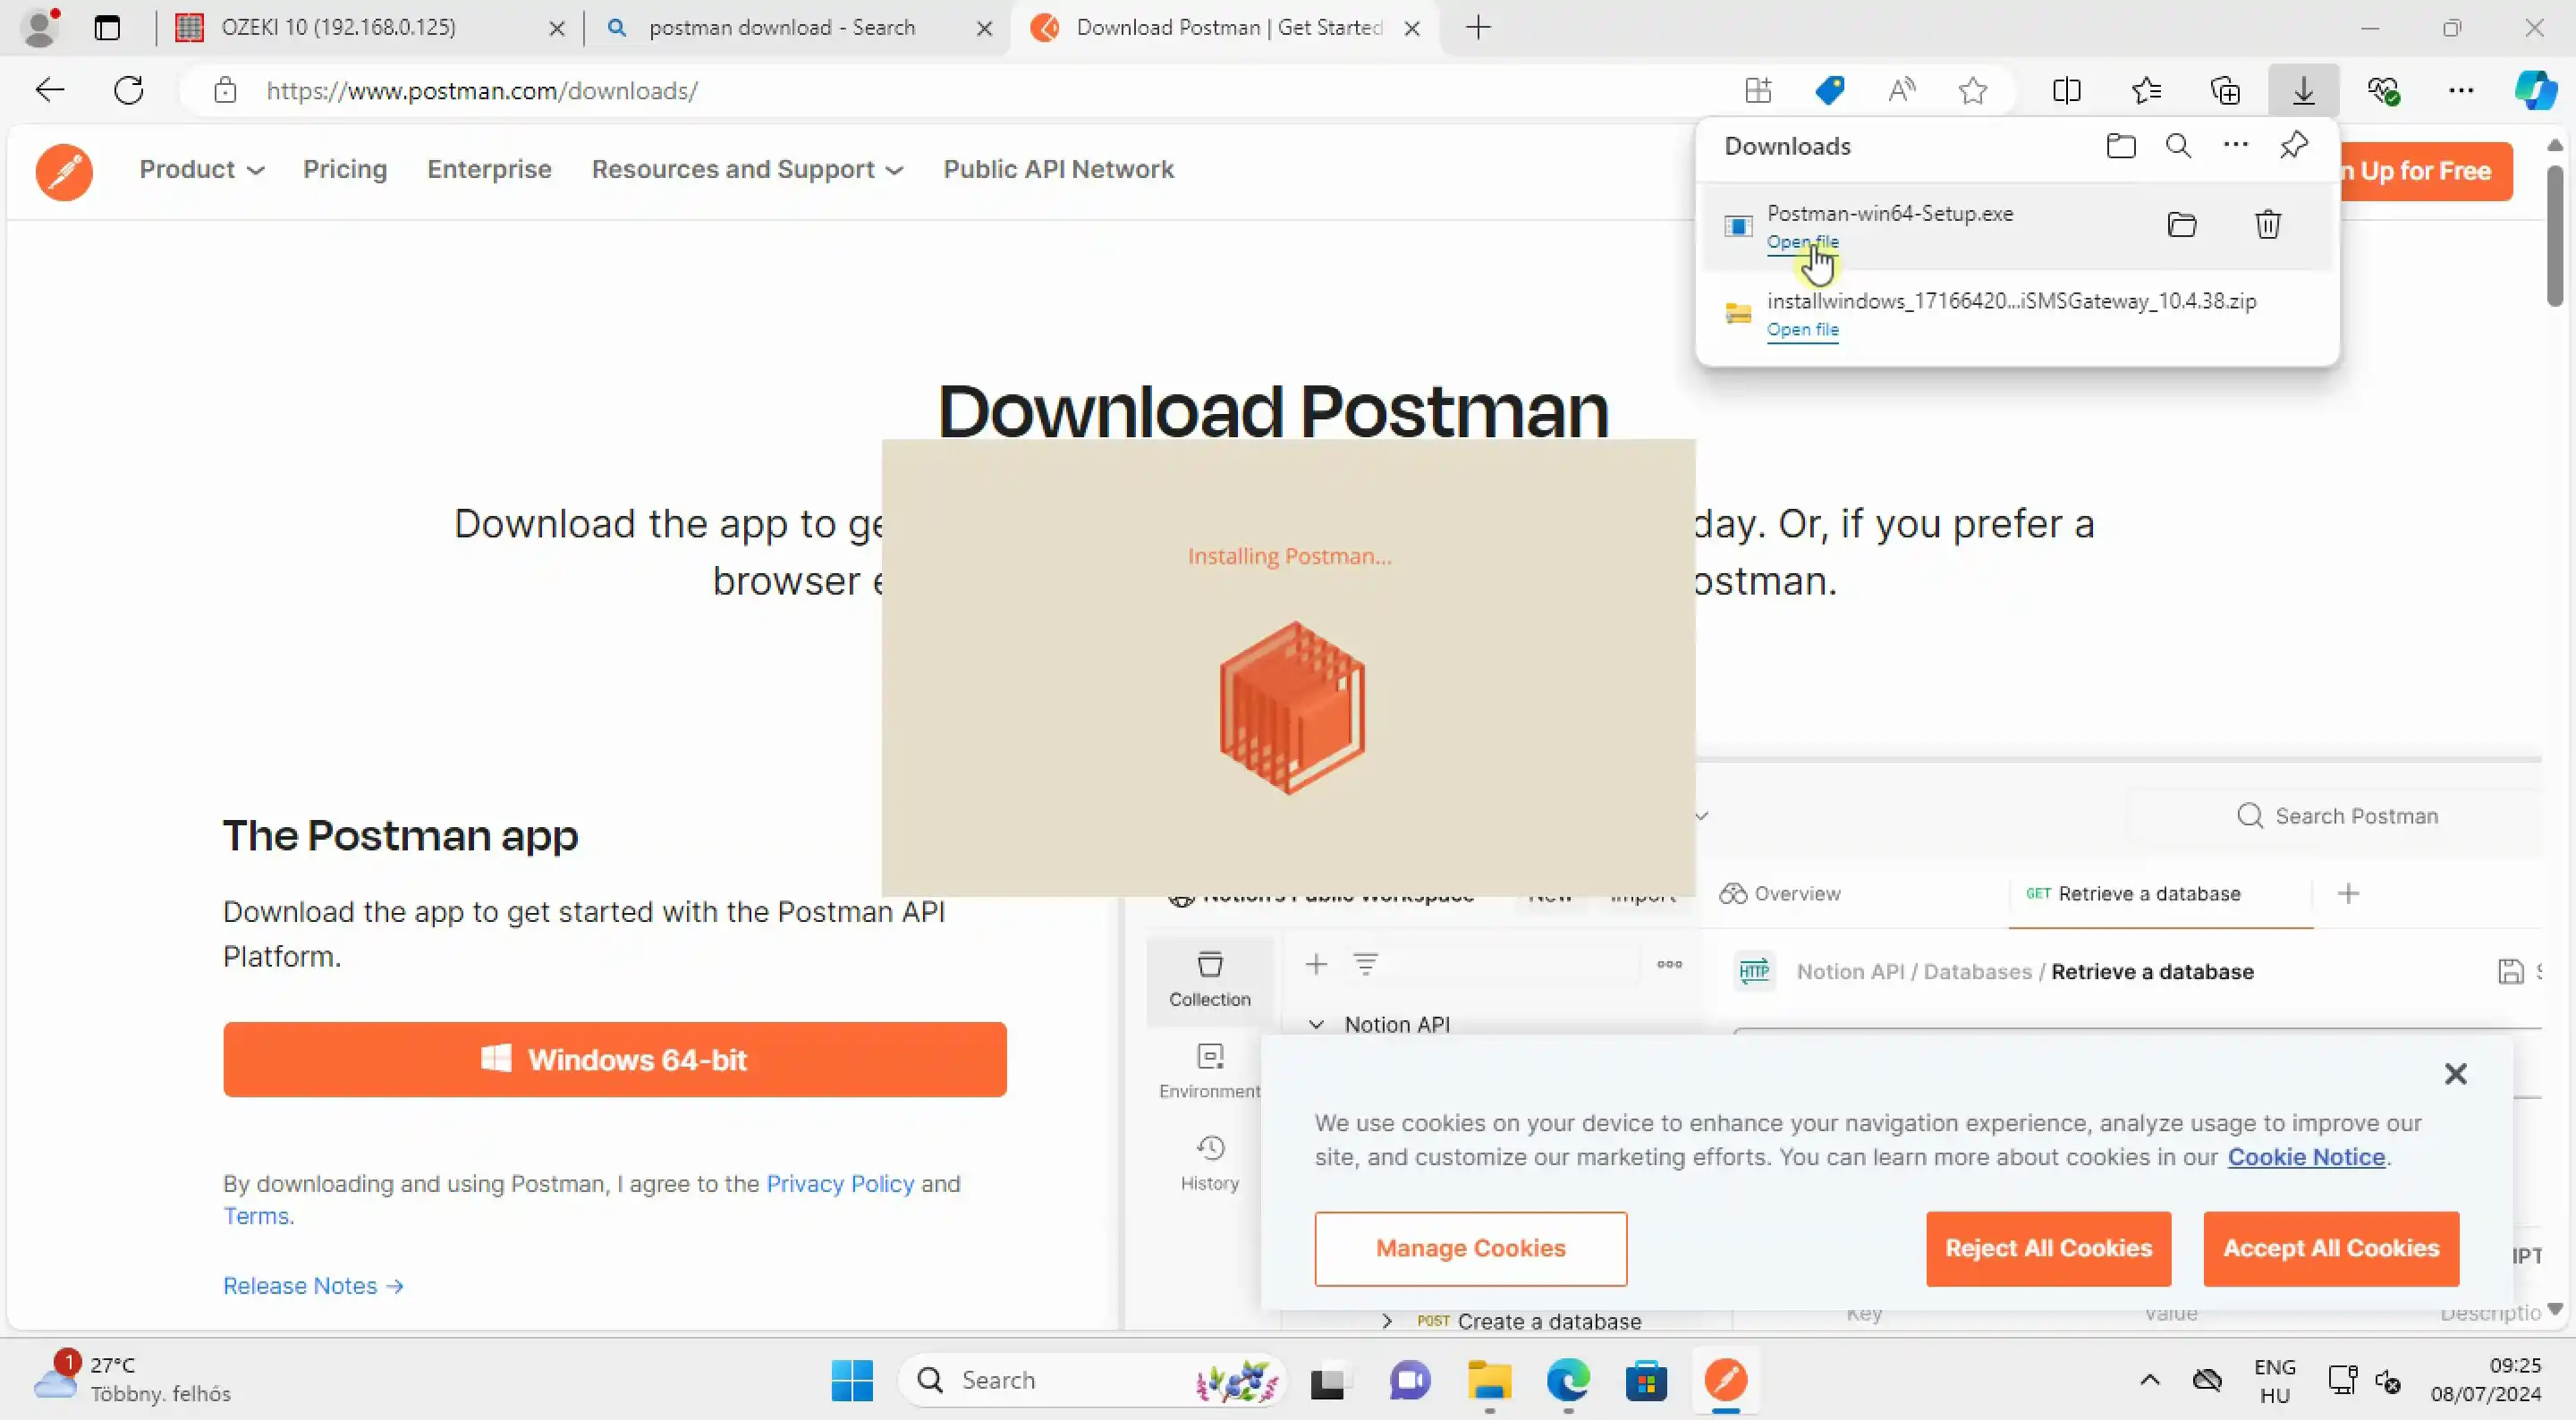
Installing Postman
The installation process is fully automated once you open the installer file, all you have to do is wait for it to finish (Figure 7). Once the installation is complete, you will have to register a Postman account, if you don't have one already. Postman provides a user-friendly interface and powerful features that make it easy to send and receive HTTP requests, which are used to verify the functionality of your SMS gateway setup.
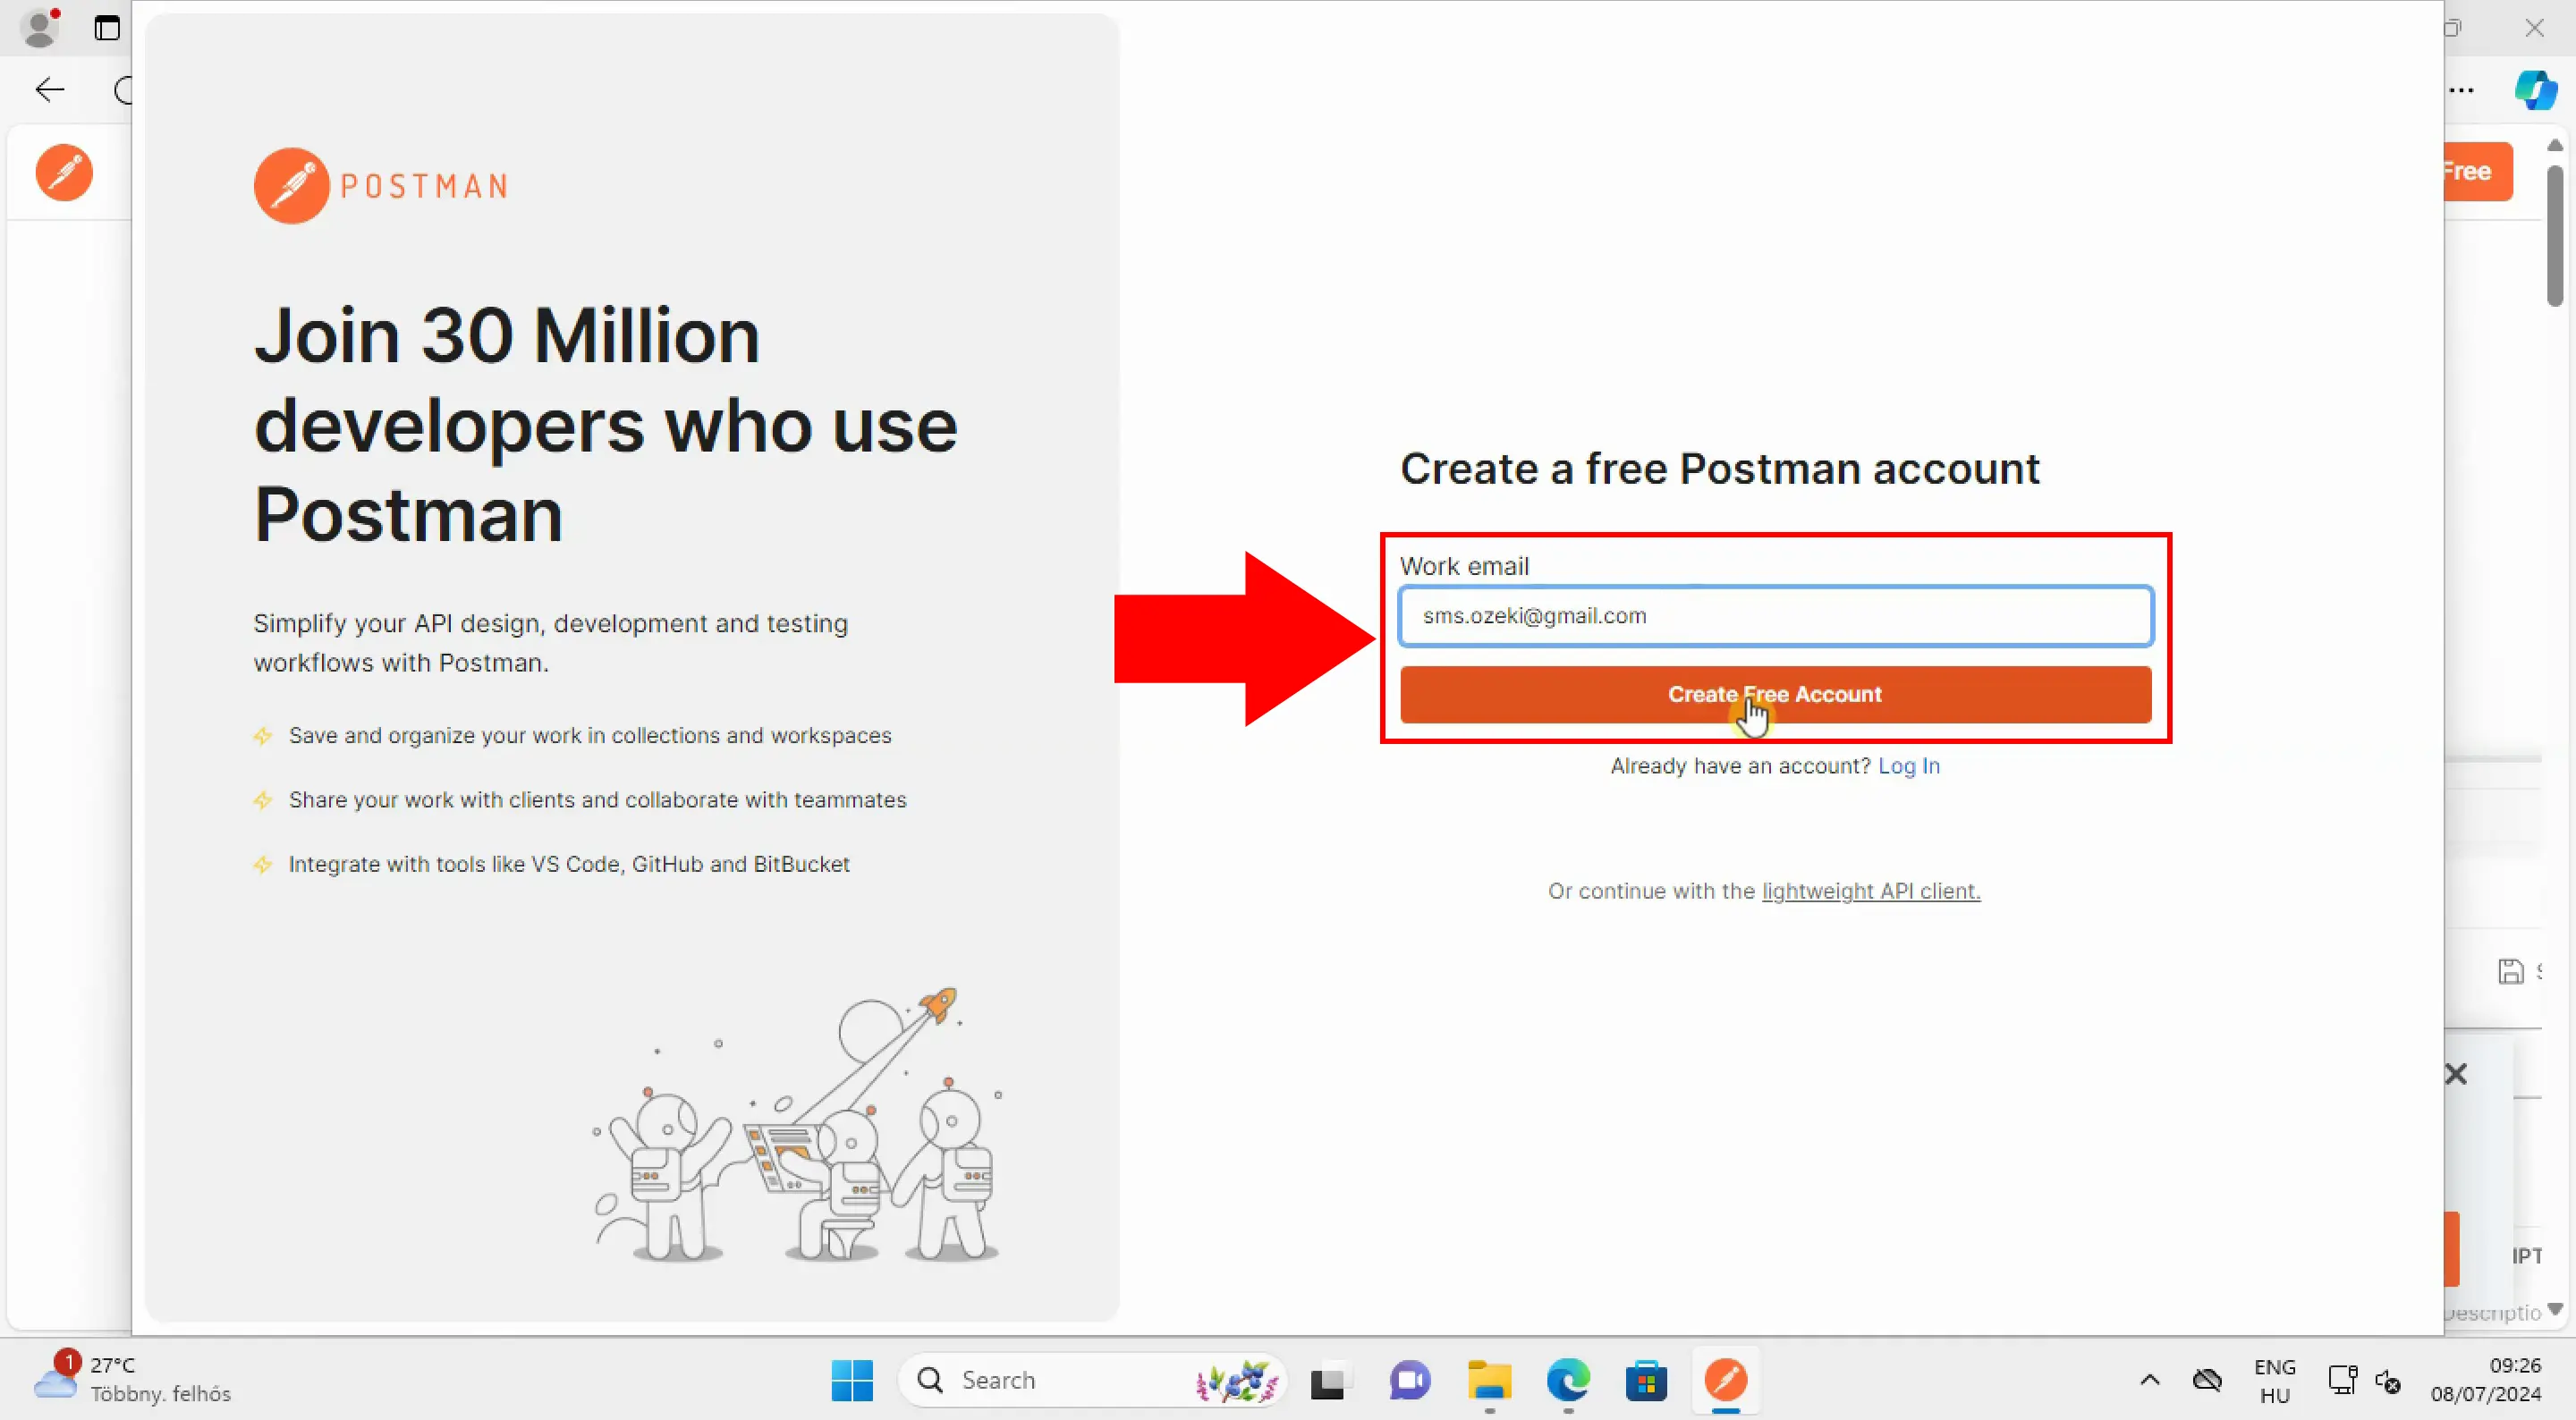
How to create a Postman account
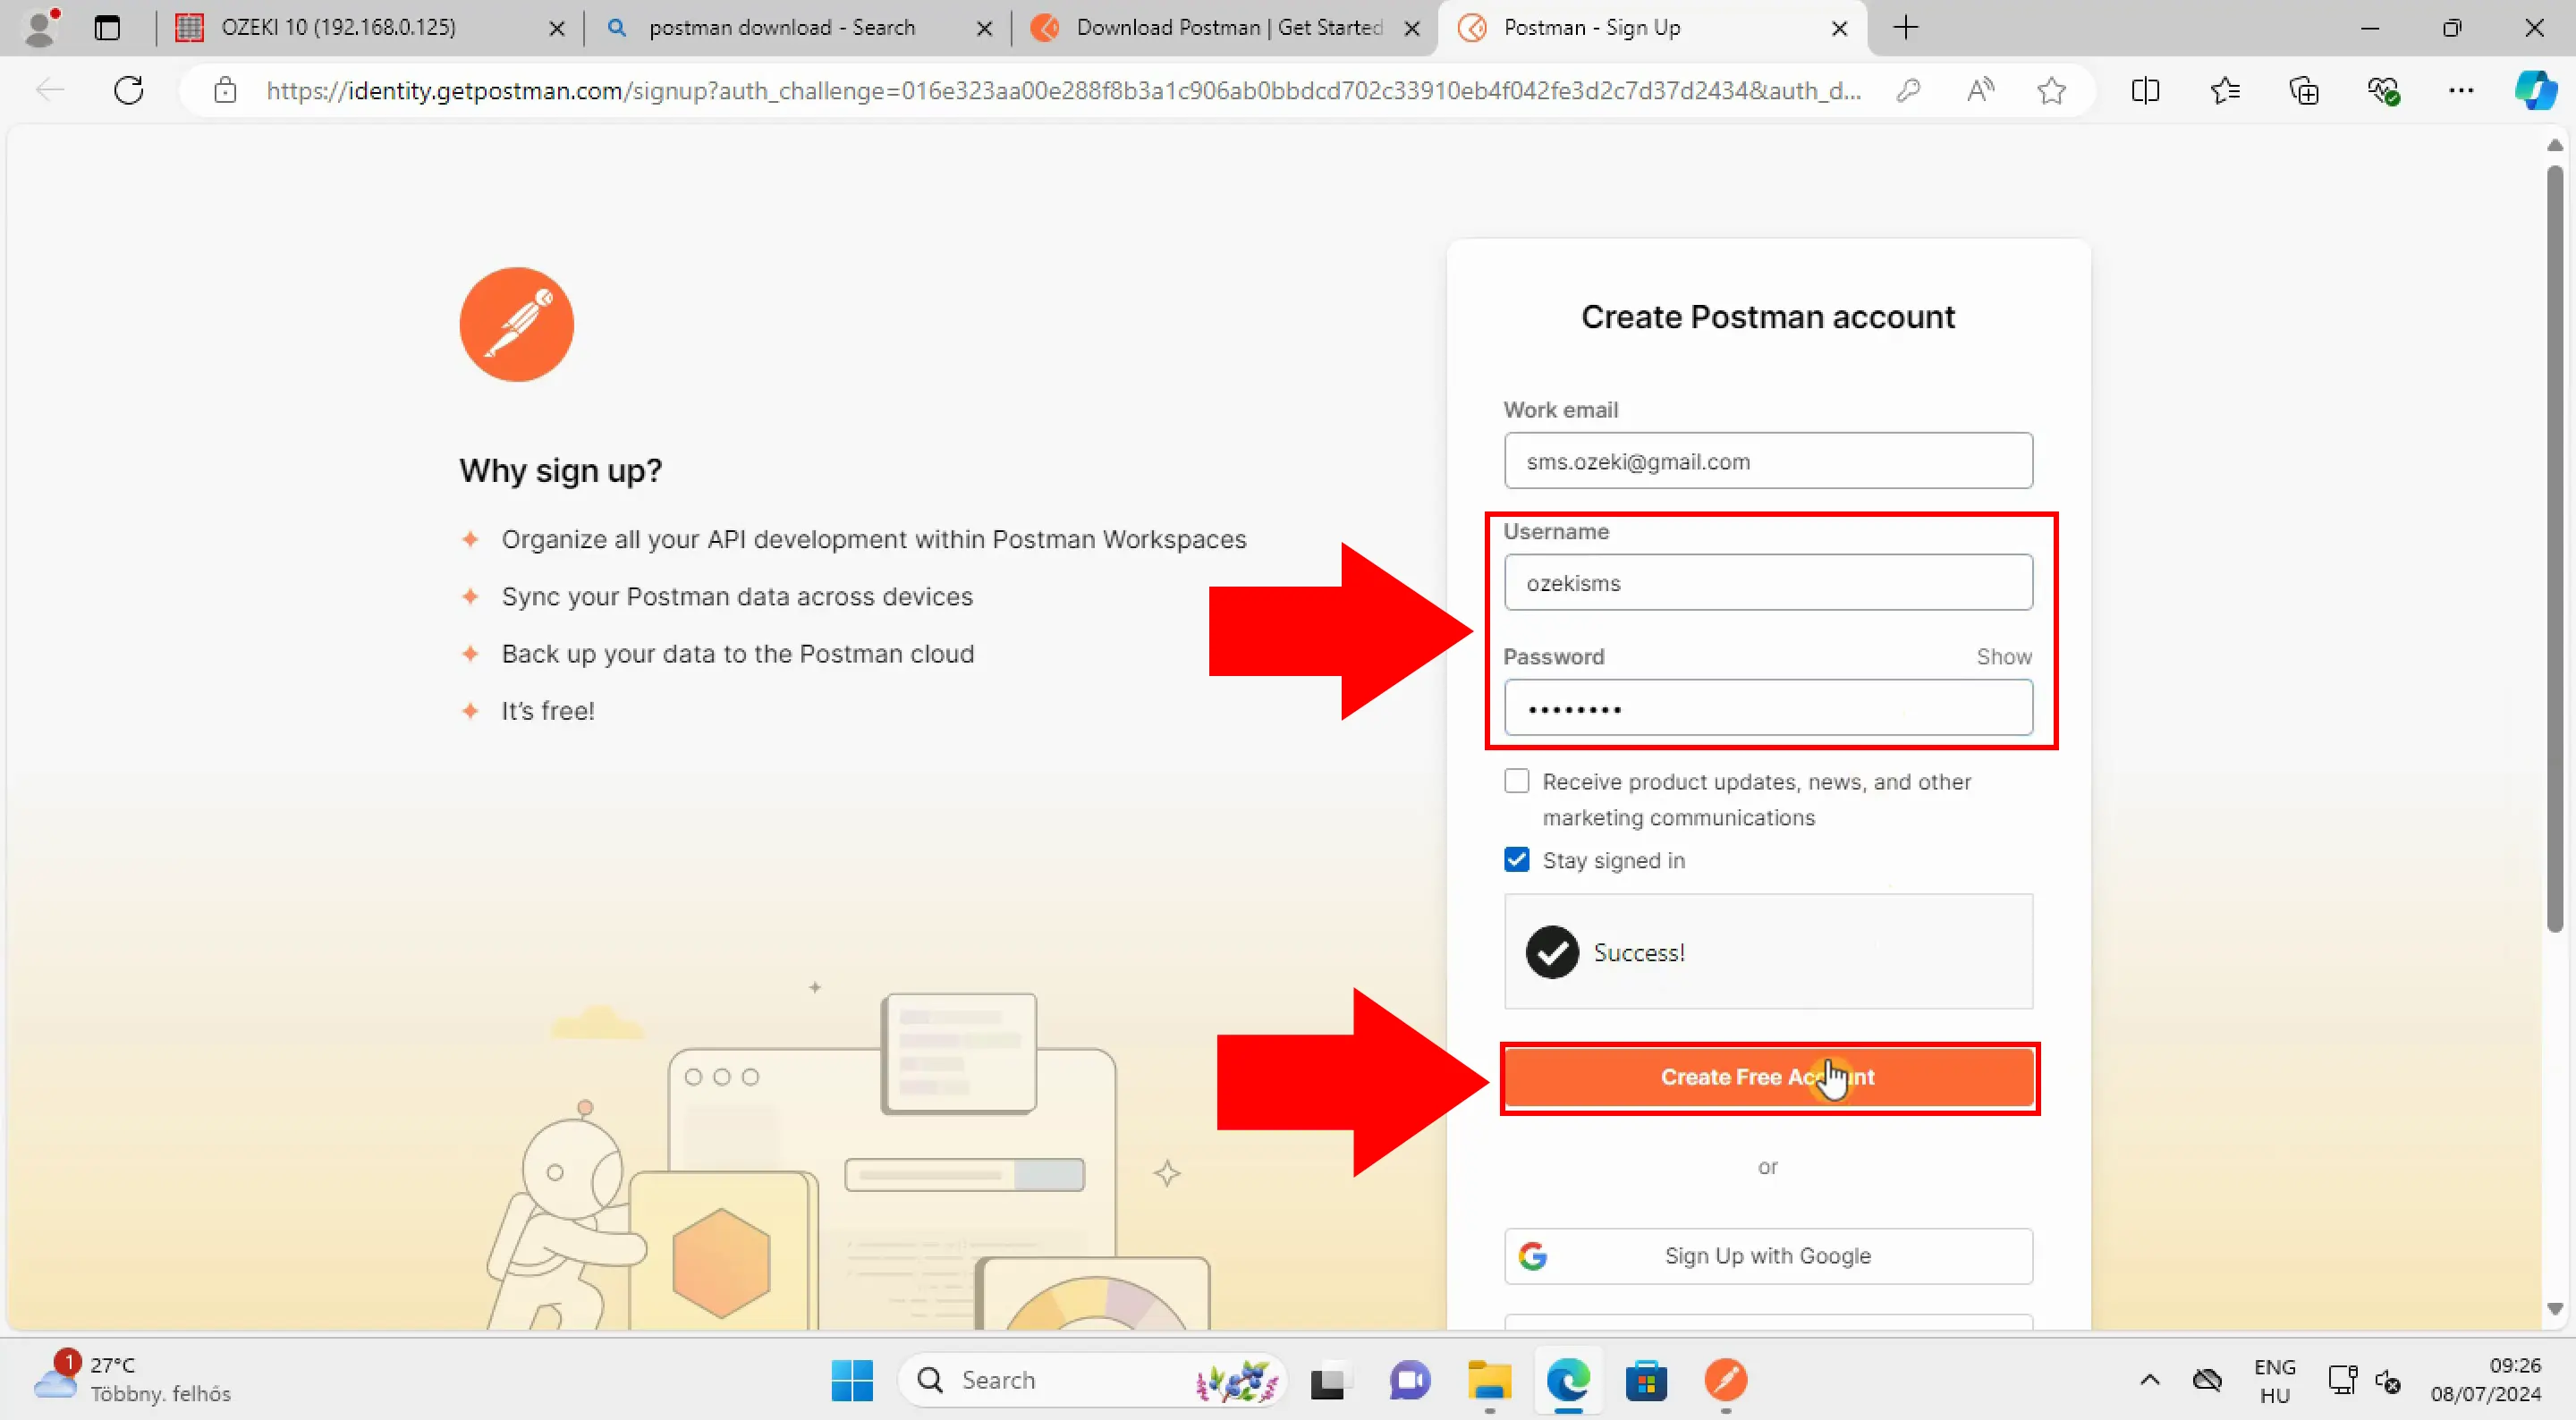
Postman will prompt you to create a free account if you don't have one already. To create an account, enter your preferred work email address in the provided field on the right side, then click the 'Create Free Account' button (Figure 8). This action will redirect you to a web browser where you can finalize the registration process. Having a Postman account is essential for accessing its full range of features and effectively testing your APIs, including the Ozeki SMS Gateway.
Provide Postman user name and password
Once the browser window opens, you will see fields on the right side for 'Username' and 'Password'. Set a username and a strong password for your account. Enter memorable yet secure information in these fields. After filling in these details, click the 'Create Free Account' button to finalize the registration process (Figure 9).
Provide your name and role
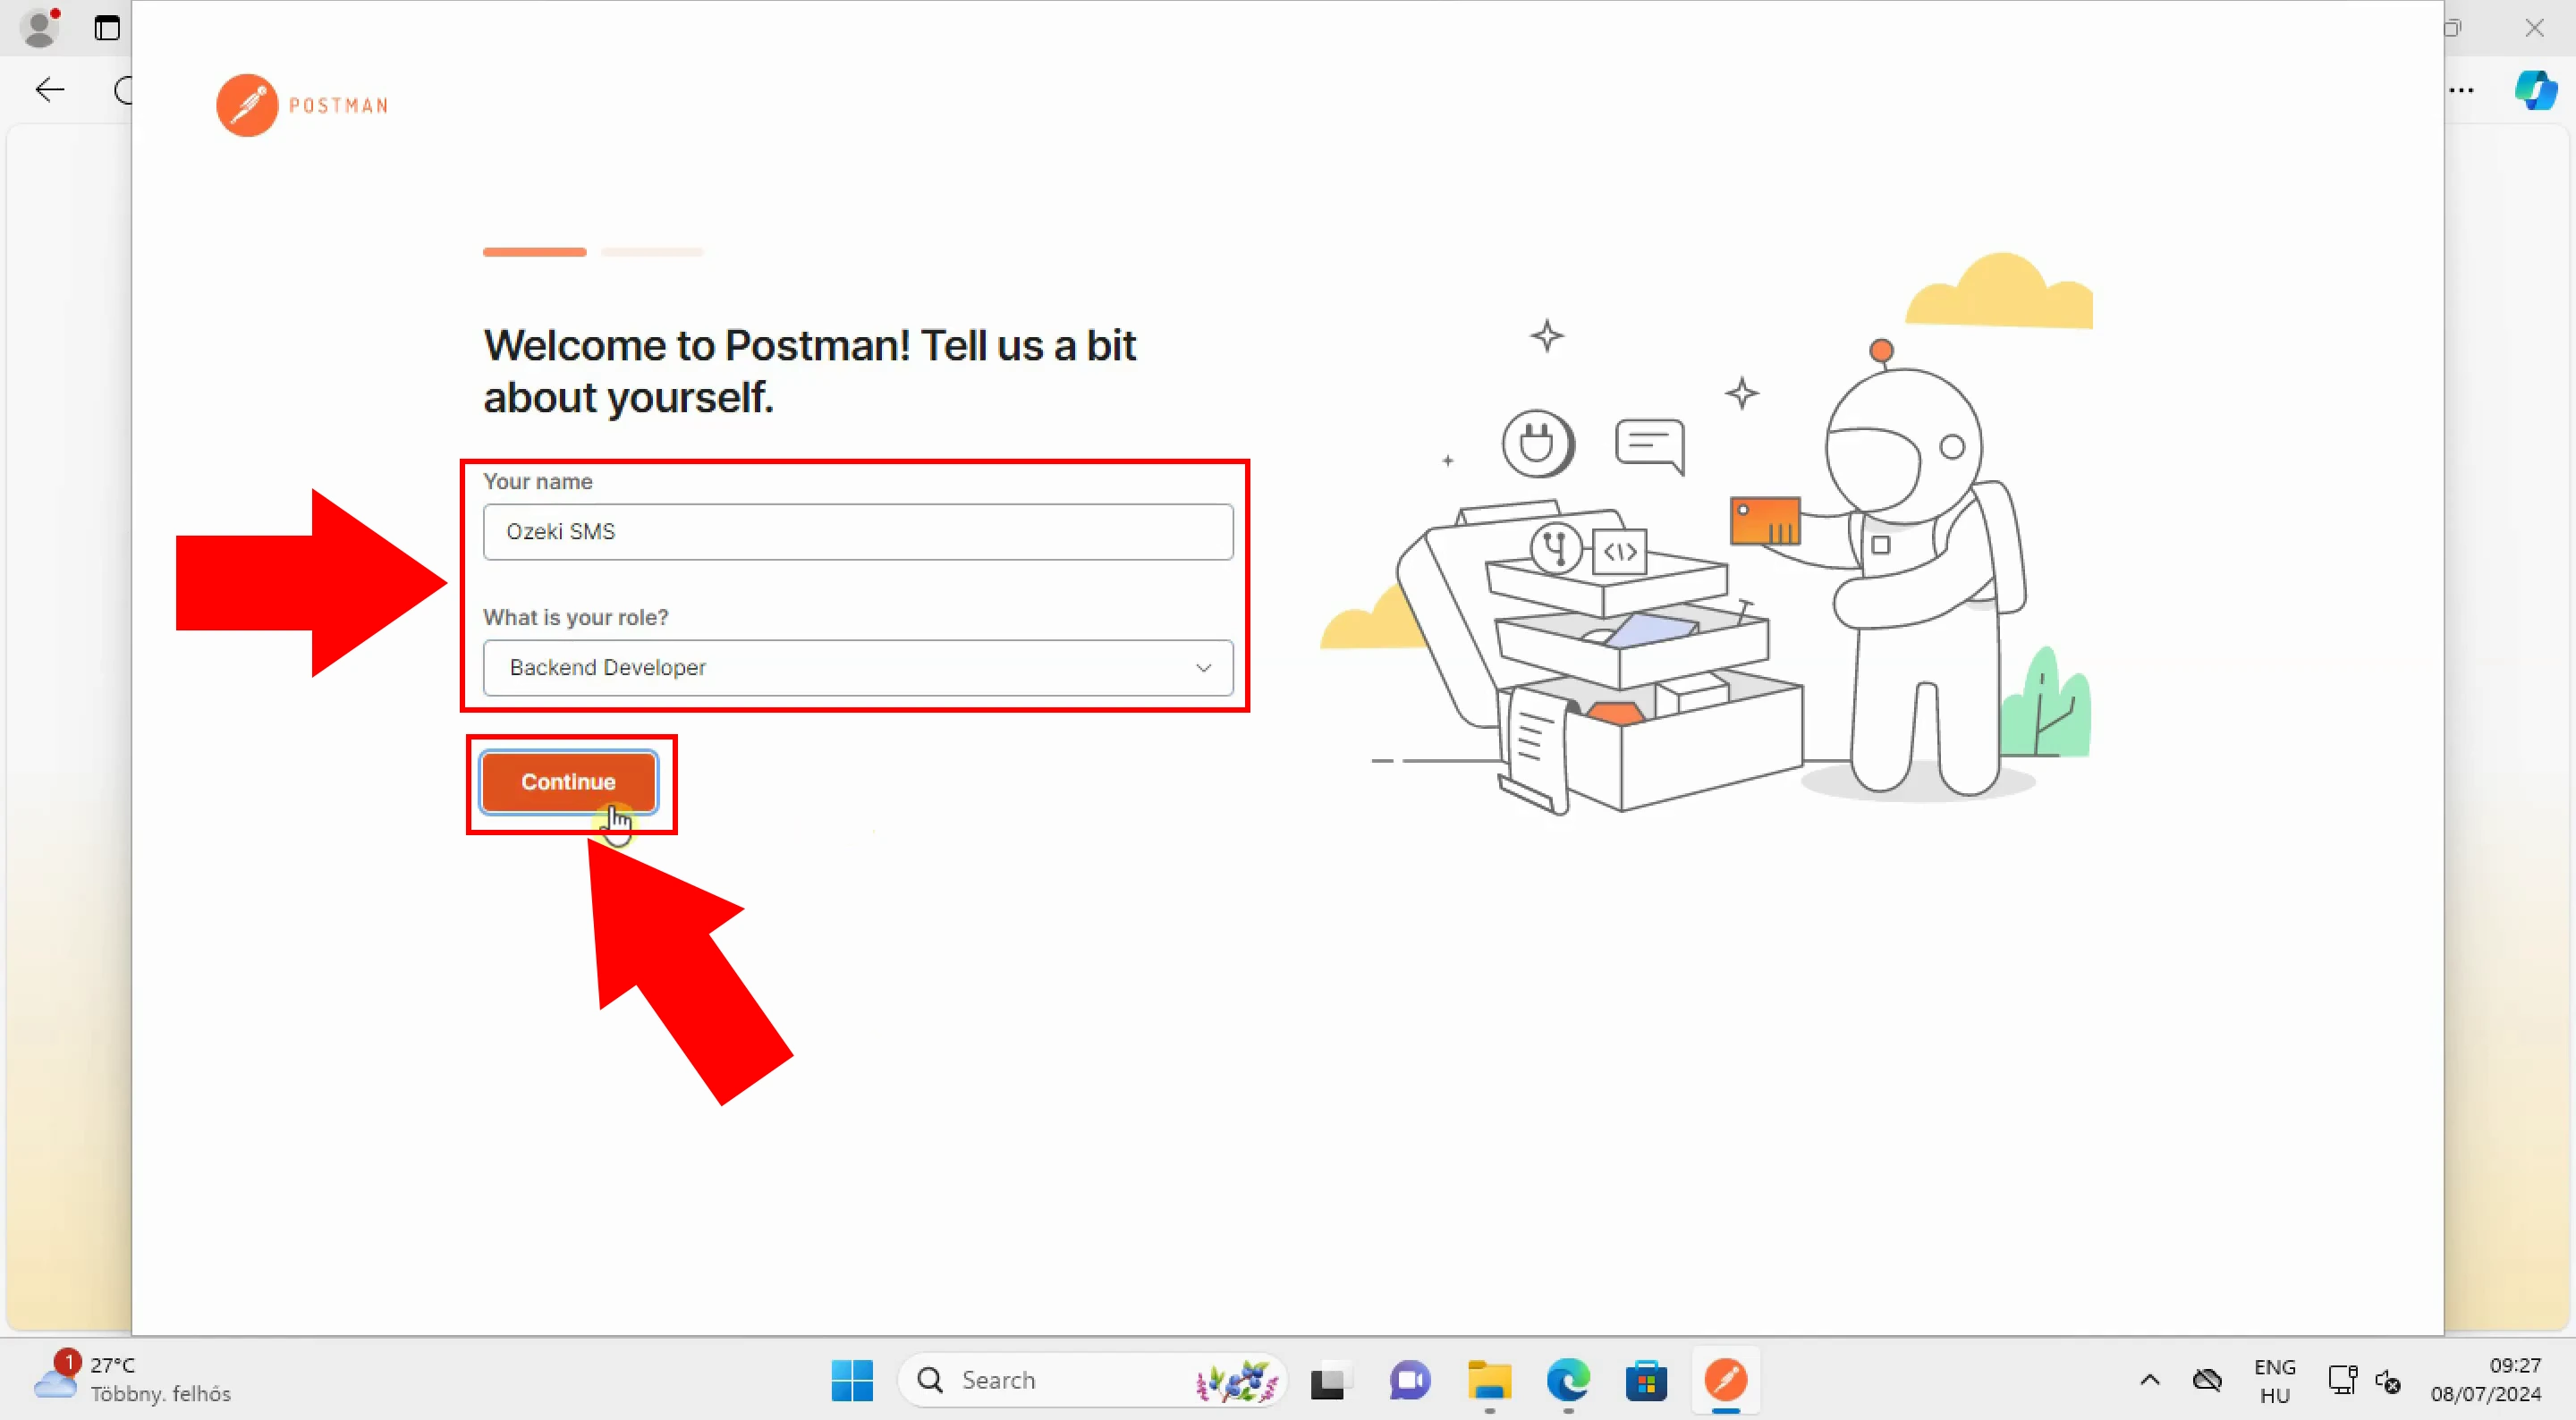
In the next step, you will be redirected to a different page prompting you to enter your name and job role. Fill in the 'Your name' textbox with your name and select your role from the dropdown menu under 'What is your role?' (Figure 10). Once you have provided this information, locate and click on the 'Continue' button to proceed. This step helps Postman tailor the experience to better suit your needs and preferences, enhancing your API testing workflow.
Postman has started
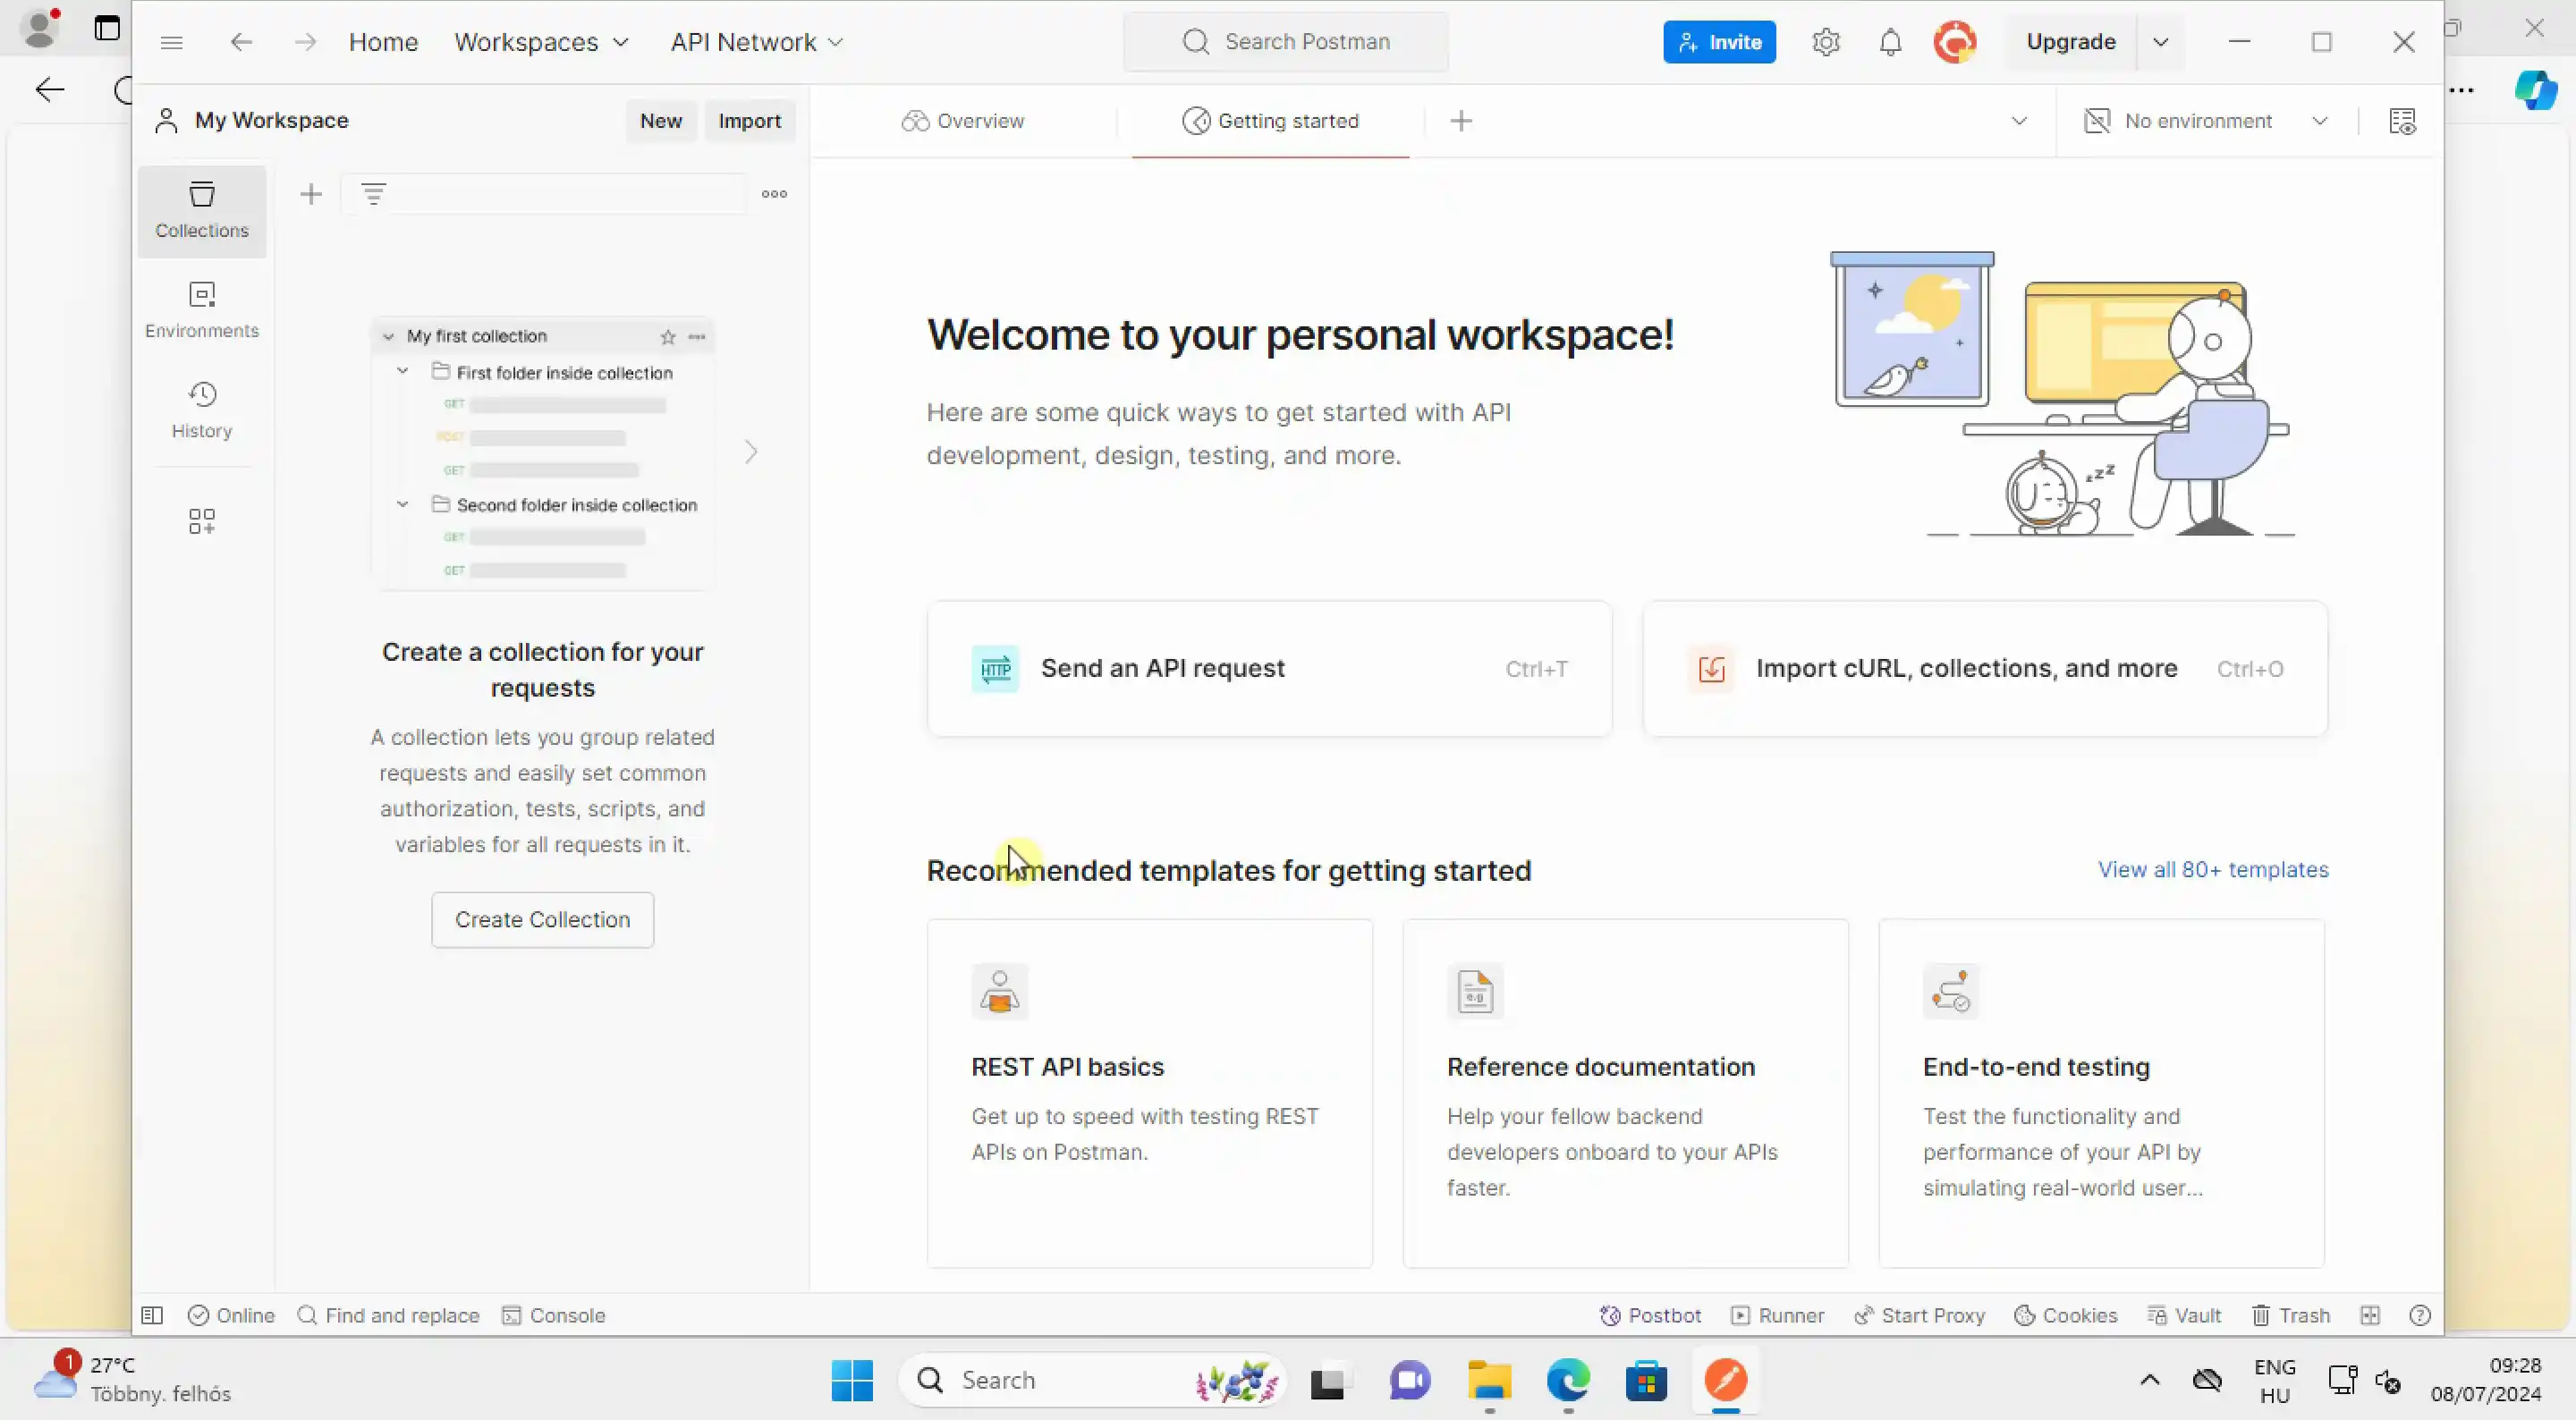
If you have correctly followed the previous steps, Postman will finally launch. The main dashboard, as shown in Figure 11, will welcome you. From here, you can access your personal workspace and begin testing your API. This main page provides a central hub for all your API development and testing needs, allowing you to manage your requests, environments, and more efficiently.
Step 3 - Send a HTTP GET request with Postman to send an SMS
How to send a HTTP GET request with Postman to test Ozeki SMS Gateway API (Video tutorial)
This short 39-second video demonstrates how to send an HTTP GET request using Postman to test the Ozeki SMS Gateway API. Starting from the Postman main dashboard, you will learn how to add a new request and send it to your HTTP user created in Ozeki SMS Gateway. You will also find out, how to check the received message in Ozeki SMS Gateway and view the message details. This quick and clear video ensures you can efficiently test your API requests with ease.
How to add a new request
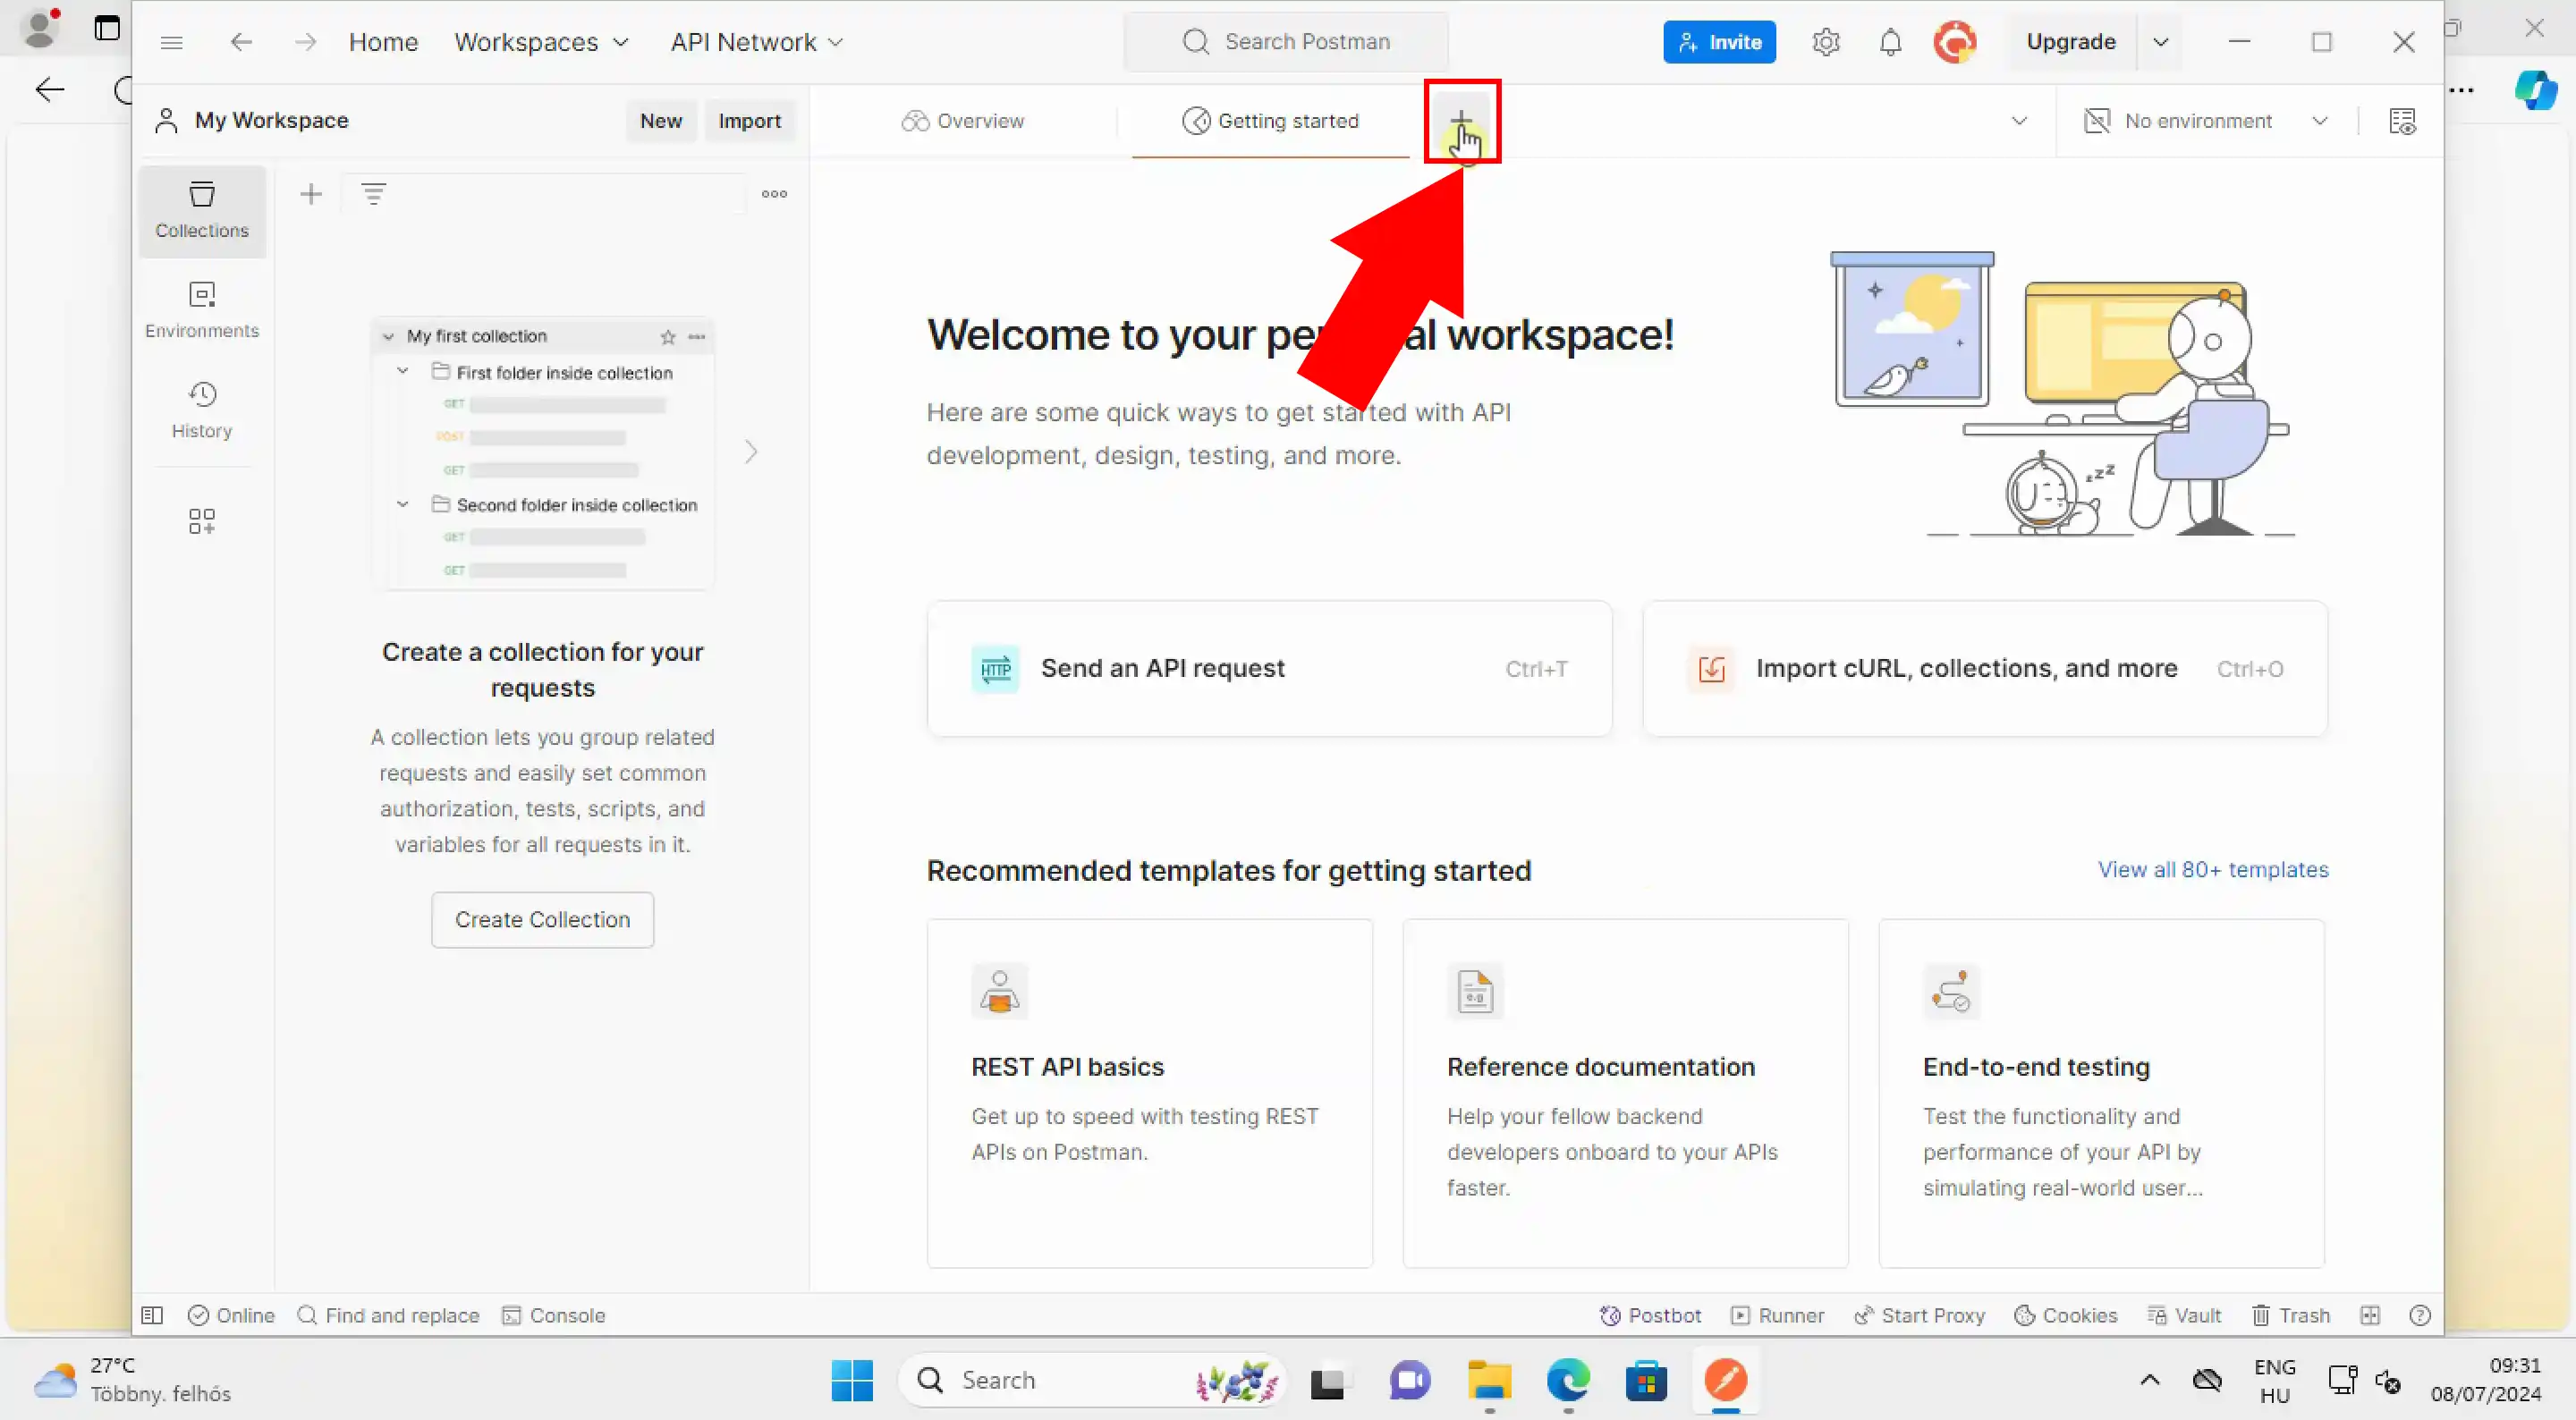
To create a new request, simply click on '+' button as shown in Figure 12. This will initiate the process of creating a new API request in Postman. From here, you will be able to configure the request details, such as the HTTP method, URL, headers, and body, to test your Ozeki SMS Gateway API effectively.
Insert request URL
To perform the test, we will utilize an HTTP GET request. Begin by locating the URL textbox within the Postman interface, as illustrated in Figure 13. Enter your request URL in this textbox. You can find an example request at 'Step 4 - Example request' if you scroll down. Make sure to replace the username and password in the request with the username and password you set when making the HTTP user.
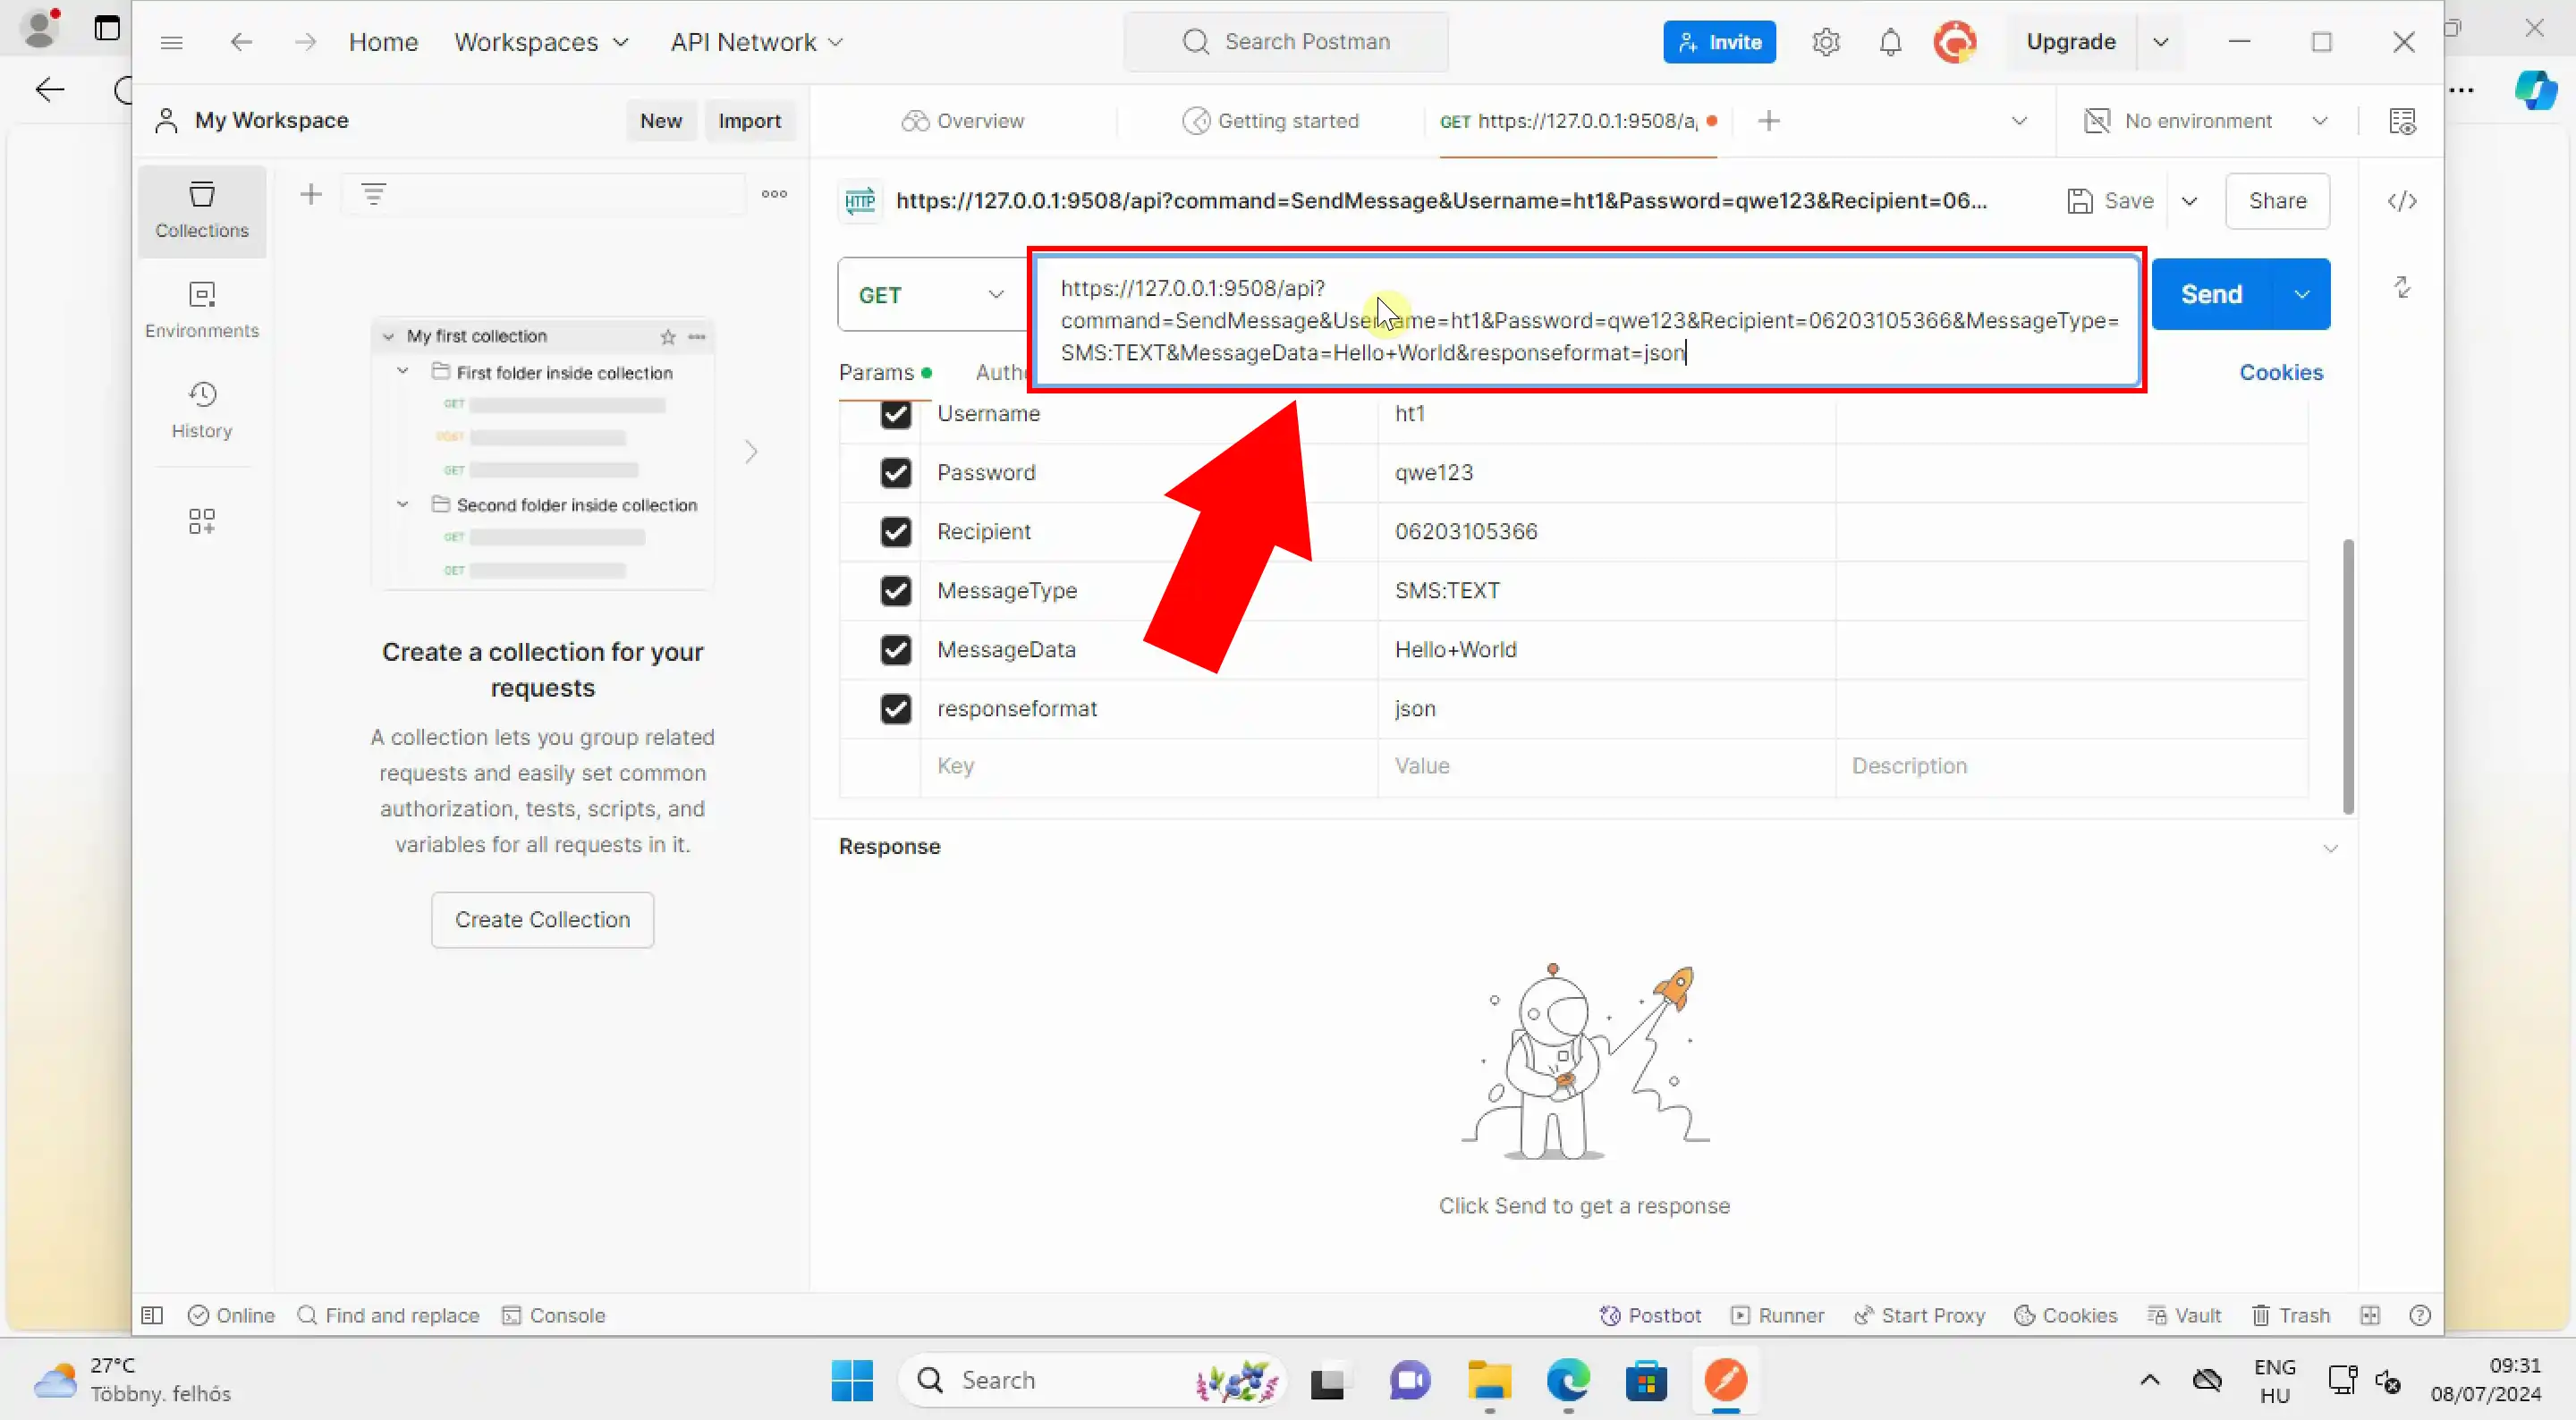
How to send the request
Once the previous steps were executed correctly, click on the blue Send button located in the upper right corner of the Postman interface. (Figure 14) This action will send your HTTP GET request to the Ozeki SMS Gateway, allowing you to test the API functionality and ensure that your setup is working as expected.
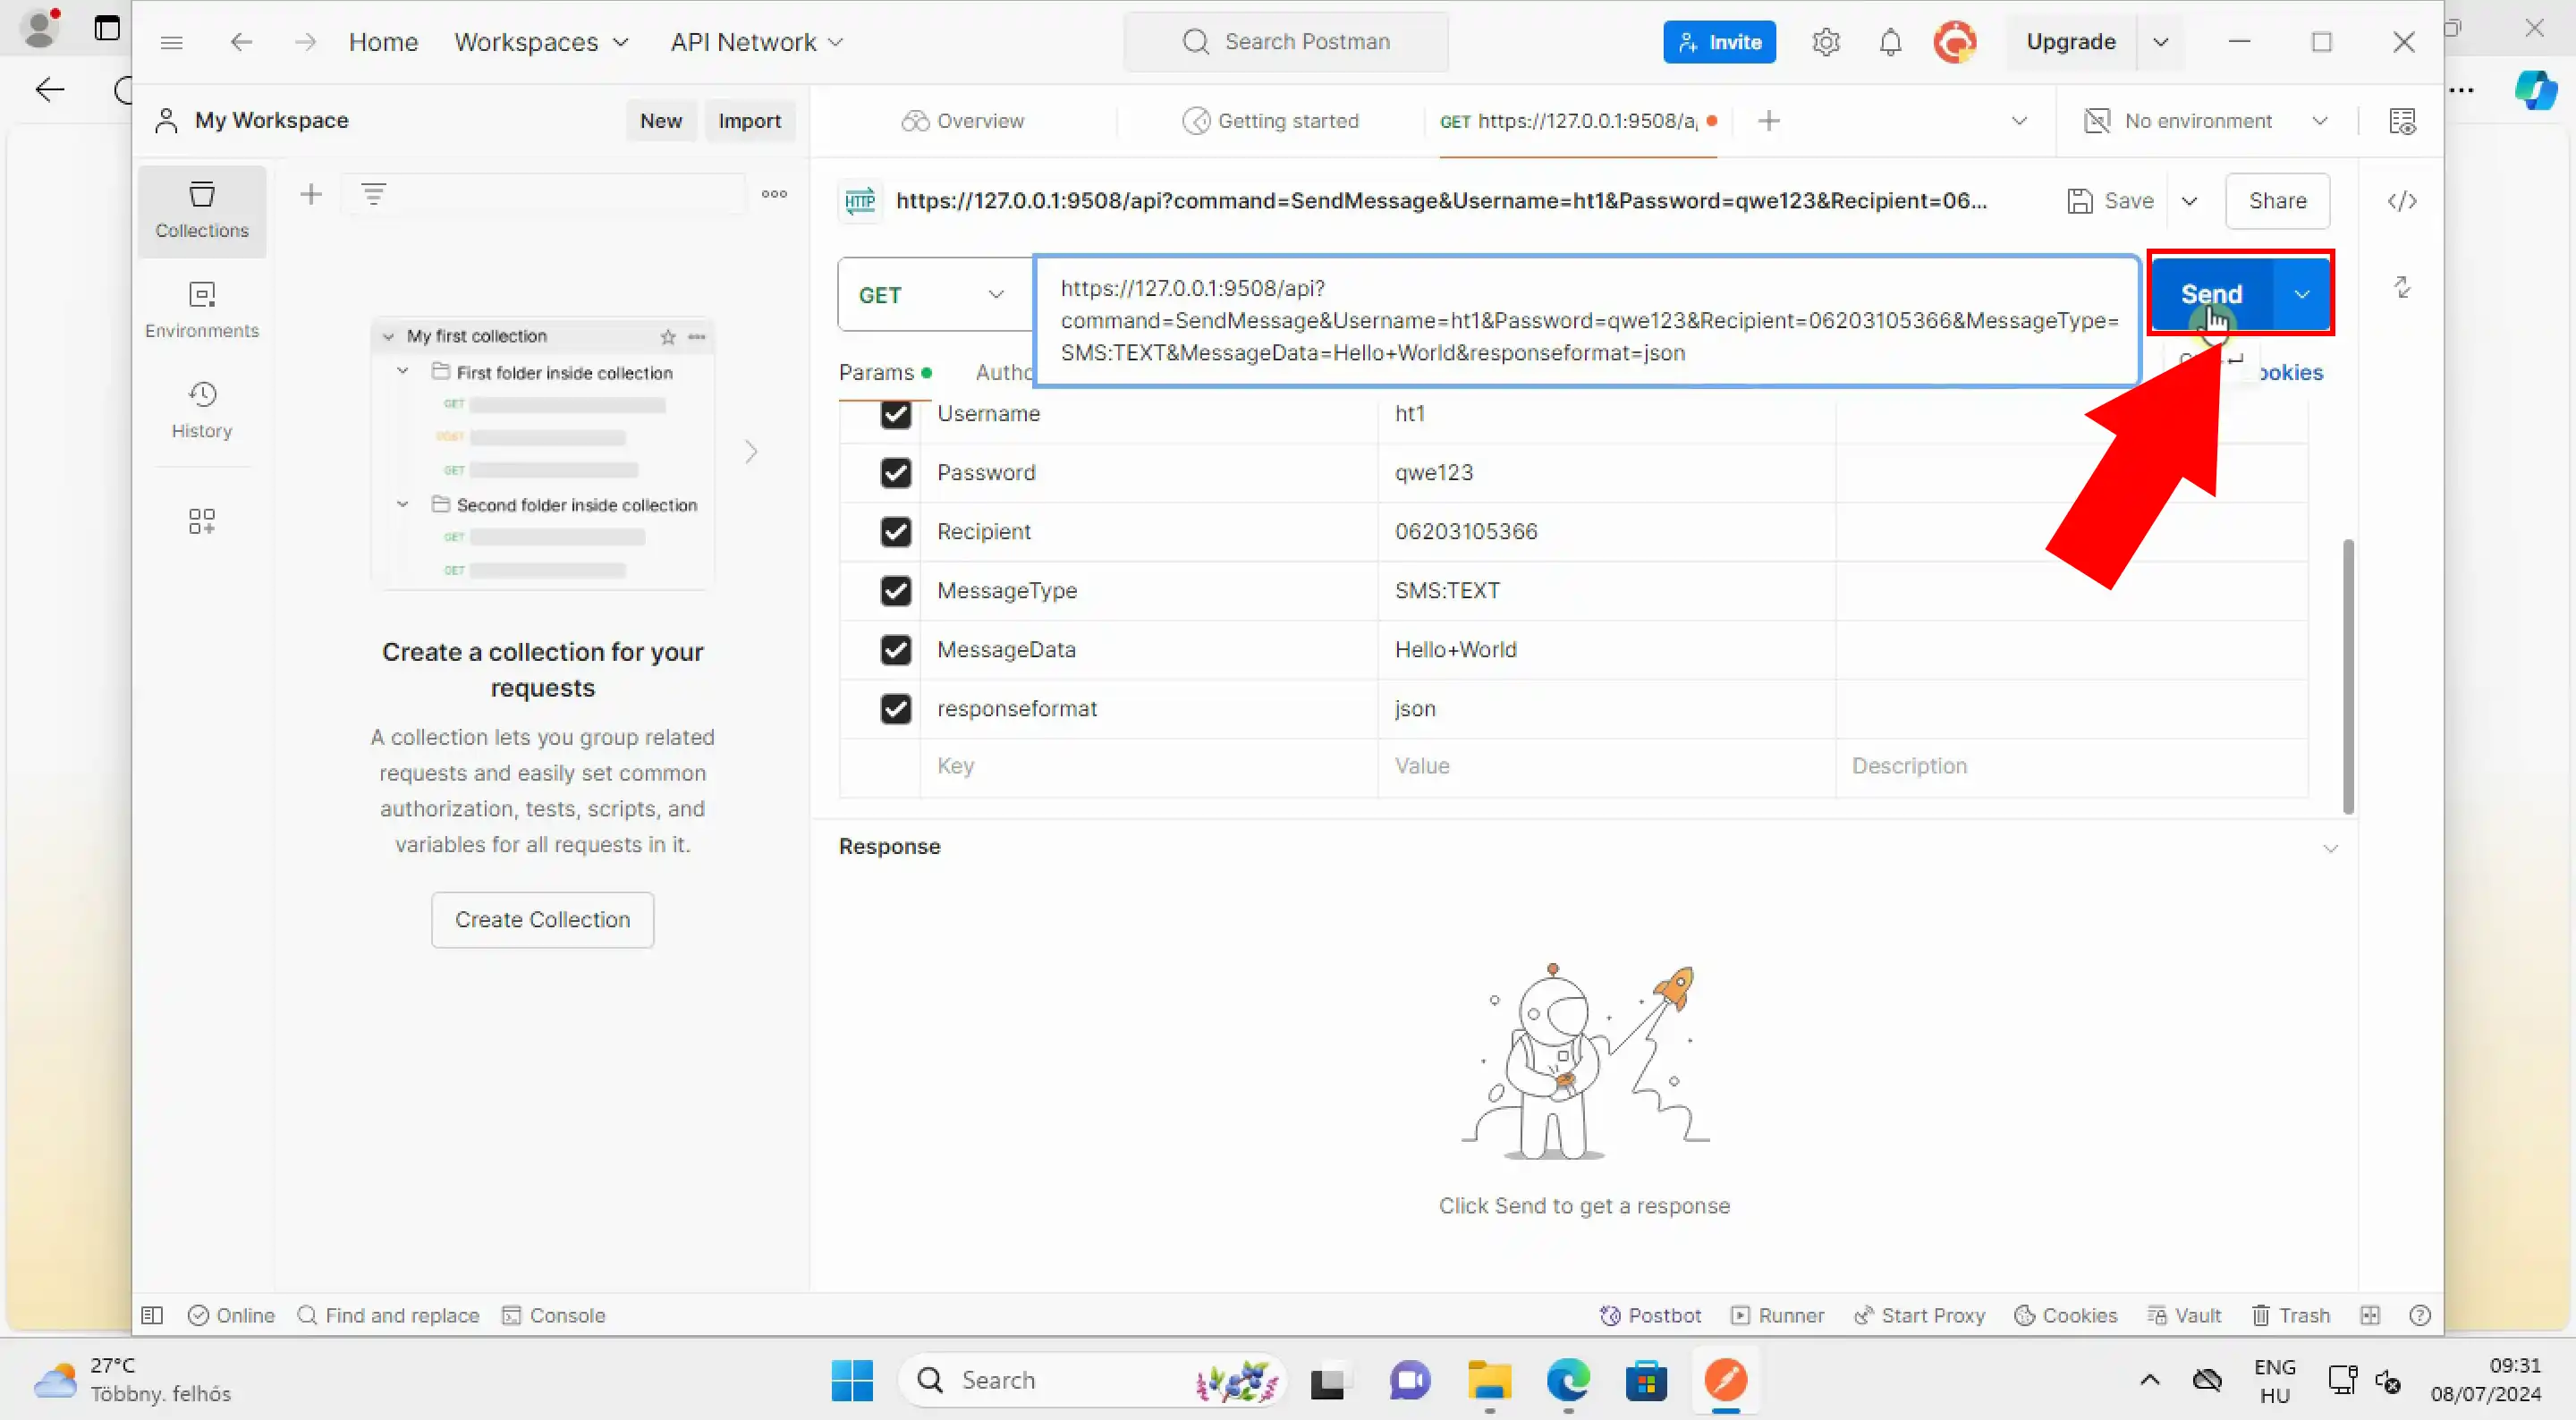
Check your received response
If the HTTP GET request was successful, you will receive a response that can be viewed at the bottom of the Postman interface. The success of the request is indicated by a status code of 0 and a status message stating 'Message accepted for delivery.' (Figure 15) This confirmation means that the message has indeed been sent through the Ozeki SMS Gateway.
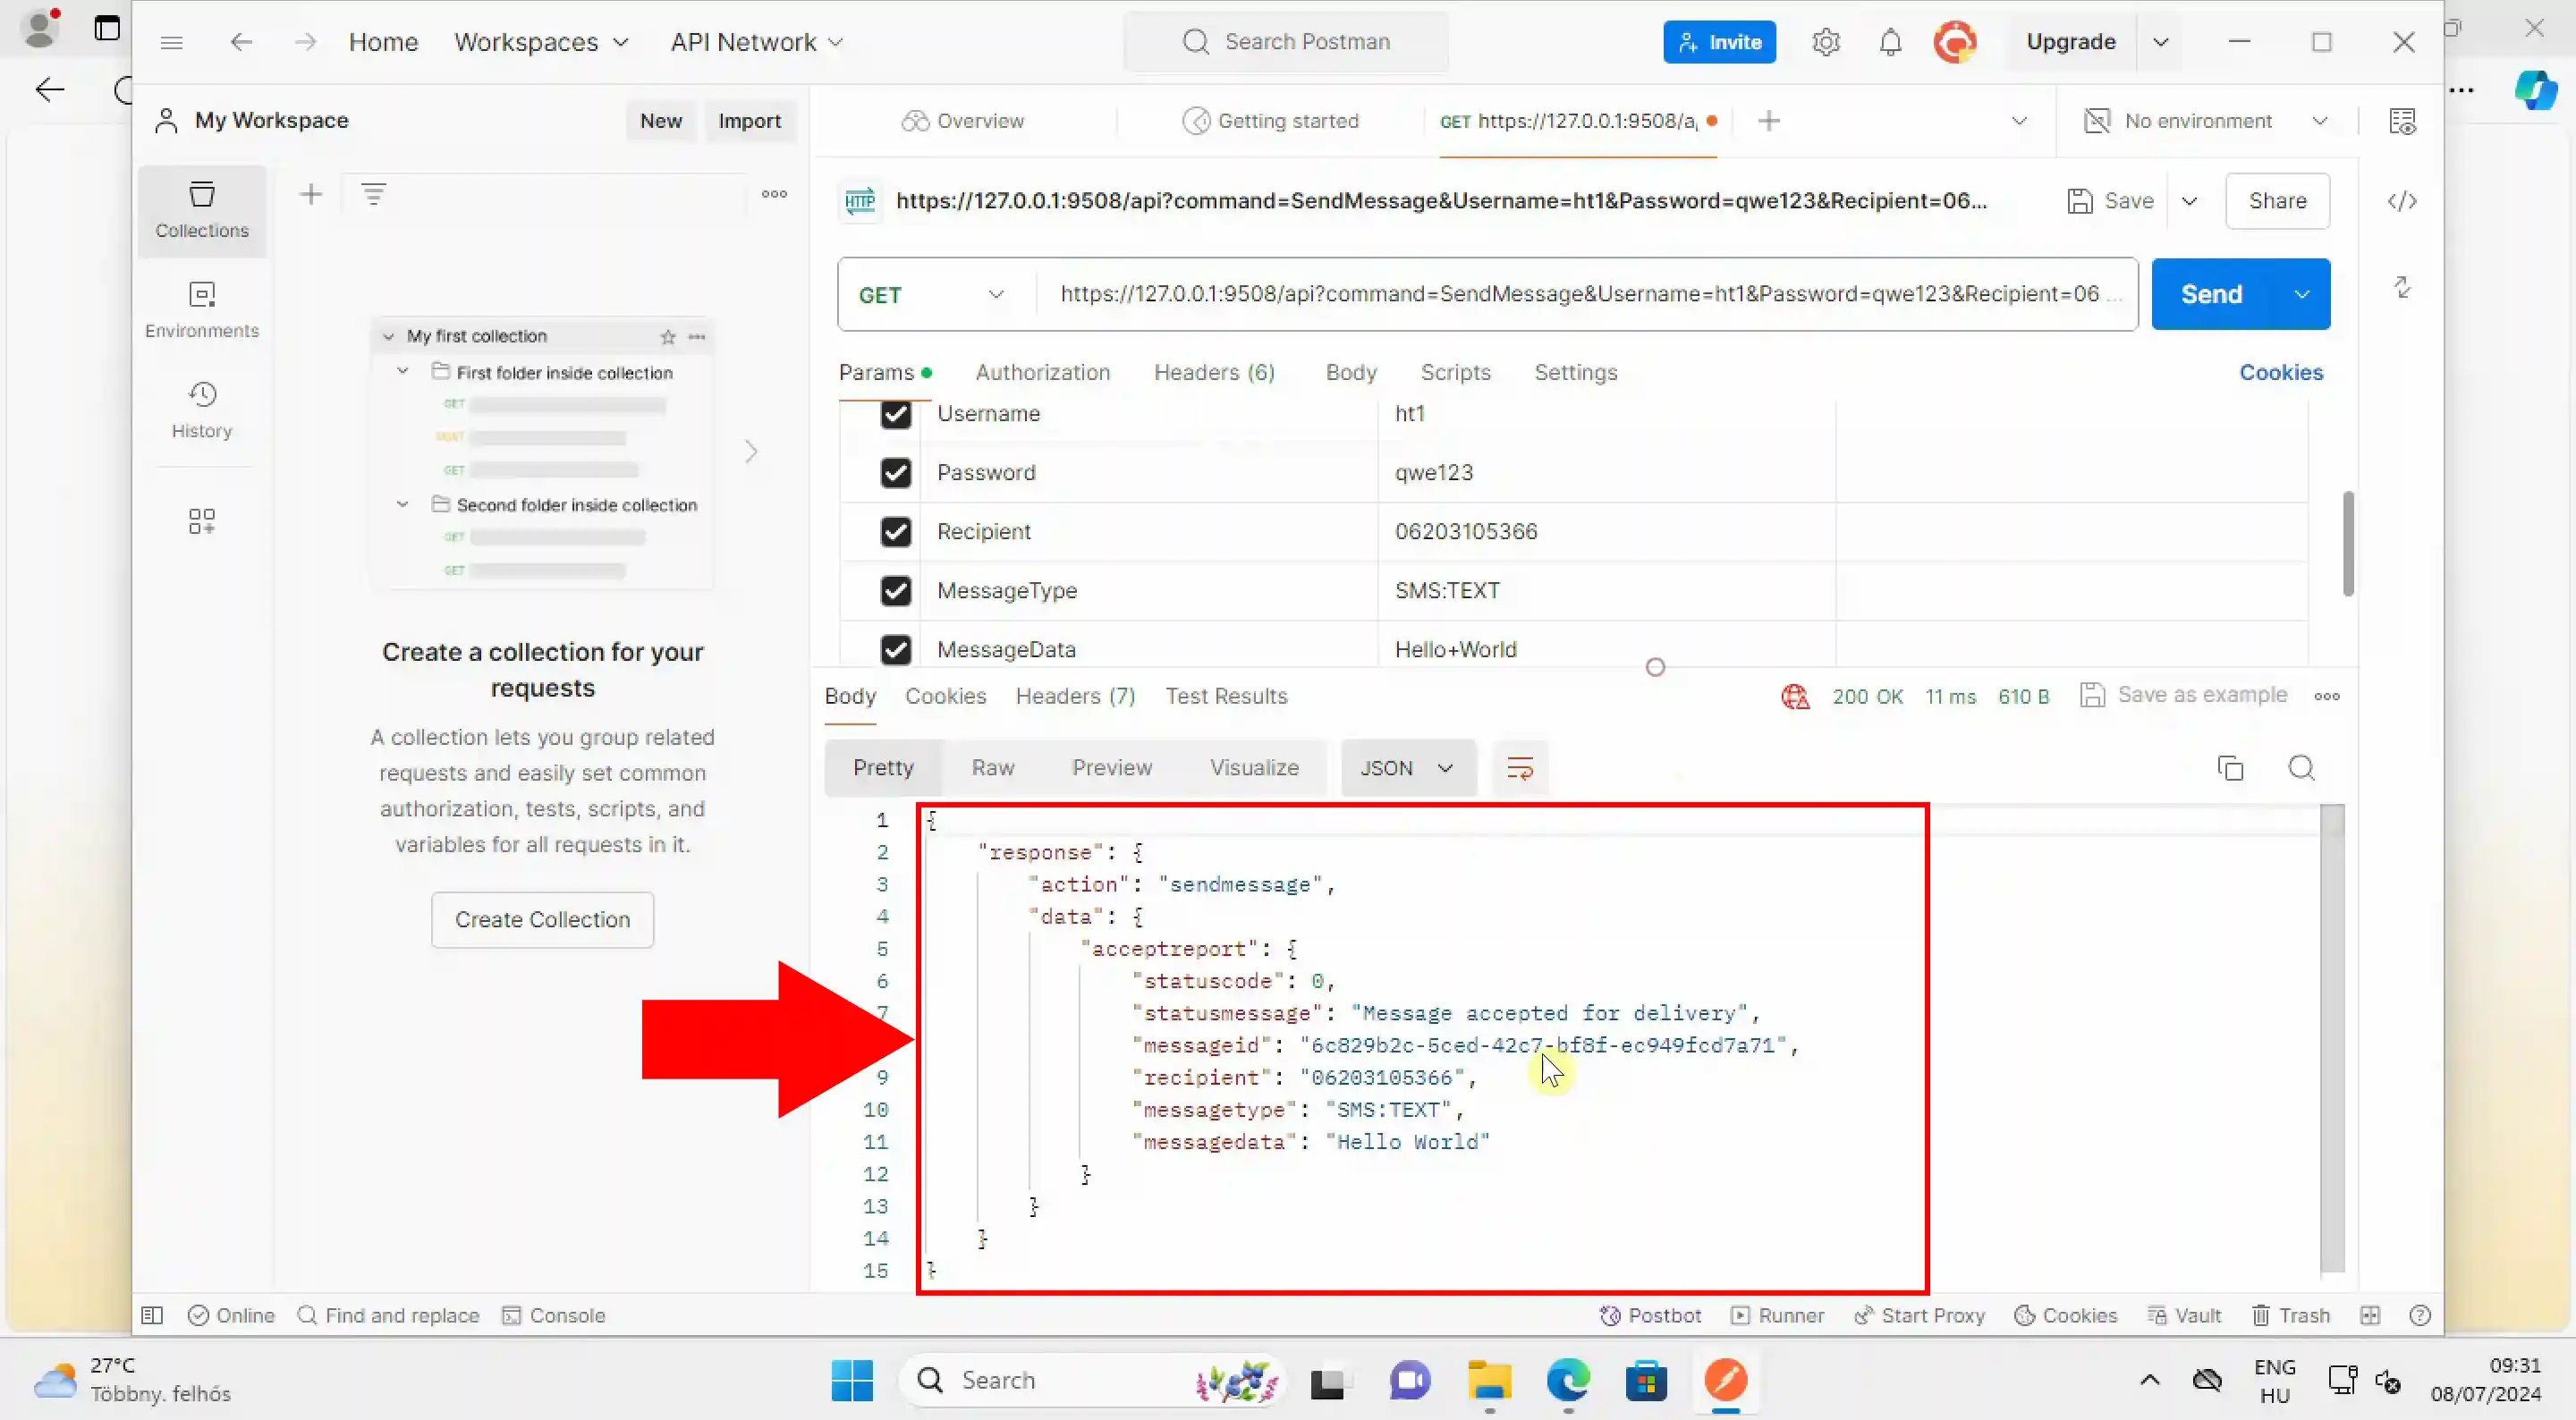
Check the received request in Ozeki SMS Gateway
To verify the successful HTTP GET request in the Ozeki SMS Gateway, navigate to the 'Events' tab, as shown in Figure 16. Here, you should see the entry labeled 'Submit accepted,' confirming the request was successful. This step ensures that the message was not only sent but also properly received and handled by the SMS Gateway.
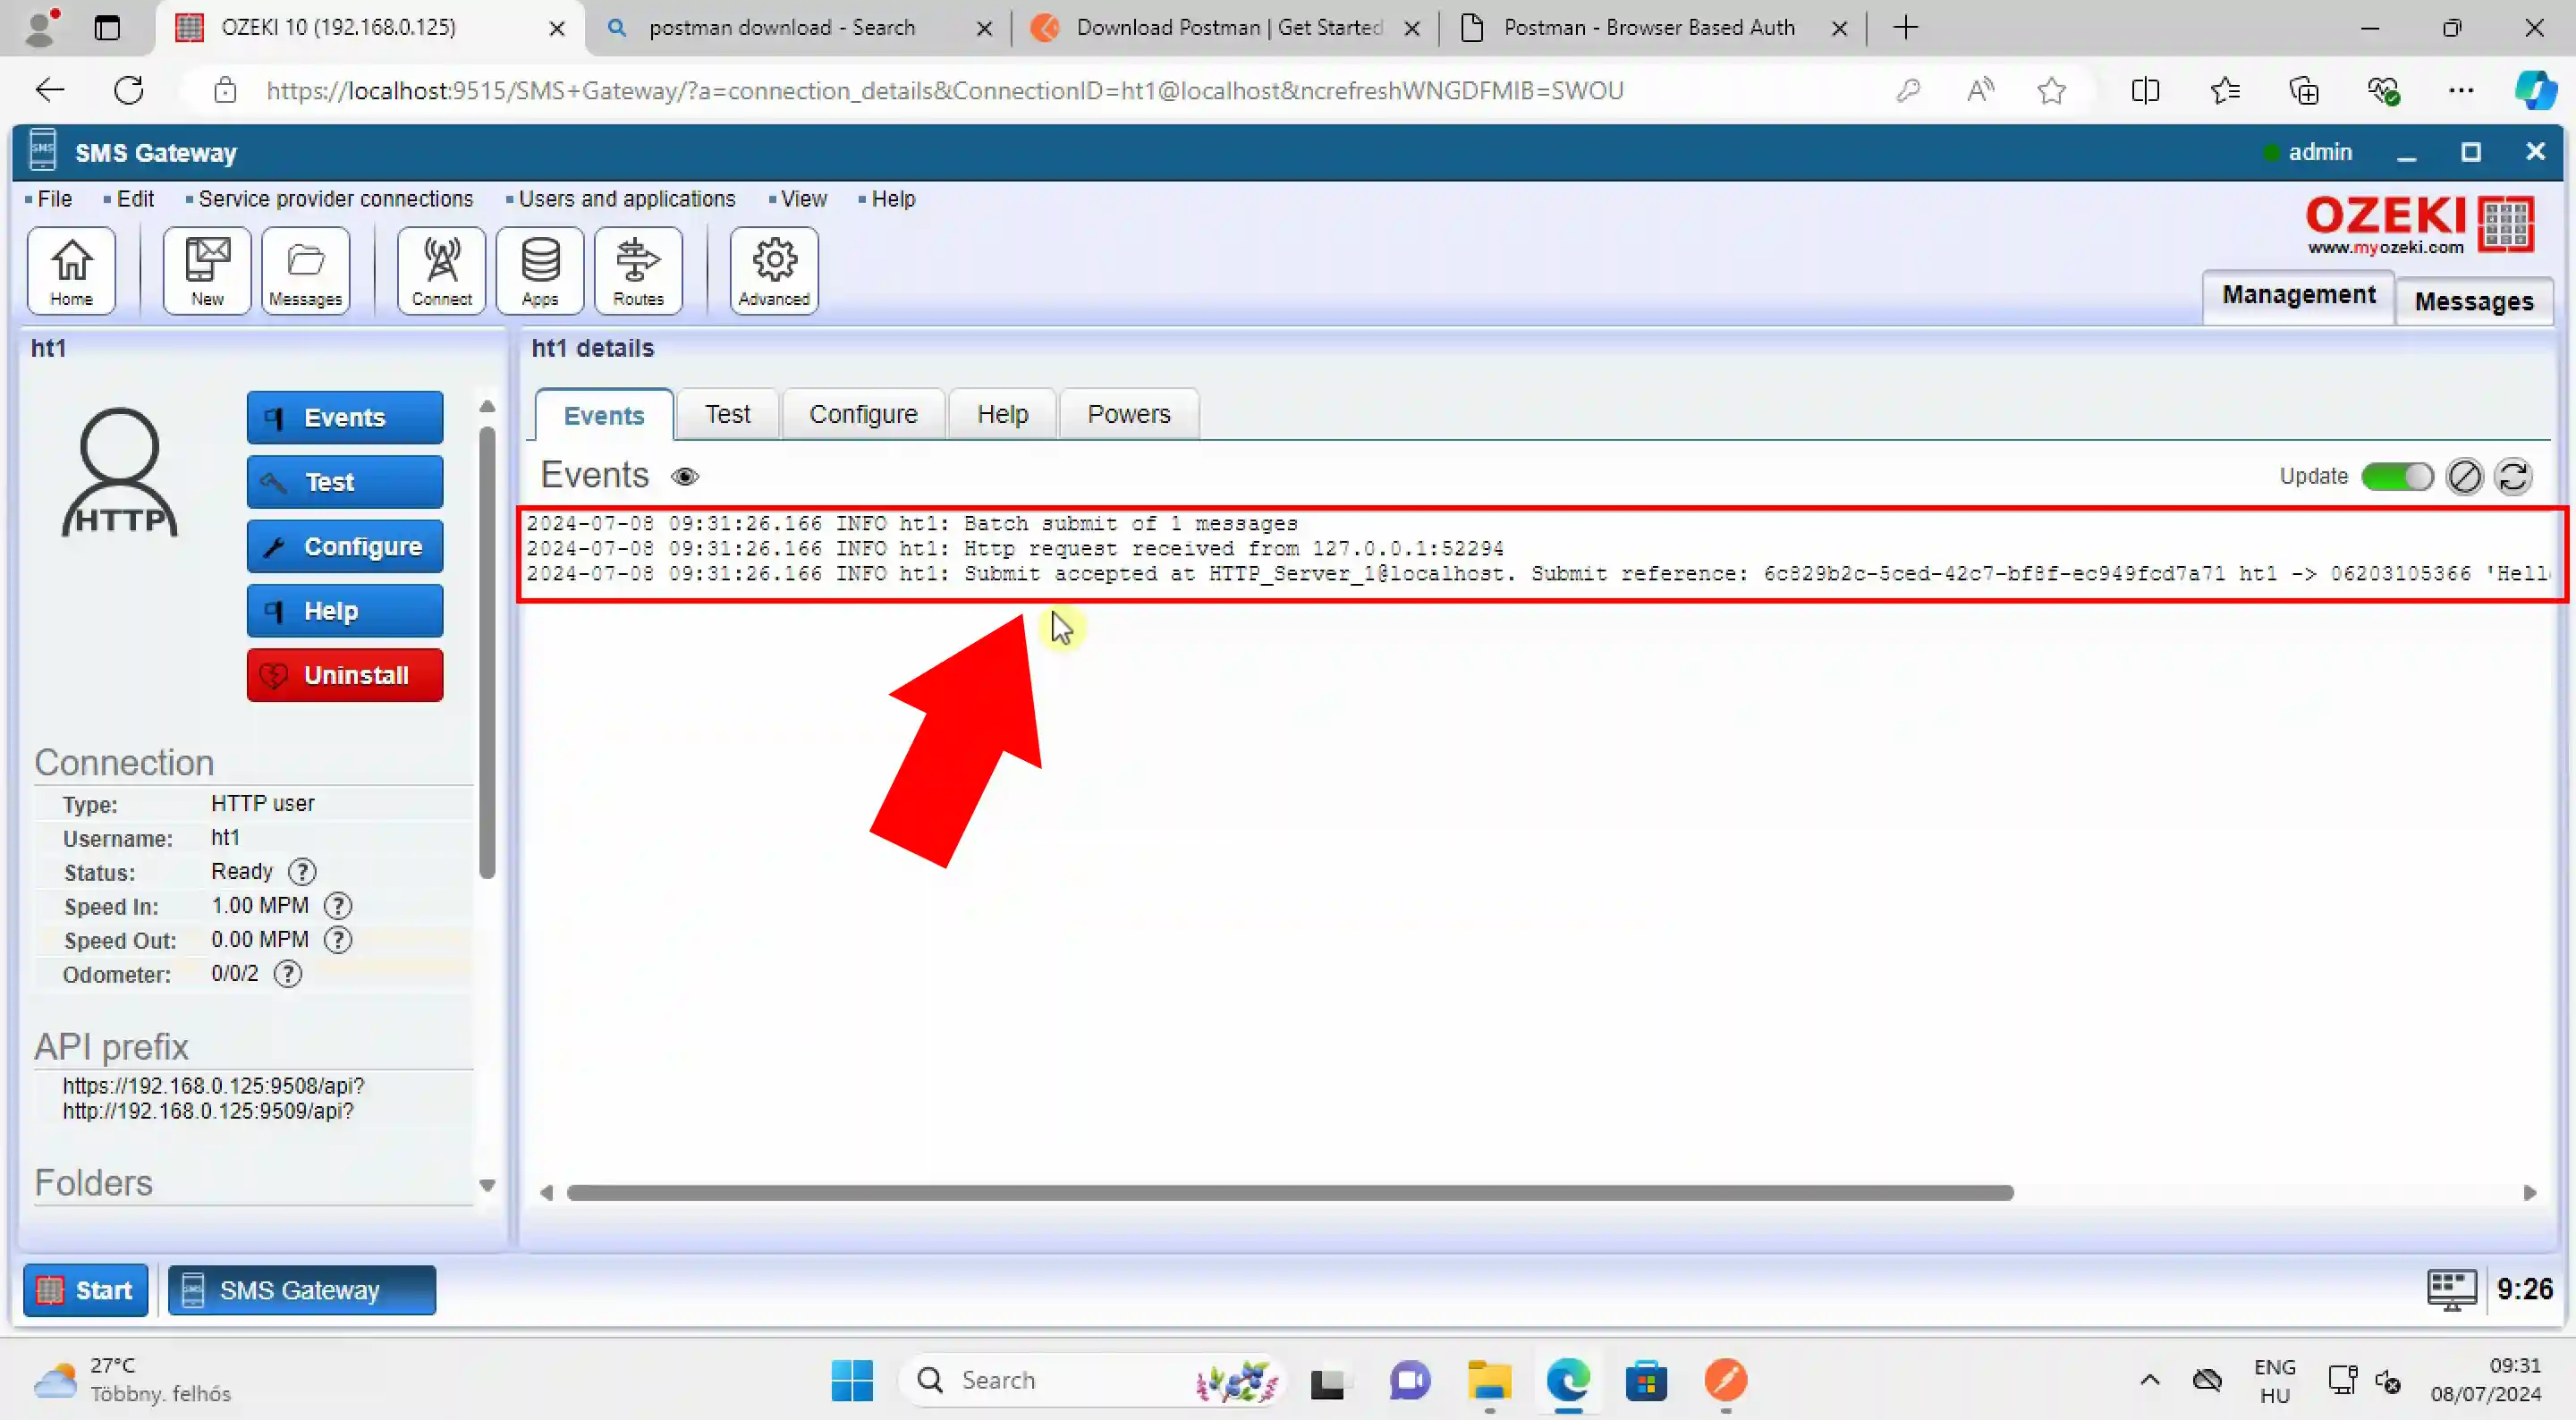
Check the sent message
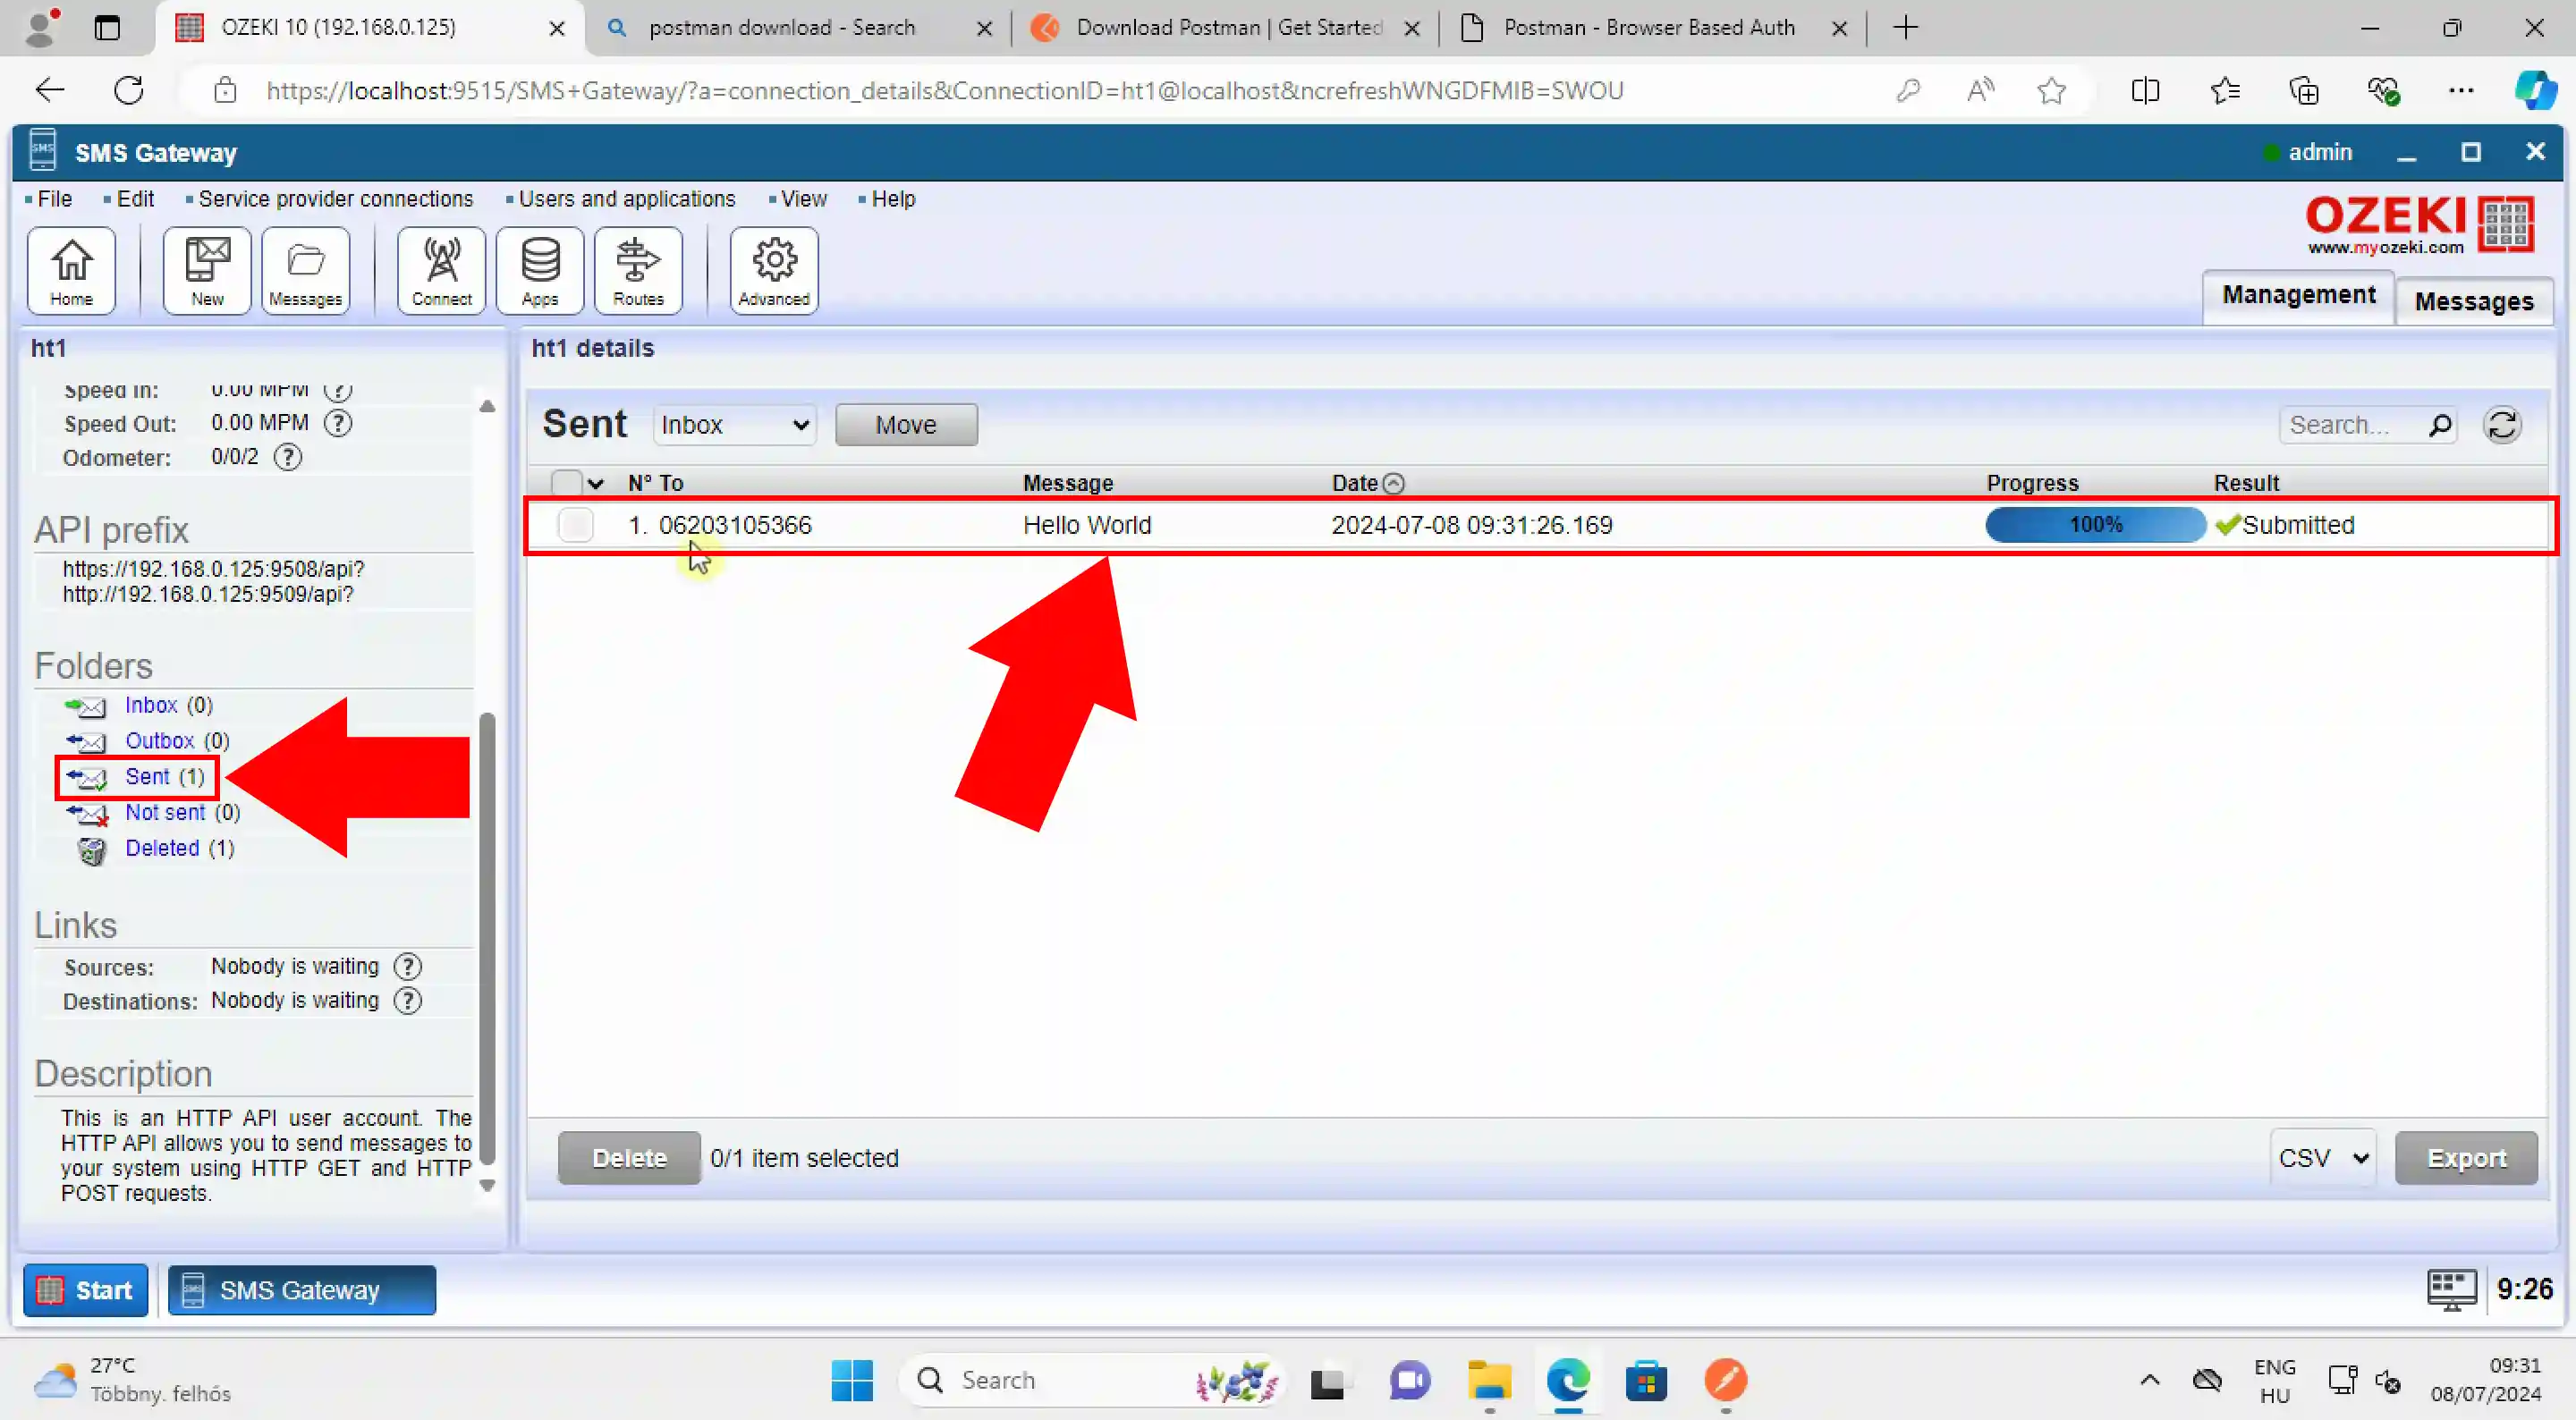
To view the sent message in the Ozeki SMS Gateway, scroll down on the left-hand side until you reach the 'Folders' control table section. Click on the 'Sent' folder, as indicated in Figure 17. This action will open a menu where you can see a list of messages that have been sent. Here, you will be able to find the API test message.
Step 4 - Example request
Example request
https://127.0.0.1:9508/api?command=SendMessage&Username=ht1&Password=qwe123& Recipient=06203105366&MessageType=SMS:TEXT&MessageData=Hello+World&responseformat=json
Example response
{
	"response": {
		"action": "sendmessage",
		"data": {
			"acceptreport": {
				"statuscode": 0,
				"statusmessage": "Message accepted for delivery",
				"messageid": "a79af012-741b-4272-ba59-427524f2e546",
				"recipient": "06203105366",
				"messagetype": "SMS:TEXT",
				"messagedata": "Hello World"
			}
		}
	}
}
FAQs
What are some common test cases for SMS Gateway API testing?
When testing an SMS Gateway API, it is important to cover a range of common test cases to ensure the system's reliability and performance. These test cases typically include verifying the successful delivery of messages, testing different message formats such as plain text, multimedia, and Unicode, and checking for any delays in message delivery. Additionally, it is crucial to test the system's handling of message length limits and validate how well the API manages error handling scenarios. These comprehensive tests help guarantee that the SMS Gateway operates efficiently under various conditions and can handle diverse messaging requirements.
What are the key aspects to consider when testing an SMS Gateway API?
When testing an SMS Gateway API, it is essential to focus on various critical factors to ensure optimal performance. Key aspects include the speed of message delivery, the accuracy of message formatting such as character encoding and handling special characters, and the effectiveness of error handling mechanisms. Moreover, assessing API response times is crucial for understanding how quickly the system reacts to requests. Additionally, testing for scalability and reliability is important to ensure the gateway can handle a large volume of messages efficiently without compromising performance or stability.
What are some common challenges faced during SMS Gateway API testing?
During SMS Gateway API testing, several common challenges can arise that must be addressed to ensure robust performance. Network connectivity issues can significantly impact message delivery, making it crucial to test in varied network conditions. Additionally, ensuring compatibility with different mobile carriers is essential to guarantee that messages are delivered across various networks. Handling message delivery failures effectively and implementing proper security measures to protect user data during transmission are also critical aspects that need careful consideration to maintain data integrity and user trust.
Is Postman totally free?
Postman offers both free and paid versions. The free version provides essential features like designing, testing, and debugging APIs. It supports individual developers and small teams with basic collaboration tools. However, for advanced features such as team collaboration, API monitoring, and automated testing, you may need to upgrade to Postman's paid plans, which offer additional functionalities and support.
To sum it up
We did our very best to make it simple and to walk you through all the details as painlessly as possible. By following the above instructions you can create the solution quickly. Now you can test the Ozeki SMS Gateway API. You have seen the advantages Ozeki SMS Gateway can bring. If you would like to discover more valuable information about the benefits of other smiliar solutions, please open ozeki-sms-gateway.com.
