How to provide HTTP SMS Service
In this guide, you will learn how to offer an HTTP-based SMS service using Ozeki SMS Gateway. By setting up an HTTP API user, generating secure API keys, and configuring proper logging, you can enable external applications to send SMS messages through your system using HTTP requests. This setup is ideal for developers and service providers who want to integrate SMS functionality into their applications or offer SMS services to clients. The tutorial also includes steps for testing the API with Postman and monitoring message activity through built-in logs to ensure reliable delivery and traceability.
What is Ozeki SMS Gateway?
Ozeki SMS Gateway is a powerful, self-hosted software solution designed to send and receive SMS messages through your own infrastructure. It supports standard communication protocols such as HTTP, SMPP, and more, making it ideal for integrating with business applications. With Ozeki SMS Gateway, you can automate SMS notifications, run two-way messaging services, and build custom SMS-based systems for marketing, customer support, or system alerts—all without relying on third-party services.
Create and Configure HTTP API User (Quick Steps)
- Open Ozeki SMS Gateway and add a new HTTP API user.
- Set a username and password.
- Generate an API key for secure access.
Test SMS Sending via Postman (Quick Steps)
- Set the Authorization to Bearer Token using the API key.
- Enter your message data in JSON format (recipient, message, etc.).
- Send the request and check for a success response.
Enable and Check Logs (Quick Steps)
- Enable logging in the HTTP API user settings.
- Enable logging in the HTTP API service details.
- Review message and HTTP logs in the Events tab.
How to setup an HTTP API user (Video tutorial)
In this video, you will learn how to create a new HTTP API user in Ozeki SMS Gateway. The tutorial walks you through accessing the user management interface, installing the HTTP API user component, and assigning a username and password. Once configured, this user can send and receive SMS messages through HTTP requests. By the end of the video, you’ll have a working HTTP API user ready to integrate with external applications, making it easy to build SMS sending capabilities into your own systems.
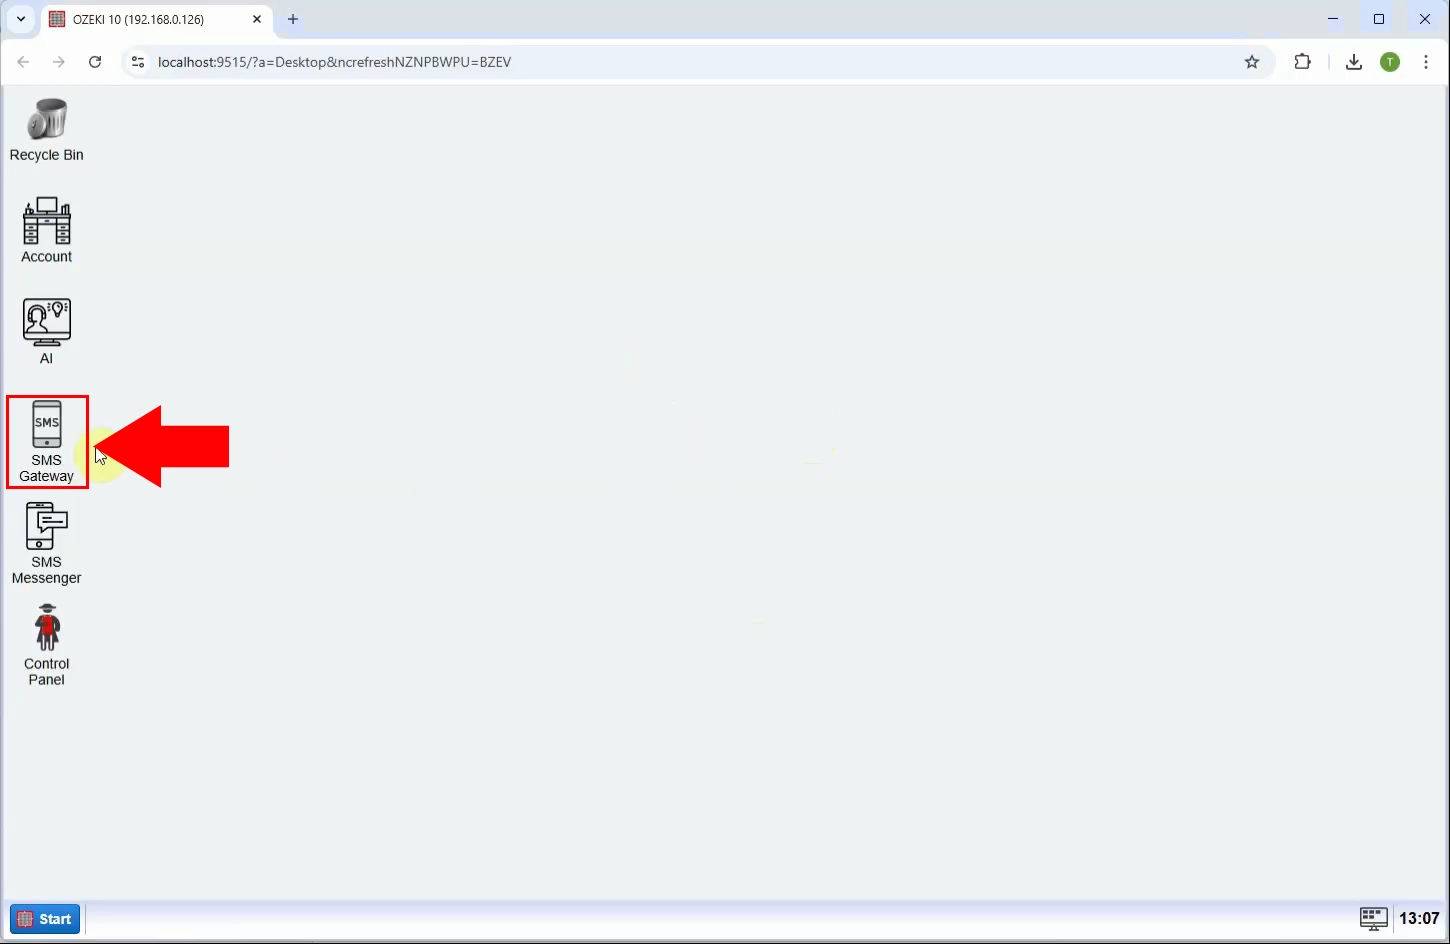
Step 1 - Open SMS Gatway
Launch the Ozeki SMS Gateway and navigate to the home dashboard where you can manage users, connections, and system settings (Figure 1).
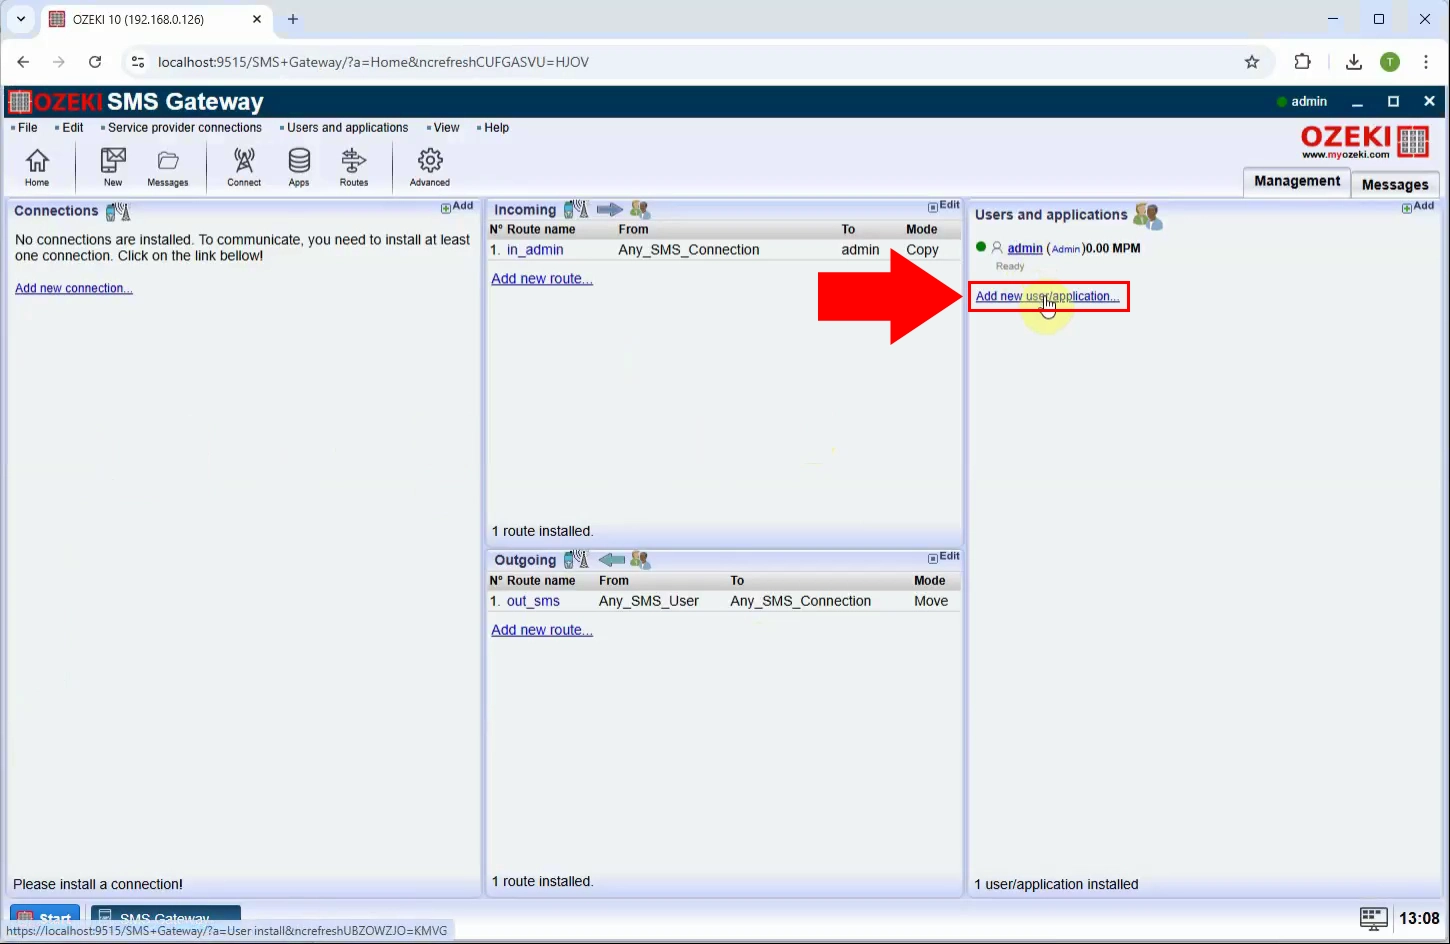
Step 2 - Add new user/application
Click on the "Add new user/application..." to begin the process of creating a new HTTP API user. This will open a list of available user types (Figure 2).
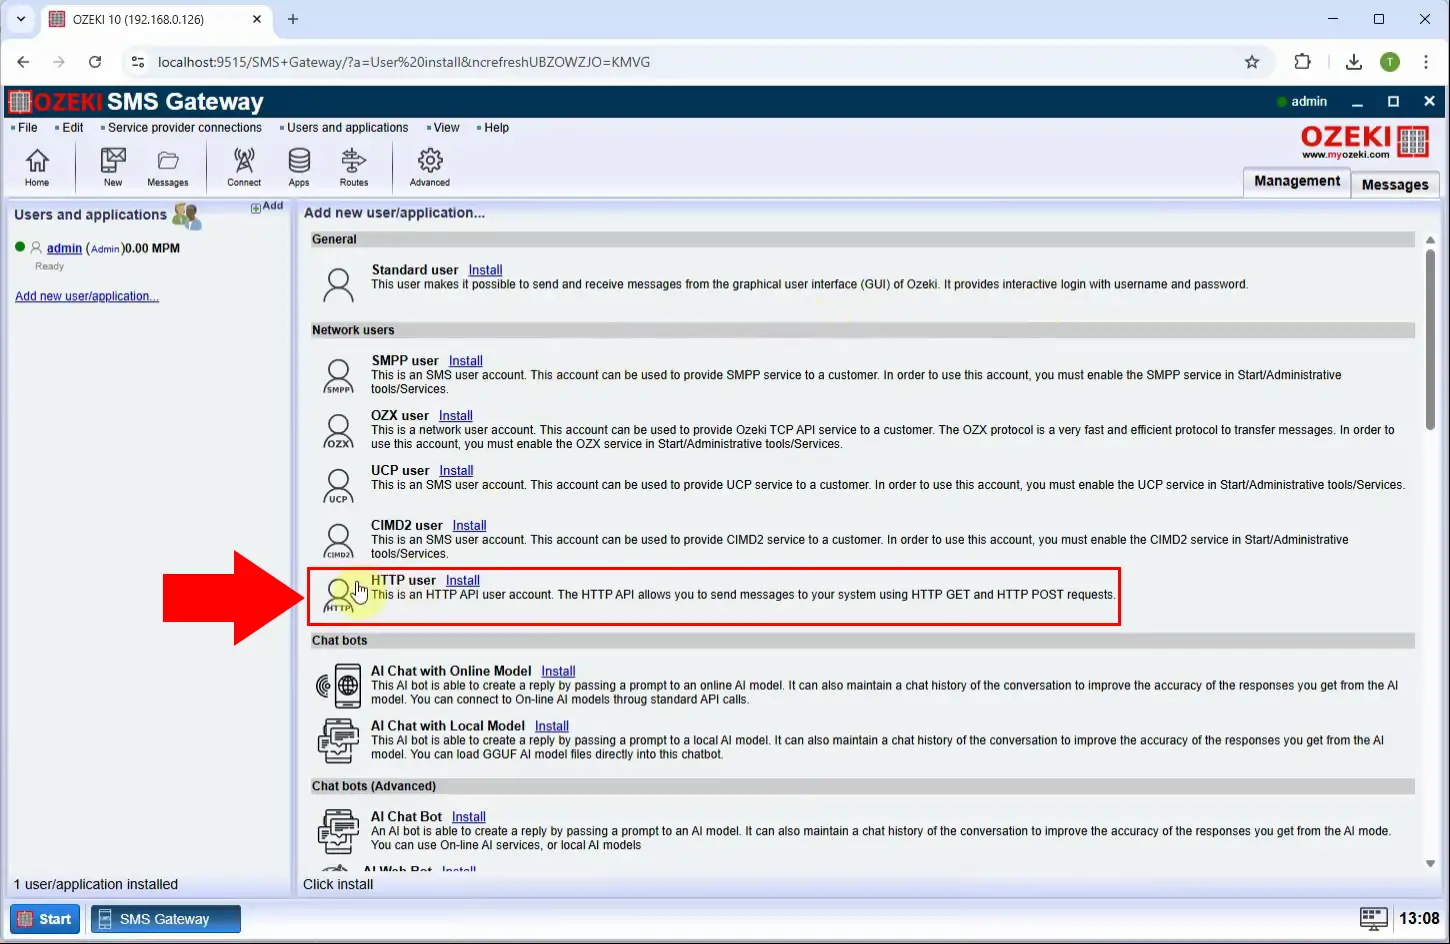
Step 3 - Install HTTP User
From the list of the Network users, select "HTTP user" and click "Install" to add this component to your system. This user type enables SMS communication via HTTP requests (Figure 3).
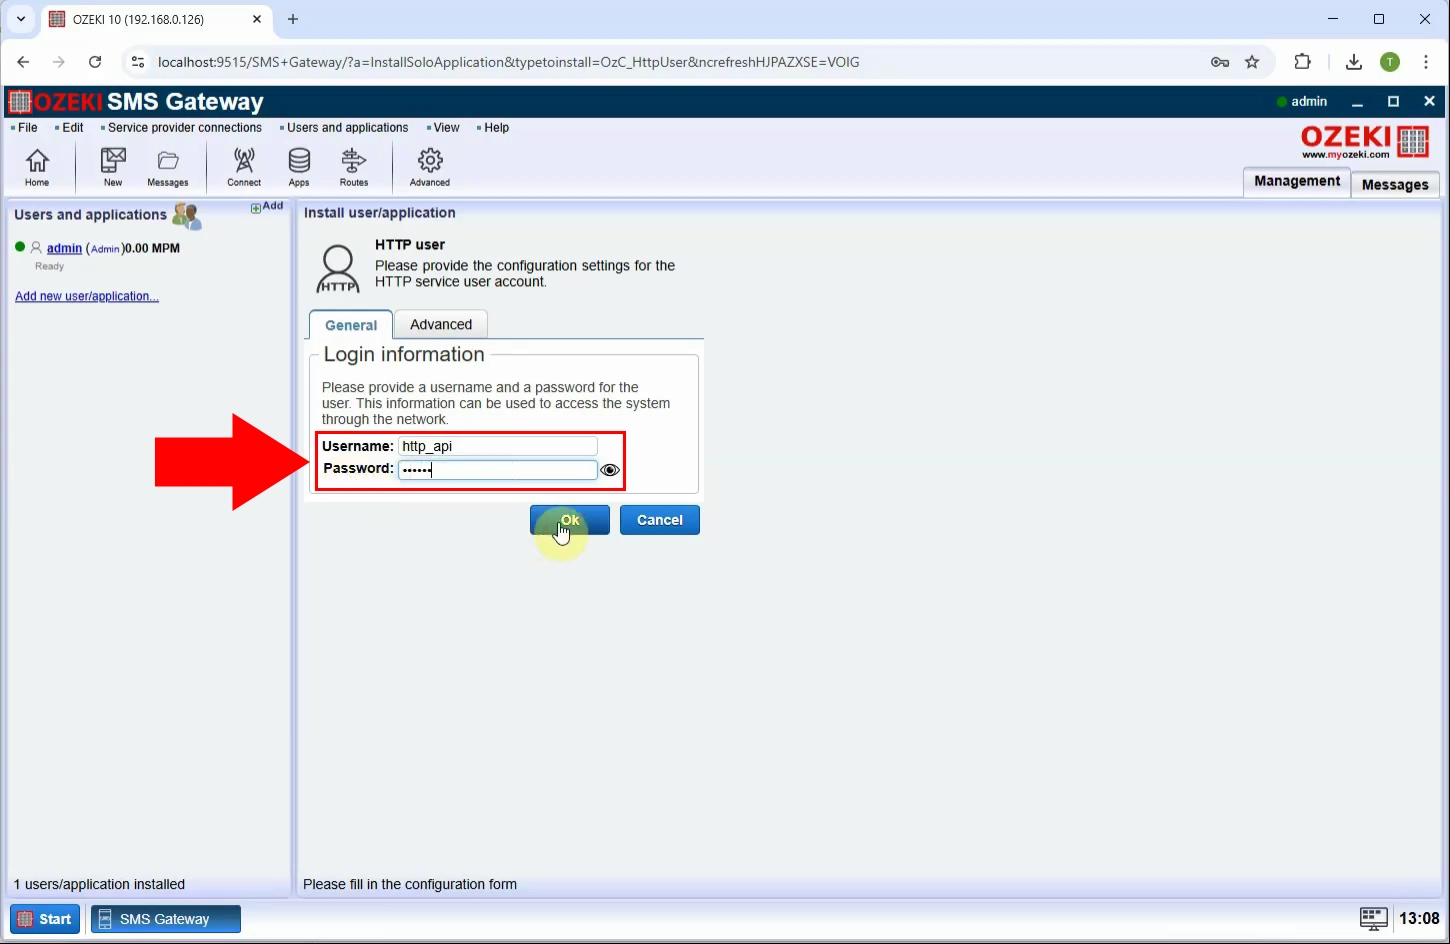
Step 4 - Provide User name and password
In the configuration panel, enter a desired username and password for the HTTP API user. These credentials will be used for authenticating API requests (Figure 4).
Step 5 - HTTP API user created
After saving the settings, the new HTTP API user is now ready to handle SMS operations via the HTTP API interface (Figure 5).
How to generate an API key (Video tutorial)
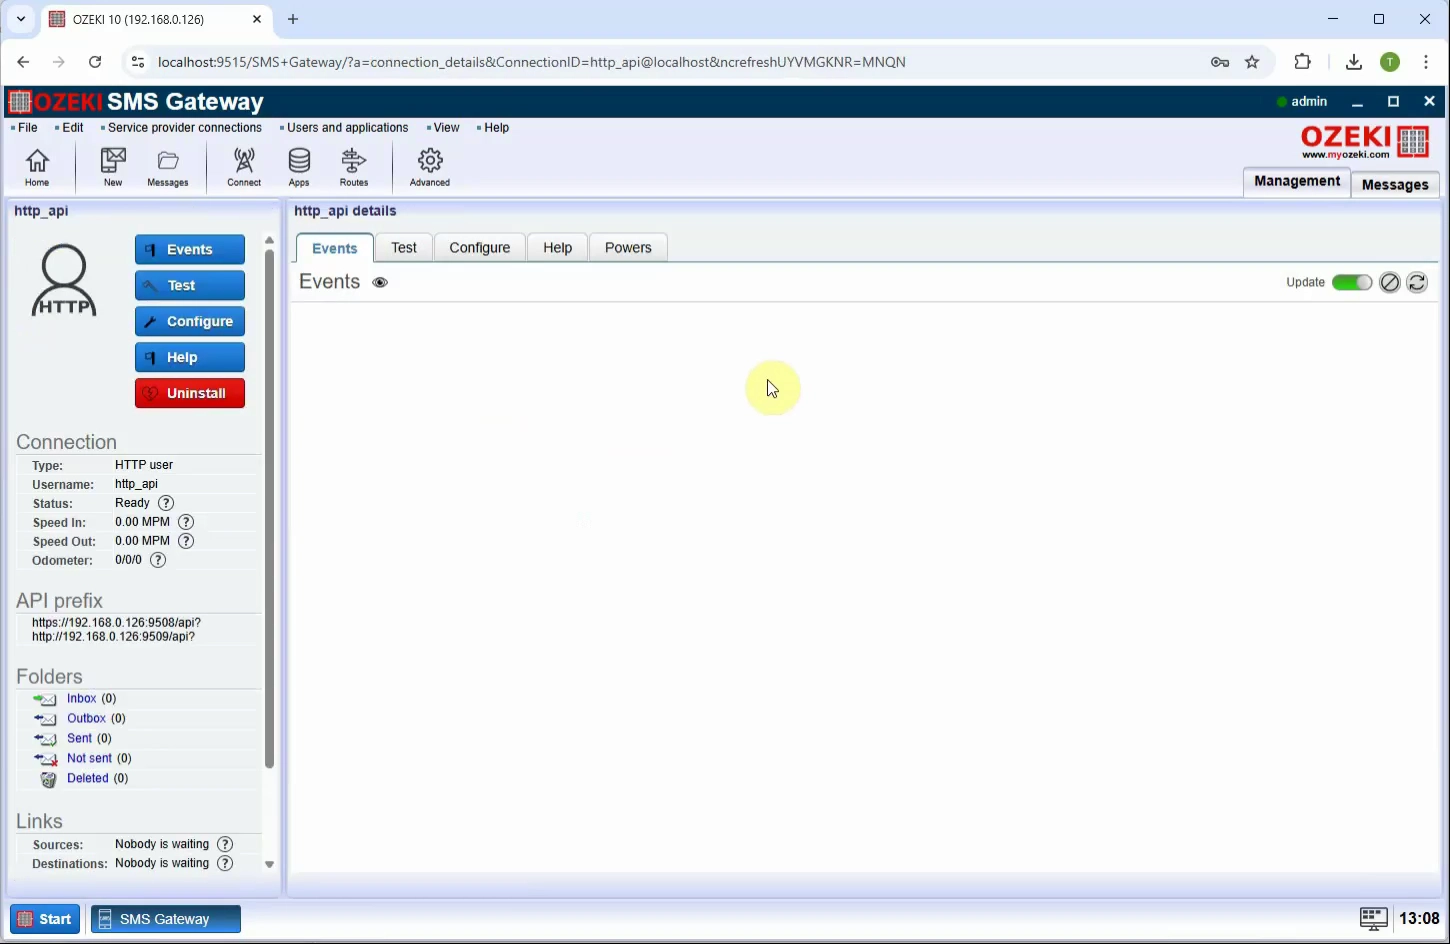
In this video, you will learn how to generate an API key for an HTTP API user in the Ozeki SMS Gateway system. The API key provides a secure way to authenticate requests without using a username and password, simplifying integration with external systems. The tutorial walks you through opening the HTTP API user's settings, accessing the API key configuration panel, and generating a new key. By the end of the video, you’ll have a valid API key ready to use for secure and efficient SMS messaging through HTTP requests.
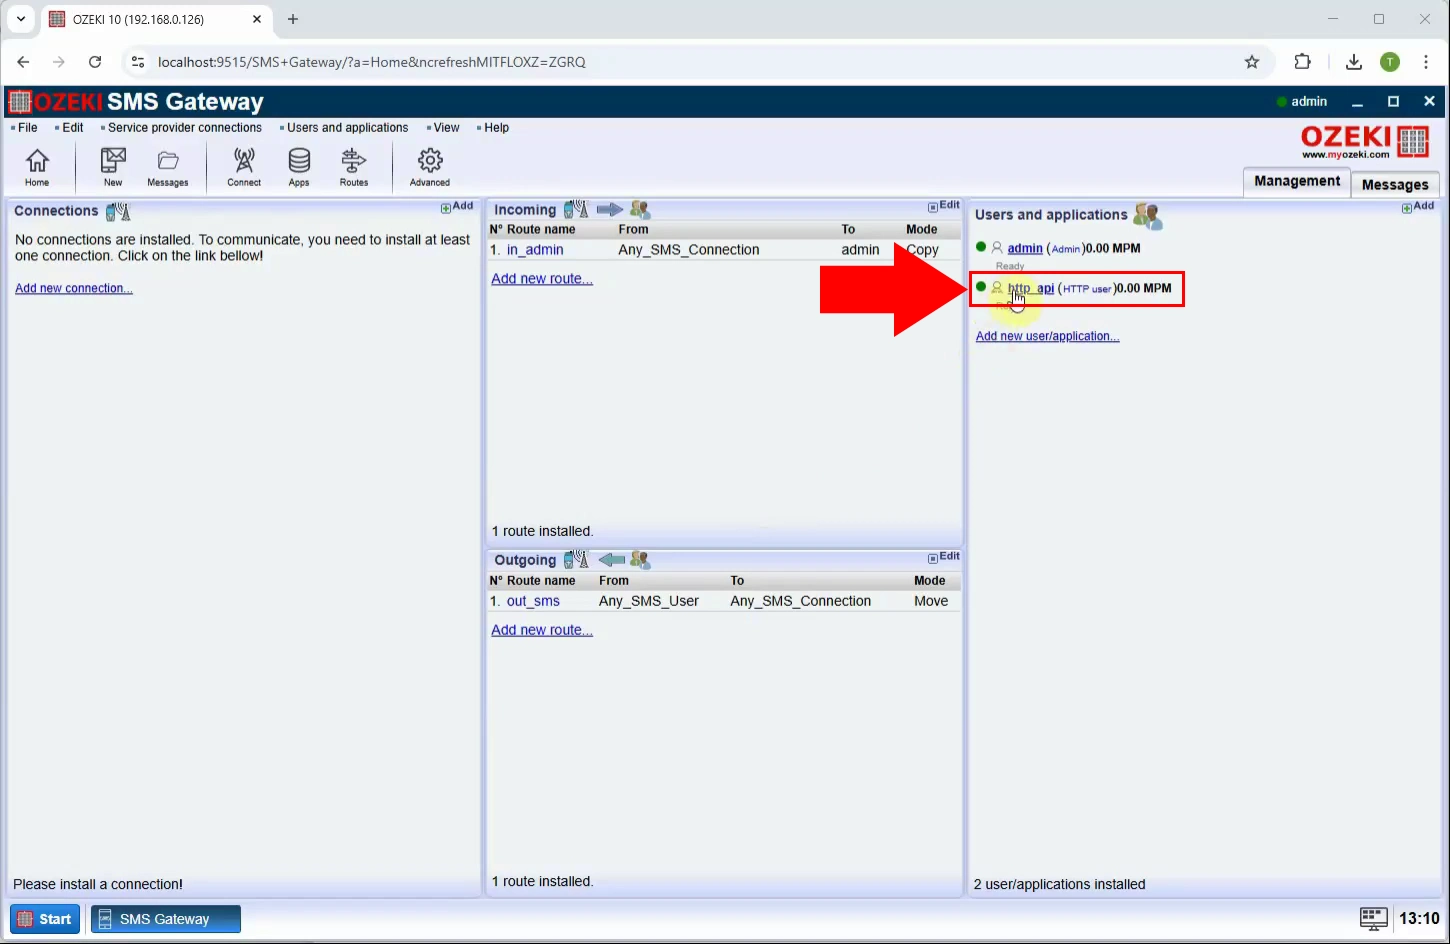
Step 6 - Open HTTP API user
Navigate to the list of users in Ozeki SMS Gateway and click on the HTTP API user you previously created. This opens the user’s configuration panel (Figure 6).
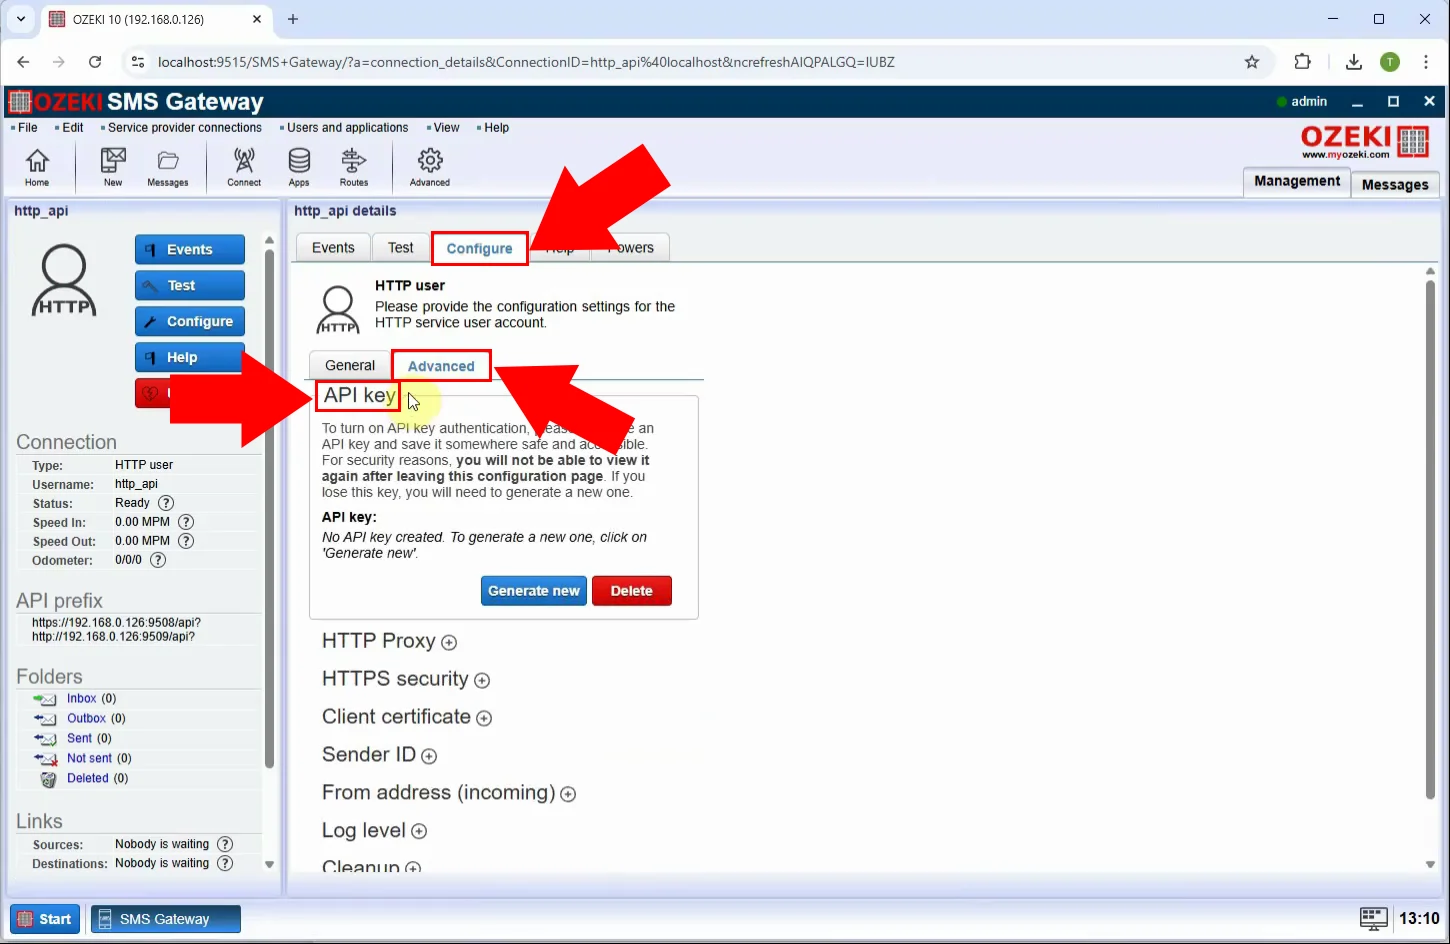
Step 7 - Open API key configuration
In the HTTP API user settings panel, locate "Configure" and click on the "Advanced" option from the menu. This section allows you to manage authentication keys (Figure 7).
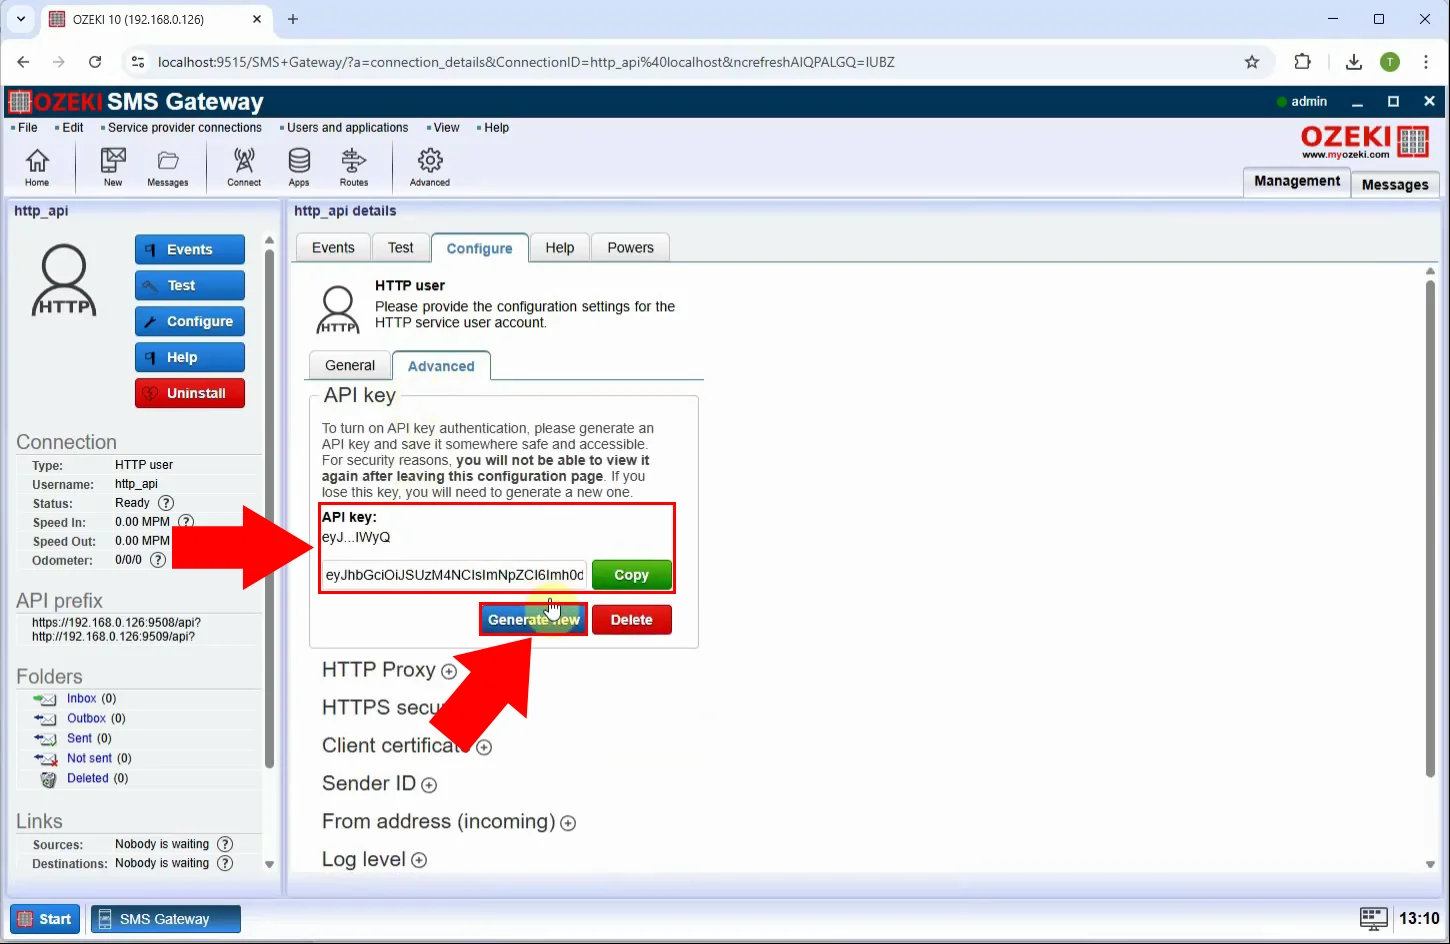
Step 8 - Generate new API key
Click the "Generate new" button to create a unique key. This key can now be used for bearer token authentication in API requests (Figure 8).
How to test the HTTP API with the API key using PostMan (Video tutorial)
In this video, you will learn how to test your Ozeki HTTP API SMS service using the Postman API testing tool. The tutorial guides you through authenticating your requests with a Bearer token (API key), setting up the request body with SMS parameters, and sending a test message. This step-by-step demonstration helps verify that your API setup is working correctly and shows how to simulate real-world usage from an external application. By the end, you'll be able to confidently use Postman to test and troubleshoot your SMS API integration.
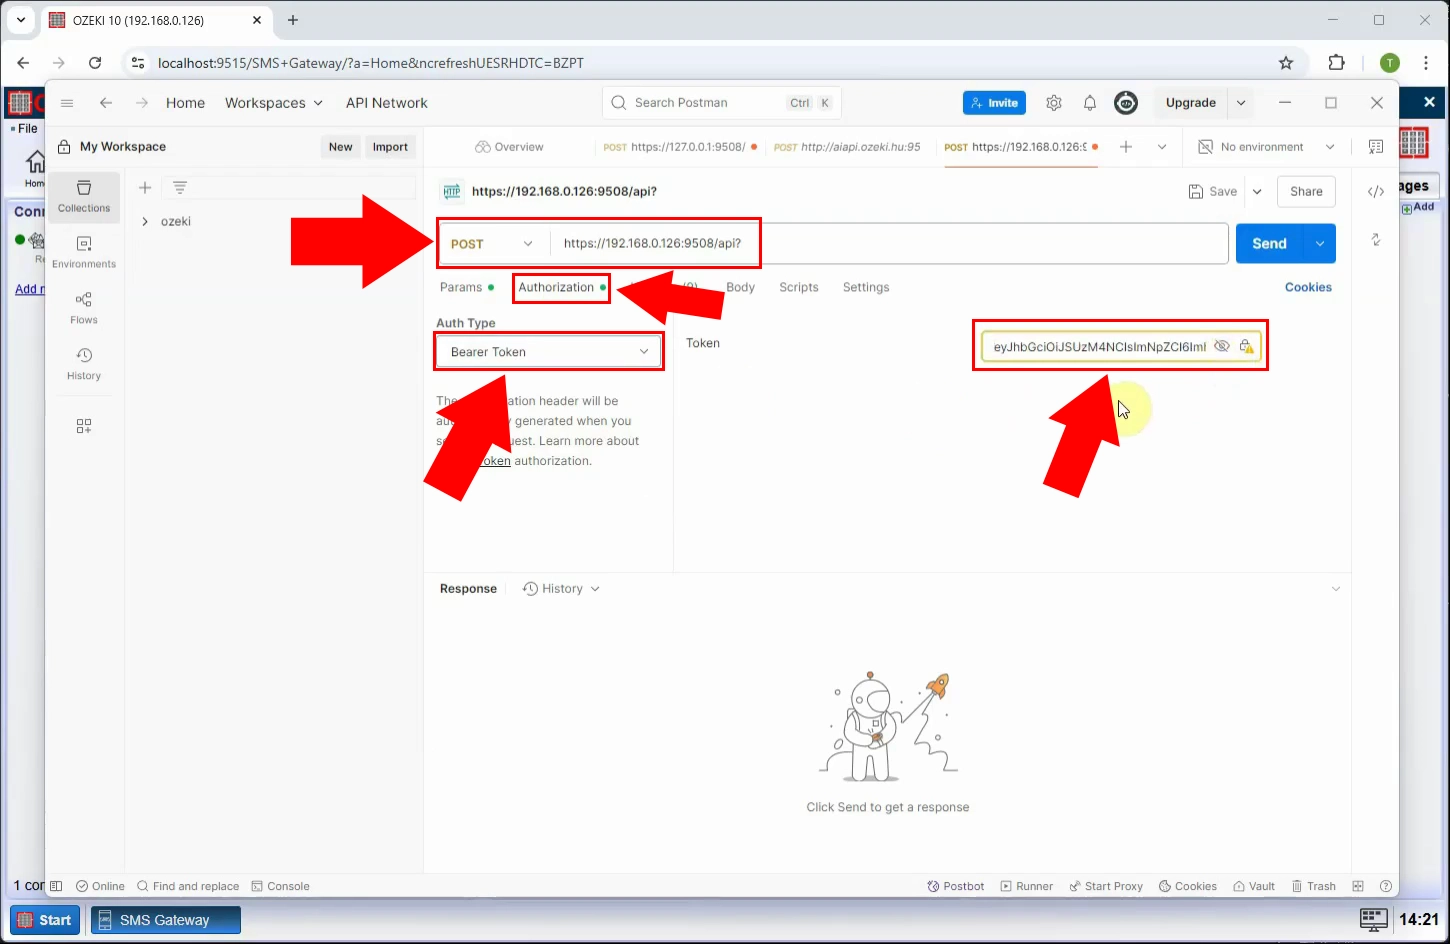
Step 9 - Configure bearer token authorization
Open Postman, go to the Authorization tab, set the POST url and set the auth type to "Bearer Token", and paste your generated API key into the token field to authenticate the request (Figure 9).
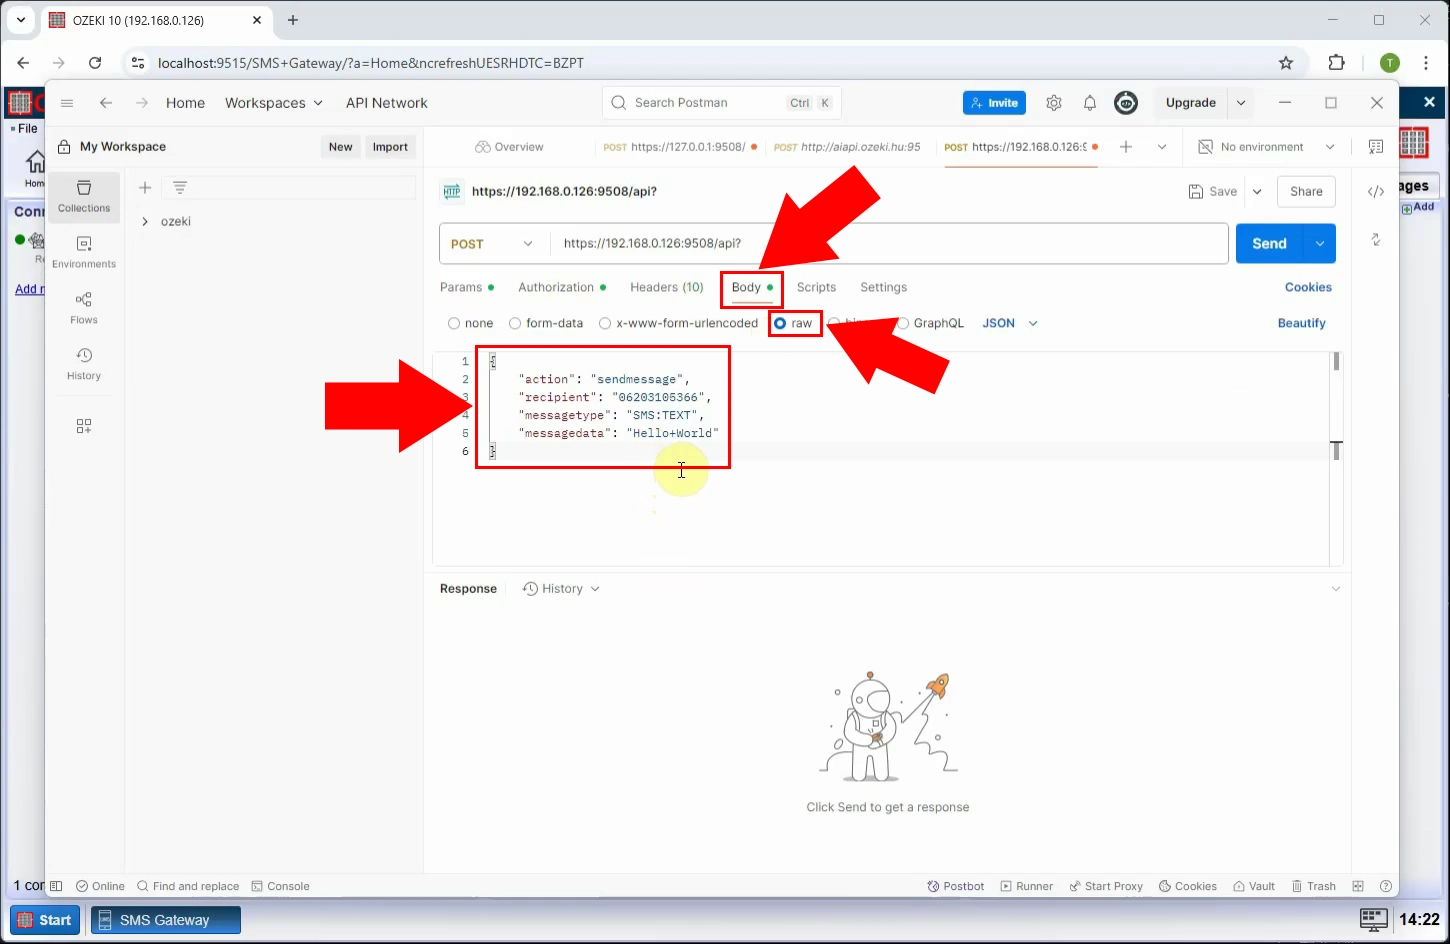
Step 10 - Configure request body
Switch to the Body tab and select "raw" as the format. Set the type to JSON and enter your SMS data - such as the recipient phone number, action, message type, message data - in proper JSON format (Figure 10).
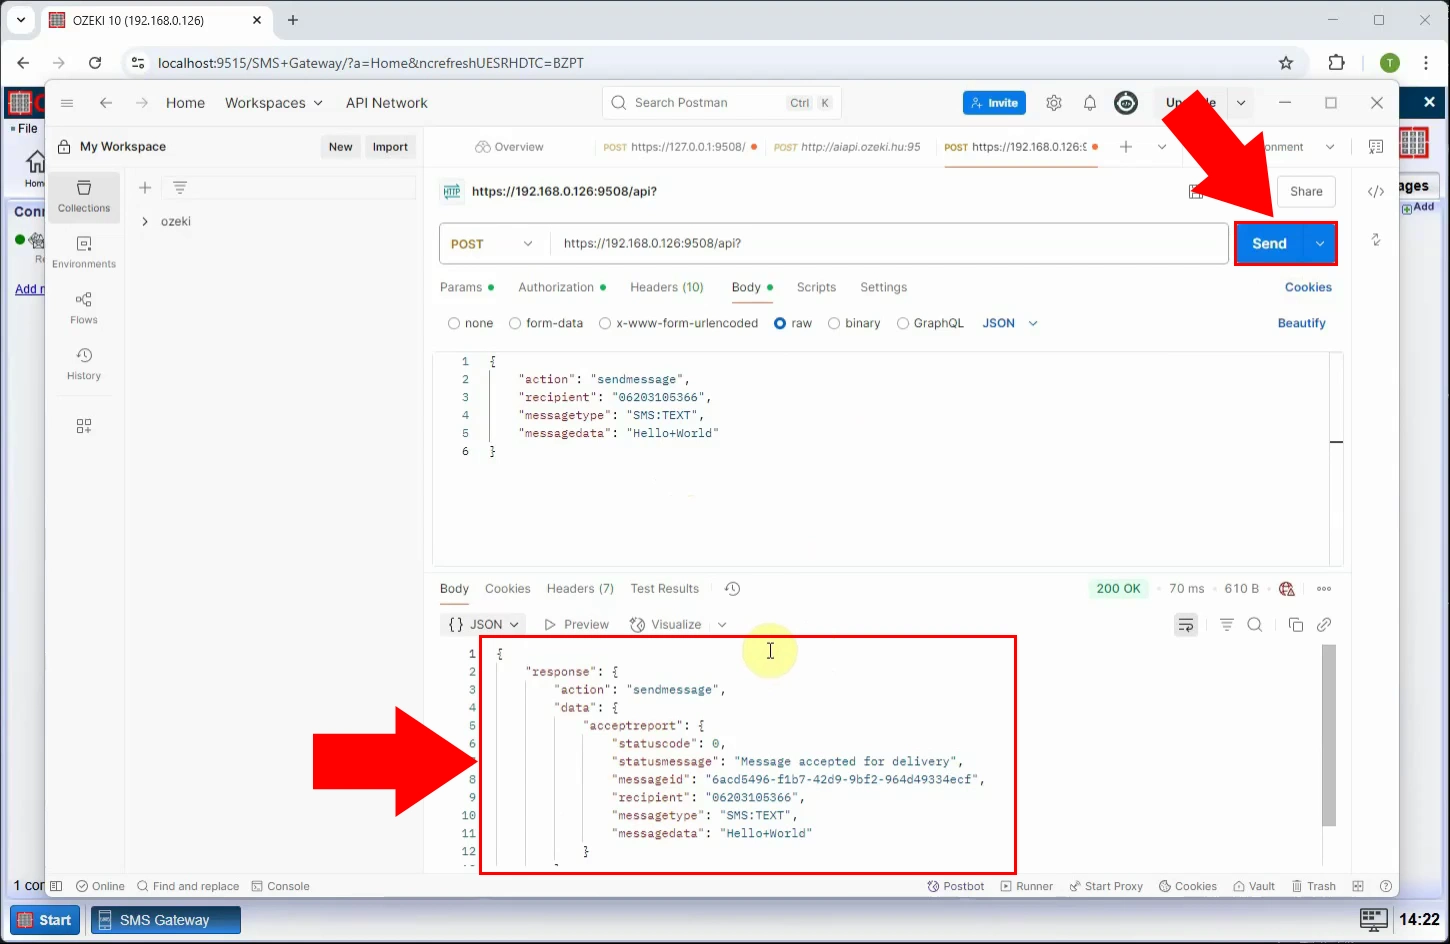
Step 11 - Send message request
Click the "Send" button in Postman. If configured correctly, you will receive a success response from the server, confirming that the message was accepted for delivery (Figure 11).
How to view the logs for the HTTP API user (Video tutorial)
In this video, you will learn how to view detailed logs for an HTTP API user in Ozeki SMS Gateway. Monitoring logs is essential for troubleshooting and verifying the delivery of SMS messages sent through the API. The tutorial shows how to access the HTTP API user settings, enable logging if it’s not already active, and review the logs generated during message sending. By the end of the video, you'll know how to track message activity, identify issues, and ensure the reliability of your SMS communications.
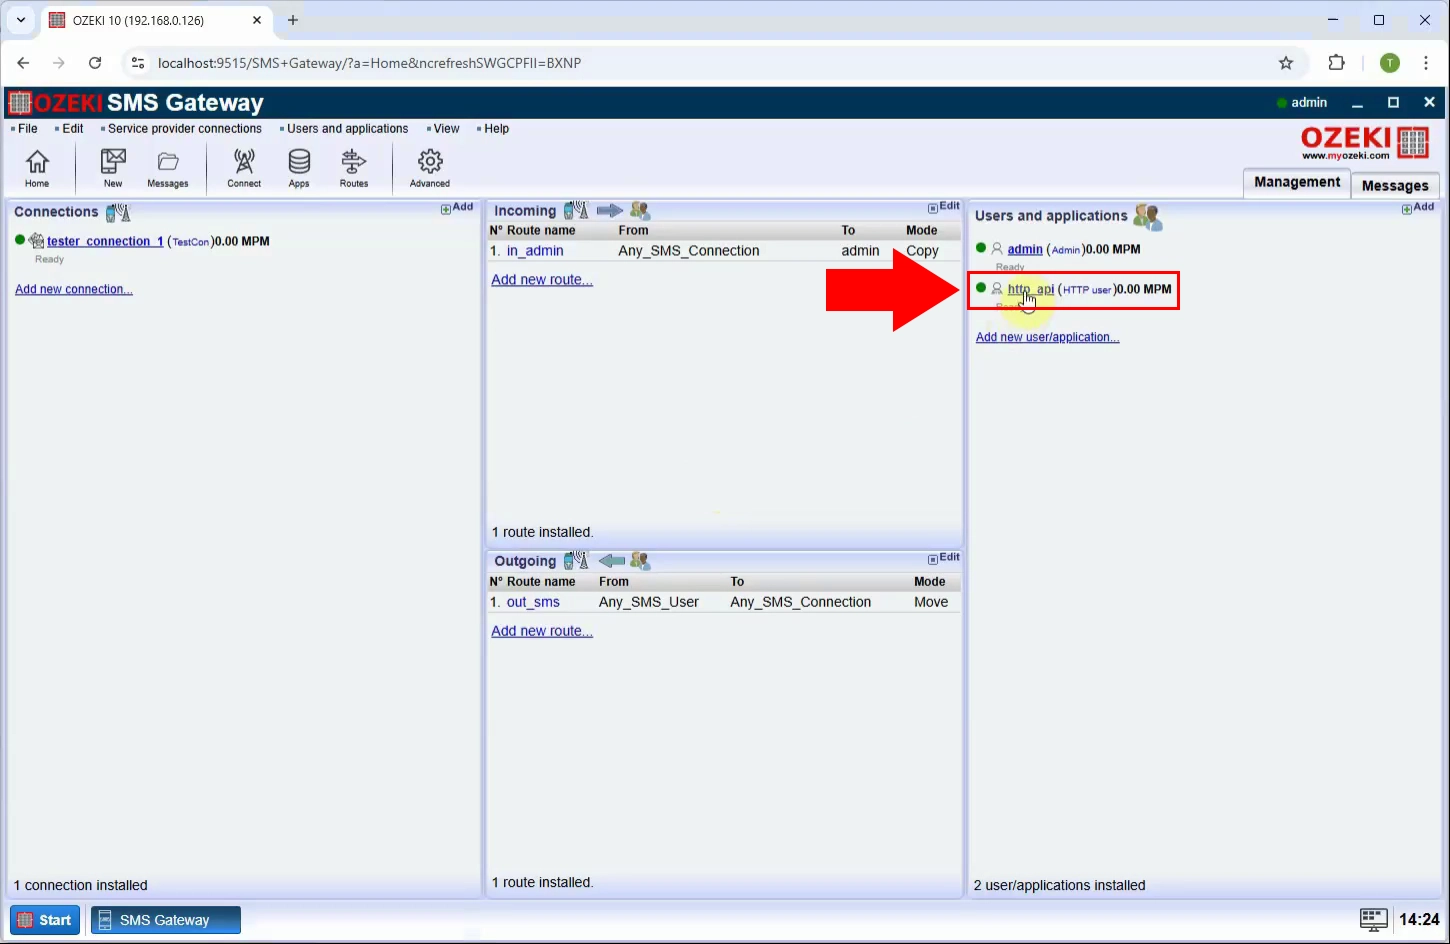
Step 12 - Open HTTP API user
In the Ozeki SMS Gateway interface, navigate to the "Users and Applications" section and open the HTTP API user whose logs you want to inspect (Figure 12).
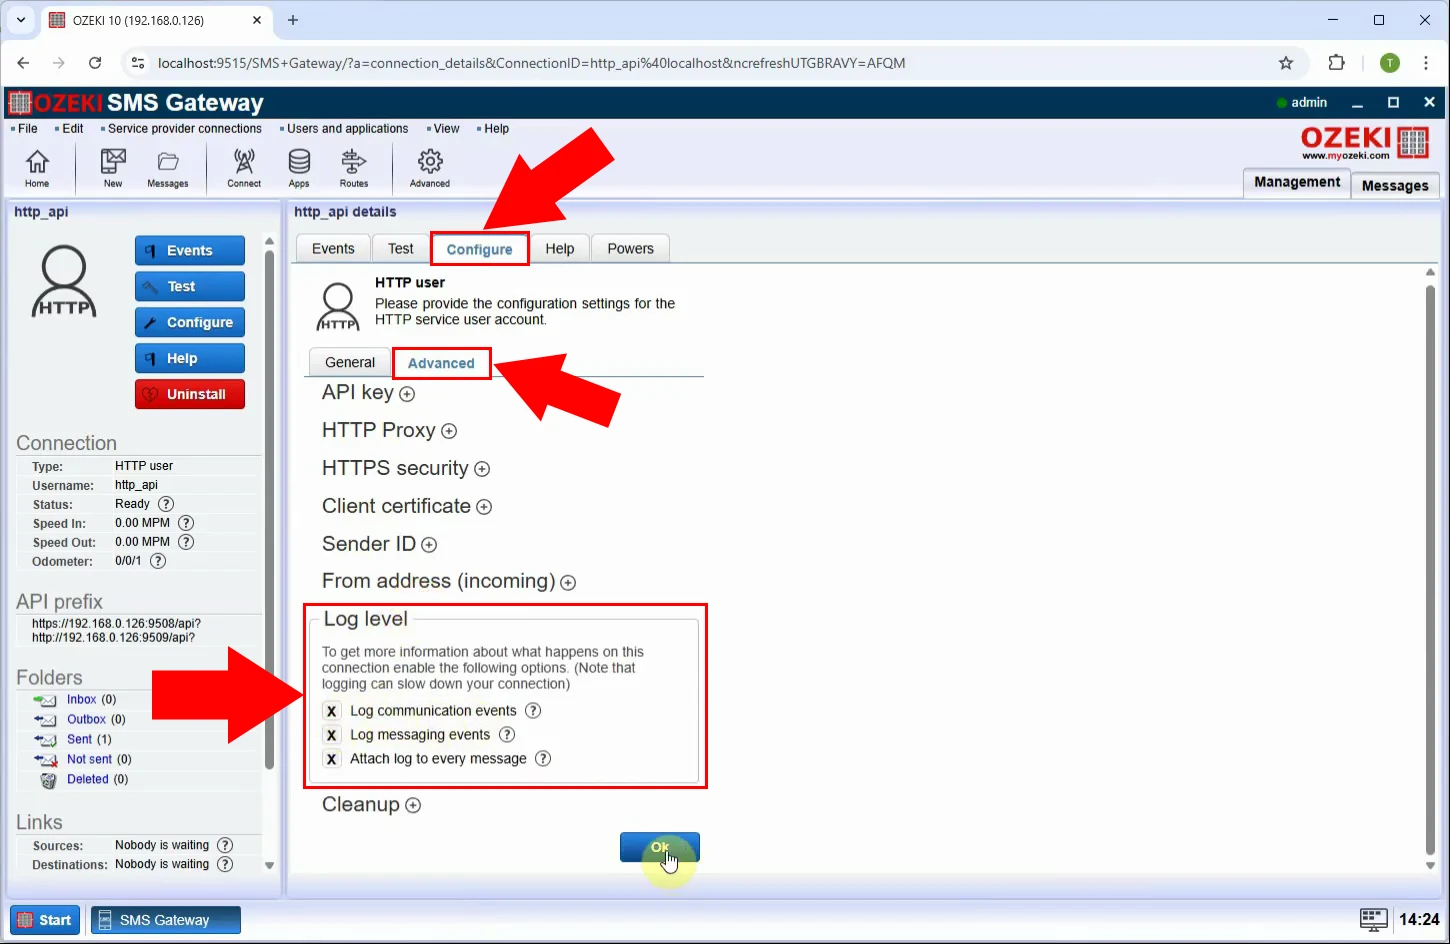
Step 13 - Enable logging
Go to the Configure tab in the http_api details configuration. Enable all three options by checking the checkbox under the Log level. Click "Ok" (Figure 13).
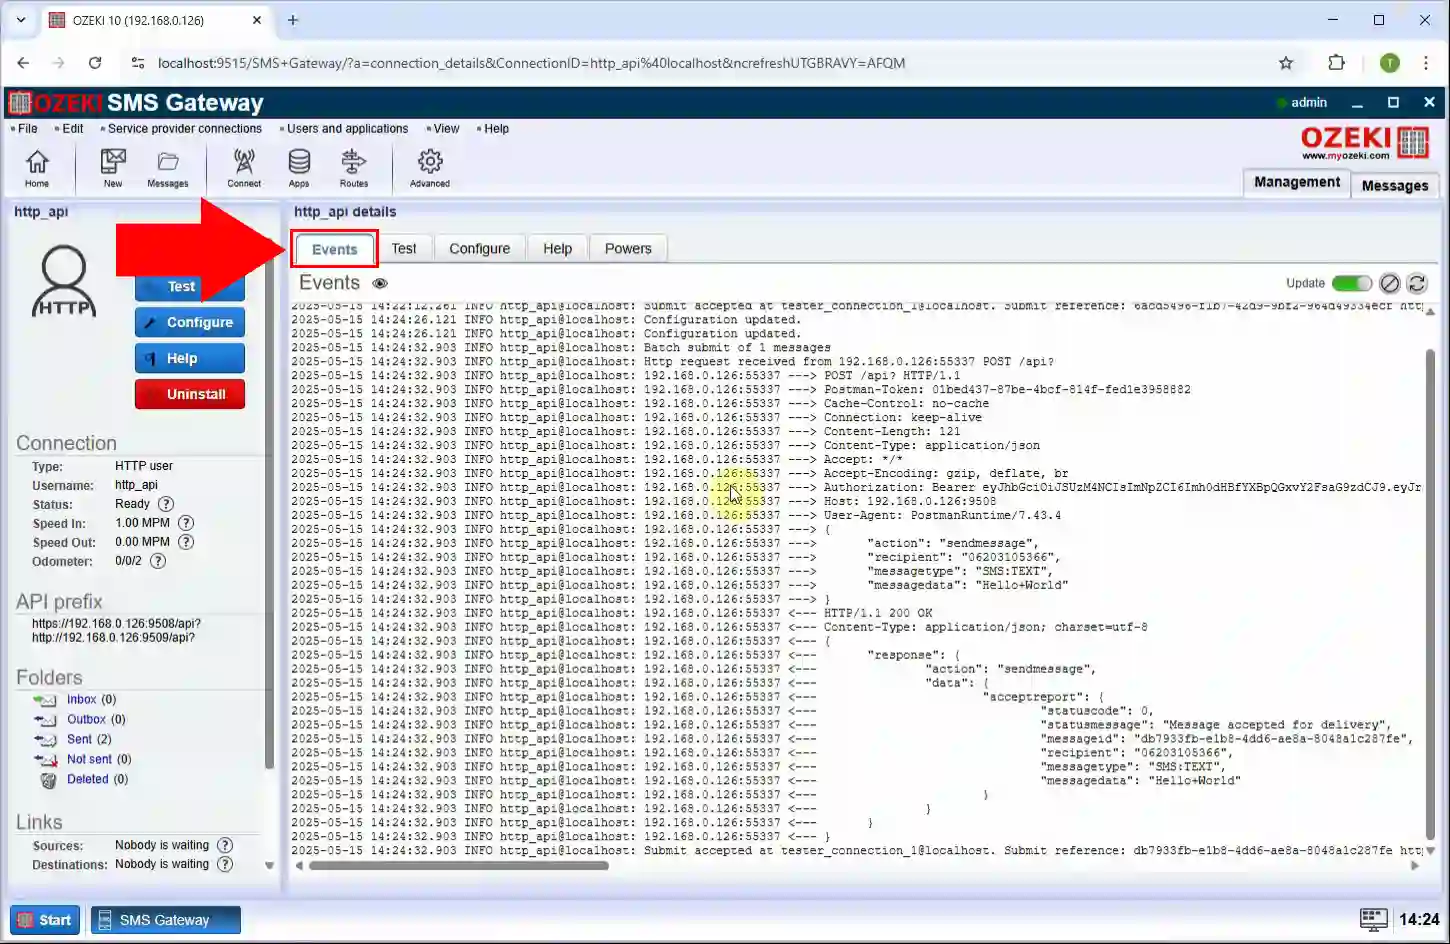
Step 14 - Send message log
Once logging is active, send a test message and go the Events section. Here you will find detailed information about the message request, including timestamps, recipient, message content, and API response (Figure 14).
How to view the logs for the HTTP API server (Video tutorial)
In this video, you will learn how to access and review server-level logs for the HTTP API service in Ozeki SMS Gateway. These logs provide a comprehensive overview of all HTTP request and response events handled by the server, which is essential for system-level debugging, traffic monitoring, and ensuring service reliability. The tutorial demonstrates how to open the HTTP API service settings, enable logging, and check both message-related logs and raw HTTP transaction logs. By the end, you'll be equipped to monitor system-wide API activity with clarity and precision.
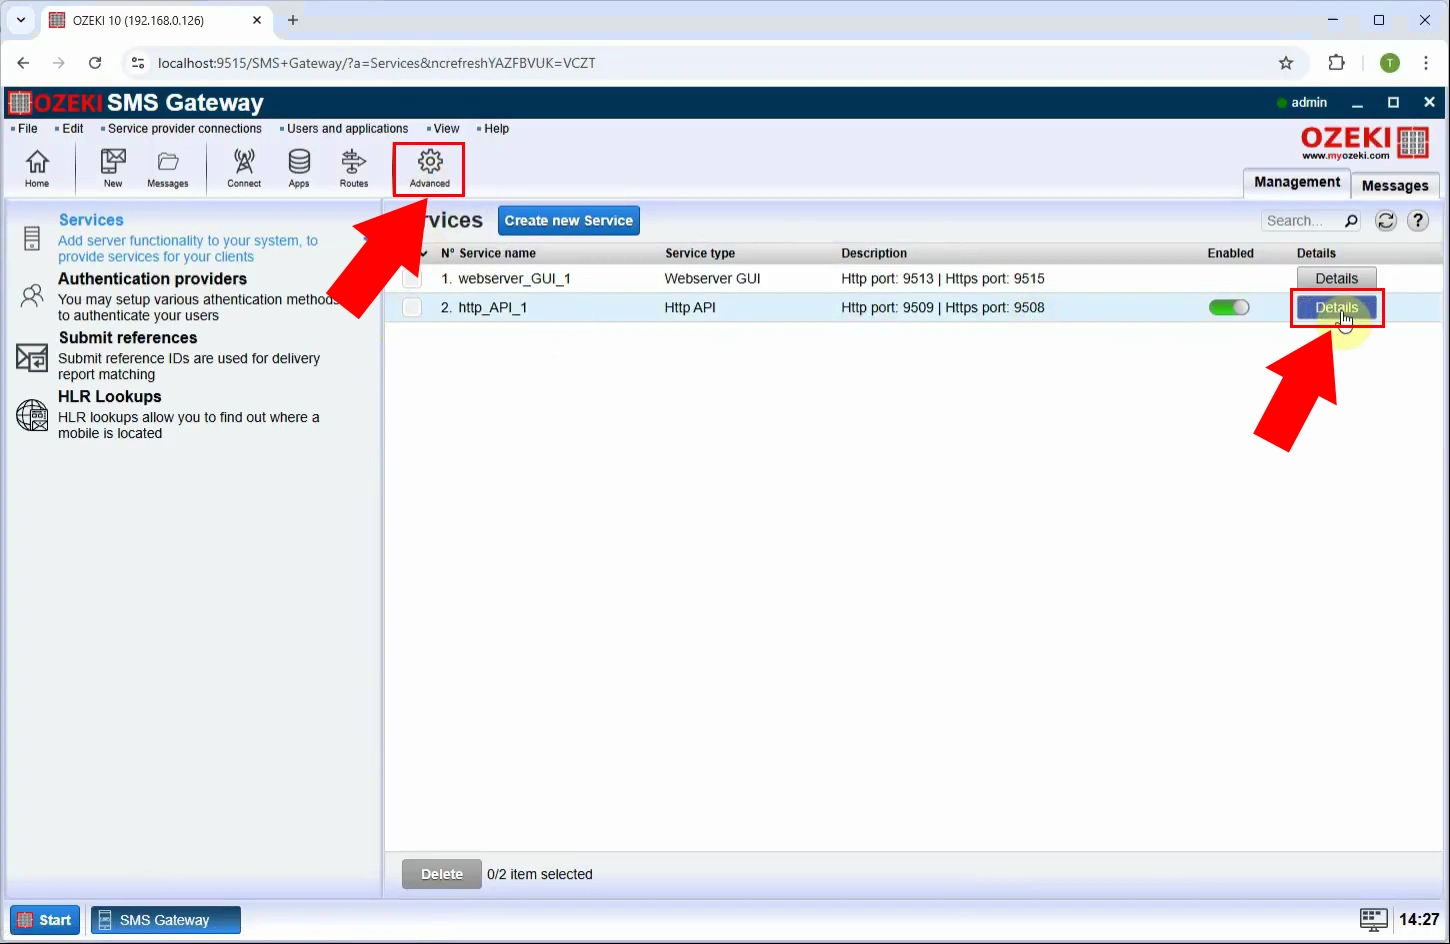
Step 15 - Open HTTP API service details
In Ozeki SMS Gateway, go to the "Advanced" section and locate the HTTP API service. Click on "Details" to open its detailed configuration panel (Figure 15).
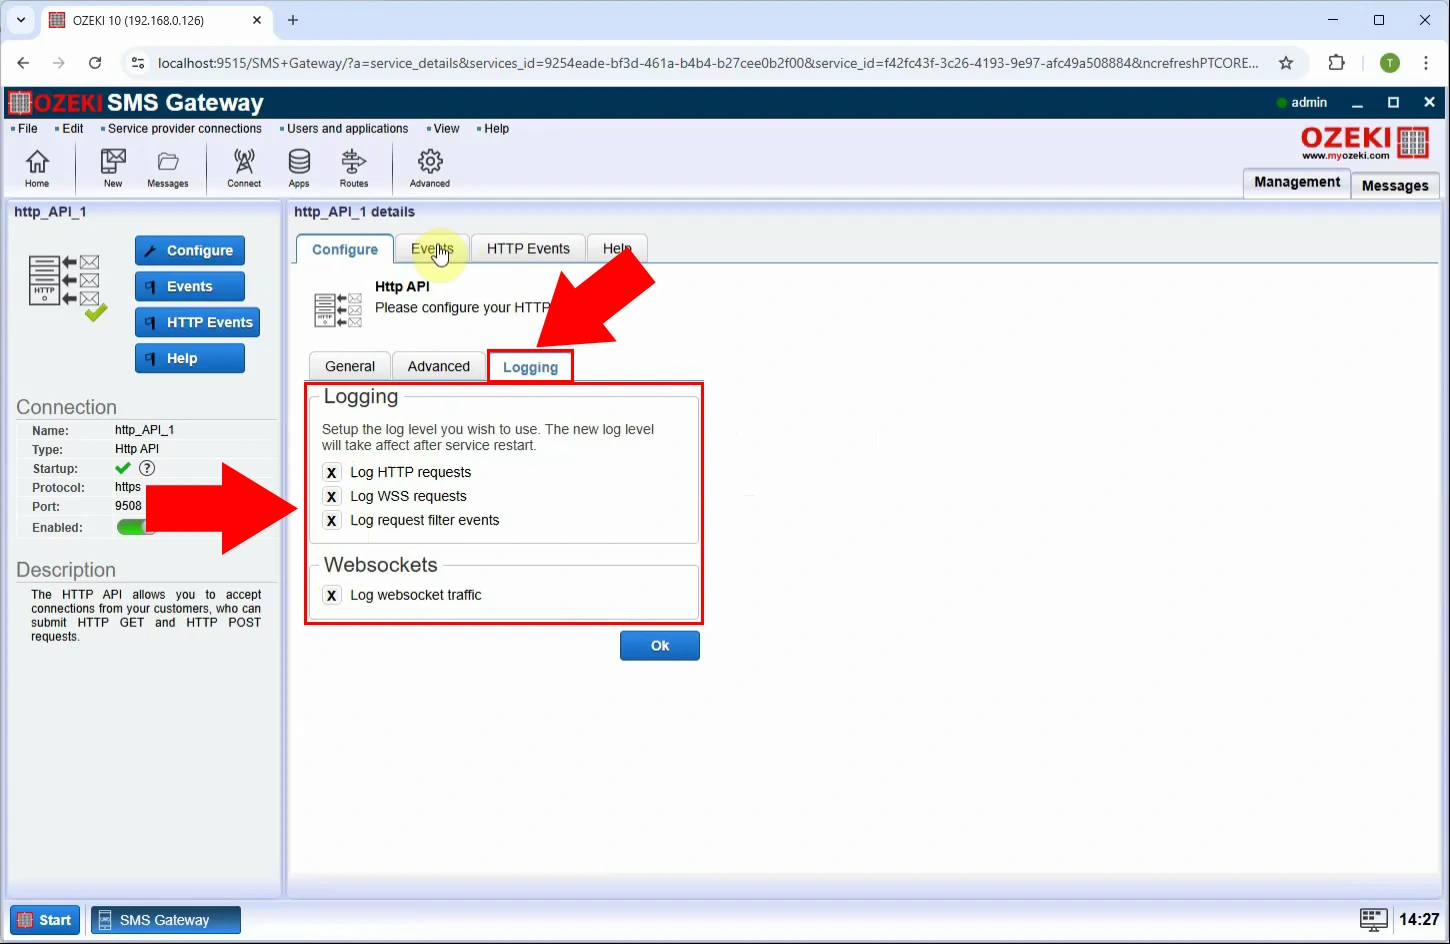
Step 16 - Enable logging
Navigate to the "Logging" tab in the HTTP API service settings. Enable logging by checking the options. Click "Ok" to apply changes (Figure 16).
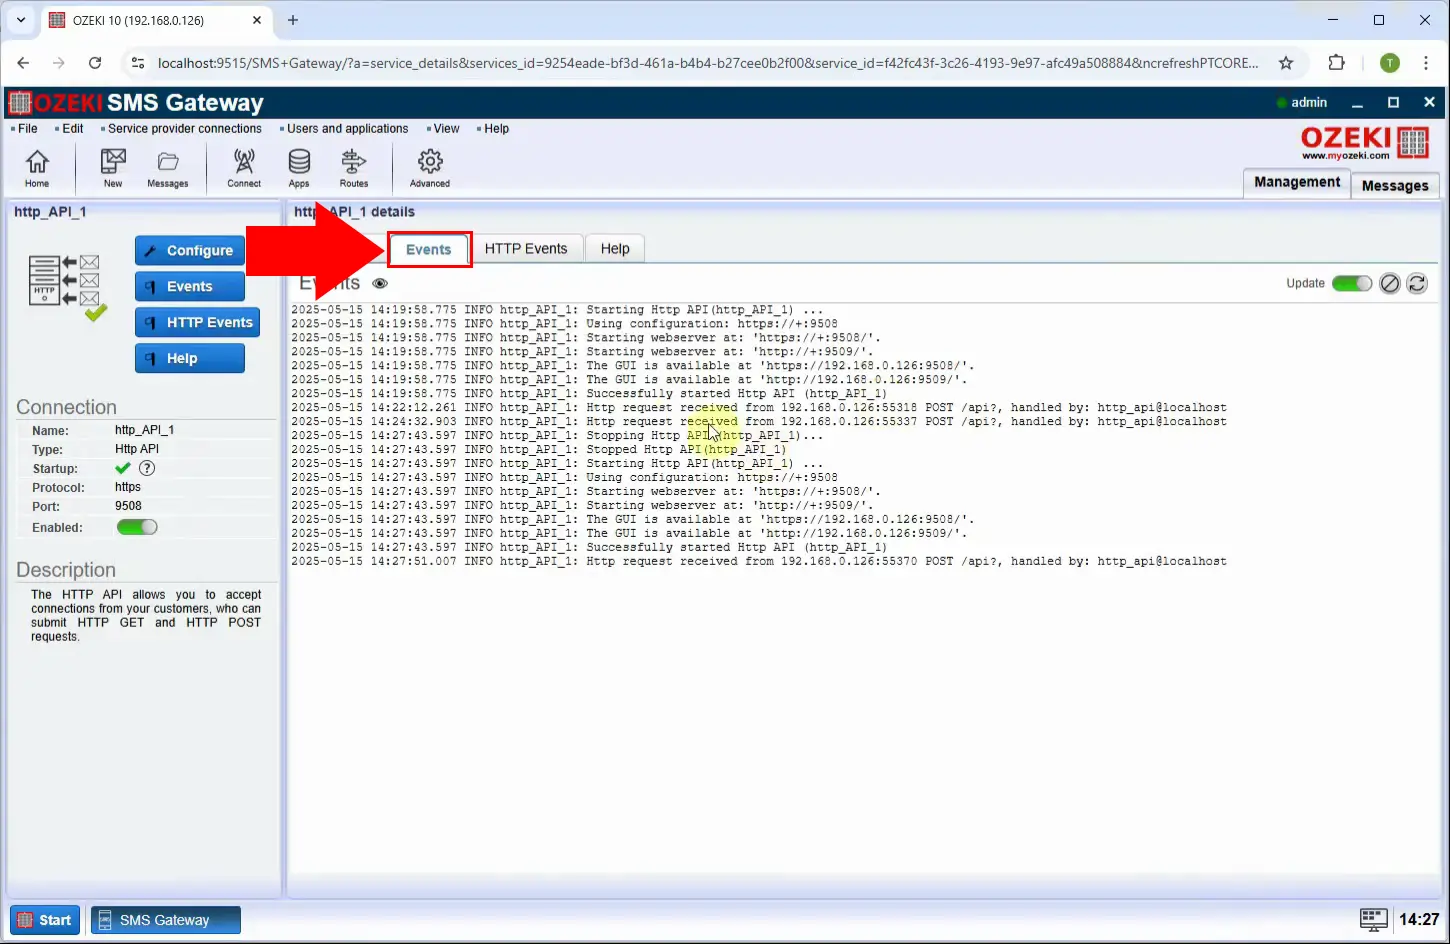
Step 17 - Message event log
After enabling logging, go to the "Events" tab to view the message event log. This section shows all SMS-related transactions processed through the HTTP API, including status codes and delivery outcomes (Figure 17).
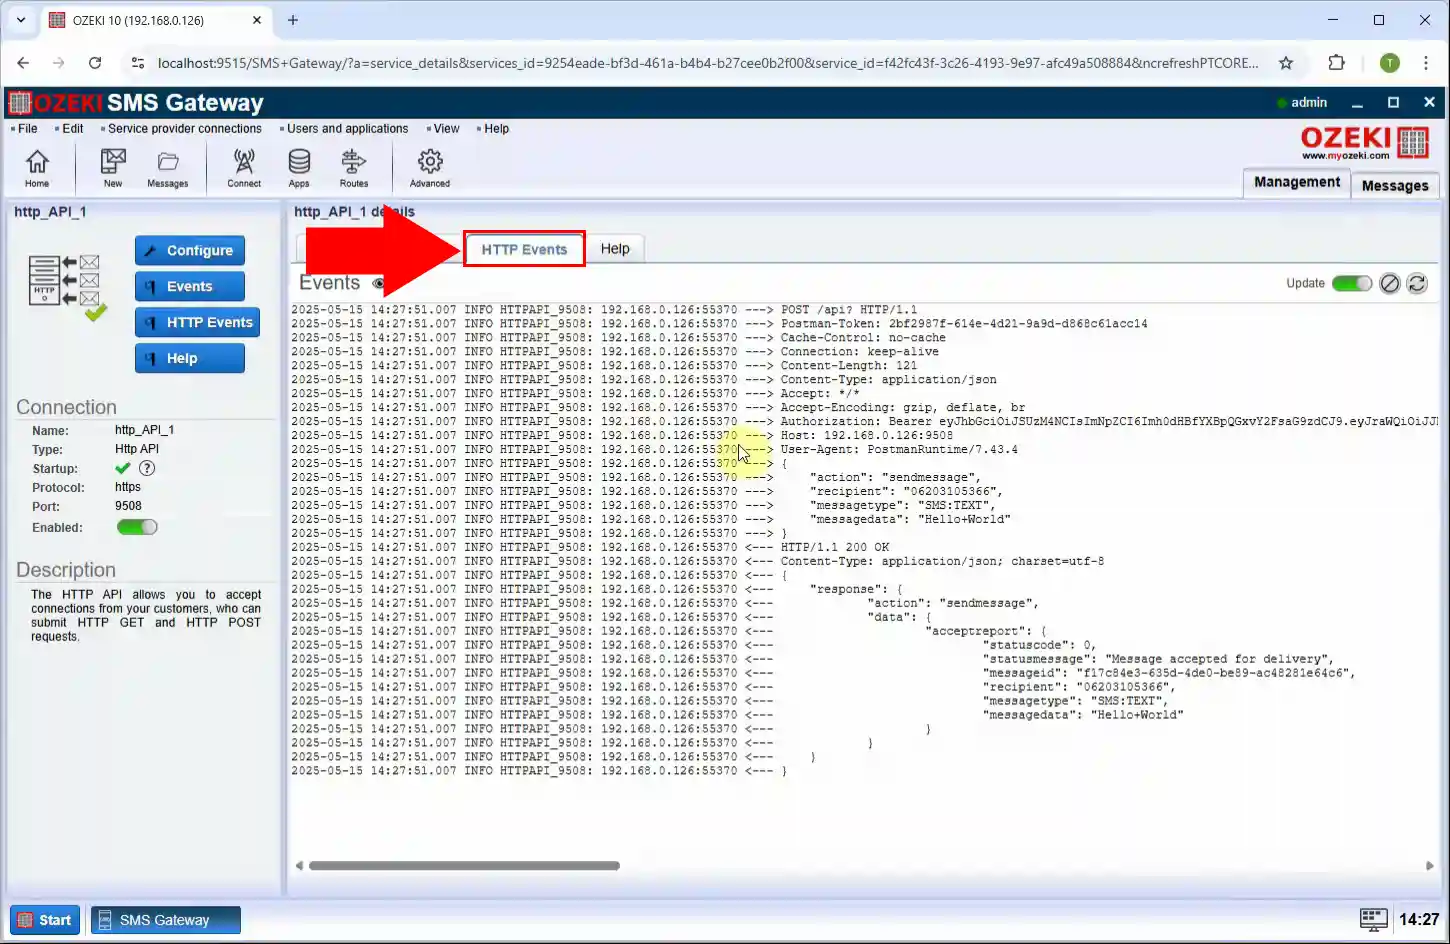
Step 18 - HTTP event log
Switch to the HTTP Events log tab to see low-level HTTP request and response details. This includes headers, endpoints accessed, and payloads - useful for advanced troubleshooting and integration debugging (Figure 18).
Conclusion
This guide has thoroughly demonstrated how to establish a robust HTTP SMS service using the Ozeki SMS Gateway. By following the detailed steps, you can successfully create and configure an HTTP API user, generate secure API keys, and integrate SMS functionality into external applications. The ability to send SMS messages via HTTP requests opens up a wealth of possibilities for developers and service providers looking to automate notifications, build custom messaging solutions, or offer SMS capabilities to their clients.
Furthermore, the emphasis on enabling and monitoring logs ensures reliable message delivery and provides crucial insights for troubleshooting and maintaining service integrity. With the Ozeki SMS Gateway, you gain a powerful and flexible platform for all your HTTP-based SMS communication needs, enabling efficient, secure, and easily integrated SMS messaging.
Start building your HTTP SMS Service. First, go to the download page and download the Ozeki SMS Gateway software if you haven't already. Then follow the steps above and send your first SMS message. If you have any questions, register at myozeki.com and ask our technical team.
More information
