How to connect to Ozeki with jSMPP
This article will show you how you can use jSMPP technology with the Ozeki SMS Gateway. The jSMPP is the Java implementation of SMPP. It has the benefits of the SMPP technology and the Java programming language. This process will take about 20 minutes to perform. It will start with downloading the required Javascript from GitHub and will take you all the way to a sent message’s event log. The tutorial is very detailed and uses the Ozeki SMS Gateway, which has an intuitive GUI. You will have no problem following the steps. We assume that you are familiar with the SMS communication technology, GitHub, and the Java programming language. Don’t waste any time! Let’s start sending SMS messages!
What is jSMPP?
jSMPP is the Java implementation of the SMPP. It is mostly used with a high-performance messaging framework like the Ozeki SMS Gateway.
What is SMPP?
SMPP is an industry-standard messaging protocol that is mostly used for messaging between applications and mobile phones. It stands for Short Message Peer-to-Peer protocol.
How to connect to Ozeki with jSMPP (Quick steps)
To connect to Ozeki with jSMPP:
- Add a new SMPP user in the SMS Gateway
- Enable logging for the SMPP client
- Browse for Ozeki jSMPP GitHub repository
- Copy the jSMPP repository URL
- Clone the repository in GitHub Desktop
- Open the jSMPP SMS project in NetBeans
- Run Maven on the jSMPP project to compile
- Provide details in the example code
- Run the configured jSMPP program
- Check the SMPP logs in the SMS Gateway
How to create an SMPP user (Video tutorial)
The following video explains how to create a new SMPP user in the Ozeki SMS Gateway, that you can use to send SMS. It will start with the Add user or application install list and takes you all the way to having a working SMPP user. The video is short and easy to understand. The SMPP user enables the SMS infrastructure to provide high throughput and efficient bulk SMS sending. This video will give you a glimpse of how easy it is to set up an SMPP user in the Ozeki SMS Gateway, and you will see that it offers a very powerful dashboard, that allows you to reach the most important functions with a single click. You will learn how to create and customize an SMPP user to your liking.
How to connect the Ozeki SMS Gateway with jSMPP (Video tutorial)
This video explains how to connect the Ozeki SMS Gateway with jSMPP. It will start with cloning the jSMPP repository from GitHub and will take you all the way to sending your first test text message. This video is detailed and easy to understand. You will need 5 minutes to watch it. It will give you detailed information about how you can acquire the jSMPP code and how you can run it using Maven.
Copy the URL of the repository
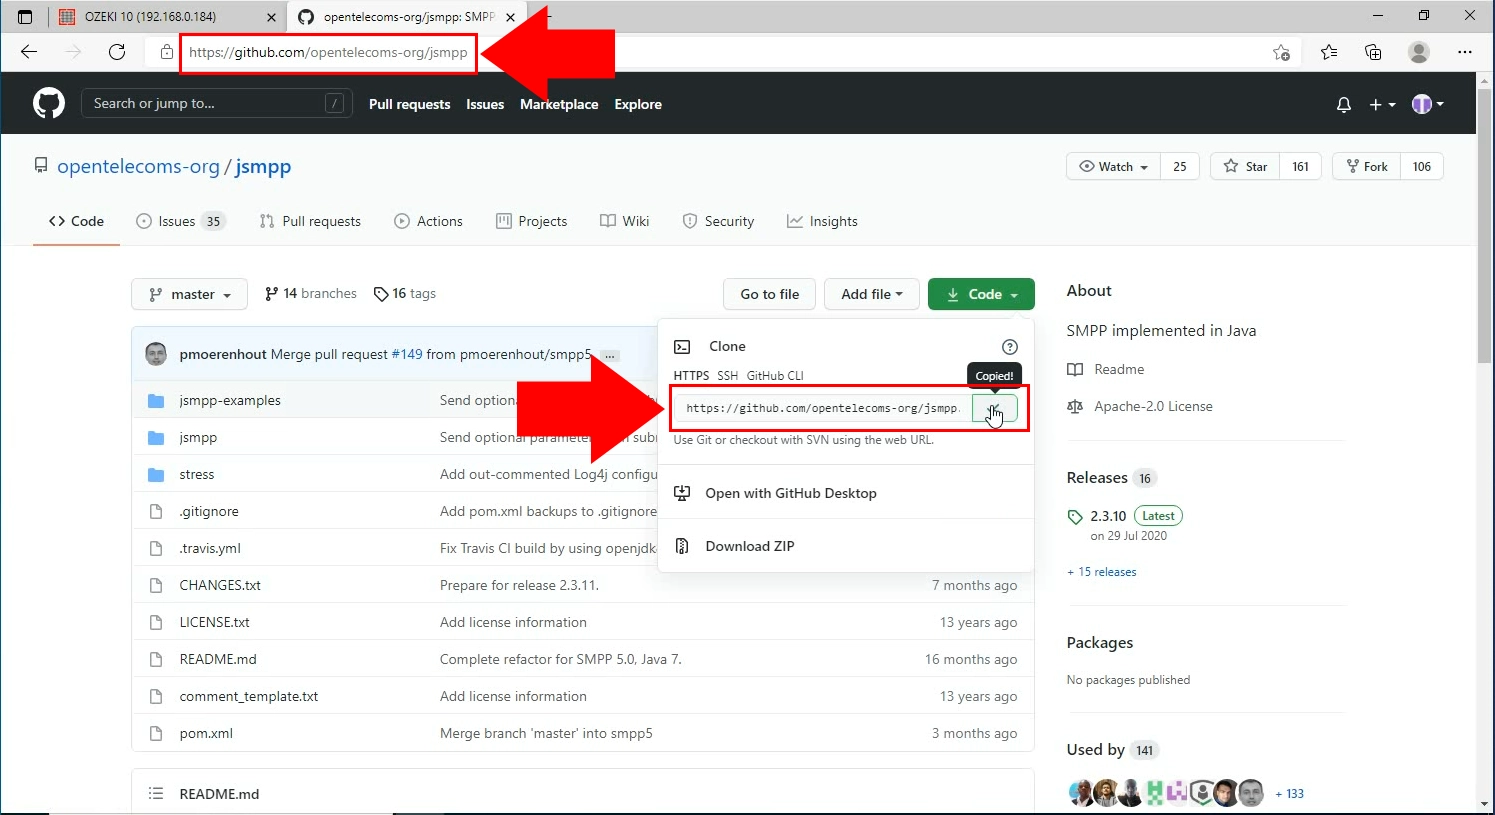
To have all the files required for the project, you need to clone the repository of the jSMPP. Click this link and it will take you to the GitHub page of the repository. Now you need to find the green Code button. Click it to access a sub-menu where you can select to copy the URL of the code (Figure 1). It will be useful because the GitHub Desktop application will download all the files you need from this URL.
Clone the repository
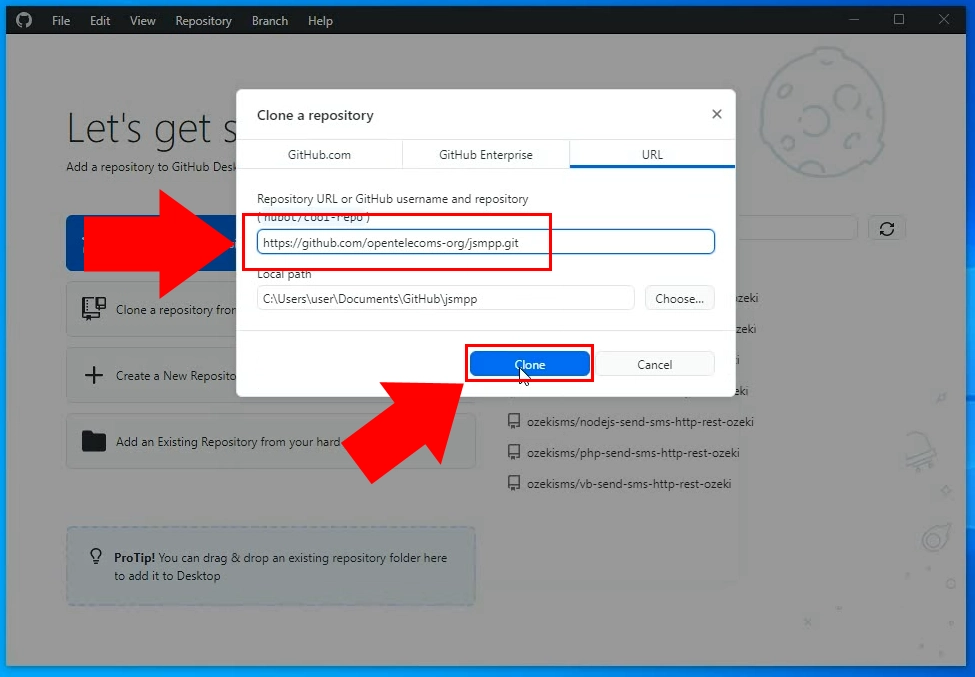
Next you need to open the GitHub desktop application and open the Clone a repository form. This page will help you download all the files from the repository to your computer where you can edit them offline. You can also set an access path for the files, where the program will store them. Click the blue Clone button to proceed, as you can see on Figure 2.
Open the project in NetBeans
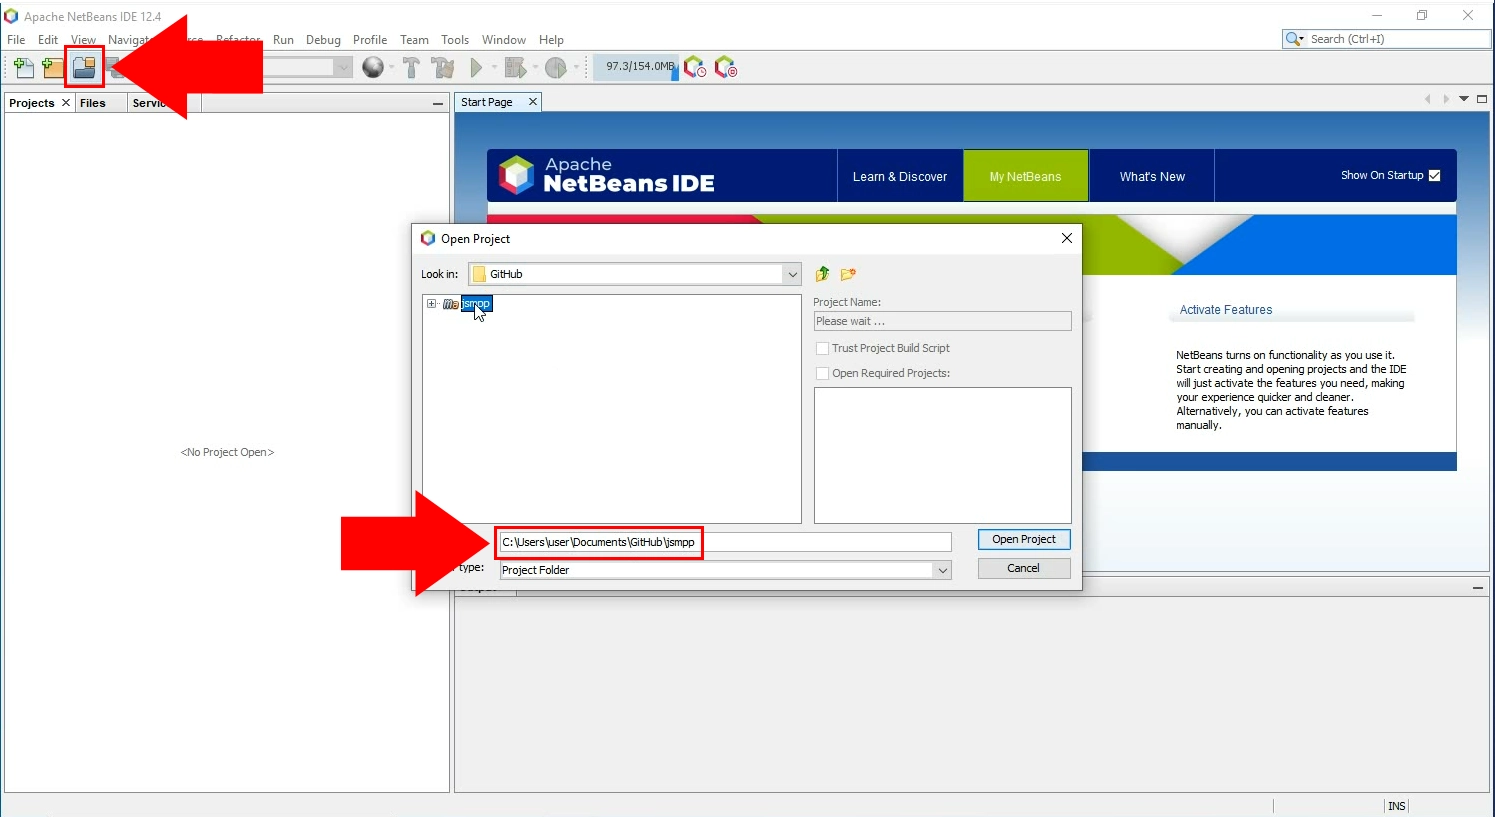
To try out or edit the code, open the downloaded file with NetBeans IDE. It is a free and open-source development environment that is mostly used for Java. Open the program and look for the Open Project button located on the toolbar of the NetBeans IDE (Figure 3). It will open a form where you can choose a file to start working on. Choose the downloaded Java project file and click the Open Project button.
Run the Maven on the project
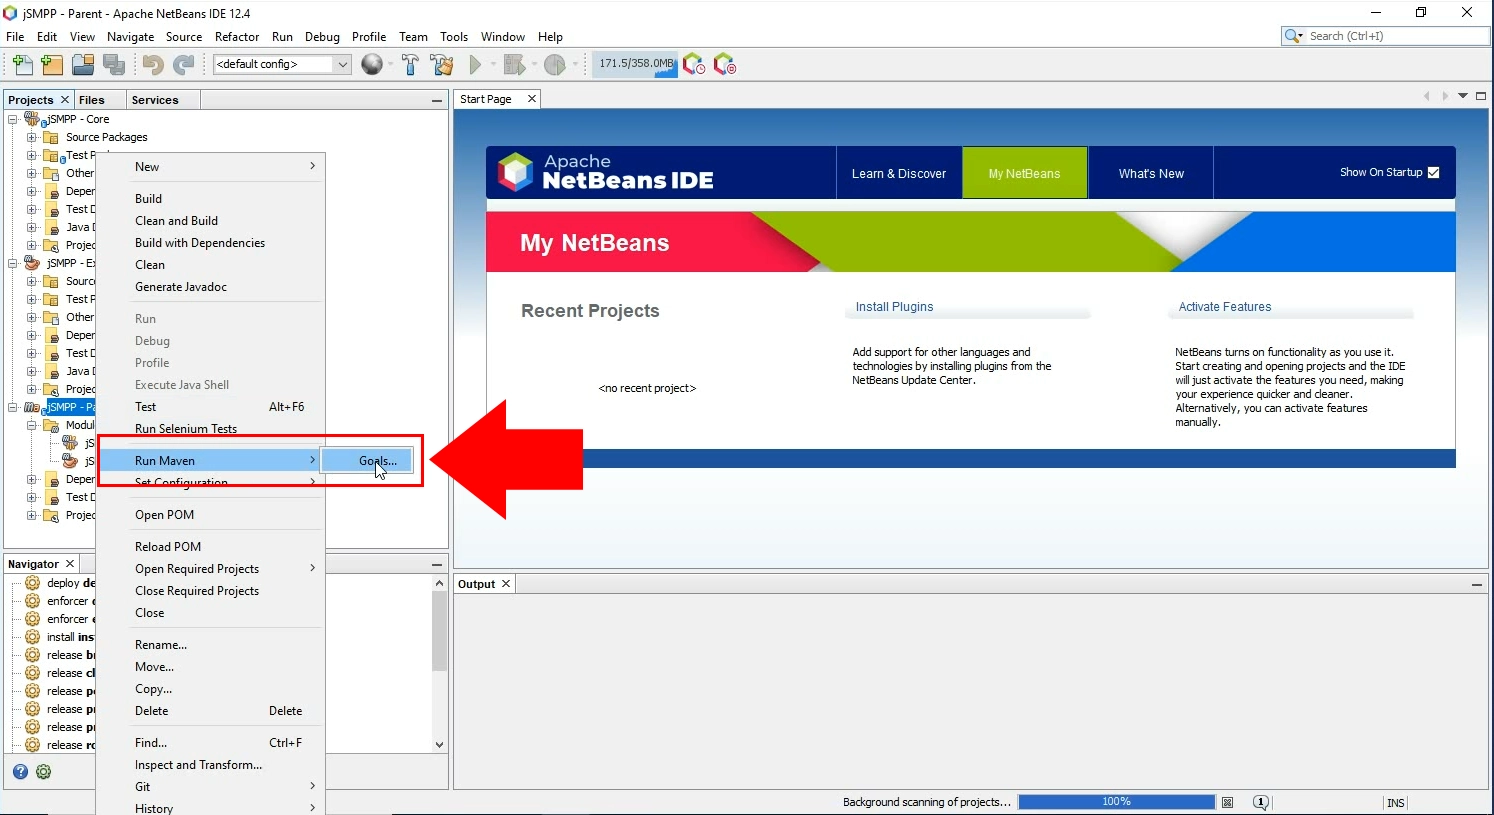
To compile the file and send a test SMS use the Maven tool in NetBeans. Maven is a tool that can be used for building and managing any Java-based project. To do so, right-click the file titled jSMPP. This will open a context menu. From there you can choose the Run Maven option. Click it and it will open the sub-menu, from where you can select to set the Goals of the Maven. (Figure 4).
Set the goal to compile
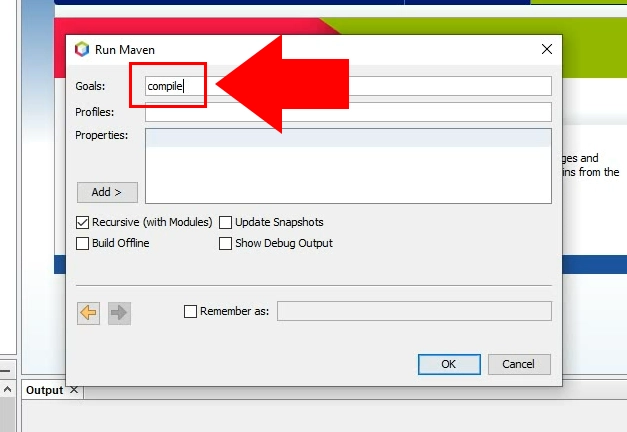
The goal of the Maven tool is to compile the example code. To set this goal, simply type in compile to the Goals textbox (Figure 5). Click the Ok button to finalize your setting. This will launch the Maven Compiler plugin and run your code.
Open the example code
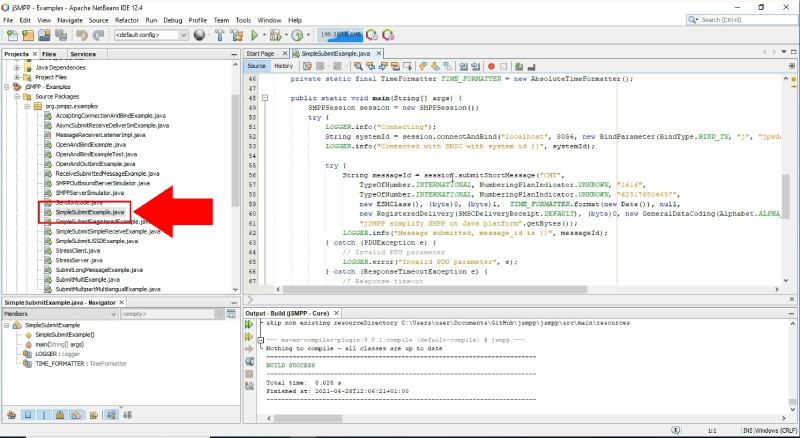
To run the SMS submit code, search for the file titled SimpleSubmitExample.java (Figure 6). Click it twice to load it into the code editor. This code will submit a request for the SMS gateway to send an SMS message with the properties defined in the code. Feel free to customize the code if you are familiar with Java.
Define the connection details
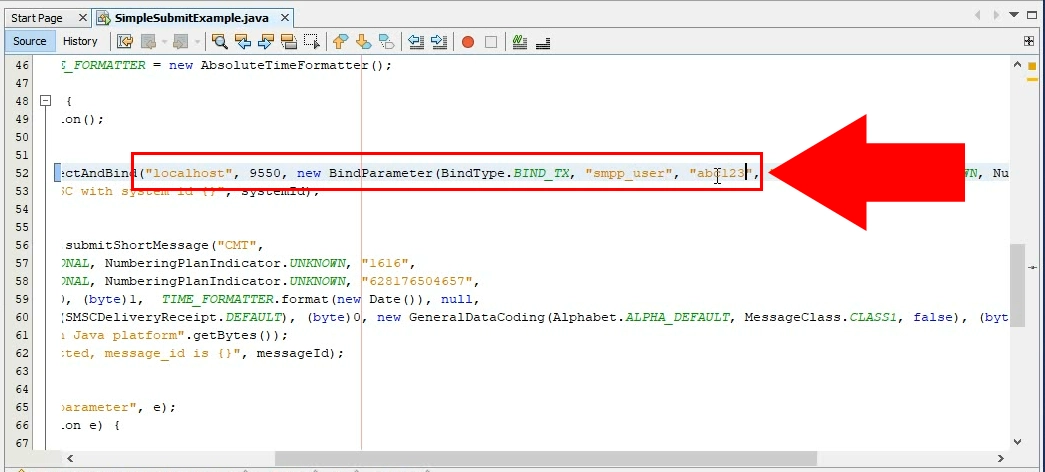
In the code editor section of NetBeans, you can customize the code to your likings. As you can see on Figure 7, you need to define the port number of the connection you wish to use to send SMS messages and the login credentials of the Ozeki SMS Gateway’s SMPP user. This way, the jSMPP script will send the message through this port and will login to the user automatically.
Run the example file
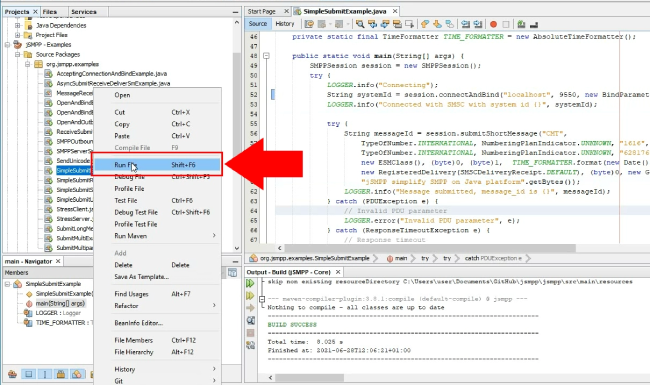
To run the configured jSMPP file, Right-click the file titled SimpleSubmit and choose the Run File option from the context menu (Figure 8). An easier way is to press the Shift+F6 keyboard combination. This will also launch the app and send your test message.
Check the log of the user
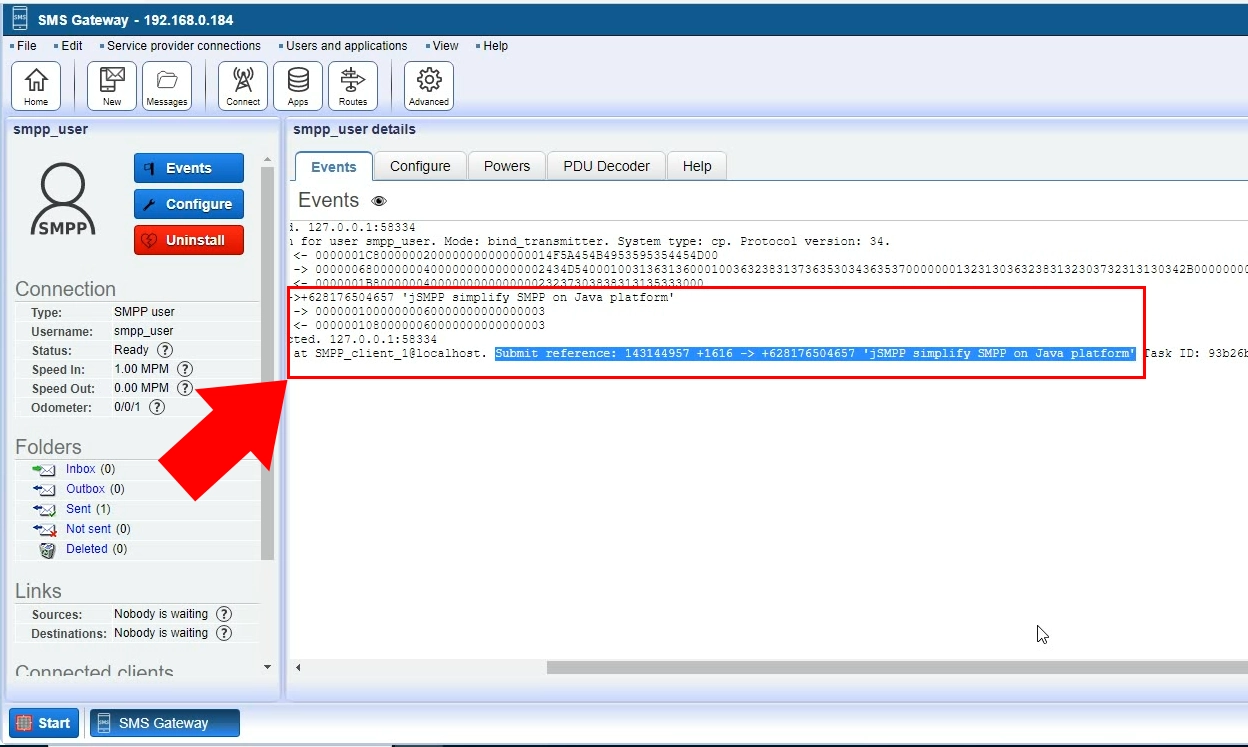
After sending your test message, you can see that the log for the sending event will show up in the Events tab of the SMPP user. You can get more information about the message like the time stamp or the body of the message here (Figure 9).
Summary
This article was written to show you how you can use the mentioned Java implementation named jSMPP technology with the Ozeki SMS Gateway. If you have followed the instructions from downloading the required Javascript to checking a sent message’s event log, you are able to set up this solution. Now you can use the jSMPP technology to build a high-performance messaging system with the Ozeki SMS Gateway.
Learn more about the SMS communication technology, GitHub, and programming languages from the Ozeki website. Check out other tutorial pages, your next topic to study might be the Javascript SMS solution of the Ozeki.
Let's get to work, download the Ozeki SMS Gateway now!
