F# tutorial: Hello world
This tutorial helps you get started with F#. It explains what you need to write your first F# program. It starts with the basics: you will learn where you can find and download the tools needed, how to install these tools and it will take you all the way to building and running your code. If you have never written a F# program before this is the place to start. We have created this article, so you can get started with F#, and move on to our sms examples. If you are already familiar with F#, you can jump directly to one of the following SMS projects.
F# sms examples:
How to send SMS from F#
How to send multiple sms from F#
F# schedule sms with the HTTP rest api (code sample)
F# receive sms with the HTTP rest api (code sample)
F# delete sms with the HTTP rest api (code sample)
Download the latest F# sms api library from Github
What is F#
F# is a programming language. It is similar to a natural language, like English. It is used to talk to a computer. The major difference between a natural language and a programming language is that programming languages have a more rigorous structure, to help the computer understand it better.
What is an F# Hello world program
The F# hello world program is the simplest program you can write. It simply prints out the sentence: Hello world on the computer screen. The Hello World program is the first program developers write in any programming language.
How to write your first program in F#
To write your first program in F#:
- Check the prerequisites
- Setup Visual Studio Community
- Create a new Console Application project in F#
- Select the .NET Target Framework
- Write the 'Hello world' F# program
- Run the 'Hello world' program
- Examine the log if the program does not run
- Fix the highlighted line of the code
Prerequisites
Here is what you need to get started. To write your first computer program in F#, you need a Windows computer, Visual Studio, and the example code presented below.
- Windows 10 computer
- Visual Studio
- Ozeki Hello World example project
Download Visual Studio
Microsoft Visual Studio Community EditionIn this video tutorial you will find how to download the Visual Studio Community Edition installer (Video 1). You may download the installer from the following URL: https://visualstudio.microsoft.com/downloads/. On this page you will see different version of Visual Studio available for download. Follow the instructions in this short video to download the installer on to your computer.
Download Visual Studio installer
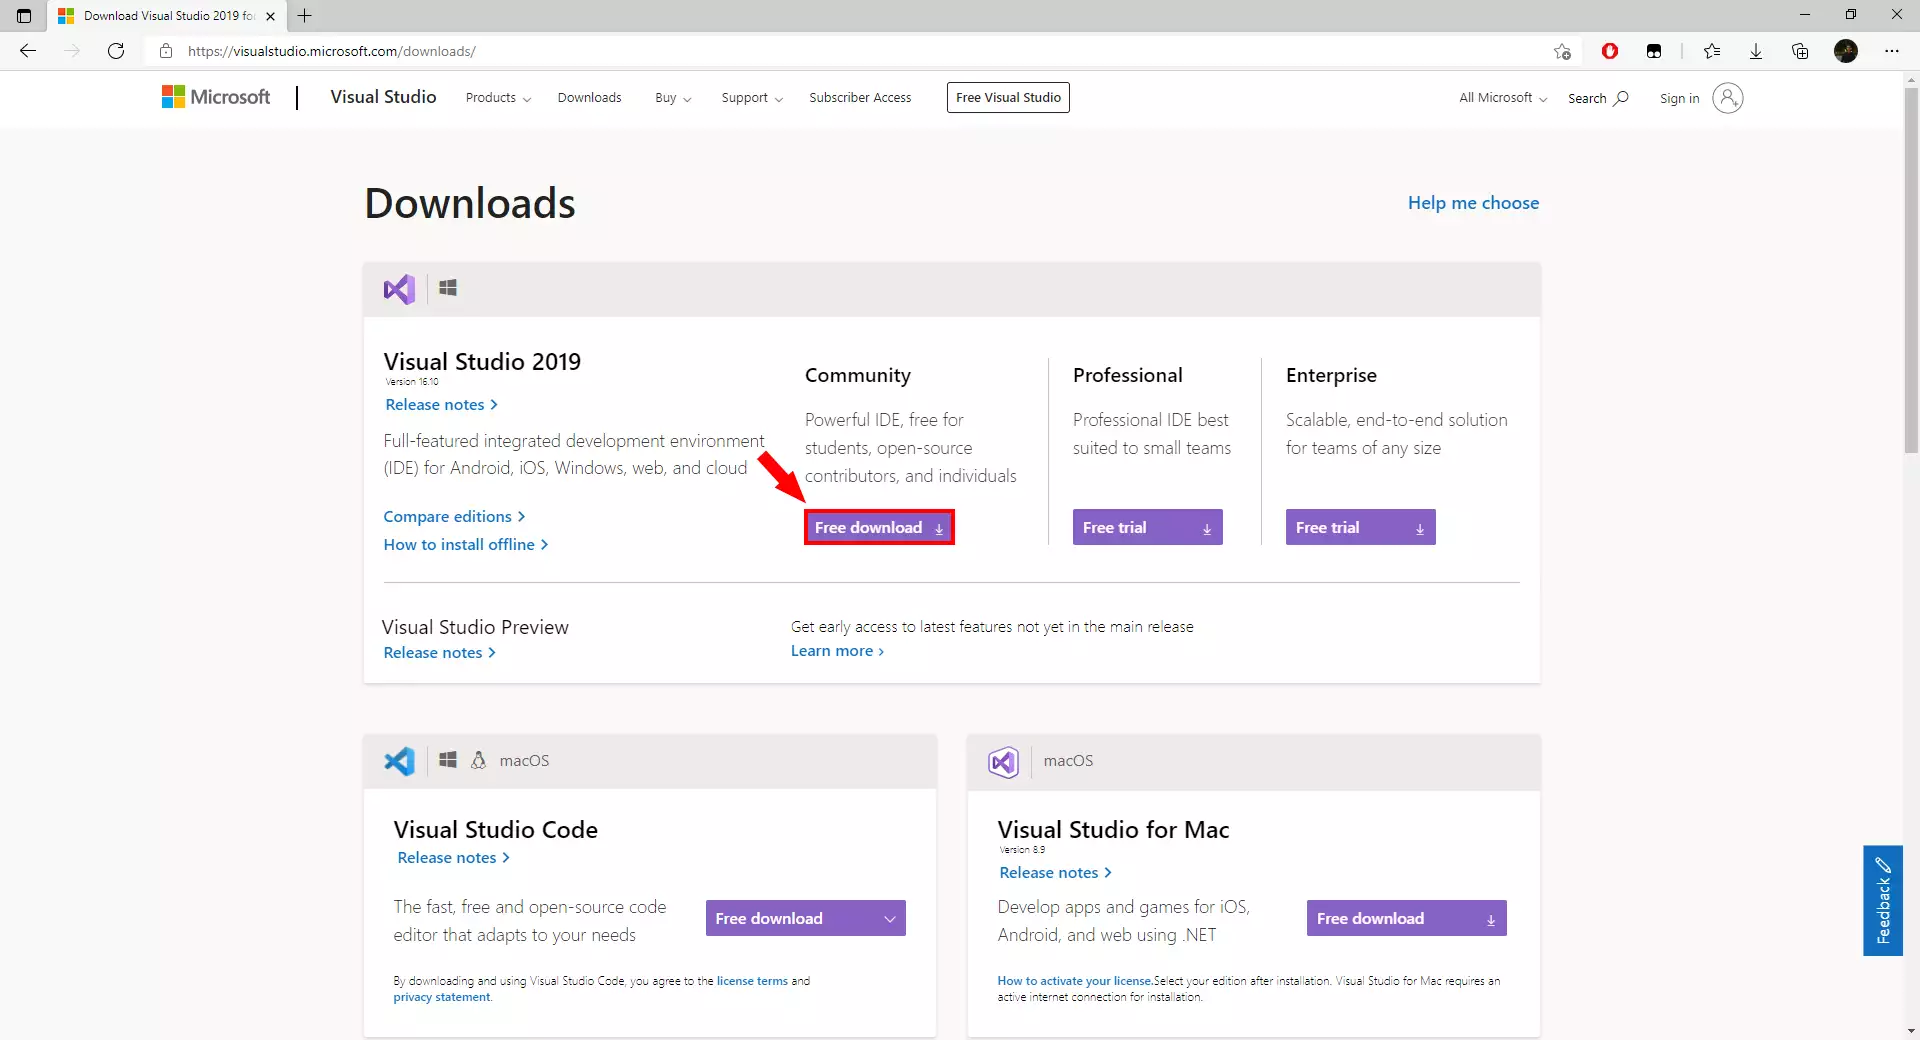
Start by going to the following website: https://visualstudio.microsoft.com/downloads/. Under the Community column, click on the purple Free download button (Figure 1). This is going to download the Microsoft Visual Studio Community Edition Installer on to your computer to the default download location specified by your browser.
Install Visual Studio
To write your first F# program, you need to install Visual Studio. The following video shows you how this installation can be done. This video includes a specifically configured installation of Microsoft Visual Studio Community edition. It contains all of the settings and steps in order for you to successfully set up an F# coding environment (Video 2).
Create your first F# Visual Studio project
This short video tutorial shows you how to create an F# project using Visual Studio. You will learn how to select the correct language (F#) as well as the project type. You will also find out how to select a path, a name, and a target framework for your newly created project. Once you have applied all the necessary settings, the F# coding environment will launch inside of Visual Studio (Video 3).
Create a new project in Visual Studio
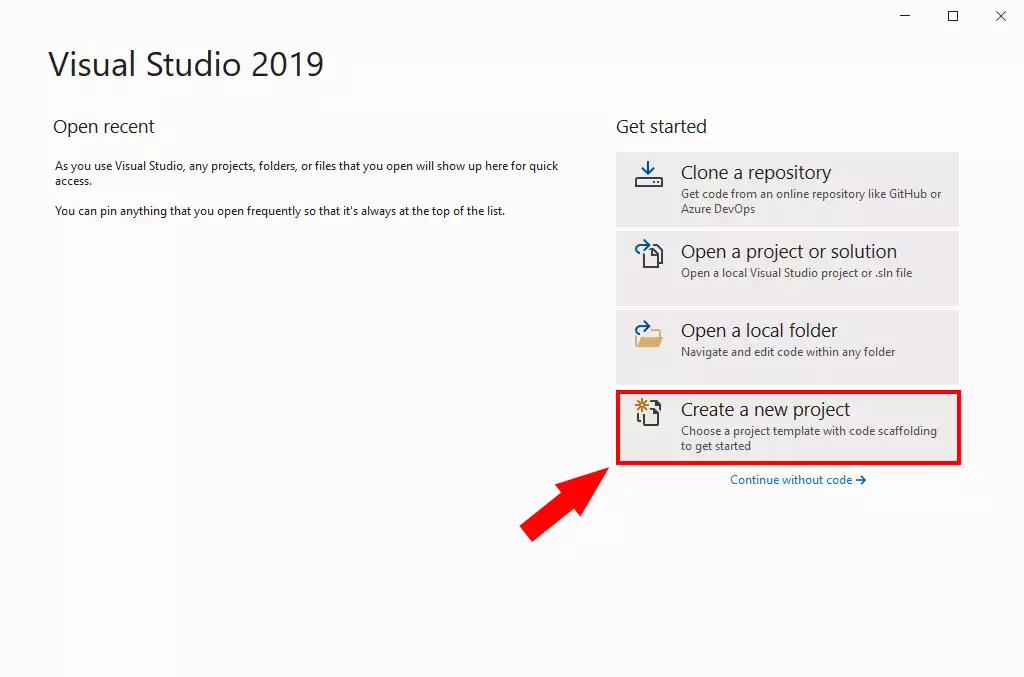
First, open Visual Studio, which you have just installed. You will be then greeted by a welcome screen. This screen lets you create a new project or open previous ones. Under the "Get Started" column on the right, click on Create a new project (Figure 2). This will forward you to the next page where you can configure the settings of your project.
Filter to F#
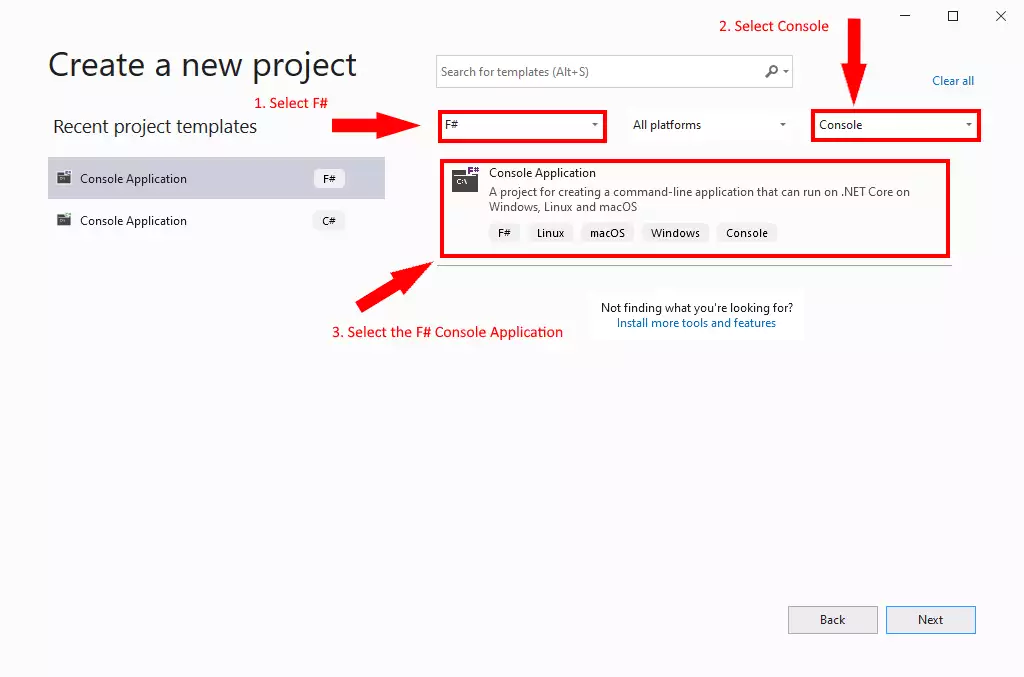
In order to create an F# project, you will first need to filter the project to F# and Console Application. After you have clicked on "Create a new project" you will be brought to a configuration screen. First, select F# from the combo box in the top middle of the window just below the search bar (Figure 3). Next, select Console in the combo box farthest to the right side of the window. As a result of your filtering an option titled Console Application will pop up. Select Console Application by clicking on it. Finally, click the Next button on the bottom right to continue.
Name your application
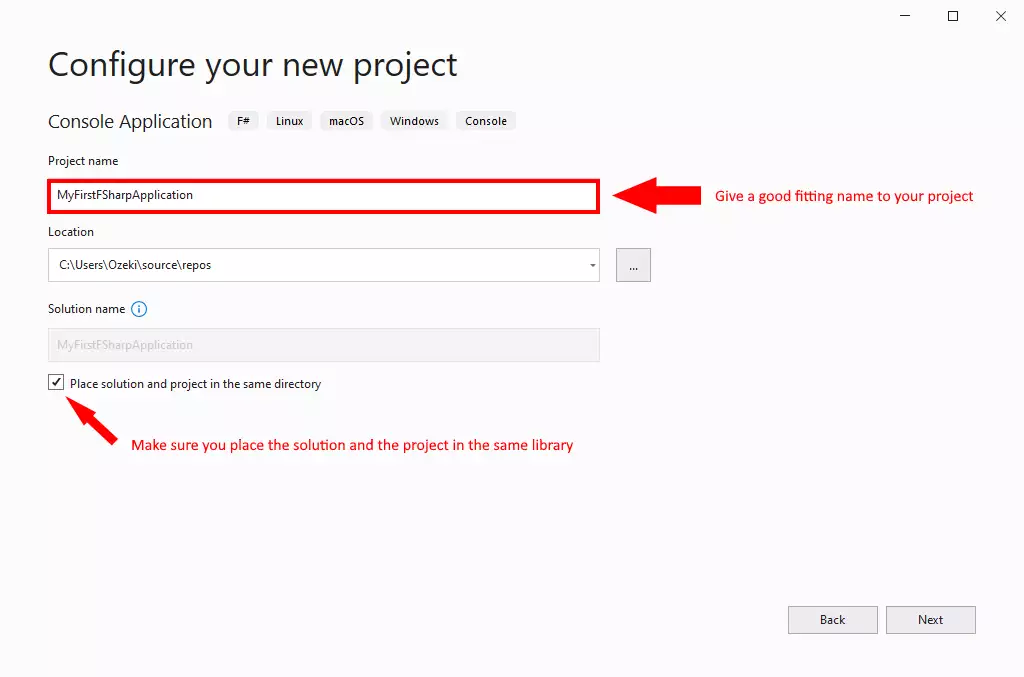
After specifying your project as a Console Application, you will be asked to give it a name. Under the text that reads "Project name" you will find a textbox (Figure 4). Enter your desired name into this textbox to name your project. Give it an easily identifiable and fitting name, so you could always recognize it. We also recommend making sure that you place the solution and the project into the same library. This is done by clicking on the checkbox on the bottom of the section to enable this option. Click on the Next button on the bottom right when you are done.
Select targeted framework
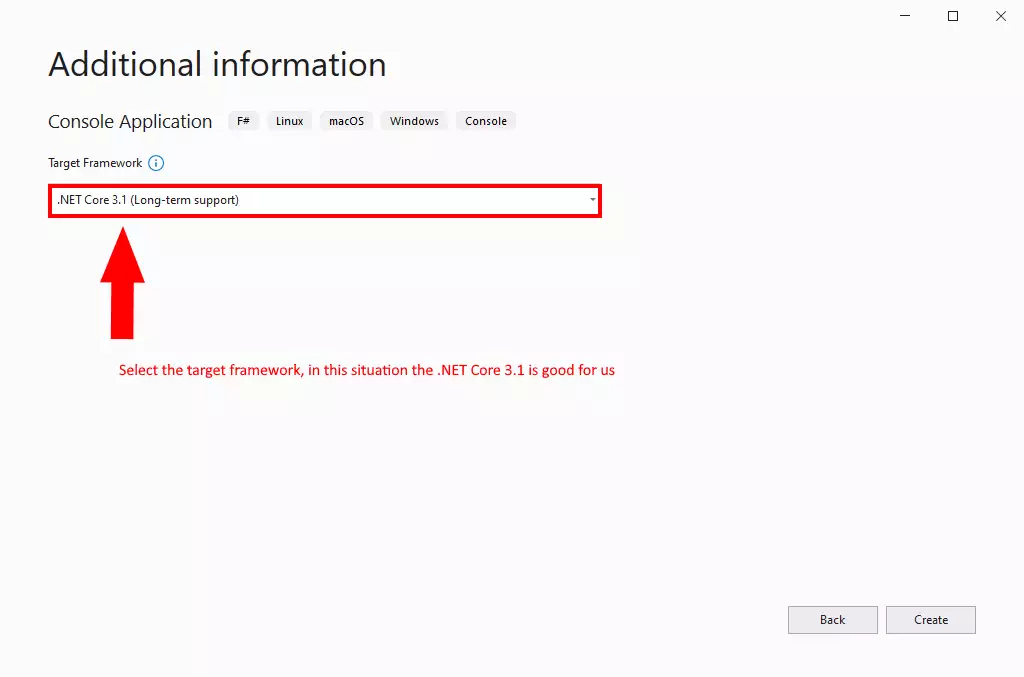
To finalize your project configuration, you need to select a targeted framework. This can be done on the last configuration page. You can select a targeted framework from the combo box by clicking on it (Figure 5). Here we select .NET Core 3.1. This is a good choice for your project. Click on the Create button on the bottom right to create your project.
Write your F# 'hello world' program
The first program you write in any programming language is the 'Hello world' program. The sole aim of this program is to print the term 'Hello world' to the computer screen. In this example the program consists of a few lines of code: The first line: printfn "Hello world!" prints the text. The second line return 0, returns 0 as an exit code (Code 1).
open System

[<EntryPoint>]

let main argv =
	printfn "Hello world!"
	0
Write your first "Hello World!" program in F#
In this video you will learn how you can write the Hello World program in F#. To write your program you need to type lines into the code editor. It only consists of 2 lines of code. Both of which you will write into main, one line after "let main argv =". The first line prints the text. The second line closes the program with exit code 0 (Video 4).
Run your F# 'hello world' program
This video showcases how you can run your program. To run the hello world program, you need to click on the green Start button in the Visual Studio toolbar (Video 5). You may also use the F5 key to run your program. Note that when you press F5, visual studio will first save your newly written file, then it will compile it to an executable code, and then it will run it on your computer.
Output of the code
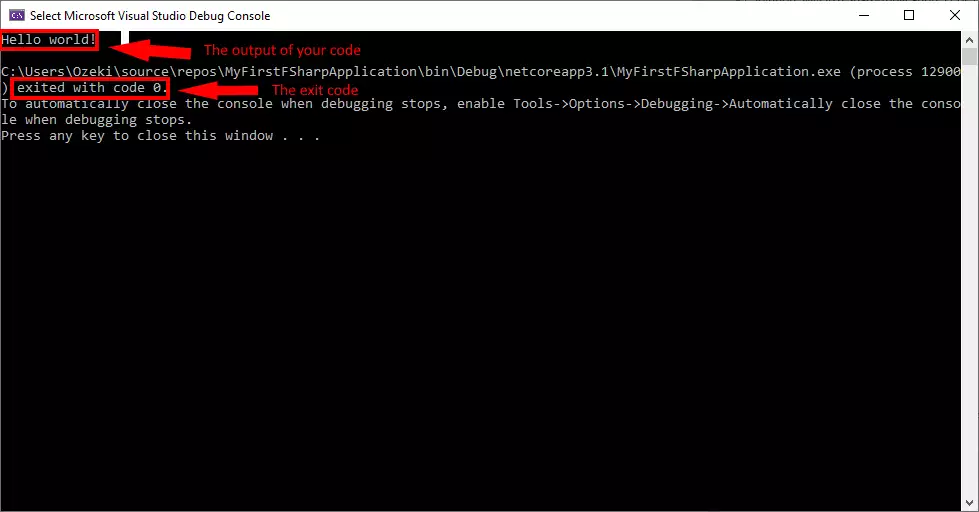
After you have instructed Visual Studio to run you program a debug console will pop up. In this debug console you can see your program run in real time. This looks very much like a regular Windows command prompt. The first line you see is the output of your code: "Hello World" (Figure 6). Then, 3 lines further down, you will see "exited with code 0". This means your program has closed.
What happens if I make a mistake in F#
If you make a mistake, when you write your instructions in F#, you will get a Syntax error. The computer will highlight the line with error in red, and it will tell you why it didn't understand the instructions. To correct the mistake, you need to go back to the text editor and modify the program. Programs say they "fix the error" when they correct mistakes.
In this video below (Video 6) we will create a mistake intentionally by removing one of the quotation marks after the Hello World text. You will see, how the computer reacts, how we fix the error, and how we run the computer program successfully.
What is syntax error?
Syntax error means I don't understand. If you talk to somebody in English and he does not understand what you say, he will reply with "I don't understand". If you talk to a computer in F# and the computer does not understand what you say, he will reply with "Syntax error".
How to handle a syntax error in F#?
In the code below we will create a syntax error intentionally by not putting a semicolon after the Hello World line. You will see, how the computer reacts, how we fix the error, and how we run the computer program successfully.
Error dialog in Visual Studio
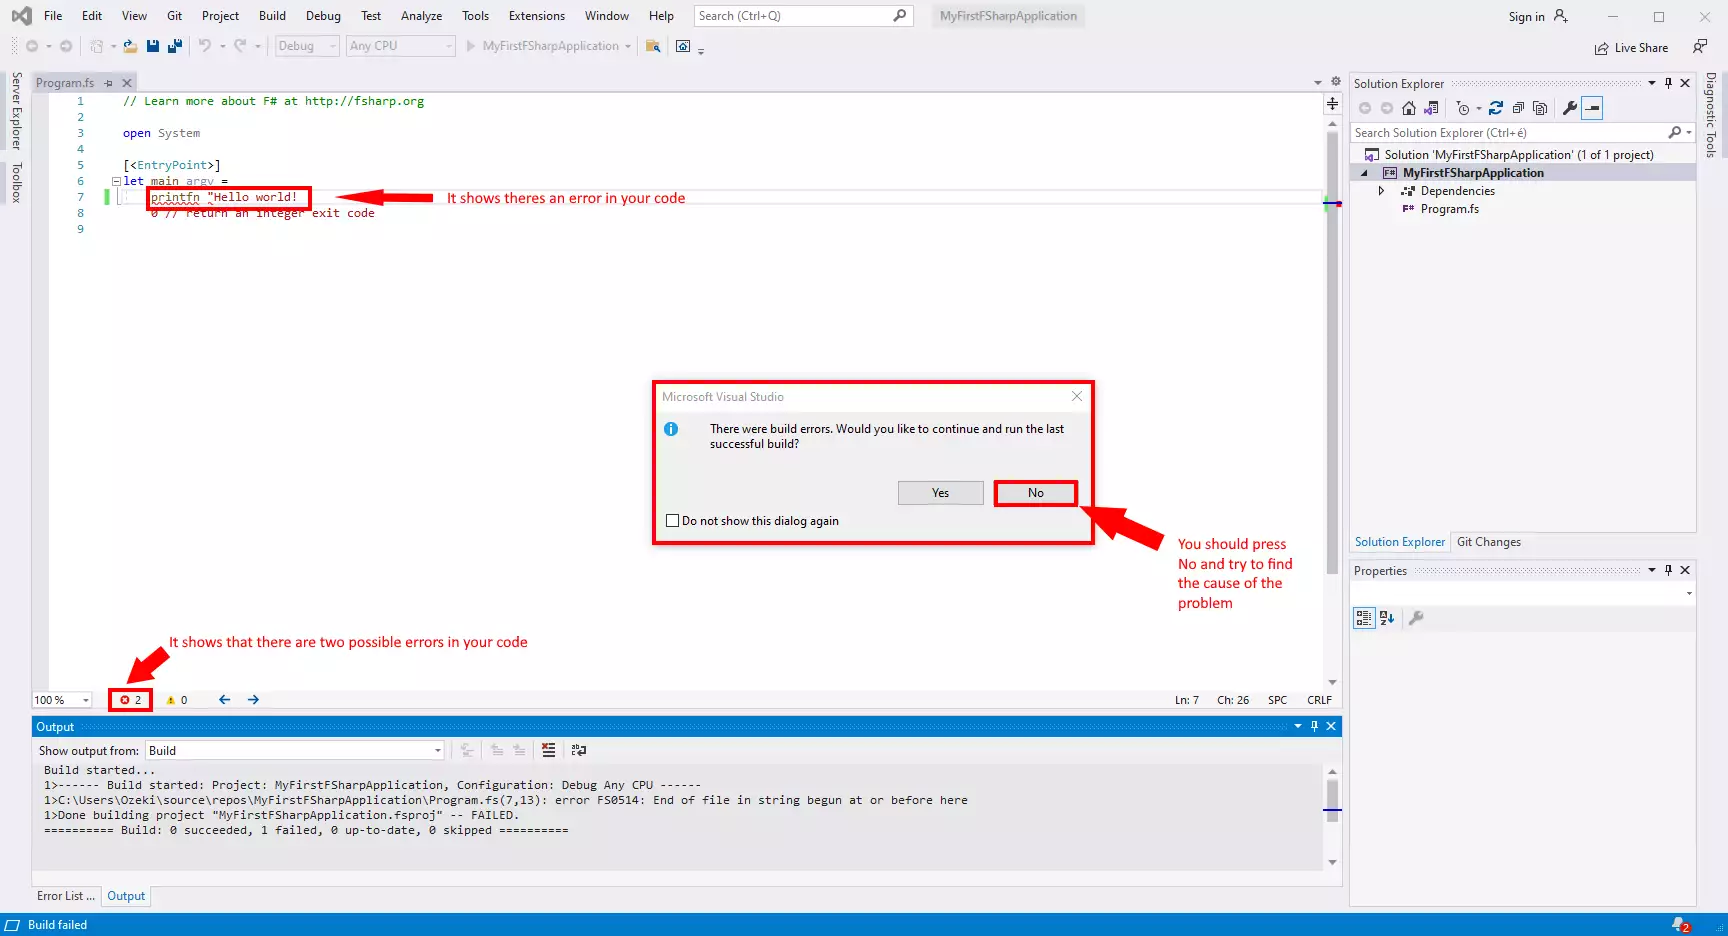
When you make a mistake in Visual Studio you are notified of the error in multiple places. First, the text editor itself show you that you have made an error (Figure 7). This happens even before you run the program. After you ran the program and it found an error, it will display an error dialogue. This asks you if you want to run the last successful build (That actually ran before), or not. You should press No and look for the cause of the problem. On the bottom of the screen Visual Studio also display the possible causes of the error. Here we can see there are 2, because there is a number 2 next to X on a red circle symbol.
Error report in Visual Studio
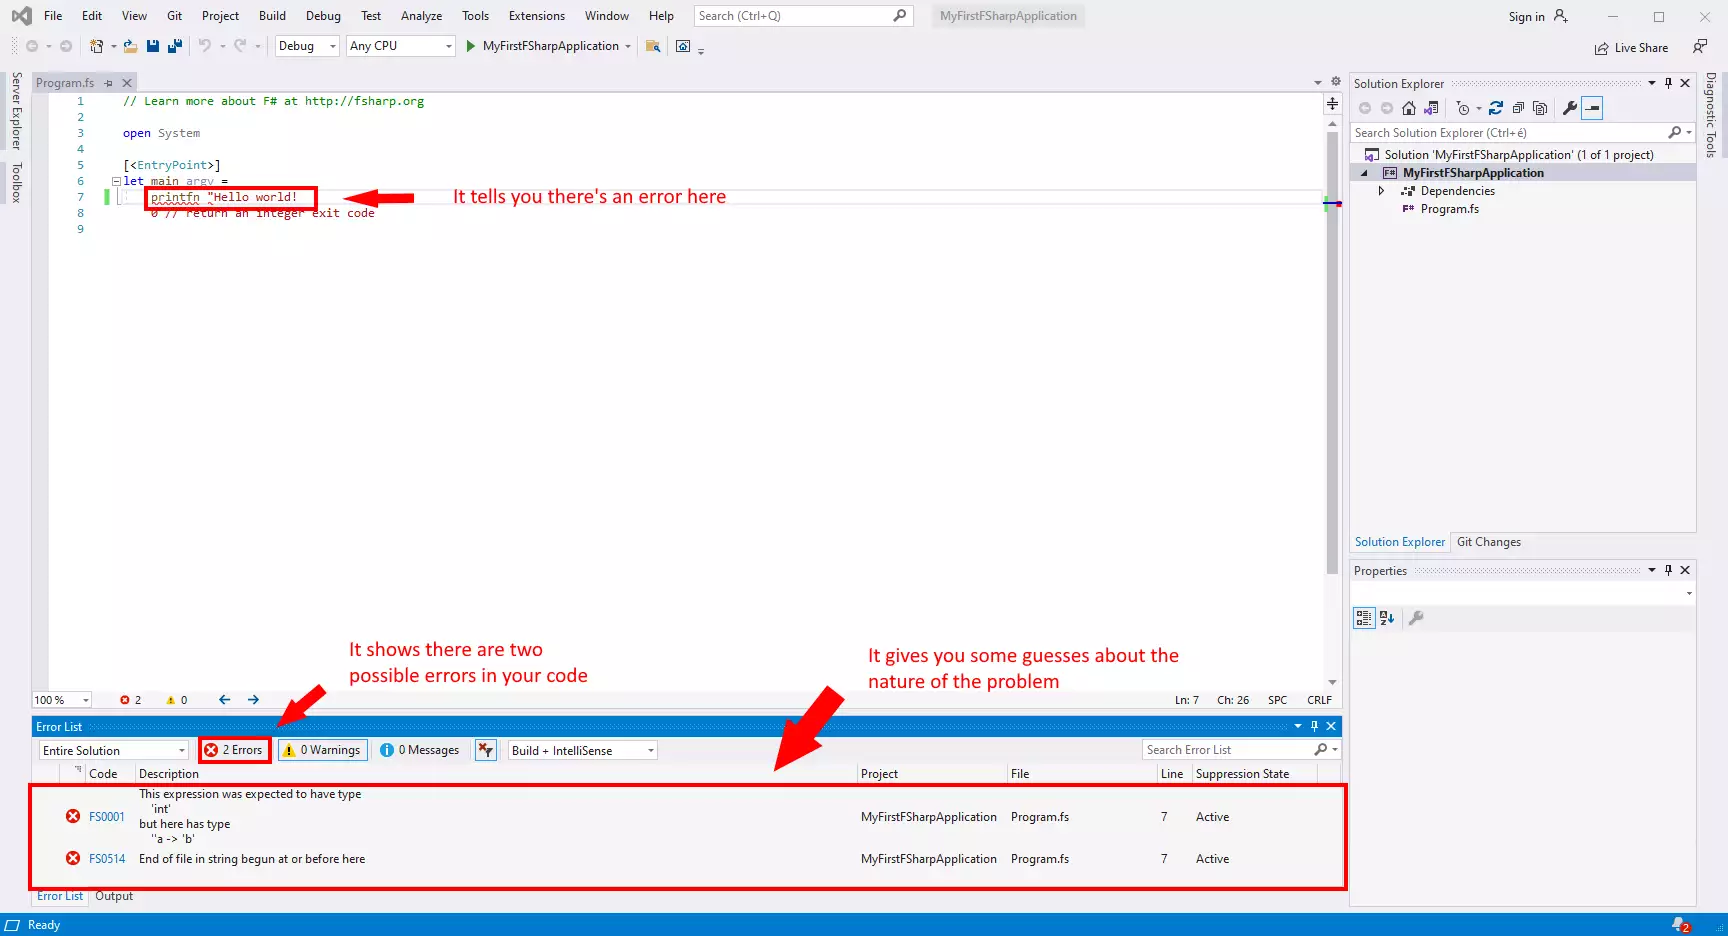
If there is an error in your code, you can click on the X on a red circle symbol on the bottom, above the Output section (Figure 8). This brings up the error report, which will list all the possible things that could have cause the problem. Here we can see there are 2 possibilities listed. This listing will give you some guesses about the nature of the problem so you could figure out quicker how to fix it.
Summary
Now that you have completed the five simple steps above, you have made your first step in becoming a F#.Net software developer. This program may seem simple, and it may not do much, but this is how great things start. Every programming course starts with these basic steps, learn carefully and the hard work will pay off! The next step in your learning journey will be creating an HTTP request.
F# is a programming language that allows you to solve complex tasks with simple codes. F# offers shorter runtimes, less bugs and higher productivity, so learning this language definitely has its benefits.
Make sure that you continue studying F# on Ozeki's tutorial page, where there is information about SMS sending and deleting in F#.
The next thing to do is to download Ozeki SMS Gateway and let the work begin!
