How to send an e-mail alert if an SMPP link goes offline
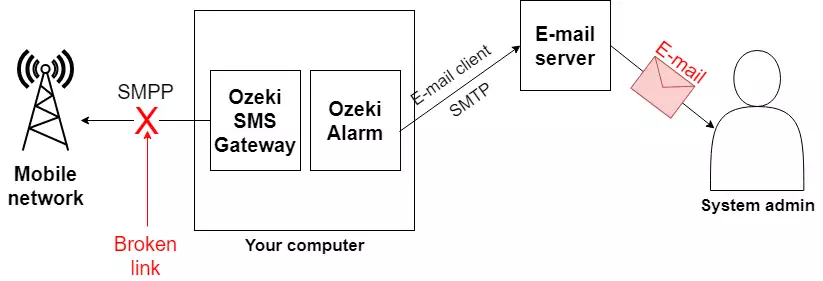
In service provider systems, reliability is very important. To have a good uptime record, you need to be able to detect errors quickly. This guide gives information about how to detect if an SMPP service provider connection goes down and how to send an e-mail alert in this case. (Figure 1)
How to send an e-mail alert if an SMPP link goes offline (Quick guidelines)
To send an e-mail alert if an SMPP link goes offline:
- Launch Ozeki SMS Gateway
- Add new SMPP client connection
- Open Ozeki Alarm System app
- Install Connection alert source
- Set up E-mail client connection
- Add new SMTP client
- Set new routing
- Check logs and e-mail alert
Prerequisites
In order to use this setup, you must have the latest version of Ozeki 10 SMS Gateway installed on your system, and you must also download and install the Ozeki Alarm system. Note that Ozeki 10 SMS gateway versions prior to v10.3.78 will not work with Ozeki Alarm.
Download Ozeki Alarm
Download link: http://www.ozeki.hu/p_4722-ozeki-download.html
Setup instructions video
The following video shows you the setup instructions. You will see that first we setup an SMPP connection in the SMS gateway, and after this we open the Ozeki Alarm app. In the Ozeki Alarm app we setup a connection alert 'alarm source', and we route the alert messages from this connection to an e-mail server through an SMTP link.
Step 1 - Launch the SMS Gateway app
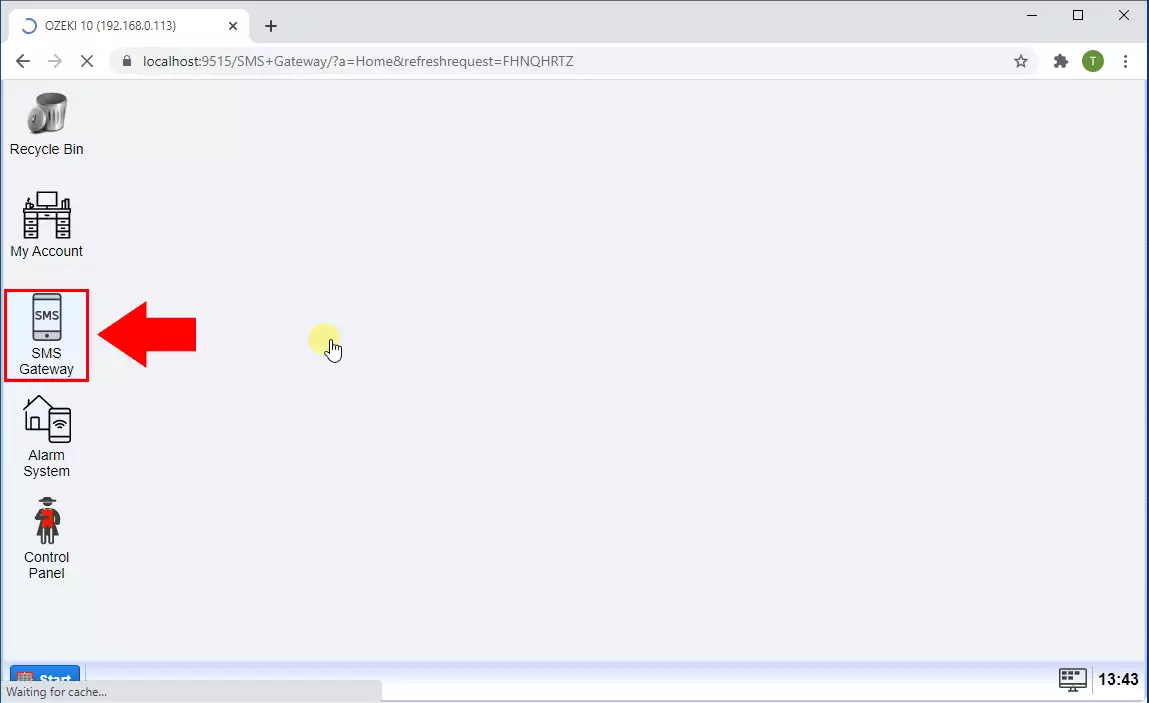
In our example first we create an SMS link (an SMPP connection) in the Ozeki SMS Gateway app. You can do this, by clicking the SMS Gateway icon in the Ozeki desktop (Figure 2).
Step 2 - Configure the SMPP Connection
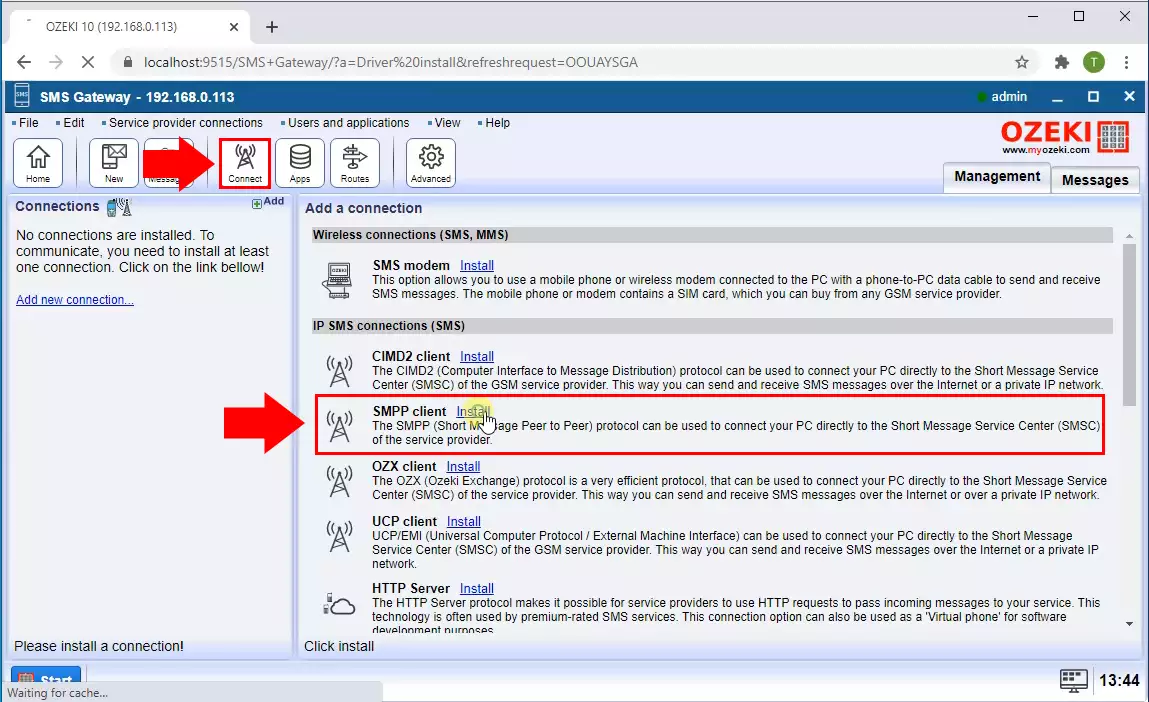
To create a new SMPP connection, you need to click on the 'Connect' button in the management console of the Ozeki 10 SMS Gateway app. This will bring up a list of available protocols. You will have to select the 'SMPP Client Connection' from the list and click on install next to it (Figure 3).
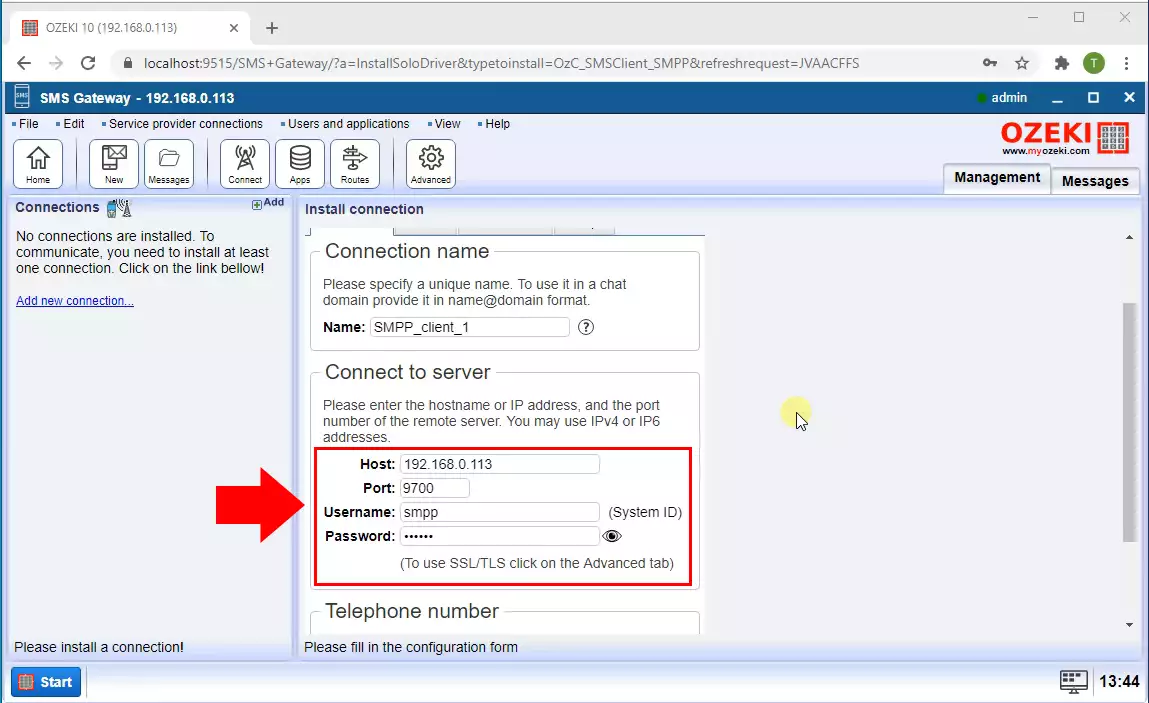
In order to configure your SMPP connection, you need to provide the host name and port number of the SMPP service, your SMPP credentials and you must specify telephone number associated with this connection (Figure 4).
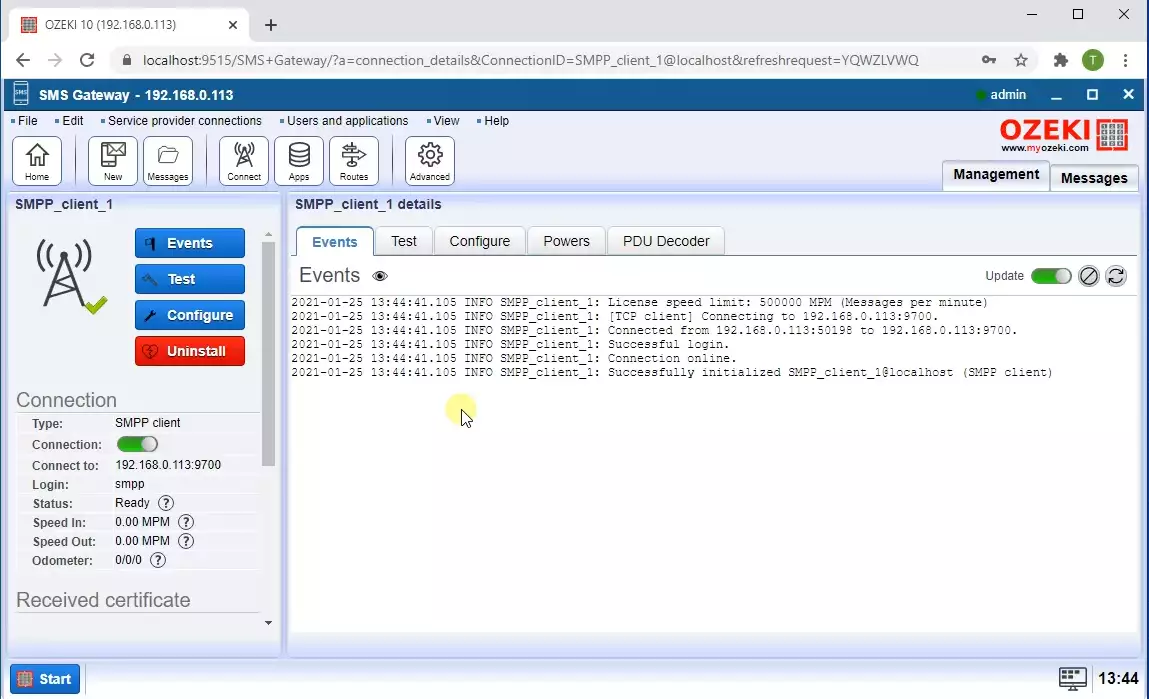
Once the SMPP connection is configured, you should check the SMPP connection log to see if the system connected properly to your SMS service provider. If the system connected properly, you would see the "Connection online" log entry (Figure 5).
Step 3 - Open the Ozeki Alarm app
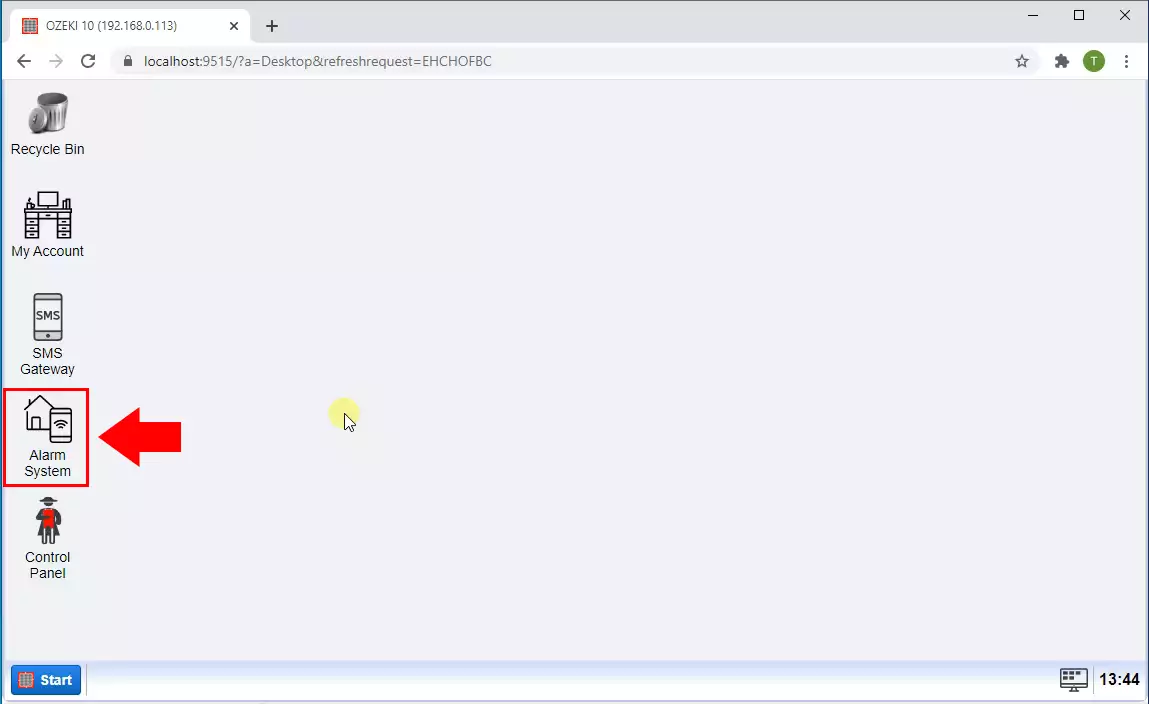
Find the alarm system icon on the Ozeki Desktop and click on it. This will open the Alarm System app. The Alarm system app has a similar user interface to the SMS gateway. To make it work, you must create an alarm source, then you must create a notification channel to send out your alerts, and finally you must link them with a route. (Figure 6)
Step 4 - Create the 'Connection alert' alarm source
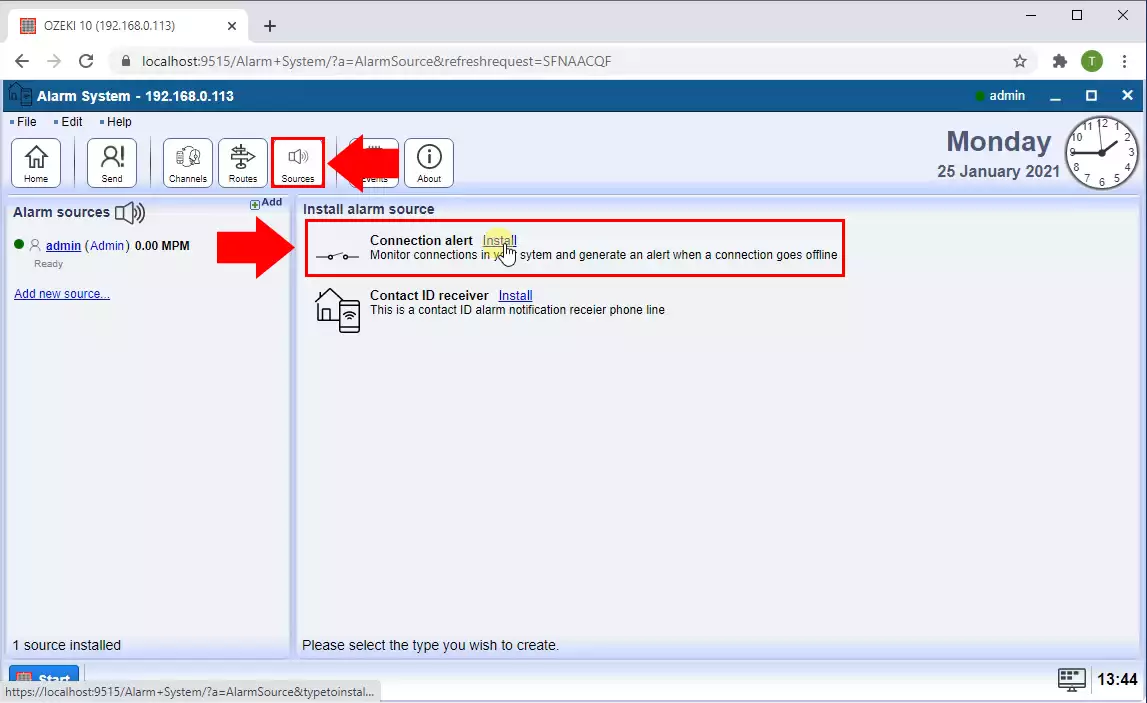
Next step is to configure the Monitoring connection. Select the Sources button from the menu. Then you will have to select the 'Connection alert' from the list and click on install next to it (Figure 7).
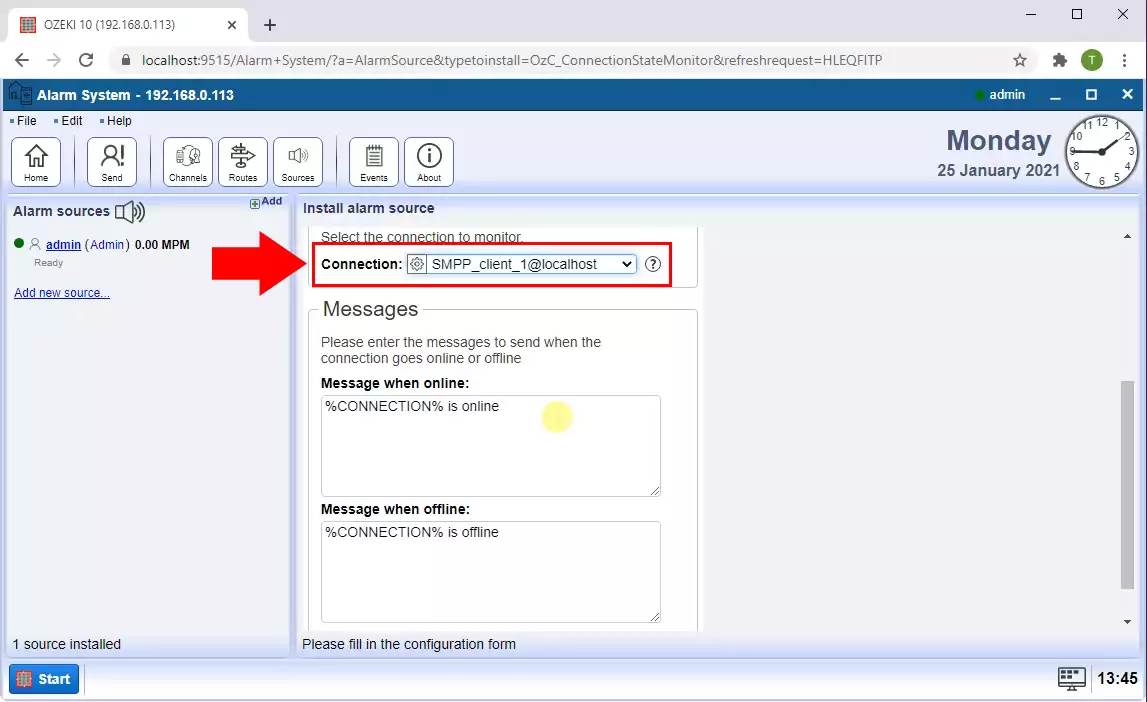
Now in the General tab select the connection to monitor from the drop-down list as you can see in the Figure 8.
Step 5 - Configure an SMTP connection to be able to send E-mail alerts
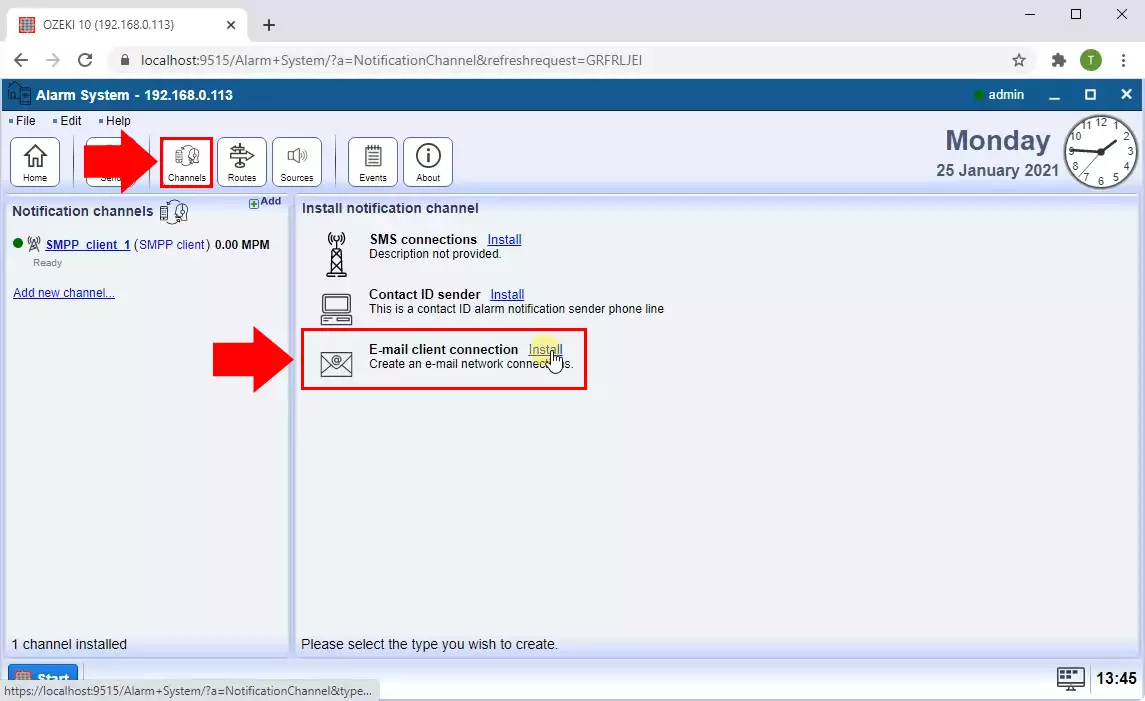
The SMTP connection can be installed by clicking on Channels in the toolbar and selecting the E-mail connections. This will bring up the E-mail connection list. Select the SMTP client. (Figure 9)
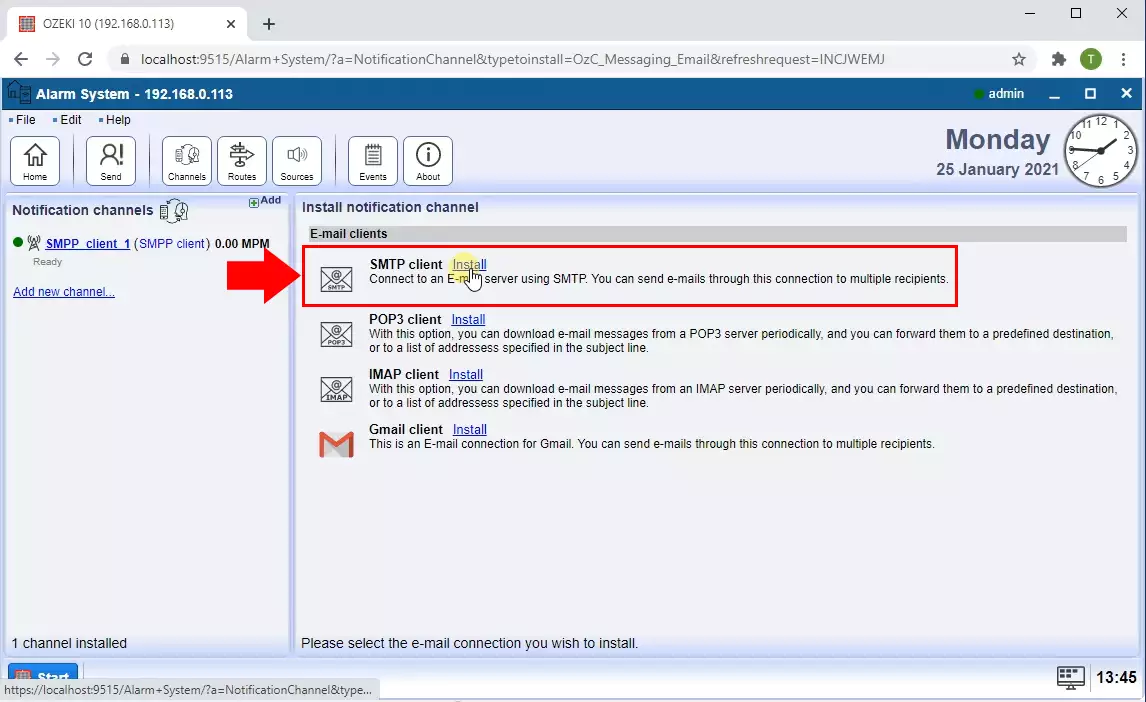
Then as you can see in Figure 10, select SMTP client by clicking on Install.
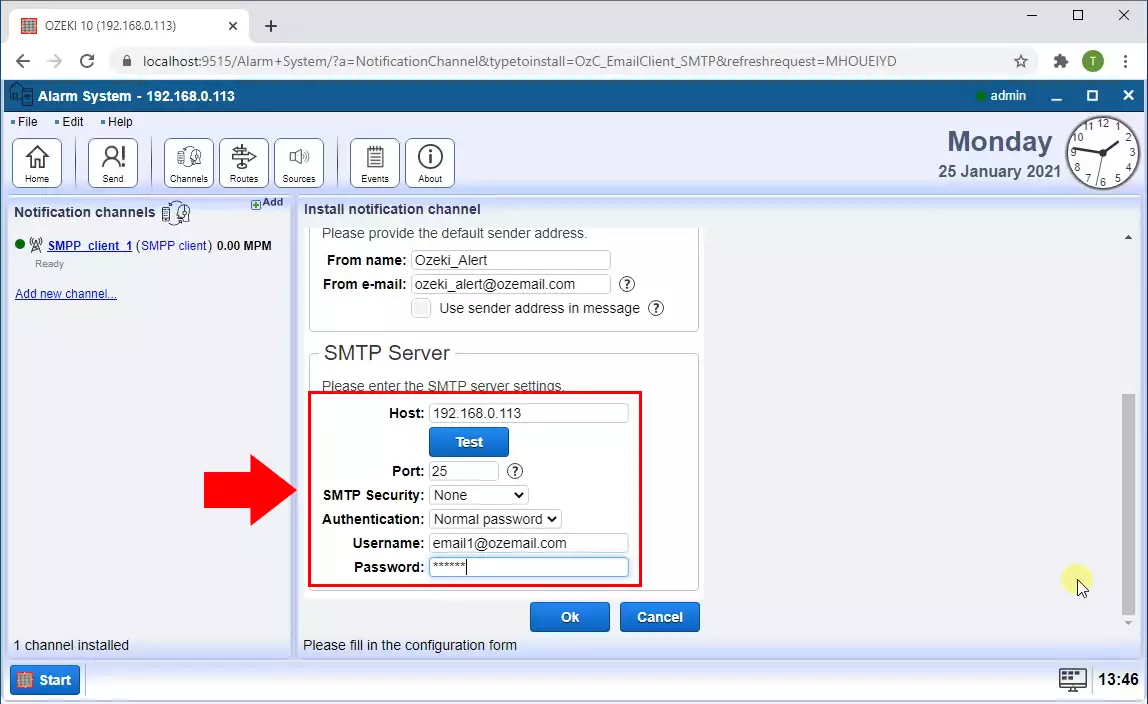
SMTP is an internet standard for email transmission. SMTP servers are used for relaying outgoing emails. On the From section provide the default sender address and On the SMTP server section, please enter the SMTP server's IP address or domain and the port number as you can see in the Figure 11. In case your SMTP server requires authentication, provide the username and password. You can also choose SSL connection if your SMTP server has a more secure connection.
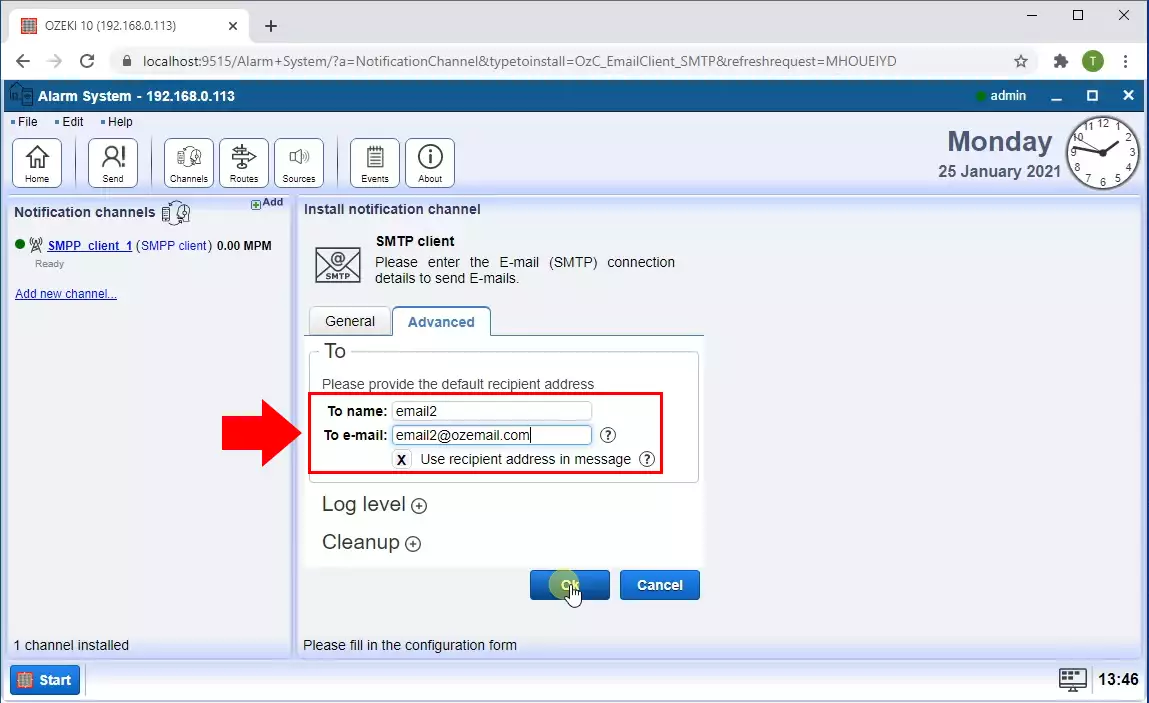
Now switch to the Advanced tab (Figure 12) and make sure the emails are sent to the correct address. In the textboxes you can set the default recipient name and address.
Step 6 - Connect the alarm source to the notification channel with a route
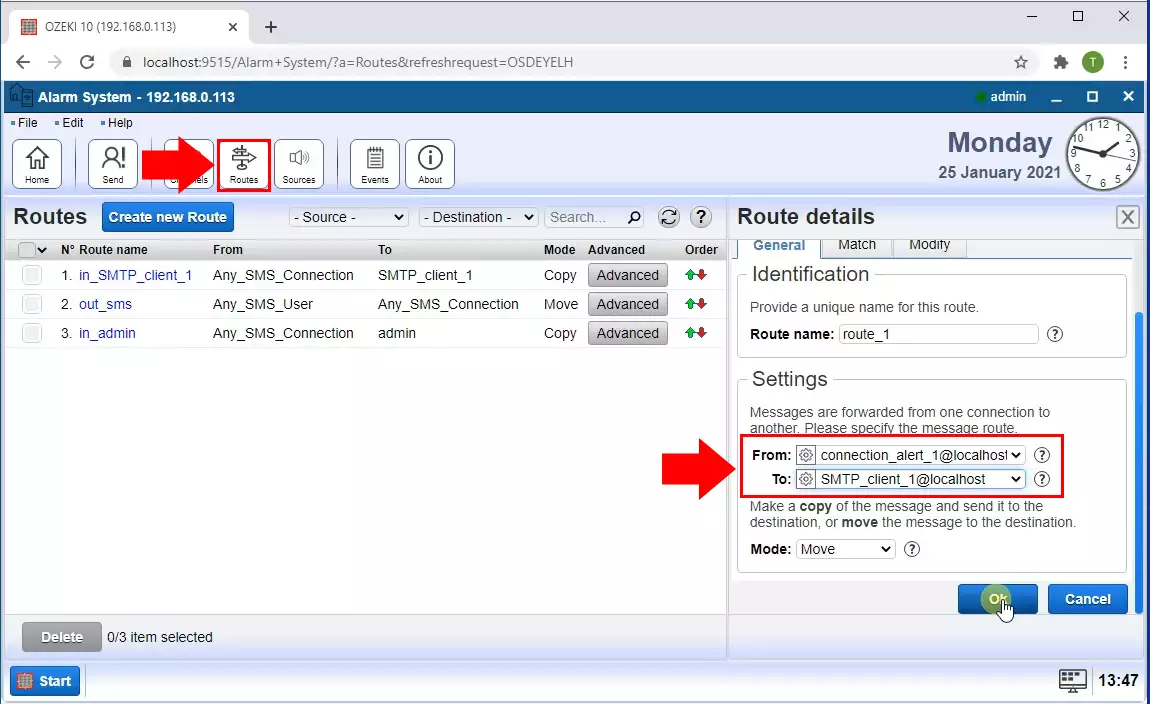
You can add a routing rule by clicking Routes button from the Alarm System menu. Then in the Settings, for the From connection, select the monitor connection from which you are sending the alert, and for the To connection, select the E-mail connection through which you want to send the alert (Figure 13).
Step 7 - View the log to see the alarm being sent when the connection goes offline
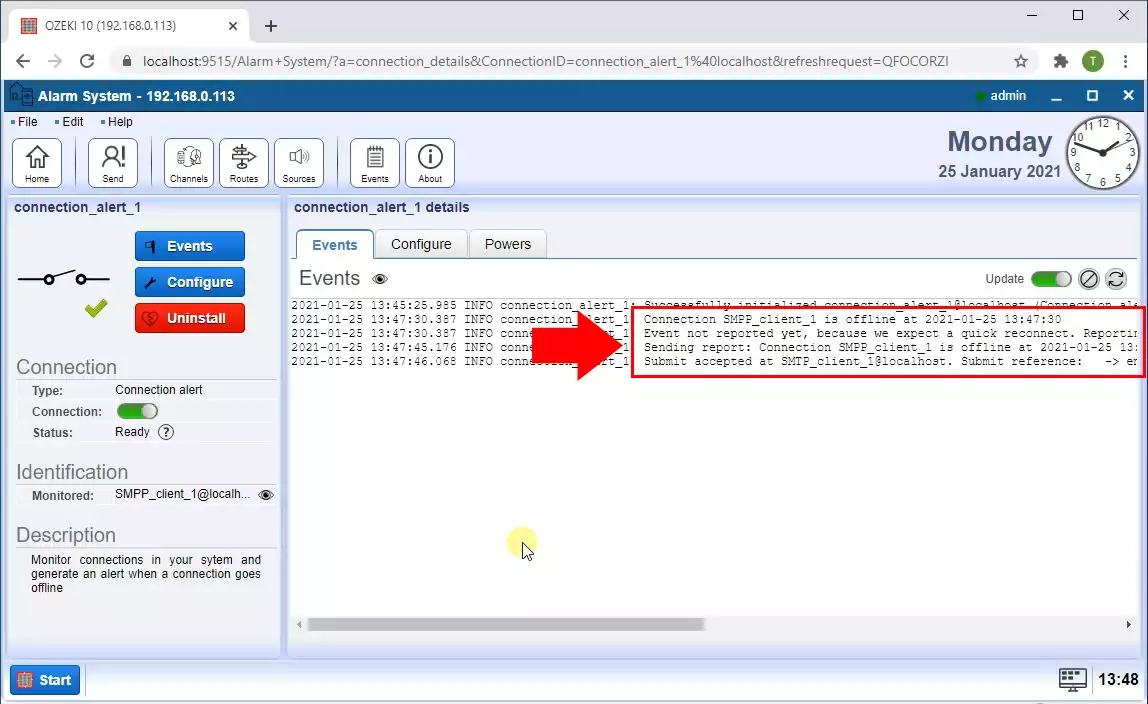
Finally, in the monitoring connection's Event tab you can see if the SMPP connection goes offline the connection alert notice it and first wait for some time because expecting a quick reconnect. By default, this time is 15 seconds but you can change it in the advanced menu. If the connection does not come back during this time the monitoring connection sends the alert via the SMTP Client (Figure 14).
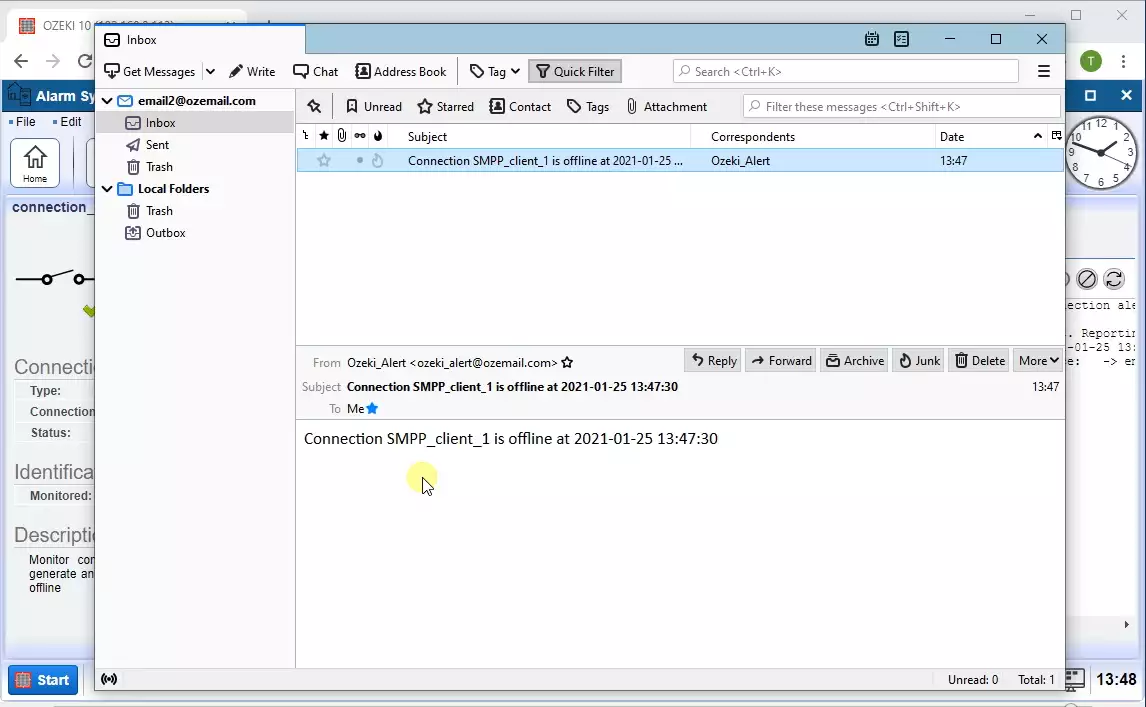
In the recipient's inbox you can see the E-mail Alert is received as the Figure 15 is shows.
