Github: PHP SMS API
This article is about how you can make changes to the PHP SMS API, located on GitHub, from your computer. This solution will only take about 20 minutes to perform. You will learn how to install Git for windows and TortoiseGit. It will start with downloading Git, and will end with the changes you made visible on GitHub. We assume that you are familiar with GitHub and PHP. The video is easy to follow and detailed so you will have no problem understanding the process. Don’t waste any time! Let’s go!
What is PHP SMS API
The PHP SMS API is a repository (library) for PHP coding. It is meant for developers to create PHP code that interacts with Ozeki SMS Gateway. This repository can be used for a variety of tasks, such as sending, receiving, deleting and scheduling SMS messages. Since this is completely customizable, it may be used for any condition the developer defines. It can perform the operations listed above in large masses, such as sending SMS up to hundreds of thousands of clients at the same time.
What is Git for Windows
Git stands for Global Information Tracker. It is a piece of software that allows you to commit changes to code online. It is commonly associated with GitHub, since it uploads the changes to the GitHub website. This is incredibly useful for coding tasks where multiple people work on the same project at the same time. In this guide we are going to commit a change to a PHP SMS sending code.
What is Github
GitHub is a web-based collaboration platform for software developers. It is useful in version control, because in larger projects, multiple people can work on the same code simultaneously. Developers may use GitHub for cloning repositories and source codes. Changes committed by the developers will also be uploaded to GitHub, where they will become visible once committed.
What is Tortoisegit
TortoiseGit provides overlay icons and various options in Windows menus, that are meant to be used for GitHub interaction. This program allows developers to easily access commit features and get their changes up on GitHub with ease. You may access TortoiseGit from right clicking in any directory, after it has been installed. It also allows you to attach changelogs to their commitments. This is useful for large projects, where multiple developers are working on the same code.
How the system works
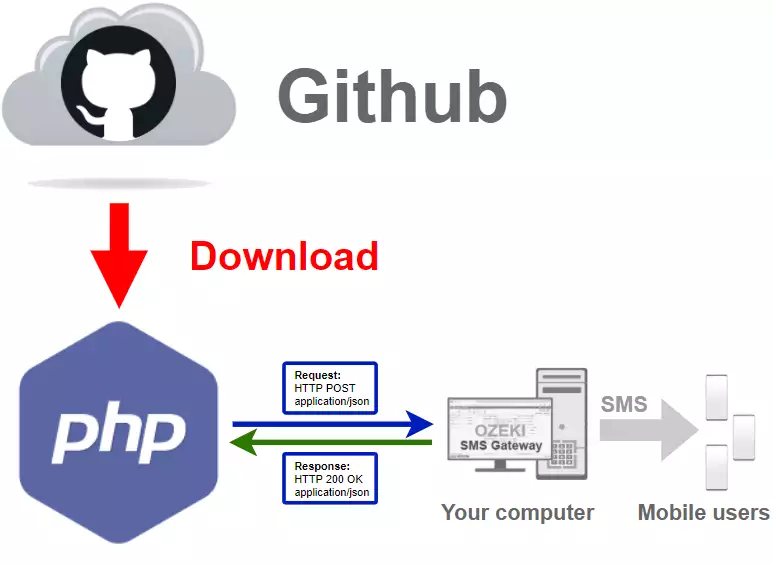
The system architecture works in a way found in Figure 1. First the user has to download the PHP SMS API library from GitHub. This process is also known as cloning. Once the cloning is complete, the repository is ready to use. The PHP SMS API sends a Request to Ozeki SMS Gateway running on your desktop or mobile device. The SMS Gateway then sends the SMS Message according to the request. It also returns feedback in form of a Response to you. This response is used to confirm that the message has been successfully sent.
How to download the PHP SMS API from GitHub (Quick steps)
To download the PHP SMS API from GitHub:
- Setup Ozeki SMS Gateway
- Download Git for Windows
- Install TortoiseGit
- Run first start wizard
- Create folder for PHP SMS API
- Git clone php-send-sms-http-rest-ozeki
- Commit changes in PHP SMS API
- Login to GitHub
- Check changes in GitHub
Download: https://gitforwindows.org/
Download: https://tortoisegit.org/download/
1. video: Install Git for Windows
In this video you will learn how to install Git (Video 1). This software allows you to commit changes to pieces of code online on GitHub. First, we are going to download the Git installer from the official website. Then we are going to open it and go through the configuration process for the installation. Start by visiting the download link above.
Download Git for Windows
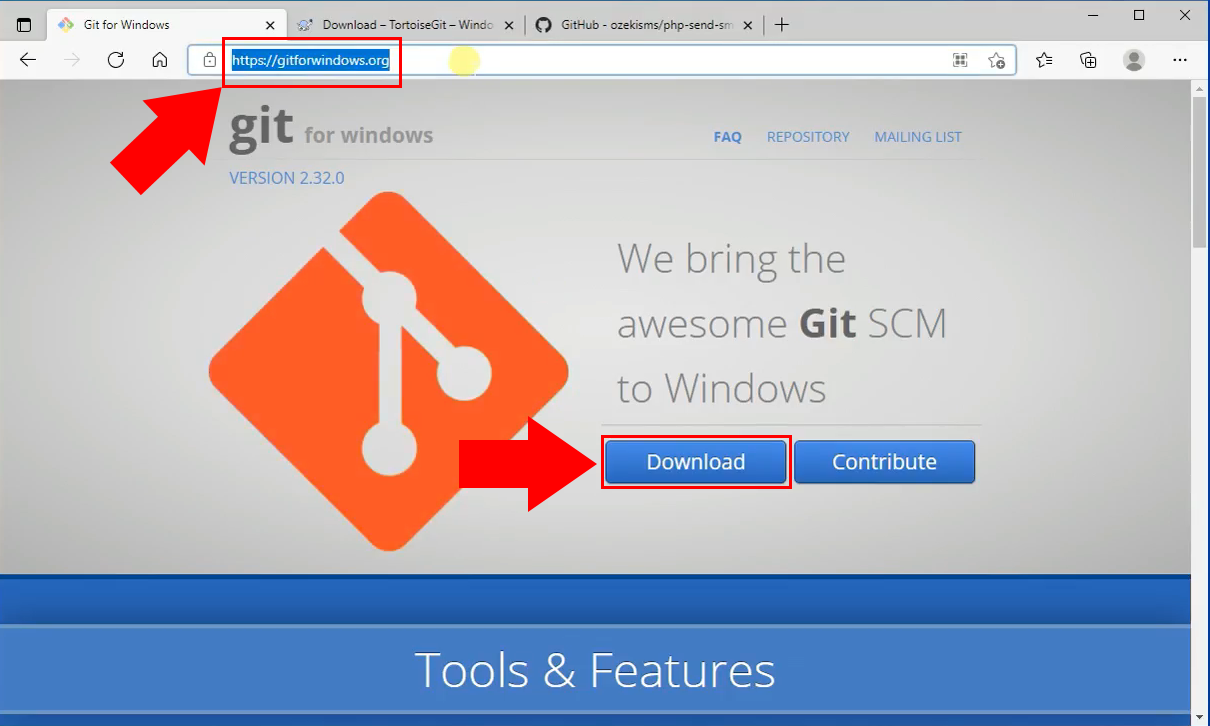
Download Git for Windows by visiting the following link: https://gitforwindows.org/. Click on the blue Download button to start downloading the Git installer (Figure 2). Once it has finished, Git is ready to install on your computer.
Open installer
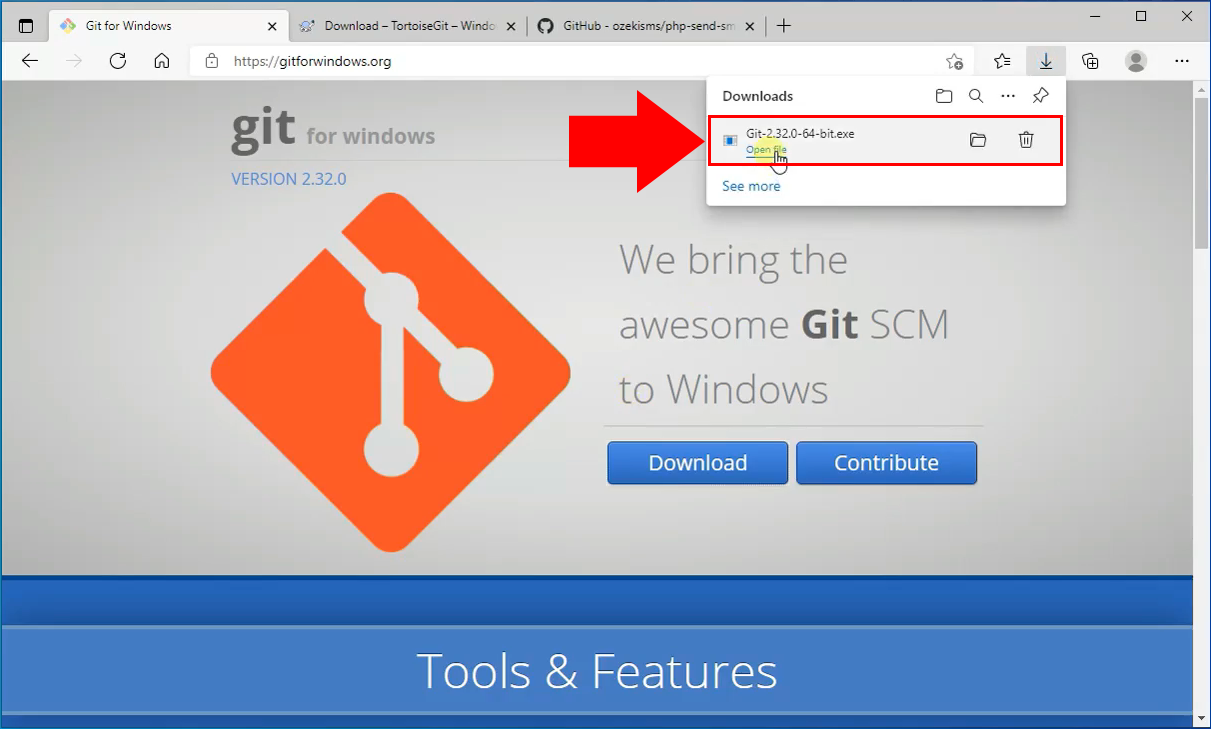
Open the Git installer which you previously downloaded. Do this by clicking on it, on the downloads popup on the top (Figure 3). Opening this file will start the installation process for Git.
Accept license
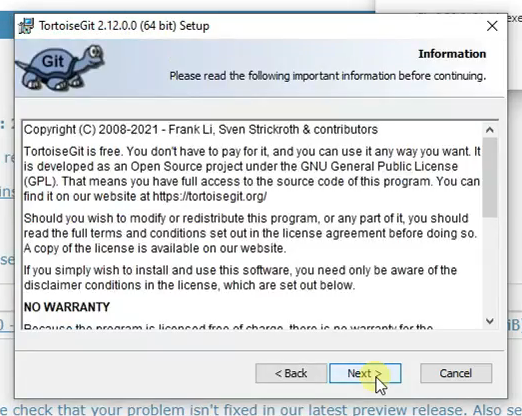
To begin the installation for Git, you must first accept the license agreement for the software. Click on the Next button to do so (Figure 4).
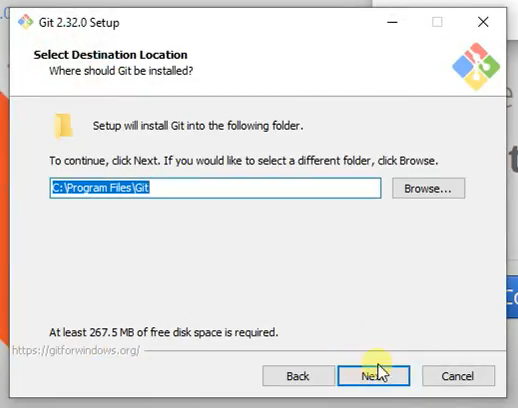
Select install path
Now you must select an install path. Click on the Browse button to select a directory or leave it as the default path (Figure 5). Click Next to continue.
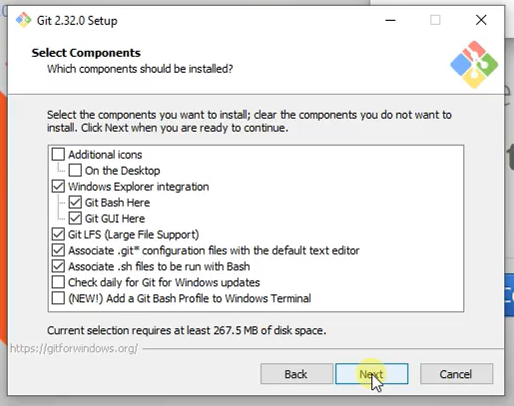
Select components
Next you need to select the components of Git you wish to install (Figure 6). We recommend leaving the default options selected. Click on Next to proceed.
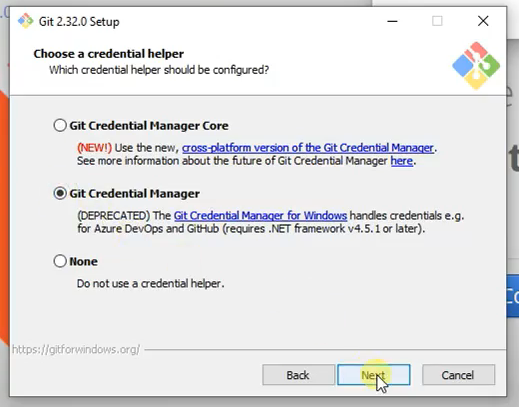
Select preferred installation options
Now you need to select your preferred installation options. For this instance, select Git Credential Manager (Figure 7). Click Next again to continue.
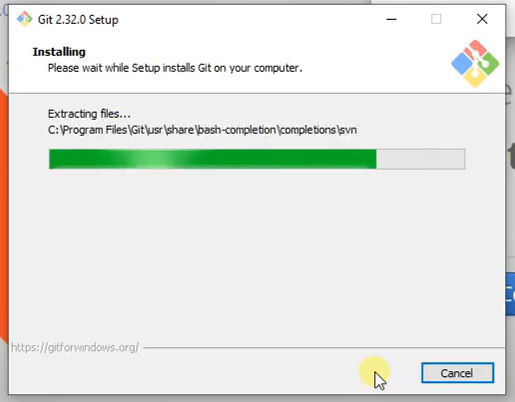
Installation process
The installation process has now begun (Figure 8). Wait for the installer to complete the process.
Finish installation
Click Finish to complete the installation (Figure 9) Git is now successfully installed and ready to use.
2. video: Install tortoisegit
This video tutorial shows you how to download and install TortoiseGit. This software allows the user to commit changes to GitHub and attach changelogs to commitments. We are going to download the TortoiseGit installer from its website. Run the installer and configure the details of your installation by following the steps in this video (Video 2).
Download Tortoisegit installer
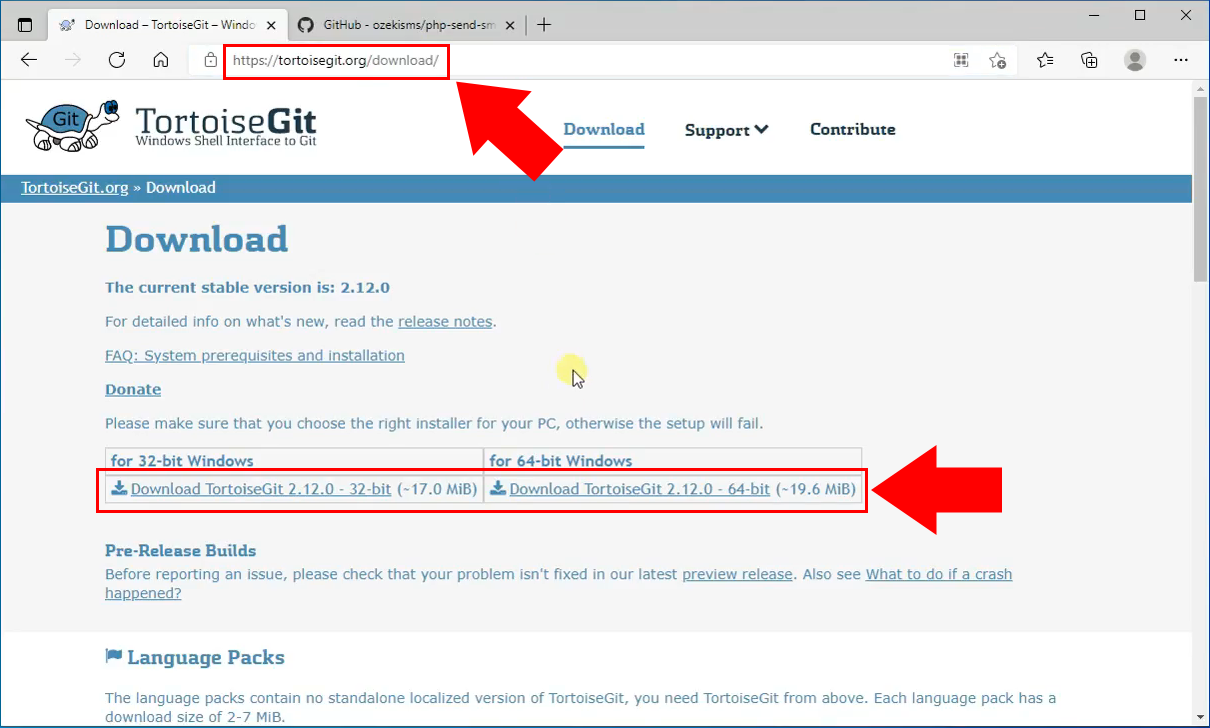
Download Tortoisegit from this website: https://tortoisegit.org/download/. Find the section that reads for 64-bit Windows. Click on the Download link under it (Figure 10). This will start downloading the Tortoisegit installer to your browser's default directory.
Open installer
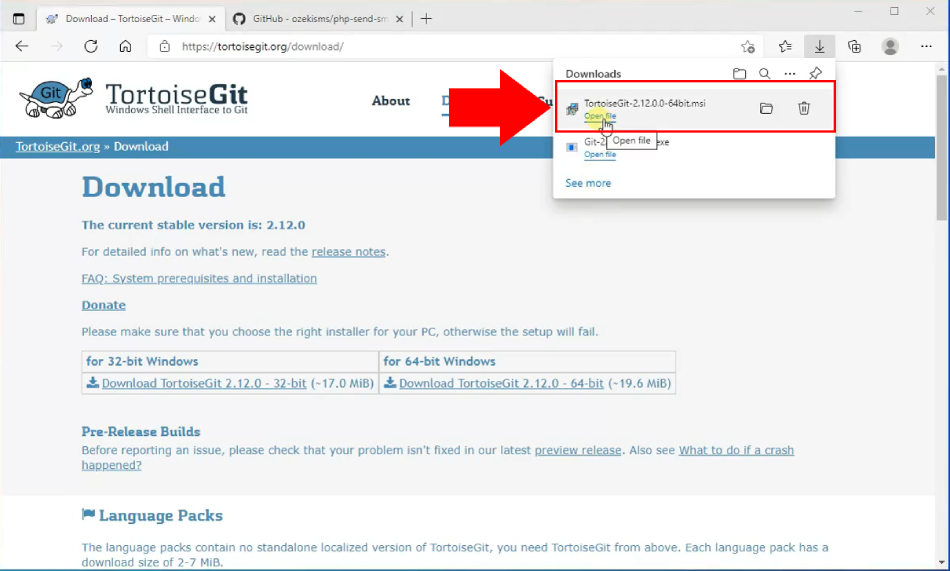
After the download is complete, the Tortoisegit installer will appear on your downloads (Figure 11). Click on it to launch the installer.
Accept license
To be able to use the Tortoisegit software, you must accept the license agreement (Figure 12). Click Next to accept it and continue.

Select features and location
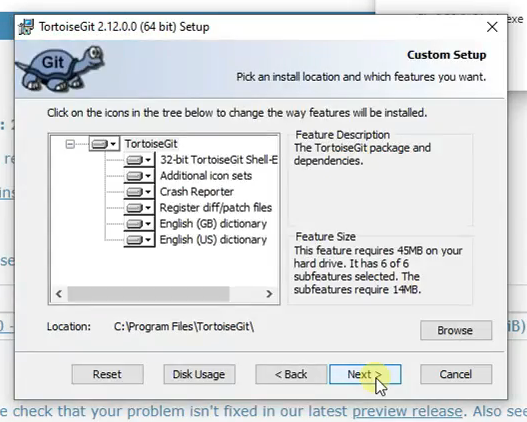
In this window you must specify the install path for Tortoisegit (Figure 13). You must also choose which features you want installed with the program. With everything done, click Next to proceed.
Start installation
Click on the Install button to begin the installation process (Figure 14). Wait for the installer to finish.
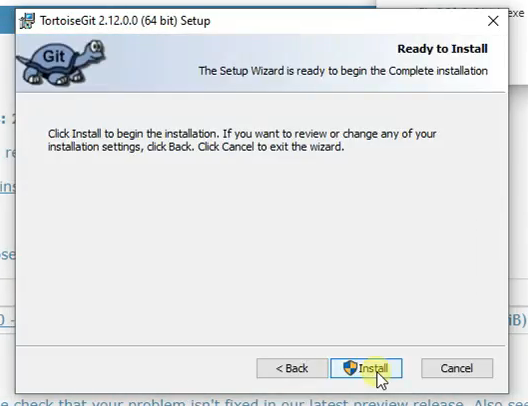
Finish installation
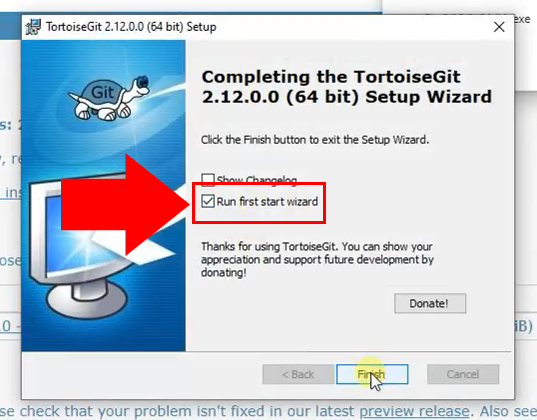
Now the installation is complete. Enable the Run first start wizard option (Figure 15). Click Finish to complete the setup. You will be brought to the first run wizard window.

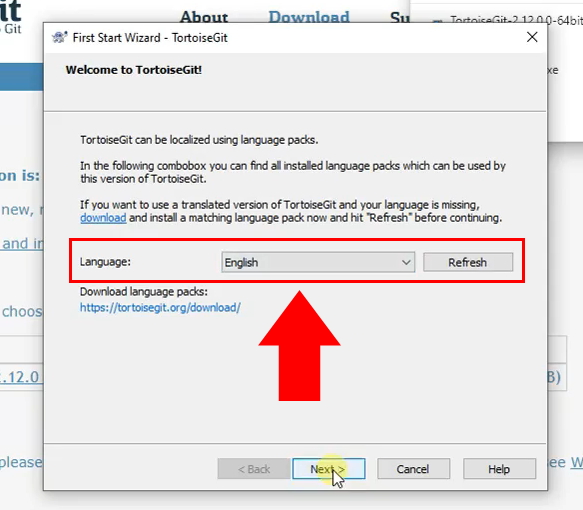
Select language
On the first screen of the first run wizard window, you will be asked to choose a language. Choose English and click Next (Figure 16).
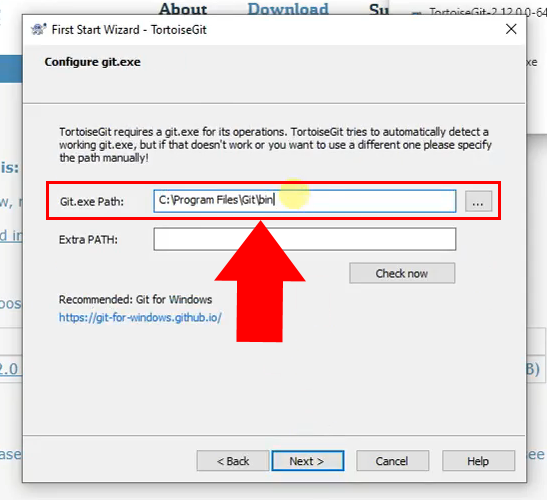
Configure Git exe
Now you must configure where git.exe should be located (Figure 17). Click on the browse button and choose a file path. This directory is where git.exe will be located on your computer after installation. Click Next to continue.
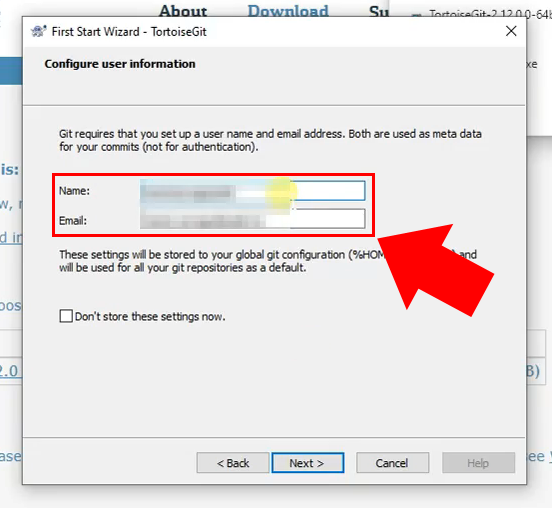
Configure Git Username and Email
Git requires you to enter your username and email address. Note that these are used for your commits and not for authentication. Enter your name and password into the respective textboxes (Figure 18). Click Next to continue.
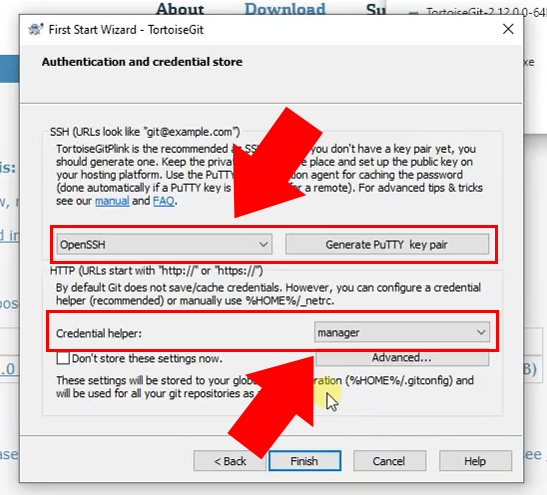
Configure authentication and credential store
The final step is to configure authentication and credential store. You should choose OpenSSH from the first combo box (Figure 19). Next to Credential helper you should select manager. Click Finish to complete the installation process.
3. video: Git clone PHP repository
In this video tutorial you will learn how to clone a repository form GitHub using tortoise git. Cloning a repository is necessary for using its functions in your codes. Access the cloning feature from your explorer and paste the URL of your desired repository from GitHub to begin cloning (Video 3).
Copy repository URL
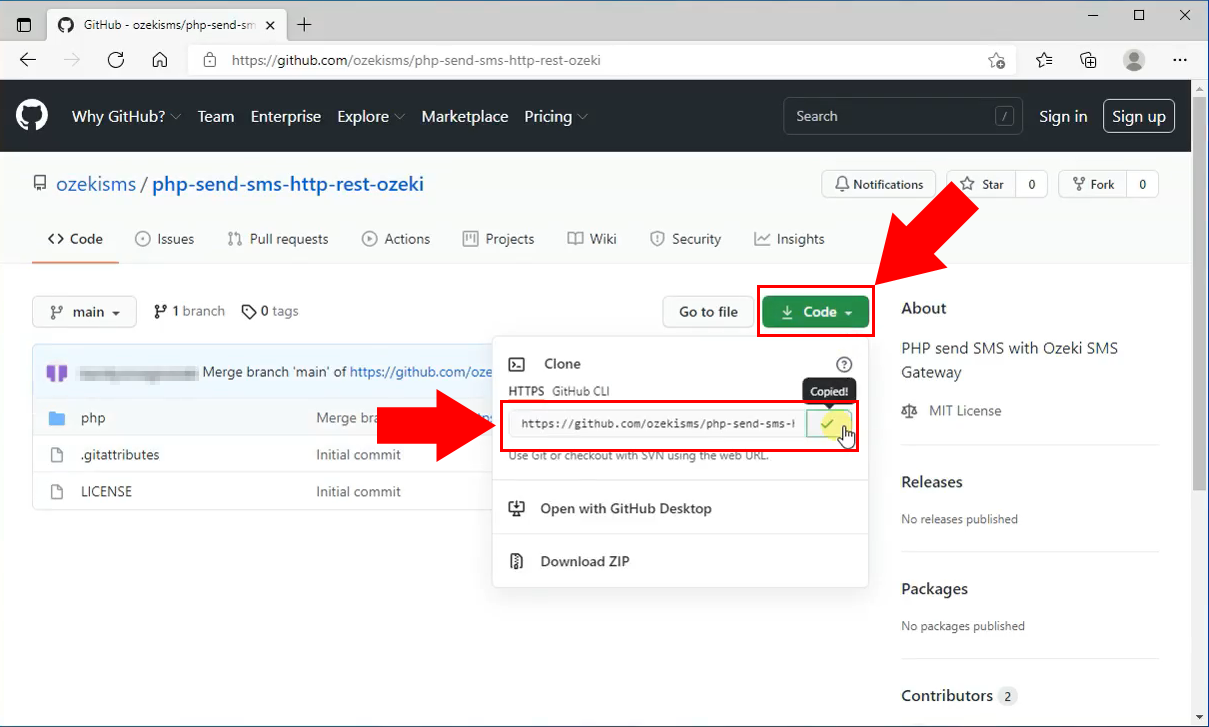
In order to clone the repository, you must first copy the repository URL. Do this by visiting the repository on the GitHub website. Click on the Code dropdown menu (Figure 20). Under HTTPS click on the Copy button. The URL is now copied.
Create folder for repository
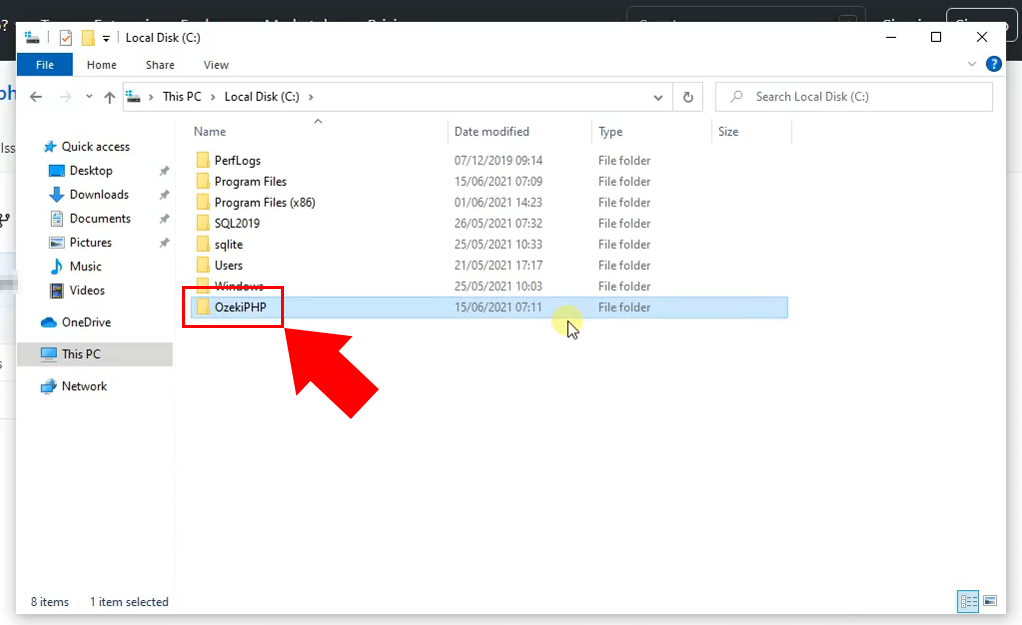
Now you must create a folder for the repository to be placed in. Right click in any directory, then click create new folder. Name it Ozeki and open it (Figure 21).
Select Git clone option
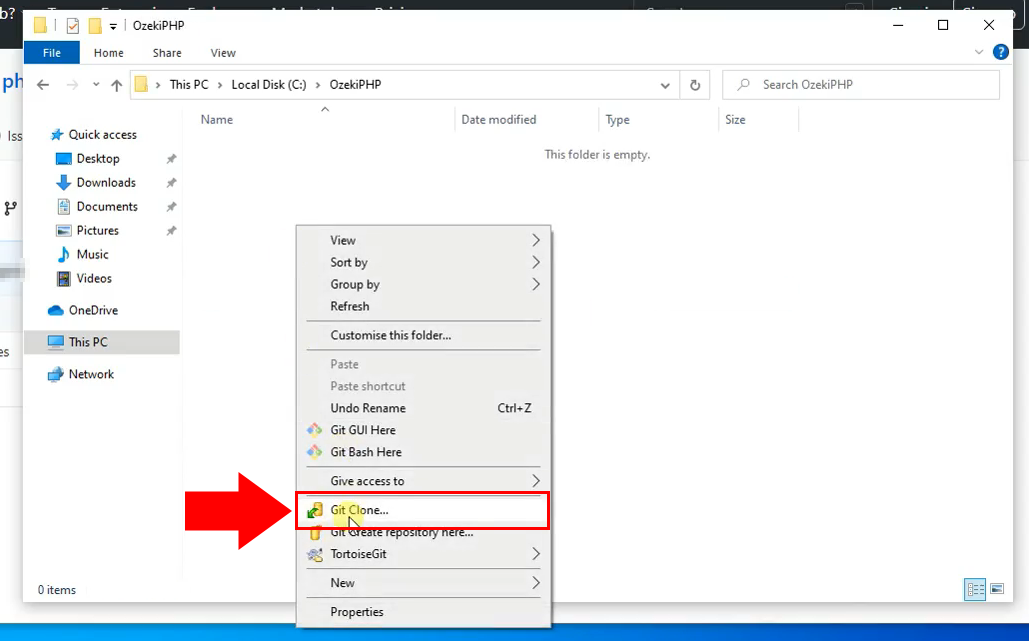
To start cloning you must first open git. Right click inside the newly created folder and click on Git Clone... (Figure 22). This will bring up the Git clone function in Tortoise git.
Configure URL
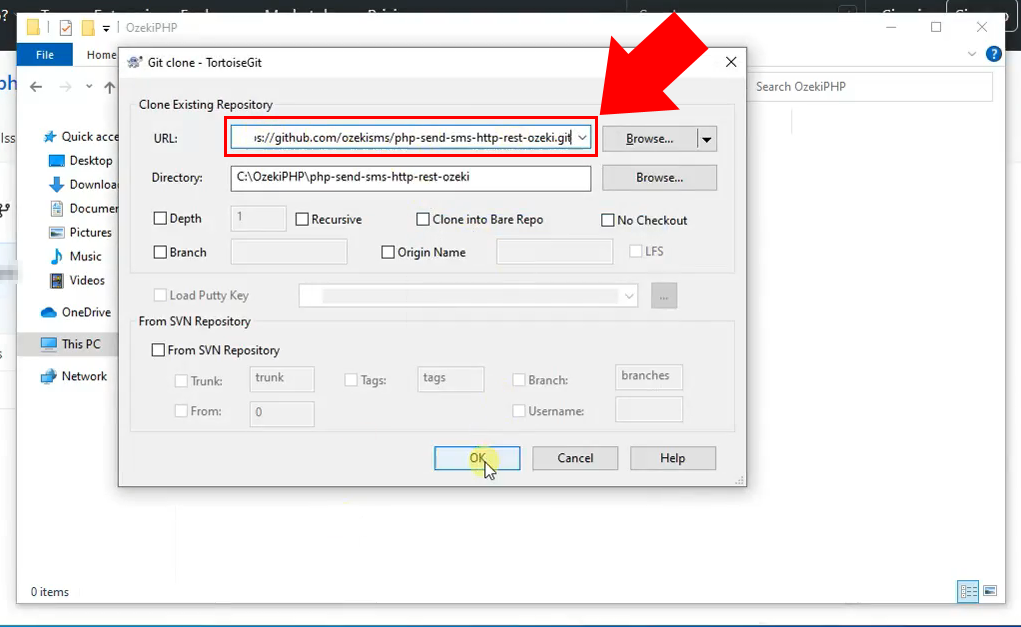
Paste your previously copied URL next to URL: (Figure 23). Click on OK to begin cloning. This will download all of the contents of the repository to your chosen directory.
Clone success
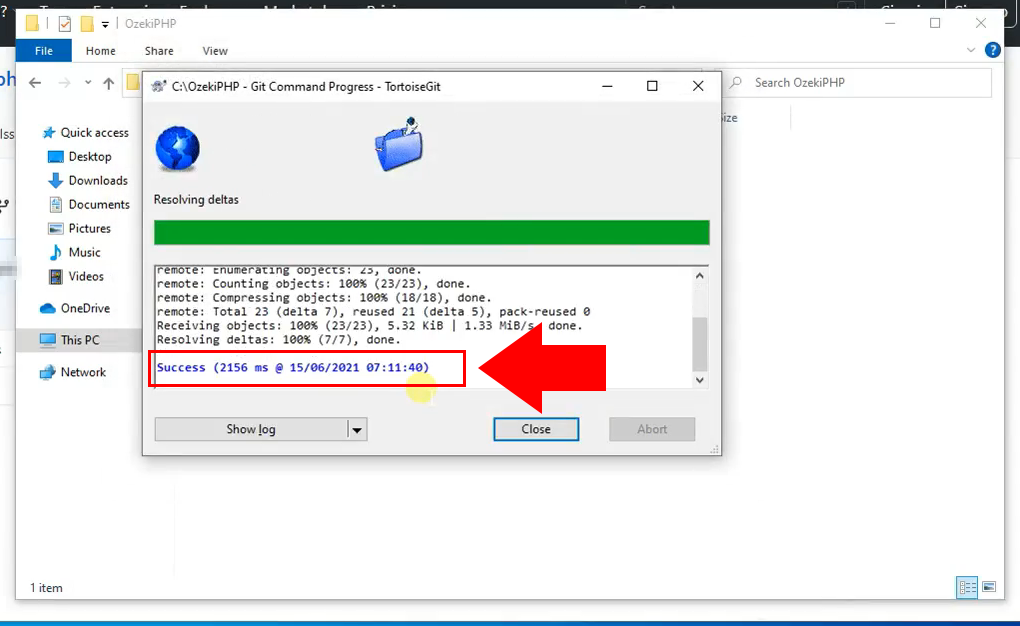
After the cloning process is finished, Tortoise Git will notify you. A blue message will appear that reads Success (Figure 24). Now you may close the program and get started with coding.
Repository cloned
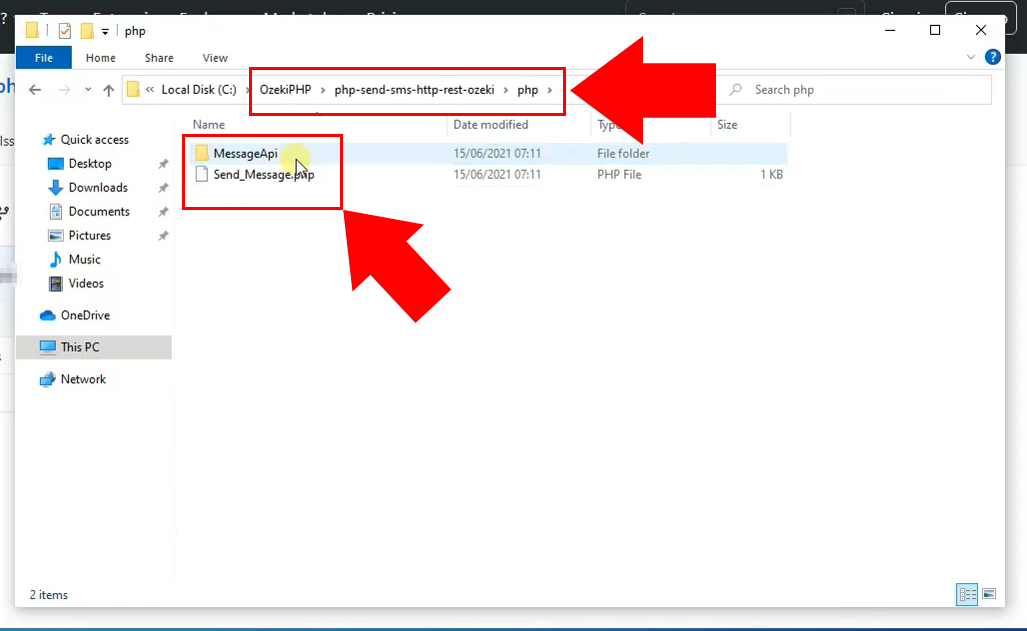
You can see that after cloning has been successfully completed, the repository will appear inside your chosen folder (Figure 25).
4. video: Git commit changes
This video explains how you can commit changes to pieces of code using Git. You may access the commit feature from your explorer (Video 4). This process is done through TortoiseGit. Tortoise Git allows you to commit changes to codes and attach changelogs to commitments. These changes will appear on GitHub once they have been committed.
Save changes
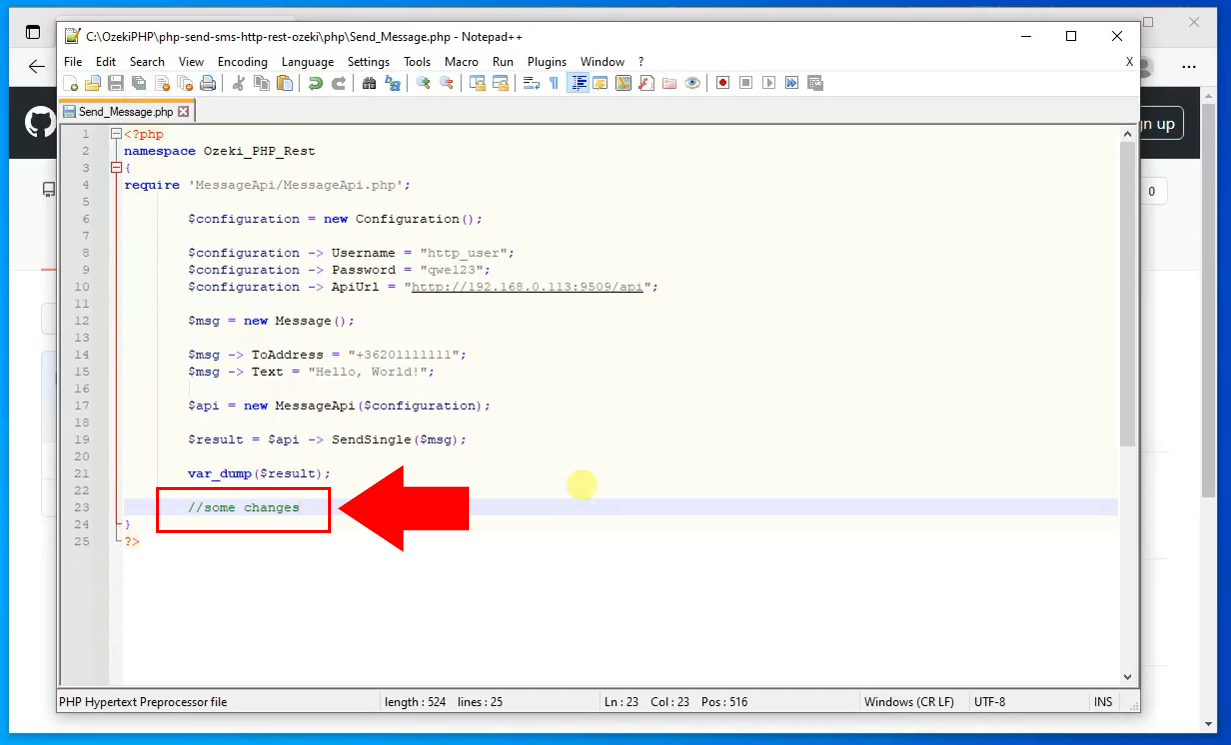
Test out the commit function on Git by editing the Send_Message PHP file. Open the file in Notepad first. Add a comment to the end, then save the file (Figure 26). You may now close Notepad.
Select Git commit option
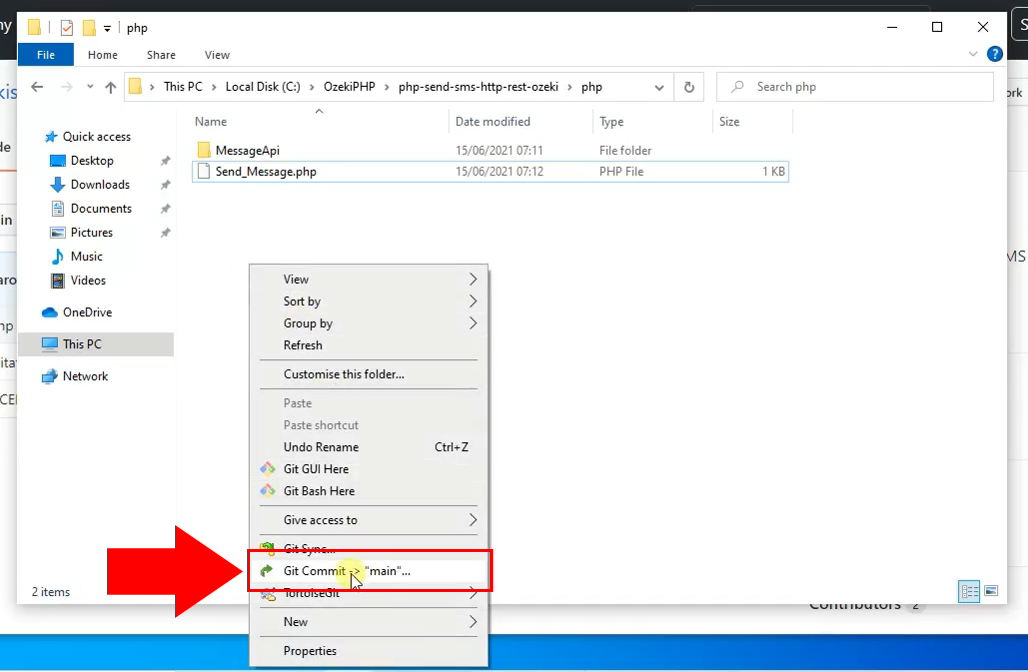
Right click inside the directory again, then click on Git Commit -> main (Figure 27). This will bring up Tortoise Git again, where you can configure your commitment.
Commit and push
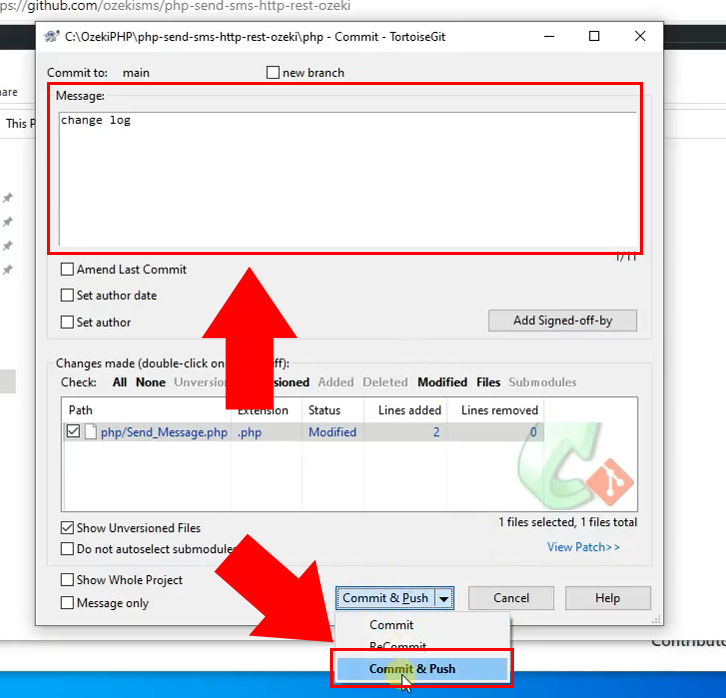
Inside Tortoise Git you are also able to attach a changelog to your commitment (Figure 28). Type your changelog text into the textbox above. Click on Commit & Push to commit your changes.
Login to Git
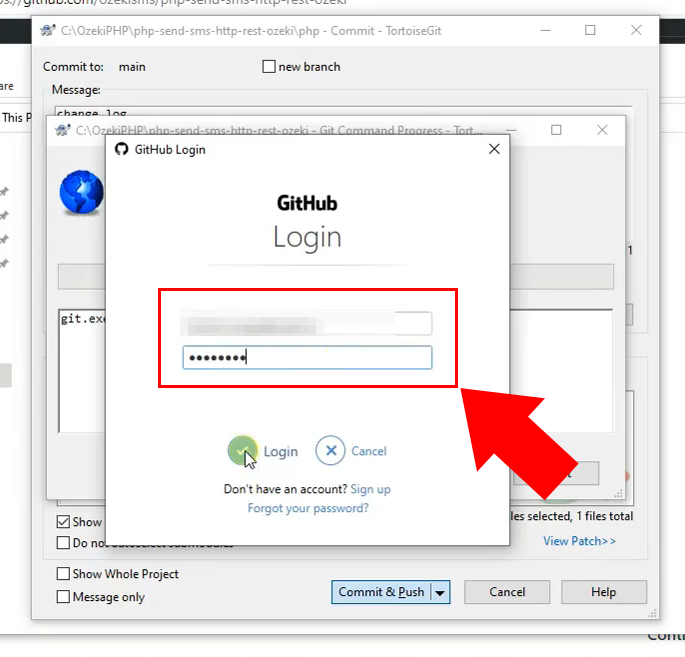
After you clicked Commit & Push, you will be asked to log into Git Hub. A new window will pop up, where you need to enter your e-mail and password for your GitHub account (Figure 29). Click on Login to sign into GitHub.
Commit success
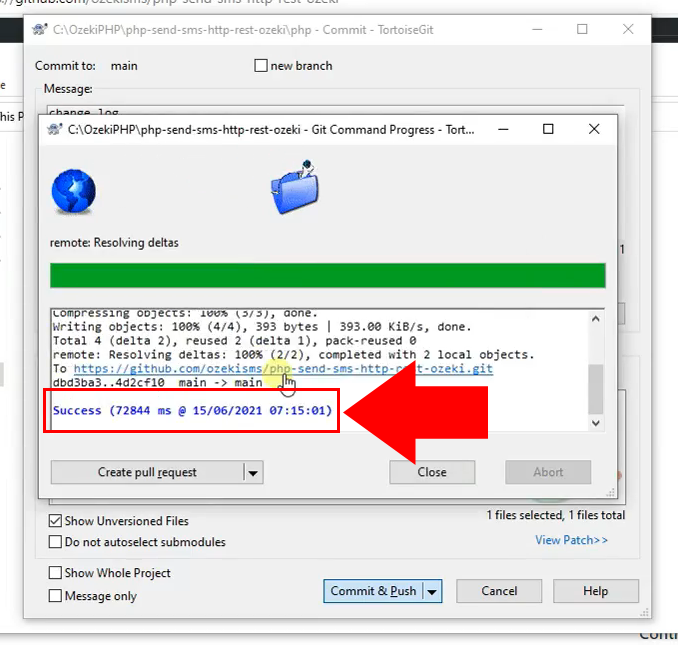
When your commit is finished, a message will indicate that it was successfully completed. Very similar to cloning, a blue message will read Success (Figure 30). You may now open GitHub in your browser and view the changes you made.
Changes in the repository
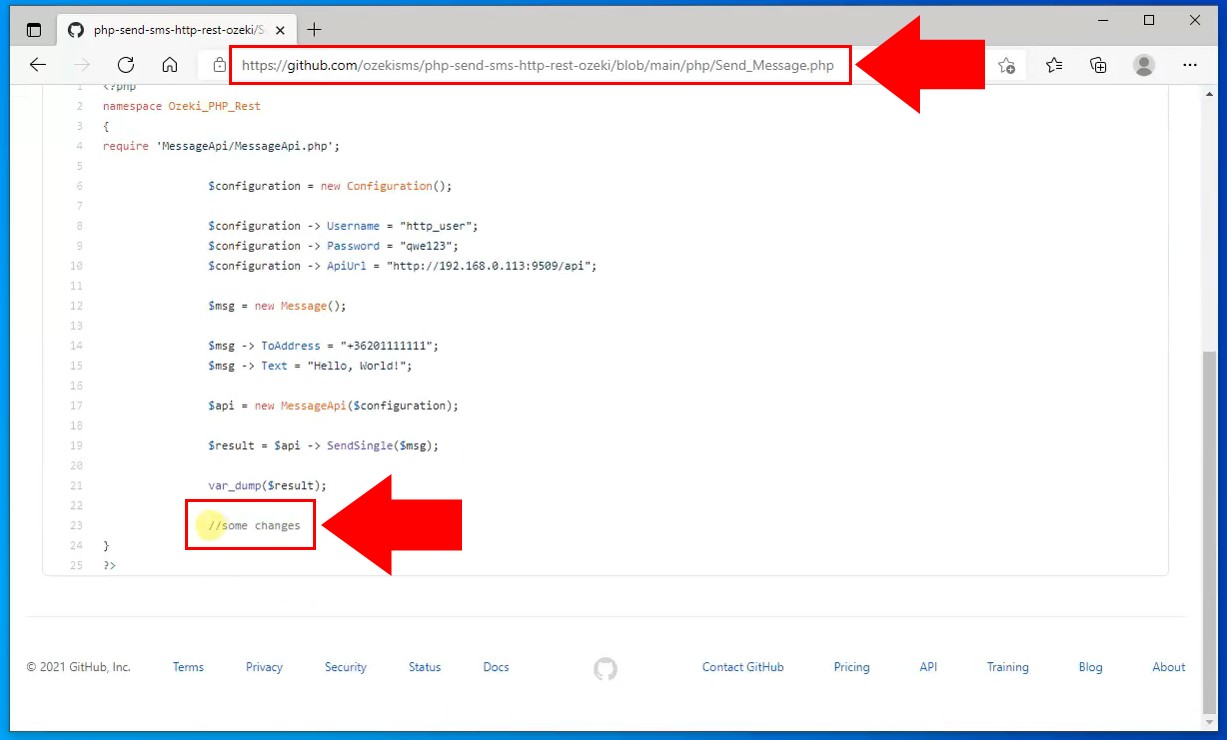
Visit the repository in the GitHub website. Here you can see that the changes you made have appeared in the code (Figure 31).
To sum it up
Now, you can relax. We hope you didn’t get lost in the explanations. We did our very best to make it simple and interesting to you to go through the steps. If you have followed the instructions closely, you should be able to make changes to the PHP SMS API, located on GitHub, from your computer. If you have already completed the steps, you can enjoy a well-deserved Irish coffee or some other treat you have in mind. Let me mention that Ozeki SMS Gateway works in any country and can send and receive sms through various mobile connections. If you would like to receive more about the advantages of other similar solutions, please open ozeki-sms-gateway.com.
