How to setup MS Active Directory and how to create an SMS user group
In this guide we will walk you through the most important steps when it comes to setting up MS Active Directory. Active Directory stores network object information in a structured data store, organizing it hierarchically for easy access and management. You will also learn how to create SMS user groups so you can improve communication efficiency, organization, security.
How to setup MS Active Directory and create an SMS user group (Quick Steps)
- Add role and feature
- Select the 'Role-based or feature-based installation'
- Select server
- Select the 'Active directory domain services' role.
- Select features
- Active directory domain service
- Install role
- You will see a 'Configuration required. Installation succeeded on...' sign.
- Promote server to domain controller
- Select the 'Add a new forest' deployment operation type
- Enter Directory Services Restore Mode password
- Select the location of the AD DS database, log files and SYSVOL
- Review your selections
- Install changes
- The server is configured as domain controller
- Open Active Directory Users and Computers
- Add new group
- Enter a group name, and then press 'OK'
- Add new user
- Enter a name in the 'User logon name' box
- Enter a password
- Select the 'Password never expires' option
- Open user properties
- Add user to group
- Enter the object name to be able to select, then navigate to 'Check names'
- Go to the 'Members' tab and check group members
- Check server IP
Configure Active directory service (Video tutorial)
In this video tutorial we will guide you through the steps of setting up MS Active Directory and teach you how to create SMS user groups. Knowing how to use MS Active Directory will help you manage and organize network resources like computers and users in an organization. It makes tasks like user authentication and access control easier for administrators, ensuring a secure and efficient network (Video 1).
Configure Active directory service (Step by step guide)
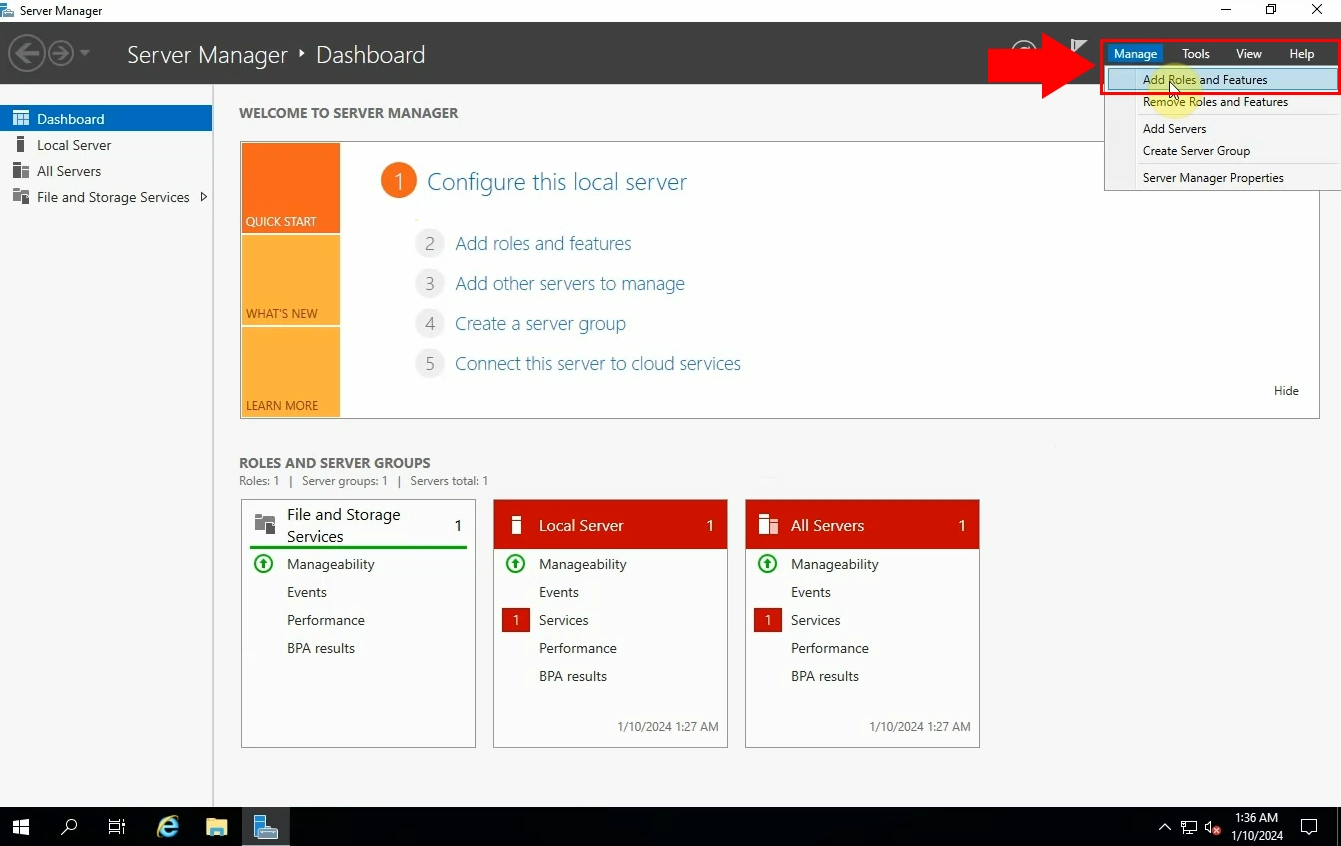
To begin the whole process, the first thing you need to do is to open the Server Manager program. Then go to the 'Manage' sign from the toolbar, it is on the upper right side of the screen. Select the 'Add roles and features' option by clicking on it (Figure 1).
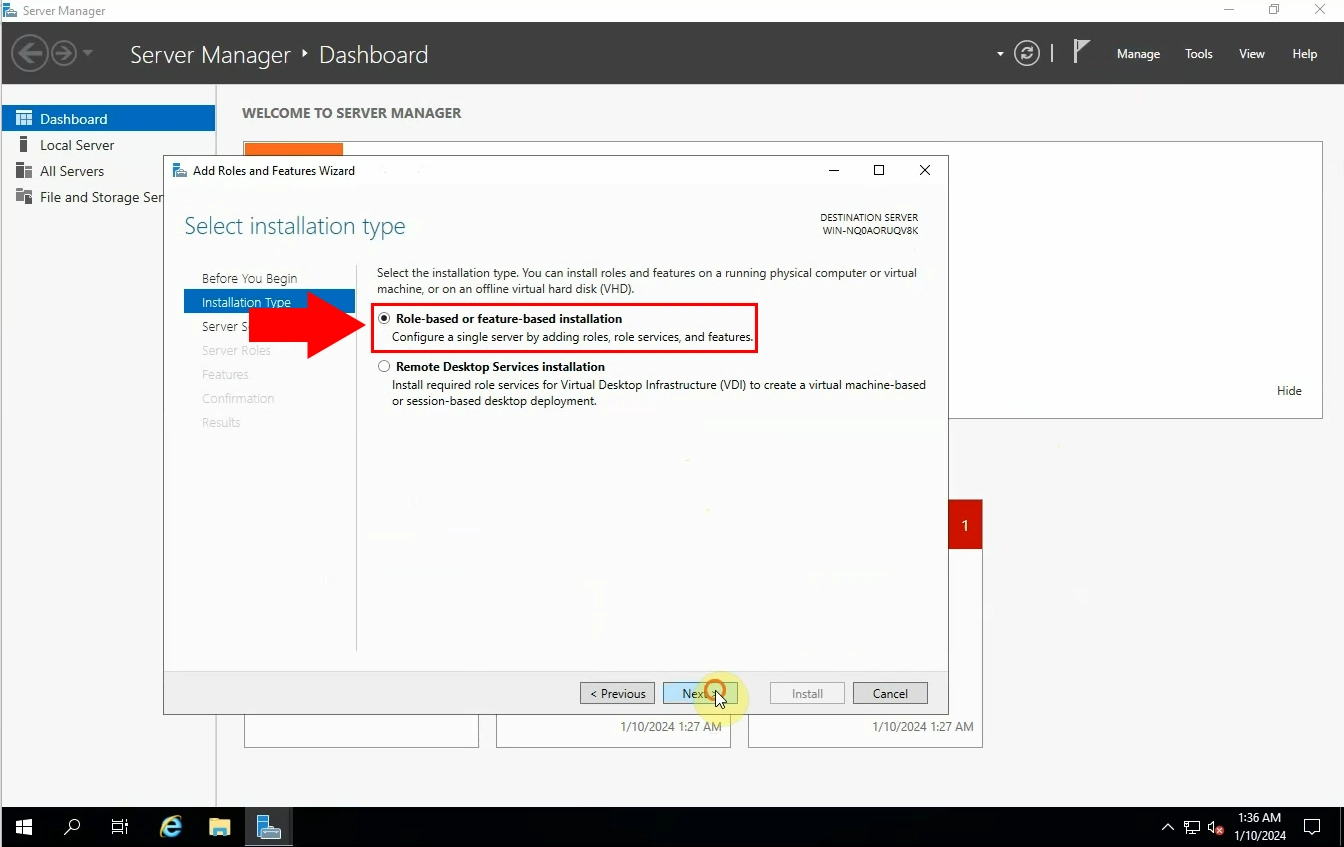
A window will pop up on your screen that will walk you through the installation process. You will be asked to select the installation type. You can install roles and features on a running physical computer or virtual machine, or on an VHD. Select the 'Role-based or feature-based installation' (Figure 2). Click on next, so you can move along.
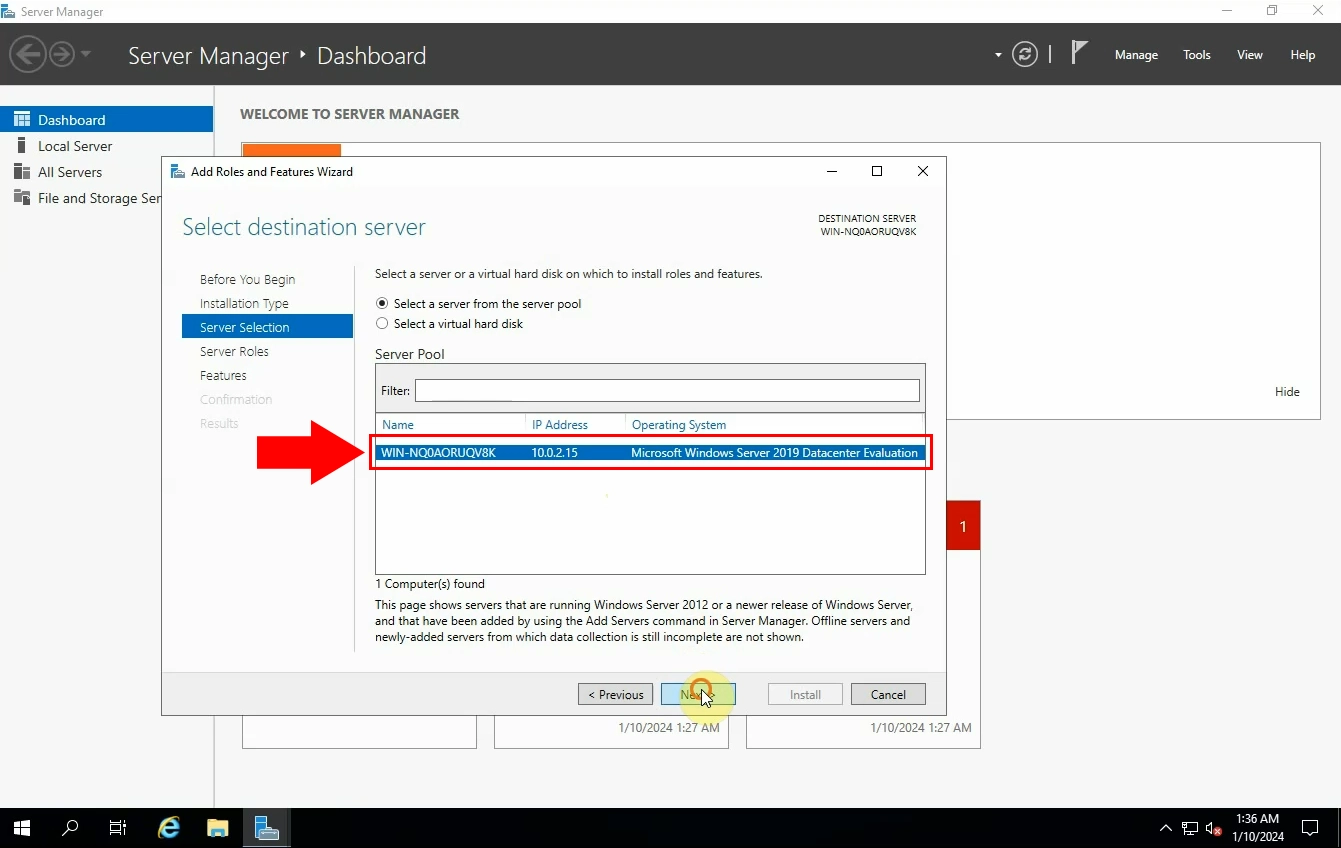
In this step you need the select the destination server (Figure 3). You have to select the server from the server pool. Once you are done, click on 'Next'.
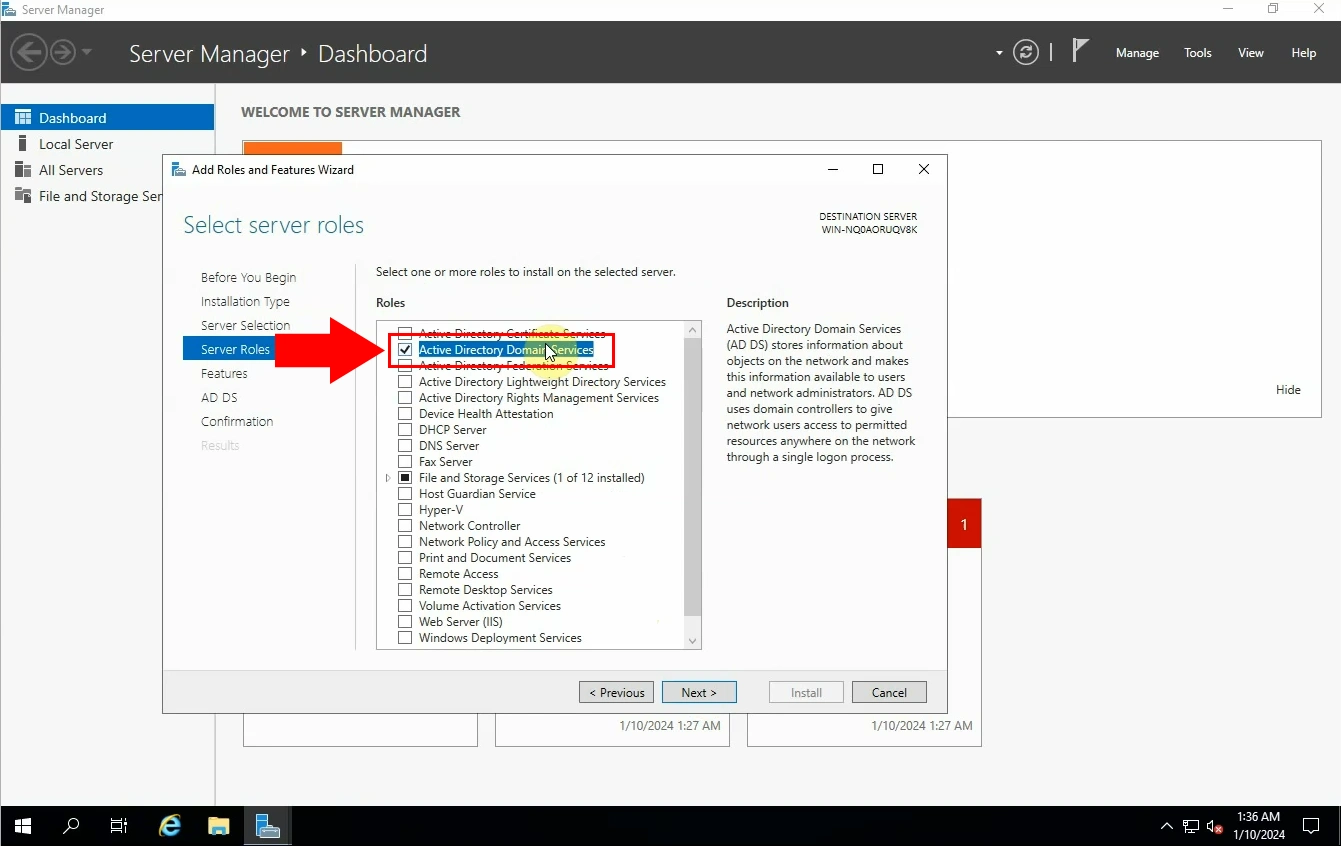
The next step is selecting the right server code. You can select one or more roles to install in the selected server. Select the 'Active directory domain services' role (Figure 4). When you click on 'Next' an 'Add roles and features Wizard' window will appear, stating that you cannot install 'Active Directory Domain Services' unless a few other role services or features are also installed. Click on 'Add features'.
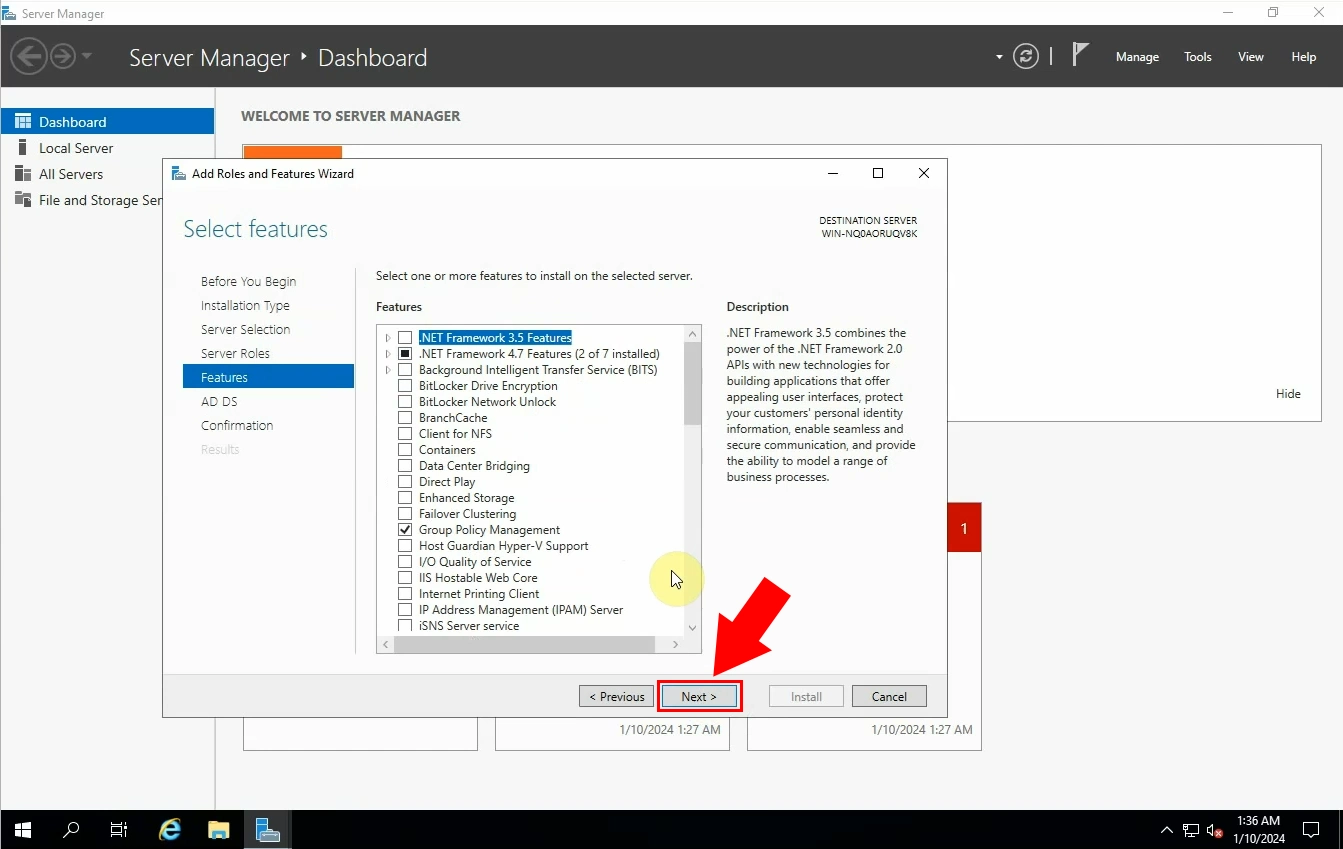
Continue the feature selection process by clicking on the 'Next' button (Figure 5).
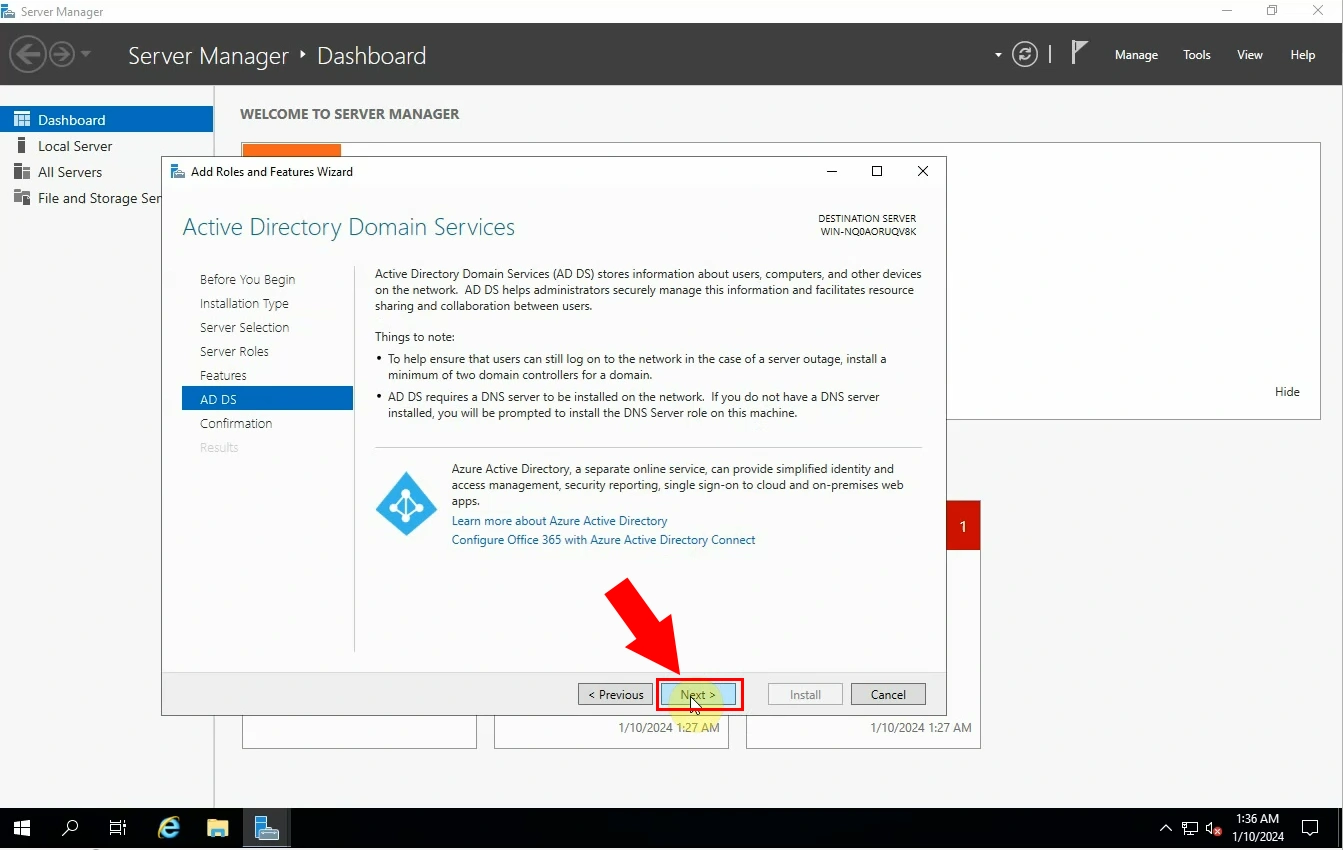
An 'Active Directory Domain Services' window will appear. It will contain information that could be important for you to know before continuing the process (Figure 6). After you read everything, click on 'Next'.
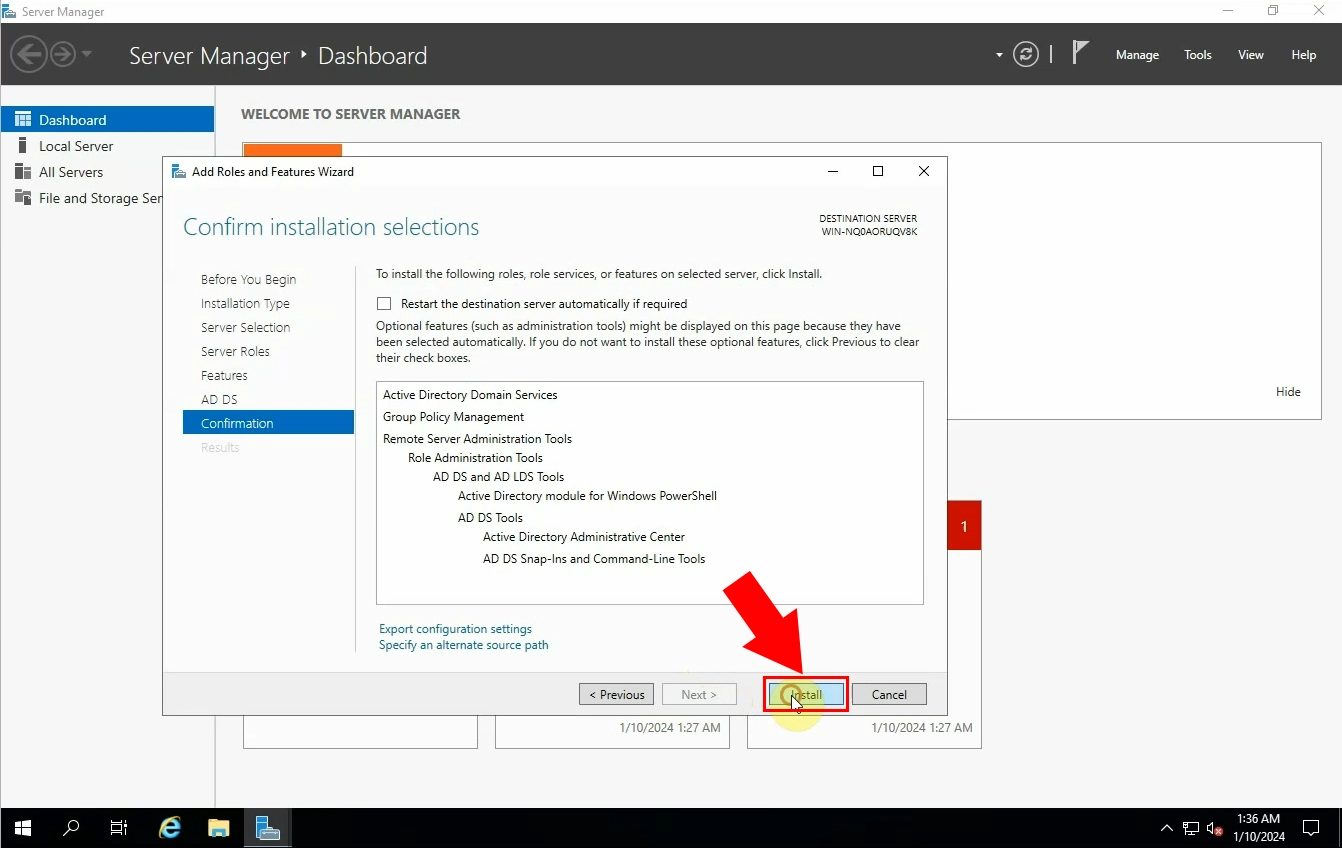
You will see a window where you can confirm the installation selection. To install the role on selected server, click on 'Install' (Figure 7). The installation process might take a while, but be patient.
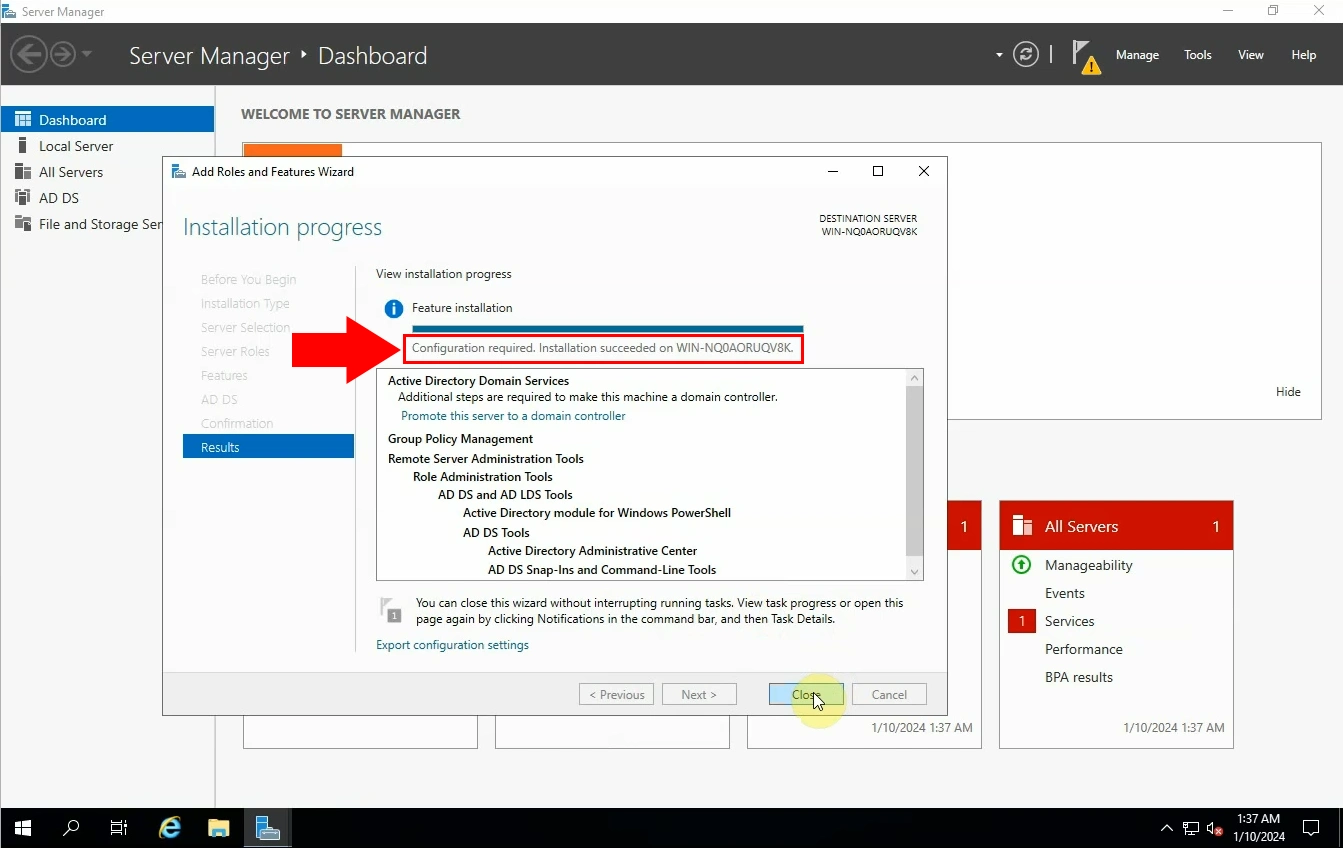
When your installation is ready, you will see a 'Configuration required. Installation succeeded on...' sign. Close the wizard to be able to move on (Figure 8).
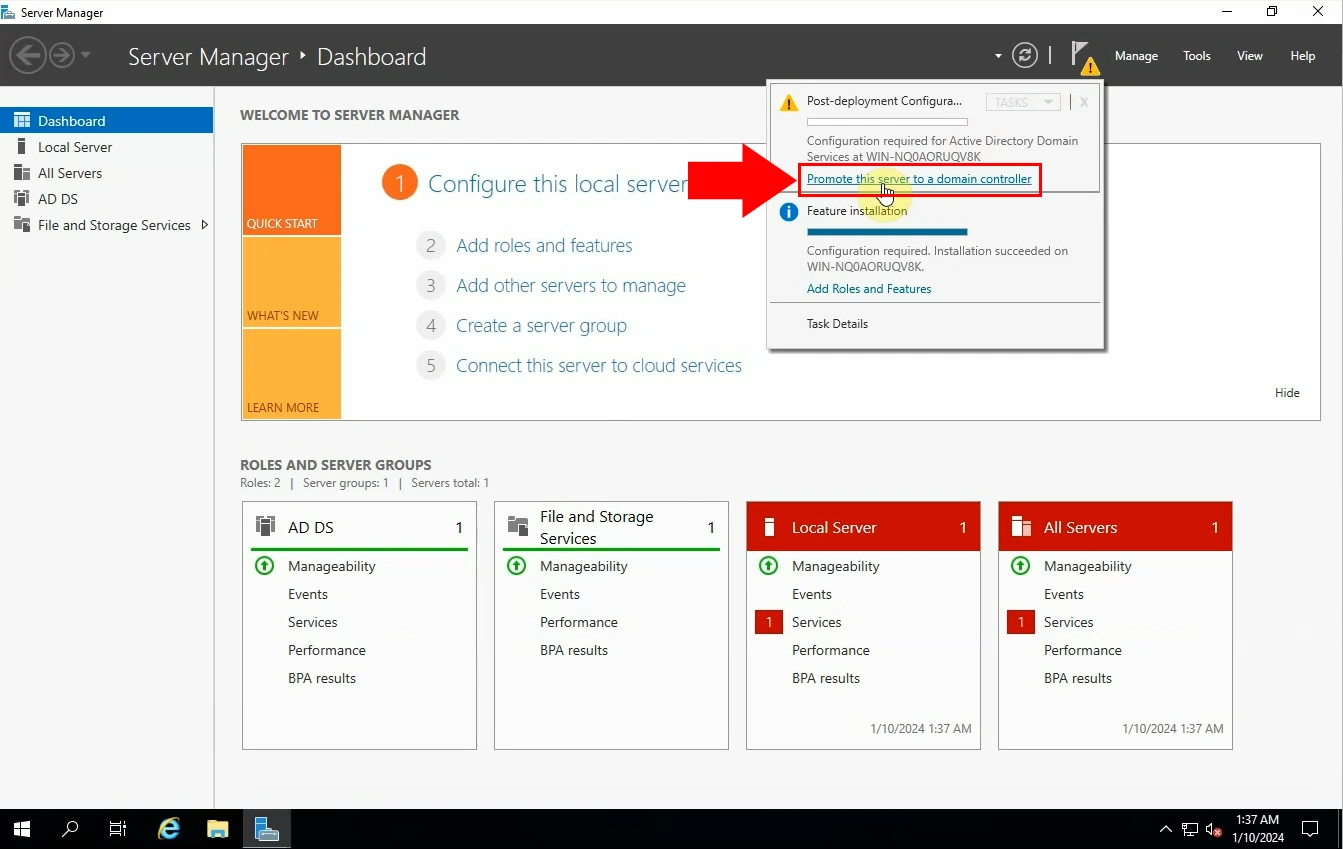
Navigate to the toolbar and open down the 'Manage' option. As you will see configuration is required for Active Directory Services at the server you have previously selected. You have to click on 'Promote this server to a domain controller' to configure (Figure 9).
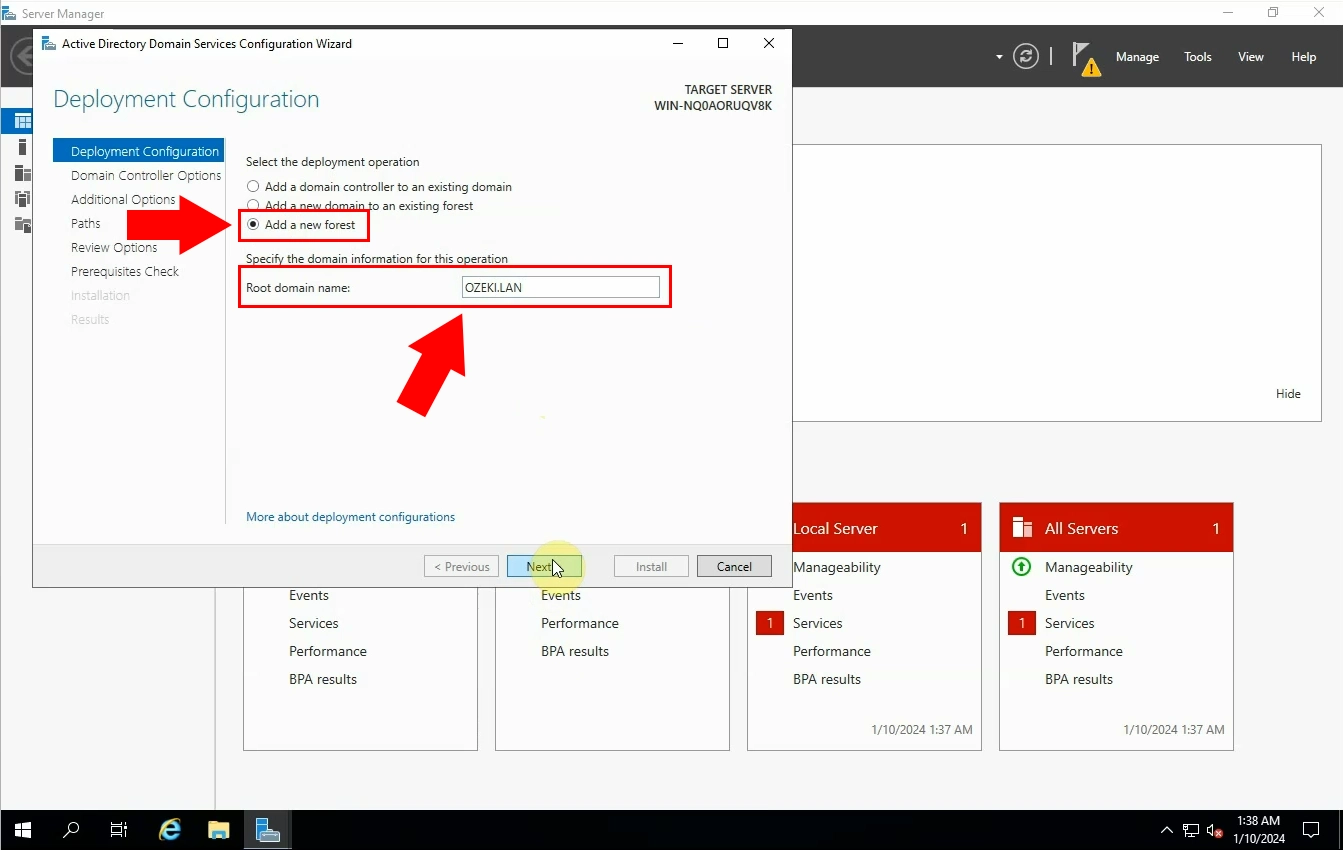
In an Active Directory Domain Services Configuration Wizard window where you can promote the server to domain controller. You will be required to select the deployment operation type, which in this case is 'Add a new forest' (Figure 10). Then you have to enter to root domain's name for the operation.
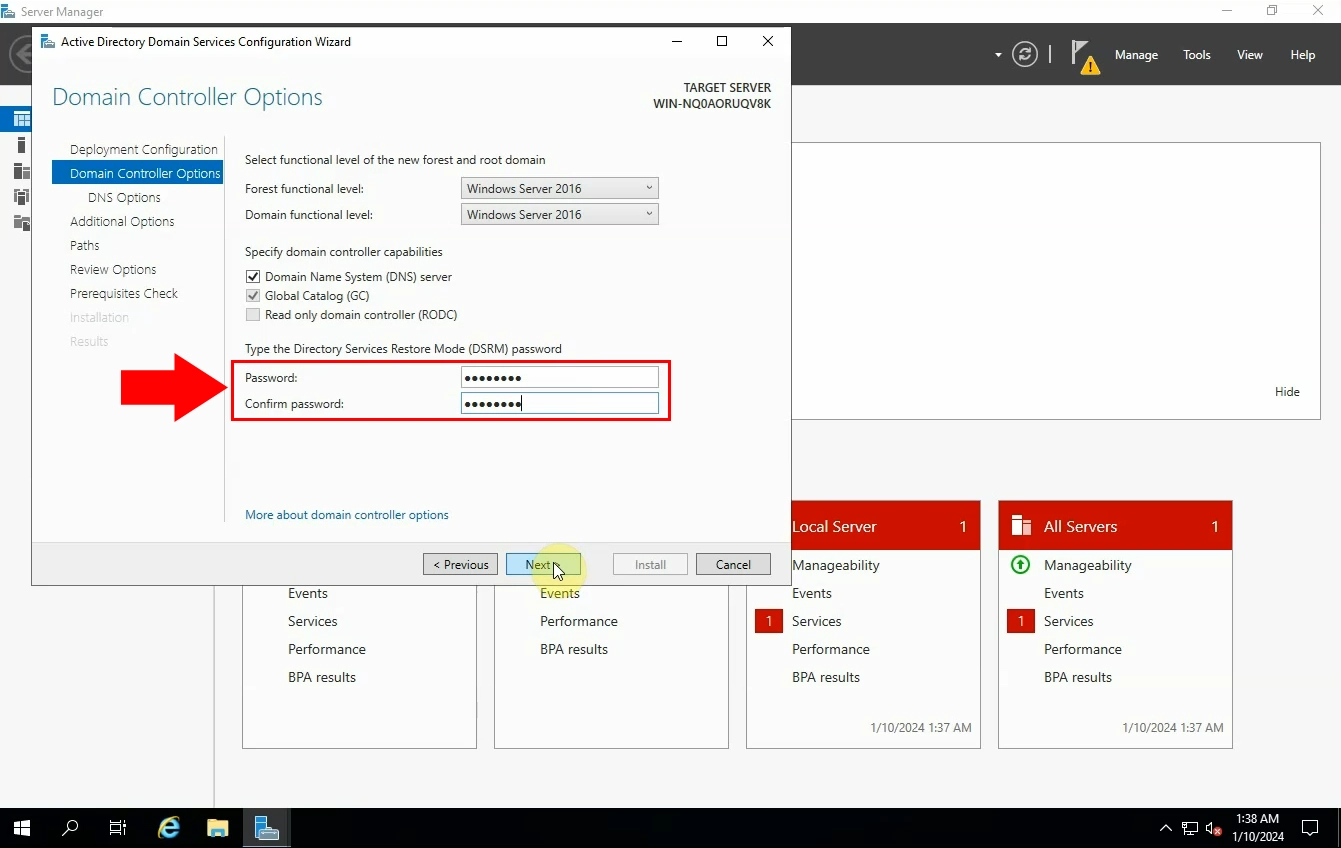
Now you can see the domain controller option. Your task is to enter the Directory Services Restore Mode password in the box as you can see in the picture (Figure 11). Do not forget to type in the same password twice, for confirmation. When you are done click on 'Next'.
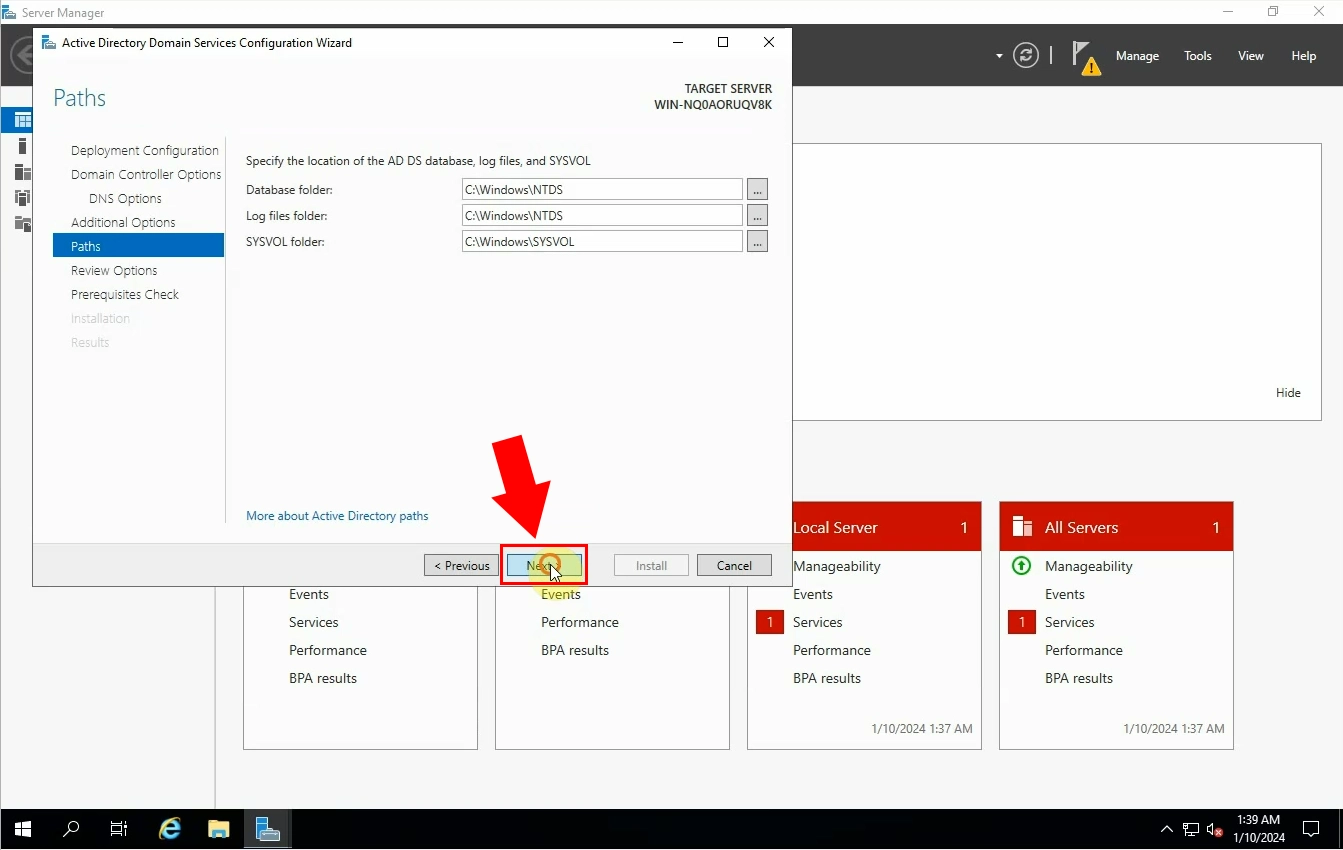
When you reach the 'Path' window you have to select the location of the AD DS database, log files and SYSVOL (Figure 12). Pay attention to this step and select the folders wisely so you can find them easily.
At 'Review Options', you have the chance to take a look at your selection, giving you the option to make changes, if necessary, before installing changes (Figure 13).
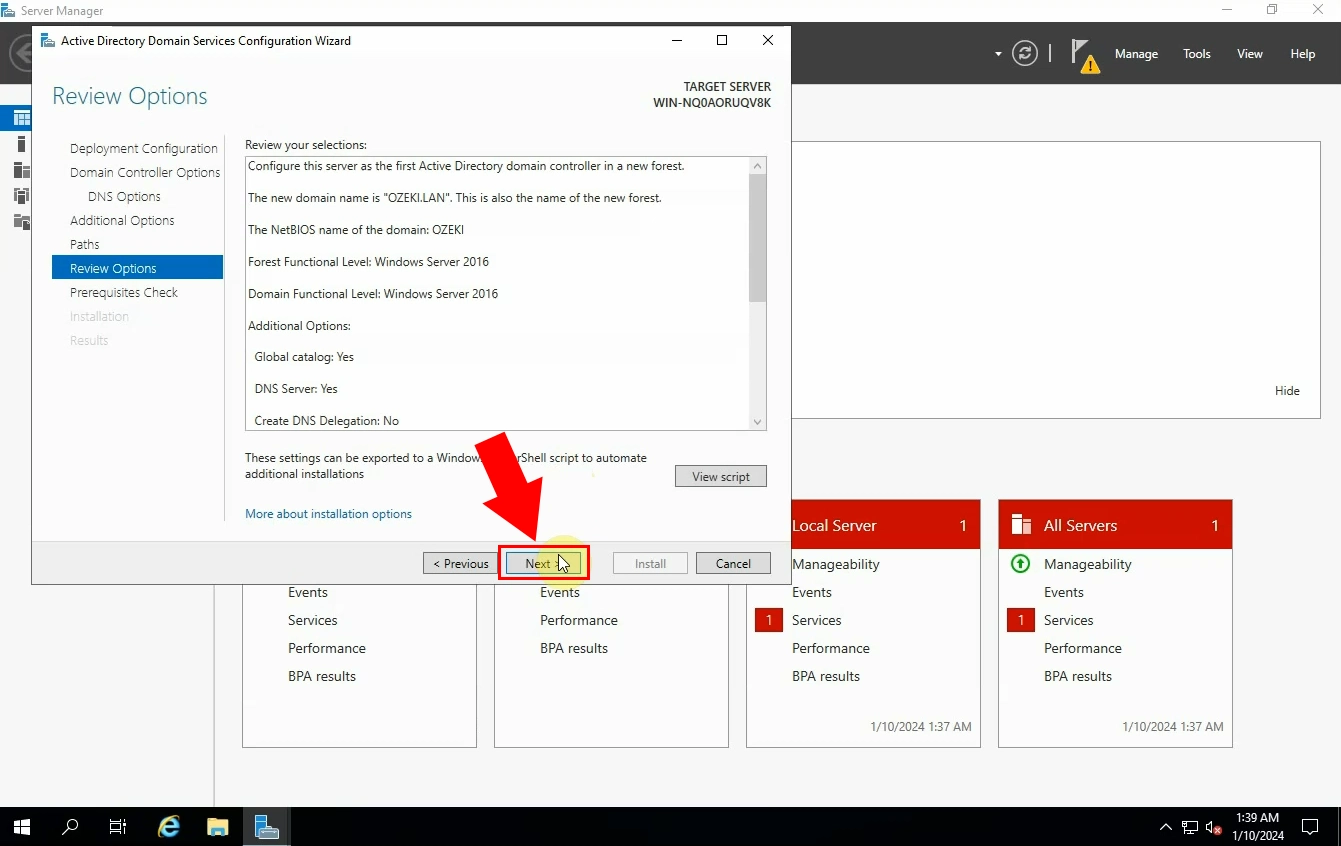
At 'Prerequisites check', you can see that prerequisites need to be validated before you can install Active Directory Domain on your device (Figure 14). Click on 'Install' to install changes.
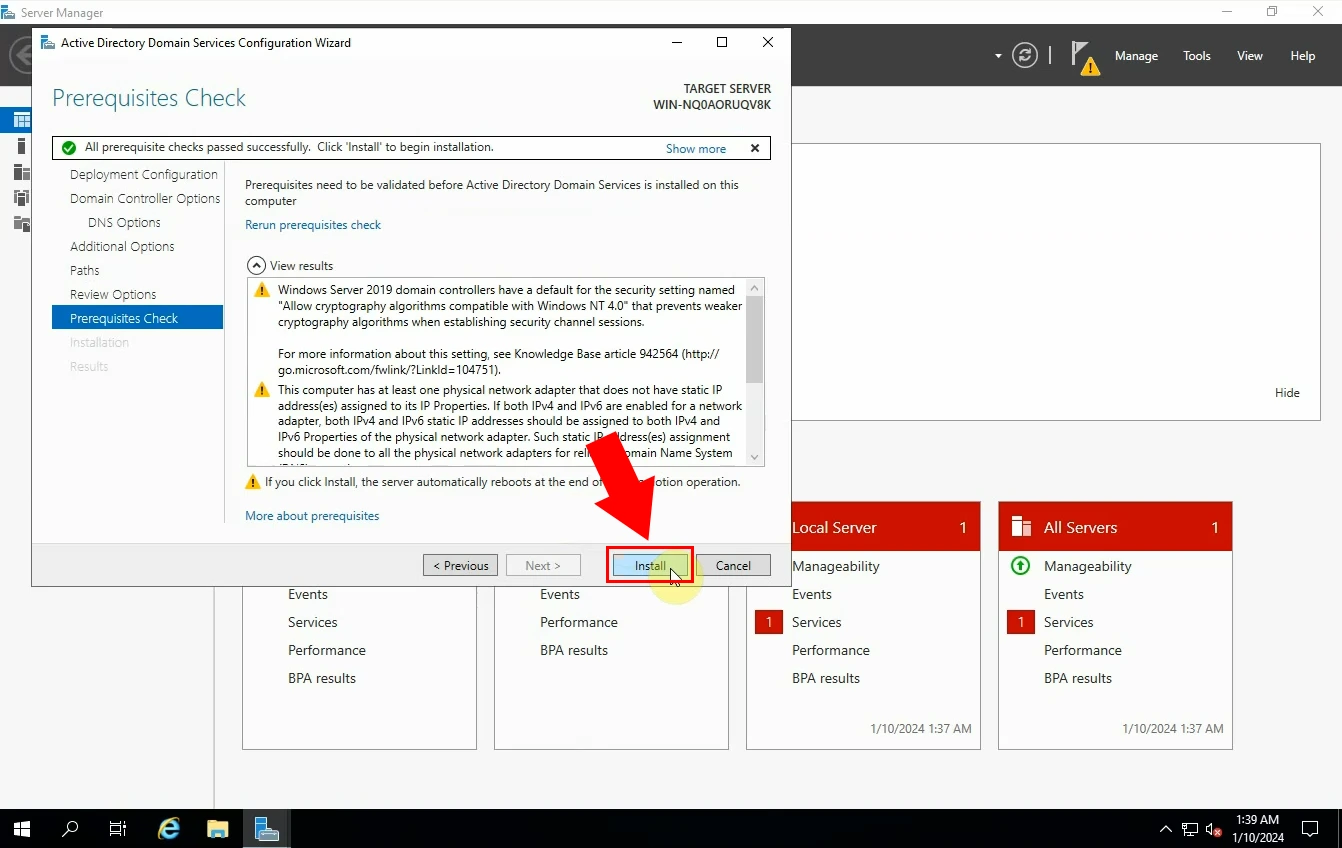
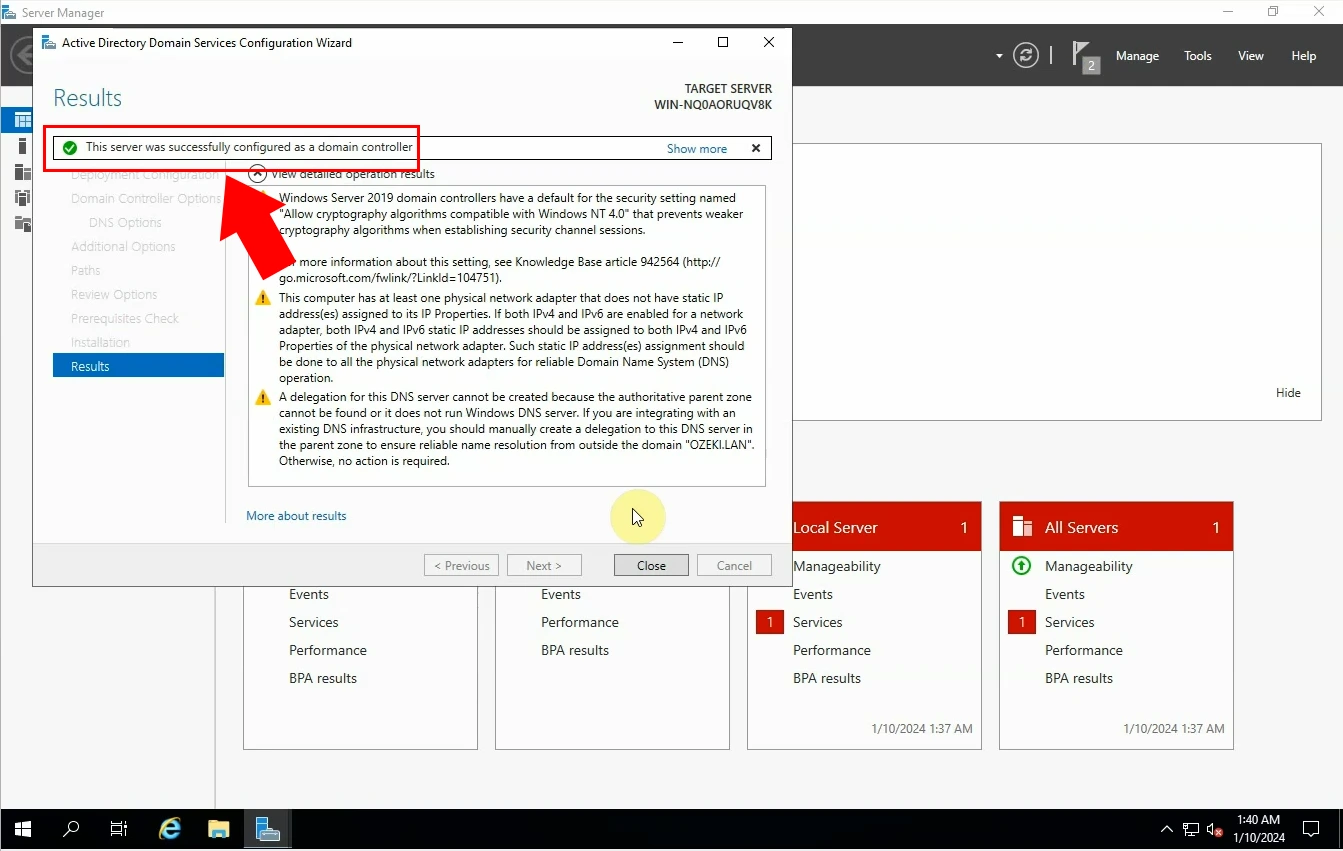
If everything went to according to plan, at the 'Results' window you will see a message stating that 'This server was successfully configured as a domain controller' (Figure 15).
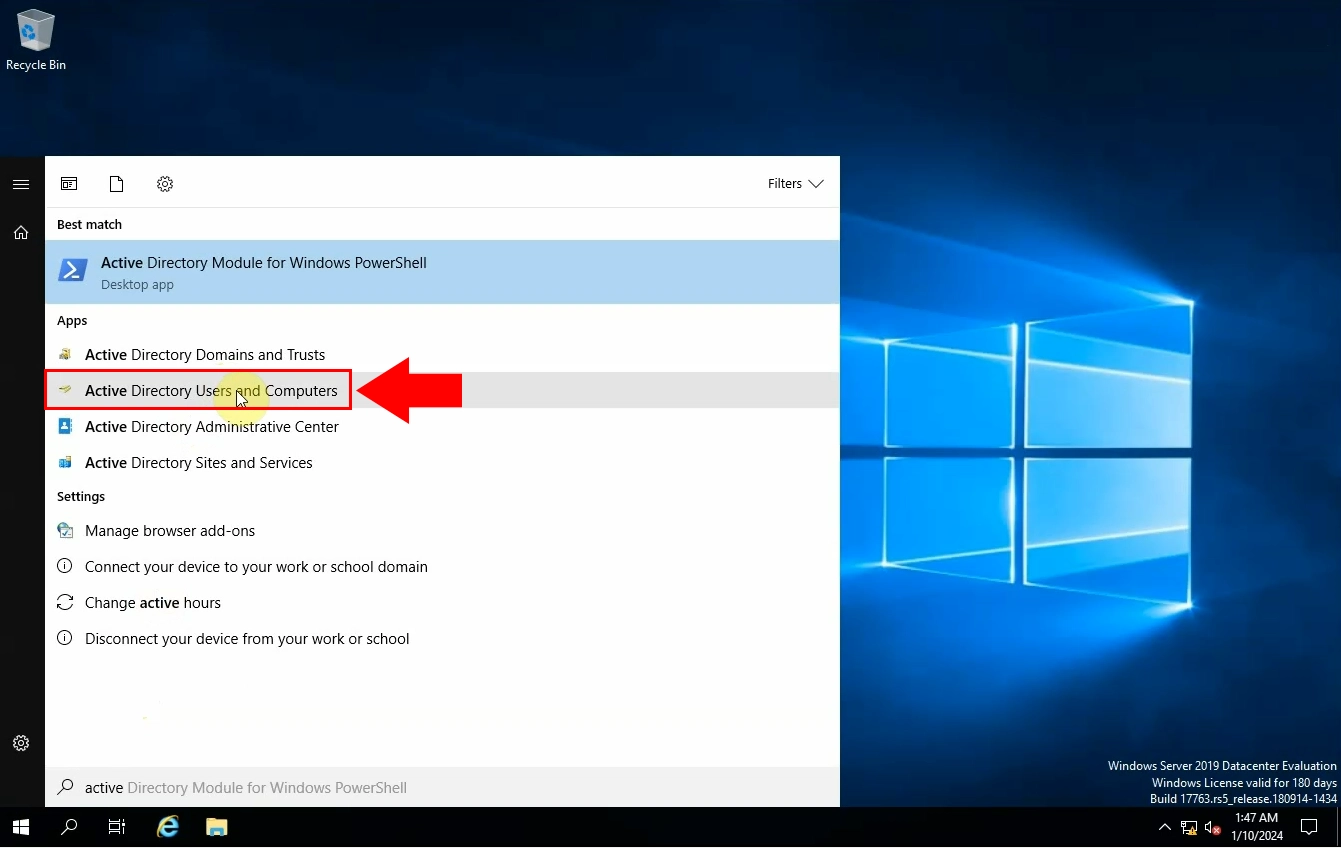
After being successful with the previous steps, you have to open 'Active Directory Users and Computers' Do this by either searching for it in the search bar or go to the folder you have saved it into (Figure 16).
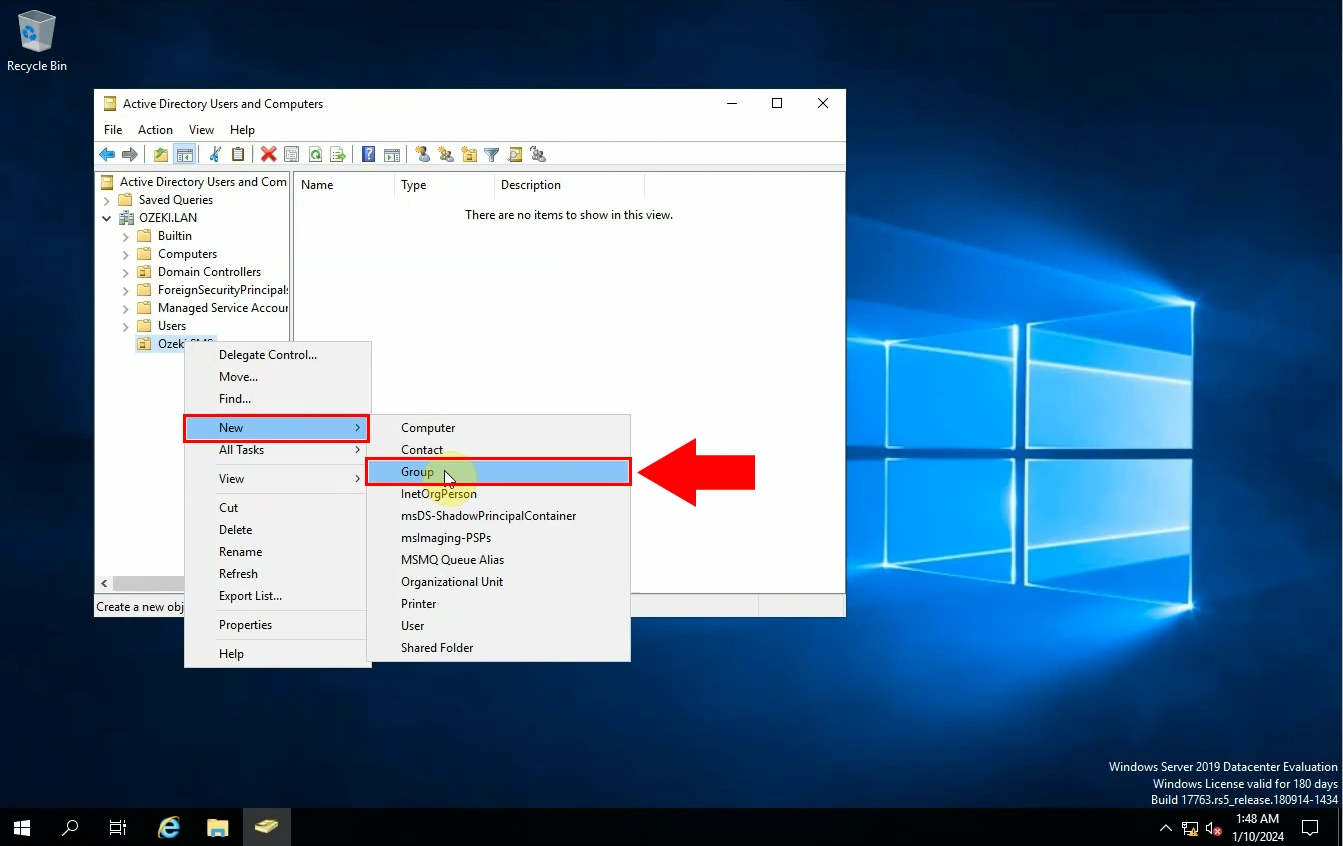
Once you opened Active Directory Users and Computers, navigate to the domain's name and add new group (Figure 17).
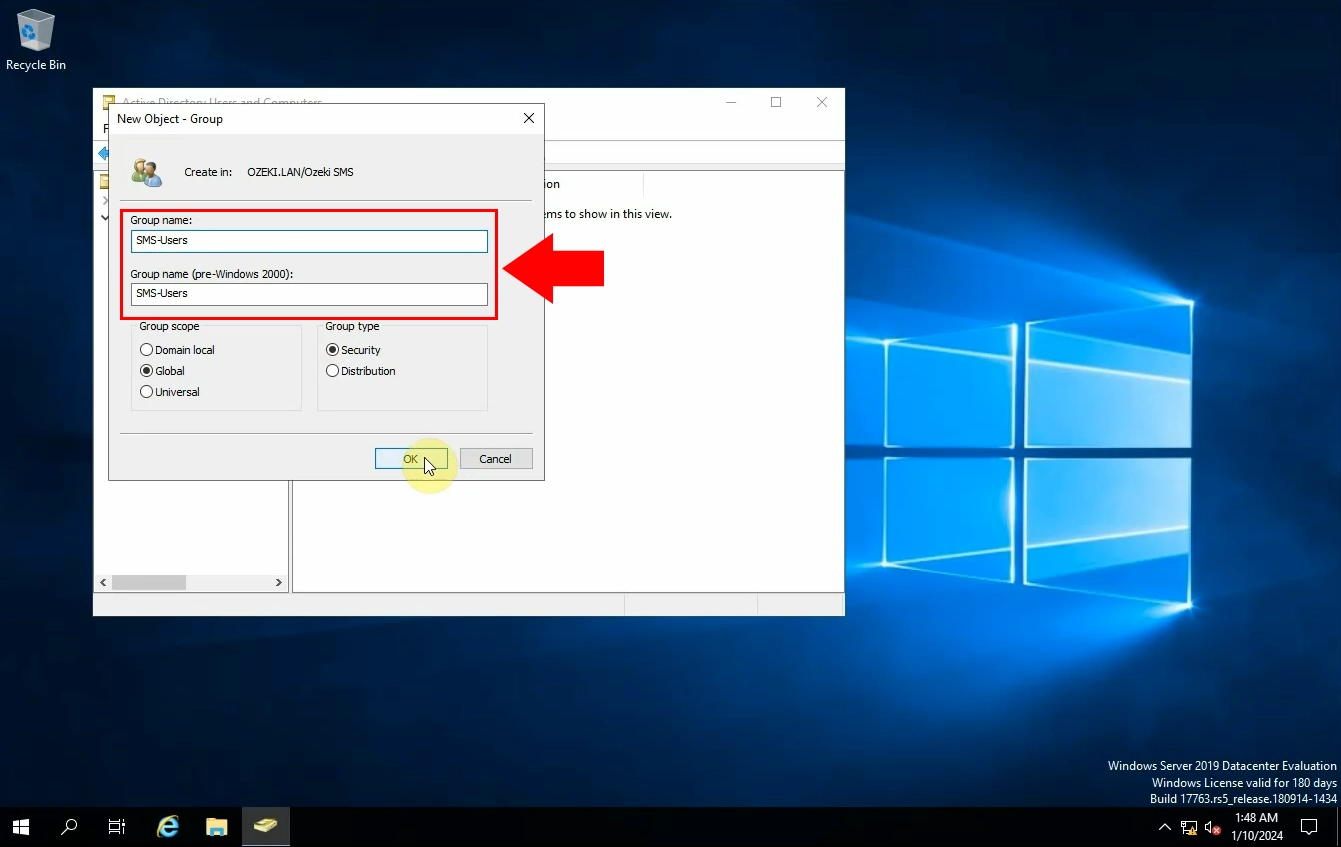
Your next task is configuring the newly created group (Figure 18). You have to enter a group name, and then press 'OK' once you are ready.
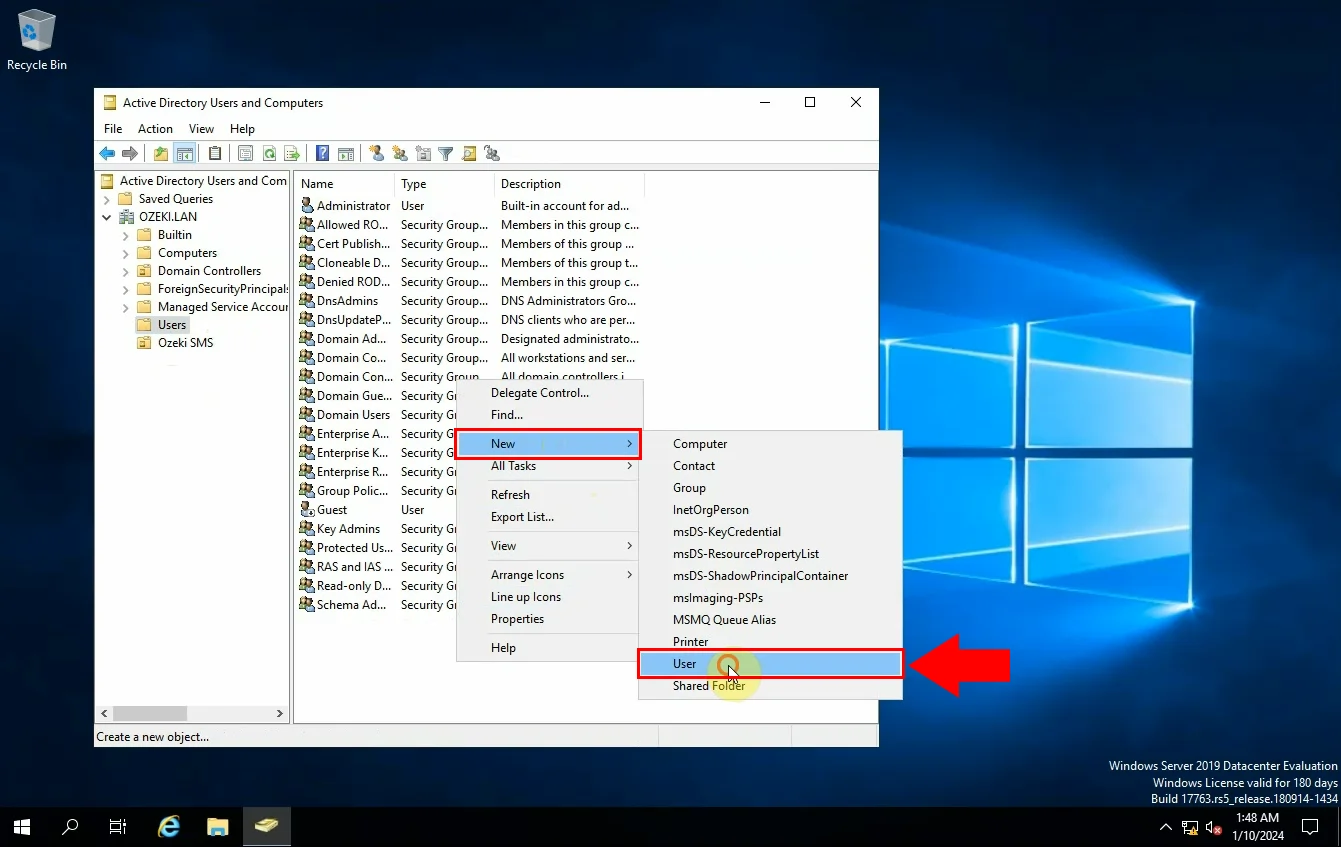
The next step in the process is adding a new user. Do this by selecting the 'Users' folder within the domain. Create a new user with the right mouse click (Figure 19).
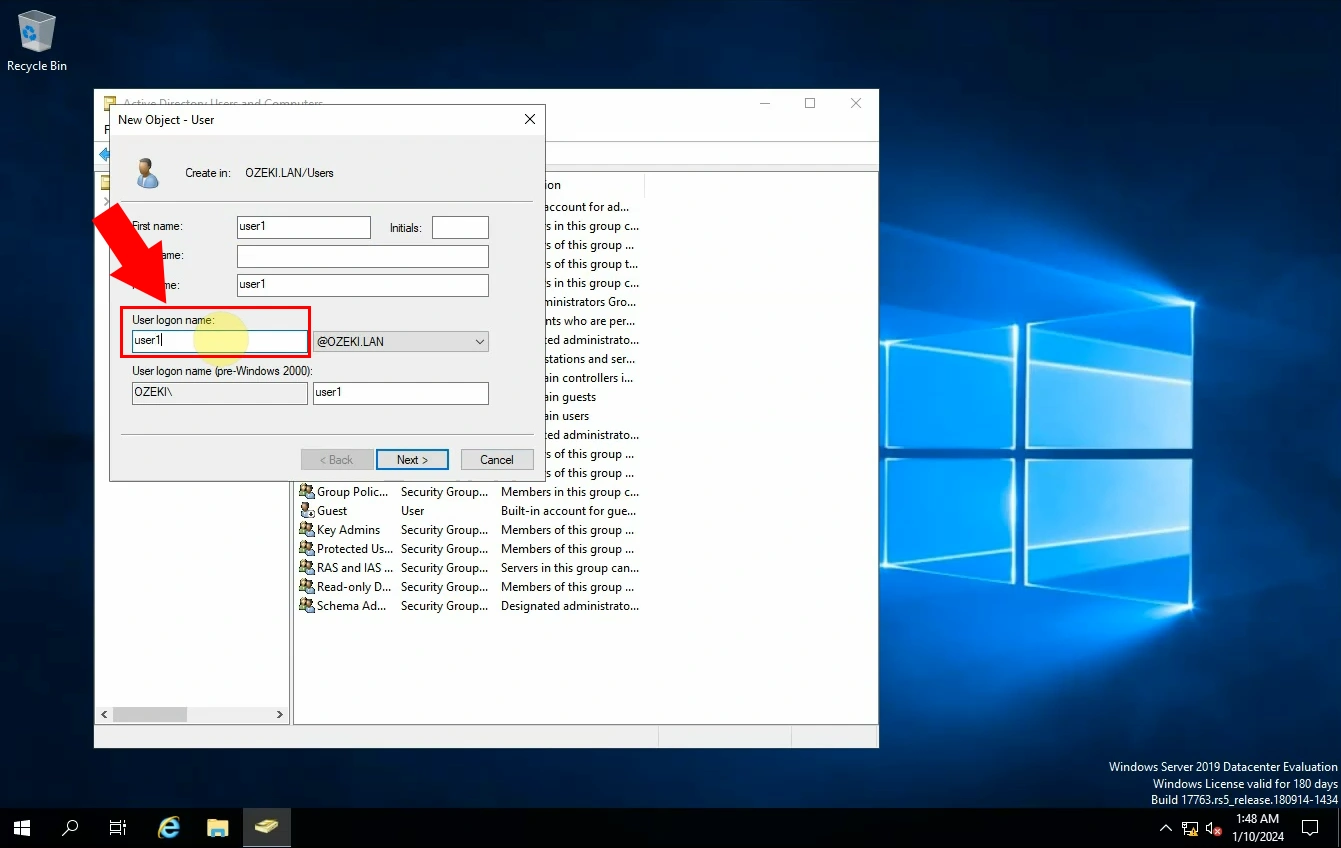
Configuring the username is the next essential step. Enter a name in the 'User logon name' box (Figure 20). When you typed in the name, click on 'Next'.
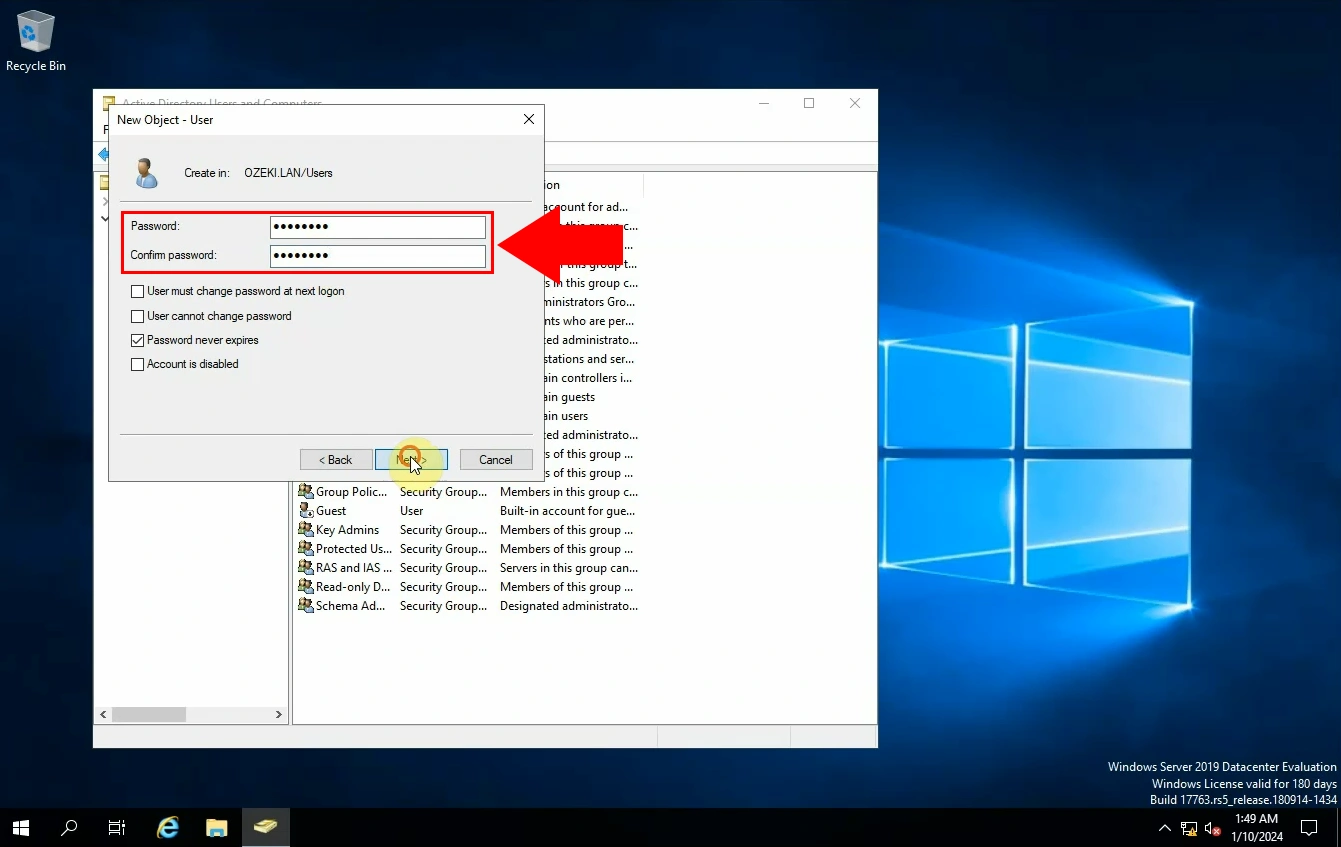
This step is still connected to the newly added user. You have to enter a password; we recommend that you make it strong. Then select the 'Password never expires' option so your password will not need to be changed regularly (Figure 21). When you click on 'Next' you can see the previously set settings. Make sure everything is how it supposed be and then click on 'Finish', to create the object.
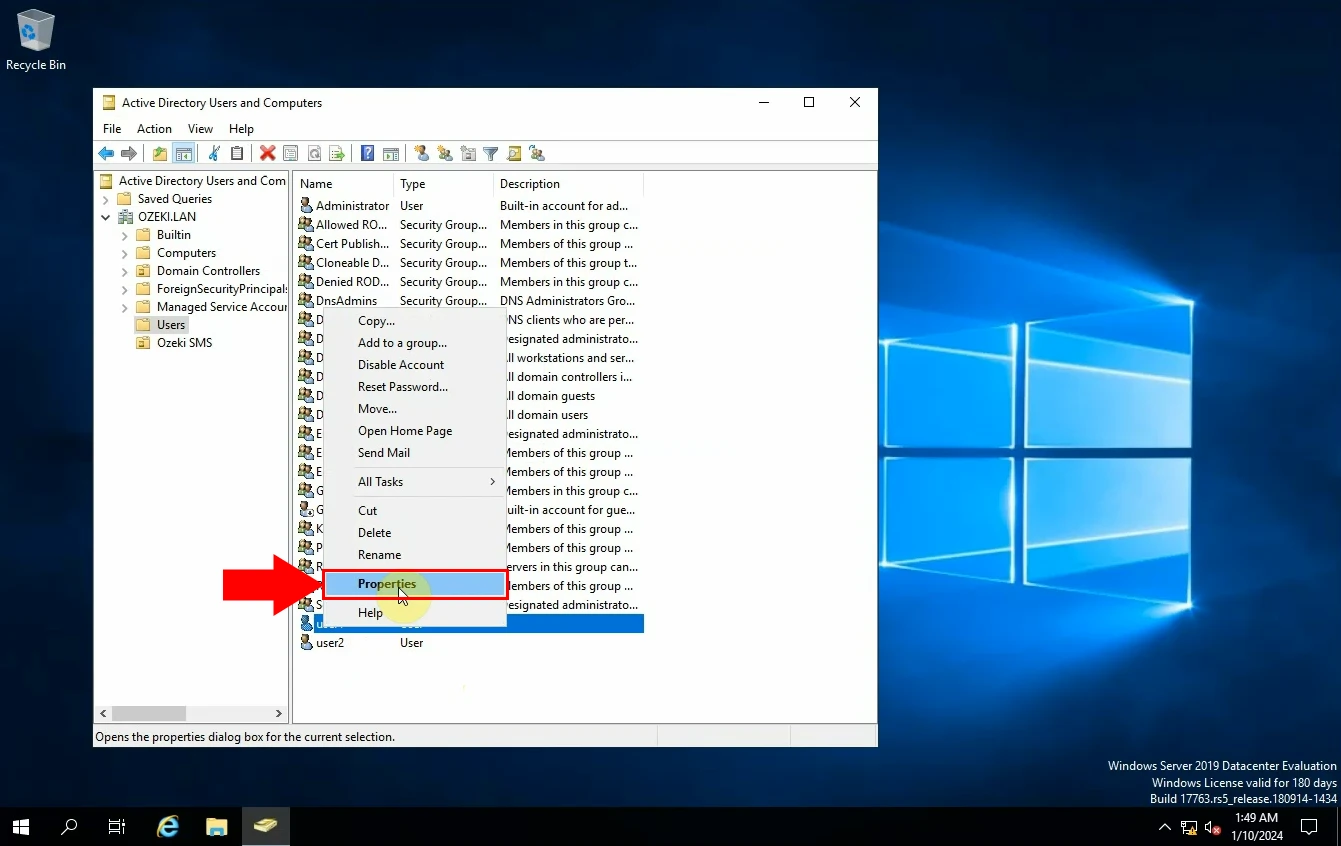
Opening user properties is the next step. Manage this by navigating to the newly created user and select the 'Properties' option (Figure 22).
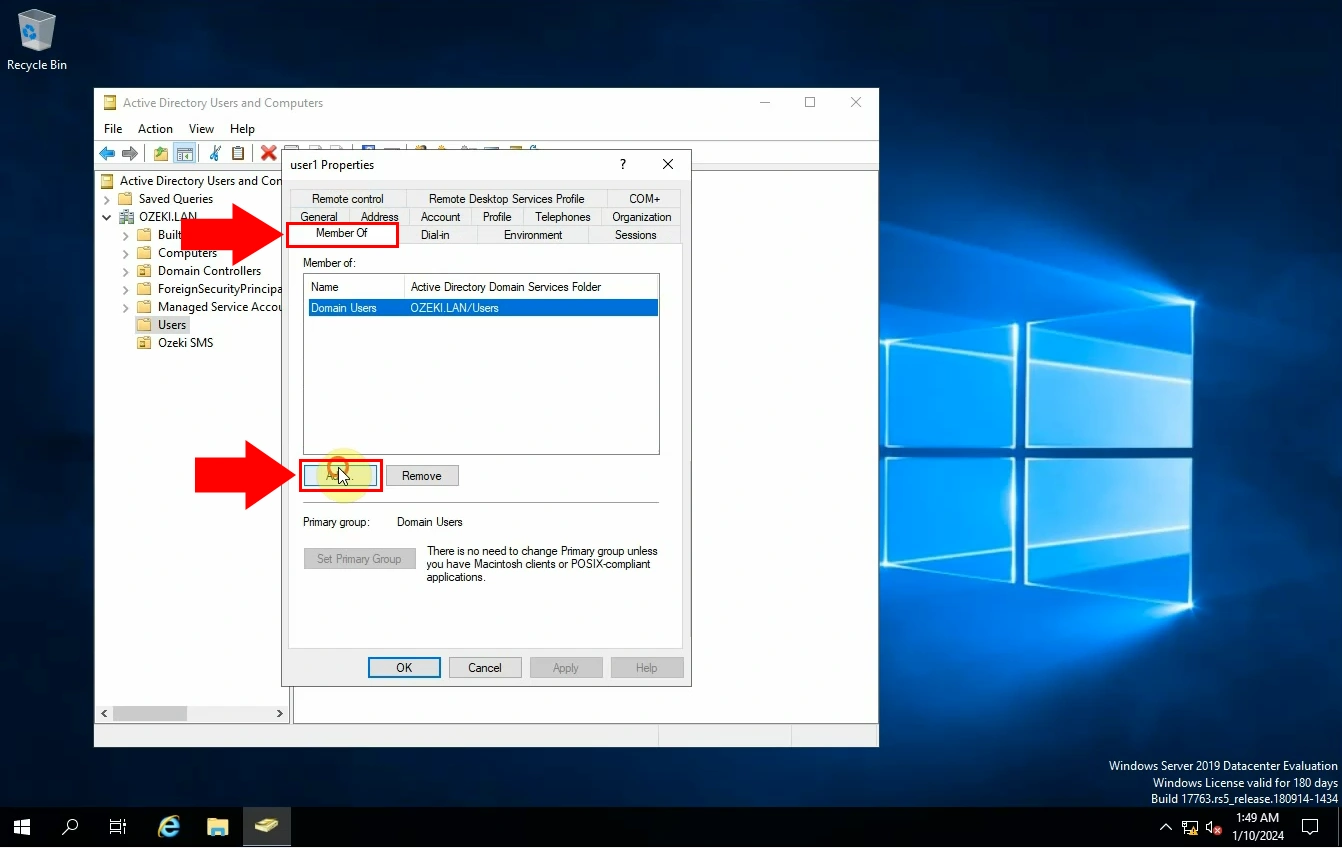
Within the properties window, select the 'Member of' tab, as we presented in the picture below (Figure 23). Click on 'Add...' to add user to group.
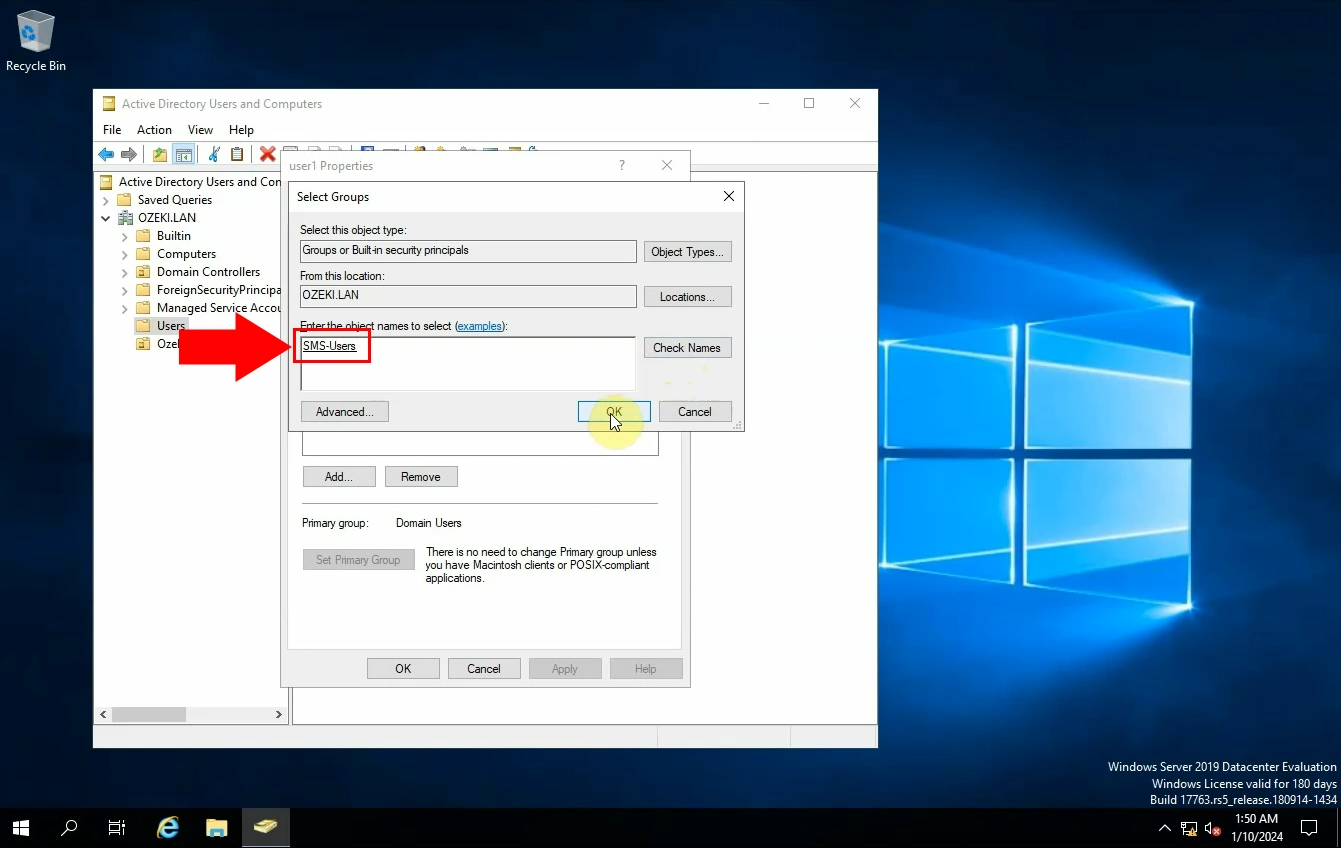
Now you have to select groups. Enter the object name to be able to select, then navigate to 'Check names' to see if you typed it in properly (Figure 24). Press the 'OK' button when you are ready.
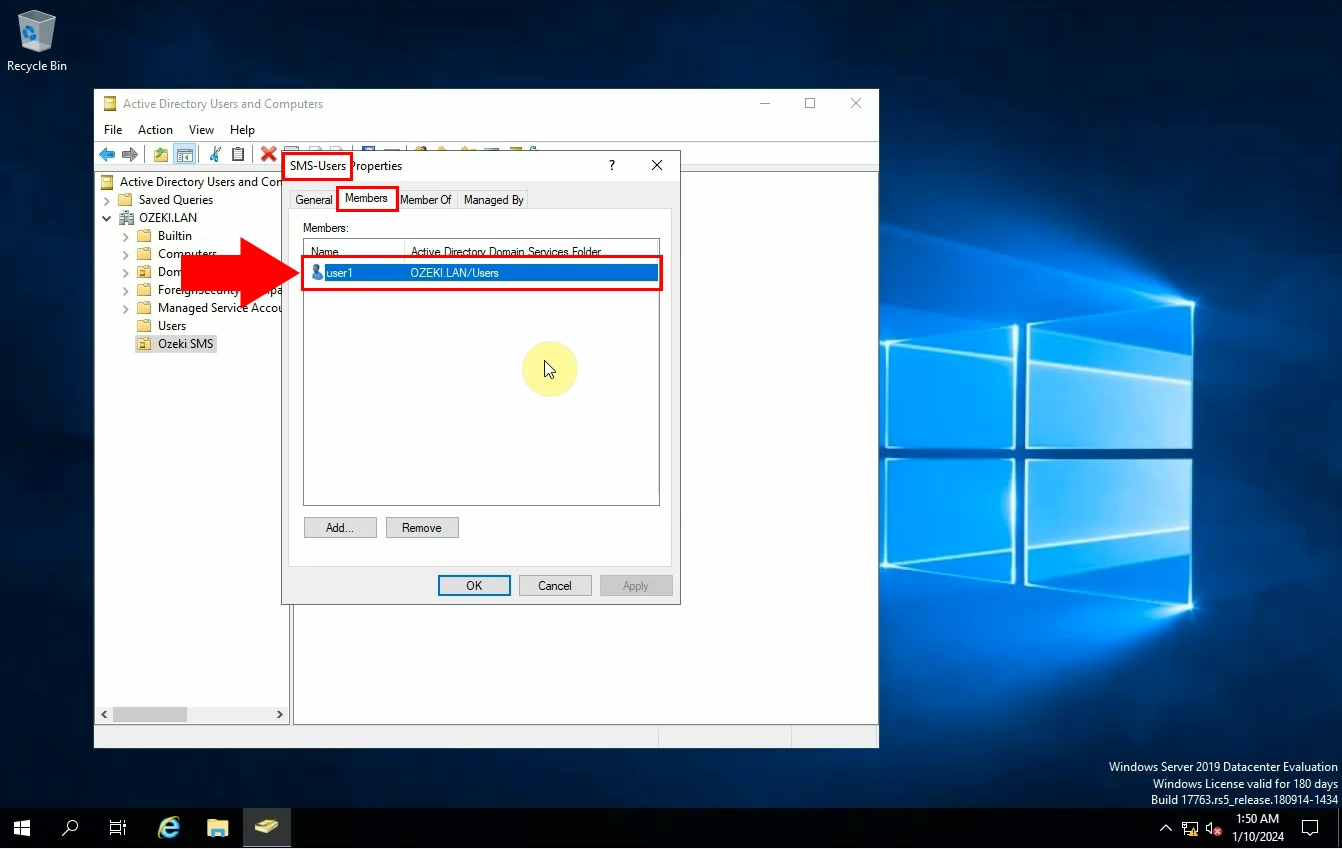
Open on of the properties you have just created. Go to the 'Members' tab and check group members (Figure 25).
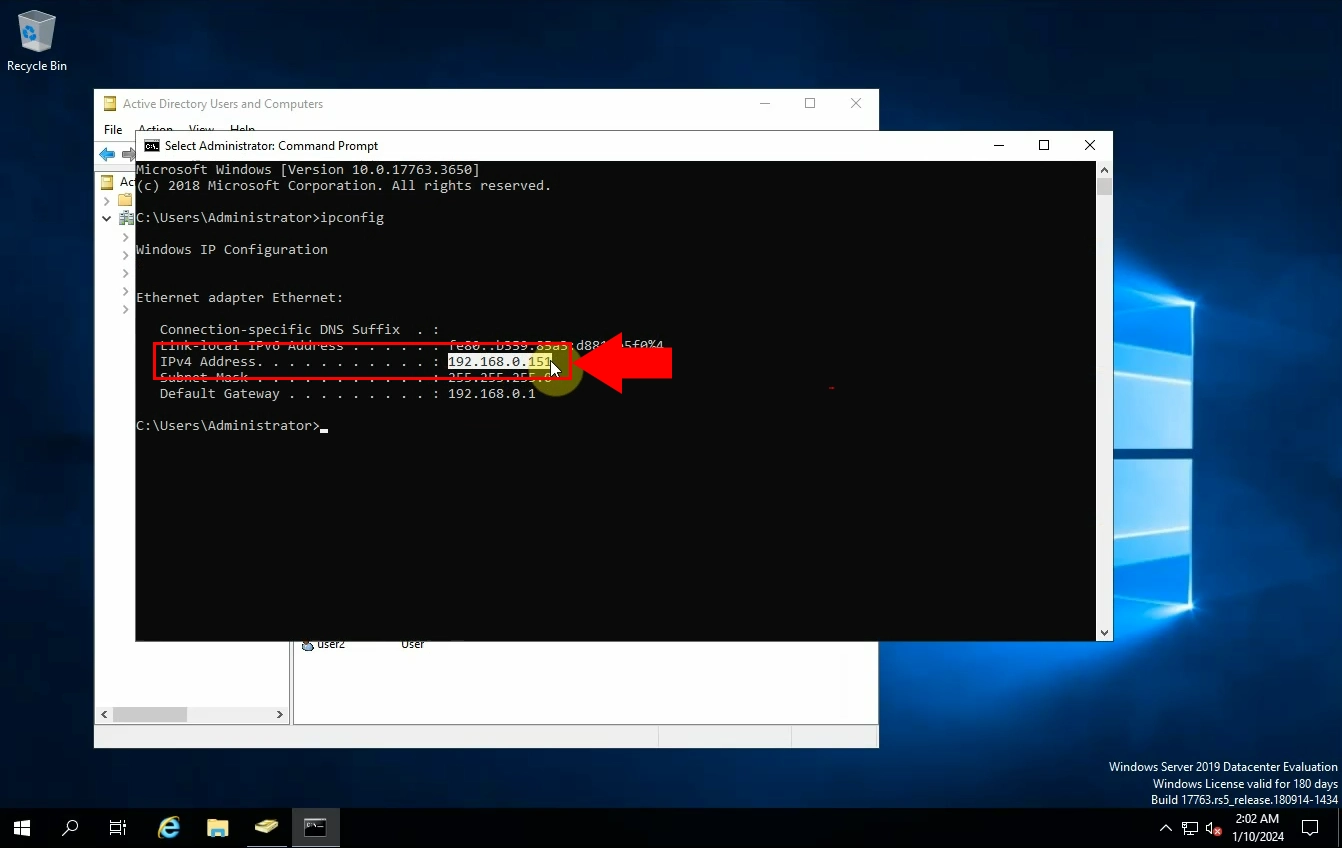
The last step is checking the server IP to make sure everything worked out well (Figure 26).
Summary
Active Directory is a network management system that stores information about network objects in a structured data store on Windows Server. It allows administrators to manage permissions and access to network resources. This guide explains how to set up MS Active Directory, create SMS user groups, and improve communication efficiency, organization, and security.
Configure SMS Gateway Authentication provider (Quick steps)
- Select the 'Advanced' option from the toolbar.
- Go to 'Authentication providers'
- Navigate to 'Create new Authentication provider'
- Add LDAP Authentication provider
- Configure Authentication provider
- Login as group member
- Make sure that the login was successful
- Login as not group member
- Login failed
Configure SMS Gateway Authentication provider (Video tutorial)
In this short video guide, we will walk you through the most important steps when it comes to configuring SMS Gateway Authentication provider. The tutorial starts with creating an LDAP Authentication provider and ends with successfully login in as a group member (Video 2). Authentication providers are important because they make sure only the right people or devices can use a system. They prevent unauthorized access and keep information safe, which is crucial for systems like SMS gateways to work securely and reliably.
Configure SMS Gateway Authentication provider (Step by step guide)
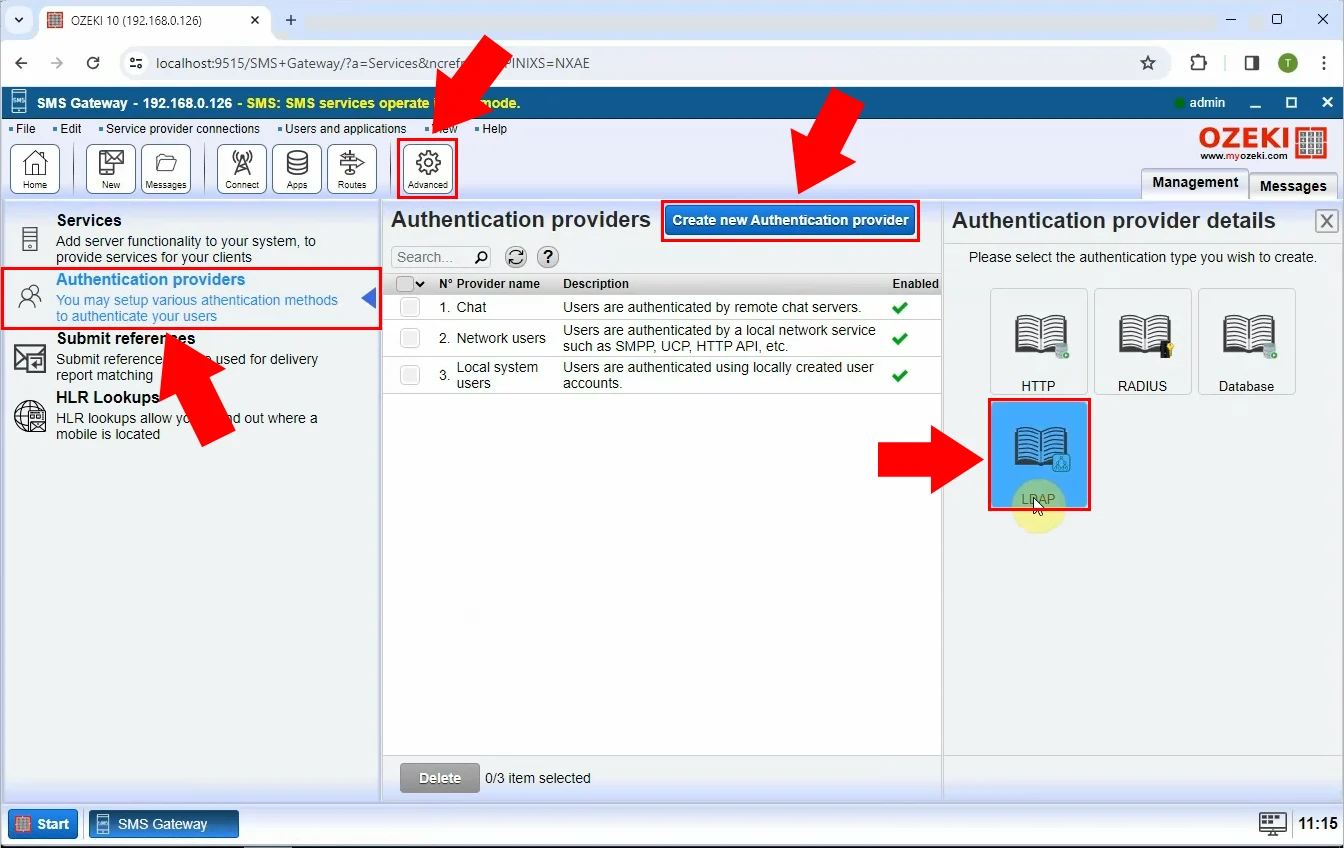
To begin the process, select the 'Advanced' option from the toolbar. To set a new Authentication provider choose the option 'Authentication providers' and then navigate to 'Create new Authentication provider'. You will be required to give out details and select the authentication type you wish to create. In this case choose the option 'LDAP' (Figure 27).
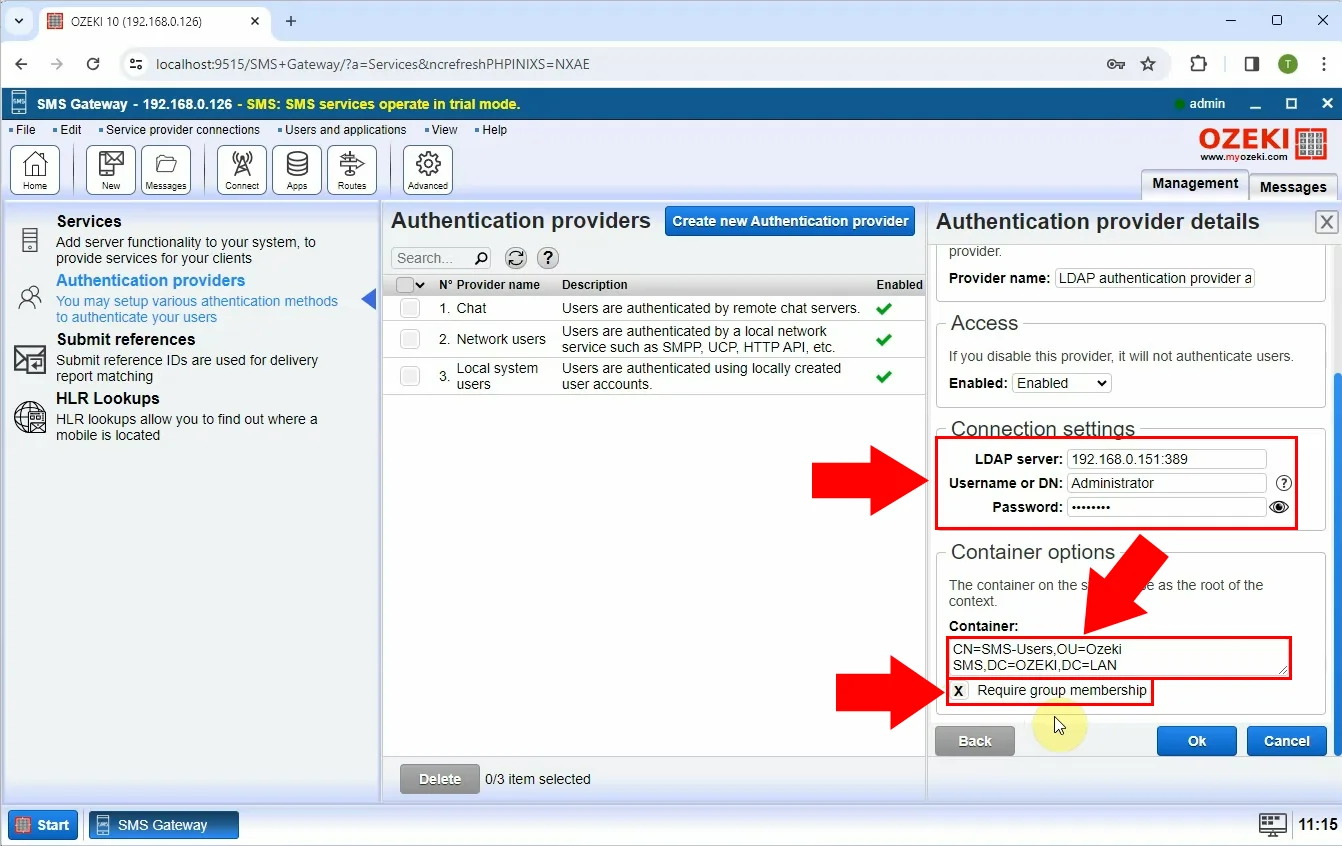
In this step you need to configure the Authentication provider. Set up the connection setting. You have to enter the LDAP server's number, the username or DN and password (Figure 28). Fill out the 'Container options' boy and tick the 'Require group membership' box.
Log out from the SMS Gateway and log back in as a group member, using the correct username and password combination (Figure 29).
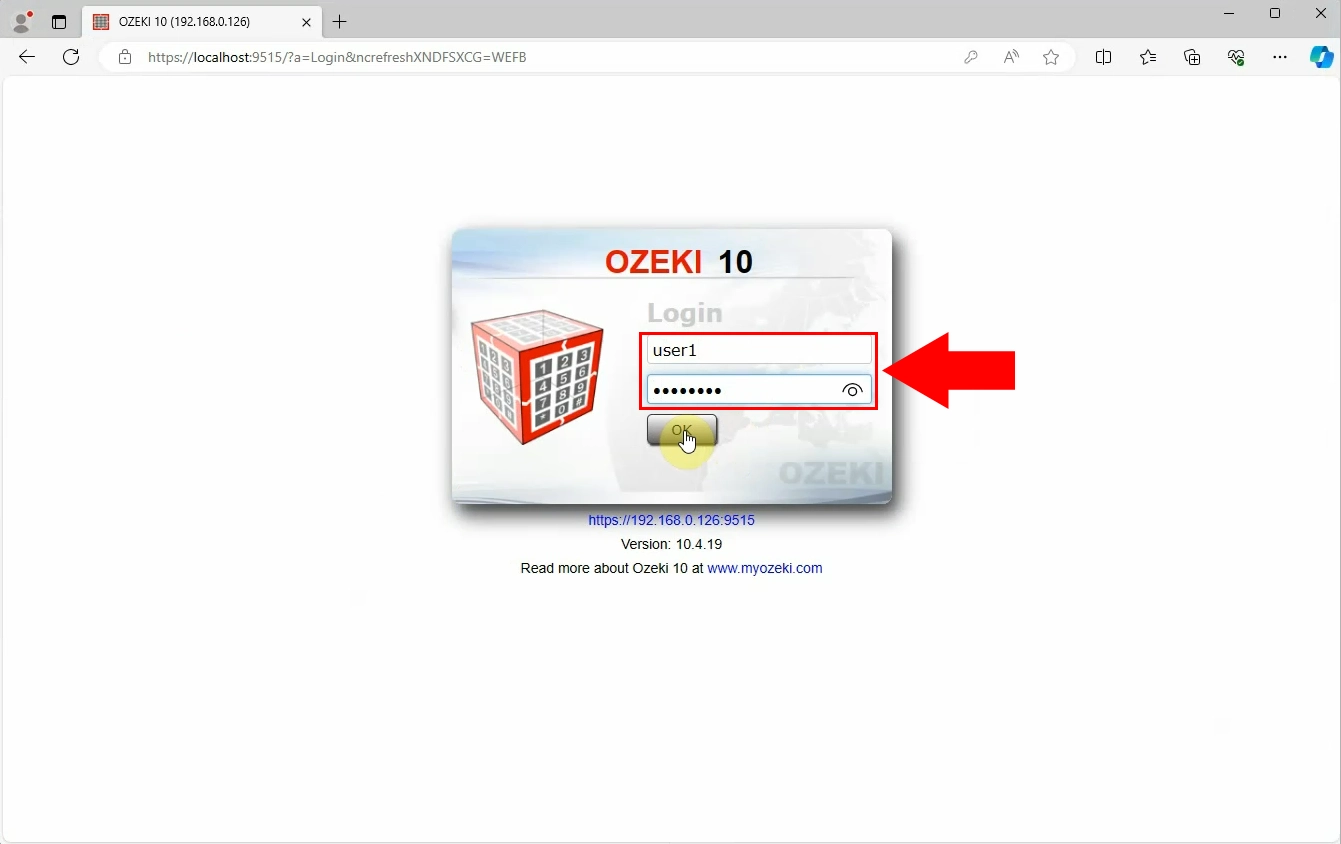
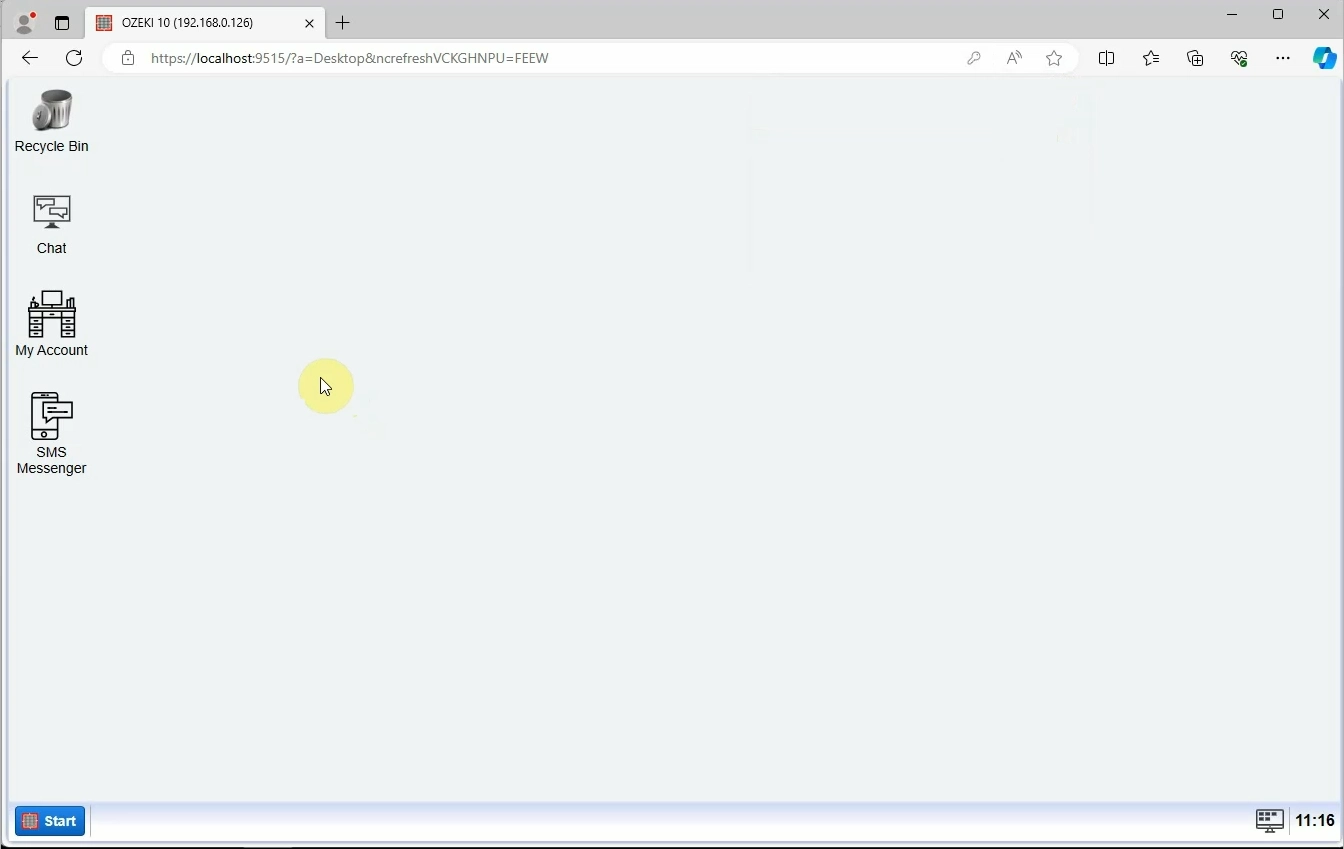
As you can see the login was successful as a group member (Figure 30).
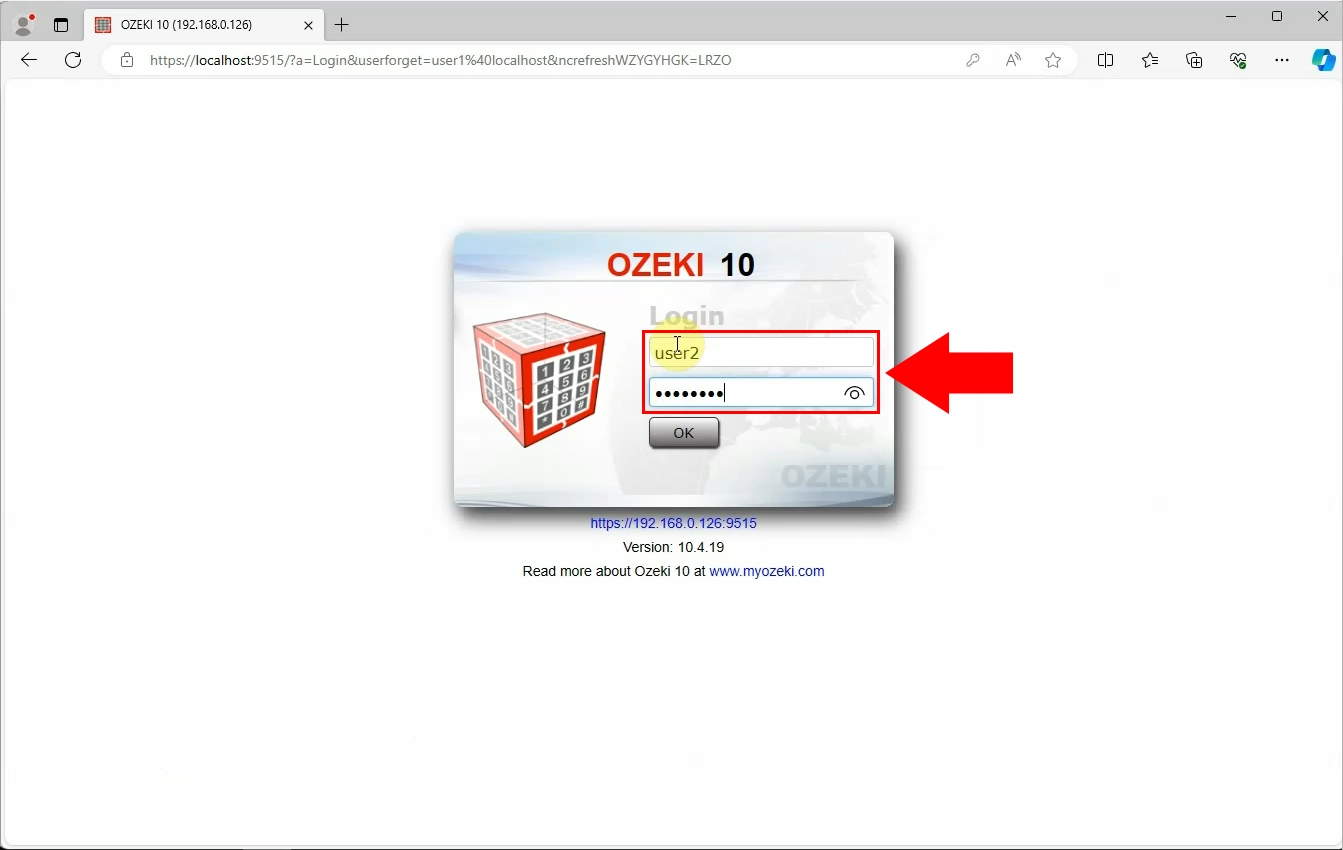
Now login as not a group member (Figure 31).
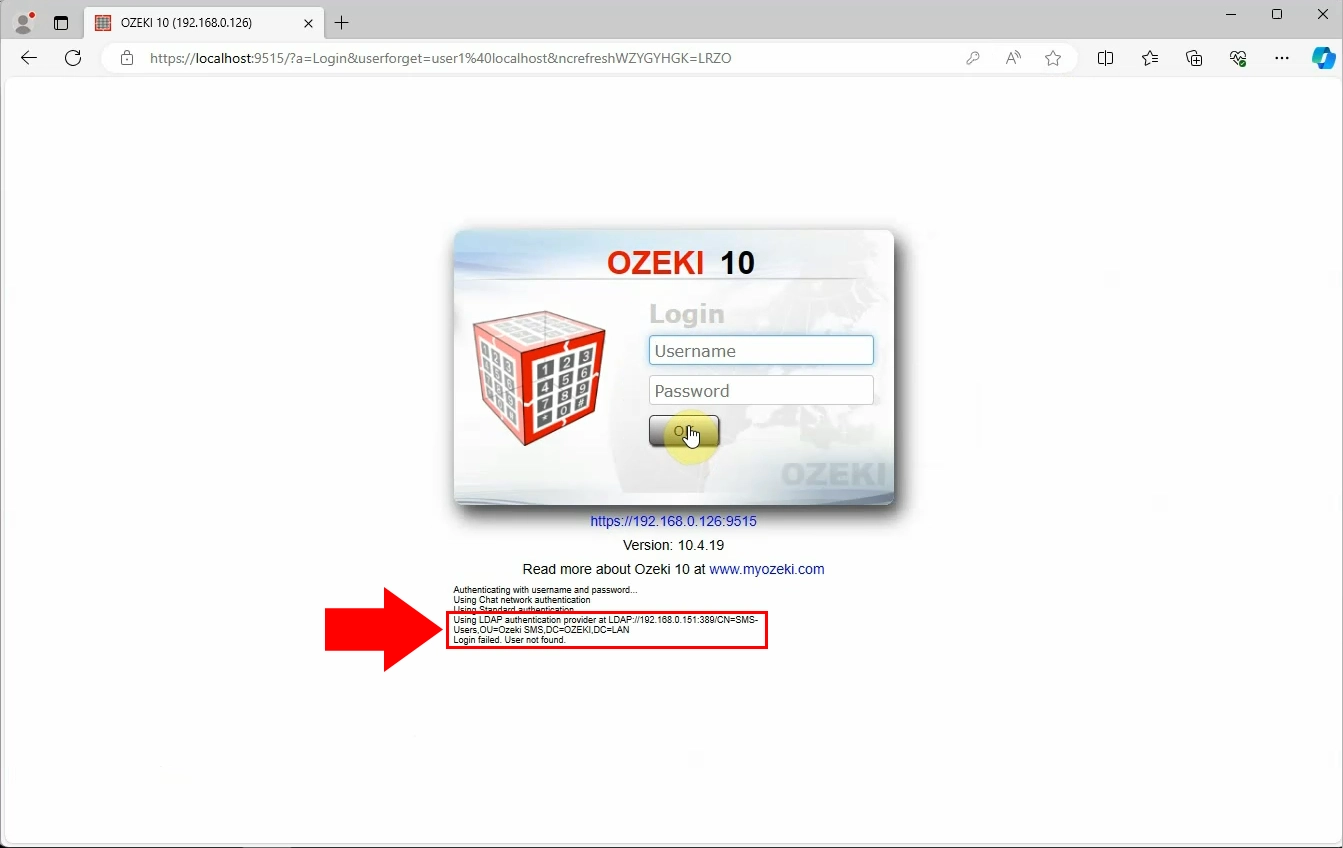
You will see that the login failed (Figure 32). It will be stated below as you can see it in the picture.
Summary
Authentication providers are essential as they verify user or device identity, ensuring only authorized access to systems or services. By preventing unauthorized entry and protecting data, they promote to the system security. This importance is mostly highlighted in SMS gateways, where ensuring secure message transmission relies heavily on maintaining strict access control measures. In essence, Authentication providers uphold system integrity, instilling confidence in reliability and security.
