How to download the latest C/Cpp SMS api library from Github
This article is about how you can make changes to the C/C++ SMS API, located on GitHub, from your computer. This solution will only take about 20 minutes to perform. You will learn how to install Git for linux. It will start with downloading and installing Git, and will end with the changes you made visible on GitHub. We assume that you are familiar with GitHub and C/C++. The video is easy to follow and detailed so you will have no problem understanding the process. Don’t waste any time! Let’s go!
How to download the C/C++ SMS API from GitHub (Quick steps)
To download the C/C++ SMS API from GitHub (Figure 1):
- Install Visual Studio Community
- Create a GitHub account
- Browse to github.com/ozekisms/cpp-send-sms-http-rest-ozeki
- Click Code to copy the link
- Clone the C/C++ SMS API using Github Desktop
- Open the Ozeki.Libs.Rest.Cpp.sln solution using Visual Studio
- Launch Ozeki SMS Gateway
- Run the C/C++ SMS API using the command prompt

Download Github Desktop (Figure 2)
To get the latest C/C++ SMS library, you have to download it from Github.
To do that, you will need a Github account, and the desktop version of Github.
In the following video I'm going to show you how to download the desktop version
of Github.
You might want to use this link:
https://desktop.github.com/ to download Github Desktop.

Install Github Desktop
In order to use Github Desktop we have to install it, and login into our
account. If you don't have an account yet, you can use the following link to
register:
https://github.com/join?source=login
In the following video I'm going to show to how to install Github Desktop
and how to login into your account.
Start the installer
If your browser finished downloading the installer, search for it in the downloads folder on your computer. Click it to start the installation process. It will be an application type file named GitHubDesktopSetup-x64. (Figure 3)

Load page of installer
After you started the installation process, you will be presented with the window visible on Figure 4. It means that the GitHub Desktop application is being installed on your computer. The application will launch as soon as this window disappear.

Sign in to GitHub Desktop
The next step is to sign in to the GitHub Desktop application. This will require the login credentials of your GitHub user account. Click the Sign in to GitHub.com button to reach the login window. If you have never used GitHub before, you can create a new user account on this page. Click the Create free account link located above the sign in button. It will take you to the new user account creating page. (Figure 5)

Provide username and password
The button will open a new browser window, where you need to log in (Figure 6). In this page, you need to use the username and password for your GitHub account. Type in both to the correct textbox and click the Sing in button to proceed to the next step.

Configure the Git
The Configure Git step will define what information will be visible as a commit detail. Check the Use my GitHub account name and email address checkbox (Figure 7). It means that the information from your GitHub will be used to identify the commits you create. It will be visible to any other GitHub user. Click the Finish button to confirm your settings.

Clone the cpp-send-sms-http-rest-ozeki repository (Figure 8)
After you have finished the installation you can go forward with the
cloning process.
In the following video I'm going to show you, how to clone the cpp-send-sms-http-rest-ozeki
repository from Github.
To clone the repository you might want to use this link:
https://github.com/ozekisms/cpp-send-sms-http-rest-ozeki
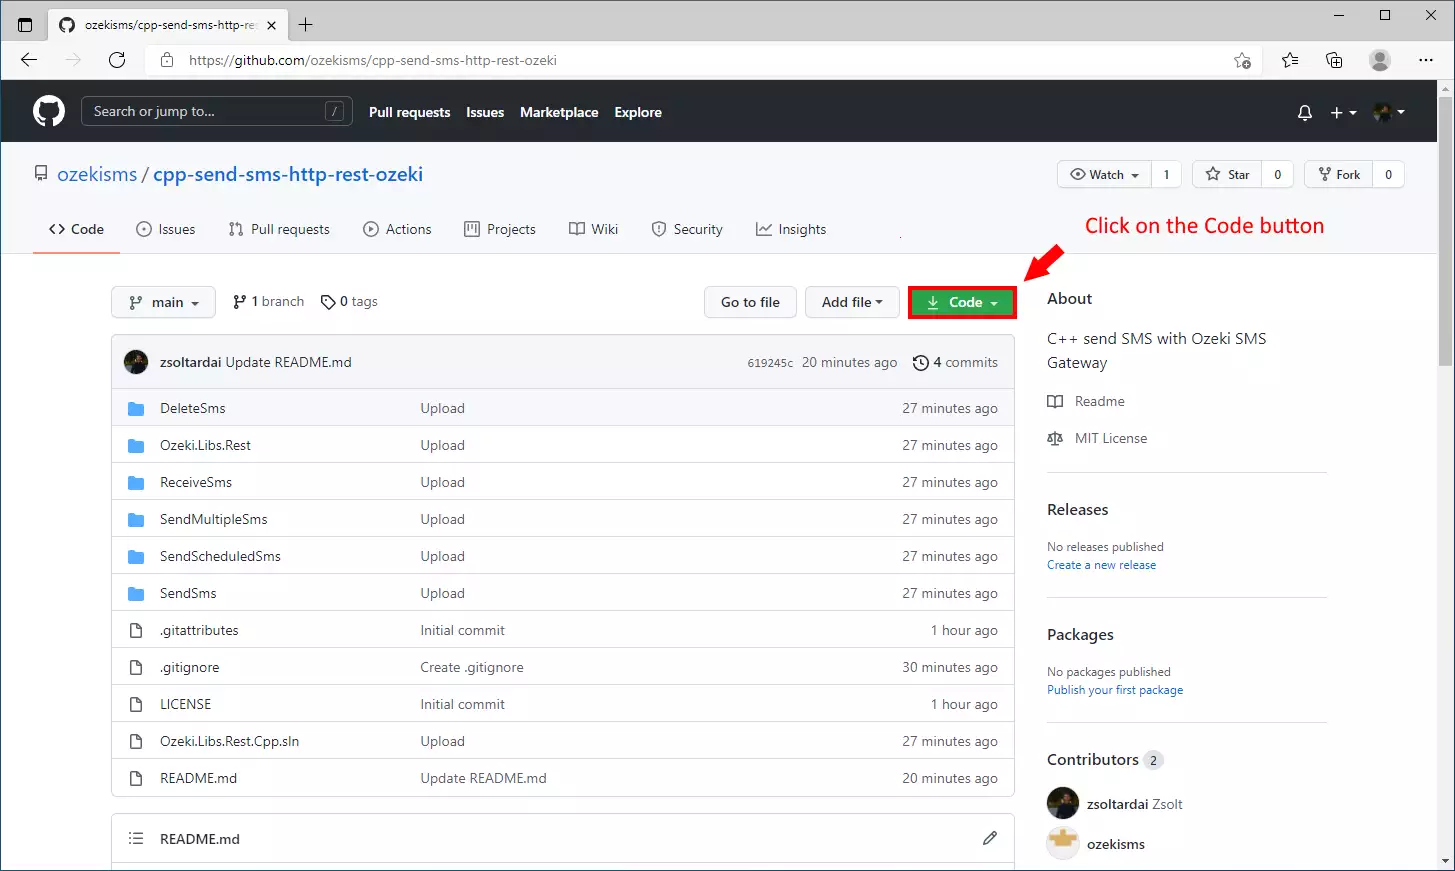
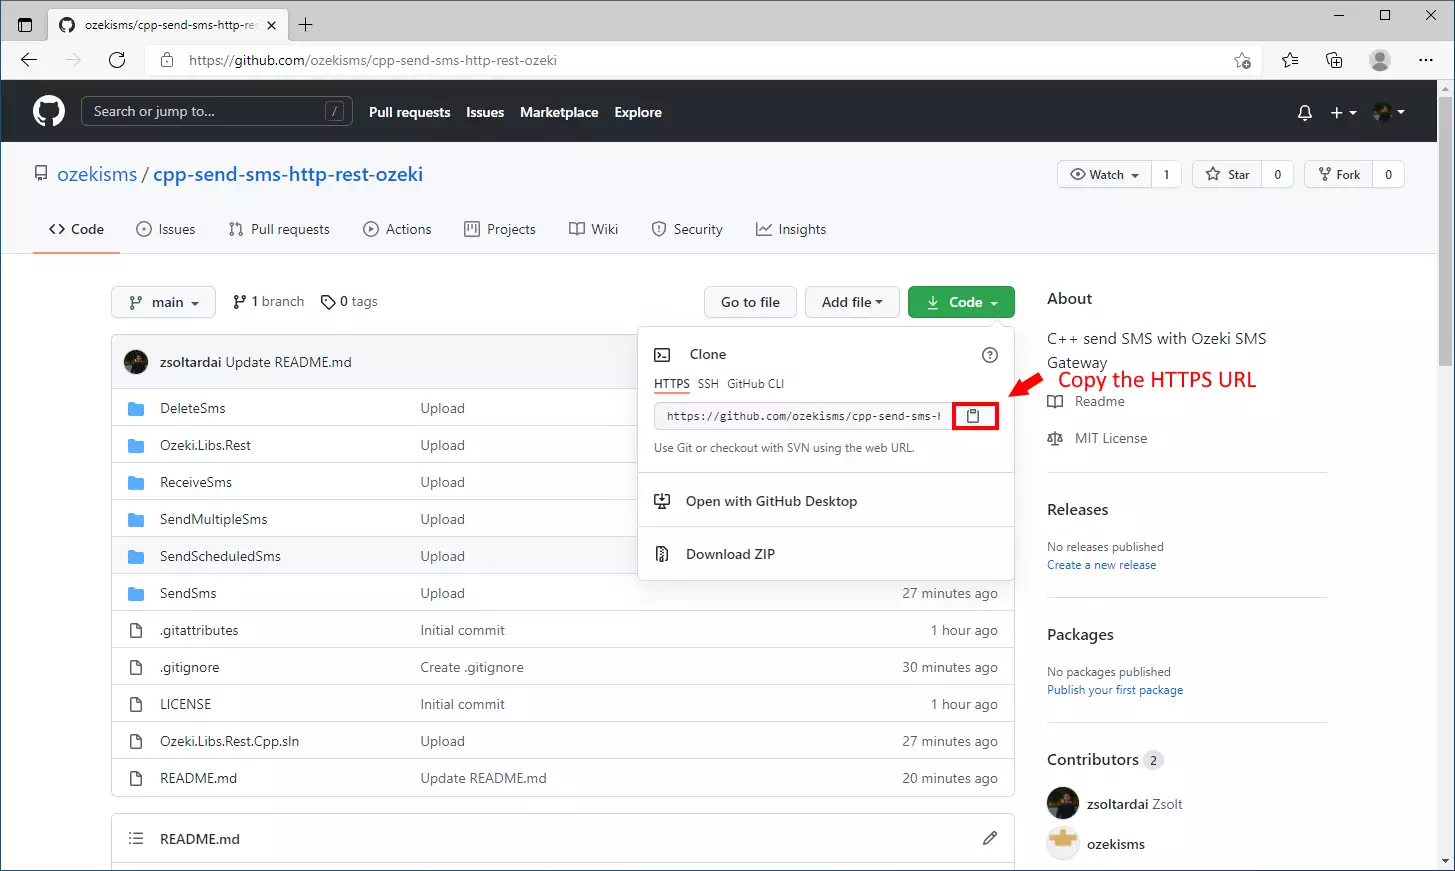
Press the copy button
In the code sub-menu, you can find the 'Copy' button next to the URL textbox (Figure 9). This button will store the URL in your clipboard, so you can paste it anywhere. The URL will be used to tell the GitHub desktop application, which repository we need to clone.
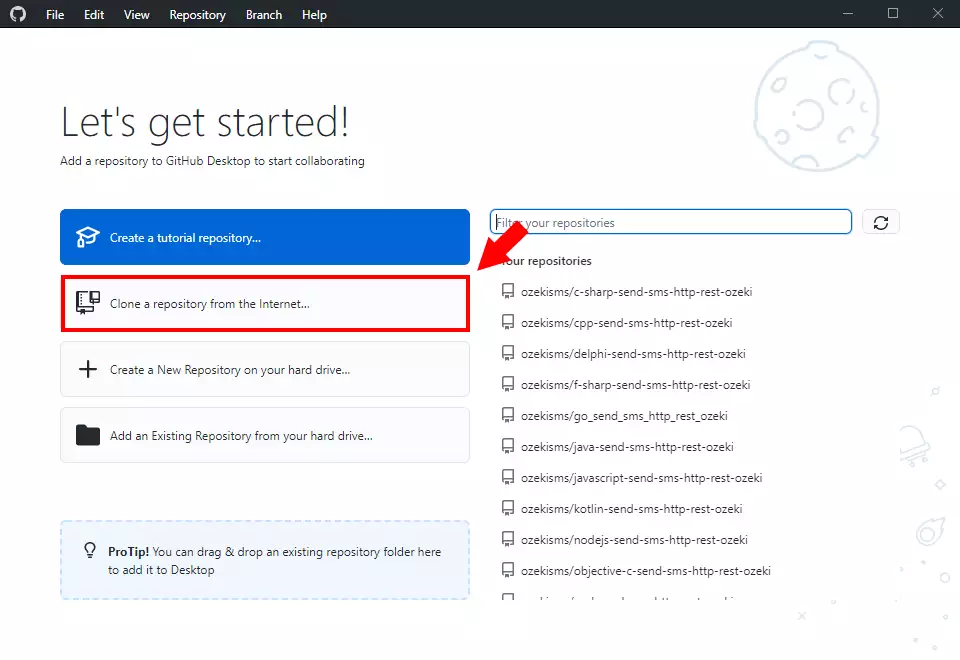
Choose the 'Clone a repository from the Internet...' option
In the next window, you will see your repository-creating options (Figure 10). Click the 'Clone a repository from the Internet...' item. It will open a window where you can provide the previously copied URL address. You can find this option under the tutorial repository button.
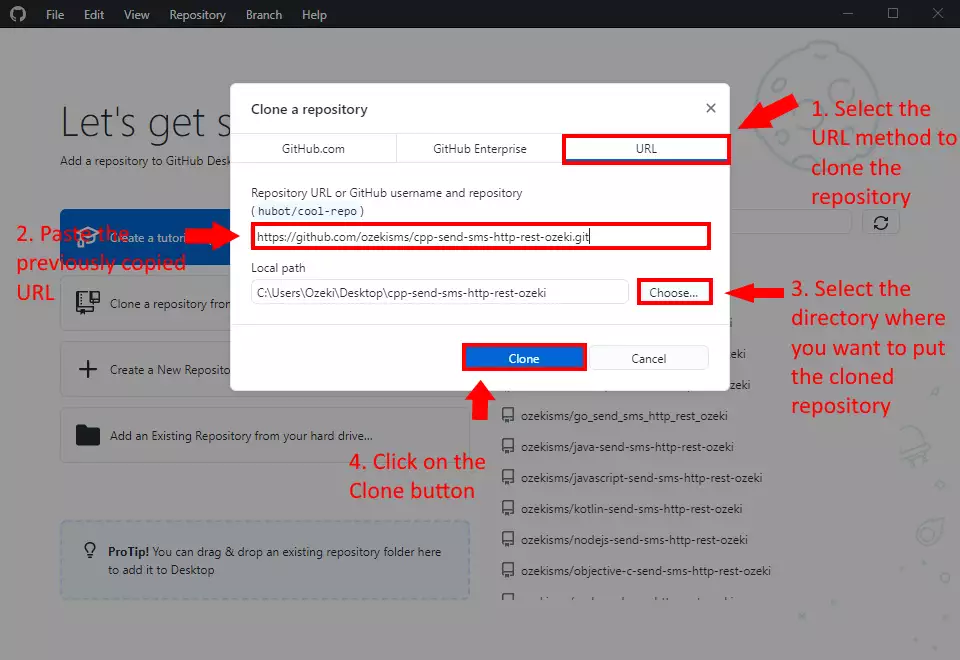
Paste in the URL
On Figure 11, you can see the setup part of the cloning process. First, you need to choose the cloning method. In this case, choose the URL option. Next, you need to paste the URL into the 'Repository URL' textbox. As the last step, choose a destination on your computer where the files should be downloaded. If you are finished with the steps, click the 'Clone' button. Now the GitHub downloads your files to the provided destination.
How to clone a repository (Video tutorial)
In this video, we are going to show you how to clone a repository. The video will start with visiting the repository you wish to clone in your browser and will take you all the way to having the data on your machine. You will learn how to get the URL of the repository and how to start the cloning process. The video is only 52 seconds long but it covers all the required actions you need to take to clone a repository.
How to use the repository
On Figure 12, you can see the downloaded files from the repository in the chosen destination. Now you can start using them locally on your computer. If you wish to update your repository without the need to download it again, you can use the git pull command.

To use the content of the cpp-send-sms-http-rest-ozeki repository, you will need
to install the Community version of Visual Studio 2019.
If you didn't install Visual Studio yet, here is a step by step guide about the
process: C/C SMS tutorial: Hello world
In the following video, I'm going to show you, how to install the Ozeki::Libs::Rest module
and use the example projects.
Why should you clone the repository?
The answer is easy, if you simply download the content of the
cpp-send-sms-http-rest-ozeki repository, you will have to download the
freshest version every time it gets updated. But if you clone
the repository, you can get the freshest version of it, by just
using the git pull command.
In the following video, I'll show you what happens if the content of the
repository got updated, and how you can get the freshest version.
Final thoughts
Now, you can take a rest. We hope this guide was as simple as hard we worked to give you the best. By following the above tutorial steps, you can create the solution in a short period of time. Now you can use the C/C++ SMS API to send SMS messages. If you have already completed the steps, you can enjoy a well-deserved latte or some other treat you have in mind. Let me mention that Ozeki SMS Gateway allows you to provide an SMS service to your customers, employees or business applications, and it can help you control the messaging activity of these users. If you would like to discover more valuable information about the benefits of other similar solutions, please open ozeki-sms-gateway.com. I hope this page will be useful to all the readers and especially to beginners.