Receive SMS in PHP
The following document is going to show how you can receive SMS messages with a web application or a website that uses PHP code. The PHP code initiates HTTP requests to the SMS Gateway to get the incoming messages. The code gets these messages as a response from the SMS Gateway, and then, you can use the messages in your web application.
What is a PHP SMS API?
The PHP SMS API ensures you to send SMS messages from a web application of a website. The API uses HTTP requests to communicate with the SMS Gateway that delivers the message and sends a response back.
Prerequisites
Receive SMS in PHP
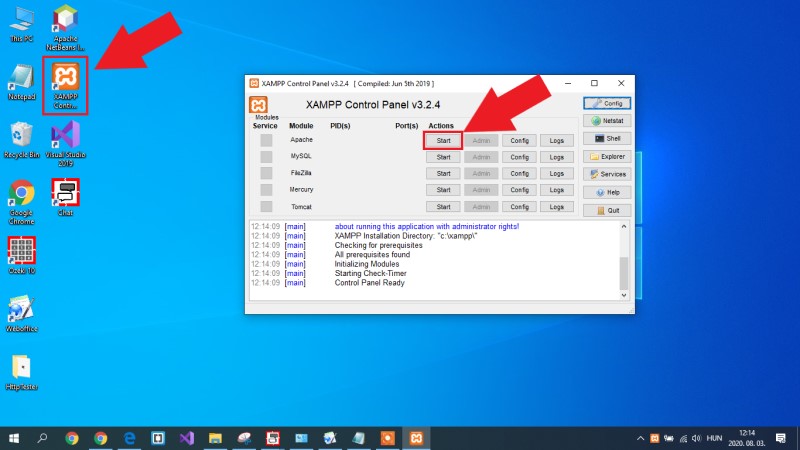
- Open XAMPP Control Panel
- Start Apache service
- Open Notepad
- Copy-Paste the PHP source code below
- Save the file to the xampp/htmldocs folder as index.php
- Open SMS Gateway and select HTTP Server connection
- Send some test messages
- Type 'localhost' in your browser to run the PHP code
The PHP example code below can get the received messages from the SMS Gateway. This code is free to use in your web application or website, and you can modify it if you want to. The step-by-step guide below and the video on this page shows how you can use the example code, if you would like to just run the PHP code on your computer and test the solution.
<!DOCTYPE html>
<html>
<head>
    <title>Http Request sending</title>
</head>
<body>
    <?php
        $username = "john";
        $password = "Xc3ffs";
        $httpUrl = "https://127.0.0.1:9508/";
        $folder = "inbox";
        $limit = "3";

        $sendString = $httpUrl."api?action=receivemessage&username="
                     .$username."&password=".$password."&folder="
                     .$folder."&limit=".$limit
                     ."&messagedata=&afterdownload=delete";

        echo '<p><b> Sending html request:</b> '.$sendString.'</p>';
        $aContext = array(
            'http' => array(
                'method'  => 'GET',
            ),
            'ssl' => array(
                'verify_peer' => false,
                'verify_peer_name' => false,
            )
        );
        $cxContext = stream_context_create($aContext);
        $response = file_get_contents($sendString, true, $cxContext);

        echo '<p><b> Http response received :</b> </p>';
        DisplayMessages($response);


        function DisplayMessages($response){
            $xml = simplexml_load_string($response);
            if($xml -> data -> message == "No more messages."){
                echo '<p><b>The inbox is empty</b></p>';
                return;
            }

            foreach ($xml -> data -> message as $value) {
                $sender  = $value -> originator;
                $text = $value -> messagedata;
                DisplayMessage($sender, $text);
            }
        }

        function DisplayMessage($sender, $text){
            echo '<p><b>'.$sender.': '.$text.'</b></p>';
        }
    ?>
</body>
</html>
Step 1 - Open XAMPP Control Panel
The first step of the guide is to set up an Apache server on your computer which is capable of executing PHP codes. These localhost servers can we set up easily using XAMPP. If you haven't got this application yet, check the Prerequisites section on this page to download it. If you have already installed it on your computer, you just need to open the XAMPP Control Panel as you can see it in Figure 1. Here, you need to start the Apache service.
Step 2 - Copy PHP code from this page
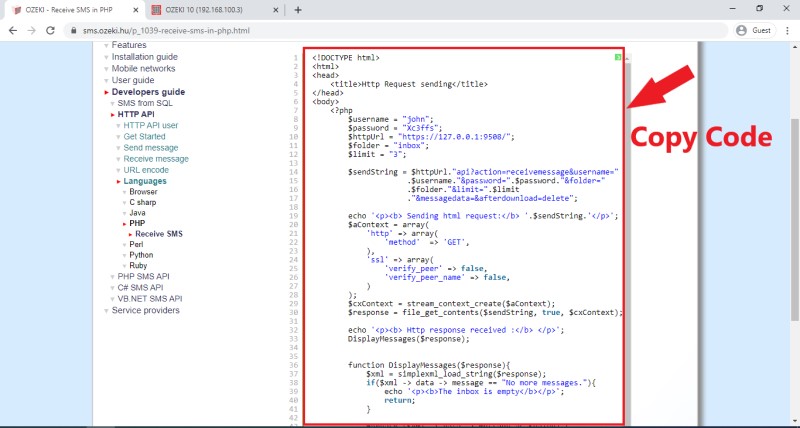
The next step of this guide is to get the code from this page to use it in your solution. For that, just go to the example code on this page, and mark out whole source code. Then, press Ctrl+C on your keyboard as you can see it in Figure 2 to copy the code to your clipboard.
Step 3 - Paste the code into a text document
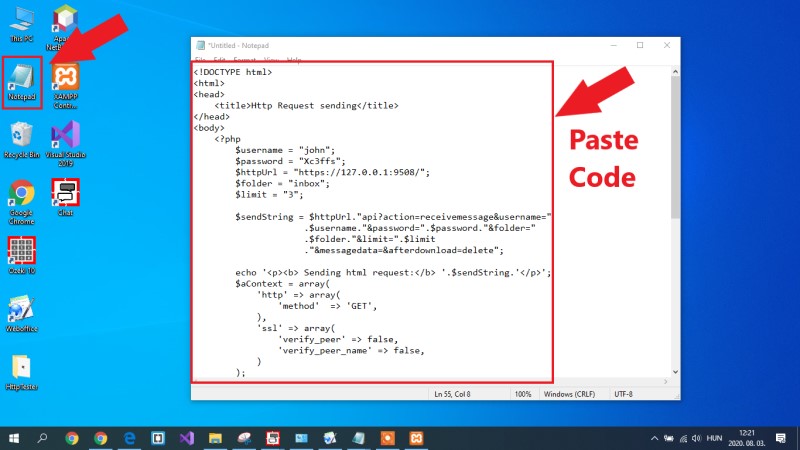
To run the code on your local server, you need a file that contains the PHP code. So, open the Notepad application and create a new text file. Here, just press Ctrl+V on your keyboard to paste the source code into that text document as Figure 3 demonstrates it. Lastly, you need to save the file to the xampp/htdocs folder and name the file as 'index.php' to be able to run it from your local server.
Step 4 - Send some test messages
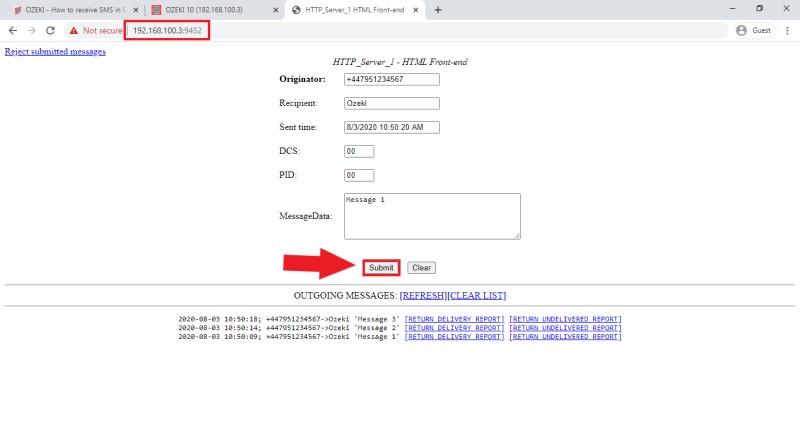
Now, your example code is up and ready to run, but first, you need to have some messages in your inbox folder. For testing purposes, you can use the HTTP Server connection to send some test messages to yourself and test the PHP example code. So, open the SMS Gateway and select the HTTP Server connection. Here, open the HTML form of the connection, and like in Figure 4, send some messages to the 'Ozeki' recipient.
Step 5 - Run the PHP code
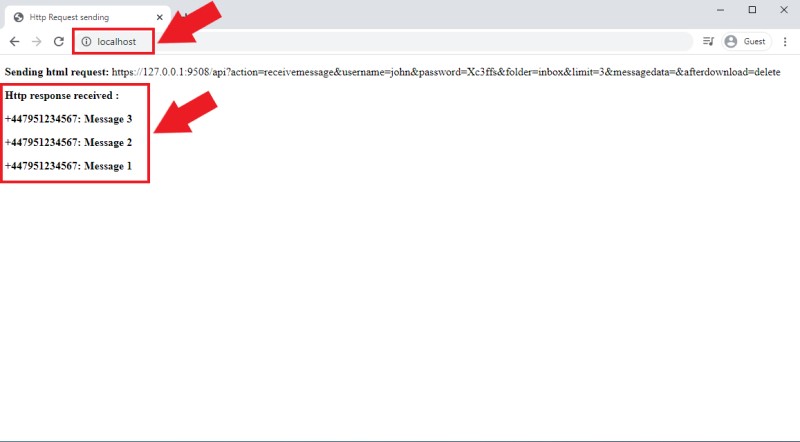
The last step is to test your solution and the PHP code. To do that, open your web browser, and type 'localhost' as an address as you can see it in Figure 5. If you press Enter, the PHP example code executes, and you will be able to see the result in the browser. This shows the HTTP request that was sent to the SMS Gateway and the response message that lists all SMS received by the SMS Gateway with the phone number of the sender and the text of the message as well.
Summary
In this article, you will be learning about how you can receive SMS messages using a PHP SMS API. Using the Ozeki SMS Gateway with the help of an API means that you can manage it gateway using PHP requests.
It is a good idea to check out the Ozeki articles, so you can know more about the communication system that Ozeki offers. To learn more about how you can utilize the Ozeki SMS Gateway, feel free to explore the articles on the website such as: “How to schedule messages with PHP” and “how to send SMS messages with C#”.
To create your first high performance SMS gateway system, now is the best time to download Ozeki SMS Gateway!
