Queue overload in high performance systems
This document gives you information about Queue overload. You will learn what it is, when does it happen and how you can prevent it, and what happens if you don't do anything about it.
What is queue overload?
Working with small datasets is always faster than working with large amounts of data. In order to operate a high performance system, the Ozeki Message Engine limits the amount of data in message queues to 4000 messages.
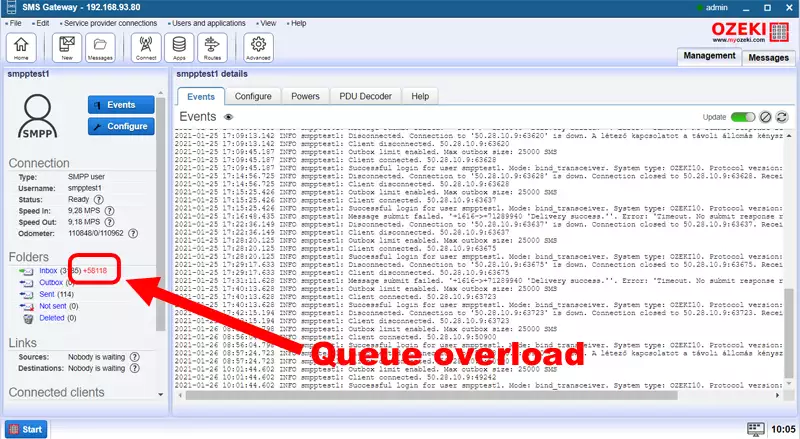
To keep the working datasets small, if more than 4000 messages are added to a queue, the extra messages are saved in a secondary queue for future processing. In this case you will see a red label next to the folder on the GUI (Figure 1). We call this scenario Queue overload.
If you are familiar with hardware technologies, you are probably know a similar term called caching. CPUs operate a small fast memory called cache and use the main mamory called RAM as the storage for future processing. It is the same concept.
Do I have to worry about queue overload?
The short answer is no. When the primary queue of 4000 is processed, the system picks up the next batch for processing from the secondary queue.
Why do I have so many messages in the Queue?
If there is a system, where the incoming capacity is higher than the outgoing capacity, you will have to store messages until the outgoing capacity for sending becomes available. If the incoming messages come in bursts they can be stored in a queue for future delivery. Note, that if the number of incoming messages is always greater than the number of messages your system can deliver, your system will sooner or later must drop messages, and report them as undeliverable to the sender.
Is there a way for me to increase outgoing capacity?
Yes. It is a good idea to disable functionality that you don't need. For example logging takes up a lot of resources. For high capacity systems it is not a good idea to maintain large log files, because your system's hard drive (even if it is a fast SSD) is slow. If you write a lot of data to the disk it will slow down the performance. I recommend you to simply disable logging in the connection's configuration form in the advanced tabpage (Figure 2).

Conclusion
Understanding and managing queue congestion is key to maintaining high-performance SMS gateway operations. Ozeki’s system efficiently handles queued messages, and optimizing the configuration by disabling unnecessary features such as logging can significantly improve throughput and prevent potential message loss. By monitoring your queues and implementing these best practices, you can ensure continuous and reliable SMS delivery. The Ozeki Diagnostics system monitoring tool helps you monitor your SMS Gateway. Ozeki Diagnostics provides in-depth monitoring and optimization of Ozeki SMS Gateway system resources. It allows for the detection of bottlenecks, identification of performance issues, and proactive measures to ensure smooth operation.