Kotlin tutorial: Hello world
This tutorial helps you get started with Kotlin, and Android development. It explains what you need to write your first Kotlin program, from where to download the tools need, how to install these tools and how to write your first 'Hello world' program. If you have never written a Kotlin program before this is the place to start. We have created this article, so you can get started with Kotlin, and move on to our SMS examples. If you are already familiar with Kotlin, you can jump directly to one of the following SMS examples.
Kotlin sms examples:
Kotlin send sms with the HTTP rest api (code sample)
Kotlin send multiple sms with the HTTP rest api (code sample)
Kotlin schedule sms with the HTTP rest api (code sample)
Kotlin receive sms with the HTTP rest api (code sample)
Kotlin delete sms with the HTTP rest api (code sample)
Download the latest Kotlin sms api library from Github
What is Kotlin
Kotlin is a cross-platform programming language. It is similar to a natural language, like English. It is used to talk to a computer. The major difference between a natural language and a programming language is that programming languages have a more rigorous structure, to help the computer understand it better.
What is a Kotlin Hello world program?
A hello world program is the simplest program you can write. It simply prints out the sentence: Hello world on the computer screen. The Hello World program is the first program developers write in any programming language.
Write your first program in Kotlin
To write your first program in Kotlin:
- Setup Android Studio
- Create a new Android Studio project
- Switch to Code view
- Write the Hello World program in Kotlin
- Run the application
- Check the output
- Test the button
- Fix errors if needed
Prerequisites
Here is what you need to get started. To write your first computer program in Kotlin, you need a Windows computer, Android Studio, an Android emulator, and the example code presented below.
- Windows 10 computer
- Android Studio
- Android emulator
- Ozeki Hello World example project
Download Android Studio
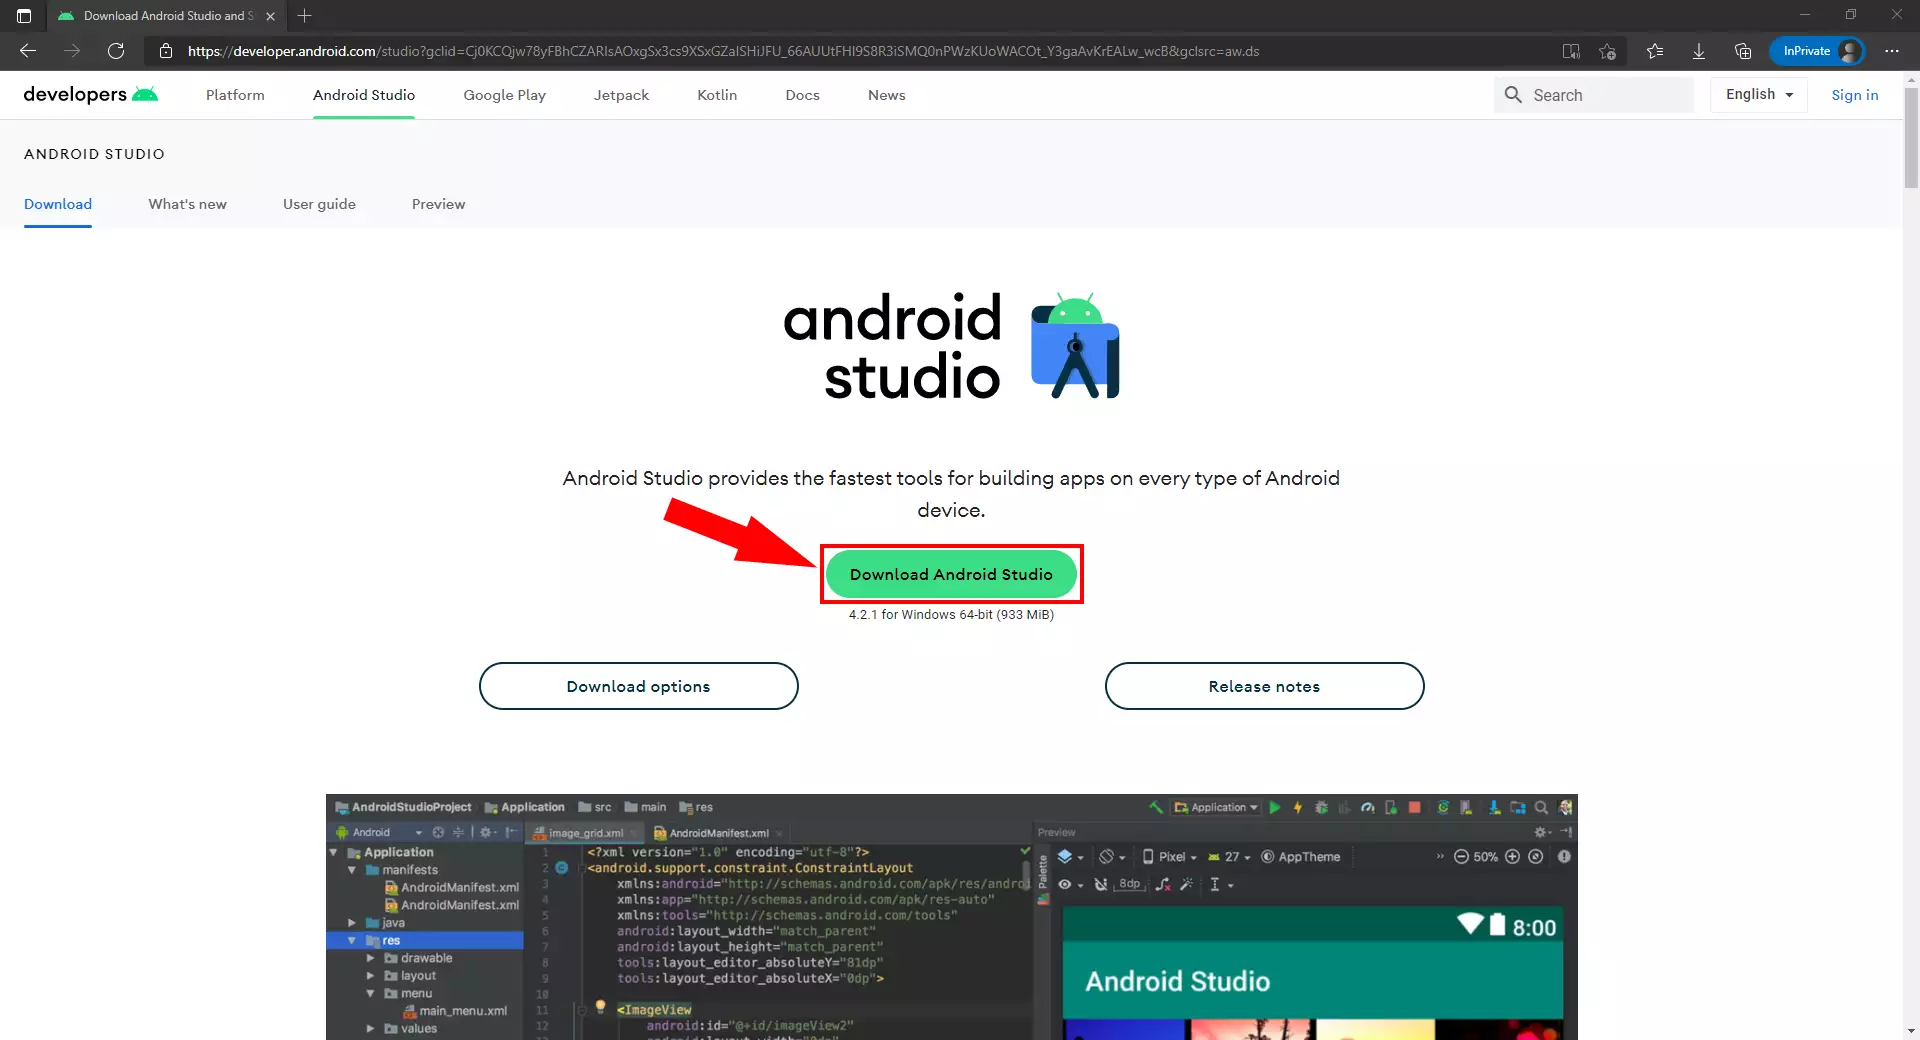
Get started with coding in Kotlin by downloading Android Studio (Video 1). To download the Android Studio installer, you may use this link: https://developer.android.com/studio.
Download Android Studio
To start programming in Kotlin you first need to download Android studio. Download the Android Studio installer by going to their website: https://developer.android.com/studio. Click on the green Download Android Studio button to start downloading the installer to your computer (Figure 1).
Install Android Studio
After the successful download, we can continue by installing Android Studio. This video shows the installation process in its entirety, so you could follow the steps to complete it successfully (Video 2).
Creating our first project in Android Studio
To write our first 'hello world' application, we have to create a new project in Android Studio (Video 3).
Writing our 'hello world' program
In this example, we are going to write a program that will
replace the default 'Hello World!' text in the TextView element.
To do that we will need to give the TextView element an id, and we have to
add a Button element to the layout.
activity_main.xml
<?xml version="1.0" encoding="utf-8"?>
<androidx.constraintlayout.widget.ConstraintLayout xmlns:android="http://schemas.android.com/apk/res/android"
    xmlns:app="http://schemas.android.com/apk/res-auto"
    xmlns:tools="http://schemas.android.com/tools"
    android:layout_width="match_parent"
    android:layout_height="match_parent"
    tools:context=".MainActivity">

    <TextView
        android:id="@+id/text"
        android:layout_width="wrap_content"
        android:layout_height="wrap_content"
        android:text="Hello World!"
        app:layout_constraintBottom_toBottomOf="parent"
        app:layout_constraintLeft_toLeftOf="parent"
        app:layout_constraintRight_toRightOf="parent"
        app:layout_constraintTop_toTopOf="parent" />

    <Button
        android:id="@+id/buttonToReplaceText"
        android:layout_width="wrap_content"
        android:layout_height="wrap_content"
        android:layout_marginStart="158dp"
        android:layout_marginLeft="158dp"
        android:layout_marginTop="391dp"
        android:text="Button"
        app:layout_constraintStart_toStartOf="parent"
        app:layout_constraintTop_toTopOf="parent" />

</androidx.constraintlayout.widget.ConstraintLayout>
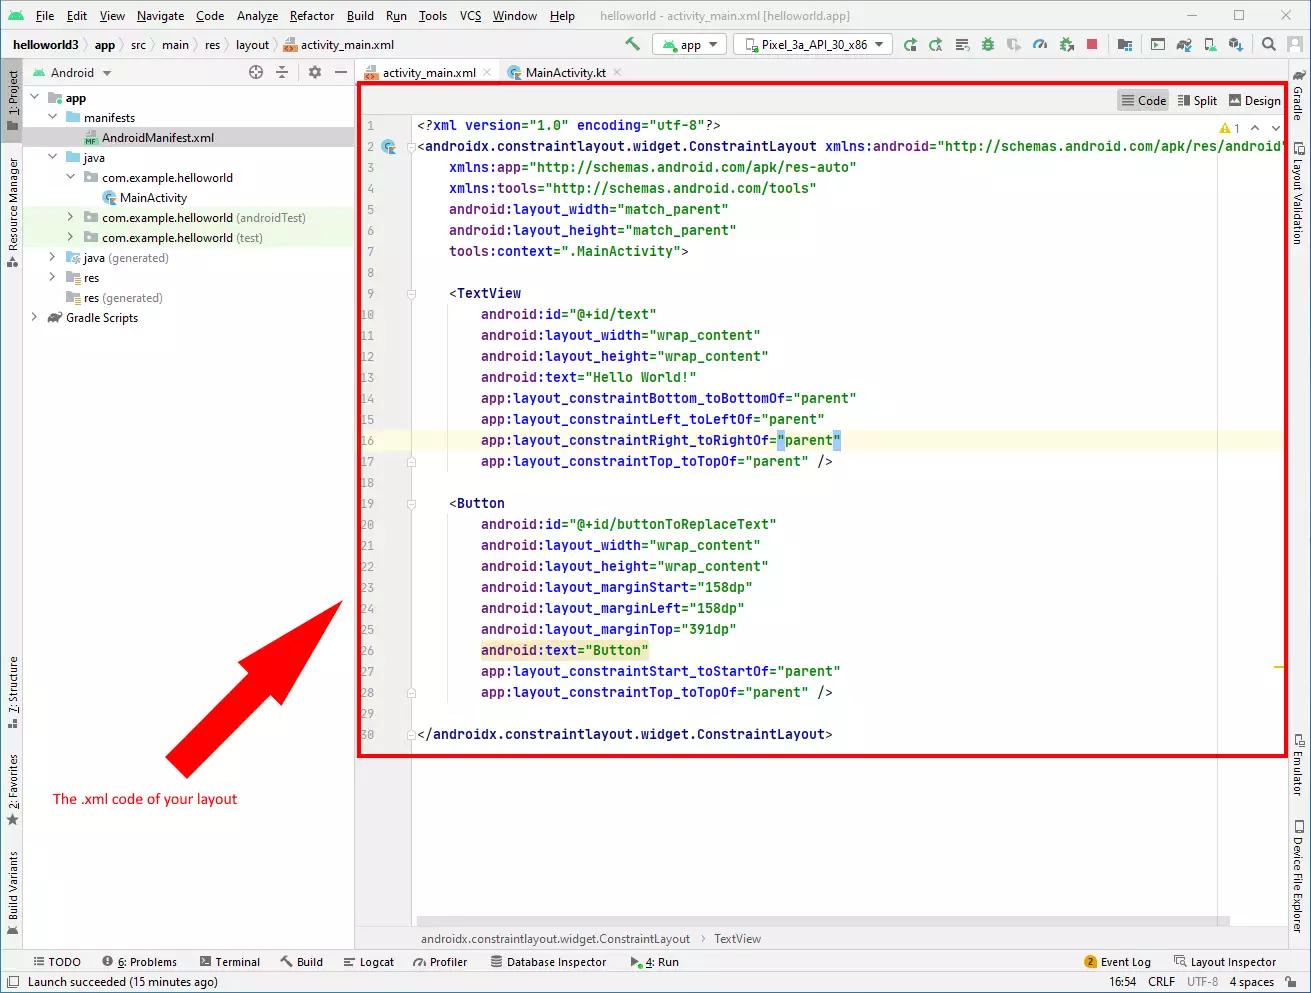
Tip: You can watch the .xml version of your layout by clicking on the code button in the main_activity.xml file. (Figure 3)
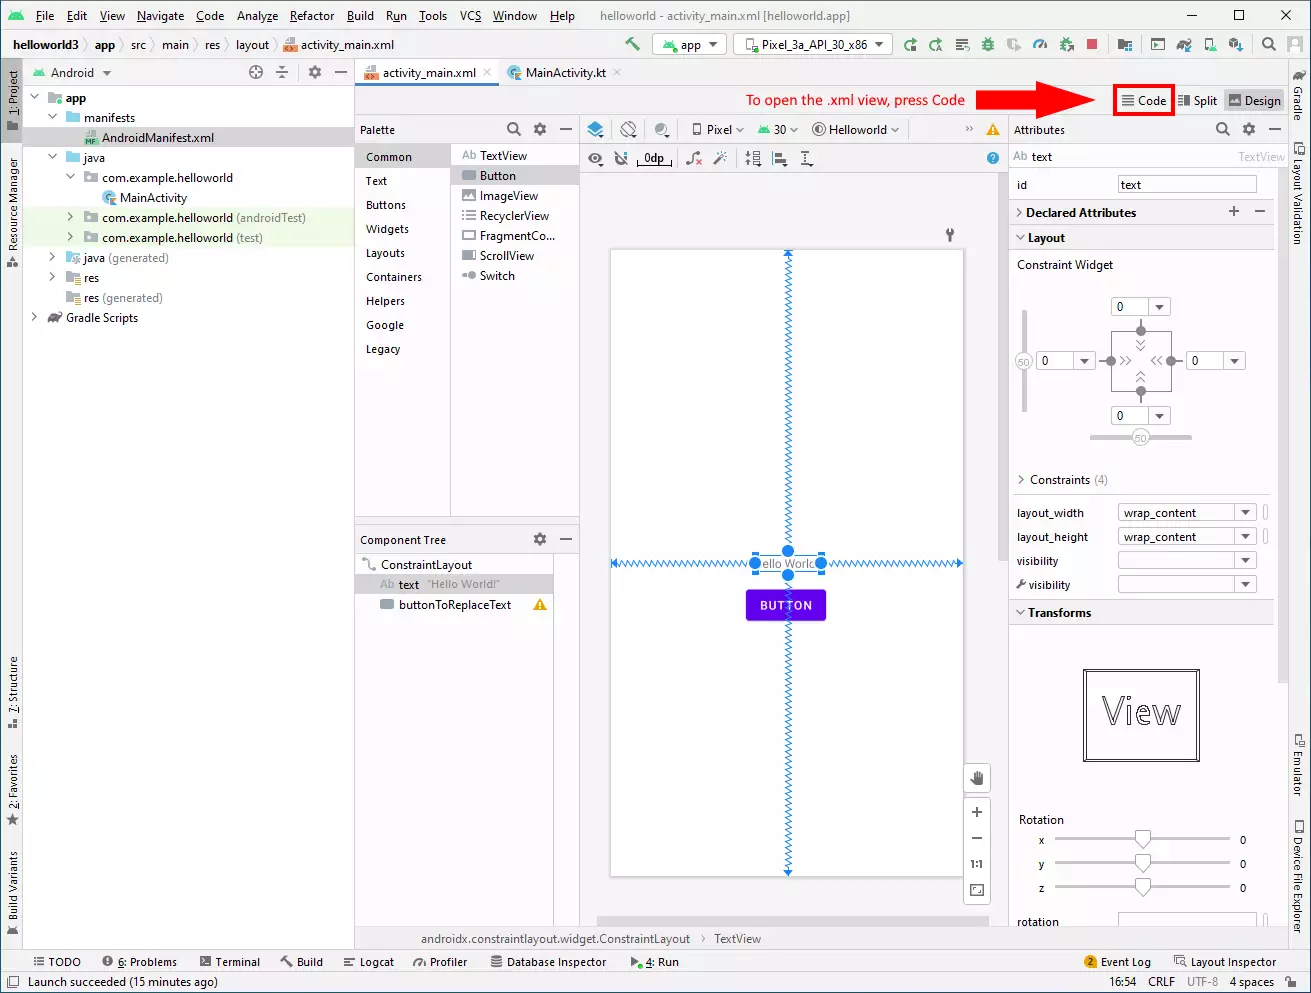
Design view
After successfully creating and opening a project in Android Studio, you will find yourself in the design view. Here we can place graphical elements and design the visuals of our application. To head over to the code of your app, you need to open the .xml view. Do this by clicking on the Code button on the top right (Figure 2) In the .xml view you can edit the code of your app.
Code view
Once you're in code view, you can start editing the code of your application. Here, the objects you placed in the design view also appear as code (Figure 3). You can the text editor to modify certain properties of your layout. The main function of code view, however, is being able to assign functions to elements (buttons for example).
Kotlin code
In this example, we are writing a code that replaces the text "Hello World" with "Hello Ozeki". The code below uses object-oriented programming (OOP) since it works with classes. We create classes, then create different objects inside the class. We assign functions to these objects to make them perform tasks when triggered.
MainActivity.kt
package com.example.helloworld

import androidx.appcompat.app.AppCompatActivity
import android.os.Bundle

class MainActivity : AppCompatActivity() {
    override fun onCreate(savedInstanceState: Bundle?) {
        super.onCreate(savedInstanceState)
        setContentView(R.layout.activity_main)
        //We are going to write a program that will replace the text Hello World with Hello Ozeki
        val button : android.widget.Button = findViewById(R.id.buttonToReplaceText)
        val text : android.widget.TextView = findViewById(R.id.text)
        button.setOnClickListener {
            text.text = "Hello Ozeki!"
        }
    }
}
Writing code in Kotlin
This video shows you how we create the code in Kotlin (Video 4). This code will change the text when the button is pressed.
Running our 'hello world' program
After we wrote the Kotlin code and saved it, we can continue with
the build of the application.
To see if our application works as we want, we will use an android emulator
which has been already created for us by the Android Studio.
In the following video, I'm going to show you how to run your Kotlin
based application for the first time in Android Studio.
Notice: When you run your code for the first time, it can take 5-8 minutes to start, but it will take less time if you have already done your first build.
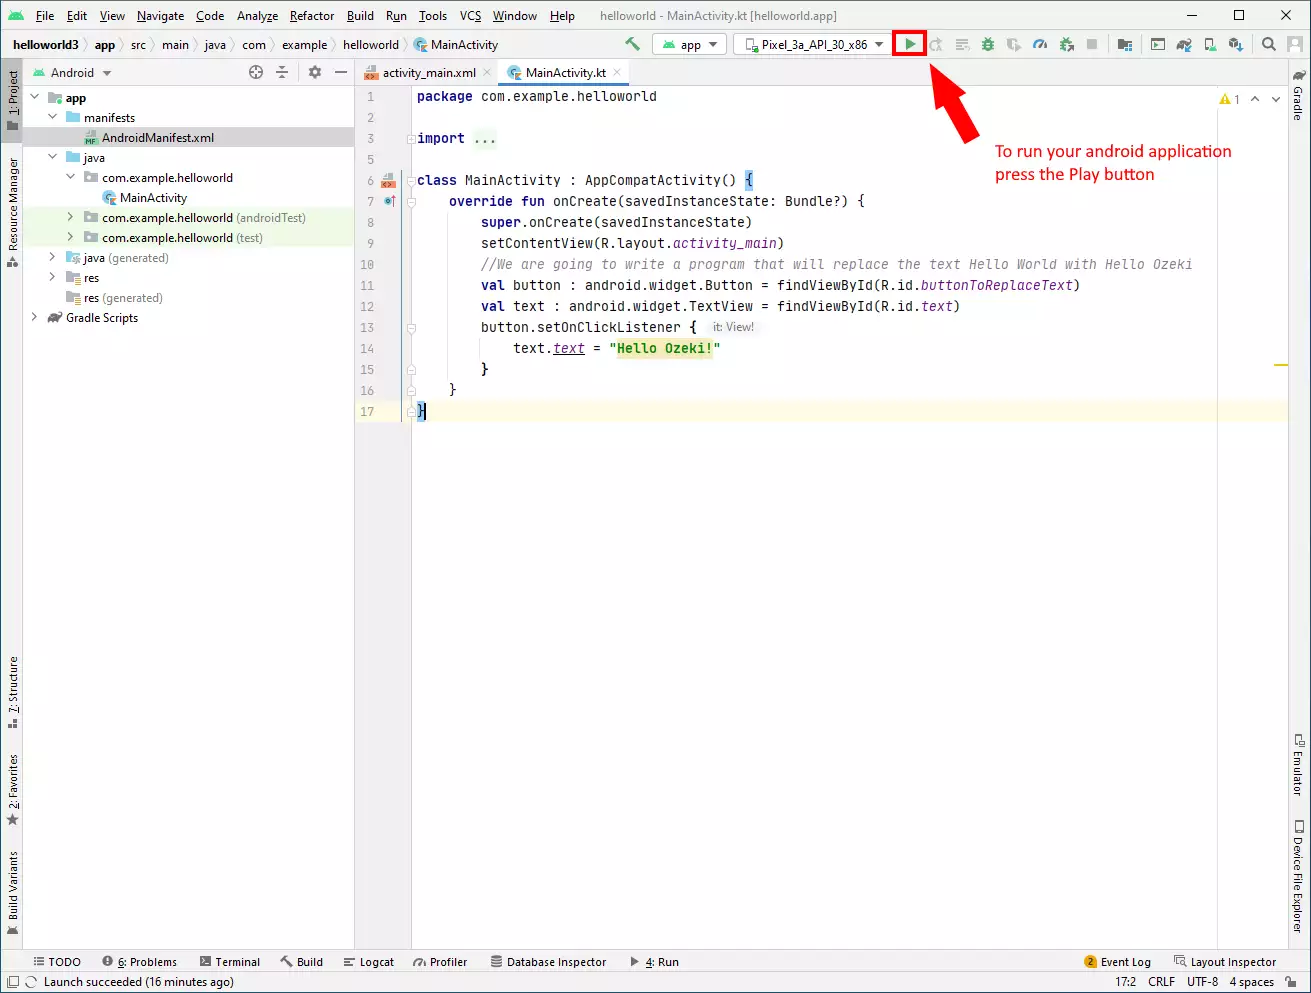
How to run your application
You can run your Kotlin based application from the inside of Android Studio to test it. Do this by clicking on the green Play button in the toolbar on the top (Figure 4). This will launch your application in a sort of Android emulator on your computer. This way you can test out your application before exporting it to mobile.
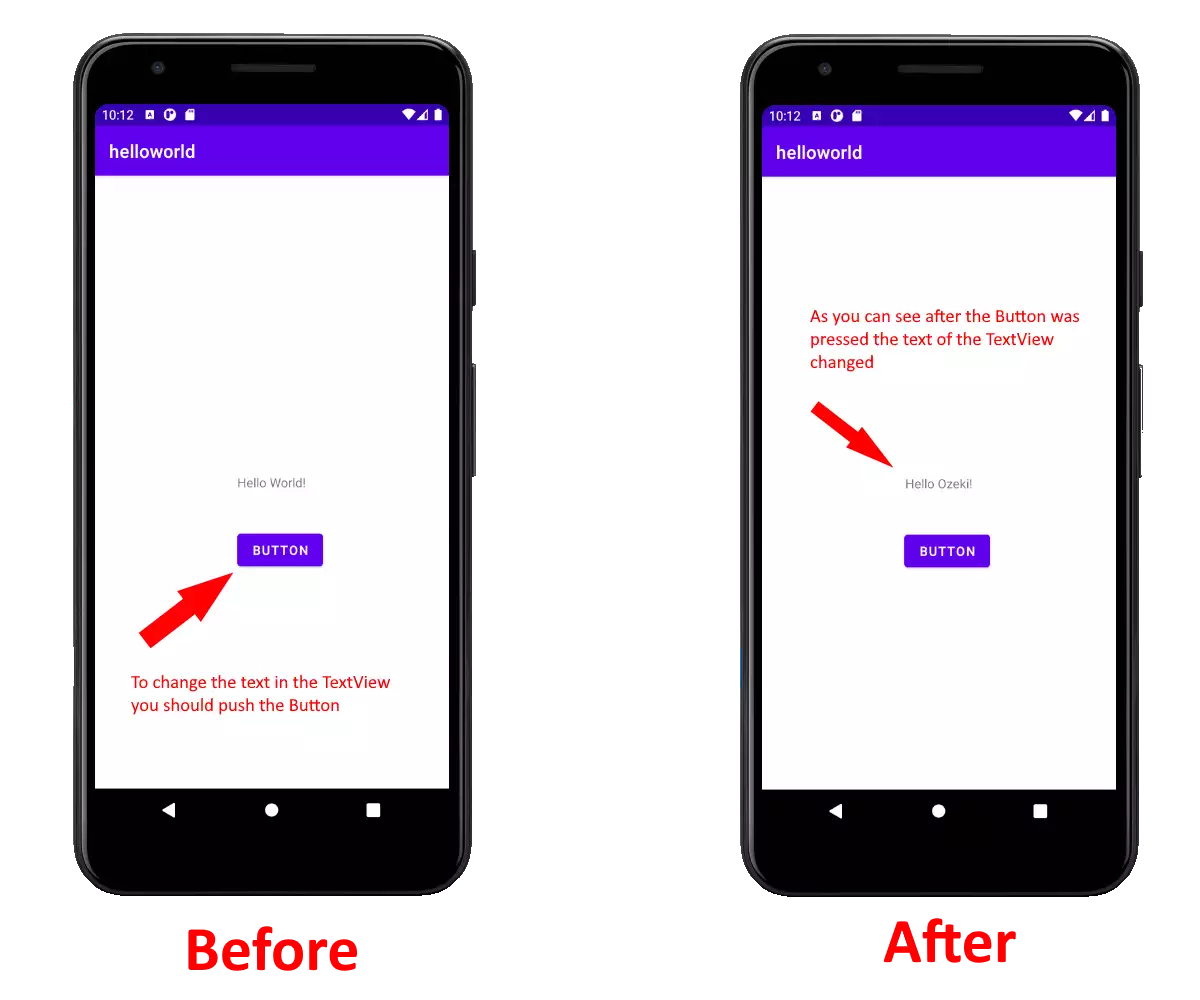
The output of your code
Once you launched your Kotlin based application in Android Studio you are able to use it on your computer. Here we can see that if we click the button, the text changes from "Hello World!" to "Hello Ozeki!" (Figure 5). In a later part of this tutorial, we will show you how you can also run your program on android devices connected to the computer.
What if you make an error in your Kotlin code
If you make an error in Android Studio, the IDE will mark the error in
your code with a wavy line. If you didn't recognize the error and you
run your code, the IDE will not display anything in the emulator,
instead of that, it will tell you on which line the error is, and what is
the nature of the error.
In the following example, I am going to show you what happens when your code
has an error.
What is a syntax error?
Syntax error means I don't understand. If you talk to somebody in English and he does not understand what you say, he will reply with "I don't understand". If you talk to a computer in Kotlin and the computer does not understand what you say, he will reply with "Syntax error".
How to handle a syntax error in Kotlin?
In the code below we will create a syntax error intentionally by not putting a semicolon after the Hello World line. You will see, how the computer reacts, how we fix the error, and how we run the computer program successfully.
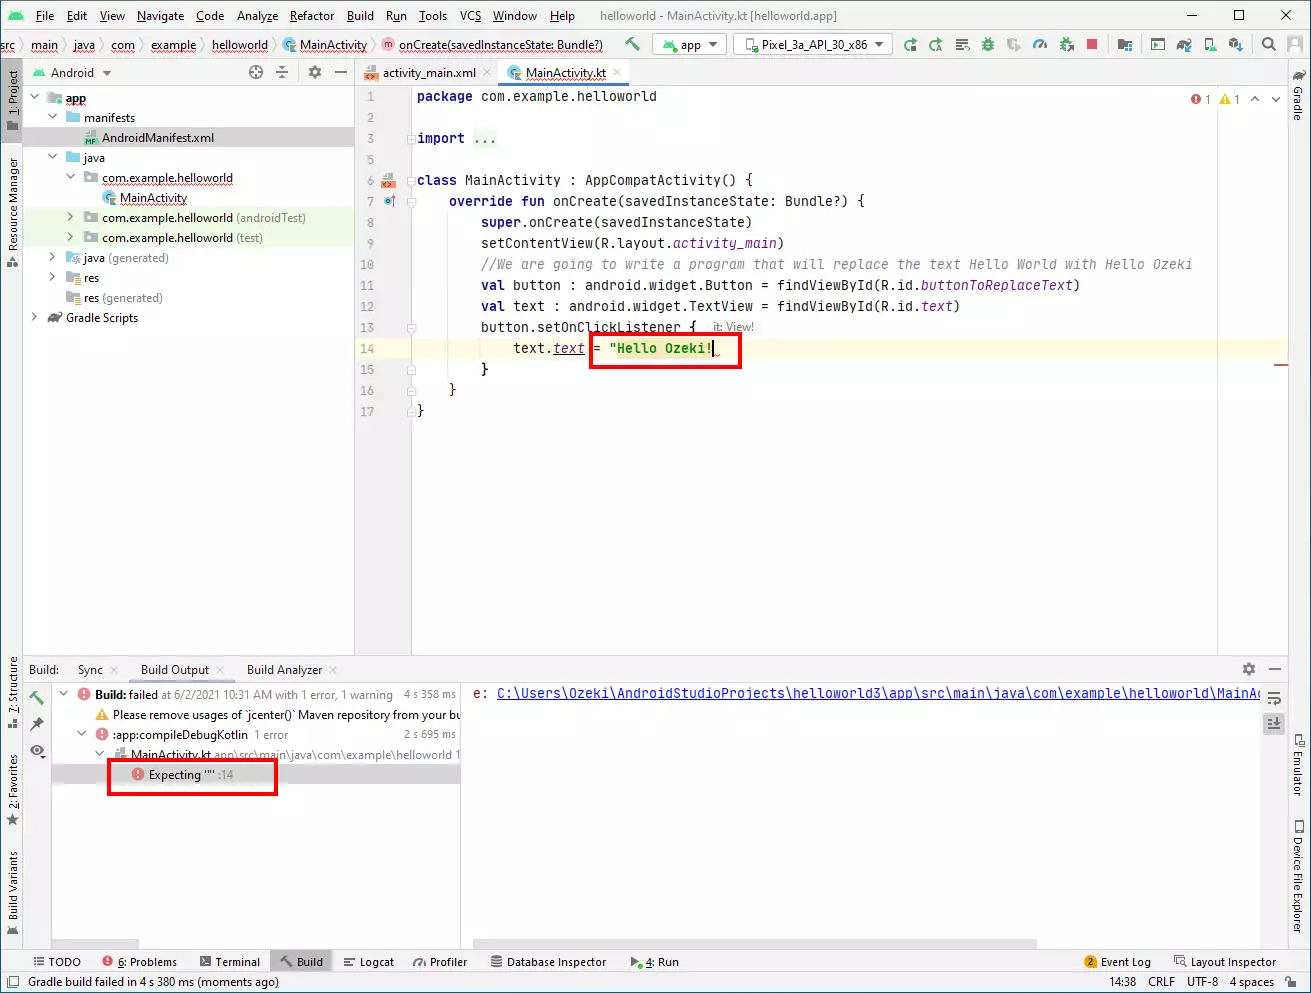
Error report in Android Studio
Android Studio notifies developers of errors in multiple ways. First, if the text editor detects that a line of code will result in a syntax error, it underlines the line with red (Figure 6). In addition, your errors also get displayed on the bottom left in the Build Output tab. If your program encounters an error while running, the problems get listed in the Build Output.
Make and fix an error in Android Studio
In this video we are going to make a syntax error in the code intentionally (Video 6). Then we will see the error displayed, as well as how to fix it.
You can also run your program on android devices connected to the computer
To use your phone for developer purposes, you have to turn on developer
options.
In our case, we are using a Huawei device. To turn on developer options on a
Huawei device you should enter About phone then press the serial
number of the phone 3 times. Now you are a developer.
It can be different for other android phones.
After this, you just have to enable USB debugging in the Developer options.
If you enabled the USB debugging, the name of your device will appear among
the devices.
Running the application on Android
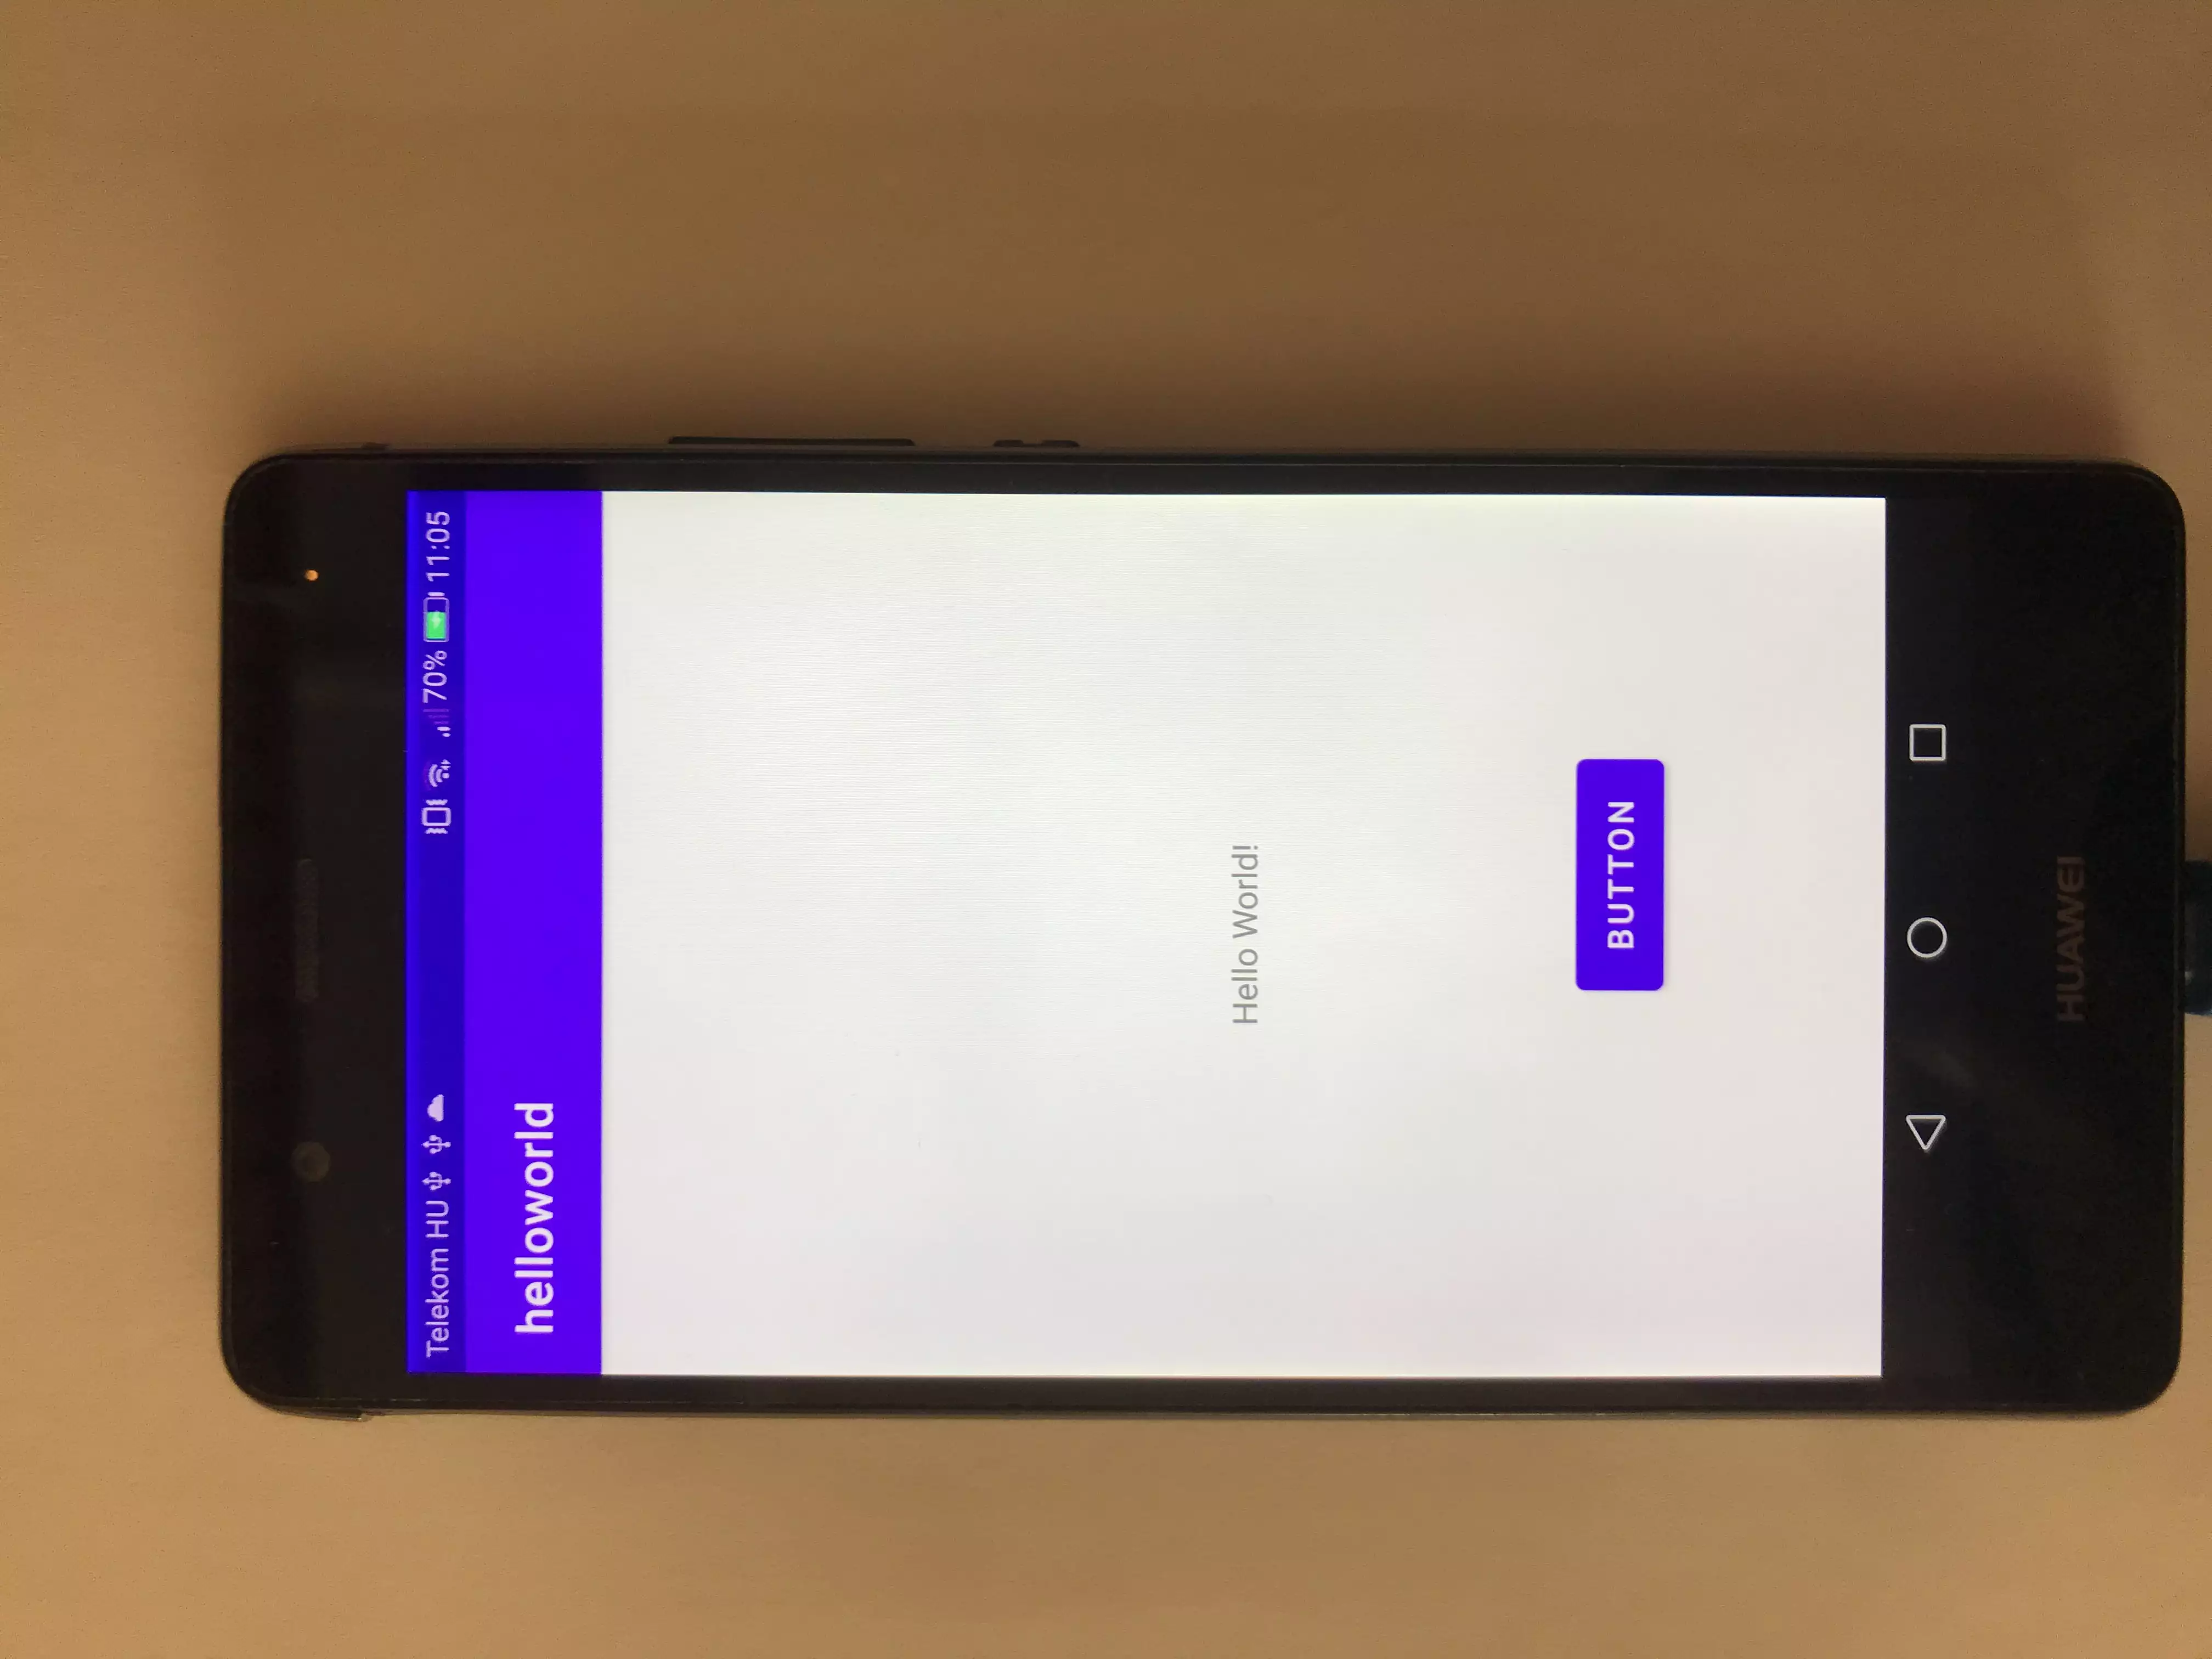
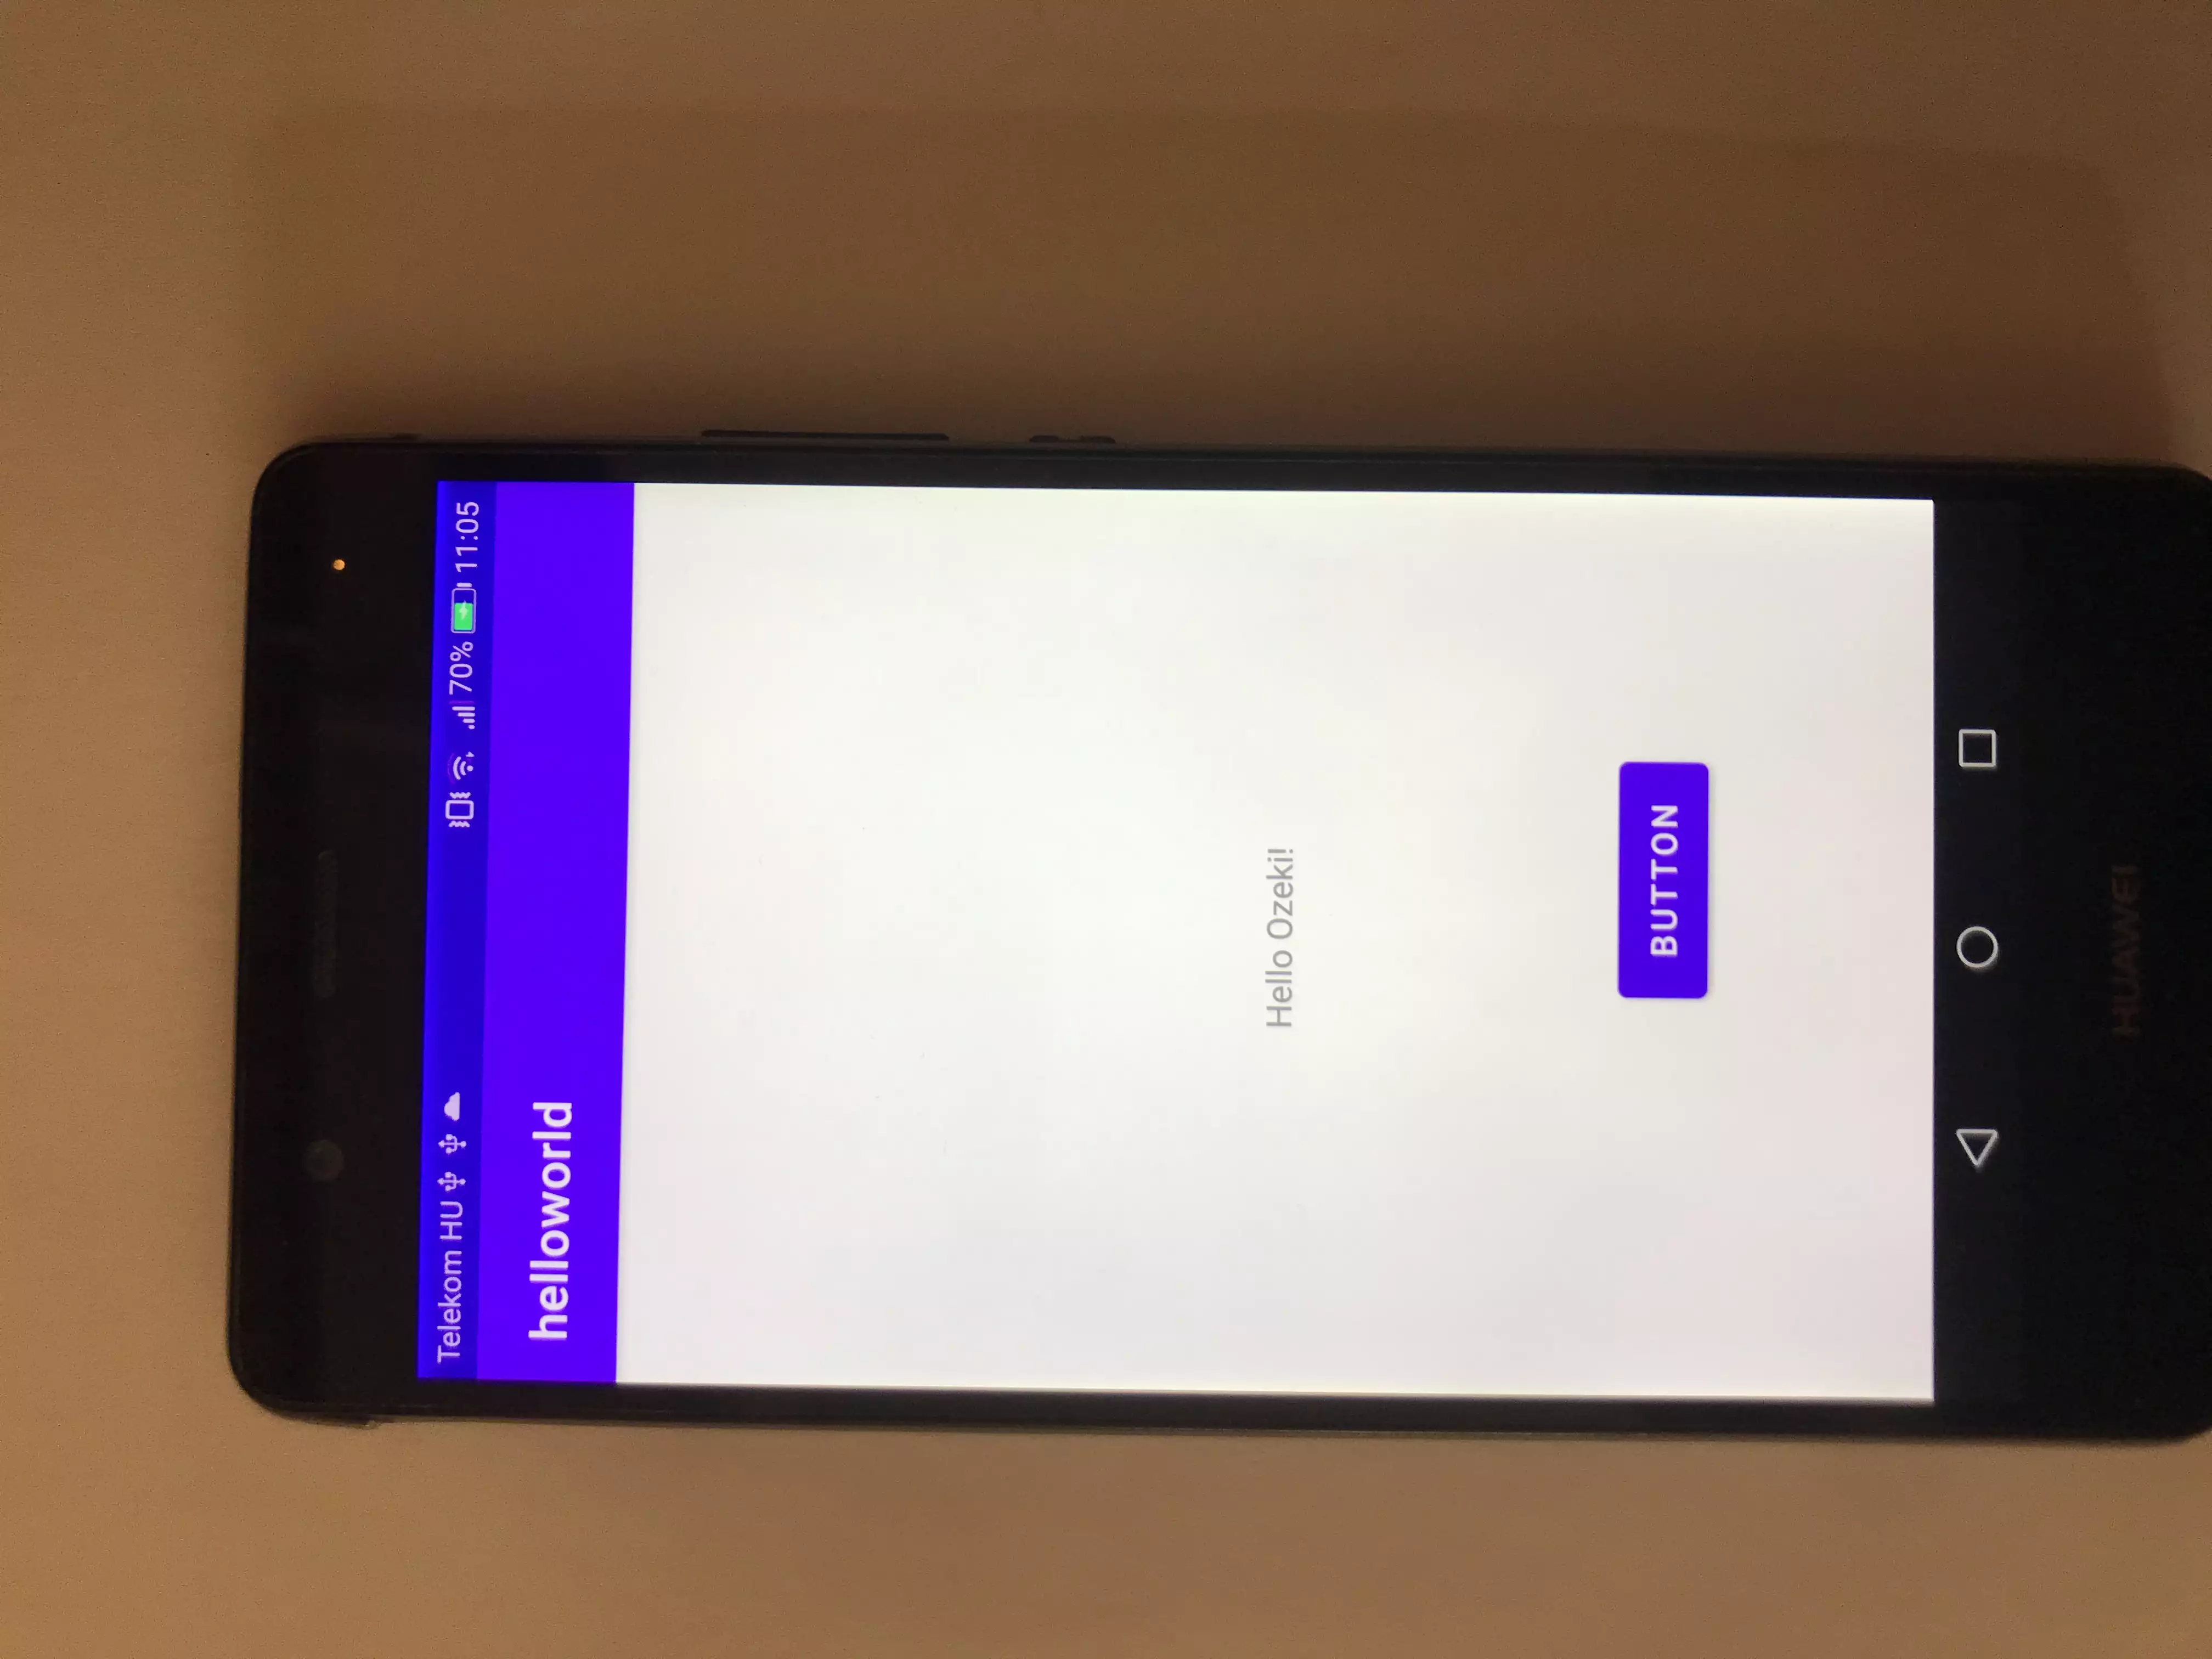
By running your program on an android device connected to the computer you will achieve the same result as with Android Studio. Here we can see the text displayed first is "Hello World!" before pressing the purple button (Figure 7). After pressing the button, the text changes to "Hello Ozeki!". As you can see it works in the same way as it did on the virtual device. (Figure 8)
Summary
This document was written to help you to get started with Kotlin by teaching you how to write the classic Hello World program in this language. We have done our best to make this guide as easy and understandable as possible so that you can learn the bases of coding in Kotlin comfortably. The Hello World program is just the beginning, while you follow the shown steps, you learn everything to prepare for coding any bigger Kotlin program.
You can learn more about creating and using Kotlin solutions from the Ozeki website. Continue your studies here, read the next document titled How to send SMS from Kotlin.
Don't waste more time, download the Ozeki SMS Gateway now!