Github: Kotlin SMS API
This article demonstrates how you can download the latest Kotlin SMS API from the GitHub using the GitHub desktop application. You will learn where to download and how to install the desktop application. It will show you how to clone a repository to edit it locally and how to start the Kotlin API. This process will take about 5-10 minutes. We assume that you have already used GitHub and familiar with the Android Studio. The tutorial is detailed and the GUI of the Ozeki SMS Gateway is very intuitive. It will take no effort to follow the steps. Don’t waste any time. Start sending SMS messages now.
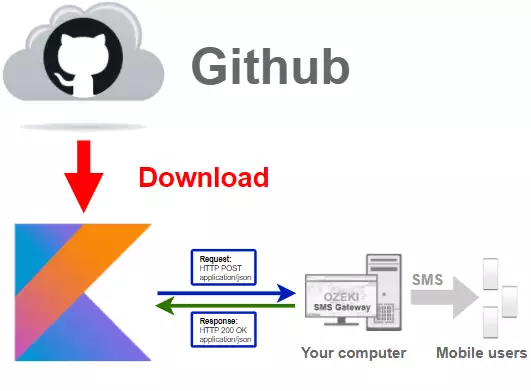
How to download the Kotlin SMS API from GitHub (Quick steps)
To download the Kotlin SMS API from GitHub:
- Download GitHub Desktop
- Sing into GitHub.com
- Configure Git
- Clone Kotlin SMS API from the Internet
- Select kotlin-send-sms-http-rest-ozeki
- Open SendSmsWithOzeki.Libs.Rest
- Start Android Studio Virtual Device
- Run Kotlin SMS API
- Check the sent SMS in Ozeki SMS Gateway
Download Github Desktop
In the following video tutorial, you will see how to download the GitHub desktop installer. The video will start with opening the download page of the GitHub desktop application. In the end, you will have the installer on your computer ready to start. This 1-minute-long video is very easy to learn and it highlights all the actions you need to take. You will have no hard time following the process.
Download the GitHub Desktop installer
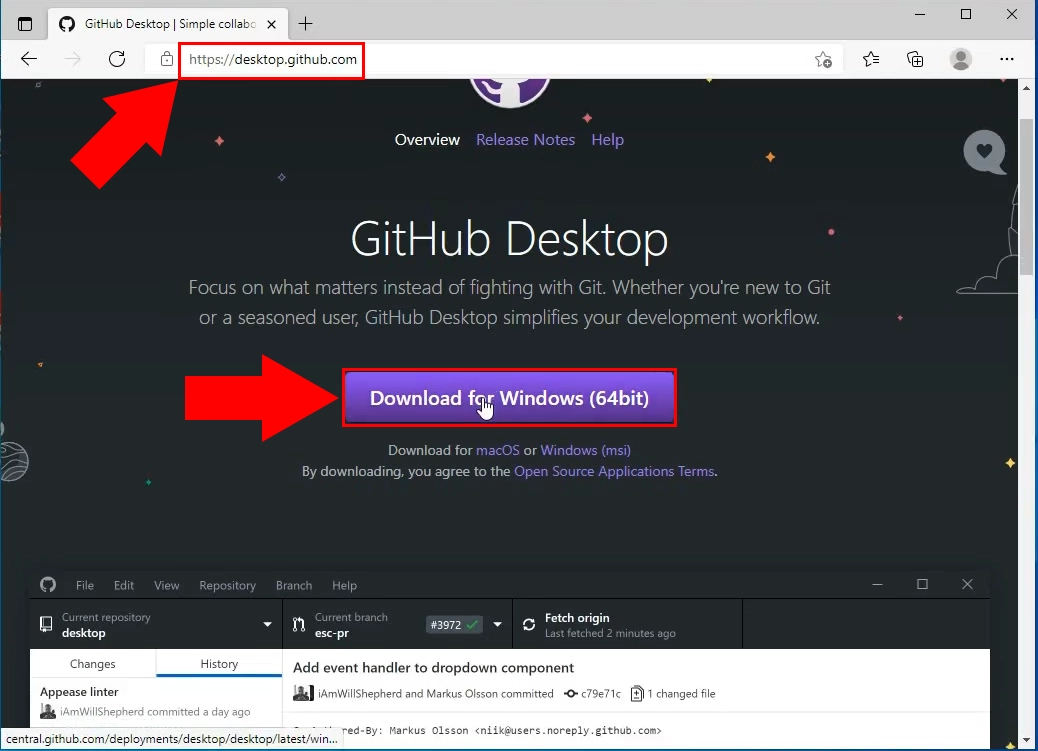
To install the GitHub desktop app, you need to download the installer from the GitHub webpage. Find the purple Download for Windows (64bit) button (Figure 2). Click it and it will start the download process. Wait for your browser to finish and you can start the installation procedure. (Figure 2)
Install Github Desktop
In this 59-seconds-long video, we are going to show you the installation process of GitHub Desktop. The video will start with opening the installer and will end with the ready-to-use application. The video is short but very accurate. You will follow it effortlessly.
Launch the installer
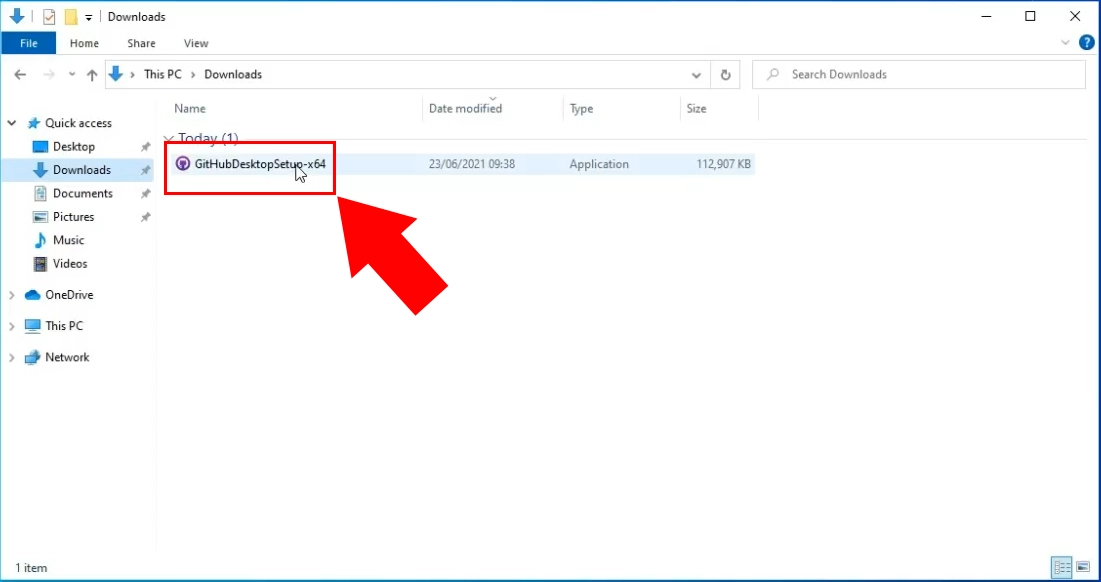
If your browser is finished with downloading the required file, search for the installer. At Default settings, the installer will be in the downloads folder (Figure 3). Search for the GitHubDesktopSetup-x64 file and launch it. It will install the GitHub Desktop application on your computer automatically.
Wait for the installation procedure to finish
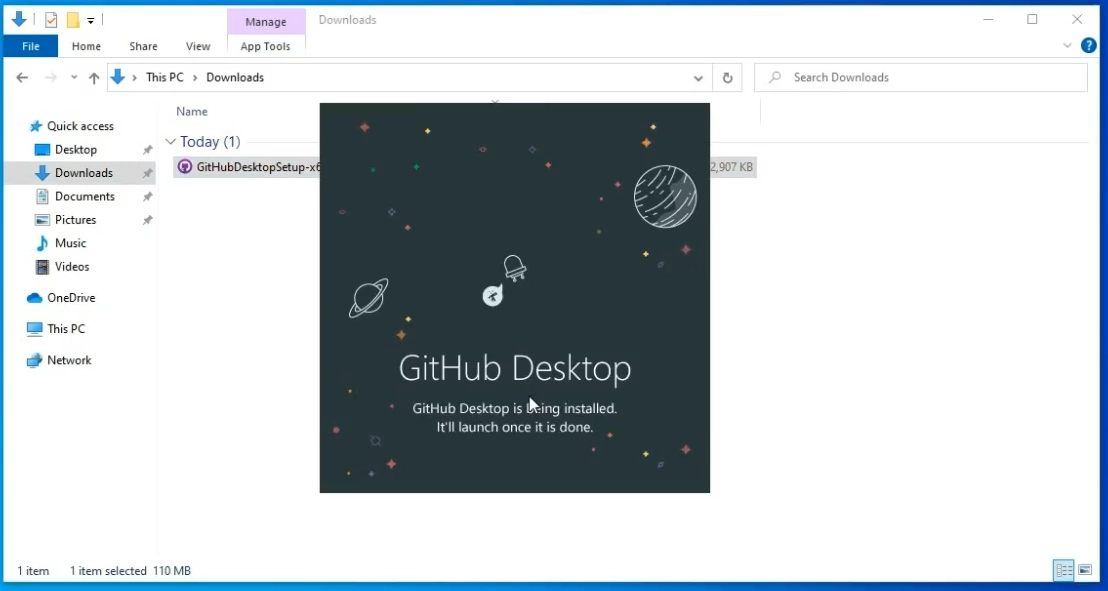
The GitHub Desktop installer will now install the software. On Figure 4, you can see the window that is visible during the installation. The software will be fully functional after this window disappears. You don’t have anything to do, just wait for the end of the process.
Choose the Sign in to GitHub.com
After the first launch, the application will ask you to sign in. You have two possible options. Sign in with your GitHub account or sign in with your GitHub enterprise account (Figure 5). Click the sign in to GitHub.com to access the login page. If you don’t have a GitHub user account yet, feel free to create one by clicking the Create your free account link above the sign in button.
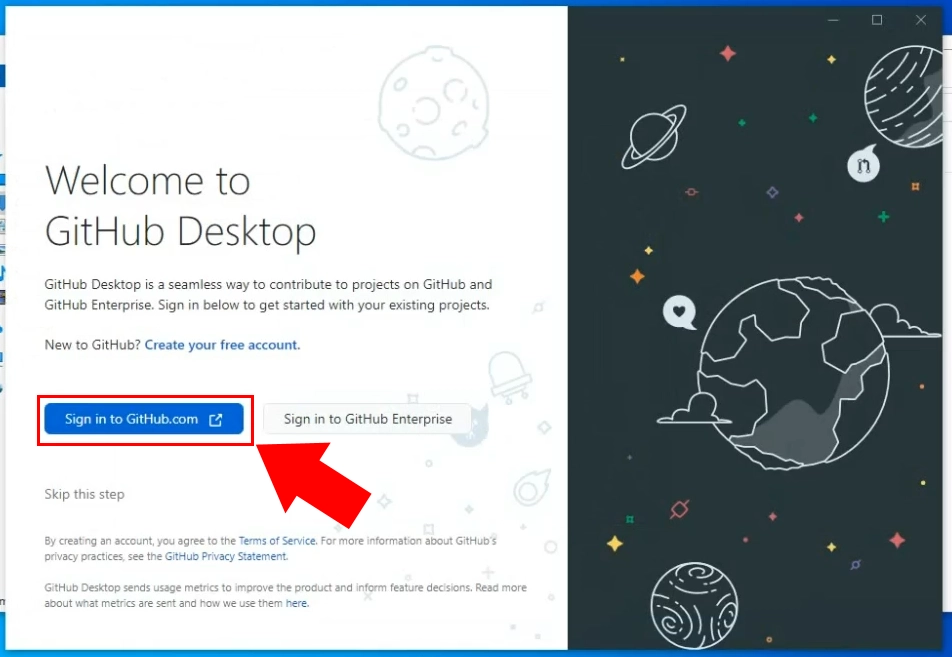
Sign in with your GitHub account
You will see a new browser page with a login form. Here, you need to login to your GitHub account. Provide the correct username and the password and click the green Sign in button to process to the next step (Figure 6). You also have an opportunity to start the new password application process if you forgot your password.
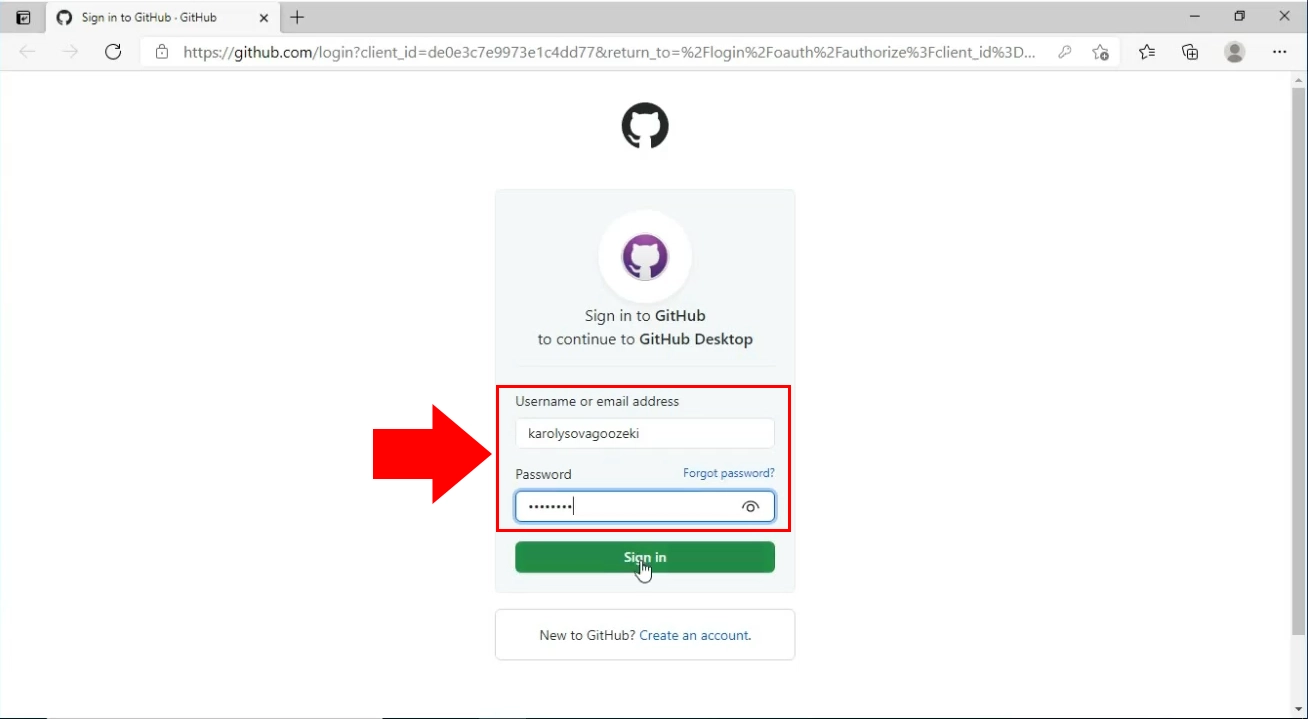
Configure the Git
If you modify anything in a repository, the other contributor will see some information about the changes. Like your name and an e-mail address. In this step, you get to decide if GitHub should use your GitHub account to display information or it should display the custom info you provide here. Decide which option is suitable for your and click the blue Finish button under the Email textbox. (Figure 7)
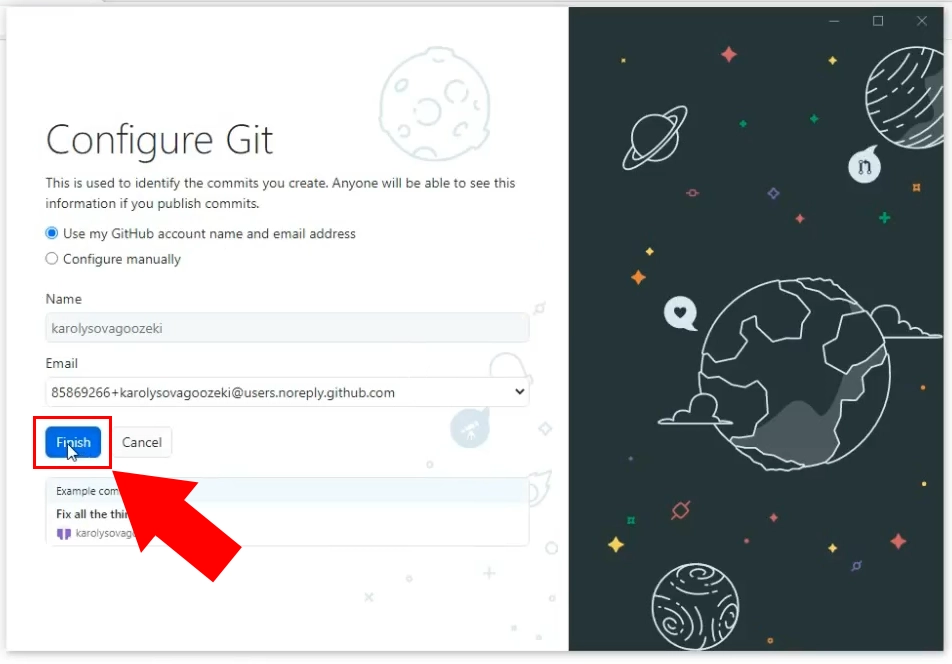
Clone the Ozeki.Libs.Rest.VB repository
In the following video, we are going to show you the process of cloning a repository. It will start with the opened GitHub desktop app and will take you all the way to having all the files on your computer. The video is only 39-seconds-long, but you will see the whole process. You will have no problem with following the steps as the video is very detailed and easy to understand.
Choose to Clone a repository from the Internet
The GitHub Desktop application will let you create or collaborate with repositories. In this page, you can create a new tutorial repository where you can learn more about the system, or clone a repository, so you can modify it without harming the original repository (Figure 8). Choose the Clone a repository from the Internet option to download an offline copy of the Ozeki Node.js SMS API files.
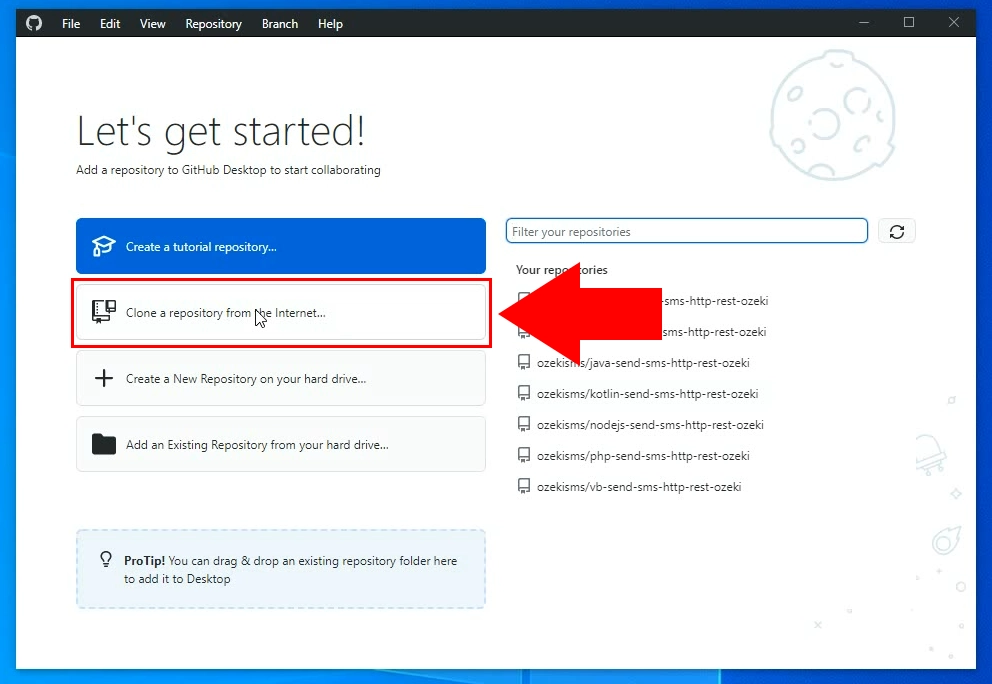
Copy the GitHub repository URL
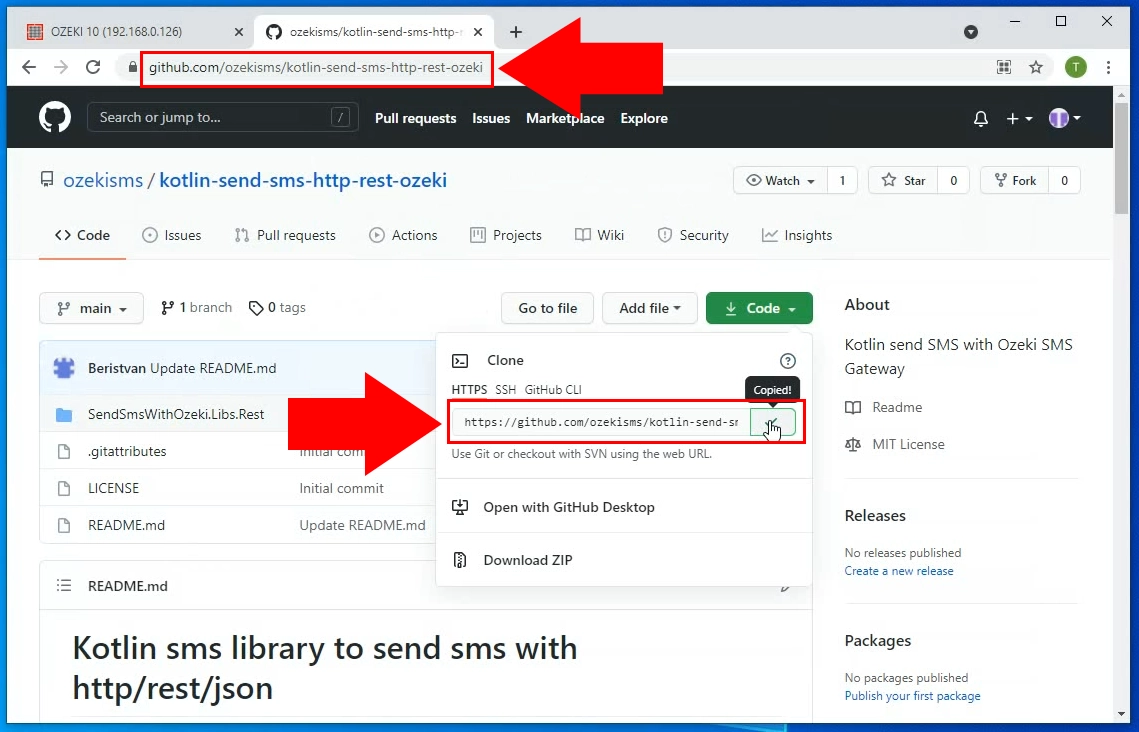
To download the correct repository, you need to provide the URL address of it to the GitHub Desktop. To do so, you need to copy it from the GitHub page of the repository. You have two options to do so. Visit the GitHub page of the repository and copy the link from the URL bar of your browser. The other method is to look for the green code button and click it. It will open the sub-menu, where you can choose to copy the link. Click the Copy button next to the URL line to do so (Figure 9).
Paste the GitHub repository URL
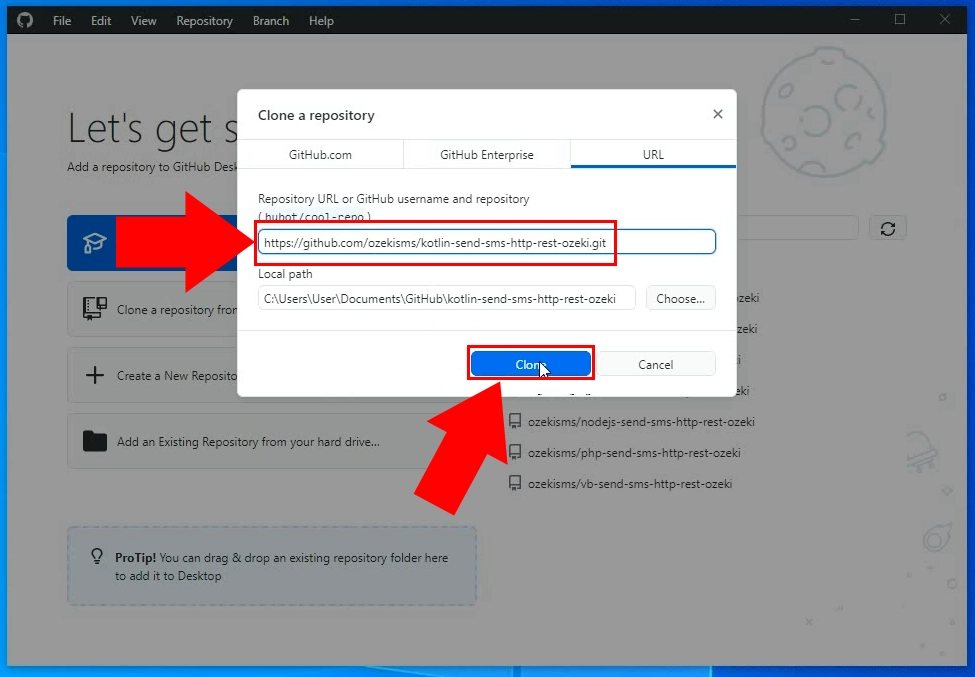
Paste the copied URL into the Clone a repository panel. You will find the Repository URL textbox where the link belongs. Below that, you can choose where to save the file. Give it an access path where there is enough space the store the files. Click the Clone button if you completed the form (Figure 10).
Find the cloned repository
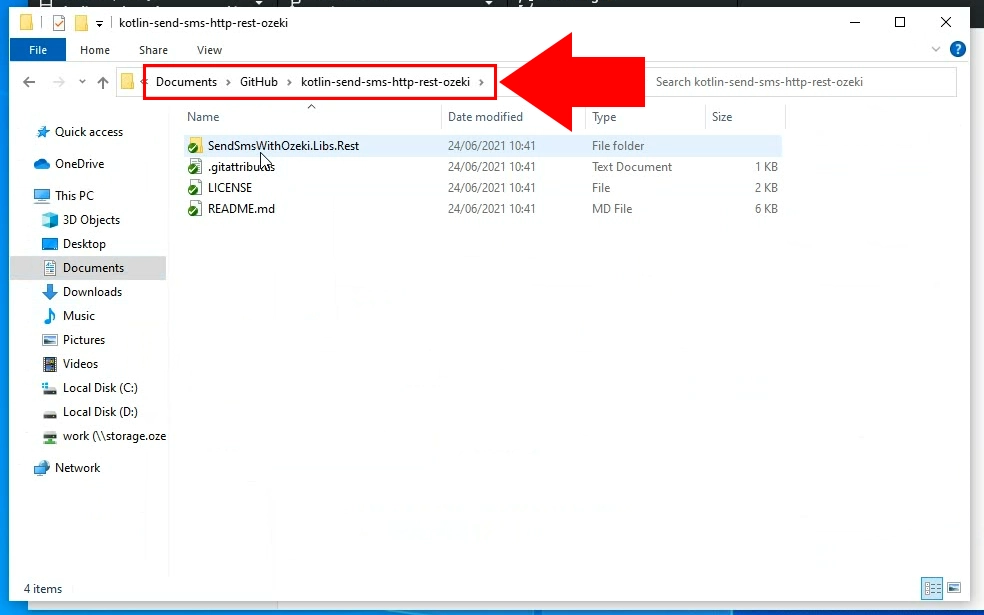
Now you have the downloaded repository with all the files. Navigate to the folder you choose to store the Rest API files (Figure 11). It will come with a README.md file, which stores information about the usage of the Rest API. Since these MD files are just plain text documents, you can open one with any text editor, like Notepad or WordPad.
How to use the repository
In this video, we are going to show you how to use the files in the cloned repository. The video will start with opening Android Studio which is a programming environment made to create Android applications. At the end of the video, you will see the final product which can send SMS messages from a phone using the Ozeki SMS Gateway. You will learn how to launch a virtual device to test the application and how to use the app. The video is only a little longer than 3 minutes and it features all the steps you need to take to have a working system.
Open the Rest API with Android Studio
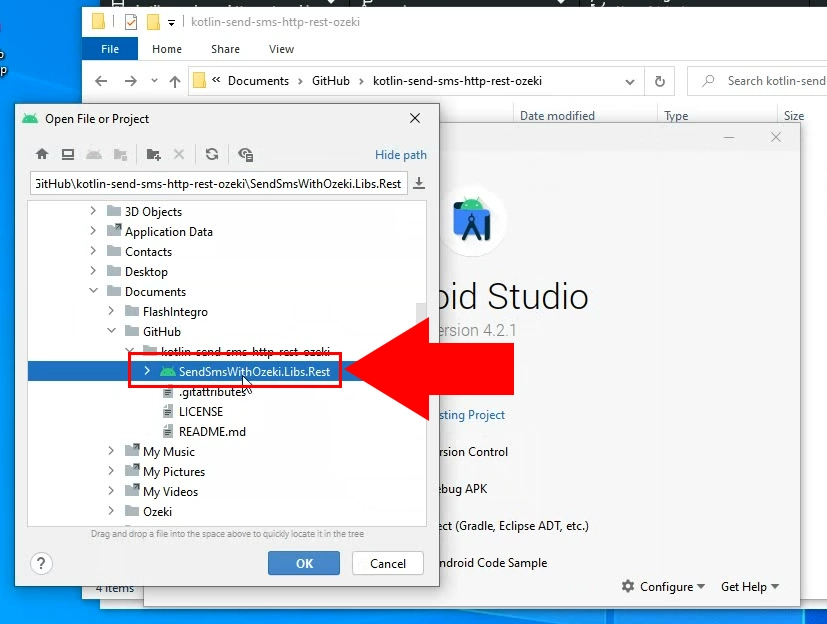
To start sending SMS messages with the provided API, launch the Android Studio development environment and import the SendSmsWithOzeki.Libs.Rest. After launching the Android Studio app, import the Rest API with the Open File or Project window (Figure 12). In there you need to find the downloaded solution and click the Ok button. It will open the pre-written code, and you can make changes to it or execute it directly.
Start the virtual device
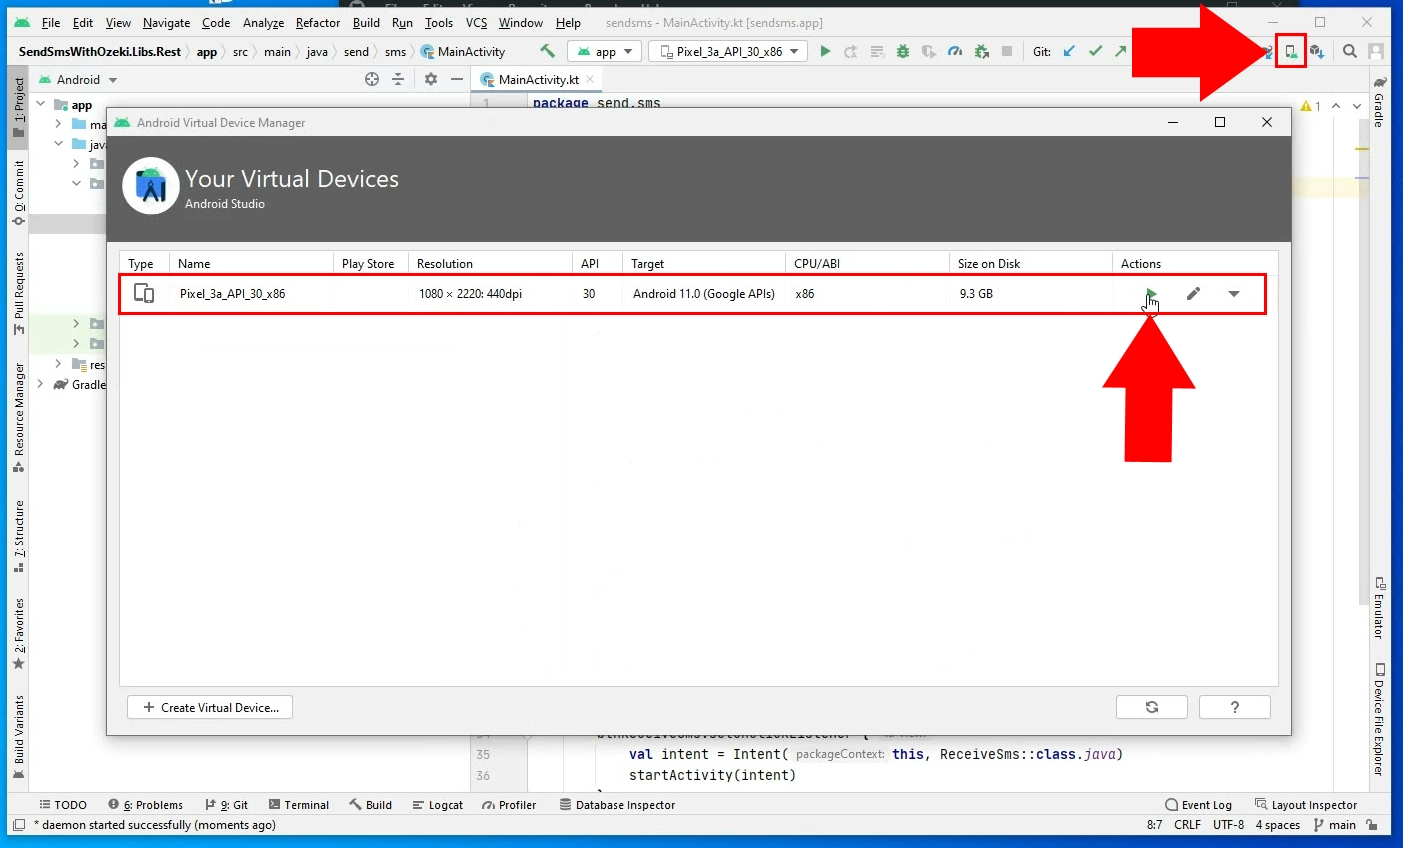
Start a virtual android device to test the API. Click the Device Manager icon located on the upper-right corner of the Android Studio GUI. Look for a phone icon with an android logo at the corner. (Figure 13). Click it and it will launch the device manager where you can start delete or modify virtual android devices. Click the play icon in the Actions column to start a virtual device.
Run the app
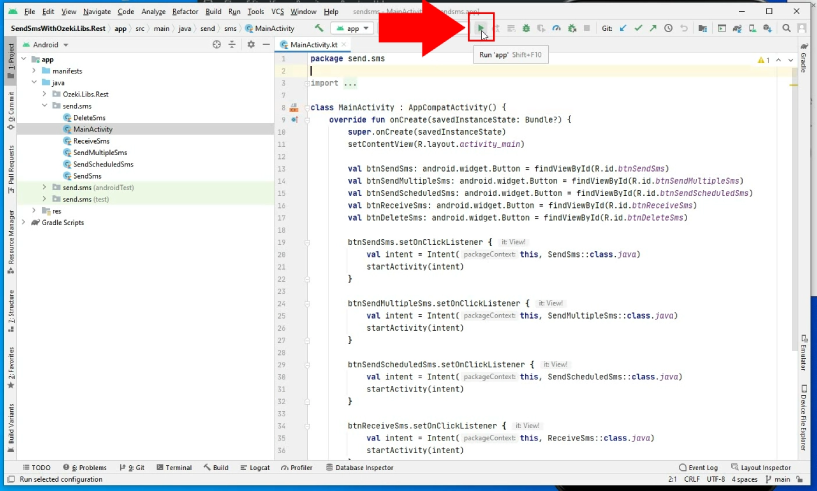
To run the app, click the play icon located on the toolbar of the Android Studio GUI. The other method is to simply press Shift + F10 (Figure 14). It will execute the code and display the virtual machine.
Send you first SMS
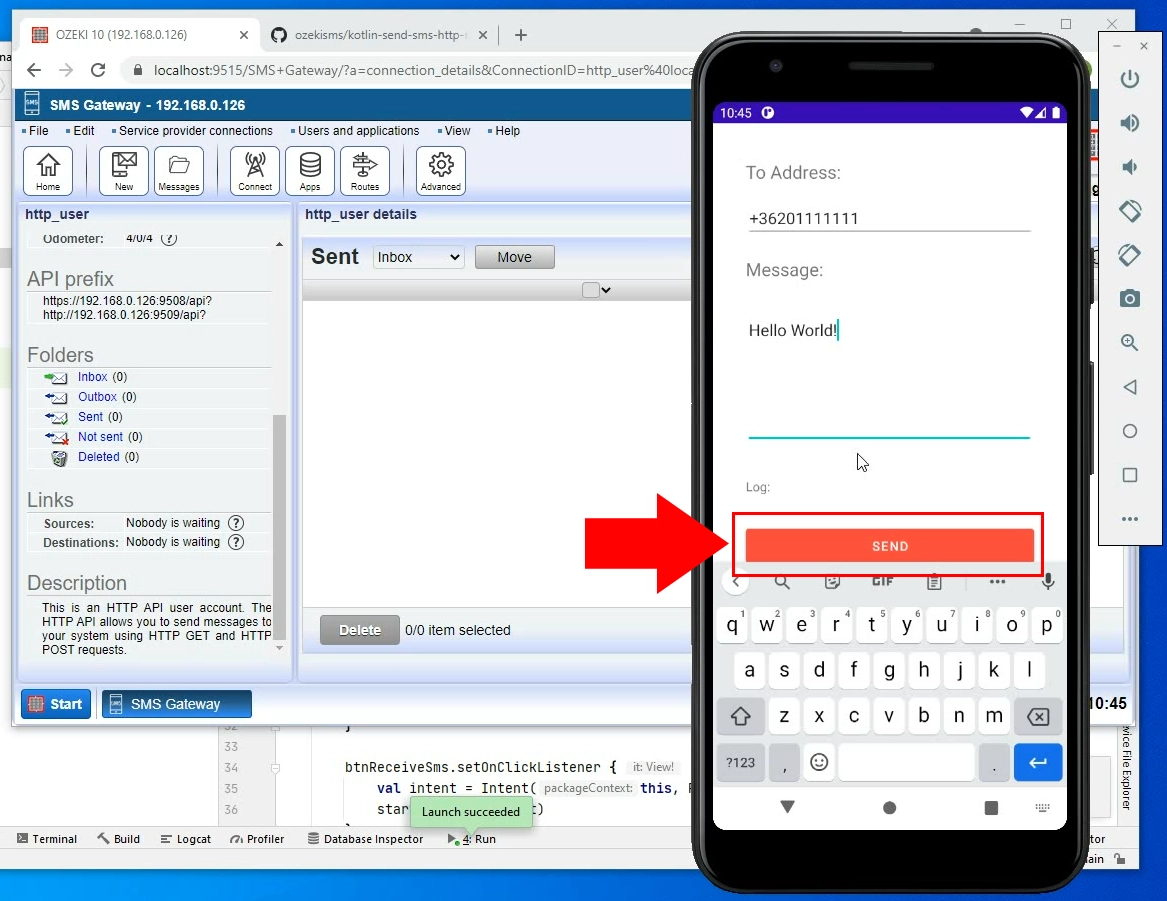
The virtual machine will display the GUI of the test program. With this program you can send SMS messages through the Ozeki SMS Gateway with the help of the API. Just type in the recipient's phone number and the body of the message and click the send icon. It will start the SMS sending procedure. (Figure 15)
Check the Sent SMS folder
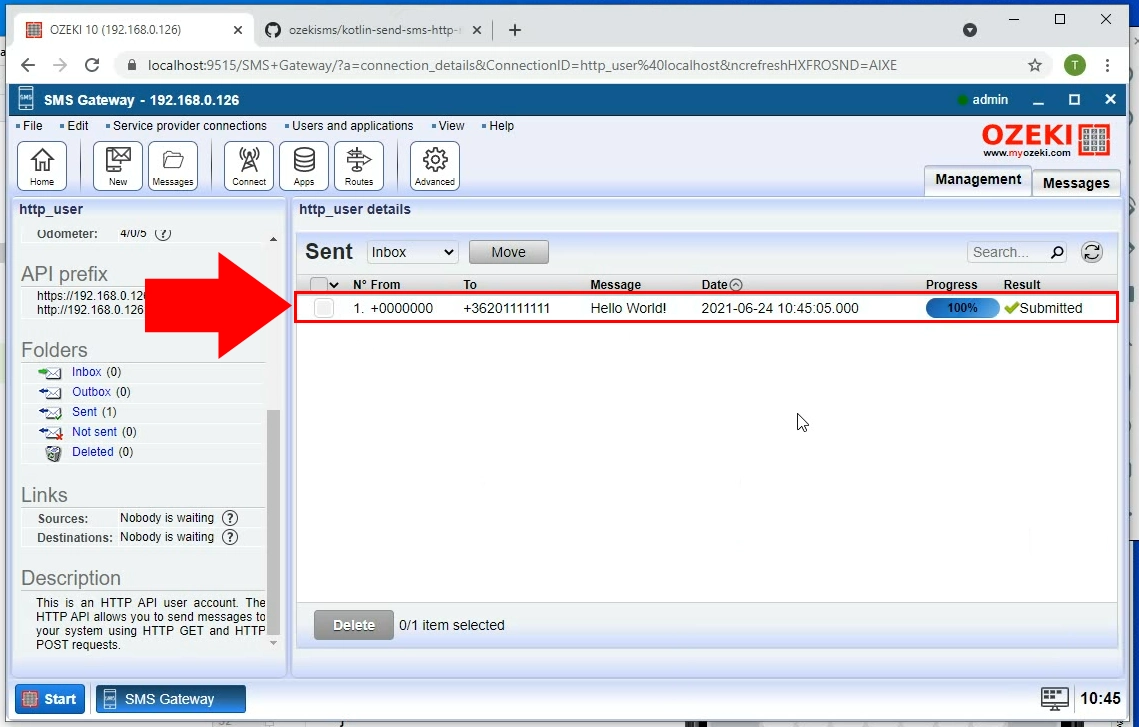
In the Sent folder you can see the message that the API sent through the Ozeki SMS Gateway. Here you can get more information about the message and check the current status of the message. (Figure 16)
Final thoughts
By reading this article, you have learned how to clone our Kotlin SMS API repository from GitHub and you can use and modify any of the codes in it as needed. We did our very best to make it simple and to walk you through all the details as painlessly as possible, you can take a rest now. This solution will have a very good impact on your business, it will help you t o evolve a well-balanced, nicely organized, and high-performance messaging system.
If you have already completed the steps, you can enjoy a well-deserved latte or some other treat you have in mind. After the break, make sure that you read more articles on the Ozeki webpage, continue with the one titled How to send SMS from Kotlin.
Start working for the better, download the Ozeki SMS Gateway now!
