Receive SMS in Python
This document provides you some useful information about how you can get the messages received by the SMS Gateway using your Python application. The Python SMS example shows how it collects the messages from your inbox folder via HTTP Requests and how it makes it available for further usage. The page contains a video tutorial and a step-by-step guide which takes not more than five minutes to complete. Let's start right now!
What is a Python SMS API?
The Python SMS API creates the opportunity to send SMS messages from a Python script. By using this Python SMS API, your Python script can send HTTP requests to the SMS Gateway which sends the SMS message.
Prerequisites
Receive SMS in Python
- Open Notepad application
- Copy-Paste the example code from this page
- Save the file as ReceiveSMS.py
- Open Ozeki SMS Gateway and select HTTP Server connection
- Open the HTML form of the HTTP Server connection
- Send some test messages
- Open Command Prompt
- Type 'python ReceiveSMS.py' in the Command Prompt and press Enter
This example Python SMS source code below is free to use in your projects and you can modify it as well to fit into your solution. The code initiates a HTTP request to get the messages from the SMS Gateway. To test the example just follow the instructions below or watch the video tutorial which clearly demonstrates all steps that have to be taken to run the Python SMS script on your computer.
import requests
import ssl
import xml.etree.ElementTree as ET

def main():
    username = "john"
    password = "Xc3ffs"
    httpUrl = "https://127.0.0.1:9508/"
    folder = "inbox";
    limit = "3";

    sendString = (httpUrl + "api?action=receivemessage&username="
        + username + "&password="
        + password + "&folder=" + folder + "&limit="
        + limit + "&afterdownload=delete")

    print("Sending html request: " + sendString + "\n")
    requests.packages.urllib3.disable_warnings()

    response = requests.get(sendString, verify=False)
    print("Http response received: ")
    DisplayMessages(response.text)

def DisplayMessages(response):
    root = ET.fromstring(response)
    if root.findall('data/message/*') == []:
        print('The inbox is empty')
        return

    for child in root.findall('data/message'):
        sender = child.find('originator').text
        text = child.find('messagedata').text
        DisplayMessage(sender, text)

def DisplayMessage(sender, text):
    print(sender + ": " + text)

if __name__=="__main__":
   main()
Step 1 - Open Notepad
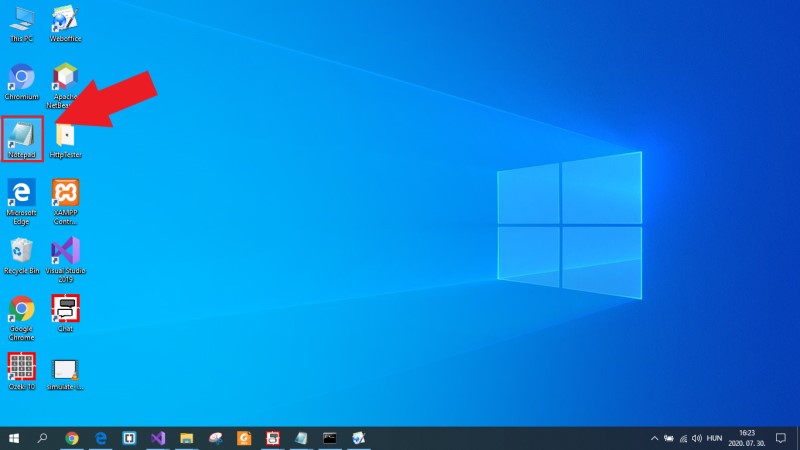
The first step of this guide is to open Notepad on your computer. This application is needed to create the Python file that you will execute at the end of the guide. So, as Figure 1 demonstrates, just click on the icon of the Notepad application on the desktop to open it.
Step 2 - Copy the Python code
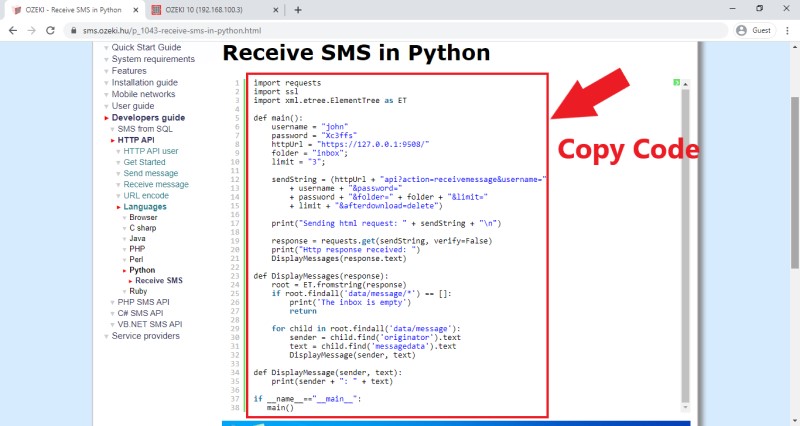
Next, you need to get the Python example script from this page. This is an easy task to do since you need to just copy it. So, to do that, just go to the example code on this page, mark out the whole source code, and like in Figure 2, press Ctrl+C on your keyboard. This action copies the source code to your clipboard and makes it ready to place it into a text file.
Step 3 - Paste the code into a text file
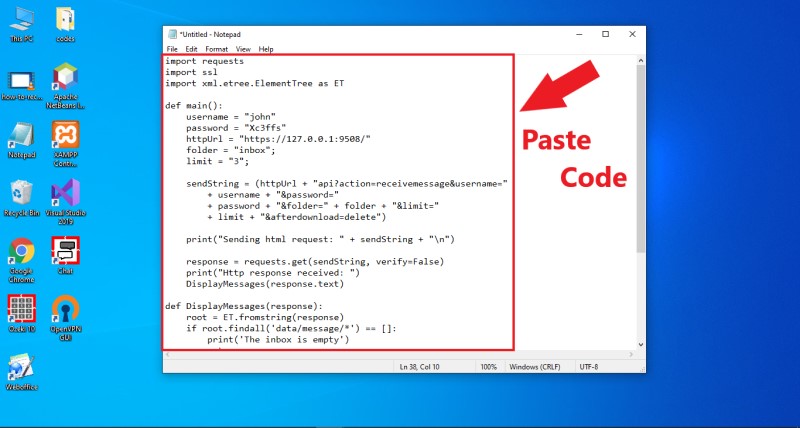
Next, you need to paste the Python source code into the text document that you opened in Step 1. This action can be performed by using the Ctrl+V shortcut which pastes the source code into the text file from the clipboard. If you have done it correctly, the Python code will be in the text file as Figure 3 shows that.
Step 4 - Save the text as a Python file
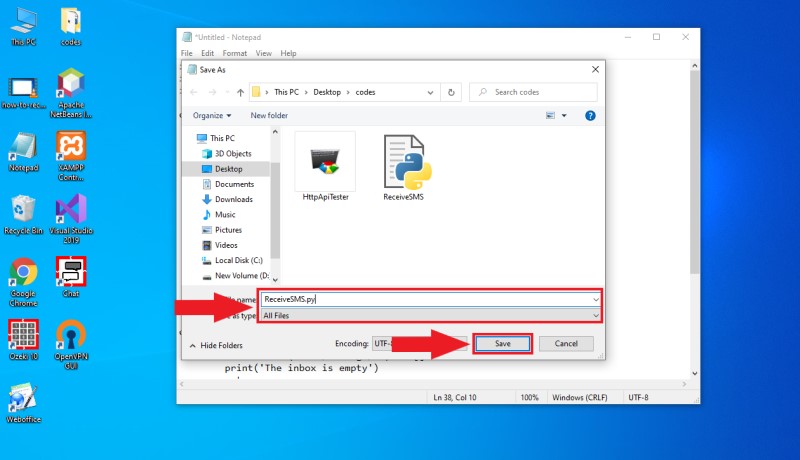
At this point, you have got a text file that contains the source code, but it is not in the right file format yet. Notepad can save files in any format, so you can solve this problem quite easily. So, select the 'Save as' option in Notepad, and save the file with the '.py' file extension. This procedure is demonstrated in Figure 4.
Step 5 - Open Command Prompt
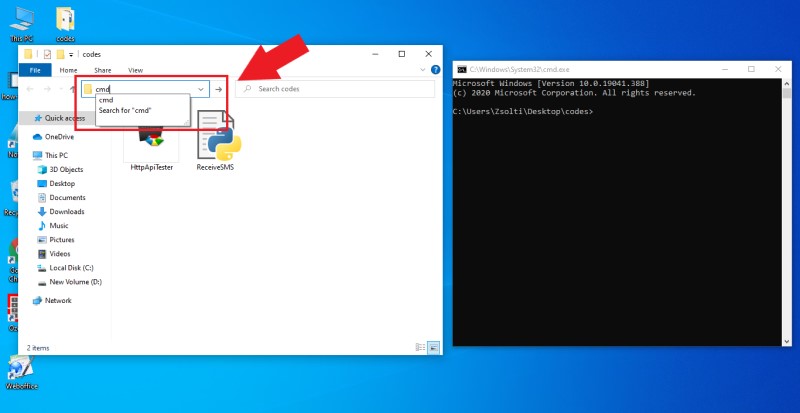
Now, the Python script is ready to use, but you need an environment where you can execute the script. For that purpose, you can simply use the Command Prompt. To open it, just navigate to the folder where you saved the Python file with the File Explorer, and like in Figure 5, type 'cmd' into the address bar of the File Explorer. If you press Enter, the Command Prompt shows up in a new window.
Step 6 - Send some test messages
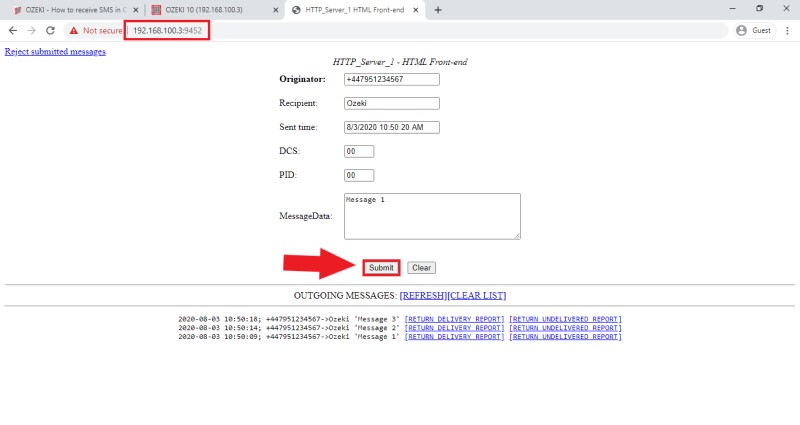
After you set up the Python file, you need some message to your inbox folder. To finish the test quickly, you can simulate incoming messages with the HTTP Server connection in SMS Gateway. If you haven't configured this connection yet, here you can see how to configure a HTTP Server connection. So, open the SMS Gateway, and select the HTTP Server connection. In the menu of the connection, open the HTML form (Figure 6). Here, you can write some messages to the SMS Gateway by setting the recipient to 'Ozeki'.
Step 7 - Run the Python script
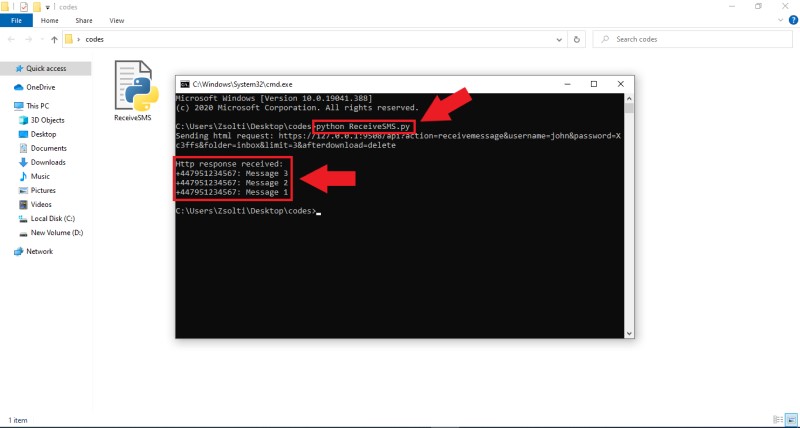
The last thing that you need to do to complete this guide is to run the Python script in the Command Prompt. For that, just type 'python *filename*.py' into the Command Prompt as you can see it in Figure 7 and hit Enter. The execution of the Python SMS example prints the HTTP request that was initiated by the Python program. Then, you will be able to see the messages from the SMS Gateway as well.
To sum it up
From this article, you have learned how to use a Python script to collect messages from your inbox. You will be able to build a system that sends HTTP requests to the Ozeki SMS Gateway and receives all the incoming messages back. Using the Ozeki SMS Gateway to manage SMS messages comes in handy because it allows the user to log SMS messages into a database and offers various reporting capabilities to give more information about your SMS communication.
Other programming languages can be used to communicate with the Ozeki SMS Gateway. To learn more about the capabilities of the Ozeki SMS Gateway, feel free to visit more tutorial pages like: How to use Pearl to send SMS messages, or How to use Ruby to send SMS messages.
All you need to do is to download the Ozeki SMS Gateway and start building your solution now!
