Receive SMS in Java
The guide on this page is about to give you a brief introduction to how you can get the received messages from SMS Gateway to your Java application. This operation is demonstrated by a simple Java code that uses HTTP requests to collect the incoming messages from SMS Gateway. If you follow this guide, you are going to learn how you can create an example Java application that gets the messages from the inbox folder and you will be able to see how to test the solution. So, let's get started.
What is a Java SMS API?
The Java SMS API enables you to implement SMS services into your Java Application. The API communicates with the SMS Gateway using HTTP requests which sends the message and returns with a response message.
Prerequisites
- Installed Apache NetBeans IDE 12.0
- Installed Ozeki 10 SMS Gateway
- A configured HTTP Server connection
Receive SMS in Java
- Open Apache NetBeans IDE
- Create a new Java Application
- Create a new Java Class
- Copy-Paste the example source code below
- Type 'https://localhost:9515' in your browser to open SMS Gateway
- Select HTTP Server connection and open its HTML form
- Send some test messages
- Run the Java application to get the messages
The Java SMS example code below which can get the incoming messages from the SMS Gateway is free to use, you can modify it or use it in your project. If you would like to just test the solution, you need to follow the step-by-step instructions below or you can also watch the video above to learn how you can create the example Java application that can get the incoming messages from the SMS Gateway.
package ozeki;

import java.io.BufferedReader;
import java.io.IOException;
import java.io.InputStreamReader;
import java.net.HttpURLConnection;
import java.net.URL;
import java.security.GeneralSecurityException;
import java.security.cert.X509Certificate;
import java.util.stream.Collectors;
import javax.net.ssl.HostnameVerifier;
import javax.net.ssl.HttpsURLConnection;
import javax.net.ssl.SSLContext;
import javax.net.ssl.SSLSession;
import javax.net.ssl.TrustManager;
import javax.net.ssl.X509TrustManager;
import javax.xml.parsers.*;
import org.xml.sax.InputSource;
import org.w3c.dom.*;
import java.io.*;

public class ReceiveSMS {

    public static void main(String[] args) {

        TrustManager[] trustAllCerts = new TrustManager[]{
            new X509TrustManager() {
                @Override
                public java.security.cert.X509Certificate[] getAcceptedIssuers() {
                    return new X509Certificate[0];
                }

                @Override
                public void checkClientTrusted(
                        java.security.cert.X509Certificate[] certs, String authType) {
                }

                @Override
                public void checkServerTrusted(
                        java.security.cert.X509Certificate[] certs, String authType) {
                }
            }
        };
        try {
            SSLContext sc = SSLContext.getInstance("SSL");
            sc.init(null, trustAllCerts, new java.security.SecureRandom());
            HttpsURLConnection.setDefaultSSLSocketFactory(sc.getSocketFactory());

            HostnameVerifier allHostsValid = new HostnameVerifier() {
                @Override
                public boolean verify(String hostname, SSLSession session) {
                    return true;
                }
            };
            HttpsURLConnection.setDefaultHostnameVerifier(allHostsValid);

        } catch (GeneralSecurityException e) {
            System.out.println(e.getMessage());
        }

        try {
            StringBuilder sendString = new StringBuilder();
            String username = "john";
            String password = "Xc3ffs";
            String httpUrl = "https://127.0.0.1:9508/";
            String folder = "inbox";
            String limit = "3";

            sendString.append(httpUrl).append("api?action=receivemessage&username=").
                    append(username).append("&password=").
                    append(password).append("&folder=").append(folder).
                    append("&limit=").append(limit).append("&afterdownload=delete");

            System.out.println("Sending request: " + sendString.toString());

            URL url = new URL(sendString.toString());
            HttpURLConnection con = (HttpURLConnection) url.openConnection();
            con.setRequestMethod("GET");

            BufferedReader br = null;
            System.out.println("Http response received: ");
            if (con.getResponseCode() == 200) {
                br = new BufferedReader(new InputStreamReader(con.getInputStream()));
                String response =  br.lines().collect(Collectors.joining("\n"));
                response = response.substring(response.indexOf('\n')+1);
                response = response.substring(response.indexOf('\n')+1);
                DisplayMessages(response);

            } else {
                br = new BufferedReader(new InputStreamReader(con.getErrorStream()));
                String response =  br.lines().collect(Collectors.joining("\n"));
                System.out.println(response);
            }

        } catch (IOException ex) {
            System.out.println(ex.getMessage());
        }
    }

    static void DisplayMessages(String response) {
        try{
            DocumentBuilderFactory dbf =
                DocumentBuilderFactory.newInstance();
            DocumentBuilder db = dbf.newDocumentBuilder();
            InputSource is = new InputSource();
            is.setCharacterStream(new StringReader(response));

            Document doc = db.parse(is);
            NodeList nodes = doc.getElementsByTagName("message");

            for (int i = 0; i < nodes.getLength(); i++) {
                Element element = (Element) nodes.item(i);

                NodeList originator = element.getElementsByTagName("originator");
                Element line = (Element) originator.item(0);
                String sender = getCharacterDataFromElement(line);

                NodeList messagedata = element.getElementsByTagName("messagedata");
                line = (Element) messagedata.item(0);
                String text = getCharacterDataFromElement(line);
                DisplayMessage(sender, text);
            }
        } catch (Exception ex) {
            System.out.println("The inbox is empty");
        }
    }
    public static void DisplayMessage(String sender, String text) {
        System.out.println(sender + ": "+ text);
    }

    public static String getCharacterDataFromElement(Element e) {
        Node child = e.getFirstChild();
        if (child instanceof CharacterData) {
           CharacterData cd = (CharacterData) child;
           return cd.getData();
        }
        return "?";
      }
}
Step 1 - Open Apache NetBeans IDE
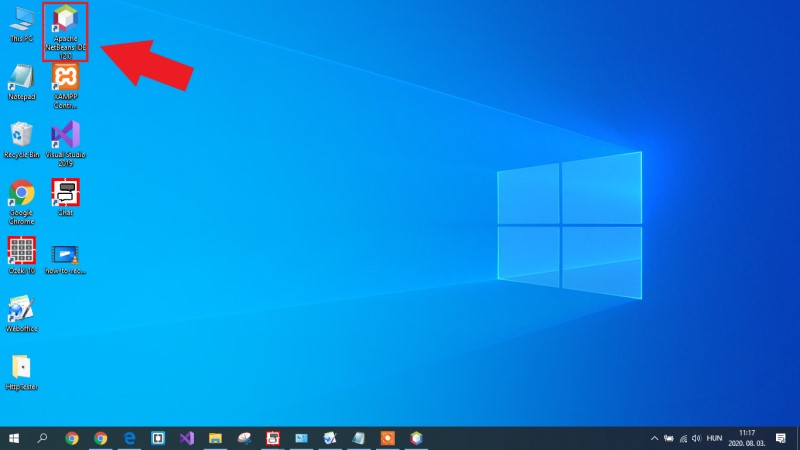
To be able to create a Java application, you need to have an application which capable of doing that. One of these applications is the Apache NetBeans IDE which can be downloaded from the Prerequisites section above. If you already have got this IDE, you just need to open it from your desktop as you can see it in Figure 1.
Step 2 - Create a new Java application
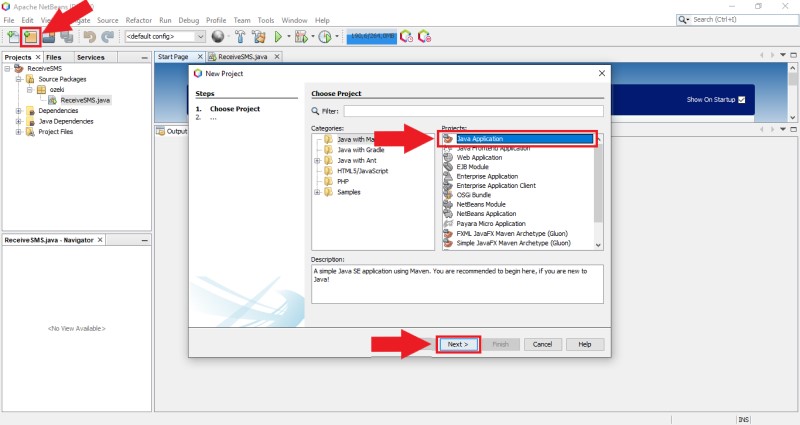
After you opened Apache NetBeans IDE, the first thing that you need to do here is to create a Java application. For that, select the 'New project..' option from the toolbar. By doing this action, a window shows up, which contains all the available projects that can be created in Apache NetBeans. Here, select the Java application option like in Figure 2, and lastly, click on 'Next'.
Step 3 - Configure the Java application
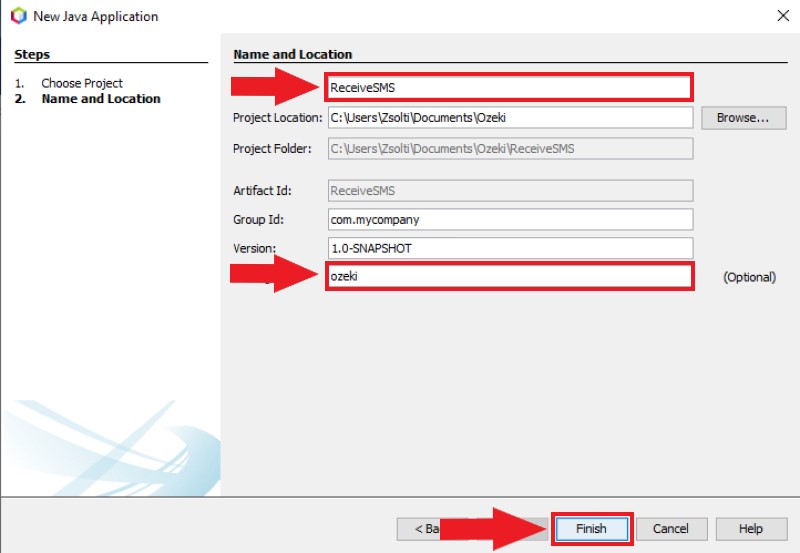
Before creating the Java application, you need to do some configurations on it. Here in this menu, you need to specify a name for the project, you can also select a location for the project. The name of the package can be specified here as well. If you finished with all the configurations, just click on 'Finish' just like in Figure 3.
Step 4 - Create a Java class
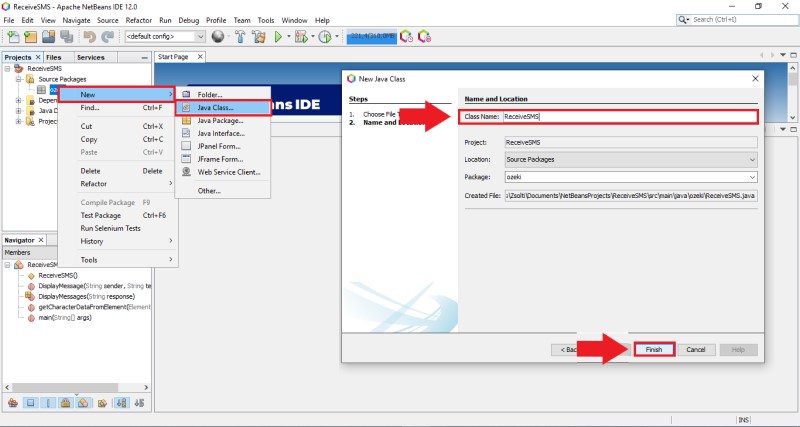
After you created the Java application, you have to create a Java class since at this point it does not contain any class yet. For that, select the package with a right click, then 'New', and as Figure 4 shows that, click on 'Java class...'. Then, you need to specify a name for the Java class and if you finished, just click on 'Create'.
Step 5 - Replace the Java code from this page
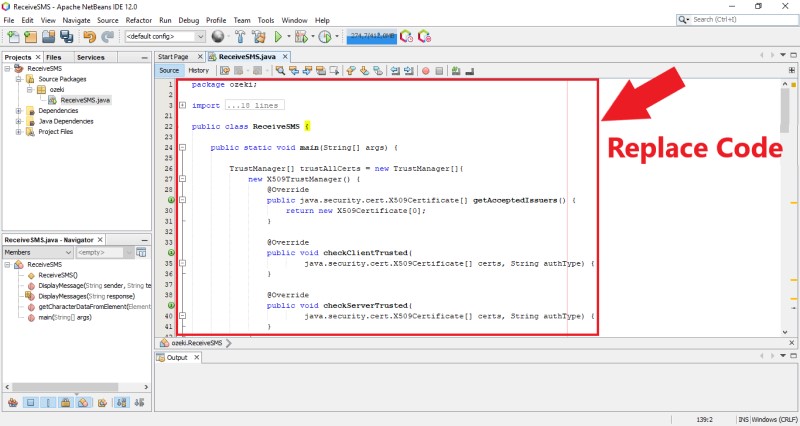
At this point, you have the Java application that you need, but it does not contain the right code. To fix that, you need to replace the original code with the example code from this page. So, just go to the example code, and copy it to your clipboard using the Ctrl+C keyboard shortcut. Then, go to the created Java class, and first, delete the code that you can be found here. After that, press Ctrl+V to paste the example code to the Java class as you can see it in Figure 5.
Step 6 - Send some test messages
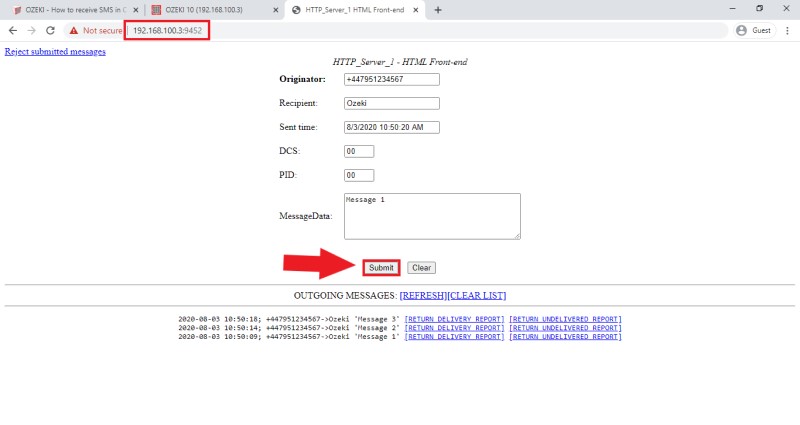
Before running the example Java application, you need to have some incoming messages that can be collected by the application. SMS Gateway provides you the opportunity to simulate the incoming messages so you can test your solution. For that, just open SMS Gateway and select the HTTP Server connection. If you don't have a HTTP Server connection, check how to create a HTTP Server connection. Here, open the HTML form of this connection, and like in Figure 6, send some test messages.
Step 7 - Run the Java application
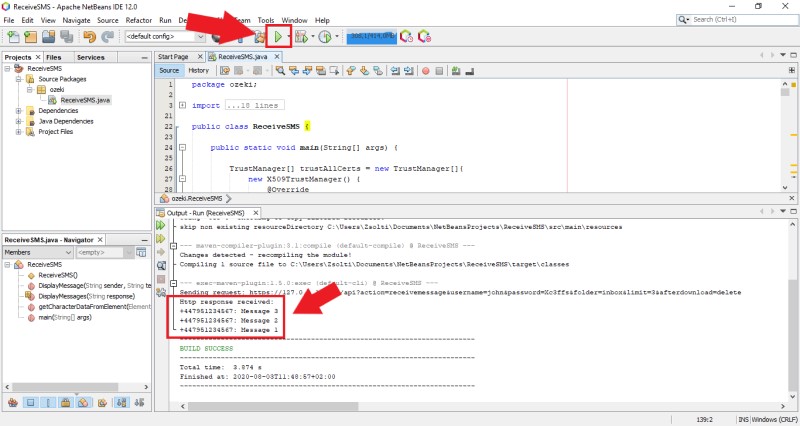
The last step of this guide is to run the Java application. This is a simple operation; all you need to do is to click on the 'Run' button in Apache NetBeans like in Figure 7. This action runs the example Java code, which prints the HTTP request that was sent to the SMS Gateway, and then, it prints the response as well from the SMS Gateway which contains all the incoming messages.
To sum it up
This guide you just read gives you information about how you receive SMS messages from the SMS Gateway using a Java application. Using our Java SMS API, you can make use of the resources of the Java language and use it to control the SMS Gateway. The Java API combined with the Ozeki SMS Gateway will make a powerful SMS sending system capable of sending up to a 1000 SMS per second.
If you would like to get to know more useful insights about the advantages of other similar API solutions, visit our page about using PHP to send SMS, or Python to manage SMS traffic.
If you need e-mail to SMS forwarding and you have not already done so, Download Ozeki SMS Gateway now and create this setup!
