How to setup an SMPP server
To setup SMPP Server you will need 20 minutes. This page gives steps and the necessary information to help you complete this procedure efficiently. We will use Ozeki SMS Gateway. For example, it can be used to keep in touch with customers and employees and to create advanced IT solutions, such as one time passwords, product delivery notifications or payment reminders. This guide requires common knowledge of SMS technology. You will be provided some valuable information and detailed step by step instructions.
How to setup an SMPP service (Quick steps)
To setup an SMPP service:
- Launch Ozeki SMS Gateway
- Create new SMS Service
- Select SMPP SMS service
- Specify SMS service details
- Enable SMPP SMS service connection
- Install SMPP user
- Provide SMPP user login information
- Check the logs
Install Ozeki SMS gateway
To learn how you can setup Ozeki Installer please visit the following page: https://ozeki.hu/p_1001-how-to-install-ozeki-apps-on-windows.html. This guide provides a general introduction to the installation of the Ozeki Installer software, as well as the SMS Gateway installation procedure.
Open Advanced menu
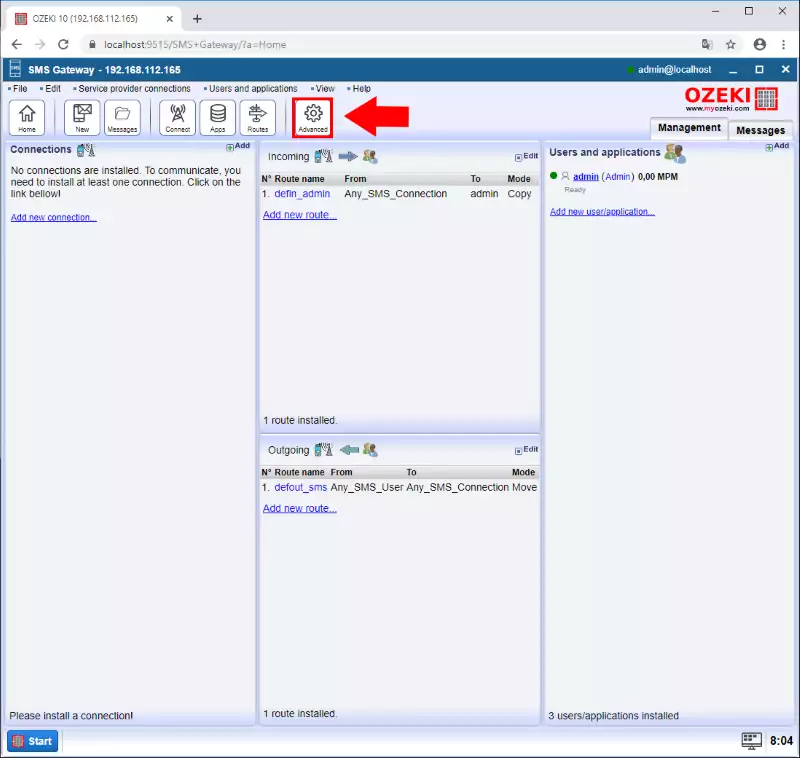
You can find the list of services in the Advanced menu of Ozeki SMS Gateway. Start the Ozeki SMS Gateway and look for the Advanced button located on the Toolbar (Figure 1). Click it to reach the list of services, where you can delete and create new ones.
Create new service
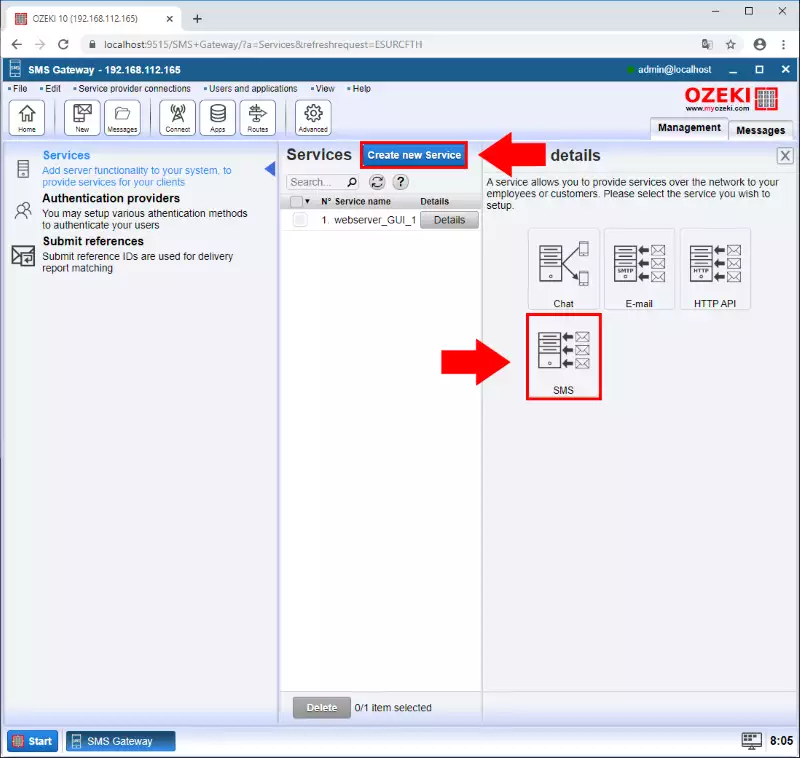
In the services list, look for the blue Create new Service button. Click it and a service details panel will pop-up on the right side of the screen (Figure 2). From there, you will see your options about what type of service you wish to create. This time, choose the SMS service. Click it and proceed to the next step.
Choose SMPP service
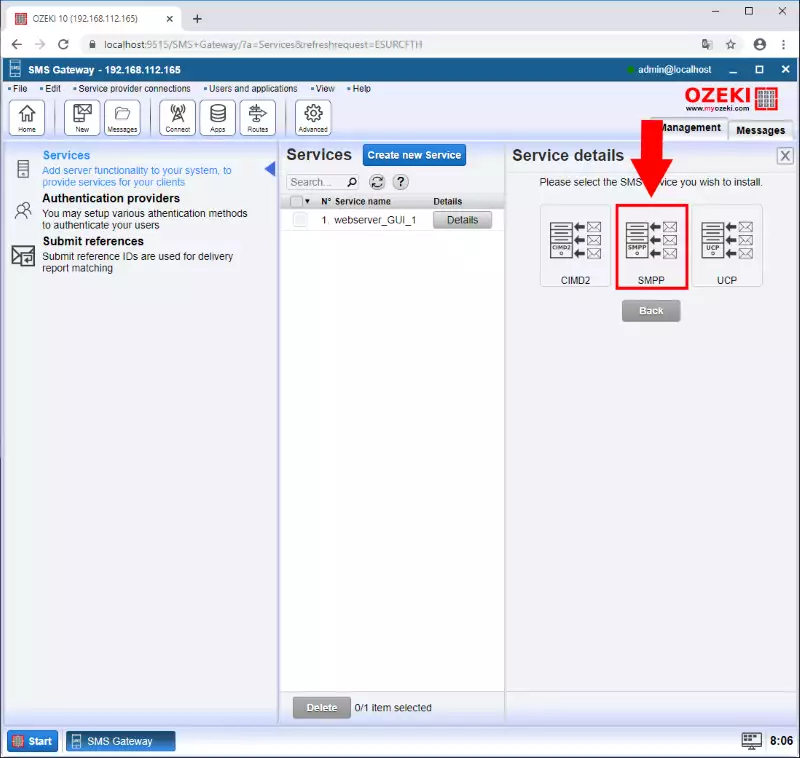
In the next panel, you get to choose what type of SMS service you wish to create. You have three options. CIMD2, SMPP and UCP. In this case, choose the SMPP one. Click it and proceed with the tutorial. (Figure 3)
Provide a name and configure the connection
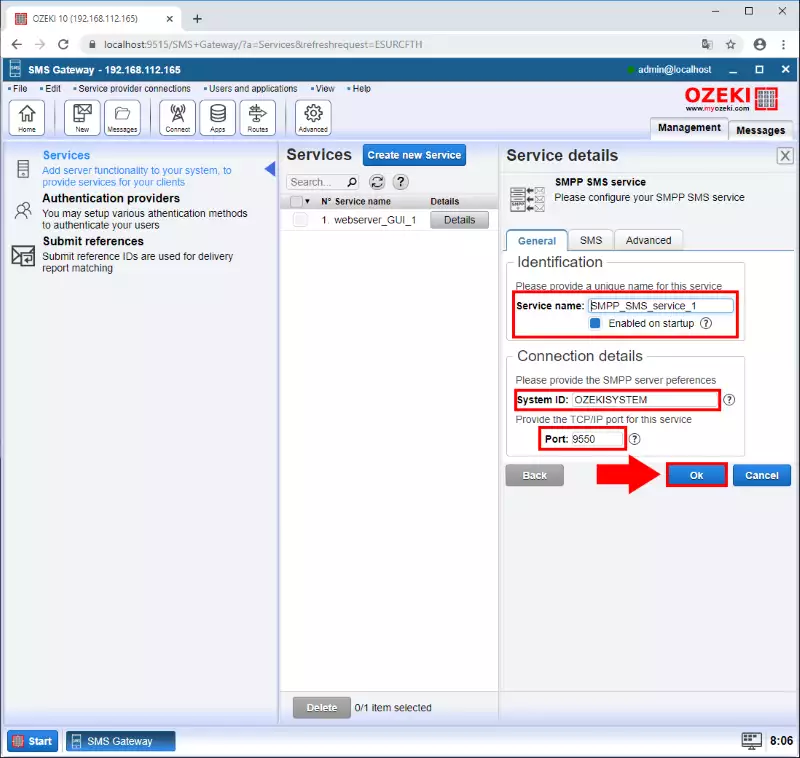
In this page, you need to name your service. Make sure to choose a name that is distinctive for easy identification later. Below the Service name textbox, you can find a Connection details group box (Figure 4). Here you need to provide a system ID and a port number for the SMPP SMS service. Note that the port number should be 9550 and the System ID should be OZEKISYSTEM. Click the Ok button to finalize the modifications.
The created service
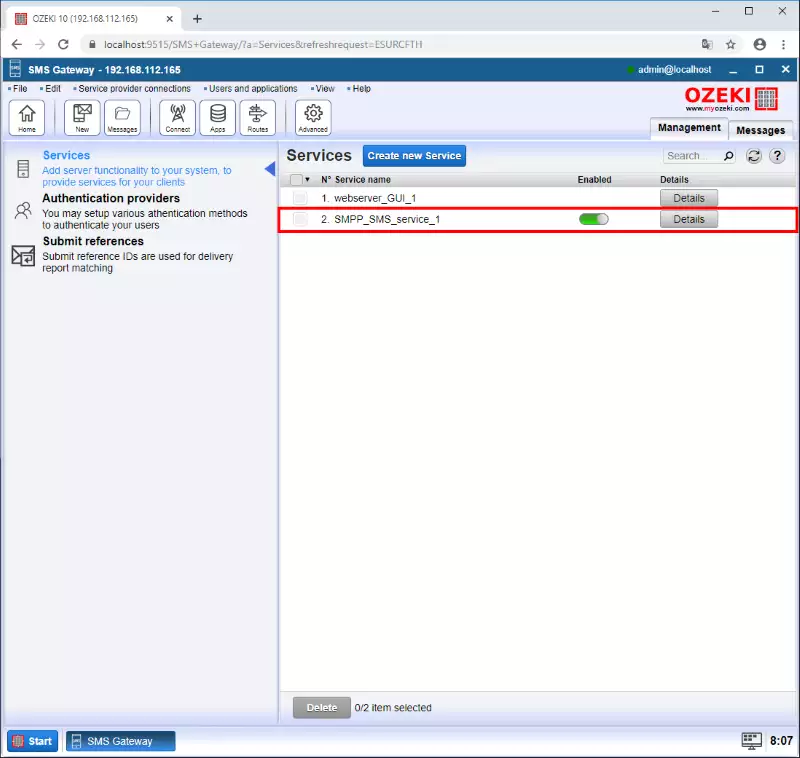
In the Service list, you can see all the created services (Figure 5). You can change the details of the service, create new ones, or delete existing services. To enable the service, look for the Enabled switch button. If it is green, the connection is live, and you can start using it.
Create new SMPP user
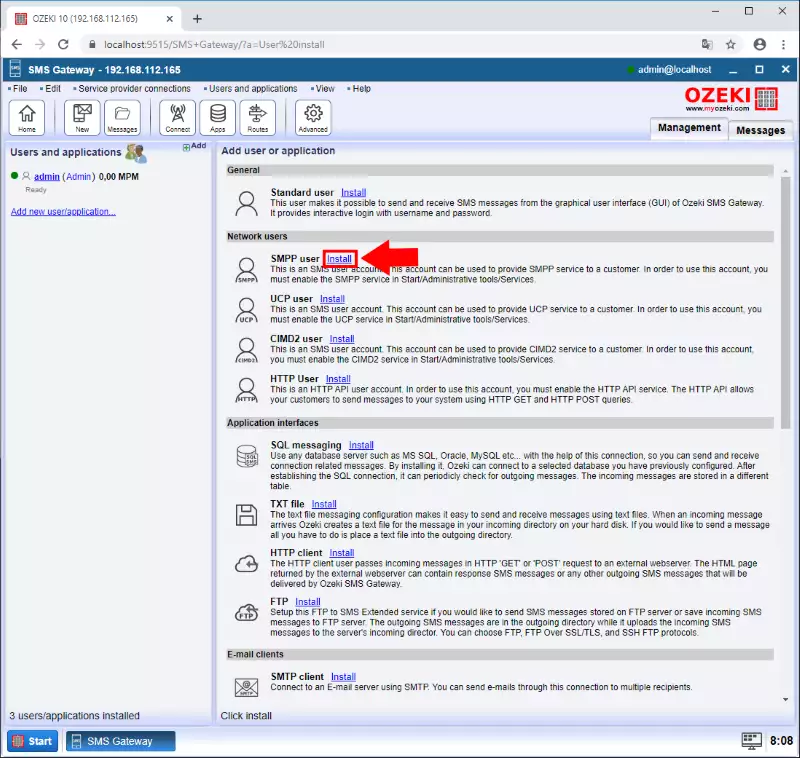
In order to use the SMPP service, you need to create an SMPP user. To do so, click the Add new user/application button located on the home page of the Ozeki SMS Gateway. After that, choose the SMPP user item from the Network users install list. Click the Install button next to it to start the installation procedure, as you can see on Figure 6.
Provide the Username and the Password of the user
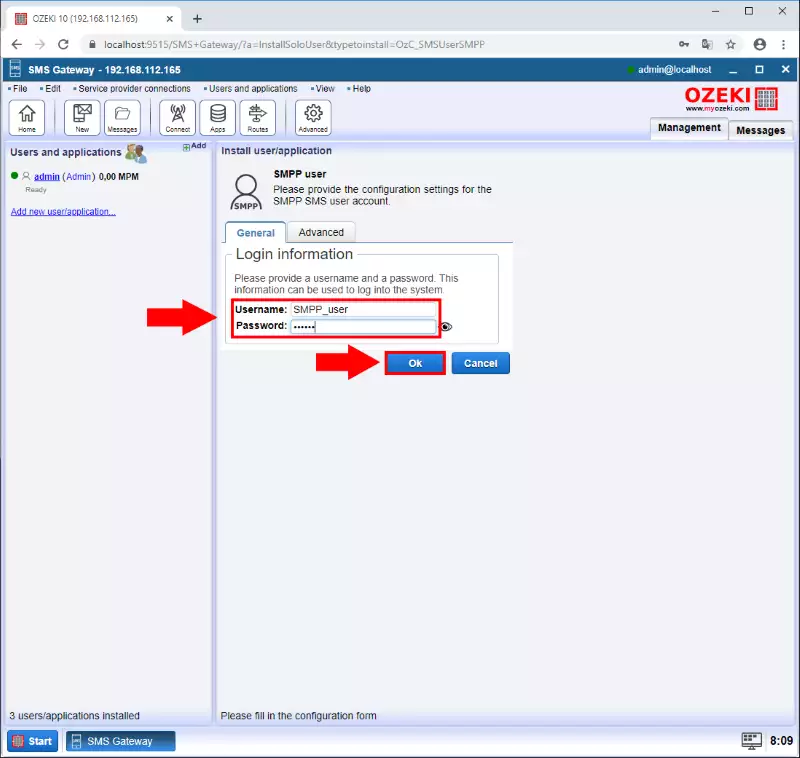
To have a secure connection, you need to provide a username and a password for logging in to the system. Make sure to use a username that you will remember and a password that is easy to remember and hard to guess. After you are done with it, click the Ok button to proceed with the tutorial (Figure 7).
The events tab
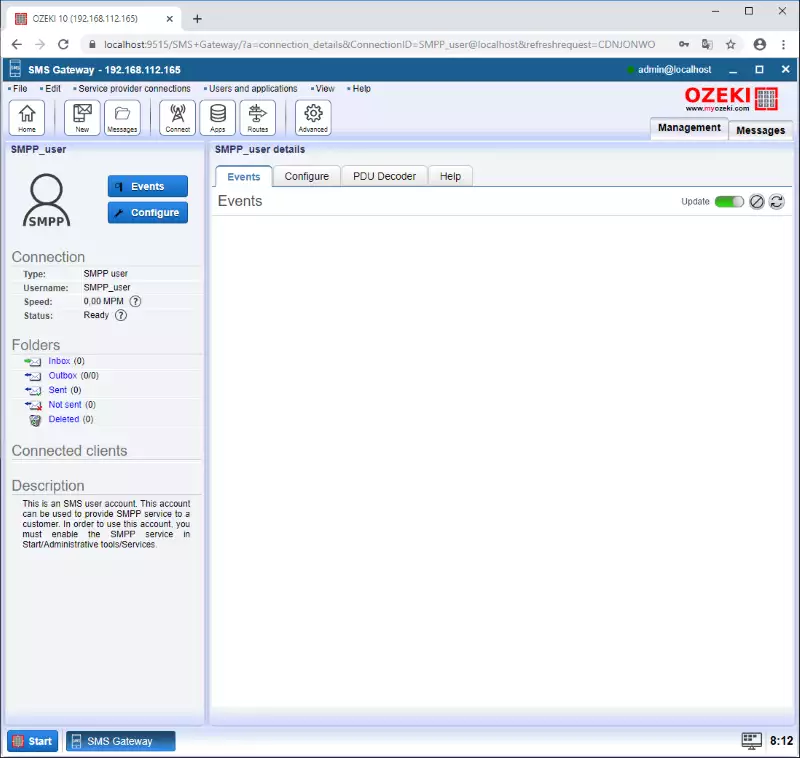
In the Event tab, you will be able to see all the recorded events on this connection. As you can see on Figure 8, at the moment it is empty, because it is yet to be connected with the SMPP client. After a while, the event panel will be full of logging information.
Check the logs about client connections
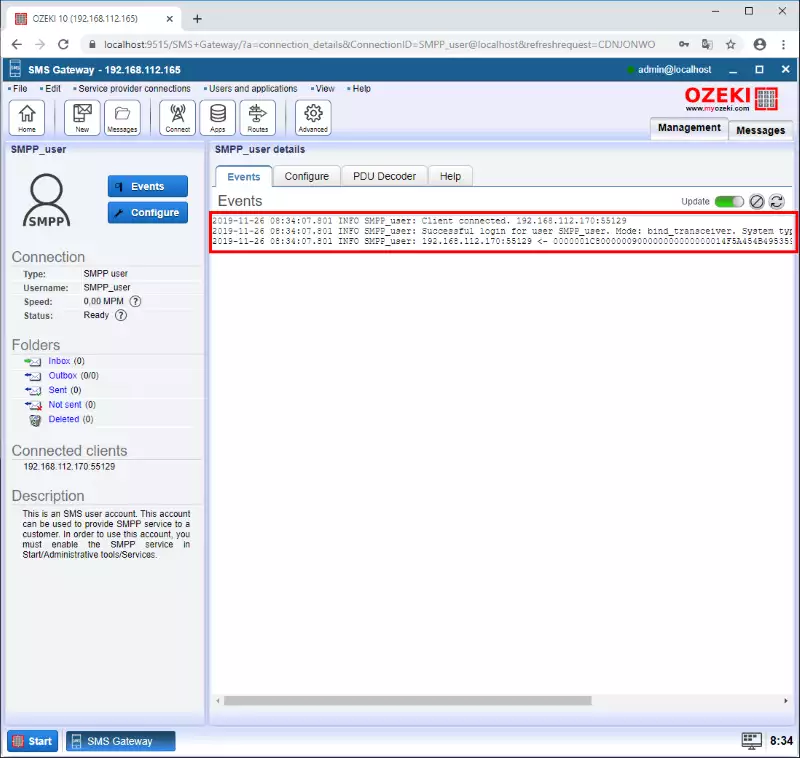
In the User's Events tab, you can see the record of a successful login. (Figure 9) Every log line contains information about the event. The logging is important because it makes dealing with errors easier and less time consuming
Check the logs about an SMS being received
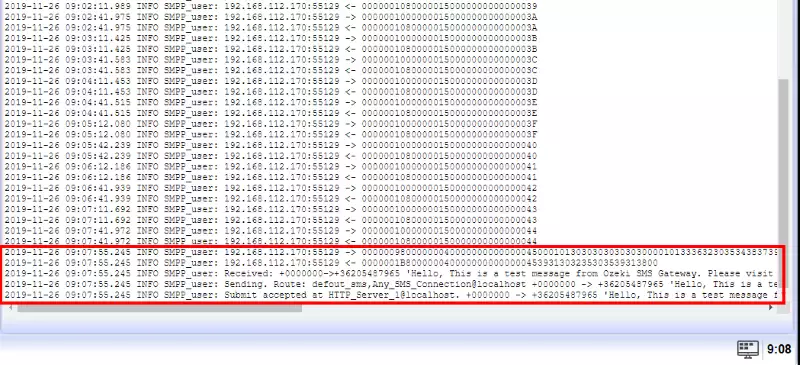
If the connection and the user is configured correctly, in case of a test SMS message, you will see the logging visible on Figure 11. It contains the body of the message, the time of the message and the sender. Make sure to check the message in the Inbox folder. (Figure 10)
FAQs
How do multipart SMS messages count in the MPS limit?
Don't worry about splitting long messages! A multipart message is counted as a single message, no matter how many segments it's broken into. This means your 20MPS license lets you send 20 messages per second, even if each message requires multiple parts. So, for example, you could send up to 60 SMS messages per second with a 20MPS license if all your messages are split into 3 parts.
If I have a high-capacity license, but a service provider limits the maximum number of messages per minute, what can I do?
While your high-capacity license allows you to send a large number of messages per minute, some service providers enforce their own limits. To maximize your sending capability, you'll need to consider both your license and the service provider's restrictions.
What is a service provider connection?
There are two main ways to connect your Ozeki SMS Gateway to the mobile network:
- IP SMS Connection (SMPP, CIMD2, UCP, HTTP): This uses the internet to directly connect to the Short Message Service Centre (SMSC) of your mobile service provider.
- GSM Modem Connection: This involves attaching a physical GSM modem with a SIM card to your computer, similar to a mobile phone.
- Multiple GSM Modems: Plug in additional modems for redundancy or to use different SIM cards.
- Multiple IP SMS Connections: Connect to various service providers for potential cost savings.
- Combined Connections: Mix GSM modems and IP connections for a hybrid approach.
- Least Cost Routing: Send messages through the most cost-effective connection based on destination or provider rates.
- Backup Connection: Ensure uninterrupted service by having a secondary connection in case one fails.
- Load Balancing: Distribute message traffic across multiple connections to increase overall sending capacity.
What is a user?
There are two main types of users that can send SMS messages through your Ozeki SMS Gateway license:
- Office User: This is a traditional user who interacts with the gateway directly through a software interface.
- Client Application: This is a software program, such as your company's financial or marketing system, that connects to the gateway to send and receive messages.
In most scenarios, a "user" refers to a client application. When you connect your company systems (finance and marketing) through separate databases, each connection counts as a separate user.
The number of users doesn't restrict the number of mobile phones you can send messages to. A single user (like your finance system) can broadcast messages to a large list of recipients.
