How to use HLR lookups in SMS routing
This guide provides information about HLR lookups and how HLR information can be used in SMS routing. It first defines what an HLR is and proceeds to give information on how HLR information can be used in SMS routing. Finally, it gives detailed step by step instructions on how to setup HLR lookups in the Ozeki SMS Gateway.
What is HLR
HLR stands for Home Location Register. HLR is a database maintained by the mobile network operator with a list of phone numbers it originally issued. The HLR stores information about whether a phone number is connected to the mobile network, is it ported to a different telephone company and is it roaming a different network.
Getting started
All mobile network operators are connected within a system called the SS7 signalling network. The SS7 transports data about subscribers, networking, voice calls, and SMS text messages between the carriers. Real-time context and status information about every mobile phone is stored in databases called Home Location Registers, which form the backbone of subscriber information for a mobile network.
HLR Lookups is a technology to query home location registers and acquire live networking and connectivity information about mobile phone numbers, such as, whether a mobile phone is switched on or switched off, to which network it belongs, whether it is currently roaming, if a number has been ported between networks, and if it is valid or invalid.
HLR Lookups supply businesses with real time queries towards the home location registers of all mobile networks. This documentation helps you to implement HLR Lookups into your own software to automatically receive real time mobile phone information when needed.
Create a hlr-lookups.com account (Video tutorial)
The following video informs you about how you can connect a HLR account and the Ozeki 10 SMS Gateway. The video starts with the registration of a new HLR Lookup account and takes you all the way to having the SMS Gateway connected with it. You will learn how to register a new HLR user account and how to setup a working connection with the Ozeki 10 SMS Gateway. This detailed video is only a little over 2 minutes and it is easy to follow. You will have no problem following the steps.
Register a user account at HLR Lookup
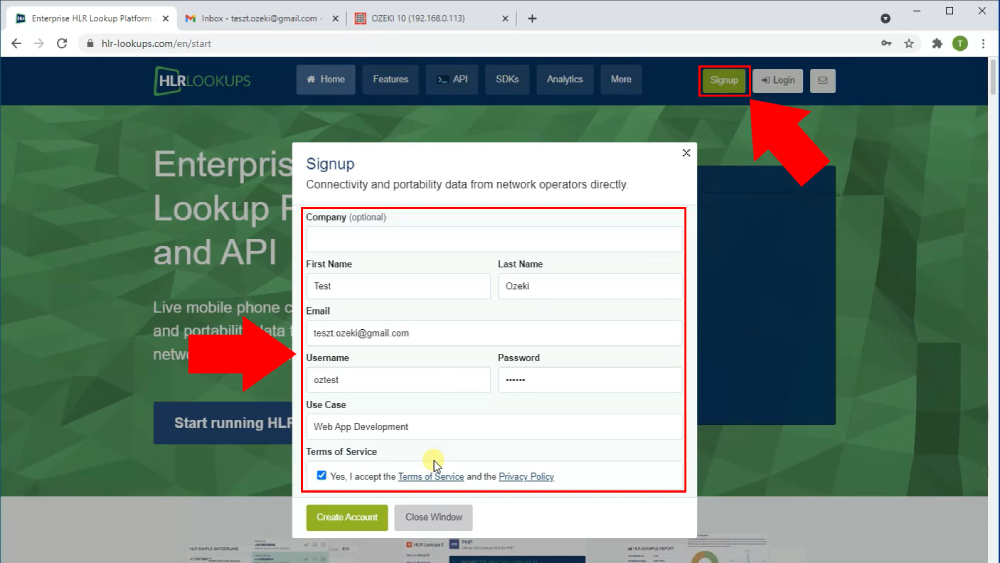
To start using the service, you first need to visit the home page of HLK Lookup. Search for a green signup button located on the upper-right side of the page (Figure 1). Click it and you will be presented with a registration form. Type in the information required for signing up and click the green Create Account button. This way you will have a registered user account for the HLR Lookup service. With this account you could begin implementing the feature to your system.
Check the confirmation email
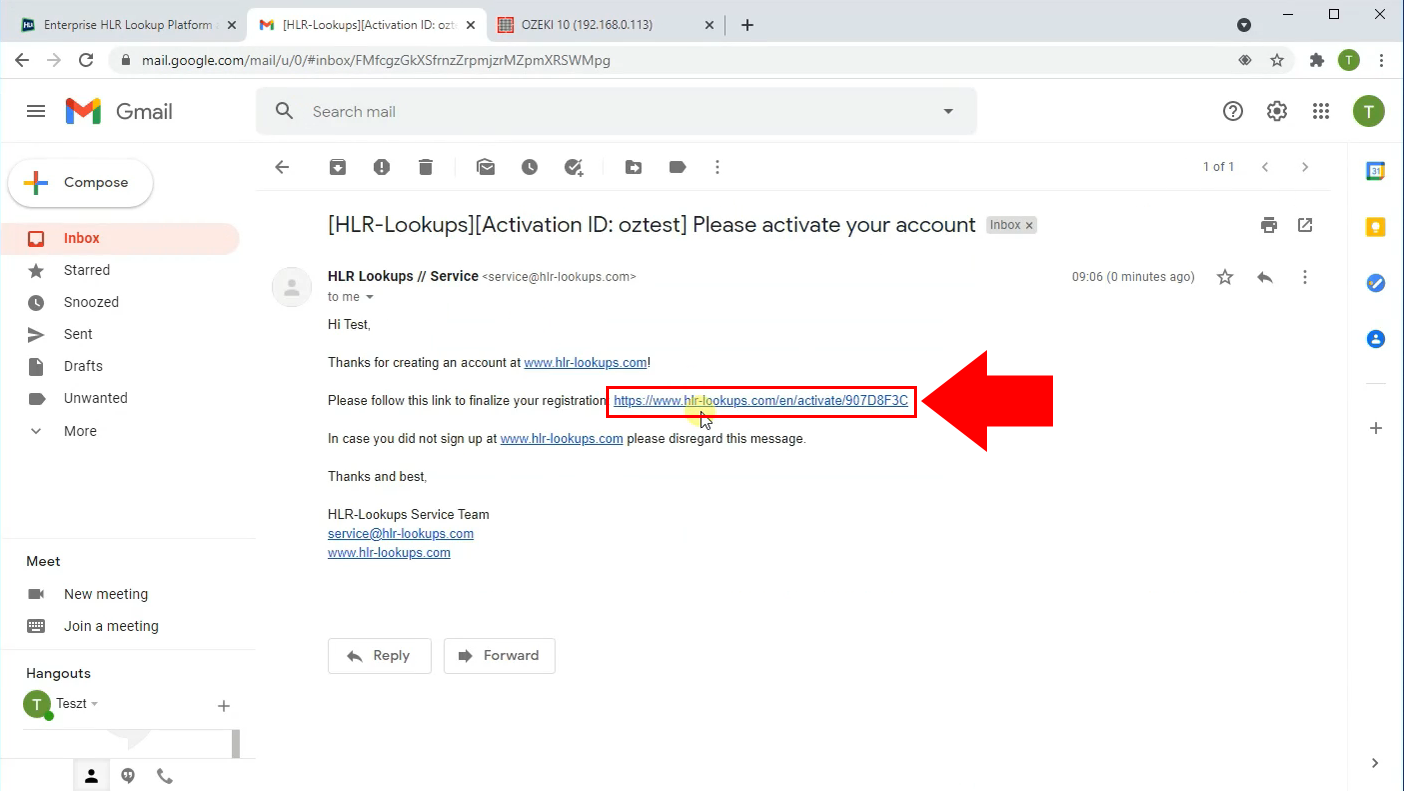
Login to your email account and search for a confirmation email from HLR Lookup. Click the blue link to finalize your registration (Figure 2). This email is an assurance that the email address for the user account is legit and reachable by the owner. If you activated your account, go back to the main page of the HLR Lookup website.
Open the API settings
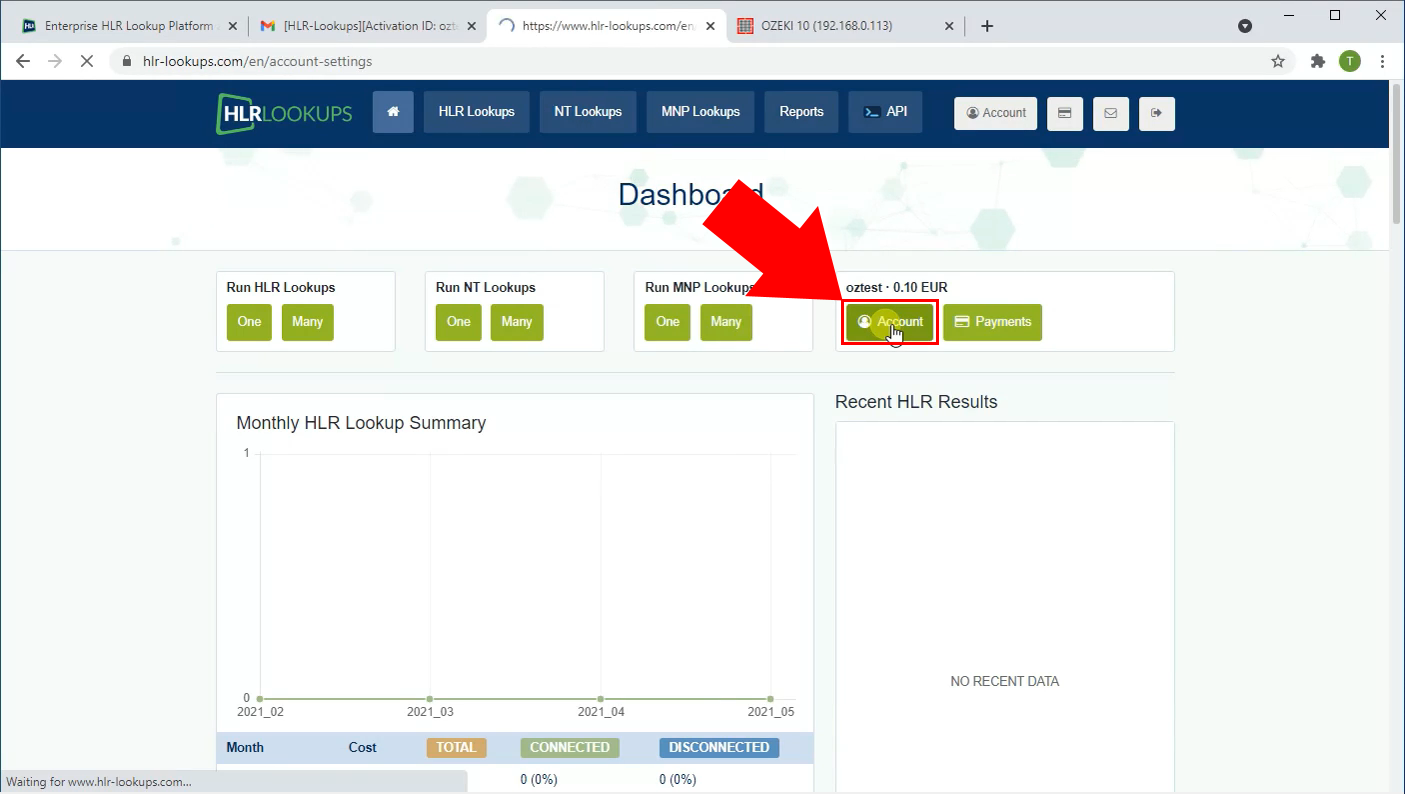
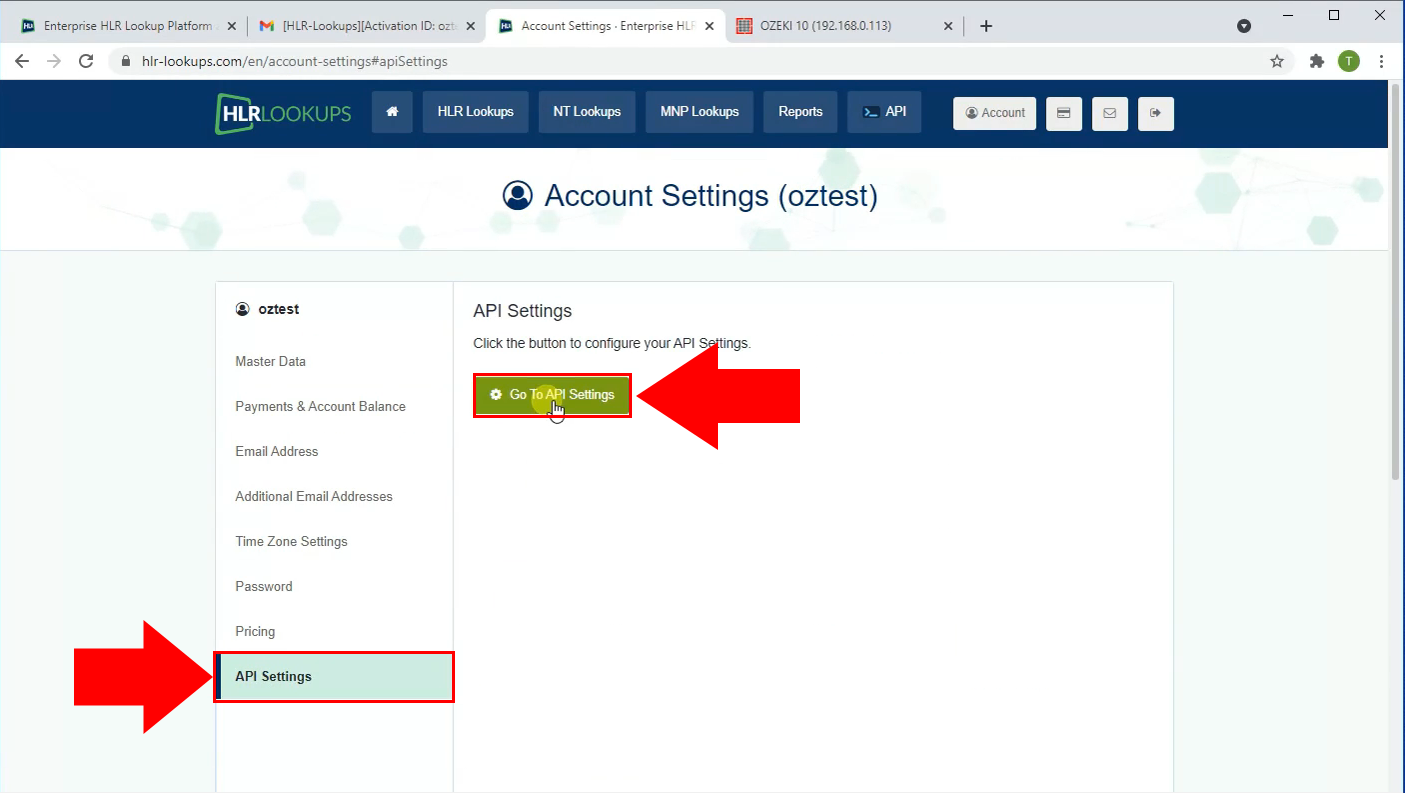
Login to your account to access your dashboard, where you could check your spendings. To access your account settings, search for a green Account button located under the Dashboard label. By clicking it, you will reach the account settings page. (Figure 3)
Look for the API settings option, which is the last one on the list of settings (Figure 4). Click it and find the green Got To API Settings button. By configuring your API settings, you will get all the necessary API credentials you need to work with the HLR Lookup service.
Copy the API key and API secret
An API is an Application Programming Interface that provides access to the hardware and software element of a system.
A program could send requests to an API that will return with the collection of required information.
To avoid exposing the ecosystem of HLR Lookup to attack,
it is important to protect the API with a unique key and password that is only available for the user of the service.
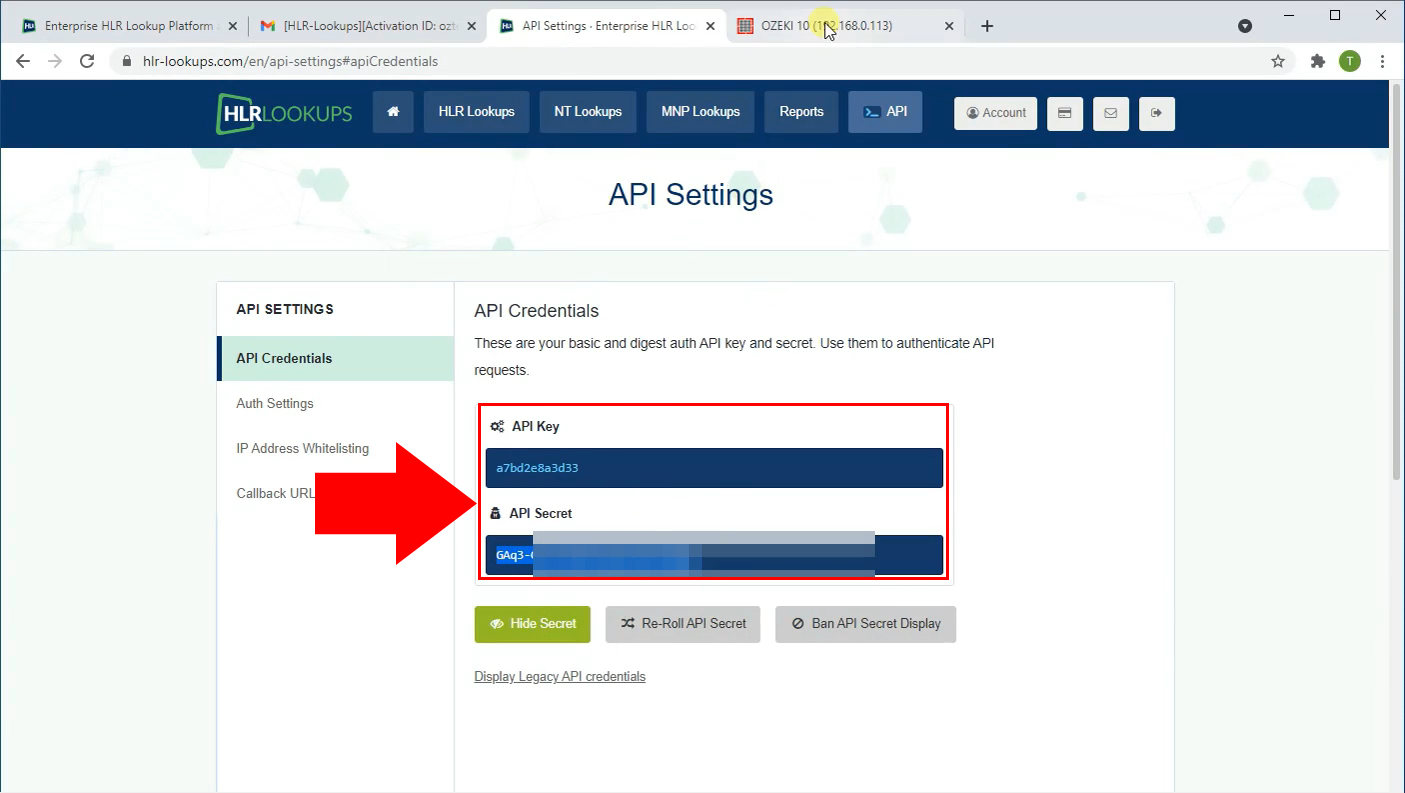
You could get the key and password in the API Credentials page of the HLR Lookup menu (Figure 5).
Copy those information, to use them later in the process of creating a HLR provider in Ozeki 10 SMS Gateway.
Create a new provider in Ozeki 10 SMS Gateway
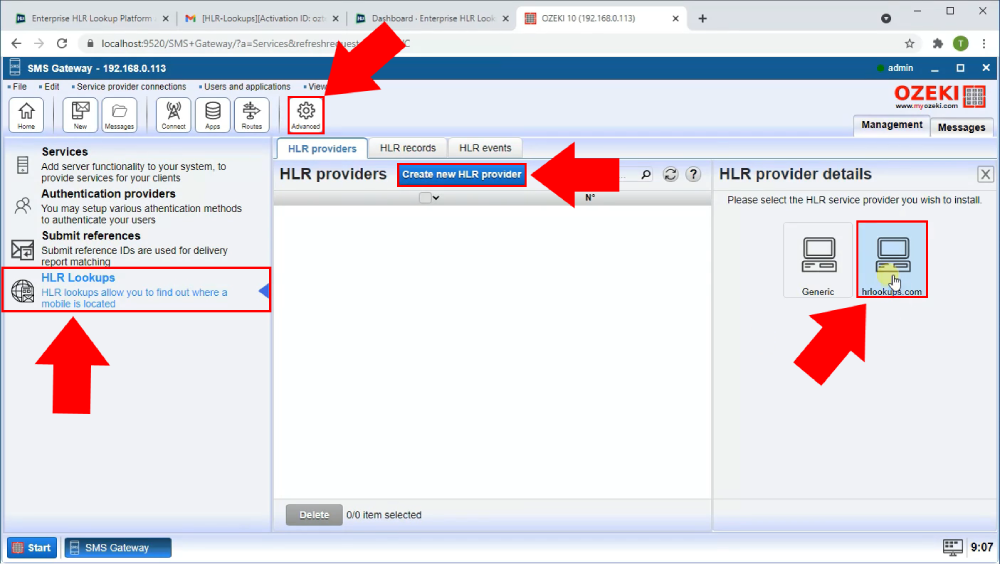
Open the Ozeki 10 SMS Gateway and open the Advanced menu with the icon located on the toolbar (Figure 6). On the left panel, you will find the HLR Lookups button. Click it and look for the blue Create new HLR provider button. Press it and you will be presented with two options on the right side of the screen. Choose the hlrlookups.com. This way, you will have direct connection to the HLR Lookup service through the API.
Provide the authentication details of the API
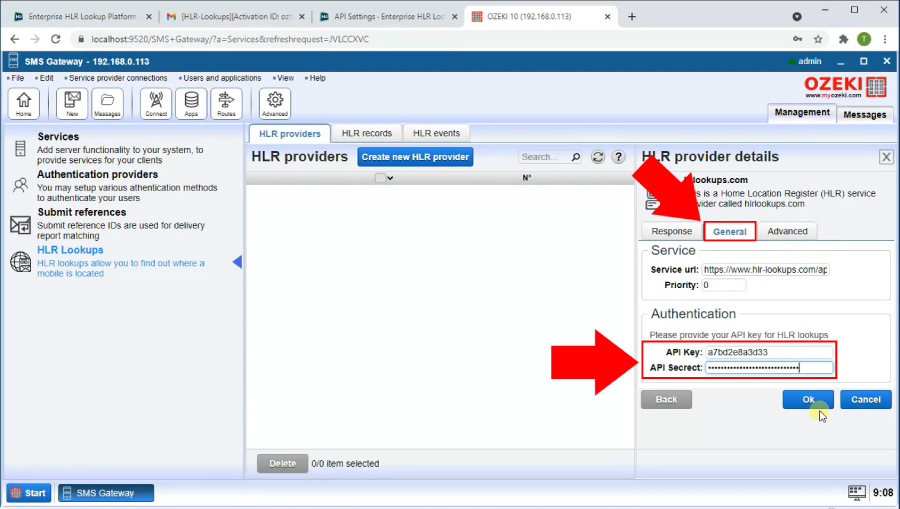
In the General tab, you can find the Authentication group box (Figure 7). There you can find two textboxes. Insert the proper data you copied from the HLR Lookup, into the input boxes. The first box needs the key, the second needs the password or secret. Click the Ok button under the Authentication group box to finalize your setup.
Run HRL lookup from Ozeki SMS Gateway (Video tutorial)
In this video, you will learn how to create a new HLR record directly from the Ozeki 10 SMS Gateway. The video will start with having a HLR provider and takes you all the way until you have every information about the phone number you provided. You will learn how to create a new HLR record and how to get information about the record. This video is only 75 second long. It is very detailed and easy to understand, so you will have no problem following the steps.
Open the HLR Lookups link
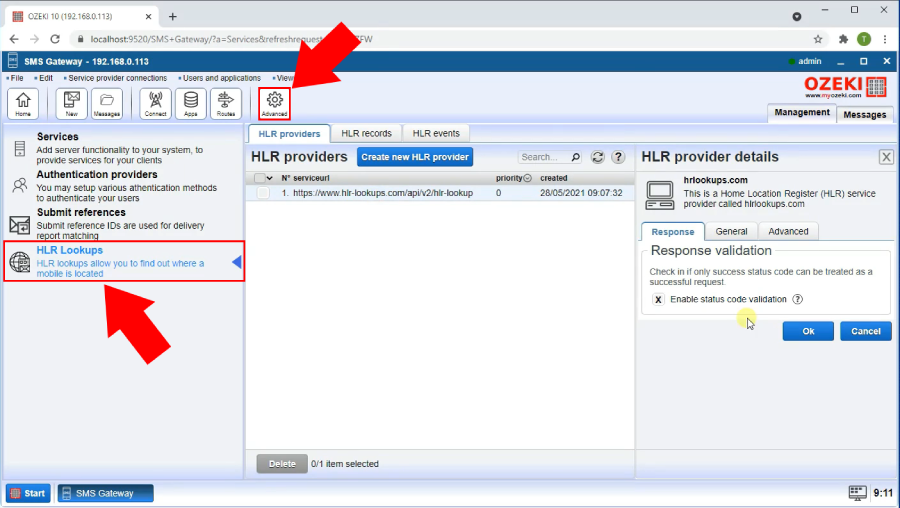
To manage your HLR providers, open the advanced page. Click the Advanced icon located on the toolbar of the Ozeki 10 SMS Gateway. Here you need to find the HLR Lookups on the left panel (Figure 8). Click it and you will see all the existing HLR Providers in the middle panel. This list is important, because you could edit, delete and add new providers from here.
Create a new HLR record
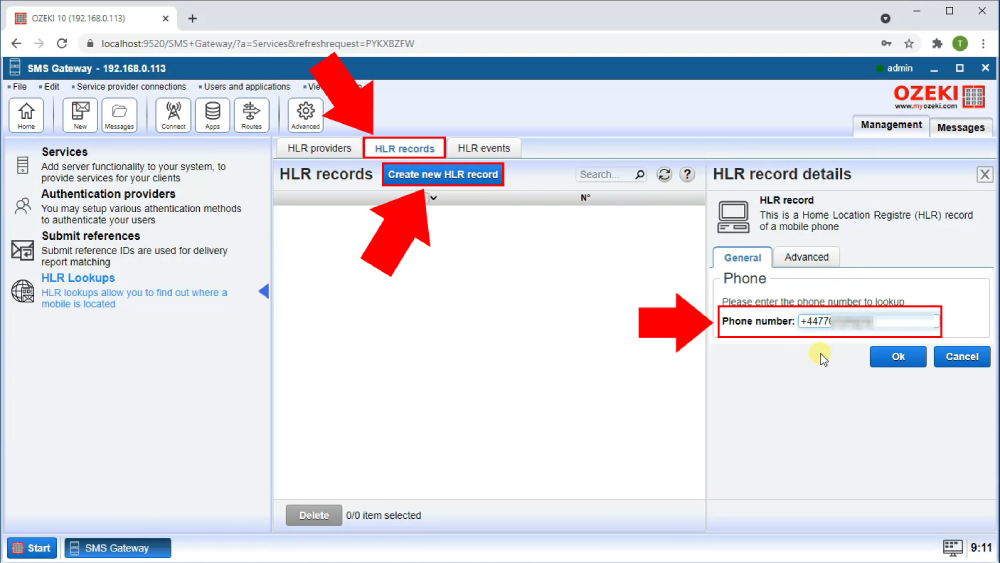
To add a new item to the HLR record list, find the HLR records tab page (Figure 9). Click it and find the blue Create new HLR record button right under the tab. Click it and in the general tab of the right-side panel, you could type in a phone number that you wish to store and query information about with HLR Lookup. This phone number and all the information the HLR Lookup find will become a HLR record.
Request a data query from HLR Lookup
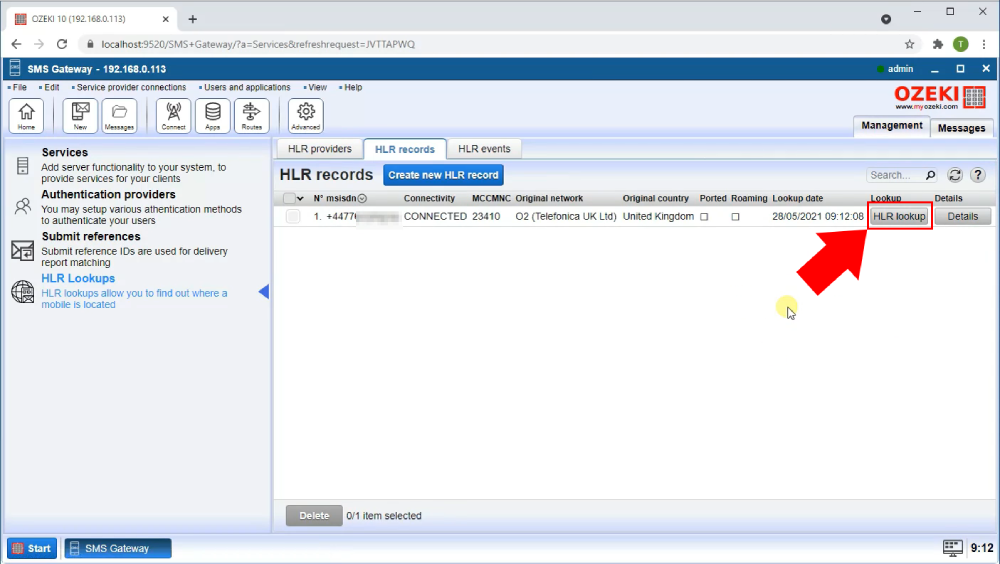
To search for information about the record, go back to the list of HLR records. There, you will find your new item. You can find the phone number, the connectivity status, and more data. To get even more information, press the HLR lookup button located next to the lookup date of the list item. Press it to send a request to the API of the HLR Lookup. It will return with the most important data elements about the record. (Figure 10)
Look at the result of the data query
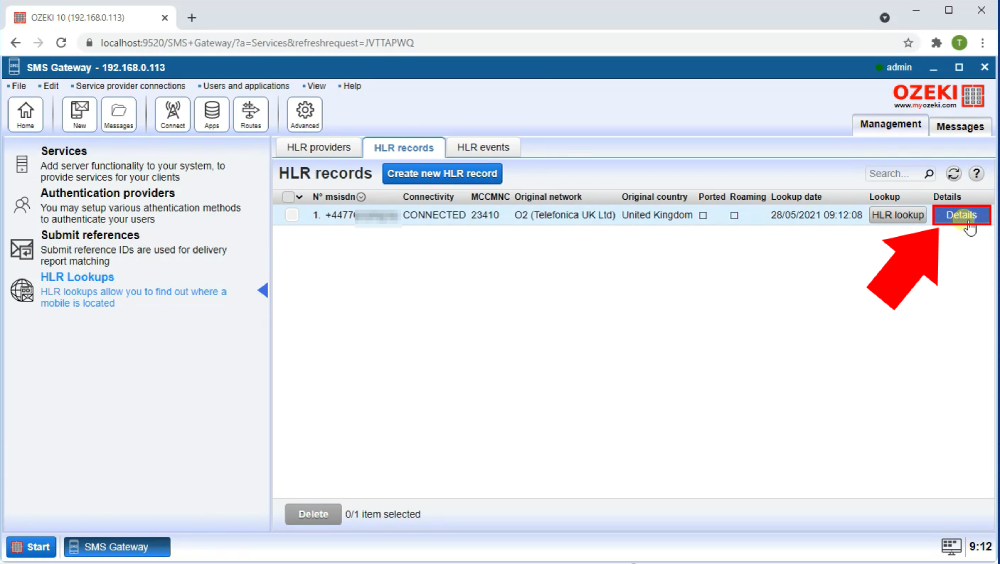
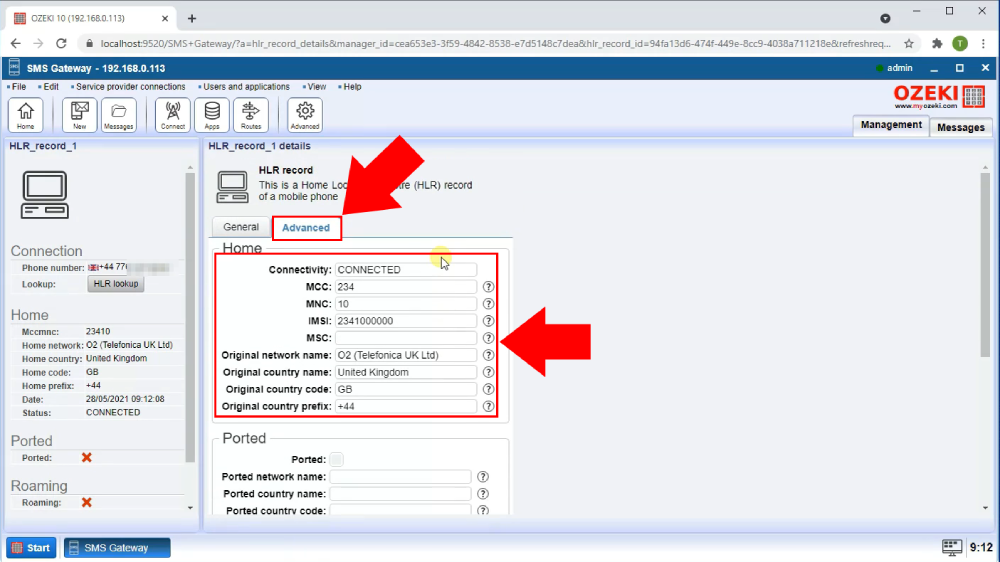
To check the result of the query, look for the Details button located at the end of the record data line (Figure 11). Click it to see the details page, which contains all the information the HLR Lookup service could acquire. The page you will se now is the record details page.
On the record details page, look for the Advanced tab. There you will see a list of information about the phone number. You can see for example if the phone number is connected to any service provider and which country the phone number is registered in. The Hint icon next to each textbox will give you more information about that specific data piece (Figure 12).
How are HLR lookups used in SMS routing?
The Home Location Register (HLR) plays an important role in SMS routing, because it can provide information to where the text message should be routed to.
Large companies setup many SMS routes, to various SMS service providers and mobile network operators and they use SMS routing to determine where each text messages should end up. SMS routing selects the appropriate SMS service provider connection, such as an SMPP client protocol connection, a CIMD2 client protocol connection or a UCP sms client protocol connection for sms delivery.
A HLR lookup can provide valuable information on how an SMS messages should be routed. A HLR lookup in Ozeki works by attaching tags to the SMS messages. Tags contain information about the fields returned by the HLR lookup. HLR lookup is performed before SMS routing takes place. When an SMS route is created it can use match conditions of tags to select the appropriate SMS service provider connection based on information received from the HLR lookup.
HLR based routing (Video tutorial)
The following video gives you all the information about how you can use the HLR Lookup service to route your SMS messages. This video starts with enabling HLR lookup service to use for SMS routing and it will take you all the way to your first sent SMS message. The video is detailed but easy to understand. It only takes a little more than 3 and a half minutes so you will have no problem following the steps. You will learn how to enable HLR lookup for SMS routing, how to configure your message for successful delivery and how to check if the message was accepted and sent.
Edit the settings of the Ozeki 10 SMS Gateway
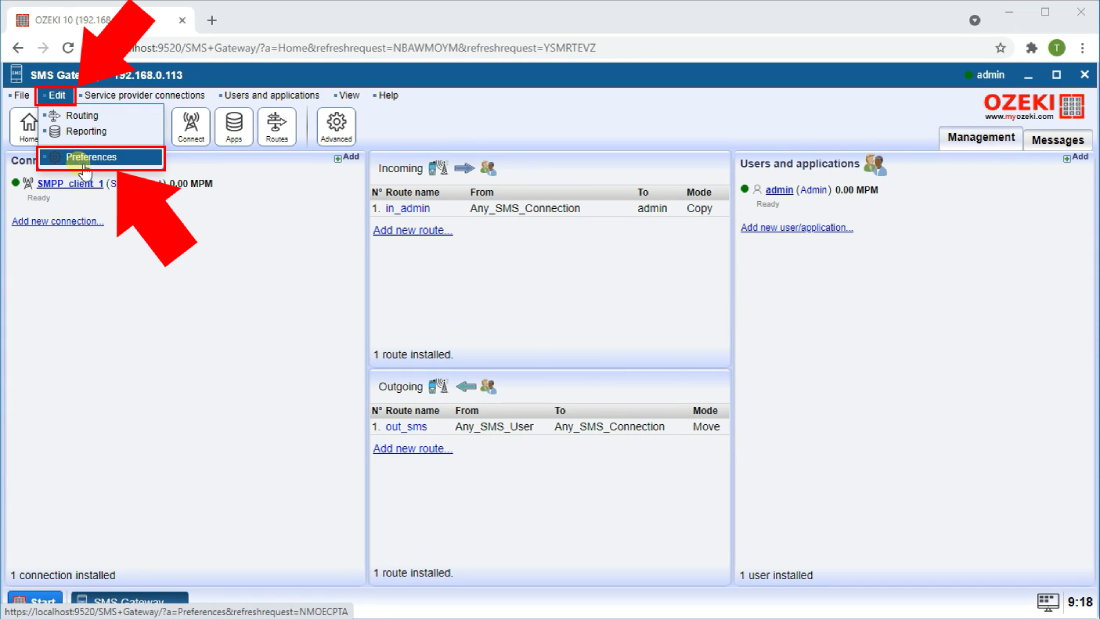
In the menu bar of the Ozeki 10 SMS Gateway, you can see the Edit menu button. Under it, you will see the Preferences submenu item. Click on the button to open the preferences menu (Figure 13). From there you can edit the settings of the Ozeki 10 SMS Gateway and enable HLR Lookup service for SMS routing.
Enable the HLR Lookup for SMS routing option
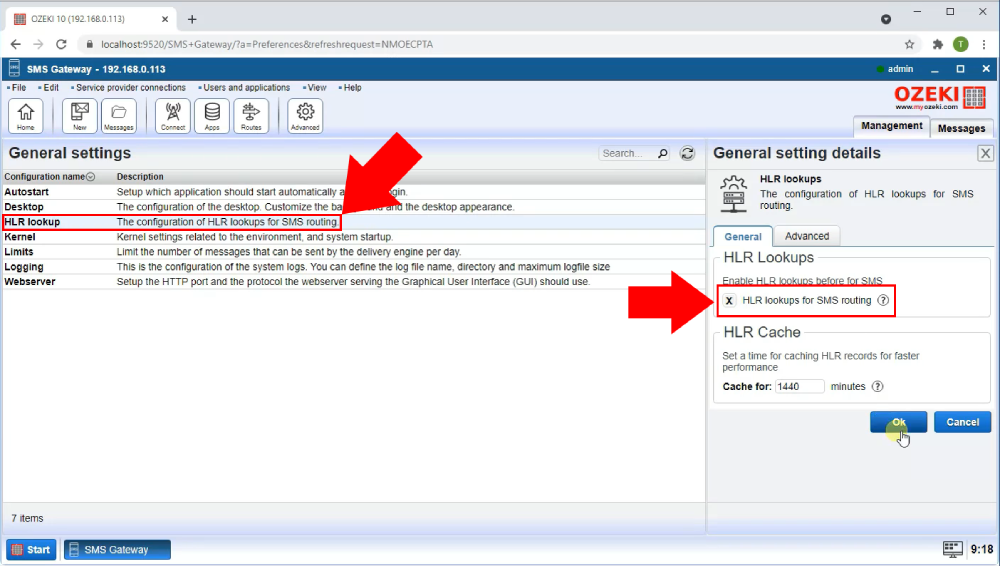
In the General settings list, look for the HLR Lookup list item. Click it to see the general setting details panel. In the HLR Lookups group box, you will find a checkbox that is for enabling the usage of the service for SMS routing (Figure 14). Tick in the checkbox and click on the Ok button to finalize your configuration.
Send a test message
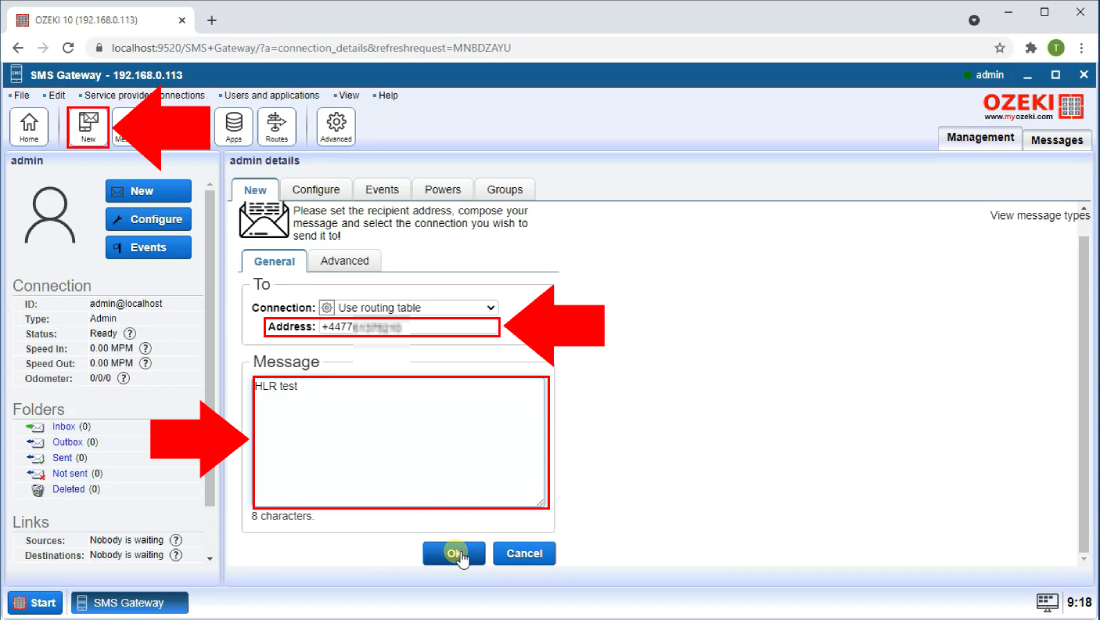
You could test the new routing settings by sending a test message to the recorded phone number. This way you will be able to get the tag that the HLR Lookup attaches to the message. To do so, click the New icon on the tollbar of the Ozeki 10 SMS Gateway (Figure 15). Now you will see New message composing panel. In the Address textbox, you will need the phone number, you wish to send the test message to. Under it, you can see the Message input field. Type in the HLR test text and click the Ok button to send the message. This way, the HLR lookup service will search for information about the phone number. It will attach the information to the message.
Check the tags of the sent message
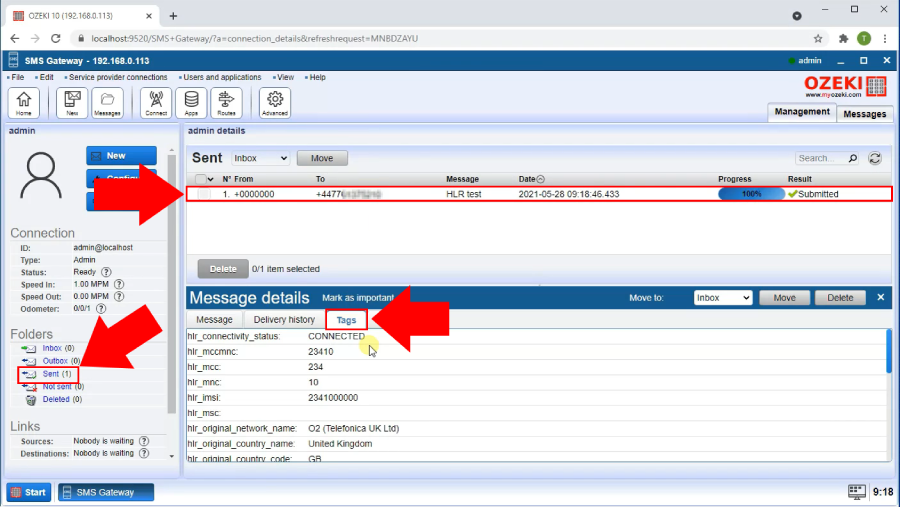
If you have successfully sent the message and it was submitted, it will be visible in the sent folder. To check the information you need in the tags, look for the user information panel on the left side (Figure 16). In the Folders group box, you can find the Sent folder. Click it and check the list of sent messages. Under the list, you will find the Message details panel. Here you can see all the information about the submitted message. Look for the Tags tab page next to the Delivery history tab. Click it and you will be presented with the tags that the HLR Looks service attached to the message. Here, you need to find the hlr_original_country_code field. This tells where the phone number is registered originally. Copy that information somewhere for later use.
Add a new route according to the HLR
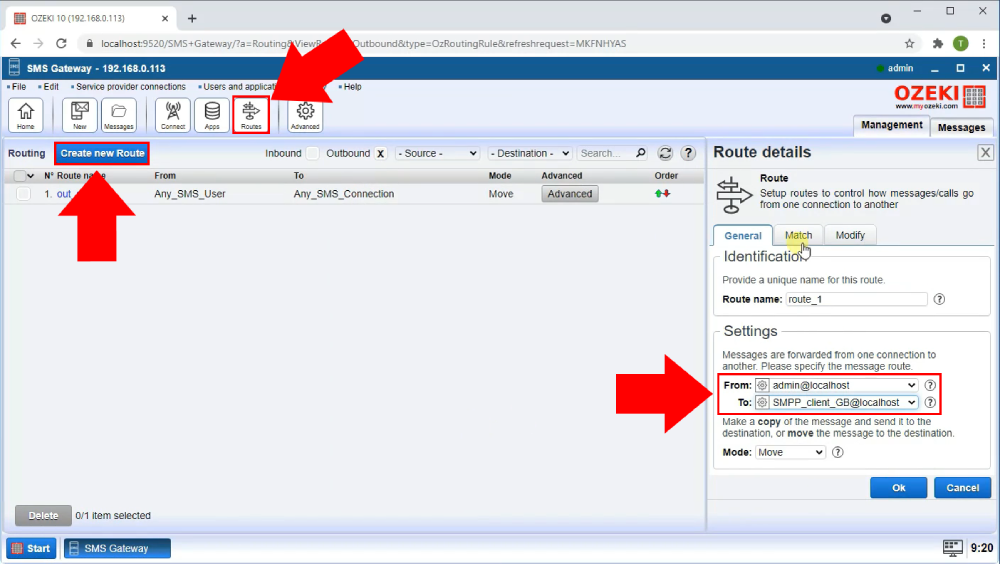
To have the message delivered successfully, you need to create a route for it according to the information obtained by the HLR service. To do this, open the Route list with the Route icon located on the Toolbar (Figure 17). Now you will find a blue button titled Create new Route. Click it to open the Route details panel on the right side of the screen. There you will find the Settings group box. In that group box you will find the To input field. You need to provide the created SMPP clients address here.
Add a new routing condition
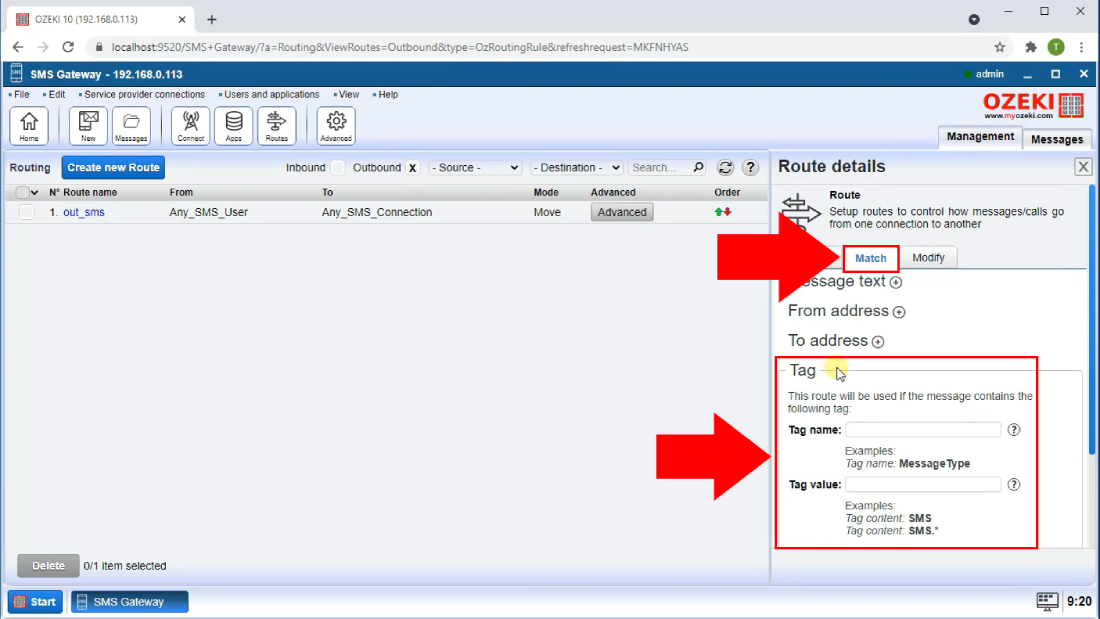
In the Route details panel, you can find the Match tab page. Here you will see a Tag group box (Figure 18). In this group box, you can add a tag name which will be detected and a tag value which will be used as the condition for detection. Next to each input field, there will be a help icon, which can be used as a way to get more information about what you need to type in to the textbox.
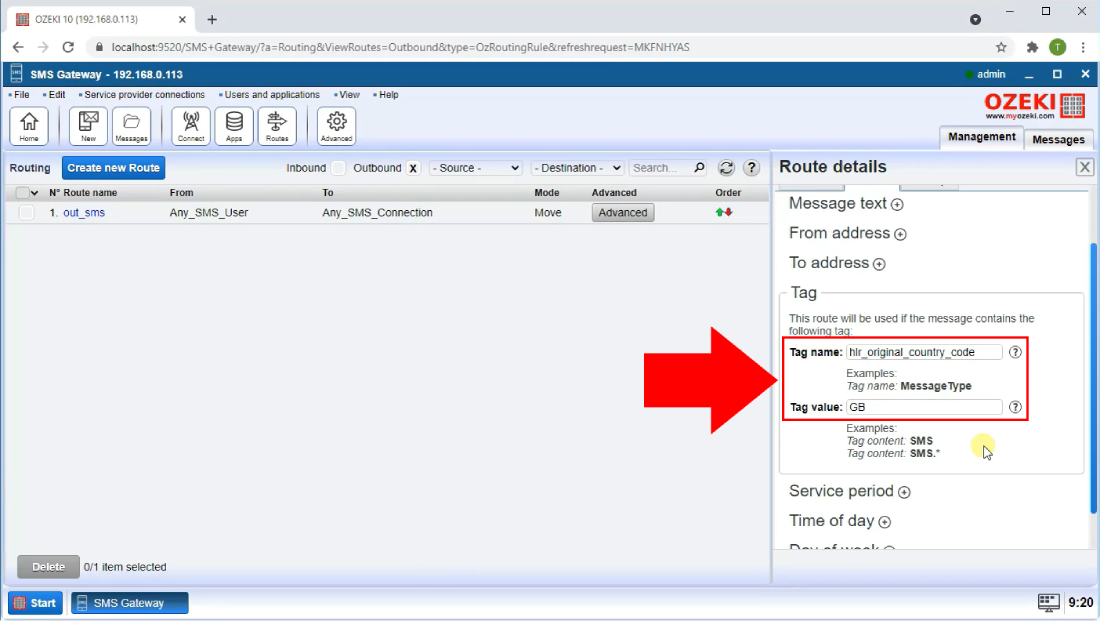
In the Tag name group box, paste in the hlr_original_country_code text that was copied from the tags of the submitted message. Paste the value of the hlr_original_country_code into this textbox. This way, if the gateway detects that a message is sent with the provided value, it will automatically use this suitable SMPP protocol for sending the SMS. In the example case this is the GB tag (Figure 19).
Send a new test message
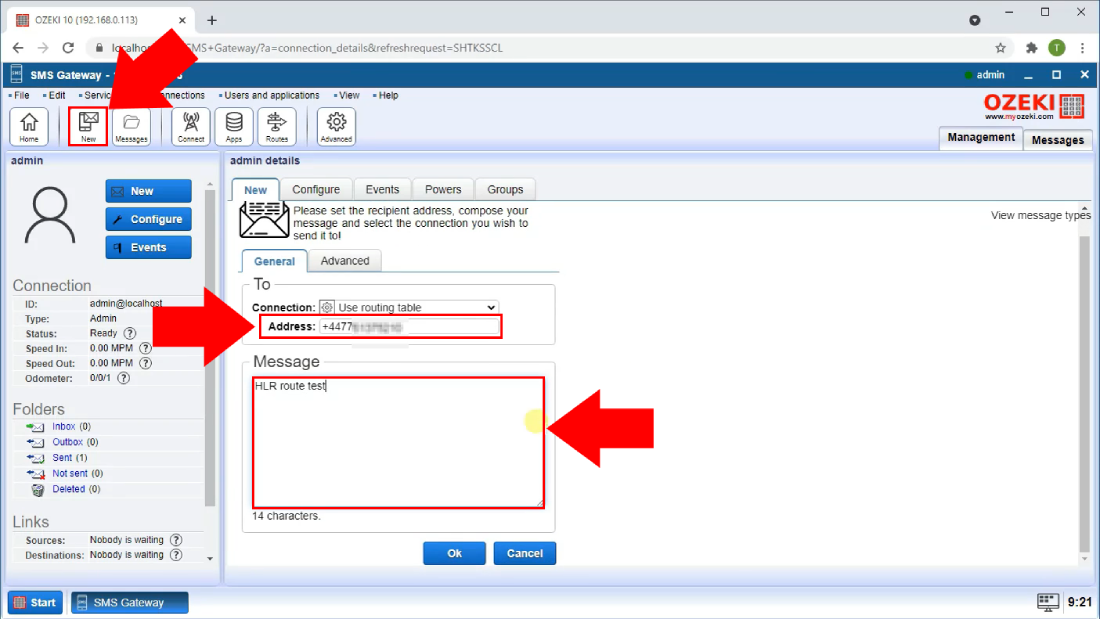
Now it is time to send a new test message. Just as before, click the New icon on the Toolbar. This will take you to the New message compositor page. In the Address textbox, you need to provide the phone number you have sent the last test message to. Under it you can see a Message input field. Type in the HLR route test text. Click on the Ok button to send the message. (Figure 20)
Test message successfully sent
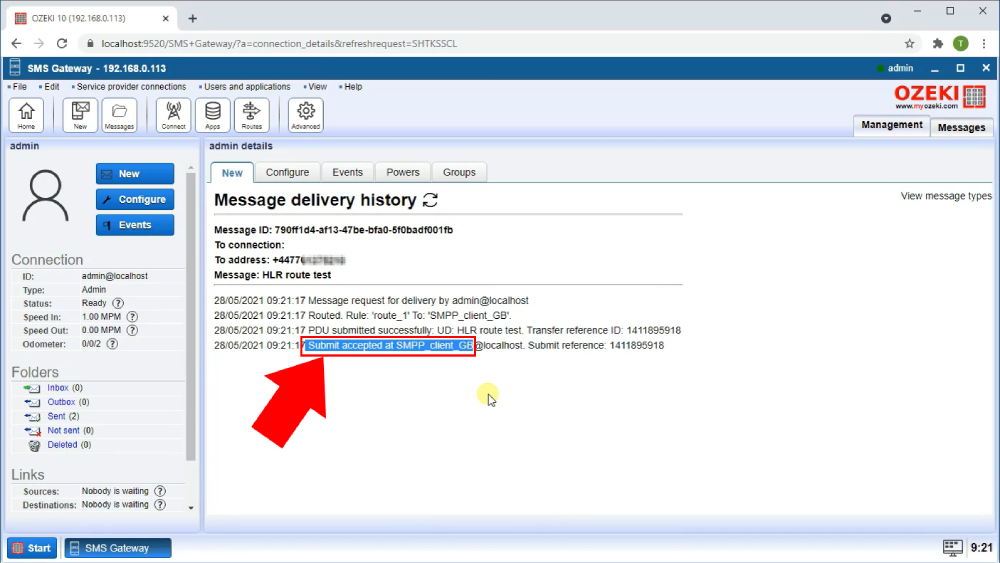
On the Message delivery history page, you can confirm that now the test massage was sent through the new configured SMS connection. The first test message status said the message is submitted. Now this new configured SMS message status says Submit accepted by the receiver. Now you can use this configured SMPP connection to send messages to the country you have provided the code of as a tag value.
