How to route (copy) an SMS to many numbers
The following guide explains how you can send a copy of an SMS message to multiple phone numbers. The solution presented can not only be used to send the same text to multiple contacts, but it can also be used to send a different text from your computer to the selected phone numbers. This solution is great if you wish to notify multiple people with one text message. It can also be used to send additional information to a single person, when a certain text message is sent to him. To understand the tutorial, it is helpful if you are familiar with the SMS routing basics of Ozeki SMS Gateway. This document contains use cases, a video tutorial and a step-by-step instruction list which makes the whole procedure easy to complete. This guide takes about ten minutes to complete. So, let's get started!
How to send multiple sms at once
This question is typically asked when our customers want to send SMS messages effectively. Finding simple solution to this problem is very easy. Use bulk SMS software like Ozeki SMS Gateway. In the software add multiple recipients from your address book in the to field in the sms composer and write the text of the message.
Use cases
- Let a business application send a notification to multiple recipients
- Receive a text and forward it to multiple contacts
- Send multiple sms from your pc with one click
- Send multiple text messages to one person with different text
- Send the same text to multiple phone numbers, when an app wants to send a notification.
- Send sms to multiple contacts in a contact list
How to send sms to multiple recipients?
There are three basic methods to send SMS to multiple recipients. You can add a list of phone numbers on the SMS composer form, you can add the phone numbers to an SMS address book (and use the address book name as the recipient field when you send the text messages), and you can use the routing table to send a single SMS to many phone numbers. This document focuses on using the SMS routing table to achieve this goal.
To send sms to multiple recipients you can:
- Add multiple recipients in the to field in the sms composer
- Use an SMS address book as the SMS recipient
- Setup SMS routing to send the sms to many numbers
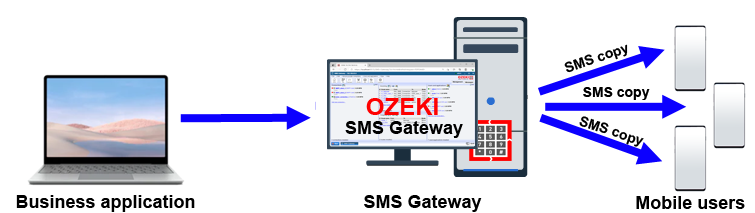
How can an application send a text to multiple numbers using a PC
If you apply this solution in a business system, you will use an SMS gateway installed on a PC. The business application will send the SMS to this SMS gateway, and it will make copies of the SMS and forward the copies to the mobile network. When you send SMS to multiple recipients from a PC you can build a high-performance system sending several thousand or even several million SMS messages.
To setup this solution install Ozeki SMS gateway on Windows or Linux, connect it to the mobile network through the Internet or using a wireless link, and create a user account in it for the business application to be able to send the notification. The notification sent by the business application can be sent to multiple phone numbers by creating several rules in the routing table with the copy directive. (Figure 1)
How to send SMS to multiple recipients (Quick instructions)
To send SMS to many numbers:
- Connect your PC to the mobile network
- Determine the phone number of the PC
- Setup routing to copy SMS messages to multiple numbers
- Send a test SMS from the SMS gateway
- Send an SMS from the Business application
- Let the SMS gateway forward the SMS to the recipients
- Check the log to see if the SMS was sent multiple times
- Ask the recipients if they received the SMS
To send sms to multiple recipients (video tutorial)
In the following video you can see the configuration example. In this example the business application will connect to the SMS gateway through an SMPP server user account. A similar configuration can be used if the business application uses the C# SMS api, or any other method to connect to the SMS gateway.
After the business application is connected, the SMS gateway will use an smpp client connection to forward the SMS messages to multiple numbers to the mobile network. The routing table will do the magic of creating copies of the sms.
Step 1 - Connect your PC to the mobile network
The first step to setup this solution is to connect your PC to the mobile network. You can do this in various ways: you can create a direct connect ot a mobile network operator's SMSC using an SMPP client connection, an UCP client connection or a CIMD2 client connection. You can connect to an online SMS service provider over the Internet, or you can also connect wirelessly, by attaching a GSM modem or a GSM modem pool to your PC or you can simply turn your android mobile into an SMS gateway.
The simplest solution is to use the android sms gateway option. The best solution is to use an SMPP client connection, because it gives much higher performance. (Figure 2)

After you opened the SMS Gateway application, you will be able to see the main menu of the SMS Gateway. This main menu contains three main sections: Connections, Routes and Users and Applications. Now, at this point, you need to create a user in the SMS Gateway. To perform this operation, just click on 'Add new user/application...' as you can see it in Figure 3.

The next menu that shows up, lists all the available users and applications that can be created in SMS Gateway. Every option has got a short description that helps you to decide which application is needed in your case. To follow this guide, you just need to have a simple Standard user, so as Figure 4 shows that, just click on the 'Install' button of the Standard user connection.

Before finishing the creation of the Standard user connection, you have to specify some details for the connection. These details in this case are a username and a password for the connection. So, all you need to do is to provide these details for the connection like in Figure 5 and finally, click on Ok to create the first of the two Standard user connections that needed to complete this guide.

Step 2 - Create the second standard user connection
To see the effects of how Ozeki 10 SMS Gateway copies the SMS messages for multiple connections, you need to create a second Standard user connection. To be able to do this, you just need to follow the instructions of Step 1, since it needs to be created the same way. The only thing that has to be different is the username and the password of the connection. After you created the connection, it shows up as you can see it in Figure 6.

Step 3 - Create HTTP Server connection
The next step of the guide that you need to complete is to create an HTTP Server connection that is capable of sending SMS messages. This way, you will be able to see how the SMS messages are routed to the Standard user connections. To create a new HTTP Server connection, first, select the 'Add new connection...' option from the main menu of the SMS Gateway as Figure 7 demonstrates that.

Next, the selection menu of the connection is going to show up, where you can choose from a lot of available connections with some description and choose which one suits your solution the most. Now, you need to choose the HTTP Server connection, so as you can see it in Figure 8, click on the 'Install' button of that connection the move to the installation menu, where you can specify some details of the connection.

Finally, before you can create the HTTP Server connection, you have to provide the main details of the connection. The first thing that you have to specify here is the name of the connection. Next, you can choose the port, where the HTTP Server is going to run. You can modify this port, or you can just leave it as the default port number. Lastly, specify a telephone number for this connection which makes it easier to identify. After you created the connection, you need to enable it by turning on the toggle like in Figure 9. If it is successfully enabled, you will be able to see the green tick on the connection.

Step 4 - Create a route to the first Standard user
After you created all connections that needed, next, you should set up the routes that copy the messages to the user connections. Since the creation of each user connections also created a default route for them, you don't have to create a completely new route, you can just modify the existing one. So, just select the route of the first Standard user connection. Here, you need to modify the 'From' field by setting the HTTP Server connection for that like in Figure 10 and for the 'Mode', select the Copy option. If you have done these settings, just click on OK.

Step 5 - Create a route to the second Standard user
The route of the second Standard user connection needs to be set up properly as well. So, as you did with the first user connection, select the route of the second Standard user connection from the list of the routes. Here, you need to select the HTTP Server connection for the 'From' field, and as you can see it in Figure 11, select the 'Move' option as the Mode. Lastly, just click OK to save the modifications.

Step 6 - Simulate incoming SMS
At this point, every connection and route set up for the incoming messages. Now, you just need to receive some. To test the solution, you can use the HTTP Server connection to initiate some message and see how it will be routed between the Standard users. For that, open the menu of the HTTP Server connection, and here, click on its URL on the left side. By doing this action, the HTML form of the connection shows up (Figure 12). All you need to do here to send a test message is to set up a recipient phone number and write the text of the message. If you finished, just click on 'Submit'.

Step 7 - Check the inbox folder of the first Standard user
Now, it's time to check the inbox folder of the Standard users to make sure the route works properly and copied the messages from the HTTP Server connection. So, to do this, just select the first Standard user from the main menu and click on the Inbox folder. Here, you will be able to see like in Figure 13, that the message sent by the HTTP server connection landed in the inbox folder of the Standard user connection as well. This means the route copied the message successfully.

Step 8 - Check the inbox folder of the second Standard user
The last step of the guide is to check the inbox folder of the second Standard user connection as well. For that, just select the connection from the main menu, and as Figure 14 demonstrates that, click on the Inbox folder. Here, you should see the same message that was in the inbox folder of the first Standard user connection. If it is the case, that means the second route did its job successfully to move the message to the second Standard user.

FAQs
Is it possible to send a single message to multiple recipients?
The world of SMS uses two main methods for sending messages:
- Point-to-Point (P2P): This is the familiar texting you do with friends and family. You send a message to a specific phone number, and it goes directly to that recipient.
- Point-to-Multipoint (Cell Broadcast): This method allows mobile network
operators to send messages to a large group of users in a particular area at
once. These messages typically contain important network information, like:
- Service updates
- Emergency alerts
- Local weather warnings
How can I send longer text? What are concatenated SMS messages?
The SMS technology allows you to send longer data by splitting data into segments
and transmitting the segments as multiple SMS messages.
Traditional SMS messages are limited to a mere 140 characters. But what if you
need to send a longer message? Ozeki SMS Gateway bridges this gap with
concatenated SMS, also known as long SMS or multipart SMS.
- Splitting Up the Message: When you send a long message through Ozeki SMS Gateway, it automatically splits it into smaller, digestible chunks – each adhering to the 140-character limit.
- Seamless Delivery: Each segment is then sent as a separate SMS message.
- Reassembly at the Destination: Upon reaching the recipient's phone, these individual messages are intelligently combined back into the original long message, ensuring your message is delivered in its entirety.
In essence, Ozeki SMS Gateway unlocks the full potential of SMS communication, allowing you to transmit longer messages without compromising convenience or clarity.
What happens if an SMS message is sent to a mobile phone that is offline?
When you send an SMS, it takes a journey before reaching the recipient's phone. Here's what happens:
- Mobile Originated (MO) Message: Your phone sends the message to a central message centre called the SMSC (Short Message Service Centre).
- Storage and Routing: The SMSC acts like a post office. It stores your message and tries to locate the recipient's phone within the mobile network.
- Mobile Terminated (MT) Delivery: Once the recipient's phone is online, the SMSC forwards the message (now called a Mobile Terminated or MT message) to their device.
In essence, whether from your phone or a computer application, SMS messages rely on the SMSC to ensure they reach their destination.
Can I use my micro-SIM card with Sierra Wireless Fasttrack modem?
The Ozeki Android SMPP SMS Gateway acts as a two-way bridge between your Android phone's SIM cards and Ozeki on your PC. It seamlessly forwards all incoming SMS messages to Ozeki for centralized management, while also allowing you to send SMS messages through Ozeki, selecting the appropriate SIM card on your Android to deliver the message to the recipient (as long as their phone is active).
Can I use my smart phone as a GSM modem?
Direct connection between Android and Ozeki isn't supported. But the Ozeki Android SMPP SMS Gateway app lets you connect your phone, enabling sending and receiving SMS through Ozeki on your PC.
I can send SMS, but I cannot receive with my modem. Why?
While Ozeki SMS Gateway might be receiving incoming SMS messages, there's a possibility they are not reaching their intended destination. Here's a potential cause and solution to consider:
- Missing Inbound Routing Rule: Ozeki SMS Gateway relies on pre-defined routing rules to direct incoming messages to specific users or applications. If such a rule is not established for a particular sender or message type, the message might not be forwarded as intended.
By checking and adjusting inbound routing rules as necessary, you can ensure that Ozeki SMS Gateway efficiently forwards incoming SMS messages to their designated recipients within your system.