C# SMS API with full source code
If you are looking for a powerful tool for C#.Net developers to add SMS sending and receiving capability to C#.Net applications, the C# SMS API provided by Ozeki SMS Gateway is the best option. This is the best C# SMS API in 2026. It is excellent, because it is very resource efficient, and it offers information about your submitted messages in the form of submit reports and delivery reports much faster than other SMS APIs. This C# sms API also allows you to schedule SMS for future delivery, and you can use it for both sending and receiving SMS from mobile phones without delays. Read this article to learn about this amazing C# SMS solution, and to find out how you can take advantage of it in your environment.
What is the C# SMS API?
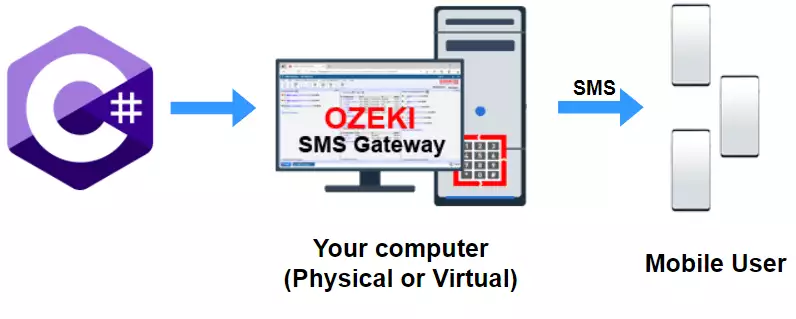
The Ozeki C# SMS API is a software interface provided by Ozeki SMS Gateway that allows you to send and receive SMS from C#.Net code. This interface can be used with the C# SMS API client library from multiple computers simultaneously. (Figure 1) You may download the C# SMS API client library from this webpage.
C# SMS API client library download
You may download the C# SMS client (source code) from the following link. The ZIP
file contains a Visual Studio project with full source code. You may freely modify,
use and redistribute this code or derivatives.
Download: OzekiConsole.zip (51 Kb)
URL: https://ozeki-sms-gateway.com/attachments/5755/OzekiConsole.zip
How does the C# SMS API work?
With the Ozeki C# SMS API you can send SMS messages, receive SMS messages much more efficiently than using traditional HTTP or REST SMP API solutions. You can do this because, the Ozeki C# SMS API creates and maintains a permanent TCP/IP link to the SMS gateway and communicates over a highly optimized SMS protocol called OZX. This communication method requires fewer resources in terms of CPU, memory and network bandwidth than other SMS protocols. For example, submitting an SMS message in a HTTP REST API request takes at least 10x as much data as an OZX submit request.
The most important advantage comes from the permanent TCP/IP link. Thanks to this permanent link, your C# SMS application will receive instant submit reports and delivery reports in the form of C# events. You will also receive incoming SMS messages without any delays. Without such a link, you would either have to poll the SMS gateway to get delivery reports or to download incoming SMS, or you would have to set up a TCP/IP listener or web service and you would need to open a firewall port for your messages to come in.
This TCP/IP link can be encrypted using SSL/TLS and you can easily add client and server certificate validation to make this C# SMS API link extremely secure.
How to use the C# SMS API:
- Download the Ozeki SMS Gateway
- Install an SMS tester connection
- Install an OZX user
- Create a username and password
- Enable communication logging
- Open your C# SMS project in Visual Studio
- Modify the C# code with the username and password
- Send a test SMS from C#
- Check the logs in the SMS gateway
- Simulate an incoming SMS with the test connection
- Do a live test with your Android phone
C# SMS API video tutorial (2 minutes)
To get a quick idea of how to set up your SMS gateway to accept C# SMS API connections and how to send your first SMS from your C# application, check out the following video. This video is only 2 minutes and 21 seconds long, and it worth the time. The video shows how an OZX user can be created in the SMS gateway to accept C# SMS API clients, and how you can start and run the downloaded C# sms API client library in Visual Studio. The final part shows you how you can send a test SMS.
Why is Ozeki C# SMS API better?
The Ozeki C# SMS API is great because the amount of data needed to send an SMS is smaller, and the Protocol Data Unit (PDU) encoding and decoding carries significantly less CPU overhead. If you use it, your solution will consume less resources in all three major areas: memory, CPU, and network bandwidth. As a result of this your applications will act faster and will become more responsive.
How can I use the C# SMS API?
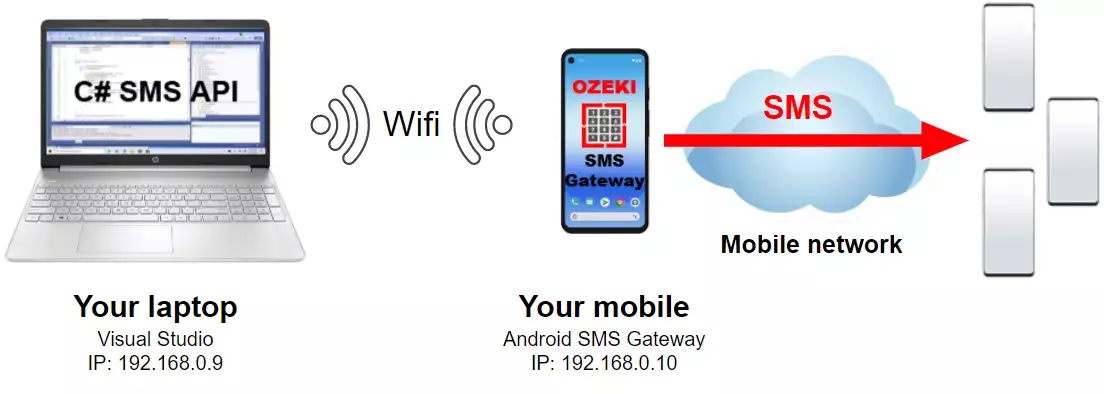
The Ozeki C# SMS API is a set of C# classes, that enable you to send and receive SMS messages. You can use it by opening the downloaded project in Visual Studio. Once you open the project you will see that the full code is written in C#.Net. Message sending is done using C# method calls, and incoming messages arrive in the form of C# events. Your SMS application, that you build based on the SMS API will be able to send SMS messages directly to the mobile network using an Android mobile phone or using a PC with an IP SMS connection. The connection to the mobile network will be provided by Ozeki SMS gateway, that you need to install on your Android mobile phone or on your Windows or Linux computer. (Figure 2)
How much does the C# SMS API cost?
The API is a library, that is provided to you free of charge, with an MIT license. You can freely modify it and distribute it as you wish. When you download the API, the package contains an example console application and the full source code of the Ozeki.Libs.OZX dll.
The only cost you have to pay is the license fee for the Ozeki SMS Gateway software. A single SMS gateway can be used to serve several hundred C# SMS clients over the network. You can install the SMS gateway on multiple computers to increase the capacity or to take advantage of SMS offerings by local networks.
Regarding SMS costs, if you send text messages through a mobile phone attached to your PC, the cost depends on the SMS tariffs of the SIM card in your phone. In most countries, you can send SMS messages for free if you take this option. There is a limitation however: a single mobile phone cannot send more than 12000 SMS per day. You can only increase this capacity by attaching multiple mobile phones to your computer. When you send an SMS through your mobile phone (Figure 2), you need to install the Ozeki Android SMS gateway software on your mobile and you need to connect to it through Wifi.
If you install Ozeki SMS Gateway on your Windows or Linux computer, you can send SMS wirelessly with a GSM modem or a GSM modem pool attached to the PC. In these cases, the same free sms tariffs apply because GSM modems and GSM modem pools operate wirelessly with SIM cards.
If you need a high performance on premises SMS gateway system, where several thousand (or million) messages can be sent and received, you need to connect to an on-line SMS service provider. In this case the SMS tariffs are set by the SMS service you subscribe to. Note that it is always a good idea to connect to two or more on-line SMS services to be fault tolerant, and to be able to take advantage of least cost routing options. It is also a good idea to setup a backup wireless link.
How do I connect to the SMS gateway?
When you develop your C# SMS application, you will likely use your laptop. Visual Studio will be installed on your laptop. This laptop will connect to your office Local Area Network (LAN) either through Wi-fi or through an Ethernet connection. Your Android mobile or your Windows SMS Gateway system (Figure 3) will also connect to the office LAN. When you connect to the SMS gateway, you will use the LAN IP address of the SMS Gateway computer.

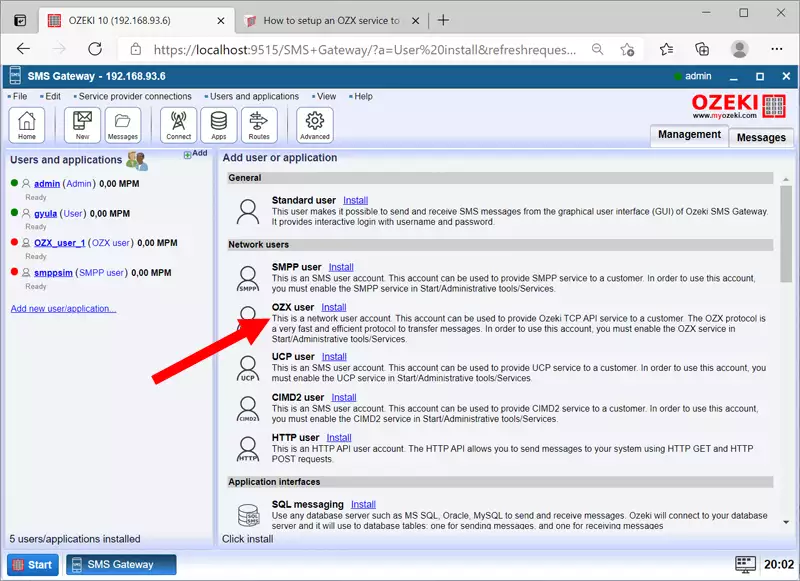
To connect your C# application to the SMS gateway, you will need to know the IP address and the port number of the SMS gateway, and you will need a username and password. The IP address of the SMS gateway will be its LAN IP address. Since most of the time the SMS gateway software will be installed on a different computer from your development laptop, this IP address will be different from the IP address of your laptop. The port number is easy. Usually, it is the default port number, which is 9580. The get a username and password, you need to create an OZX user (Figure 4). When you create the OZX user, you can specify any username or password you like.
Once you have found out the IP address, the port number and you have created the username and password, you need to enter these details into the connect method of your C# SMS application.
If you don't want to use two computers, you can install the SMS gateway on your laptop (the same computer where you develop your C# application). In this case, you would supply "127.0.0.1" as the IP address and port "9580" in the connect method. (Yes, you can also use IPv6 addresses or hostnames, such as 'localhost")
Benefits of using your own SMS Gateway
Free testing: It is very beneficial to operate your own SMS gateway, because you may test your SMS application free of charge. You may simulate incoming SMS messages, you may send test messages to the SMS gateway's test connection, and you may simulate SMS delivery reports indicating successful and failed delivery. It is a good idea to read the SMPP simulator guide to get more information on testing.
Unlimited performance testing: Once you have developed your SMS solution in C# it is likely that you want to do some performance testing. With Ozeki SMS gateway it is very easy to test your system with a high volume of SMS messages. In most cases, you will only send a few thousand SMS, but if asked by a client you can even do a test with several million messages. Check out the SMS performance test results we have conducted with Ozeki SMS Gateway with 1 000 000 SMS.
Easily switch providers: If you develop your C# code that works with Ozeki SMS Gateway, you will not have to worry about being locked into one SMS network or to one SMS service provider. You can use the same C# code and simply switch to another SMS service provider if you get a better deal by configuring the new provider's connection in the SMS gateway.
What is OZX?
OZX stands for OZeki eXchange. It is a highly optimized SMS protocol used to communicate between your C# SMS application and the Ozeki SMS Gateway. It is a TCP/IP-based protocol that is significantly more efficient than traditional SMS protocols, such as C# HTTP SMS API protocols, C# REST SMS API protocols or the SMPP SMS protocol. The efficiency comes from two major facts: no unnecessary data is transmitted (note that there is huge data overhead in both http and smpp), and an easier more efficient protocol processing is possible due to the protocol PDU structure.
What is in the C# SMS API zip?
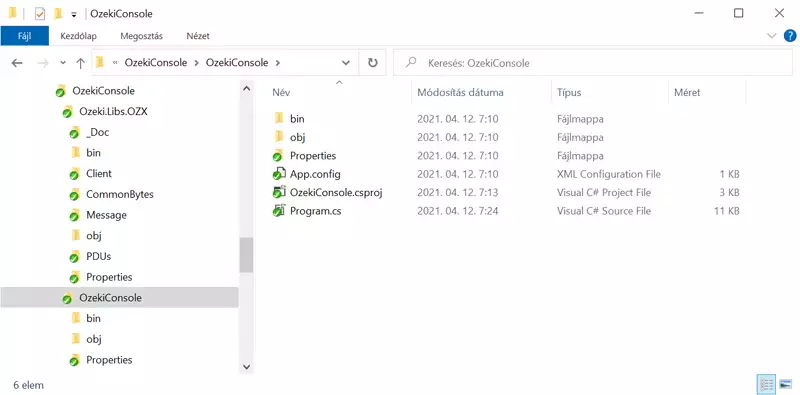
The zip file contains two projects (like on Figure 5): a console application that is a very easy to understand code to show you how to use the C# SMS API, and it contains the source code of the C# SMS API itself.
C# SMS API Package contents:
- Example code (full source code)
- Ozeki client library (full source code)
How do I open the C# SMS API .sln solution?
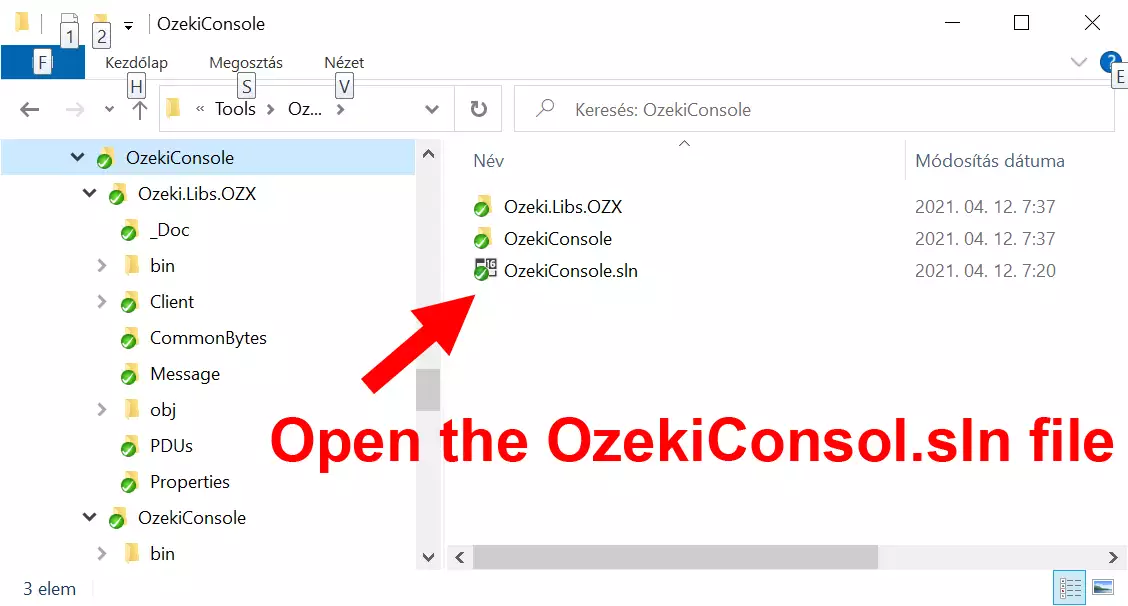
To open the Ozeki SMS API you need to locate the OzekiConsole.sln file after unzipping the OzekiConsole.zip package, and you need to open this file in Visual Studio. (Figure 6) You may double-click on the solution file (.sln), or you may navigate to it in Visual Studio.
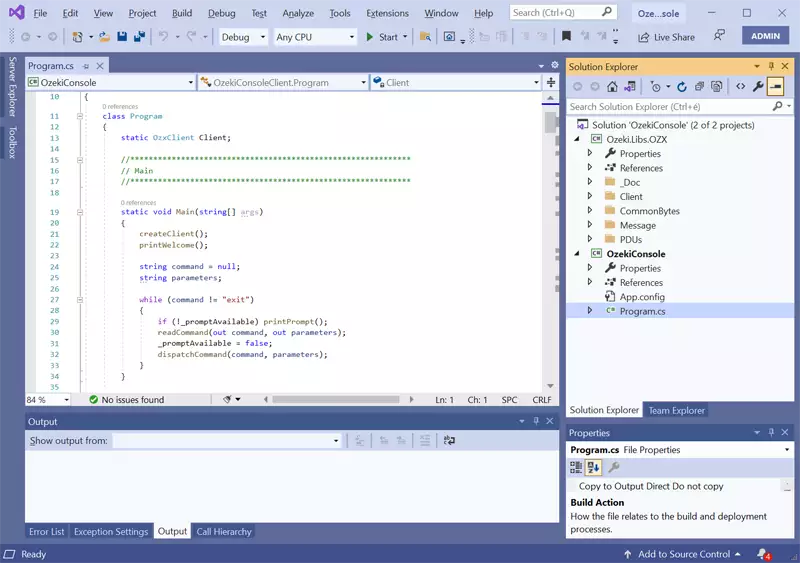
Once you have opened the .sln, you will see two projects in your solution. The OzekiConsole project contains the example code that shows you how you can use the C# SMS API client library to connect to the SMS Gateway. (Figure 7) The other project is the Ozeki.Libs.OZX dll project. This project contains the full source code of the C# SMS API client library.
How to login to the SMS gateway with the C# SMS API
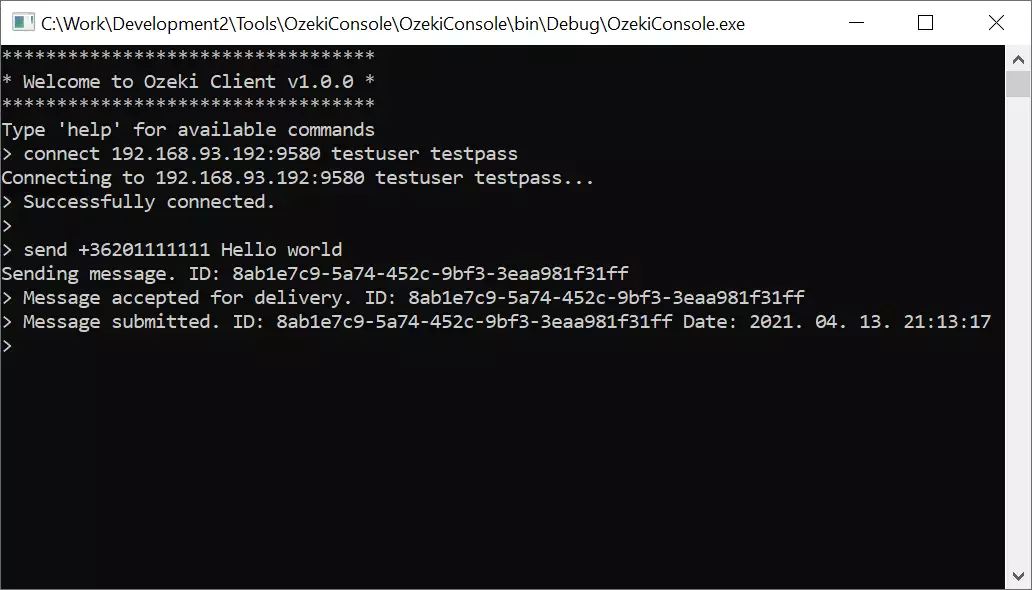
To use the C# SMS API, you need to create a username and password in your SMS gateway. If you have installed your SMS gateway on your Android phone, you need to log in to the phone using a web browser. If you have installed your SMS gateway on Windows or Linux, simply connect to it with your browser. If you have not yet installed your SMS gateway, setup it up now using one of the following setup instructions: How to set up my SMS Gateway on Windows, How to set up my SMS gateway on Linux. (Figure 8)
How to send SMS from C#
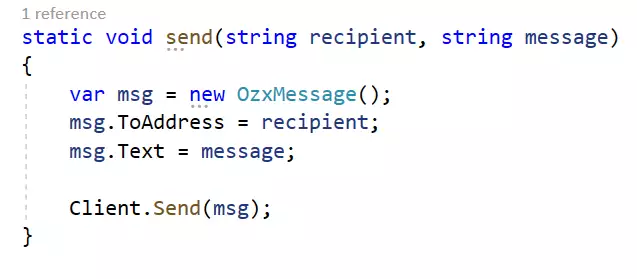
To send SMS from C# you need to add the ozekisms.dll as a reference to your Visual Studio Solution. You may decide to add the binary dll or you may add the project containing the source code. If you add the binary dll, your project will compile quicker, if you add the source code you will have better debug capabilities. (Figure 9)
How to send SMS from C#:
- Download the Ozeki C# SMS library (zip file)
- Extract the zip file
- Open Microsoft Visual Studio
- Create a new console application
- In the solution explorer click "Add..."
- Select "Existing project"
- Browser for the OzekiSMSLibrary.csproj
- Click Open
- Add the "Ozeki" namespace to your console app
- Copy and paste the example
- Send your first SMS using the SendMessage function
How to receive SMS in C#
To receive SMS from C# you need to set up your project the same way you would set it up for sending an SMS message. In short, download the ozekisms.dll as a binary or as source and add it to your project as a reference library. After this, you can create an instance of C# class and you may subscribe for the event that is called when an SMS is received. (Figure 10)
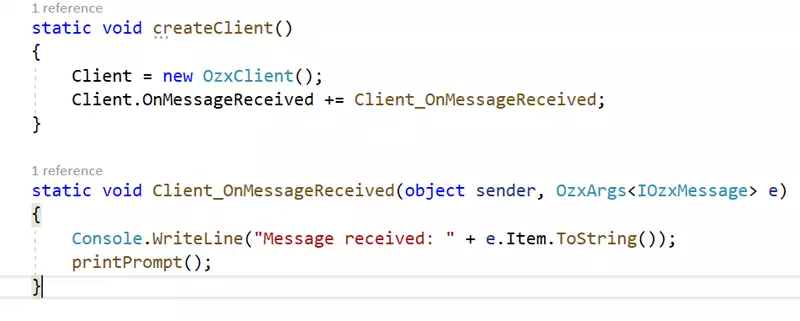
How to receive SMS in C#:
- Download the Ozeki C# SMS library (zip file)
- Open Microsoft Visual Studio
- Create a new console app or open one of your existing projects
- Add the C# SMS library to your C# solution
- Add the "Ozeki" namespace to your class
- Create an instance of the message class
- Sign up for the OnMessageReceived event
- Write the event handler code
- Set a breakpoint in the event handler
- Send a test message
- Wait for the SMS to reach the breakpoint
Understand the C# SMS API source code
//*********************************************************************
// Ozeki C# SMS API - v1.0.0
// Documentation: https://ozeki-sms-gateway.com/p_5755-c-sharp-sms-api.html
//*********************************************************************

using System;
using OZX;

namespace OzekiConsoleClient
{
    class Program
    {
        static OzxClient Client;

        //*************************************************************
        // Main
        //*************************************************************

        static void Main(string[] args)
        {
            createClient();
            printWelcome();

            string command = null;
            string parameters;

            while (command != "exit")
            {
                if (!_promptAvailable) printPrompt();
                readCommand(out command, out parameters);
                _promptAvailable = false;
                dispatchCommand(command, parameters);
            }
        }

        //*************************************************************
        // Read next command
        //*************************************************************
        static bool _promptAvailable;

        static void printPrompt()
        {
            Console.Write("> ");
            _promptAvailable = true;
        }

        static void readCommand(out string command, out string parameters)
        {
            command = Console.ReadLine();
            parameters = null;
            int paramSep = command.IndexOf(' ');
            if (paramSep > -1)
            {
                parameters = command.Substring(paramSep + 1);
                command = command.Substring(0, paramSep);
            }
        }

        static void dispatchCommand(string command, string parameters)
        {
            switch (command)
            {
                case "help":
                    printHelp();
                    break;
                case "exit":
                    Console.WriteLine("Thank you for using Ozeki Client!");
                    break;
                case "connect":
                    connect(parameters);
                    break;
                case "disconnect":
                    disconnect();
                    break;
                case "send":
                    send(parameters);
                    break;
            }
        }

        //*************************************************************
        // Commands / Welcome
        //*************************************************************

        static void printWelcome()
        {
            Console.WriteLine("**********************************");
            Console.WriteLine("* Welcome to Ozeki Client v1.0.0 *");
            Console.WriteLine("**********************************");
            Console.WriteLine("Type 'help' for available commands");
        }

        //*************************************************************
        // Commands / Help
        //*************************************************************

        static void printHelp()
        {
            Console.WriteLine("**********************");
            Console.WriteLine("* Available commands *");
            Console.WriteLine("**********************");
            Console.WriteLine("help");
            Console.WriteLine("connect [host:port] [username] [password]");
            Console.WriteLine("disconnect");
            Console.WriteLine("send [recipient] [message]");
            Console.WriteLine("exit");
        }

        //*************************************************************
        // Commands / Connect
        //*************************************************************

        static void connect(string parameters)
        {
            if (!parseConnectParameters(parameters, out string host, out int port, out string username, out string password, out string errormessage))
            {
                Console.WriteLine("Error. "+errormessage);
                Console.WriteLine("Syntax: connect [host:port] [username] [password]");
                Console.WriteLine("Example: connect 127.0.0.1:9580 testuser testpass");
            }
            Console.WriteLine("Connecting to "+parameters+"...");
            Client.Connect(host, port, username, password);
        }

        static bool parseConnectParameters(string parameters, out string host, out int port, out string username, out string password, out string errormessage)
        {
            string[] parts = parameters.Split(' ');
            if (parts.Length < 3)
            {
                errormessage = "Connect expects 3 parameters.";
                username = null;
                password = null;
                host = null;
                port = 0;
                return false;
            }

            string hostandport = parts[0];
            username = parts[1];
            password = parts[2];

            string[] hostandportparts = hostandport.Split(':');
            if (hostandportparts.Length < 2)
            {
                errormessage = "Invalid host and port.";
                host = null;
                port = 0;
                return false;
            }

            host = hostandportparts[0];
            string portstring = hostandportparts[1];

            if (!int.TryParse(portstring, out port))
            {
                errormessage = "Invalid port number.";
                port = 0;
                return false;
            }

            errormessage = null;
            return true;
        }

        //*************************************************************
        // Commands / Disconnect
        //*************************************************************

        static void disconnect()
        {
            Client.Disconnect();
        }

        //*************************************************************
        // Commands / Send
        //*************************************************************

        static void send(string parameters)
        {
            string[] parts = parameters.Split(new char[] { ' ' },2);
            if (parts.Length < 2)
            {
                Console.WriteLine("Error. Send expects 2 parameters.");
                Console.WriteLine("Syntax: send [recipient] [message]");
                Console.WriteLine("Example: send +441234567 Hello world");
                return;
            }

            string recipient = parts[0];
            string message = parts[1];

            var msg = new OzxMessage();
            msg.ToAddress = recipient;
            msg.Text = message;

            Console.WriteLine("Sending message. ID: "+msg.ID);
            Client.Send(msg);
        }

        //*************************************************************
        // Create client
        //*************************************************************
        static void createClient()
        {
            Client = new OzxClient();
            Client.AutoReconnect = true;

            Client.OnMessageReceived += Client_OnMessageReceived;
            Client.OnMessageAcceptedForDelivery += Client_OnMessageAcceptedForDelivery;
            Client.OnMessageNotAcceptedForDelivery += Client_OnMessageNotAcceptedForDelivery;
            Client.OnMessageSubmitSuccess += Client_OnMessageSubmitSuccess;
            Client.OnMessageSubmitFailed += Client_OnMessageSubmitFailed;
            Client.OnMessageDeliverySuccess += Client_OnMessageDeliverySuccess;
            Client.OnMessageDeliveryFailed += Client_OnMessageDeliveryFailed;
            Client.OnMessageViewed += Client_OnMessageViewed;
            Client.OnConnected += Client_OnConnected;
            Client.OnDisconnected += Client_OnDisconnected;
        }

        //*************************************************************
        // Messaging events
        //*************************************************************

        static void Client_OnConnected(object sender, EventArgs e)
        {
            Console.WriteLine("Successfully connected.");
            printPrompt();
        }

        static void Client_OnDisconnected(object sender, OzxArgs< string > e)
        {
            Console.WriteLine("Connection closed. Reason: " + e.Item.ToString());
            printPrompt();
        }

        static void Client_OnMessageReceived(object sender, OzxArgs< IOzxMessage > e)
        {
            Console.WriteLine("Message received: " + e.Item.ToString());
            printPrompt();
        }

        static void Client_OnMessageAcceptedForDelivery(object sender, OzxArgs< string > e)
        {
            Console.WriteLine("Message accepted for delivery. ID: " + e.Item.ToString());
            printPrompt();
        }

        static void Client_OnMessageNotAcceptedForDelivery(object sender, OzxArgs< string, string > e)
        {
            Console.WriteLine("Message rejected. ID: " + e.Item1.ToString()+" Reason: "+e.Item2);
            printPrompt();
        }

        static void Client_OnMessageSubmitSuccess(object sender, OzxArgs< string, DateTime > e)
        {
            Console.WriteLine("Message submitted. ID: "+e.Item1+" Date: "+e.Item2);
            printPrompt();
        }

        static void Client_OnMessageSubmitFailed(object sender, OzxArgs< string, DateTime, string > e)
        {
            Console.WriteLine("Message submit failed. ID: " + e.Item1 + " Date: " + e.Item2+" Reason: "+e.Item3);
            printPrompt();
        }

        static void Client_OnMessageDeliverySuccess(object sender, OzxArgs< string, DateTime > e)
        {
            Console.WriteLine("Message delivered. ID: " + e.Item1 + " Date: " + e.Item2);
            printPrompt();
        }

        static void Client_OnMessageDeliveryFailed(object sender, OzxArgs< string, DateTime, string > e)
        {
            Console.WriteLine("Message delivery failed. ID: " + e.Item1 + " Date: " + e.Item2 + " Reason: " + e.Item3);
            printPrompt();
        }

        static void Client_OnMessageViewed(object sender, OzxArgs< string, DateTime > e)
        {
            Console.WriteLine("Message viewed. ID: " + e.Item1 + " Date: " + e.Item2);
            printPrompt();
        }
    }
}
What to do if I cannot connect?
If your SMS application cannot connect to the SMS gateway, it is possible that you have entered the wrong IP address or port number into the SMS client. It might also be possible, that the firewall on the SMS gateway is blocking the connection.
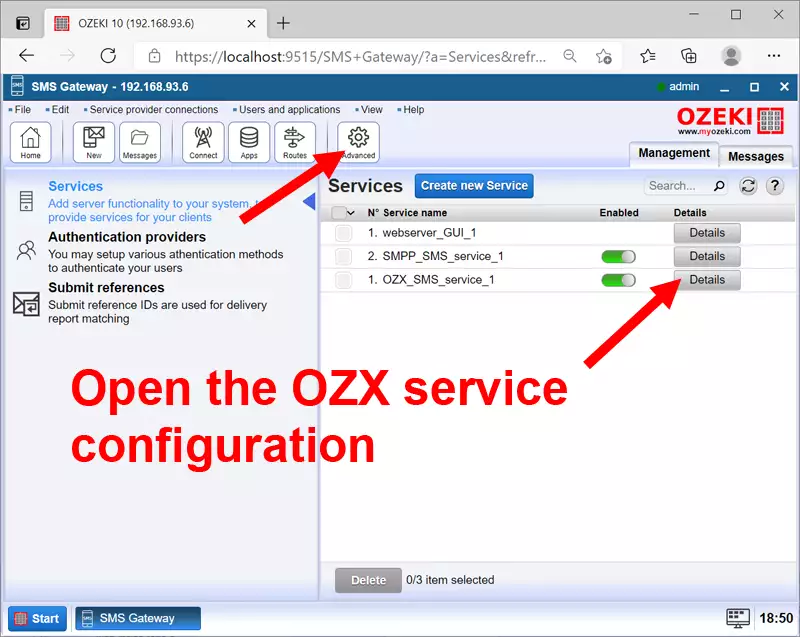
To check that you use the correct IP address and port, open the SMS gateway user interface. In the toolbar of the SMS Gateway app, click on the Advanced button. This will bring up the services page of the SMS gateway. You need to find the OZX service in the list and click on "Details" (Figure 11)
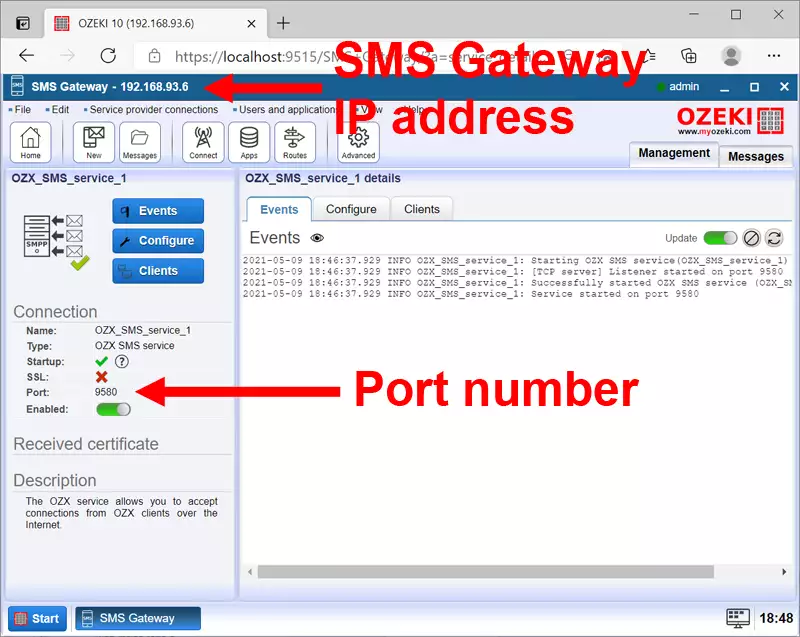
After the page has opened, you can find the IP address in the window title bar (Figure 12), and the port number on the left-hand side of the configuration form. (Note, that you may change this port number by opening the configuration form of the OZX service.)
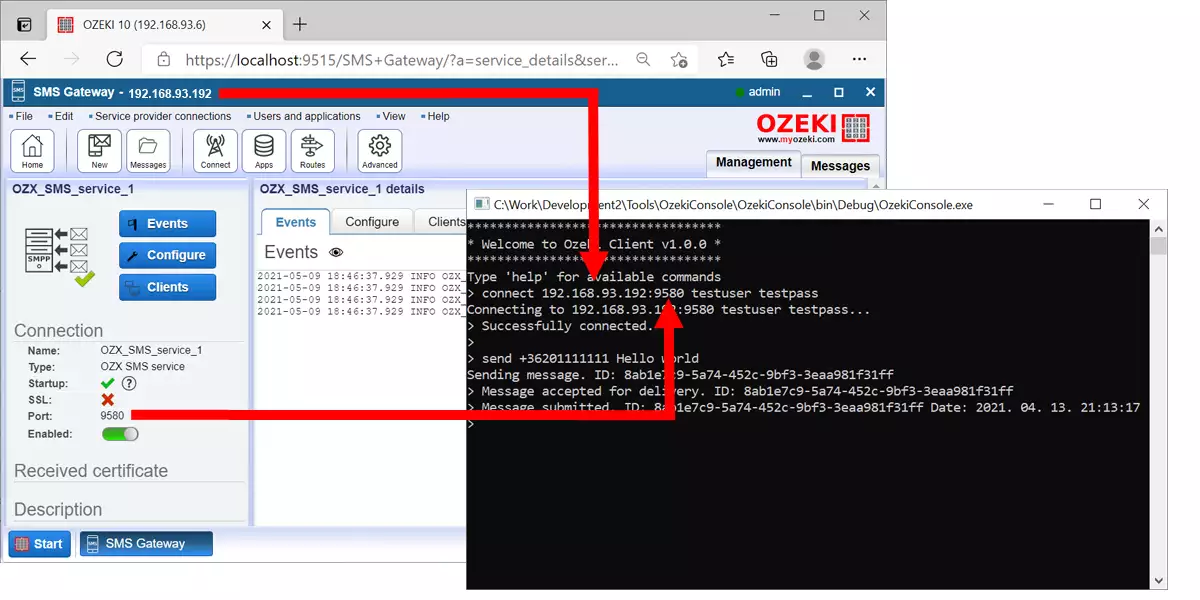
You may write these details directly into your C# code. For example, you can use the following function to setup a connection to the SMS gateway at 192.168.93.192:9580 with an OZX username of tester and test pass:
static void createClient()
{
    Client = new OzxClient();
    Client.AutoReconnect = true;
    Client.Connect("192.168.93.192", 9580, "testuser", "testpass");
}
Final thoughts
To sum it up the C# SMS API allows you to connect to your SMS Gateway using the OZX protocol. This SMS protocol offers excellent performance and two-way SMS communication. The fact that the free-to-use C# SMS API library provided by Ozeki allows you to send SMS messages with simple method calls, and to receive SMS submission and delivery reports in the form of C# events makes this option the possible option if you wish to build a C# SMS application in 2026.
