How to send SMS from C# using and SQL Server
Download:
 Sending_SMS_through_MS_SQL_Server.zip
See how to send SMS by inserting rows into a Microsoft SQL database through a C#.NET application. This technology is intended for developers with basic knowledge in C#.NET and SQL. The downloadable source code helps you get started.
In the following chapters you can find the required prerequisites and a detailed explanation on how to use the code. A helpful workflow diagram shows you the basic connection between the C# application's user and the recipient's phone.
The code is useful if who would like to
- include SMS functionality to your C# application.
- integrate automated SMS notification.
- secure your products by adding SMS login.
Prerequisites
The software requirements of the system is listed on the following table. Please download SMS Gateway and install SMS Gateway software with .NET framework 4.5 and a Microsoft Visual Studio to run your code.
| Operating System: | Windows 11, Windows 10, Windows 8, Windows 7, Windows Server 2019, Windows Server 2016, Windows Server 2012 R2, Windows Server 2008 R2, Windows Vista |
| Basic software requirements: |
.NET Framework 4.5
Ozeki SMS Gateway Microsoft SQL Server 2016 Express Edition or newer Microsoft SQL Server versions |
| Development platform: | Microsoft Visual Studio |
How does it work
First you need to install Ozeki SMS Gateway and create a Database User in the SMS Gateway. Connect the user to your MSSQL database. The SMS messages to send will be SELECT-ed from the outgoing messages SQL table, which is called 'ozekimessageout' as default.
Then you should install a C#.NET environment. Your C# application can connect to your MSSQL database and insert SMS messages to the SQL table of outgoing messages.
Make sure your Ozeki SMS Gateway is connected to the GSM network through a GSM modem or any IP SMS service provider over the internet. For example SMPP, CIMD2 or UCP/EMI are very popular service provider connections.
See the workflow of the C# through MSSQL connection on Figure 1.

So basically, the Microsoft SQL Server can be reached from both your C# application and Ozeki SMS Gateway. All incoming and outgoing messages are stored on the MSSQL Server for further usage.
By adding the appropriate codes to your C# application, you can connect it to your SQL database to make it able to INSERT new rows into the outgoing message table and read incoming messages.
Ozeki SMS Gateway's Database User is capable to read the outgoing message table to send SMS messages and INSERT new rows into the incoming message table for other users to read. For example, the C# application user can read it.
How to set up your MSSQL Server
Step 1: Install Microsoft SQL Server 2016 Express EditionStep 2: Start Microsoft SQL Server 2016 Express Edition and log in.
Step 3: Turn on server authentication, so it would always require database user and password pair. (Short help tutorial)
Step 4: Create database and grant select, insert, update, delete permissions to a user. (Short help tutorial)
Add a Database User to Ozeki SMS Gateway
Step 1: Start Ozeki 10 browser GUI (Picture help)Step 2: Start Ozeki SMS Gateway from Ozeki 10's desktop.
Step 3: Install a Database User and set the connection string. (Short help tutorial)
Use the downloaded C# code
Step 1: Download the zip file and unpack it.Step 2: Set SQL database connection data in 'DatabaseHandling.cs'. (Short help tutorial)
Step 3: Start Ozeki 10 service if it is not running. (Short help tutorial)
Step 4: Build and run the project in Microsoft Visual Studio
Step 5: A window will pop up. Click the Compose message button.
Fill the recipient and message text fields and click 'Send'. (Short help tutorial)
How does the example code work
The downloadable code on the top of the page can insert messages in the 'ozekimessageout' table. Ozeki SMS Gateway's Database User periodically checks 'ozekimessageout' to find new message rows and send them to the recipient's phone. Each message row has a status attribute. After sending the SMS message, the status will change from 'Send' to 'Sent'.
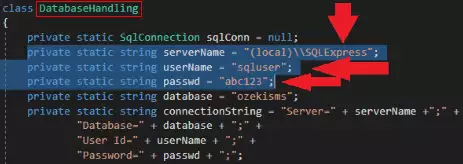
Do not forget to check if your Microsoft SQL server is up and running and modify the server connection details in 'DatabaseHandling.cs', which you can find in the example project.
C# classes of the example code
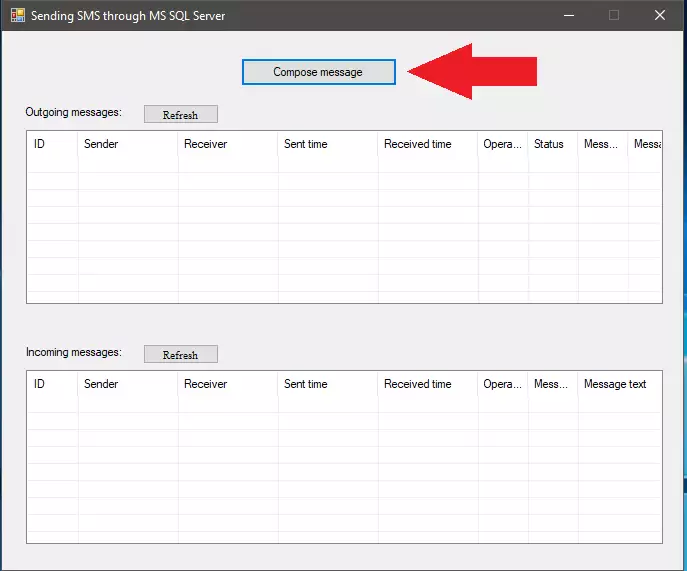
MainForm.cs (Figure 2):
This class contains the first window that opens up.
As you can see on Figure 2, it can show the content of two tables.
This content is read by a SELECT statement from 'ozekimessageout' and 'ozekimessagein'.
It also contains two 'Refresh'
buttons and a 'Compose message' button as well. Press it to use the next class, 'ComposeMessageForm.cs'.

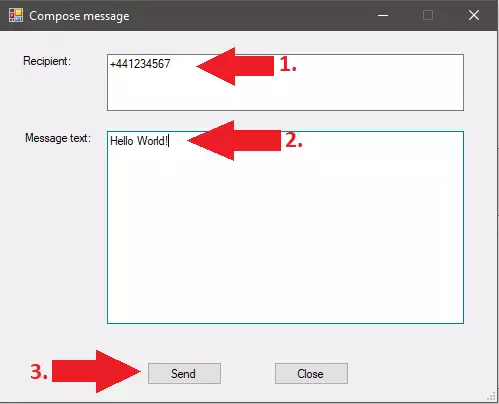
ComposeMessageForm.cs (Figure 3):
This is the next page where you can fill the necessary data fields to create a new message.

DatabaseHandling.cs:
This is where you can set the database connection (Figure 4)
and refresh the tables of 'MainForm.cs'.

How does the message sending code work
In 'ComposeMessageForm.cs' you can fill the two fields with the recipient's address and message text. By pressing 'Send', you can start the following code:
ComposeMessageForm.cs
...
private void buttonSend_Click(object sender, EventArgs e)
{
    CheckAndSendMessage();
}

private void CheckAndSendMessage()
{
    if (textBoxRecipient.Text == "")
    {
        MessageBox.Show("Recipient field mustn't be empty!",
                    "Incorrect field value");
        return;
    }

    string errorMsg = "";
    DatabaseHandling.insertMessage(textBoxRecipient.Text,
                textBoxMessageText.Text, out errorMsg);

    MessageBox.Show(errorMsg, "Result of inserting message");
}
...
Figure 5 - Checks if the recipient's field is empty
The CheckAndSendMessage() method is called by 'buttonSend_Click(...)'. The method starts by checking the recipient's field and runs insertMessage(...) from 'DatabaseHandling.cs' if the recipient's field is NOT empty (Figure 5). insertMessage(...) can insert a new row to the 'ozekimessageout' table (Figure 6) (The default value of the msgtype attribute is SMS:TEXT). Ozeki SMS Gateway will read the rows from the SQL server as you can see on the workflow diagram above.
DatabaseHandling.cs
...
public static void insertMessage(string receiver, string messageText,
            out string errorMsg)
{
    Connect(out errorMsg);
    if (errorMsg != "")
       return;

    try
    {
       SqlCommand sqlComm = sqlConn.CreateCommand();
       sqlComm.CommandText = "insert into ozekimessageout " +
                    "(msgtype,receiver,msg,status) " +
                    "values ('SMS:TEXT','" + receiver + "','" +
                    messageText + "','send');";
       if (sqlComm.ExecuteNonQuery() == 0)
       {
            errorMsg = "Insert was UNsuccessful!";
       }
       else
       {
            errorMsg = "Insert was successful!";
       }
    }
    catch (Exception e)
    {
        errorMsg = e.Message;
    }

    CloseConnection();
}
...
Figure 6 - INSERT's message into your SQL database
You can use other message types than 'SMS:TEXT' (e.g. 'SMS:WAPPUSH', 'SMS:VCARD') as you can see on Figure 7.
...
sqlComm.CommandText = "insert into ozekimessageout " +
                    "(msgtype,receiver,msg,status) " +
                    "values ('SMS:WAPPUSH','" + receiver + "','" +
                    messageText + "','send');";
...
Figure 7 - Message type changed from 'SMS:TEXT' to 'SMS:WAPPUSH'
Frequently asked questions
Question:
Can this C# example run on a different computer than
Ozeki SMS Gateway's or MSSQL server's machine?
Answer: Yes, it can. Please modify the IP address in 'DatabaseHandling.cs' to your MSSQL server's IP address.
Question:
Can I change the sender's phone number?
Answer:
Yes. Please INSERT the sender's number into the message row as well (Figure 8).
It only works if you have an IP SMS connection.
...
string SenderNumber = "+449876543";
sqlComm.CommandText = "insert into ozekimessageout " +
                    "(msgtype,sender,receiver,msg,status) " +
                    "values ('SMS:TEXT','" + SenderNumber + "','" + receiver + "','" +
                    messageText + "','send');";
...
Figure 8 - Modified INSERT INTO statement with an additional 'sender' attribute
Summary
This article explained how to send SMS from C# using an SQL Server. This means that you can send an SMS by inserting a row into a Microsoft SQL database. This system uses a C#.NET application. Sending an SMS from an SQL Server means that you can use the SQL language to search for a message or manage SMS messages. It will greatly improve the efficiency of communication inside of your organization and will make the flow of information faster.
If you would like to know more about the technology that Ozeki provides, visit the Ozeki website. We advise you to start with the C# SMS API. You will learn more about the Ozeki C# SMS API in this article. Next up, if you would like to send the SMS using HTTP SMS API, visit this article: HTTP SMS API.
To start sending SMS messages using APIs, download the Ozeki SMS Gateway now and start the work!
