How to install Ozeki SMS Gateway in Amazon AWS
Setting up the SMS Gateway on Windows inside Amazon AWS takes about 15 minutes. This document presents instructions and the necessary information to help you complete this procedure efficiently. We will use Ozeki SMS Gateway. It is an incredible tool that allows you to create great solutions in various environments. For example, it can be used to create advanced IT solutions, such as one-time passwords, product delivery notifications, or payment reminders and to keep in touch with customers and employees. This guide requires common knowledge of SMS technology. You will be presented with some useful information and well-structured step-by-step instructions. We hope you will find the presented instructions beneficial.
What are Amazon AWS?
Amazon AWS (Amazon Web Services) is a safe cloud-based platform where you find a collection of services offered by Amazon.com. Amazon AWS offers data transmission, database storage, very large computing capacity, and other functionality to assist your business is growth.
Install Ozeki SMS Gateway in Amazon AWS (Simple commands)
To install Ozeki SMS Gateway in Amazon AWS:
- Launch new EC2 instance
- Select an Amazon Machine Image
- Choose an Instance Type
- Review Instance Launch
- Create a new key pair
- Save private key
- Connect to the instance with private key
- Decrypt the generated password
- Connect to the instance through remote desktop
- Provide username and password
- Setup Ozeki SMS Gateway
- Add new security group rule
- Define new Windows firewall inbound rule
- Check remote access connection
- Change the admin password to get SMS Gateway GUI accessible
Seamless SMS Communication with Ozeki SMS Gateway integrated with Amazon AWS
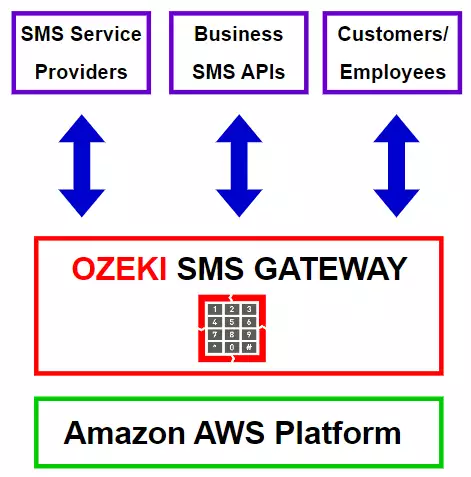
Ozeki SMS Gateway, integrated with Amazon AWS, provides an efficient SMS communication solution. Users can install Ozeki SMS Gateway on Amazon AWS and establish connections to various service providers using API credentials. The system provides an easy-to-use SMS client program to simplify text message processing. Businesses may access capabilities that are specifically designed to fit their needs by utilizing the business SMS APIs offered by Amazon AWS. Once configured, the gateway makes it simple to send and receive SMS messages, which makes it ideal for sharing promotional information, notifications, and urgent warnings. Businesses can effectively manage large SMS campaigns and ensure timely message delivery worldwide thanks to Amazon AWS's flexibility and reliability.
How to install Ozeki SMS Gateway software in Amazon AWS (Video tutorial)
This video tutorial will show you the steps on how to install the Ozeki SMS Gateway in Amazon AWS. In the following video, you will find examples on how to launch a Windows instance in Amazon AWS, create a private key, as well as installing and launching Ozeki SMS Gateway. It will also show you how to access the SMS Gateway remotely from your browser. This 14-minute video is great since it contains all the necessary steps of this procedure in order.
Launch a new EC2 instance
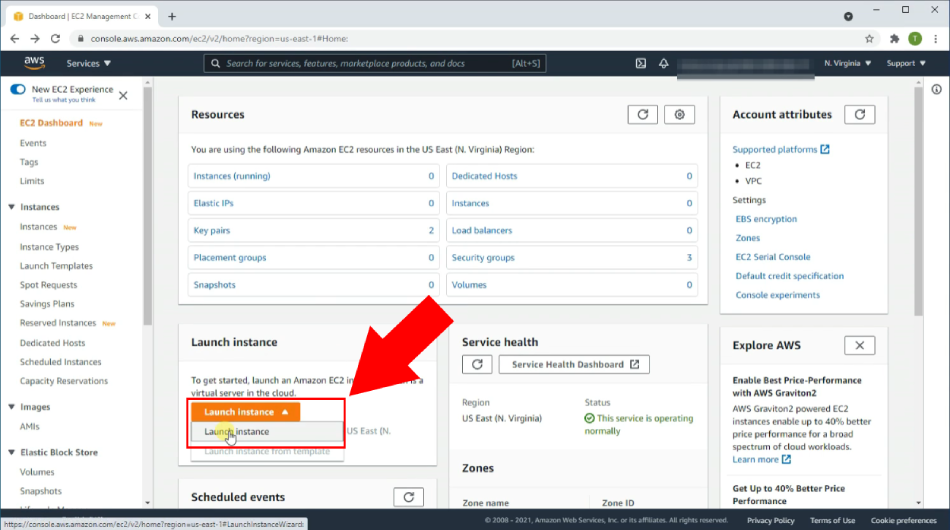
First, navigate to the EC2 Management Dashboard on console.aws.amazon.com. Next, find the Launch instance button and click on it (Figure 2). When clicked on, it brings up a combo box (dropdown menu). In the combo box you need to click launch instance again. This will bring you to Step 2, where you are able to choose an Amazon Machine Image.
Select the Windows image
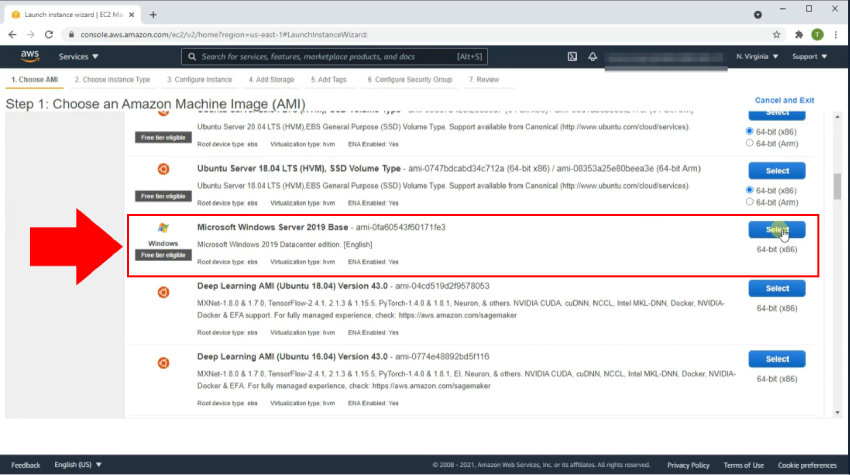
Find the Microsoft Windows Server 2019 Base option (Figure 3). It is located under the "Step 1 - Choose an Amazon Machine Image" section. Click the blue button labelled Select next to it. This will select the Windows image, which is "Microsoft Windows Server 2019 Base". Note that you will have to scroll down to find this option. Once you selected it, it will forward you to Step 3.
Choose an instance type
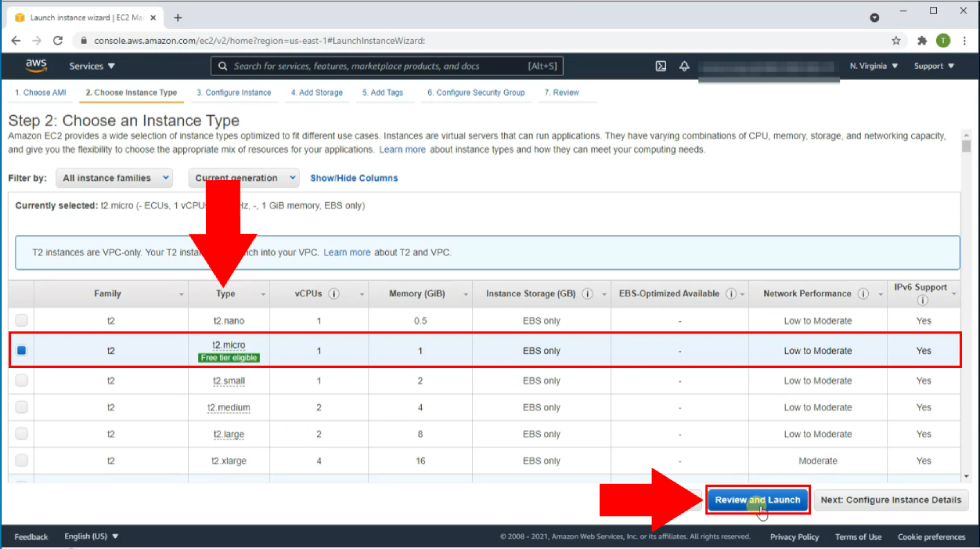
Step 3 is choosing what type of instance you wish to launch. On this page, you will find a spreadsheet containing different types of instances. Find the second option. It has "t2.micro" written under the "Type" column. Click on the checkbox next to it on the left side of the screen to select it (Figure 4). (This option may be selected already by default). Then, click on the blue button labelled "Review and Launch" at the bottom right of the screen.
Review and launch instance
After you have clicked "Review and Launch", you will be forwarded to Step 7. On this page, you are able to review the options you have previously selected. This page contains details about your chosen options, so you can make sure that you have selected the right ones. If everything is correct, click on the blue Launch button at the bottom right of your screen (Figure 5).
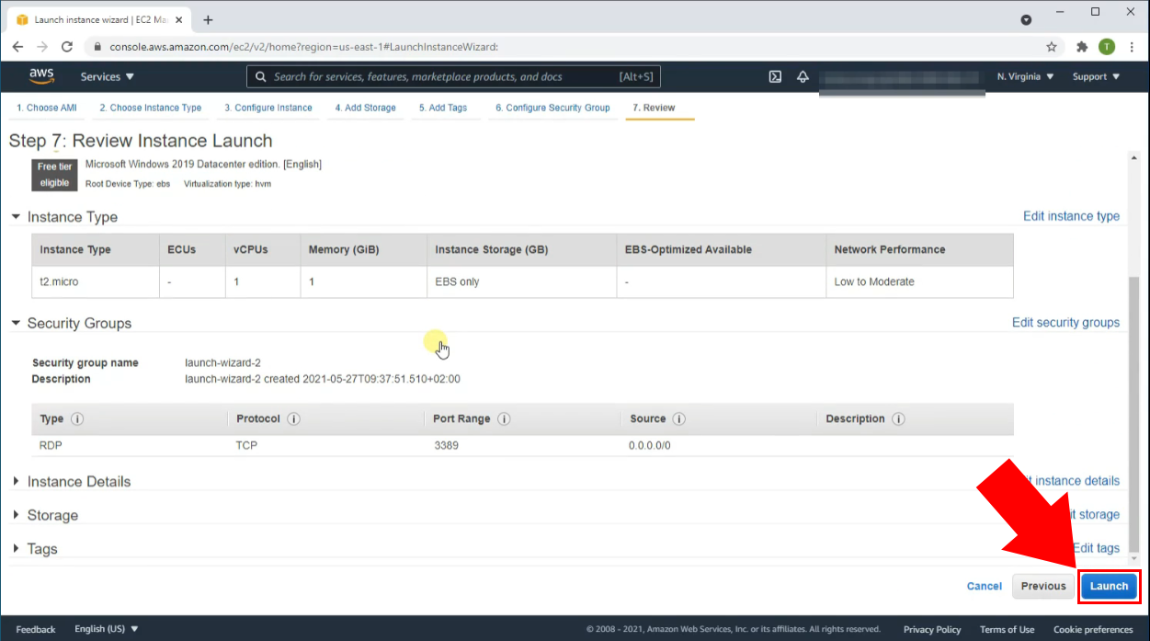
Create new key pair
After you have launched your instance, a new window will pop up. Here, you will be asked to select an existing key pair or create a new key pair. Click on the combo box in the middle of the window (Figure 6). Select the "Create new key pair" option. Give your key pair a name by entering the name in the textbox below. Next, click on the "Download key pair" button at the bottom right of the window. This will download the newly created keypair on to your computer.
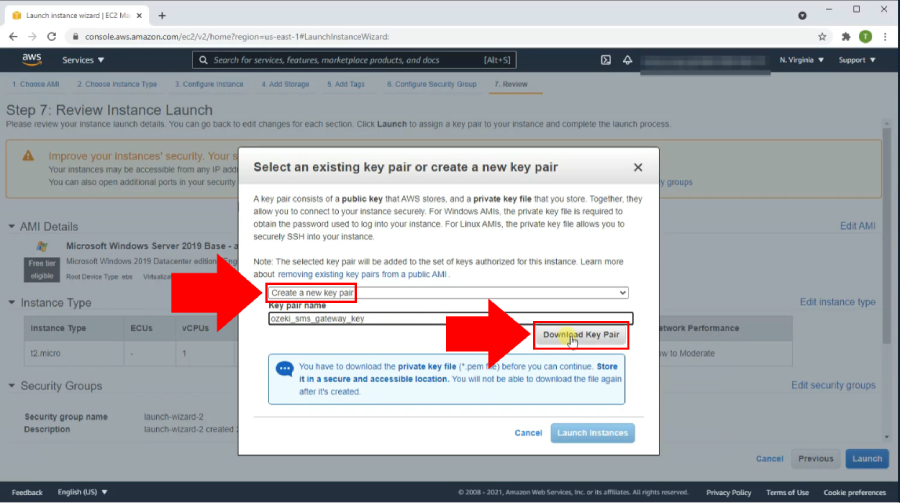
Save private key
Once you have downloaded the private key, it will be located in your default download location. This is usually specified in your browser settings. The file will show up at the bottom left of your browser when downloaded. Move the file into a desired directory on your computer. This can be done by dragging and dropping the file from the browser's download popup to your location of choice (Figure 7). After you have saved your key, click on the blue Launch instance button located at the bottom right of the window.
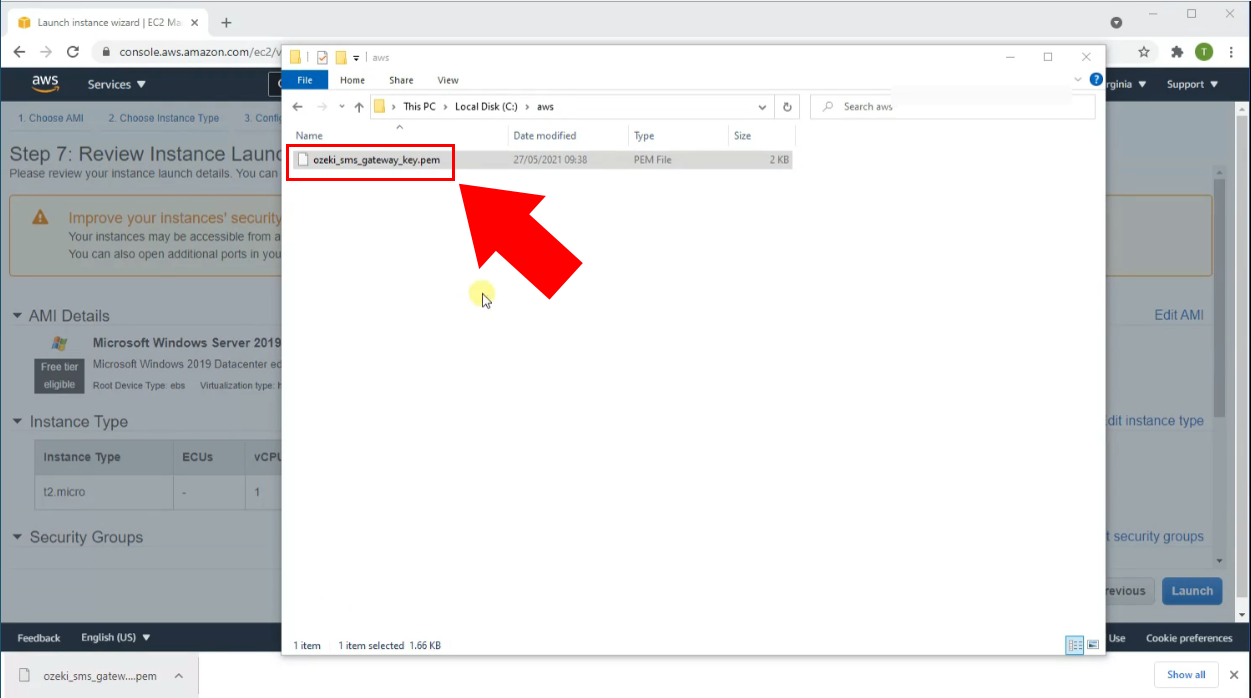
Open the running instance
After you have clicked the launch button, you will need to wait a few seconds for the instance to launch. Once it's completed, you will be shown the Launch Status screen. If you see a green checkmark followed by the statement "Your instances are launching" you can continue. Next, click Services on the top left of the screen. From the Services menu, click on EC2 (It will appear under "Recently viewed"). Then, click on "Instances in the Resources menu. Finally, click on the Instance ID highlighted in blue (Figure 8).
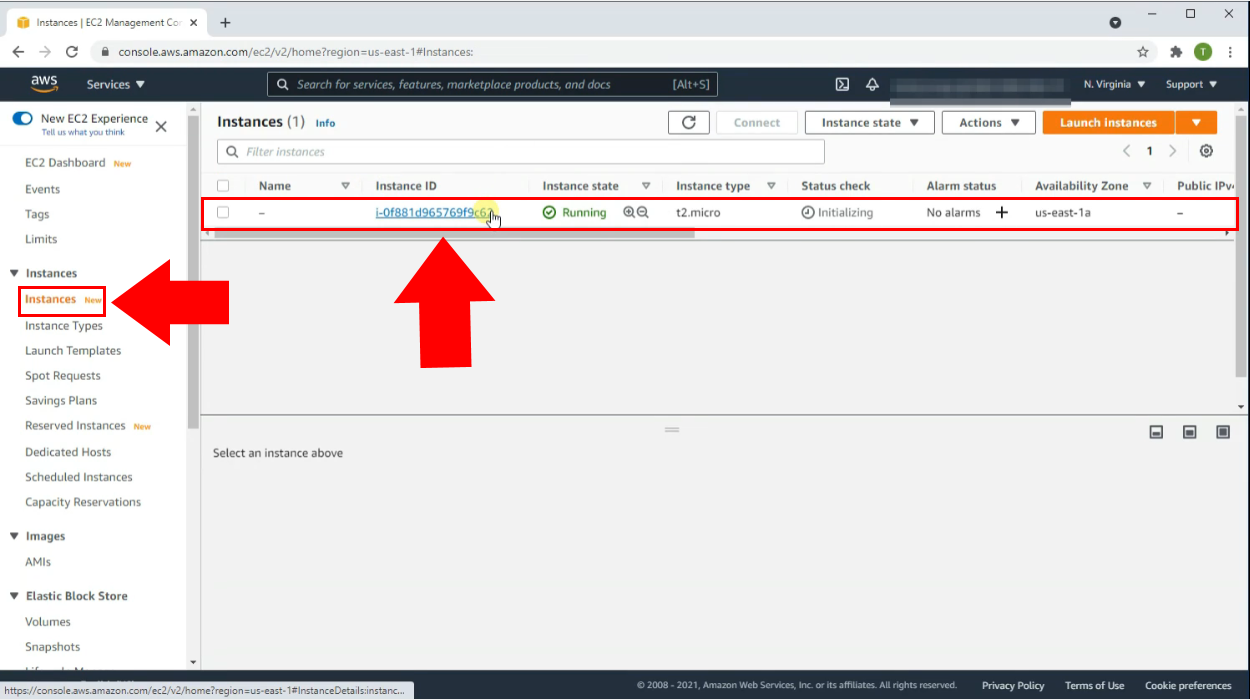
Connect to the instance
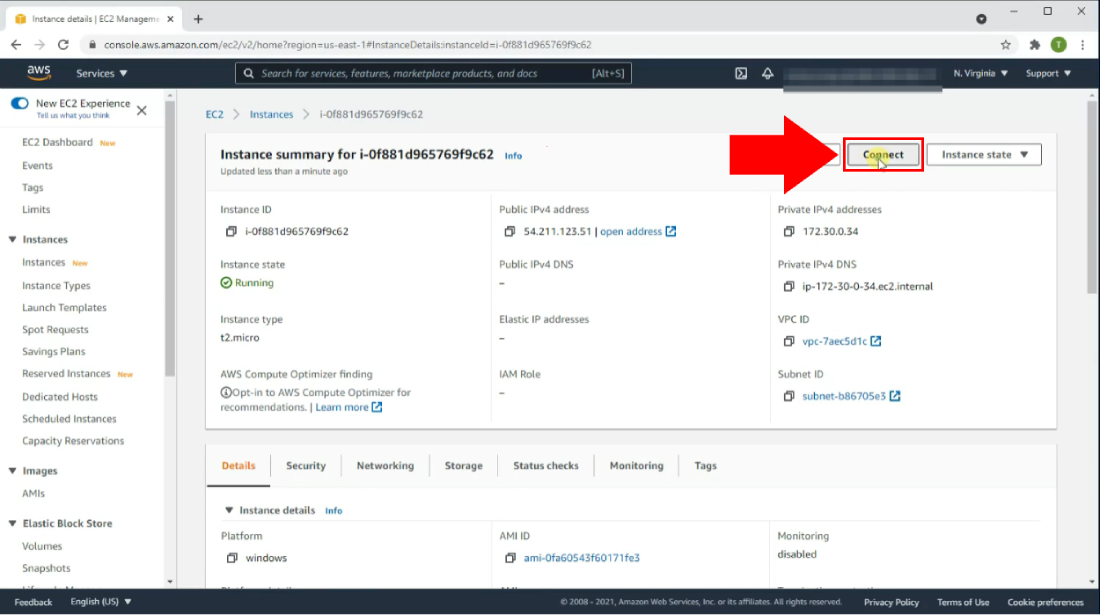
Once you have opened the instance you are going to see an instance summary. In this instance summary, locate the Connect button (Figure 9). The Connect button is found on the top right of the instance summary. This will bring you to a screen named "Connect to instance". Here you can generate an Administrator password.
Get Administrator password
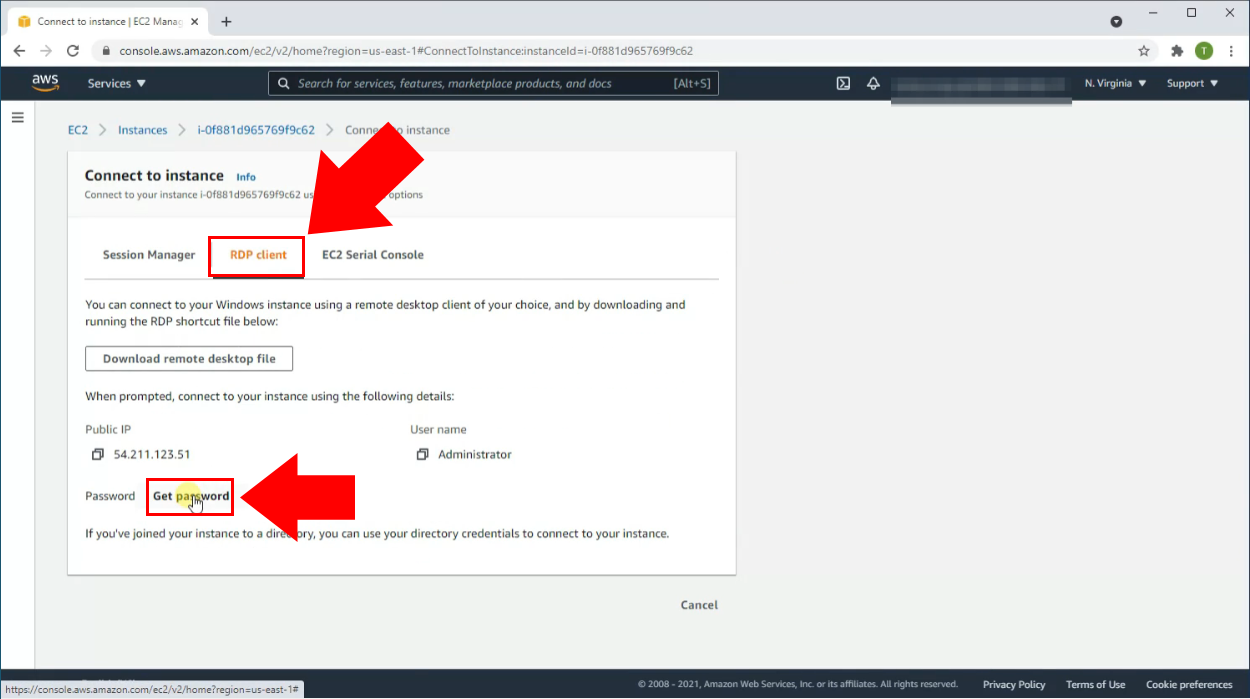
To get an Administrator password, you need to be on the "Connect to instance" screen. First, click on the RDP client tab on the top of the panel (Figure 10). This brings you to RDP client section. At the bottom of this section, click on "Get password". This will bring you to another panel titled "Get Windows password".
Browse your private key
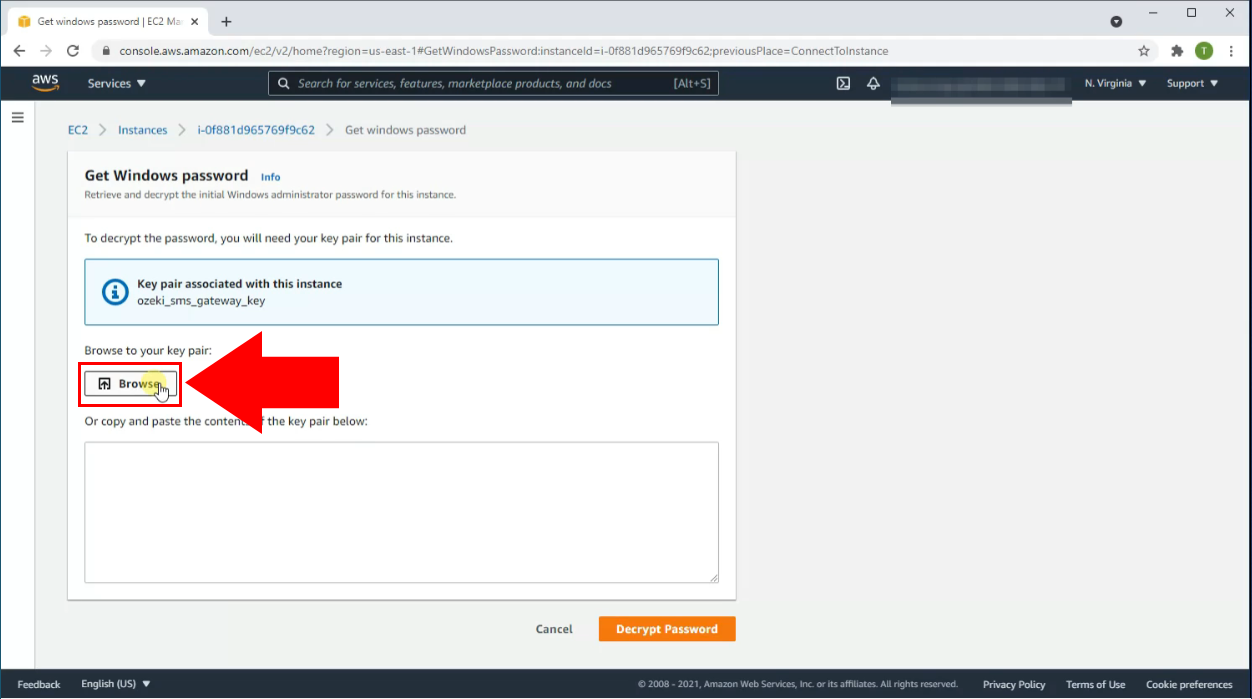
To decrypt the Windows password, you need to upload your private key to the website. You have previously saved this file to your computer. Make sure you put the file in an easy to find directory which you will be able to find in the file browser. To browse your key pair, click the Browse button with an upload icon next to it (Figure 11). This will bring up the file browser.
Open your private key
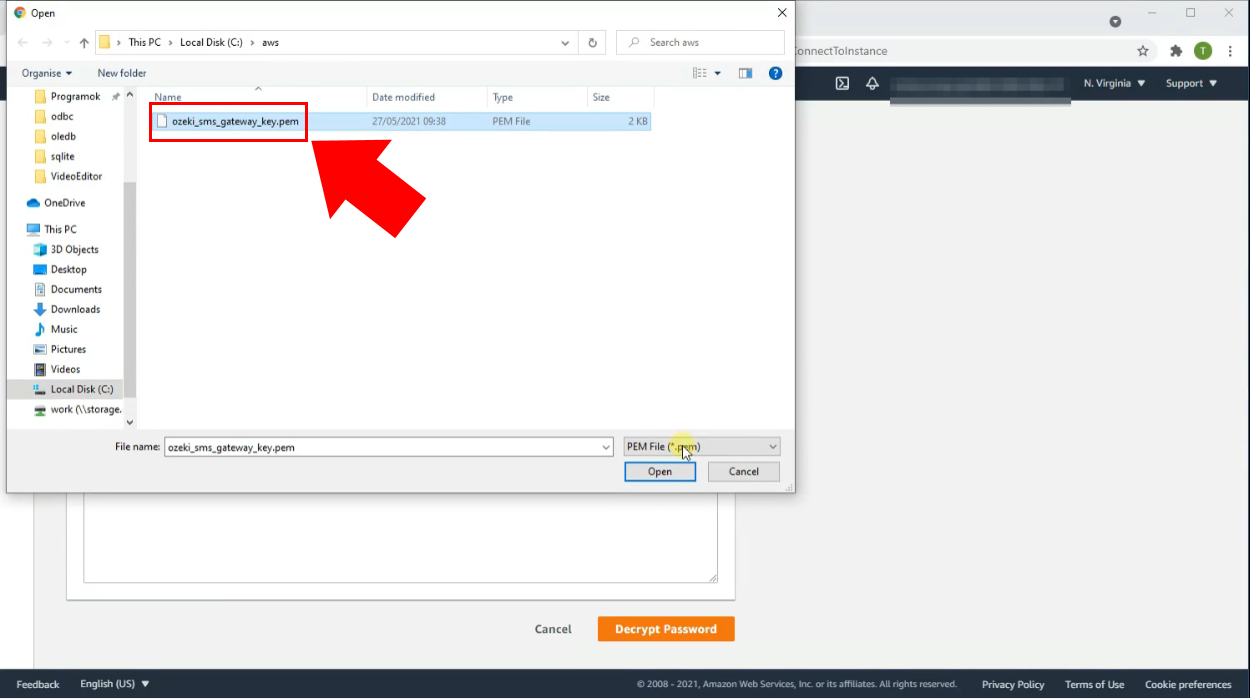
Open your private key by navigating to the private key file you have previously saved. Find the private key in the file explorer in the directory you saved it to. Select the private key file by clicking on it. Click Open at the bottom right of the window (Figure 12). This will upload your private key to the website.
Decrypt password
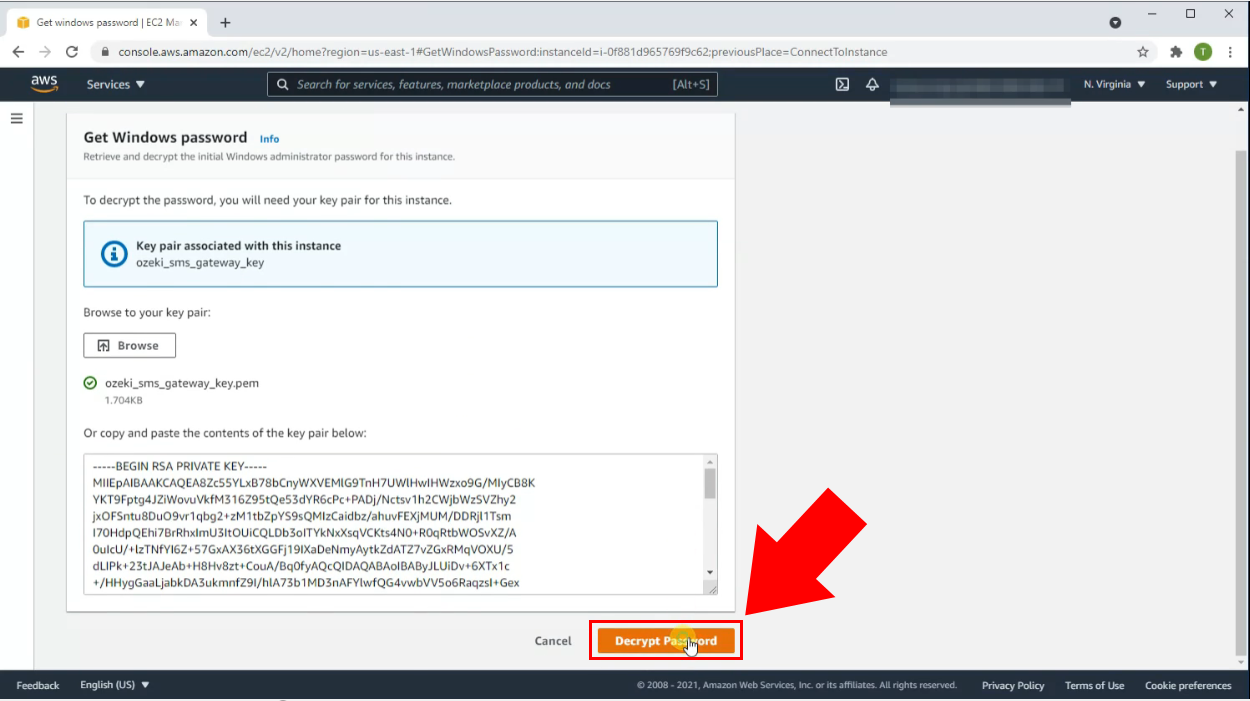
If you see a green checkmark with your private key's file name next to it, then it was uploaded successfully. This can be checked below the "Browse" button. Decrypt your password by clicking on the orange Decrypt Password button at the bottom of the panel (Figure 13). This will then bring you once again to the "Connect to instance" section. In the RDP client tab, you will your password at the bottom of the screen.
Connect to instance with Remote Desktop
Start by opening the Remote Desktop Connection application. Copy the Public IP address from the website (Figure 14). In our case it's 54.211.123.51. Paste it into the Remote Desktop Connection application into the textbox next to "Computer:". Click on Connect once you have entered the IP address.

Enter username and password
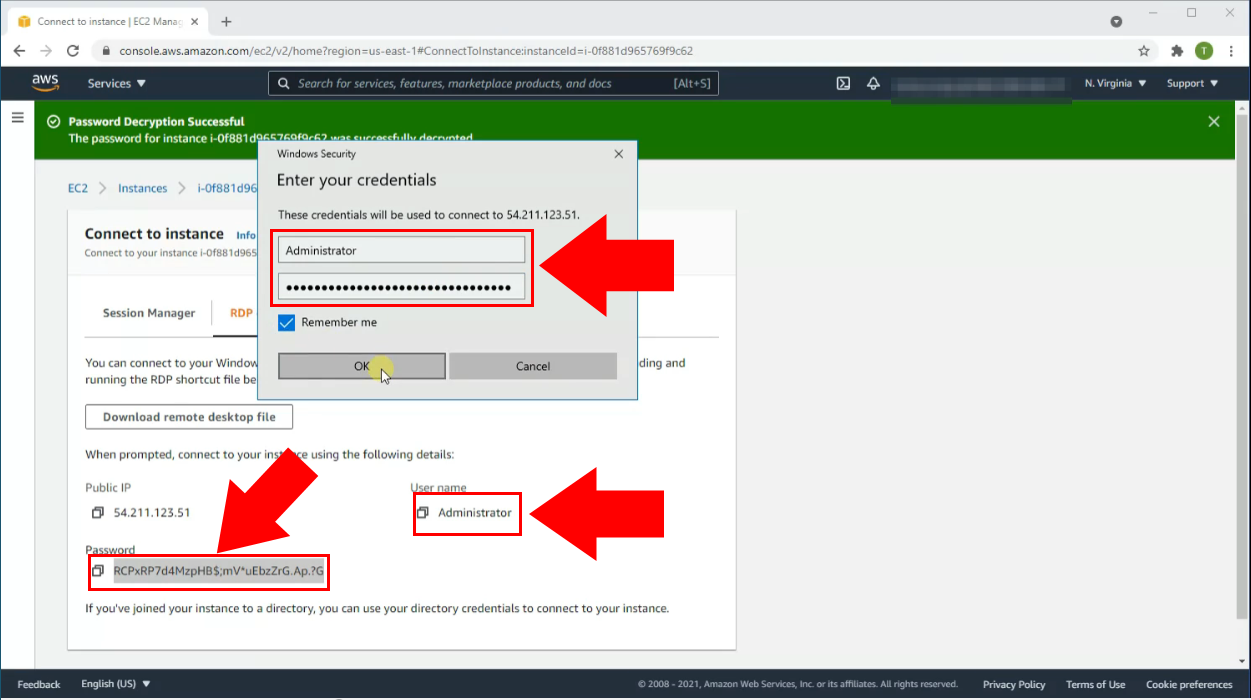
After you have connected following a short loading screen, a login screen pops up (Figure 15). On the website you will find a username and the password. Copy and paste the username into the first textbox. Do the same for the password into the second textbox. (You can also click "Remember me", if you wish for your login details to be filled automatically) When you entered both, click OK.
Connected to the remote Windows instance
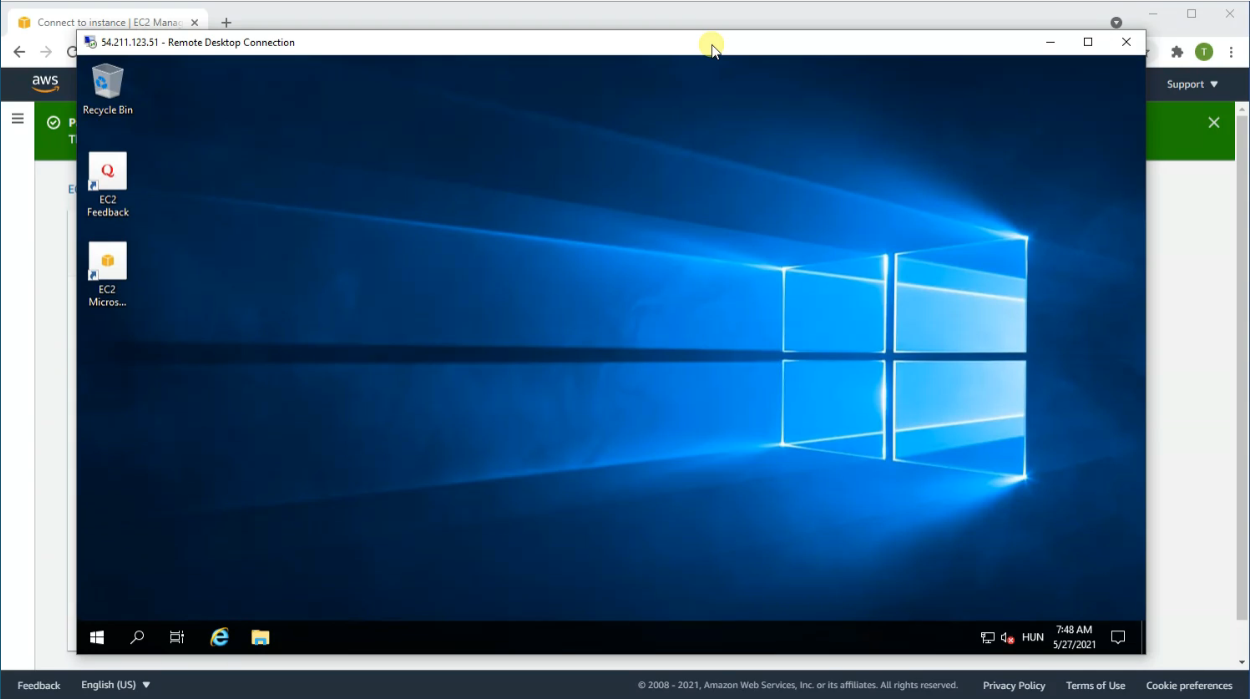
After a short amount of loading, you will be connected to the remote Windows instance. (Figure 16)
Download SMS Gateway
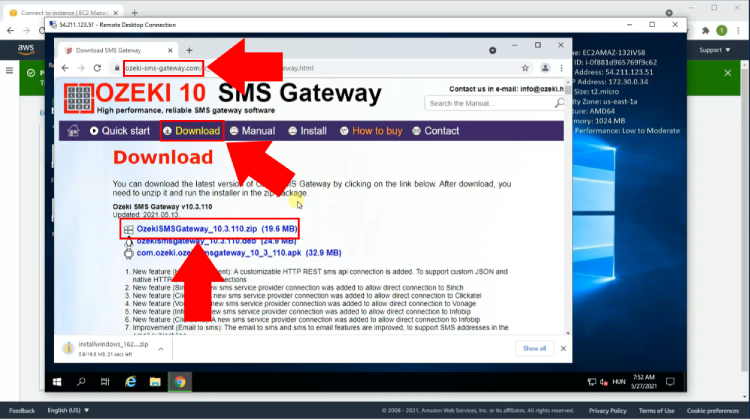
Once you're connected to the Windows instance open any browser (Internet Explorer in our case). (Note that you may have to enable downloads. This can be done by going to Settings > Internet options > Security > Custom level > Click Enable checkbox under "File download" and "Font download"). Next, type ozeki-sms-gateway.com into your URL bar, then hit enter (sms.ozeki.hu also redirects you to the same page). Then click on Download on the top of the page. This will bring you to the downloads page. Finally, click on OZEKI_SMS_GATEWAY.zip highlighted in blue with a Windows icon next to it (Figure 17).
Extract the zip file
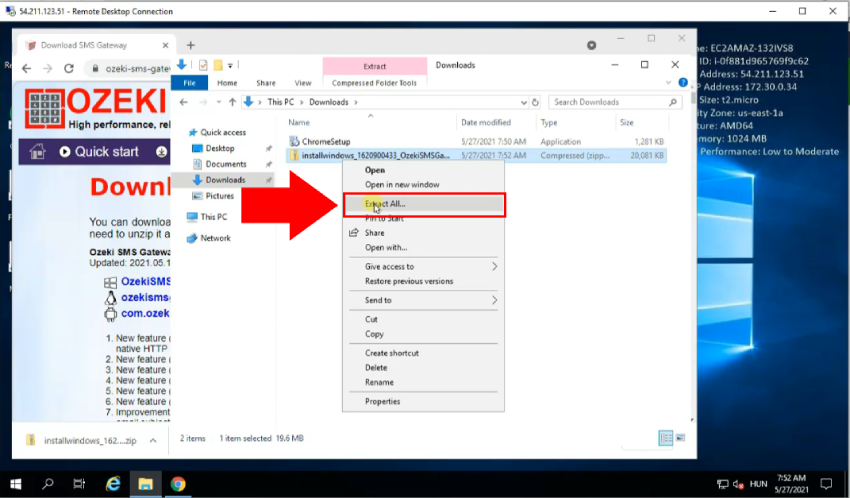
After you have downloaded the Ozeki SMS Gateway installer you need to extract it. First go to your Downloads folder and locate OZEKI_SMS_GATEWAY.zip. Next, right click on it. Then, click on the "Extract all" option from the dropdown menu (Figure 18). This will extract the zip file to its current location.
Start SMS Gateway installer
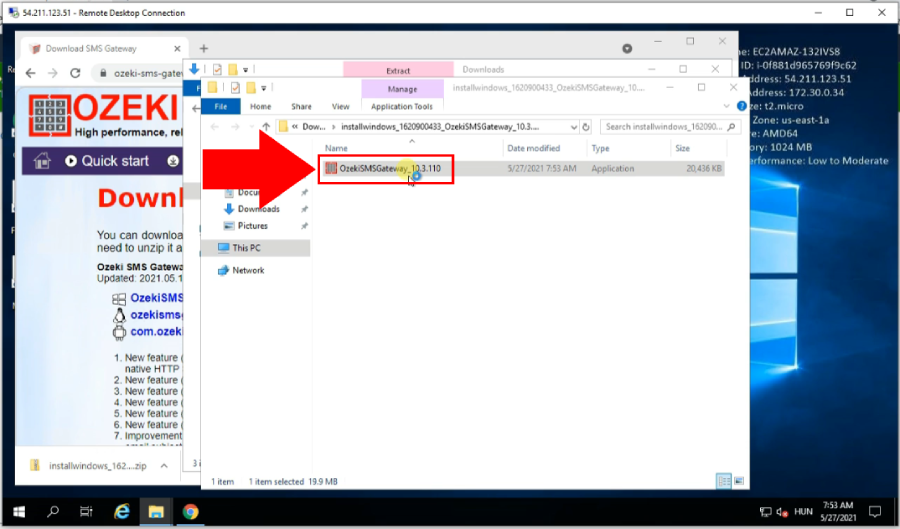
Double click on the Ozeki SMS Gateway installer you have previously extracted (Figure 19). By opening it you will start the installation process.
Install Ozeki SMS Gateway
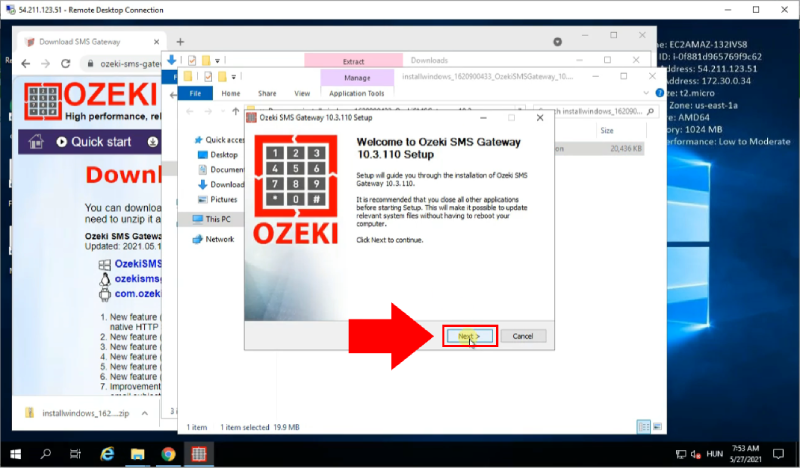
On the welcome screen, click on the Next button to proceed with the installation (Figure 20).
Accept license agreement.
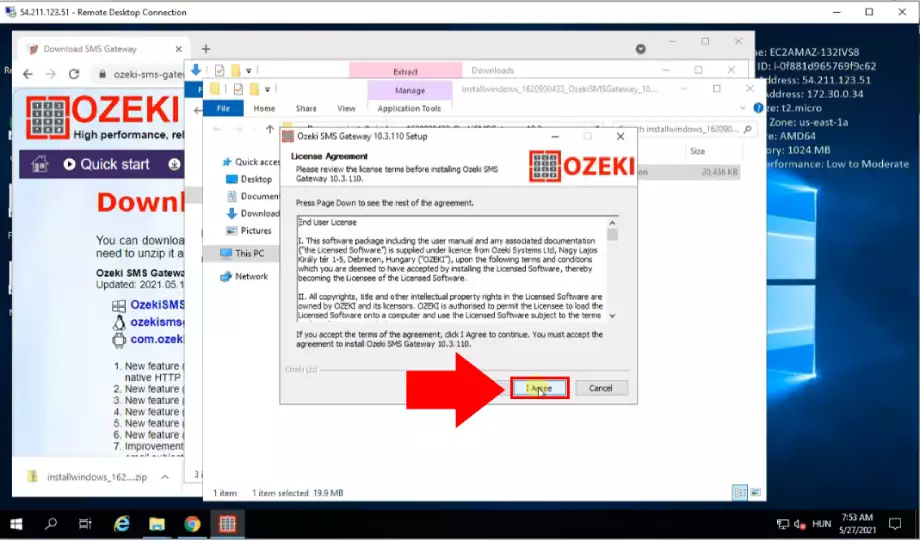
In order to be able to use this program you need to accept the license agreement. Do this by simply clicking on the I Agree button (Figure 21). The program will install after you have done so. A progress bar will indicate the status of the installation. Once it is done, you will be forwarded to the final screen.
Finish the Installation
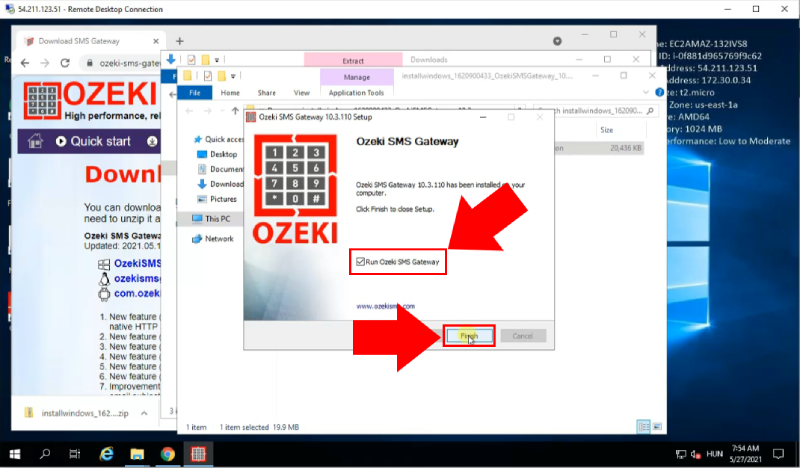
Finish the installation by clicking on the Finish button (Figure 22). You can also launch the program immediately after it installed. To started it, put a checkmark into the checkbox that reads "Run Ozeki SMS Gateway".
Ozeki SMS Gateway management
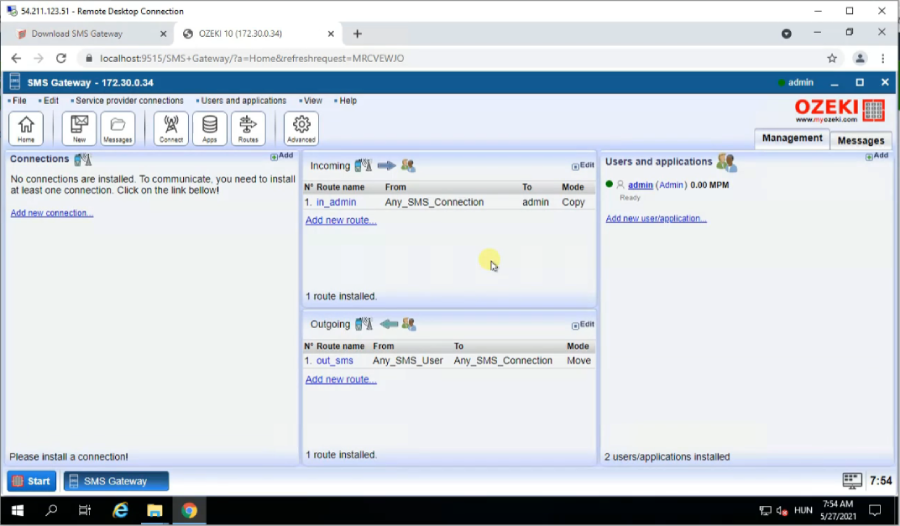
Once you have successfully installed and launched the program, Ozeki SMS Gateway will launch inside your browser. After the program launched you are entered into the desktop. On the desktop click on the SMS Gateway icon at the left side of the screen. This brings you to the Ozeki SMS Gateway management window (Figure 23).
Open security group
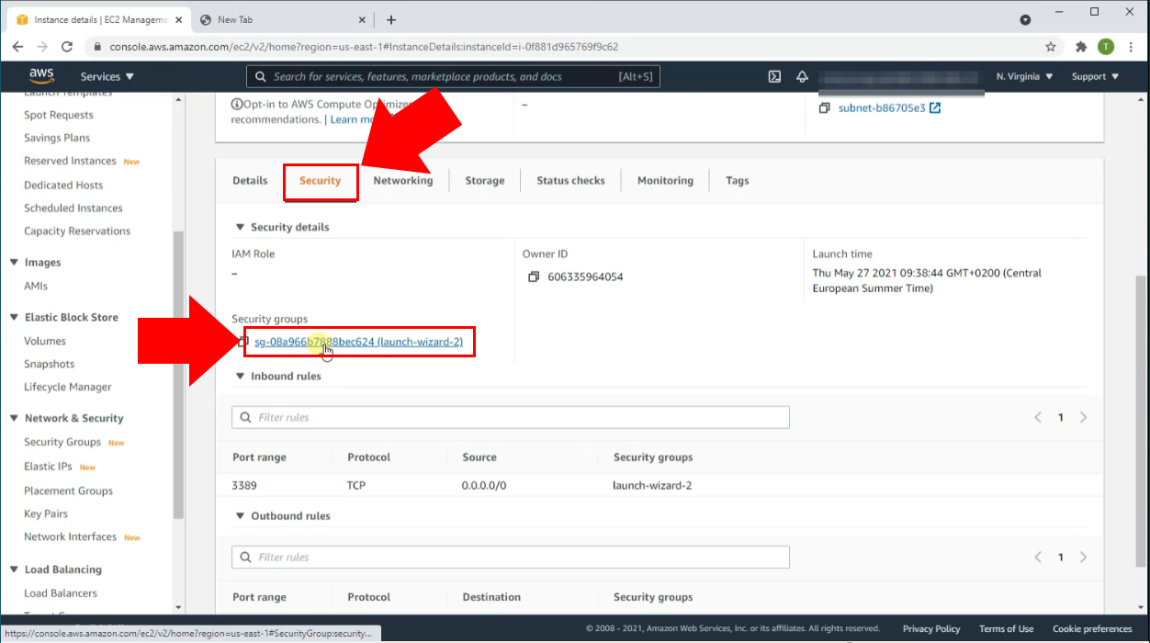
Open the security group by once again returning to the Amazon AWS console outside of the Remote Desktop Connection application. Do this by entering console.aws.amazon.com into the URL bar of your browser in case you have closed it. Open the menu on the left by clicking on it. Scroll down and click on the option named Security groups. In the Security Group panel click on the Security tab (Figure 24). Next, click on the link highlighted in blue below "Security groups". This will bring you to the details of your security group.
Edit inbound rules
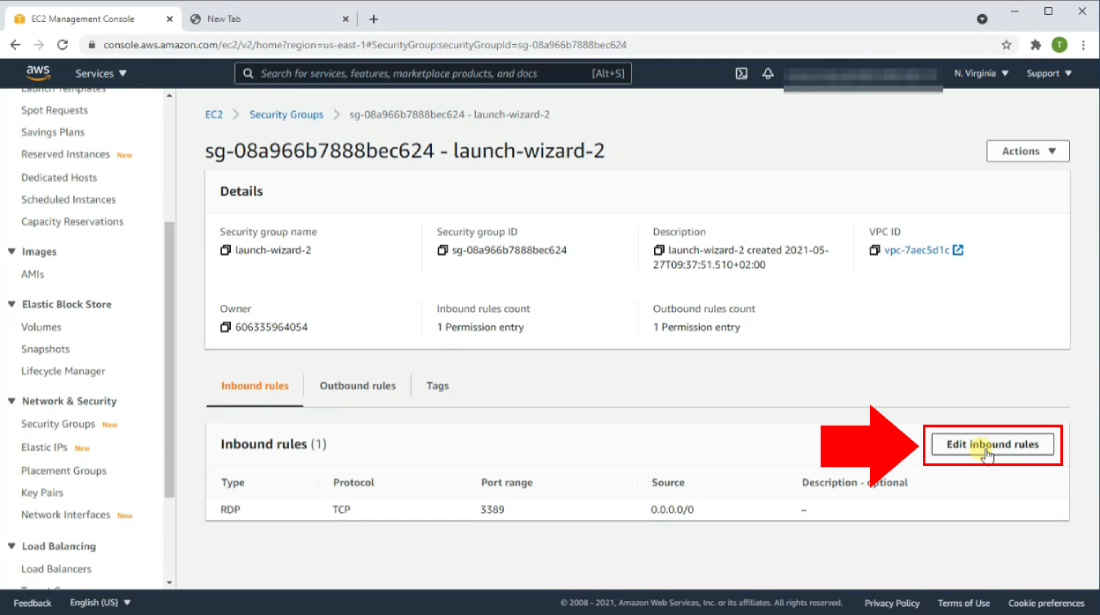
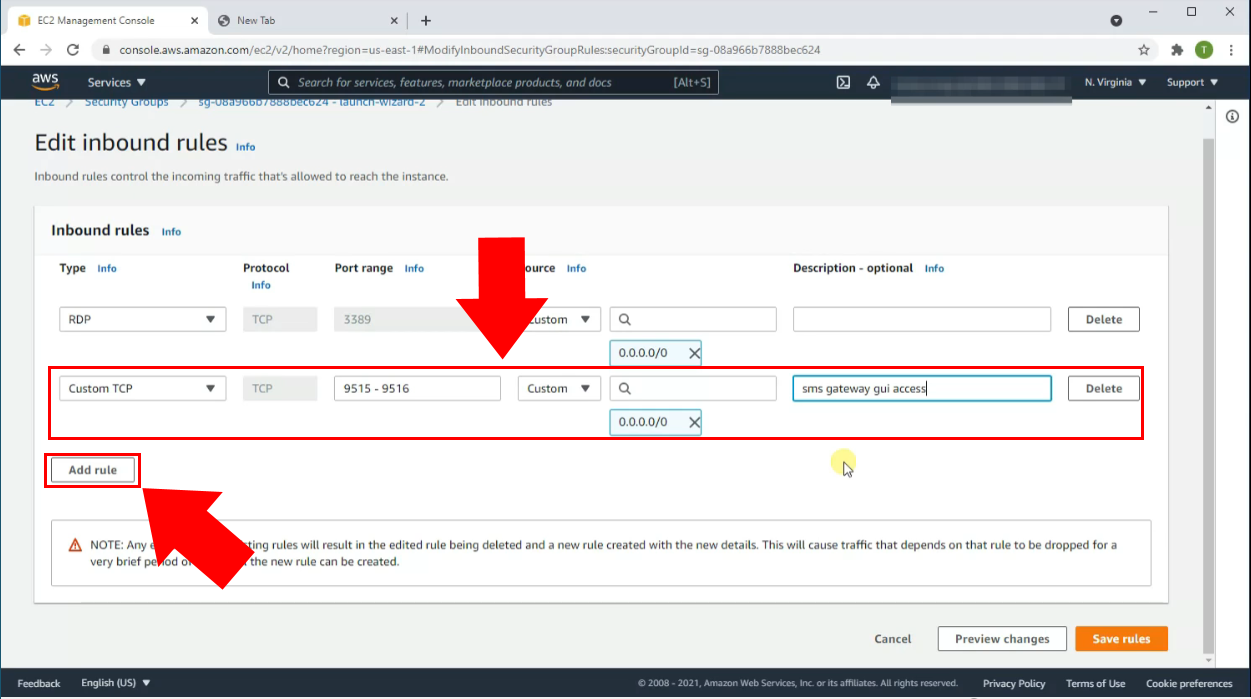
To edit inbound rules, you need to be on the details page of your security group. Click on the Edit inbound rules button to be able to edit them (Figure 25). By clicking on this button, you are brought to a configuration screen for inbound rules.
Add a new rule for GUI access
First, click on the Add rule button in the Edit inbound rules panel (Figure 26). Next, proceed to enter a port range separated by a "-" into the textbox below "Port Range" (We have used 9515-9516). Then, click on the combo box with the search icon and select the first option (which is: 0.0.0.0/0). You can also give it a name under the Description column. (We have named it "sms gateway GUI access"). When done, click on the orange Save rule button at the bottom right.
Open Windows firewall
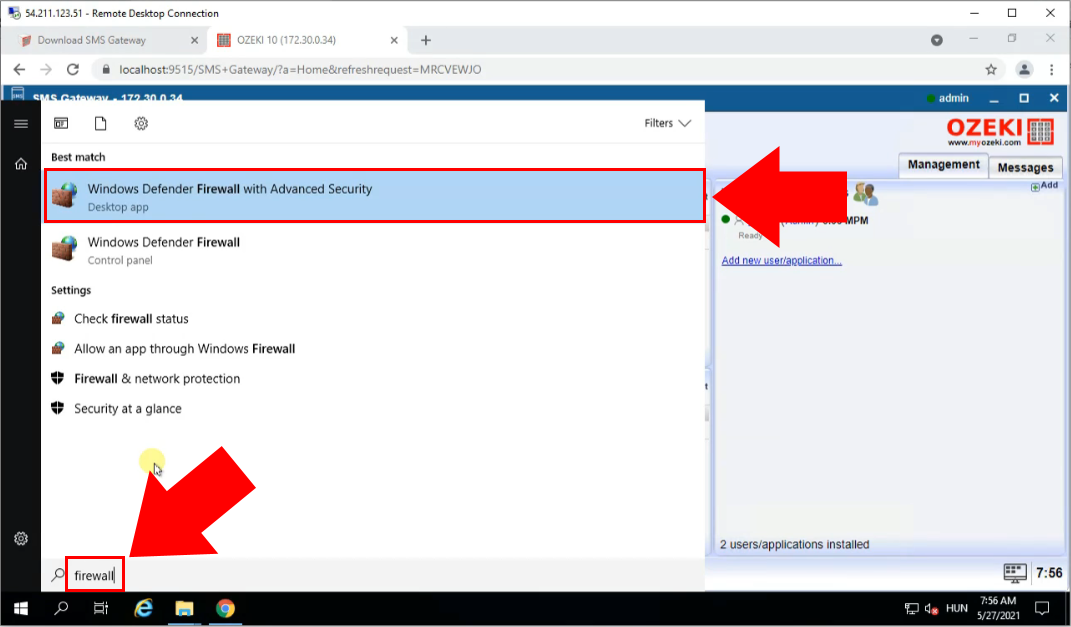
Start by typing "firewall" into the search bar on your taskbar (Figure 27). The search bar is located on the left side of your taskbar at the bottom left of your screen. The search results will return with the Windows Firewall program. Now find the first option the search has given. Click on the Windows Defender Firewall with Advanced Security application icon to launch the program.
Add a new Windows Firewall inbound rule
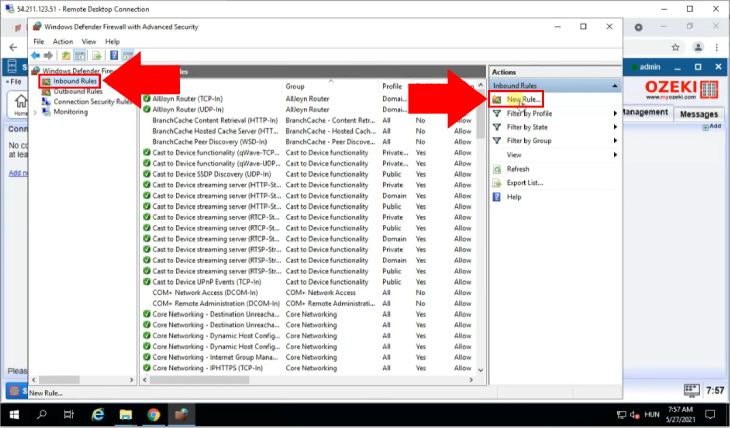
Inside the Windows Defender Firewall application click on Inbound rules inside the menu on the left (Figure 28). Next, navigate to the Inbound rules menu which appeared on the right. In this menu click on New rule. By clicking this option, a new window will pop up which lets you create a new rule.
Select inbound rule type
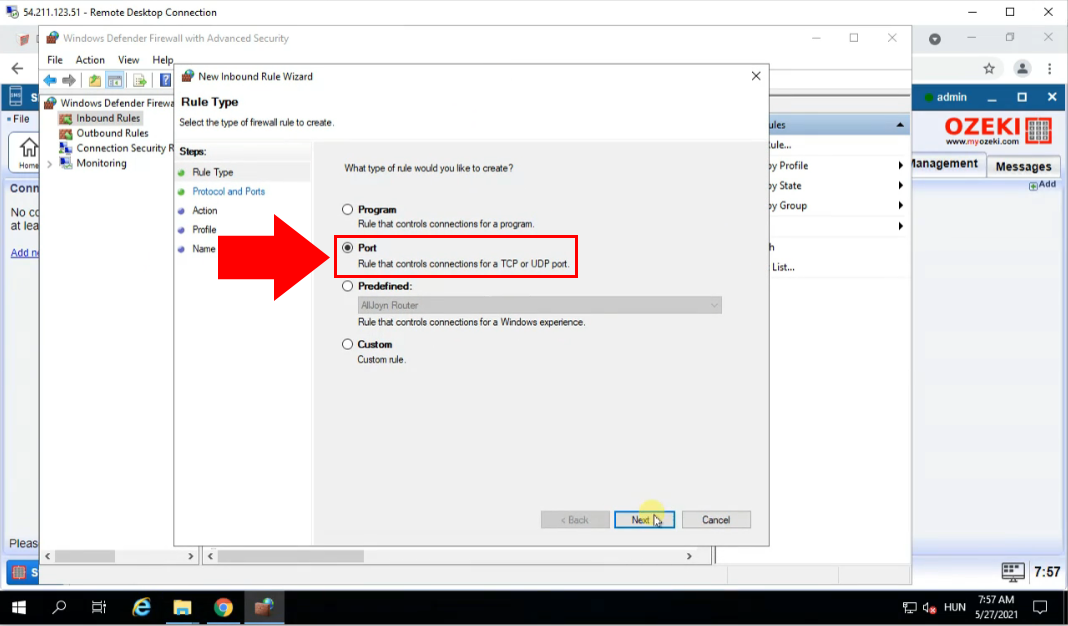
Select the inbound rule type in the New rule window. Under the text which reads "What type of rule would you like to create", find the Port option (Figure 29). Click on the checkbox next to it to select the Port option. Click the Next button at the bottom right of the window to continue. You will be brought to the Protocols and Ports section.
Define ports
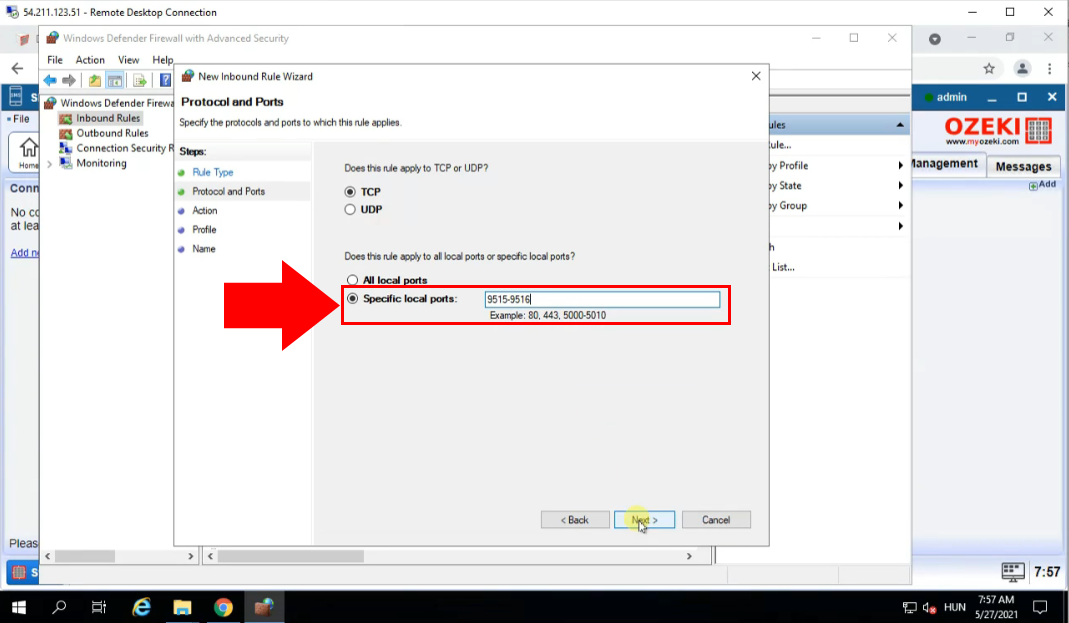
Define your ports by entering the previously selected port range. (In our case, this was 9515-9516) Enter this port range once again separated by a "-" into the textbox (Figure 30). This textbox is located next to a text which reads "Specific local ports". (Make sure that TCP and "Specific local ports" are both selected). To proceed, click the Next button at the bottom right of the window.
Allow the connection
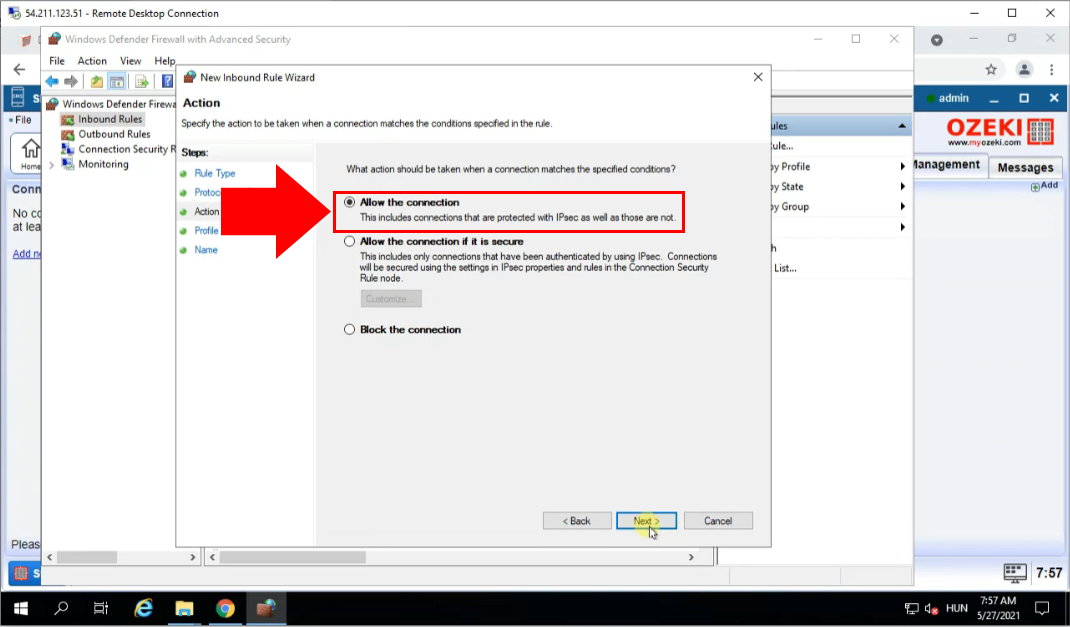
After defining your ports, you are brought to the Action section. Allow connection by clicking on the checkbox next to the text that reads "Allow Connection" (Figure 31). Once selected, click on Next again to continue. You will then be brought to the Name section.
Specify the name of the inbound rule
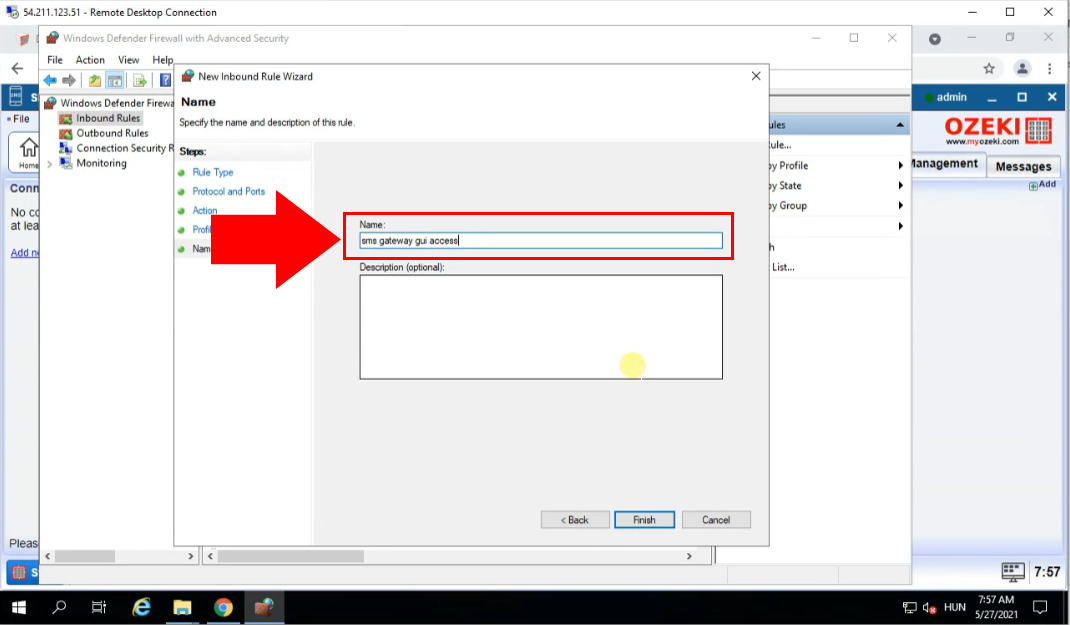
The last step of creating a new rule is to give it a name. In the Name section, type your desired name into the first textbox (Figure 32). This textbox is located below the text that reads "Name:" in the middle of the window. Click the Finish button found at the bottom right of the window to create the rule.
Connect remotely to the SMS Gateway
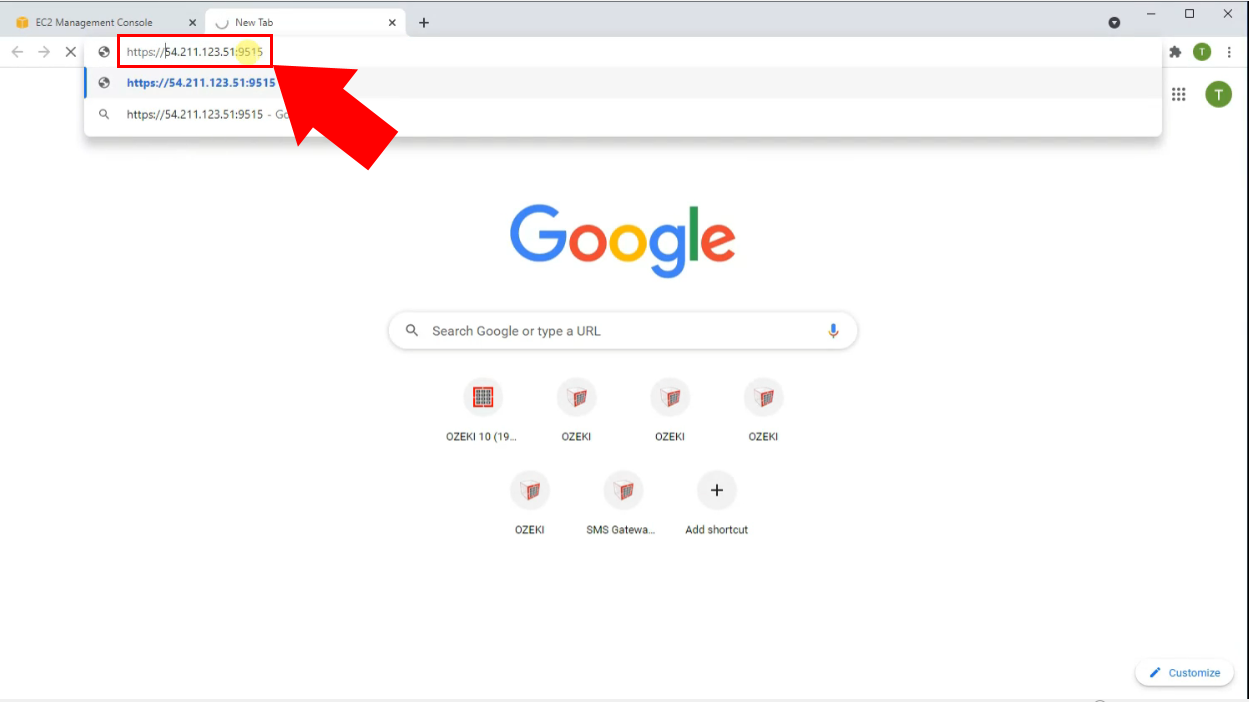
First, open your browser once again outside of the Remote Desktop Connection application. Then, copy the IP address provided in Amazon AWS again. In our case this was 54.211.123.51. Paste this into the URL bar of your browser, then add a port to it in your port range followed by ":". For our example, this is :9515. The final address looks like this 54.211.123.51:9515 (Figure 33). To access it, hit enter.
Remote access is not allowed screen
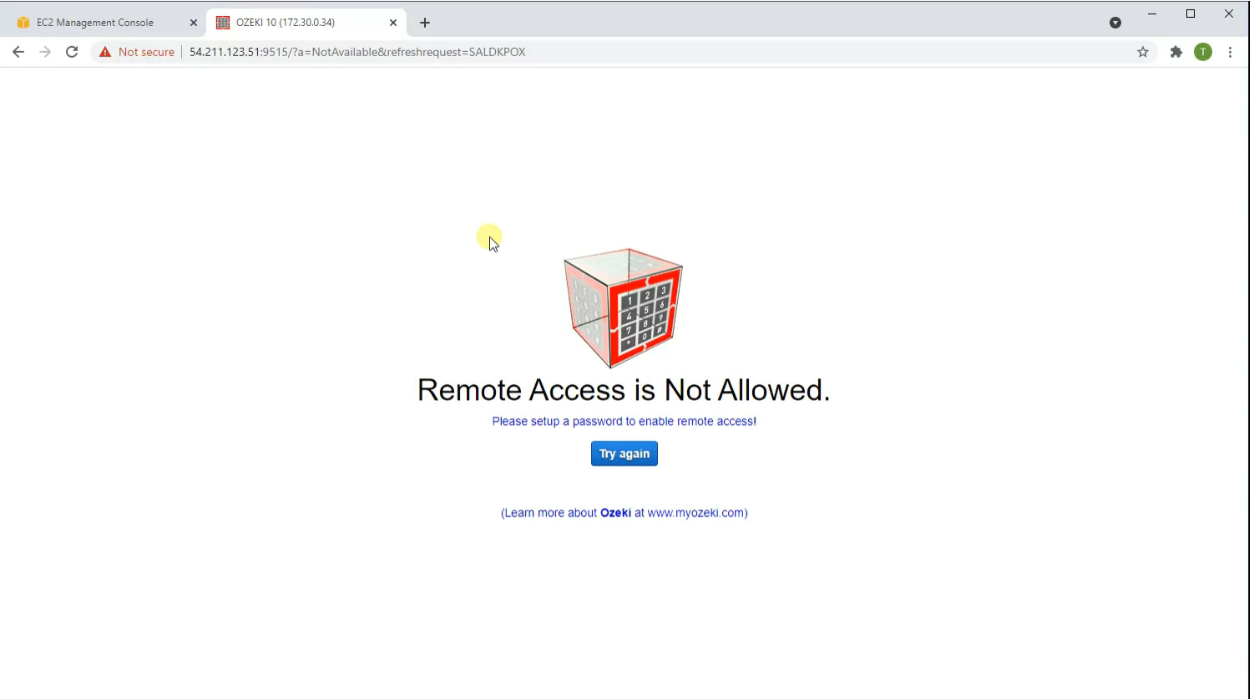
With the current settings remote access will not yet be allowed. You are then shown a screen displaying "Remote Access is Not Allowed" (Figure 34).
Change default admin password
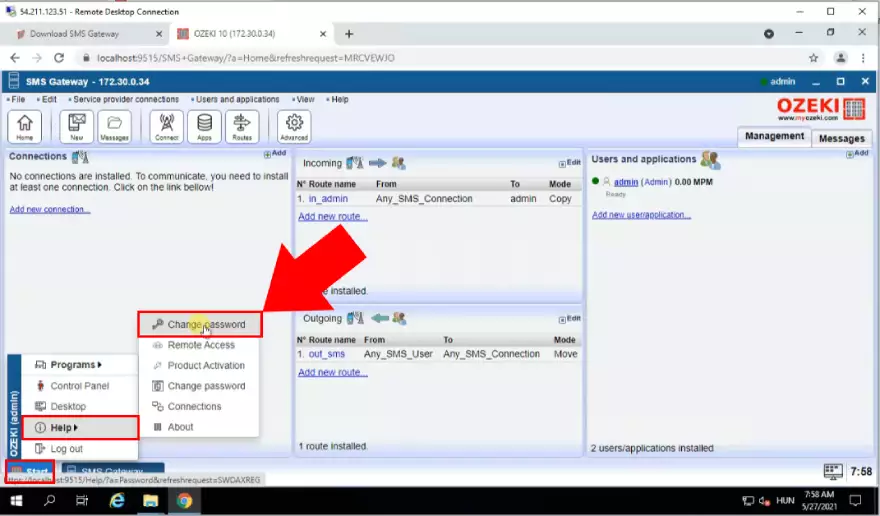
First, go back to the SMS Gateway application inside the Remote Desktop Connection application. Next, click on the Start button at the bottom left of your screen (Figure 35). A menu then pops up where you need to hover your cursor over Help. Then another menu pops up where you need to click on Change password. Clicking on this option will bring you to another page where you are able to change your admin password.
Create a new admin password
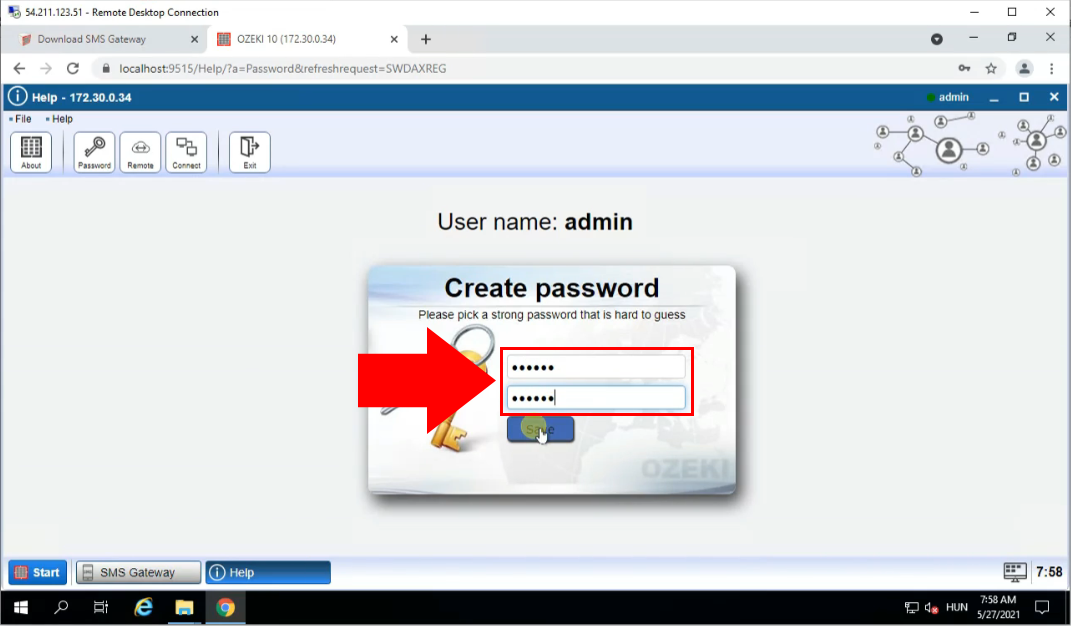
On the create a new password screen you are able to assign a new password to admin access. Type your desired password into both of the textboxes shown in the middle of the screen (Figure 36). Make sure the passwords you have entered are the same. This is to assure that the user is not able to enter their password incorrectly. When you have entered your password click on the blue Save button below the textboxes. You will be brought to a login screen, but you can continue from your browser outside of the Remote Desktop Connection application.
Log in remotely to the SMS Gateway
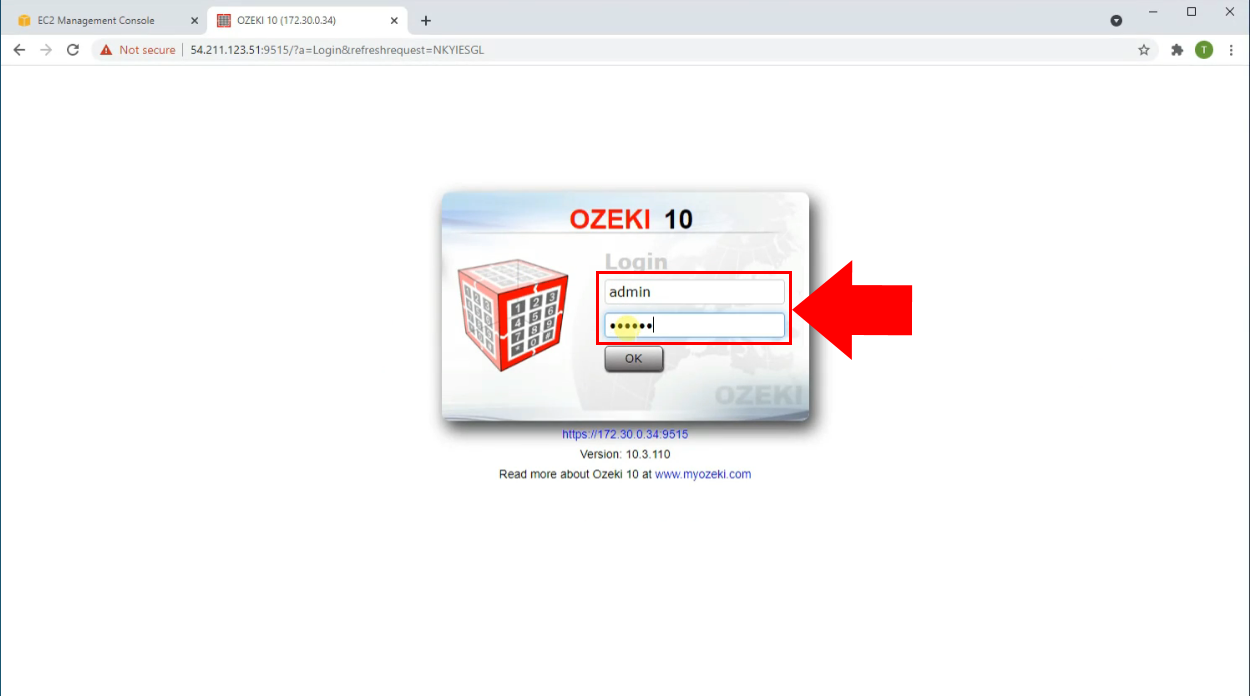
Now that you have created a new admin password you can log into the SMS Gateway from outside of the Remote Desktop Connection program. Start by typing the address followed by the port into the URL bar of your browser. In our example it was 54.211.123.51:9515. Then hit the Enter key. You are then shown a login screen with two textboxes in the middle of the screen (Figure 37). Type "admin" into the first textbox. Then type your newly created admin password into the second textbox. Click on OK to log in.
SMS Gateway GUI is now accessible
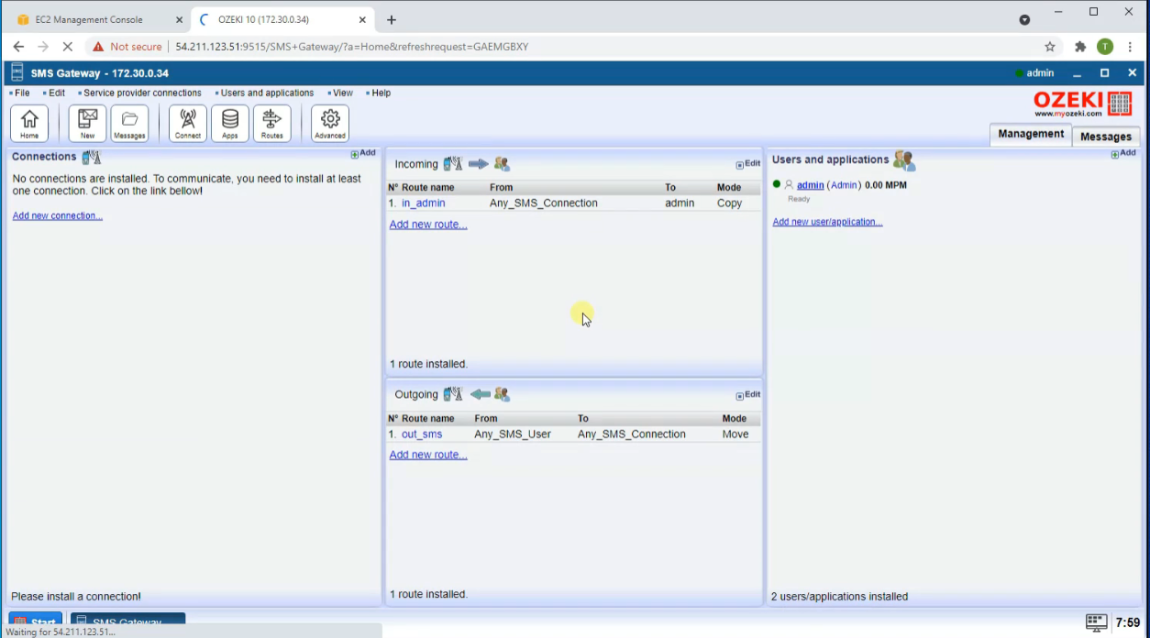
After successfully logging in you are able to access the SMS Gateway GUI from your browser (Figure 38).
Final thoughts
Now, you can pause and catch your breath. We did our very best to make it simple and to walk you through all the details as painlessly as possible. If you have followed the tutorial steps closely, you should be able to send sms using the Amazon AWS with Ozeki SMS Gateway without problems. If you have already completed the steps, you can enjoy a well-deserved latte or some other treat you have in mind. If you would like to discover more useful insights about the advantages of other similar solutions, please open ozeki-sms-gateway.com. I hope this tutorial will be helpful to all the readers and especially to beginners.
