How to install Ozeki SMS Gateway in Microsoft Azure
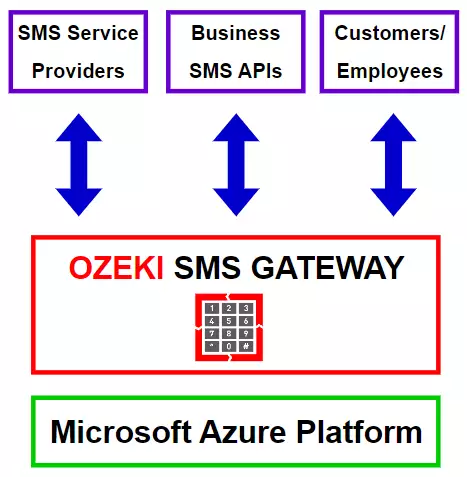
This guide explains how you can setup Ozeki SMS Gateway inside Microsoft Azure's virtual machine service. The tutorial below presents all the steps and the necessary information to help you complete this procedure with ease. Ozeki SMS Gateway is a great program that makes it possible to create great solutions in various environments. It can be used for a variety of different tasks. For example, to keep in touch with customers and employees. In this article, you will find out how to launch an Azure instance, install Ozeki SMS Gateway on a Virtual Machine and access it remotely. You will be provided step by step instructions. We hope you find this article informative and helpful. Let's get it started!
What is Microsoft Azure
Microsoft Azure is a public cloud computing platform. It allows the users to run instances of virtual Windows computers remotely on Microsoft's servers. This has the benefit of being able to use more computing power without actually having to own the hardware. You can use an Azure instance of a virtual machine just like a regular computer running Windows. In this article, we use it to run Ozeki SMS Gateway.
What is Ozeki SMS Gateway
Ozeki SMS Gateway is a communication software that routes messages between real world entities. It allows you to build up simple communication between shared hardware and software resources of your system. It offers real time information and provides various configuration options to route messages.
How to install Ozeki SMS Gateway on Microsoft Azure (Quick steps)
To install Ozeki SMS Gateway in Microsoft Azure:
- Create new virtual machine in Microsoft Azure
- Open virtual machine in Remote Desktop Connection
- Download Ozeki SMS Gateway .zip file
- Extract the downloaded .zip file
- Start Ozeki SMS Gateway installer
- Click on the Next button to continue
- Add inbound port rule in MS Azure
- Provide new inbound rule in Windows Firewall
- Connect remotely to the SMS Gateway
- Change default admin password
Optimize SMS Communication with Microsoft Azure and Ozeki SMS Gateway
Microsoft Azure offers an efficient solution for improving SMS communication through the integration of Ozeki SMS Gateway. Users may effectively manage SMS communication by setting up the Ozeki SMS Gateway on Microsoft Azure and creating connections to various service providers using API credentials. As the gateway successfully installed and connected, businesses can streamline SMS management. Combining these tools optimizes messaging for marketing, notifications, and emergencies, ensuring highly effective communication with your audience. With the Ozeki SMS Gateway deployed on Microsoft Azure, businesses can optimize their SMS communication strategies, making it an ideal solution for a wide range of applications.
How to install Ozeki 10 on Microsoft Azure (video tutorial)
This video tutorial will show you the steps on how to launch a Microsoft Azure virtual machine, as well as how to install Ozeki SMS Gateway on the virtual machine and access it remotely.
Select virtual machine service
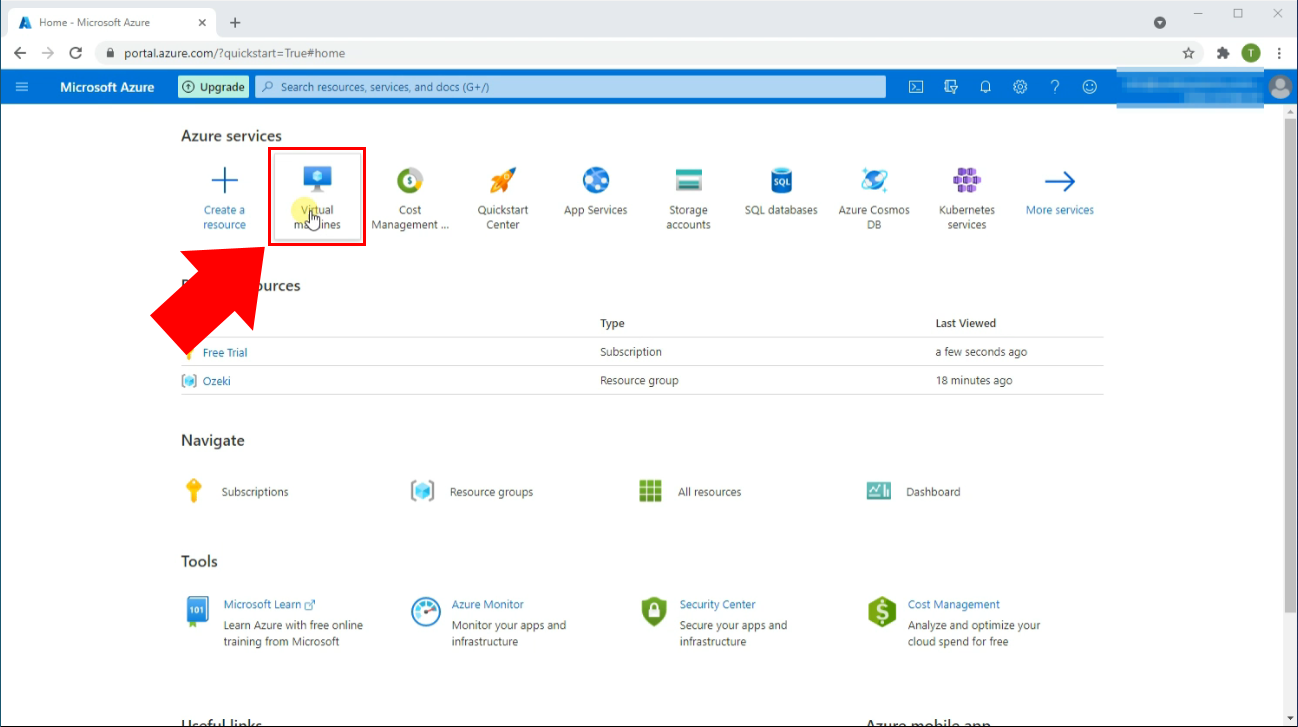
First, go to the Home page on portal.azure.com. To select a virtual machine, click the Virtual machines icon located under Azure services (Figure 2). Selecting this option will forward you to the next page where you can add a new virtual machine to your account.
Add new virtual machine
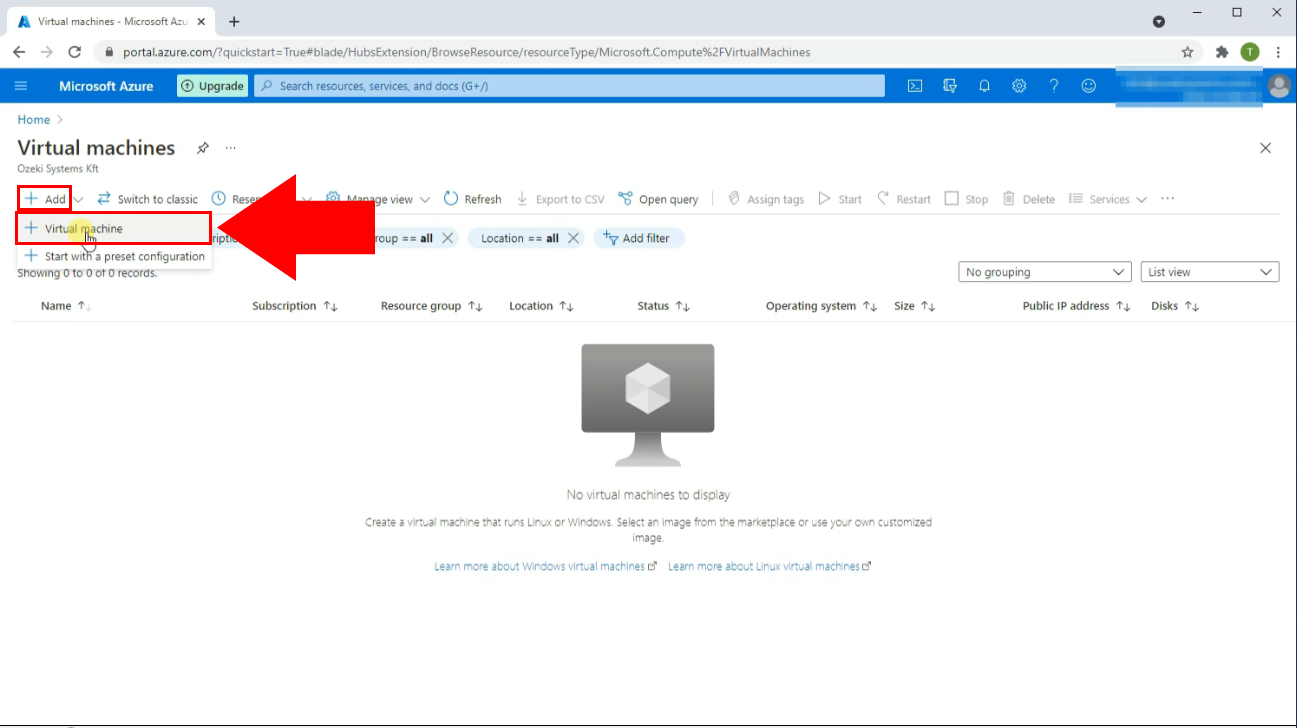
Once you are on the Virtual machines page you can create a new one. Do this by clicking the blue "+" icon where it says "Add" in the virtual machine toolbar (Figure 3). This brings up a dropdown menu. In this menu select Virtual machine by clicking on it. Selecting it brings you to the "Create a virtual machine" page, where you can configure the details of the instance.
Configure instance details
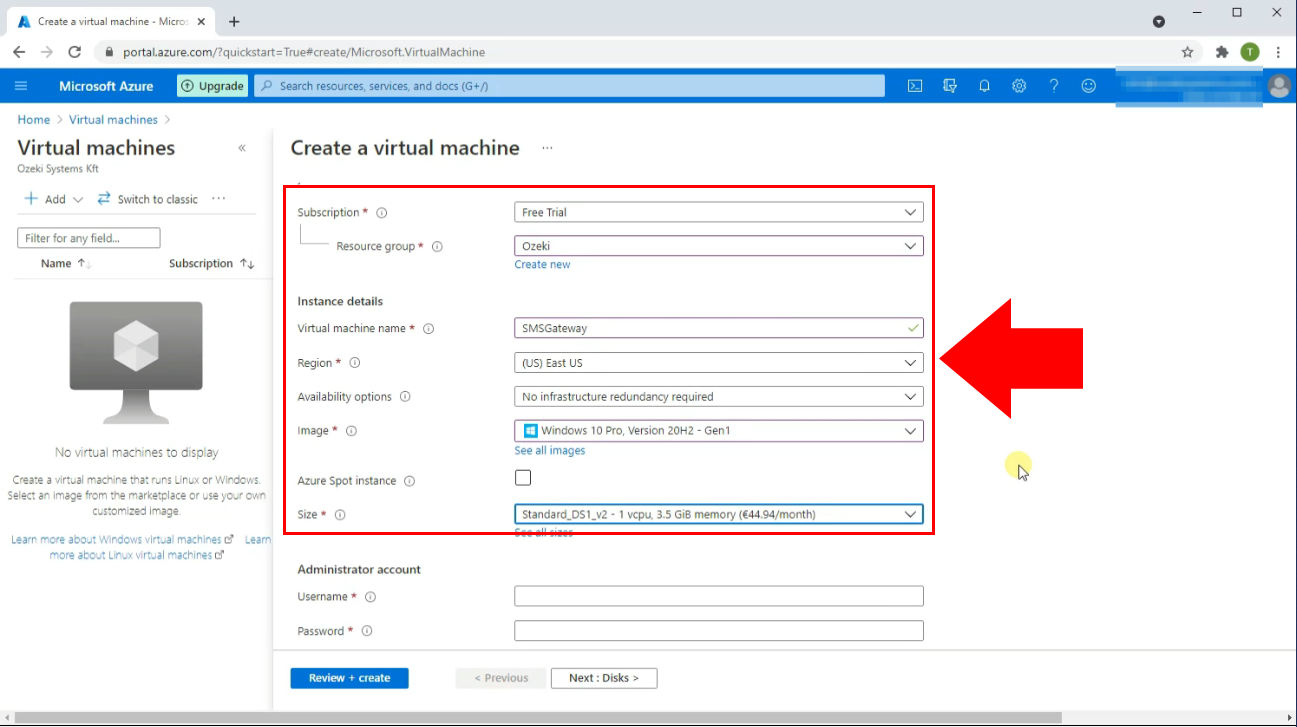
On the "Create a virtual machine" page you need to configure the details of your instance. Select your desired options from the combo boxes to configure your setup (Figure 4). In this tutorial, we select Free trial as the type of subscription. You can also name your virtual machine by typing a name into the textbox next to "Virtual machine name". We have also selected East US as the region and Windows 10 pro for the image. The image is the operating system that gets installed on your virtual machine. We selected "Standard_Ds1_v2" as Size. This is the hardware specification of your virtual machine. Scroll down to Administrator account details when done.
Enter administrator account details
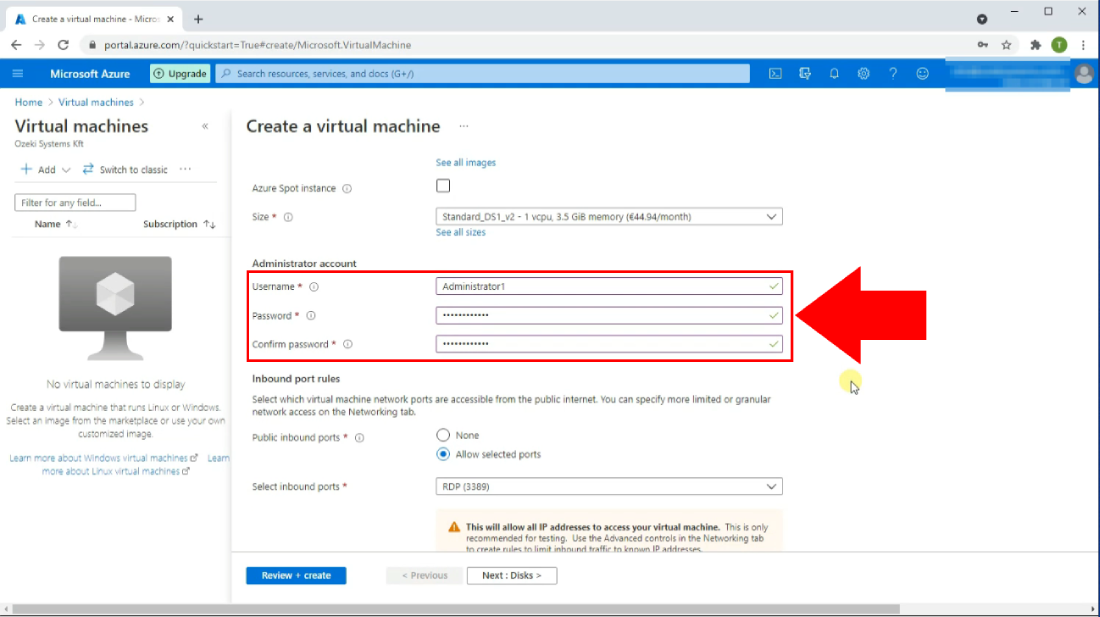
In the Administrator account section, you need to specify a username and a password (Figure 5). These are used to log into your virtual machine using remote access. Type the username you wish to create into the textbox next to "Username". Then, type your desired password into the next textbox below. Confirm your password by entering it again into the third textbox. Scroll down to the Licensing section when done.
Review virtual machine
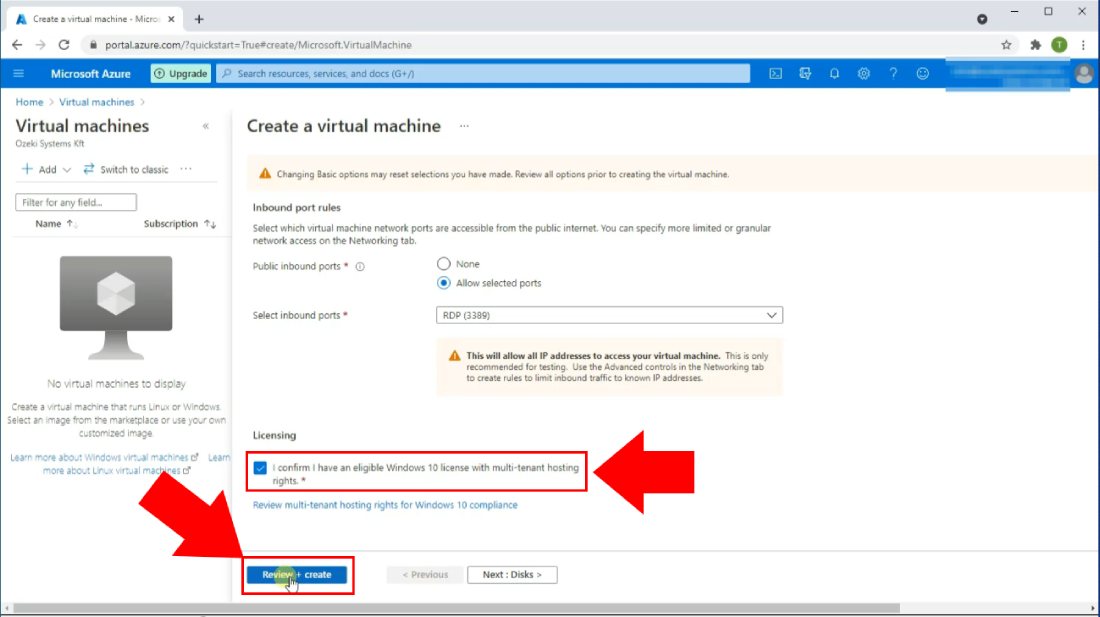
To be able to review and create your virtual machine you first need to accept the licensing agreement. This way you confirm that you have an eligible Windows 10 license with multi-tenant hosting rights. Confirm the licensing agreement by clicking on the checkbox (Figure 6). Finally, click on the blue Review + Create button at the bottom. You will then be forwarded to the review page.
Create virtual machine
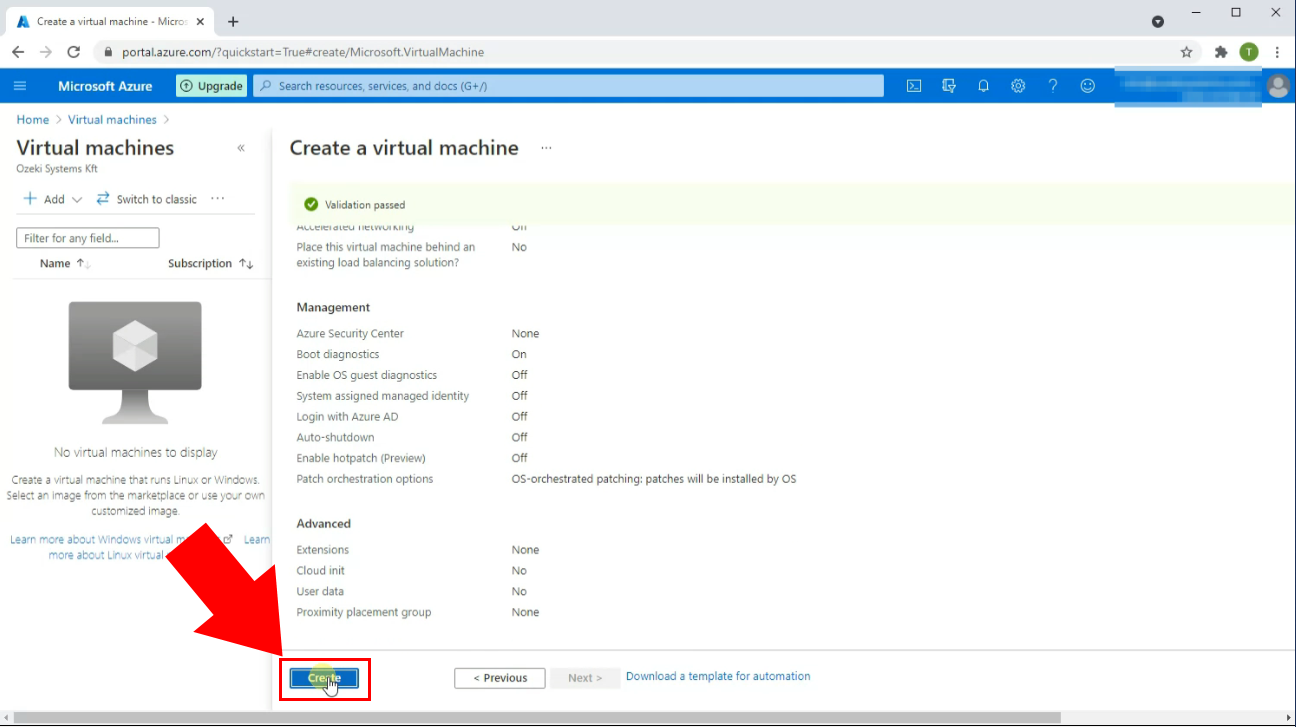
On the review page, you can make sure that all of the details you have provided are correct. If you find that something is not correct, you can go back and edit your settings by clicking on the "Previous" button at the bottom. Click on the blue Create button at the bottom to create your virtual machine (Figure 7).
Your deployment is complete
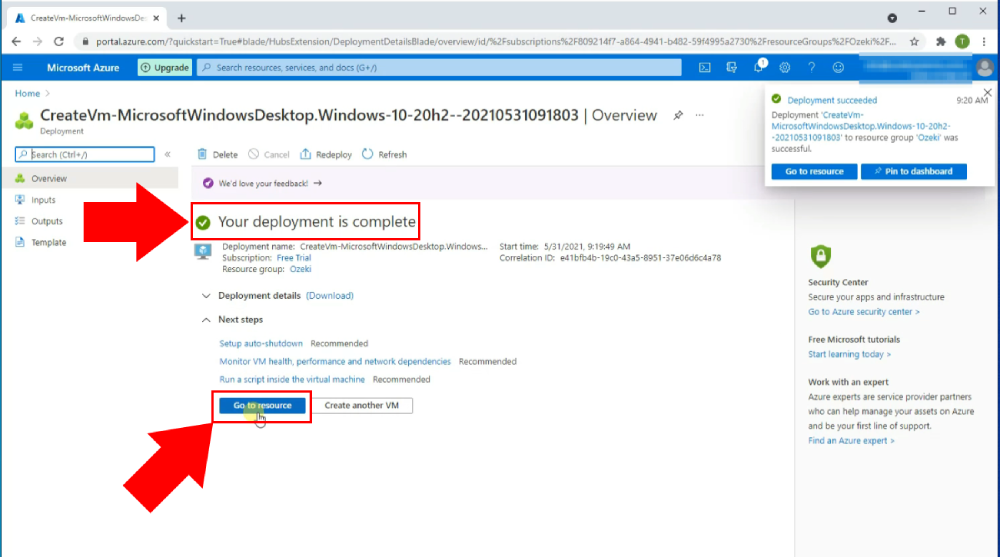
After you have clicked create, Microsoft Azure will take a short amount of time to deploy your virtual machine. Once it has finished creating your virtual machine your deployment is successful. You are going to see a message that reads "Your deployment is complete" with a green checkmark next to it (Figure 8). Click on the blue Go to resource button at the bottom to view the properties of your newly created virtual machine.
Open virtual machine in Remote Desktop Connection
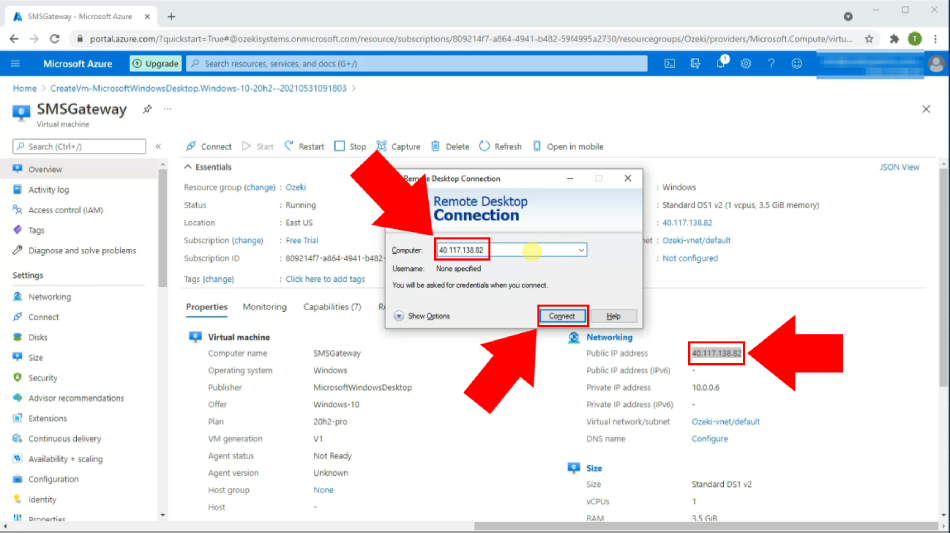
First, open the Remote Desktop Connection application on your computer. Next, find the Public IP address of your virtual machine (Figure 9). It is located under Networking. Copy the Public IP address (In our case this is 40.117.138.82). Paste the address into the textbox in Remote Desktop Connection. Click on the Connect button at the bottom of the window to connect to your instance.
Enter username and password
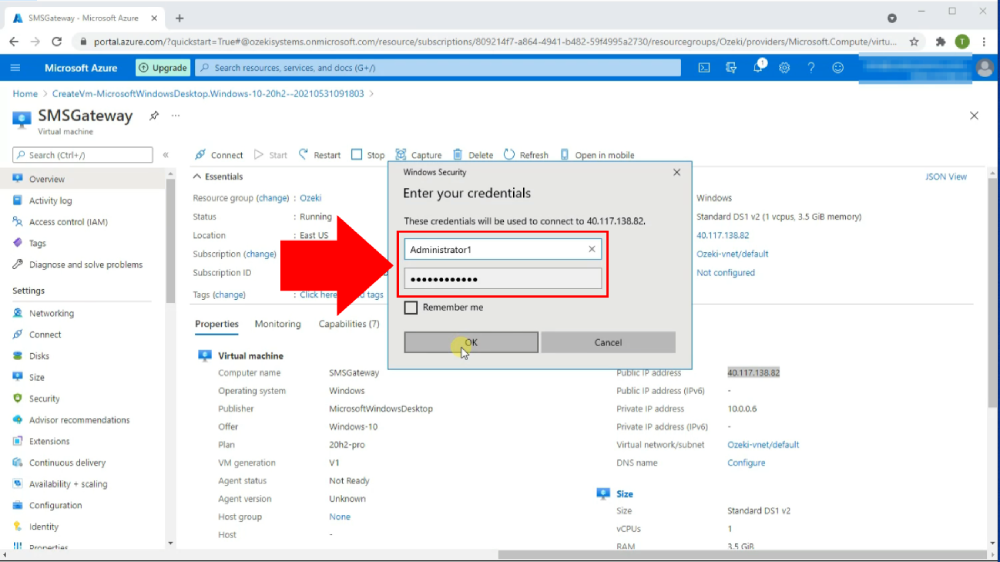
After you clicked on connect, a Windows Security window will pop up. This window will ask for your administrator account credentials which you have previously created in Microsoft Azure. Enter the username into the first textbox, then enter the password into the second textbox (Figure 10). Click on OK at the bottom of the window to log in.
Virtual machine started
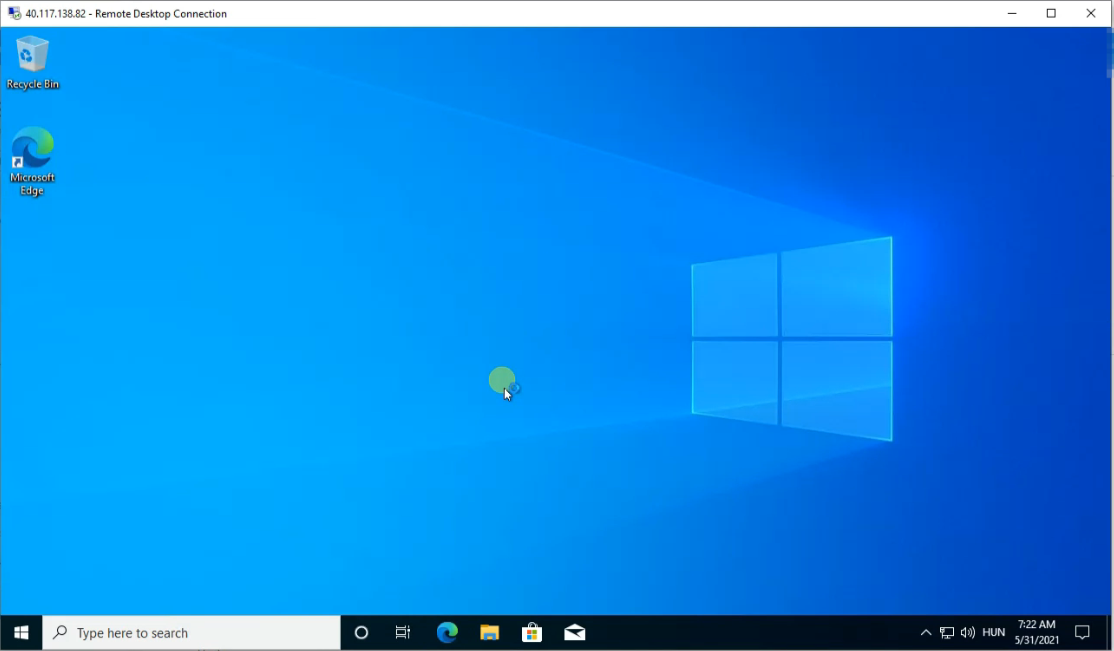
After successfully logging into your virtual machine, you will be booted into Windows 10 remotely (Figure 11).
Download Ozeki SMS Gateway
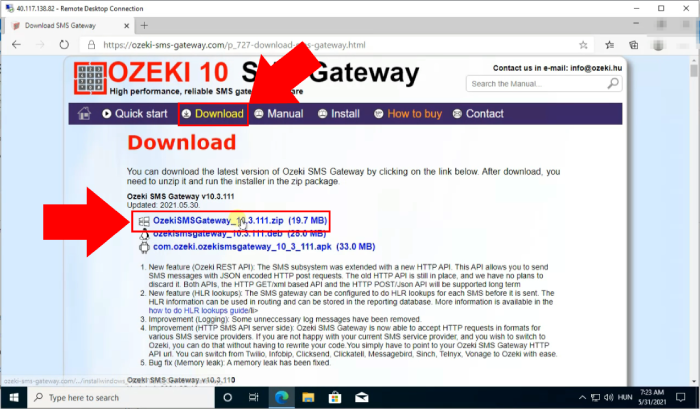
Now that you are in the virtual machine, open any browser (The default browser installed is Microsoft Edge). Type ozeki-sms-gateway.com into the URL bar of your browser, then press enter. Click on the Download button in the toolbar on the top of the page. This brings you to the download page (Figure 12). Click on OZEKI_SMS_GATEWAY.zip highlighted in blue with a Windows icon next to it. This will download the Ozeki SMS Gateway installer on to your computer. The file will appear in the default download location specified by your browser.
Extract downloaded zip file
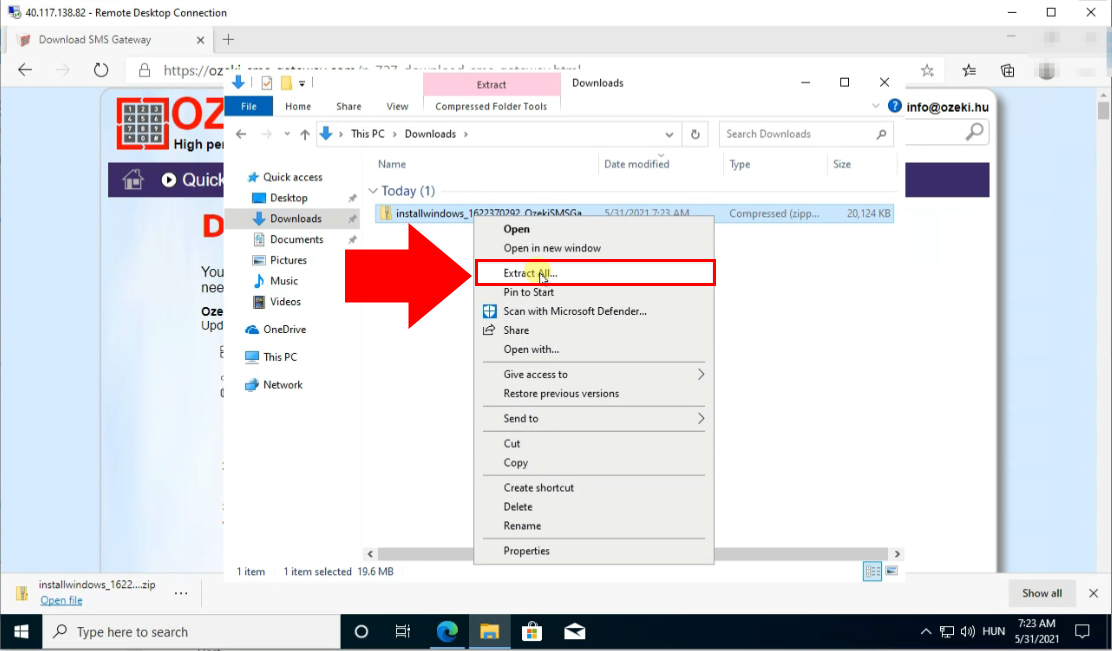
After you have downloaded the Ozeki SMS Gateway installer you need to extract it. First, go to your Downloads folder and locate OZEKI_SMS_GATEWAY.zip. Next, right click on it. Then, click on the "Extract all" option from the dropdown menu (Figure 13). This will extract the zip file to its current location.
Start SMS Gateway installer
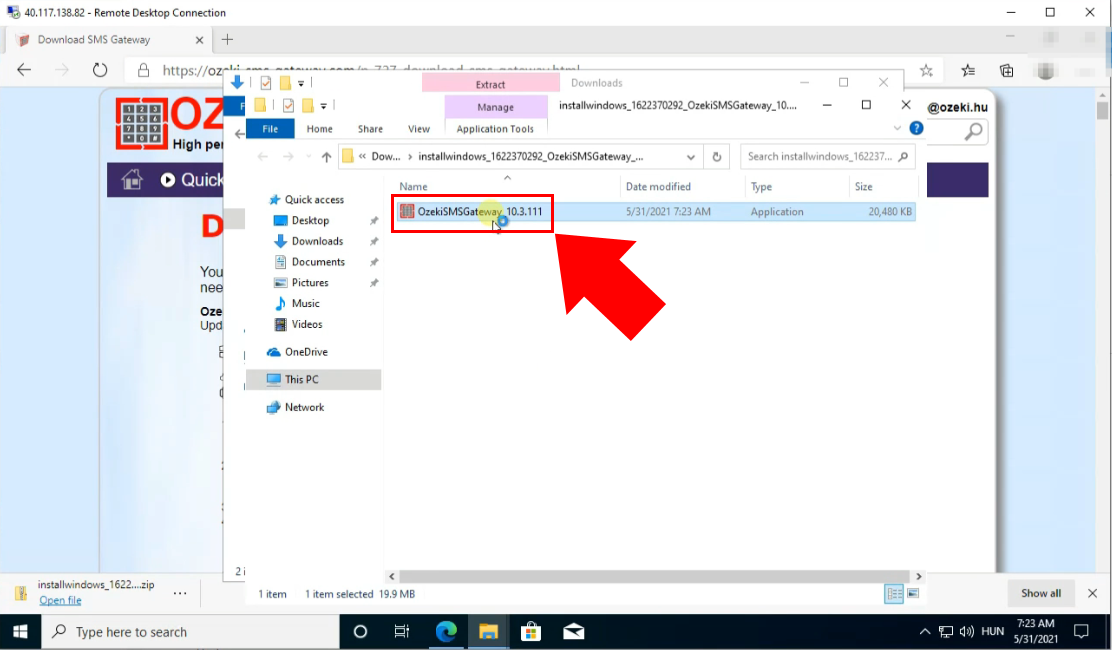
Double click on the Ozeki SMS Gateway installer you have previously extracted (Figure 14). By opening it you will start the installation process.
Installer welcome screen
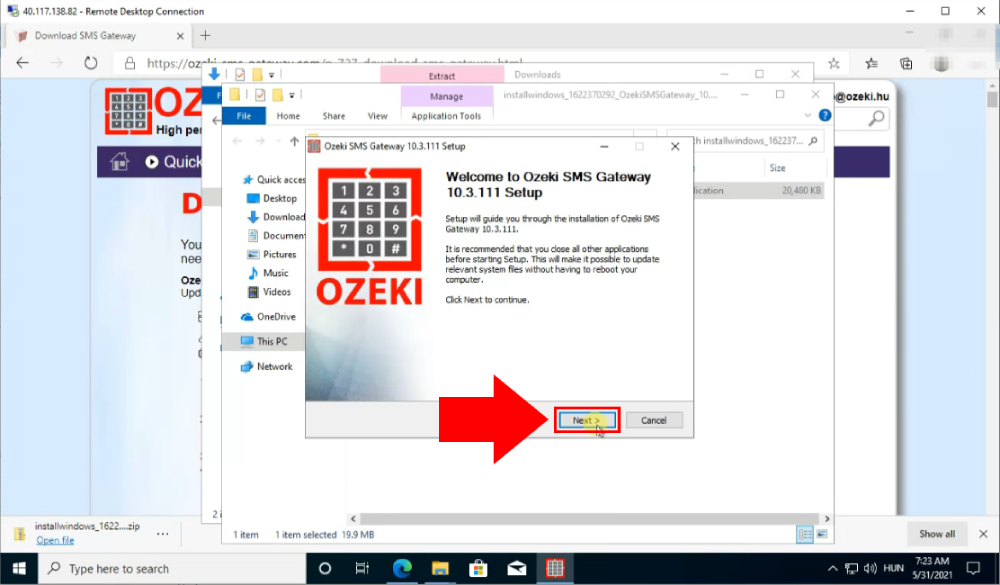
On the welcome screen, click on the Next button to proceed with the installation (Figure 15).
Accept license agreement
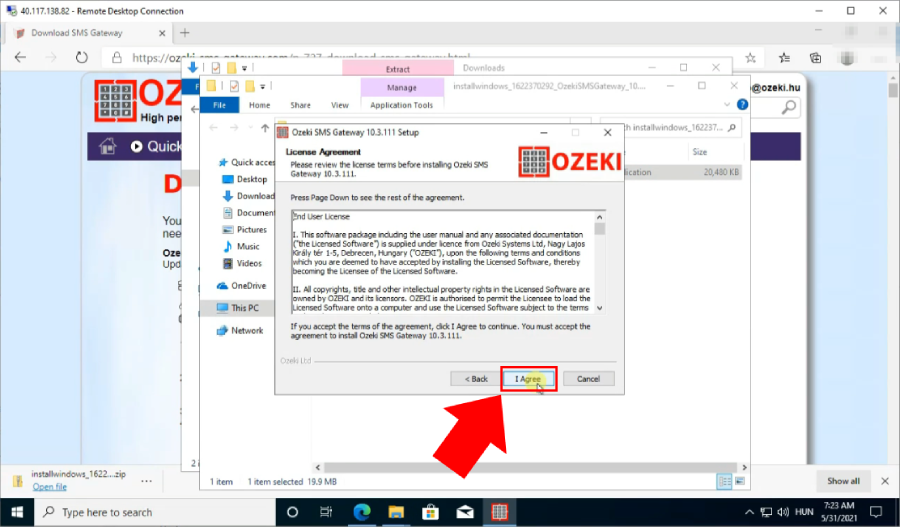
In order to be able to use this program you need to accept the license agreement. Do this by simply clicking on the I Agree button (Figure 16). The program will install after you have done so. A progress bar will indicate the status of the installation. Once it is done, you will be forwarded to the final screen.
Finish installation
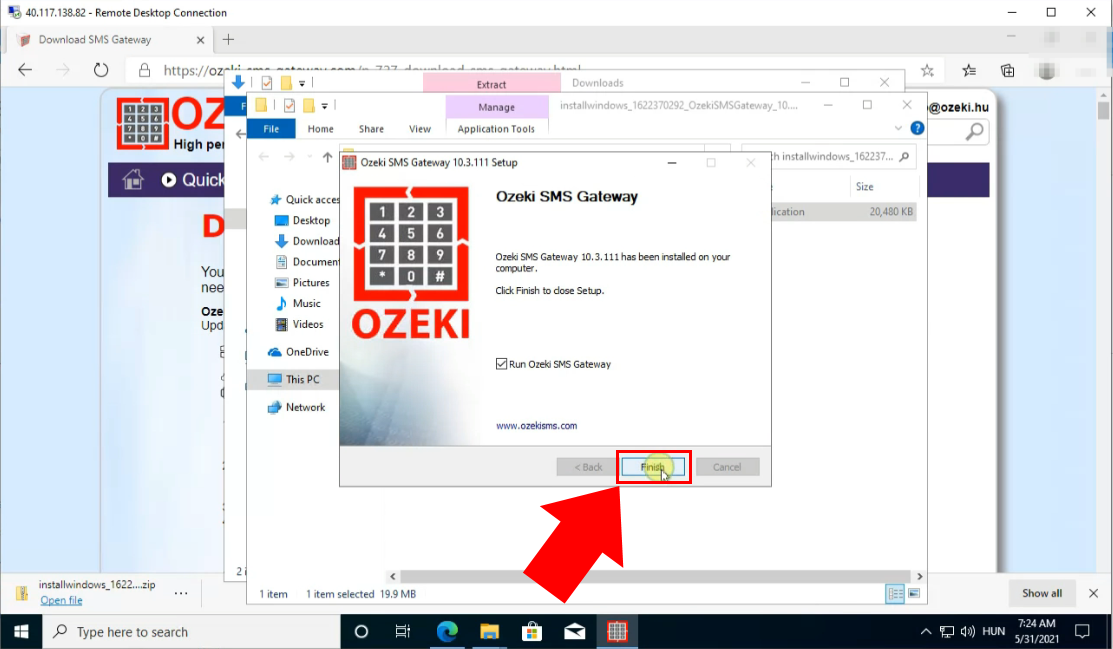
Finish the installation by clicking on the Finish button (Figure 17). You can also launch the program immediately after it is installed. Start it by putting a checkmark into the checkbox that reads "Run Ozeki SMS Gateway".
SMS Gateway started
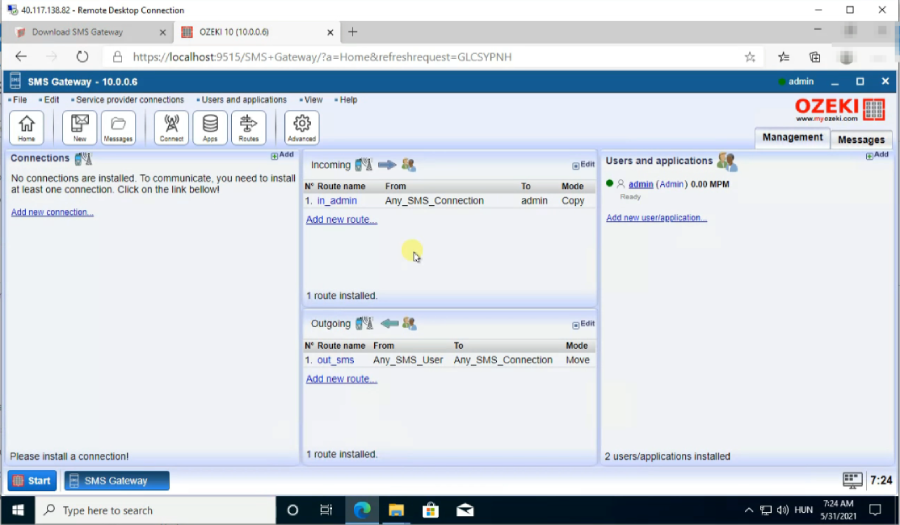
Once you have successfully installed and launched the program, Ozeki SMS Gateway will launch inside your browser. After the program is launched, you are entered into the desktop. On the desktop click on the SMS Gateway icon at the left side of the screen. This brings you to the Ozeki SMS Gateway management window (Figure 18).
Add inbound port rule in Azure
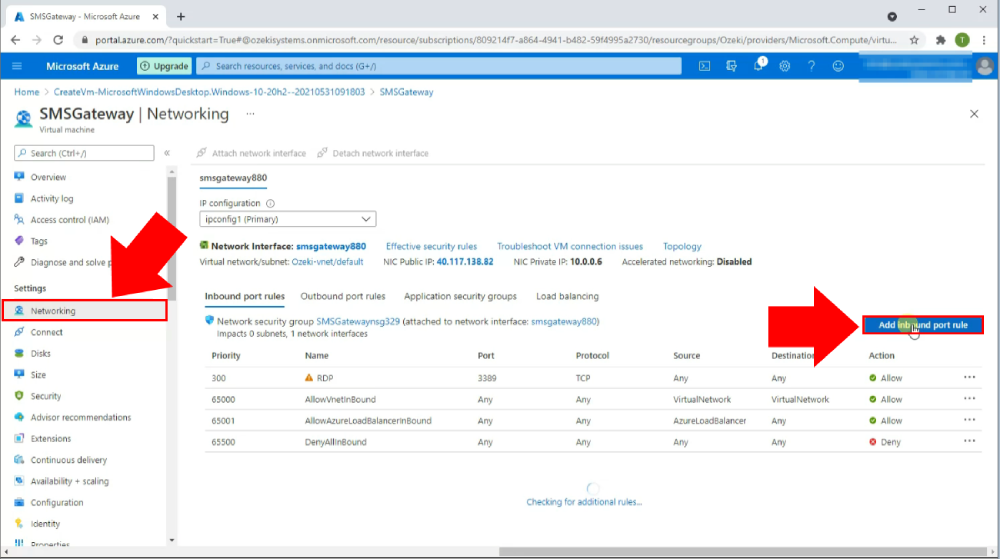
After you opened Ozeki SMS Gateway, switch back to your computer outside of the virtual machine. Click on Networking in the menu on the left (Figure 19). This takes you to the networking settings of your virtual machine. Click on the blue Add inbound port rule button on the right to add a new rule.
Configure inbound rule
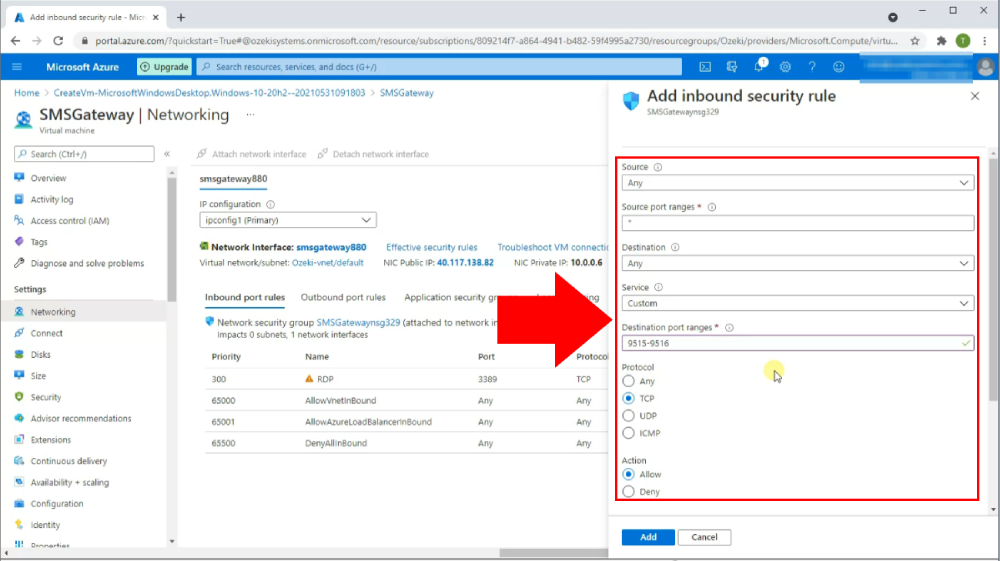
After you clicked the Add inbound port rule button a menu appears. In this menu, leave the first 4 options as default. First enter 9515-9516 into the textbox below "Destination port ranges". Then, set the Protocol to TCP by clicking on the checkbox next to it. (Figure 20)
Define rule name and create rule
Scroll down to the bottom of the menu. Give your inbound port rule a name by typing it into the textbox below "Name" (Figure 21). When done, click on the blue Add button to add a new inbound port rule.
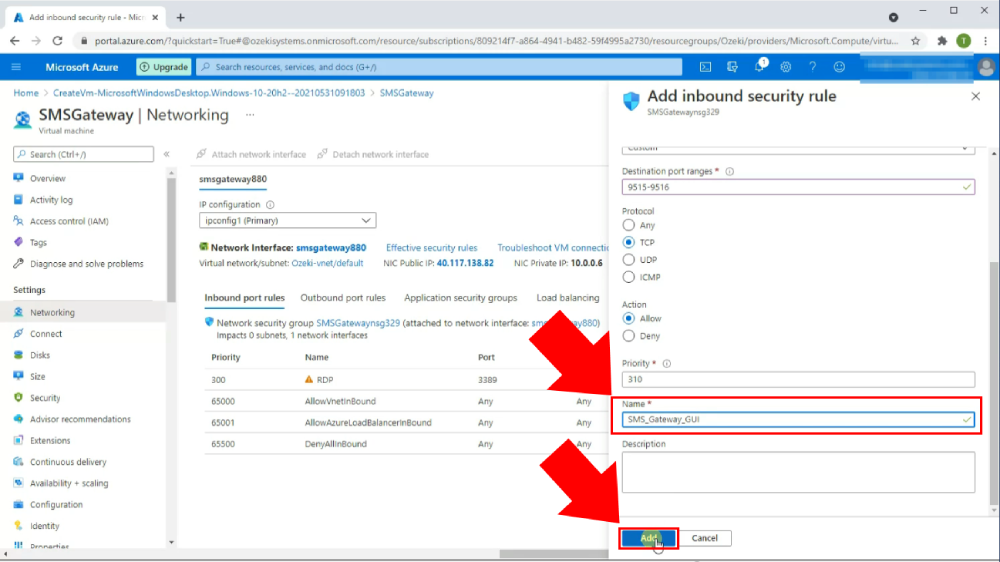
Open Windows firewall settings
Start by typing "firewall" into the search bar on your taskbar (Figure 22). The search bar is located on the left side of your taskbar at the bottom left of your screen. The search results will return with the Windows Firewall program. Now find the first option the search has given. Click on the Windows Defender Firewall application icon to launch the program.
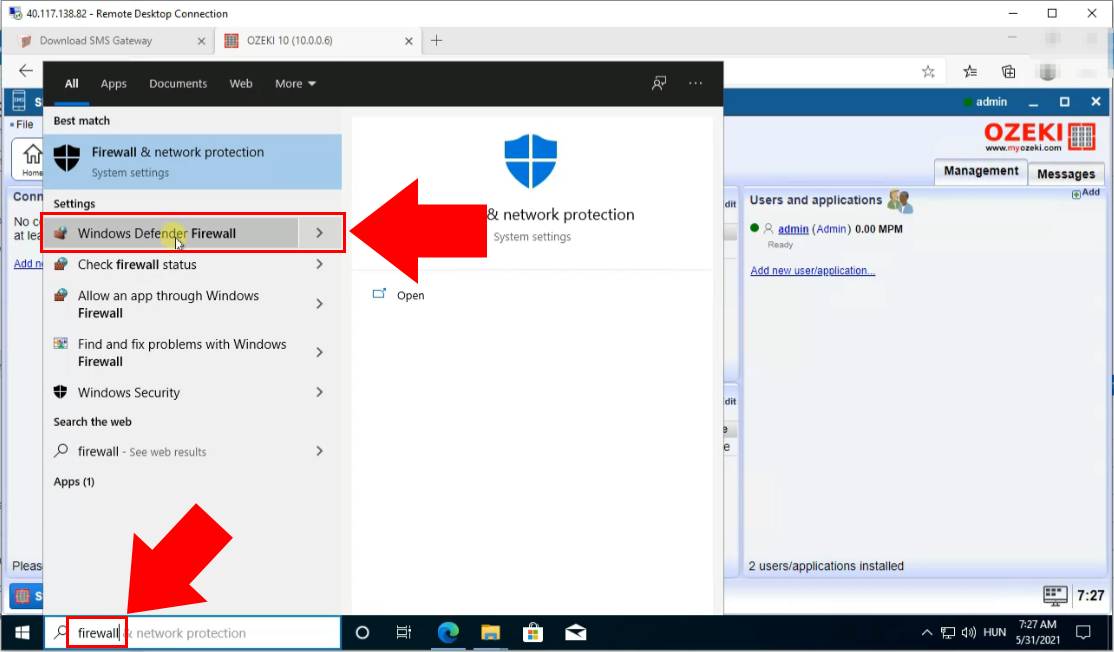
Open firewall advanced settings
Inside the Windows Defender Firewall application. Navigate to the menu on the left side of the window. Click on Advanced settings highlighted in blue (Figure 23). This will bring up a new window where you are able to add a new inbound rule.
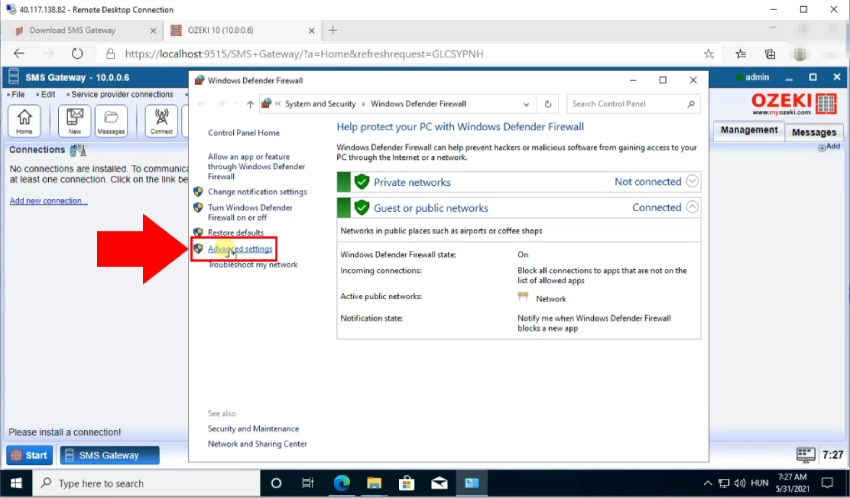
Add new Windows Firewall inbound rule
In Advanced Settings click on Inbound rules inside the menu on the left (Figure 24). Next, navigate to the Inbound rules menu which appeared on the right. In this menu click on New rule. By clicking this option, a new window will pop up which lets you create a new rule.
Select inbound rule type
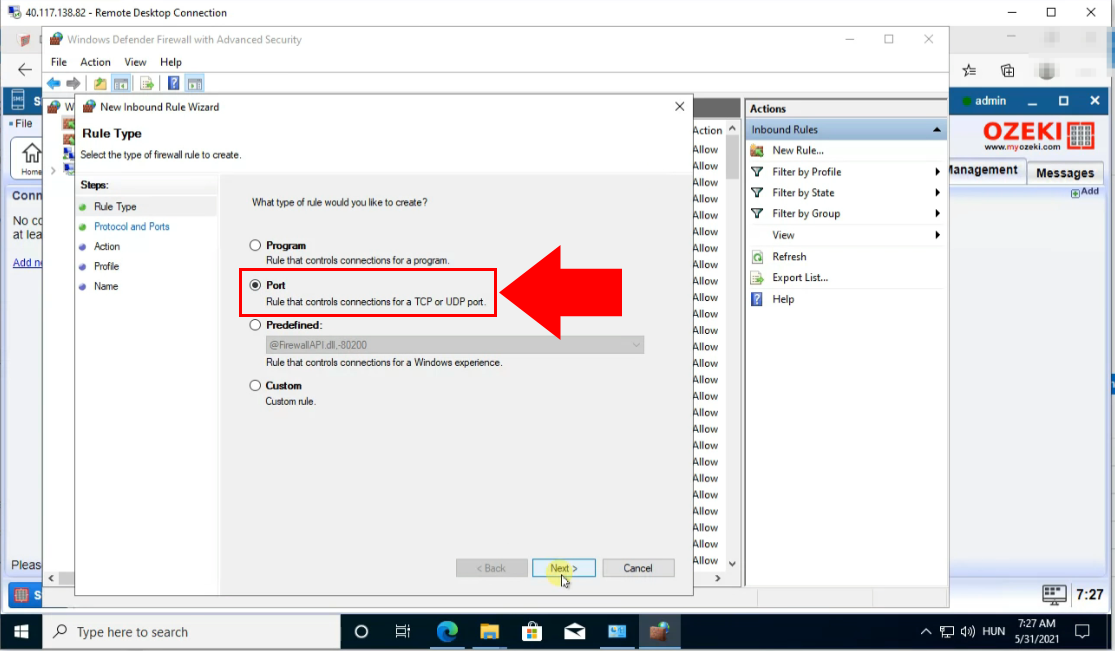
Select the inbound rule type in the New rule window. Under the text which reads "What type of rule would you like to create", find the Port option (Figure 25). Click on the checkbox next to it to select the Port option. Click the Next button at the bottom right of the window to continue. You will be brought to the Protocols and Ports section.
Define ports
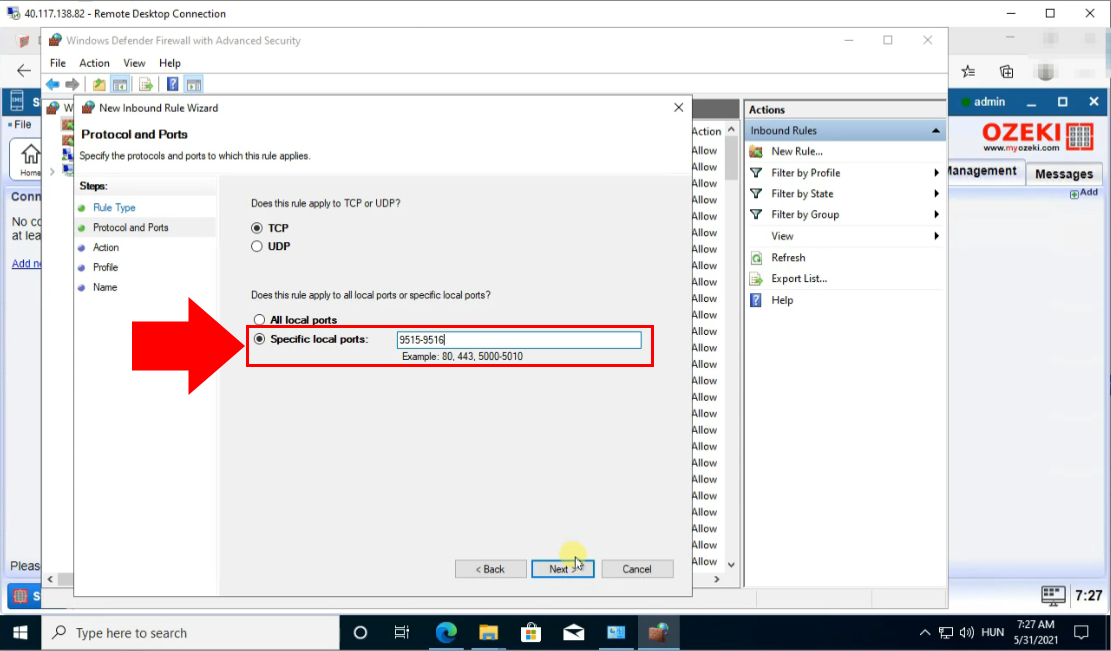
Define your ports by entering the previously selected port range. (In our case, this was 9515-9516) Enter this port range once again separated by a "-" into the textbox (Figure 26). This textbox is located next to a text which reads "Specific local ports". (Make sure that TCP and "Specific local ports" are both selected). To proceed, click the Next button at the bottom right of the window.
Allow connection
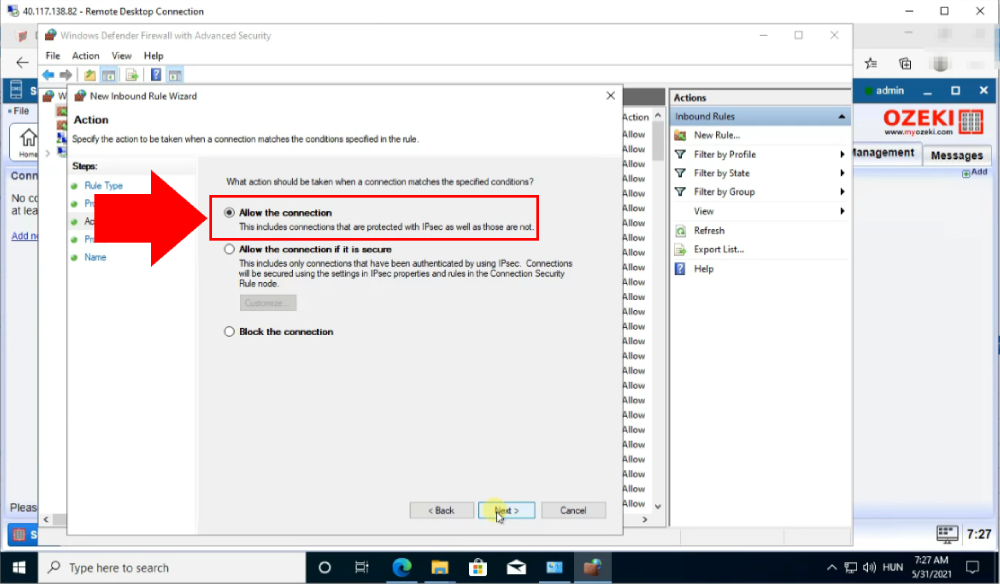
After defining your ports, you are brought to the Action section. Allow connection by clicking on the checkbox next to the text that reads "Allow Connection" (Figure 27). Once selected, click on Next again to continue. You will then be brought to the Name section.
Specify inbound rule name
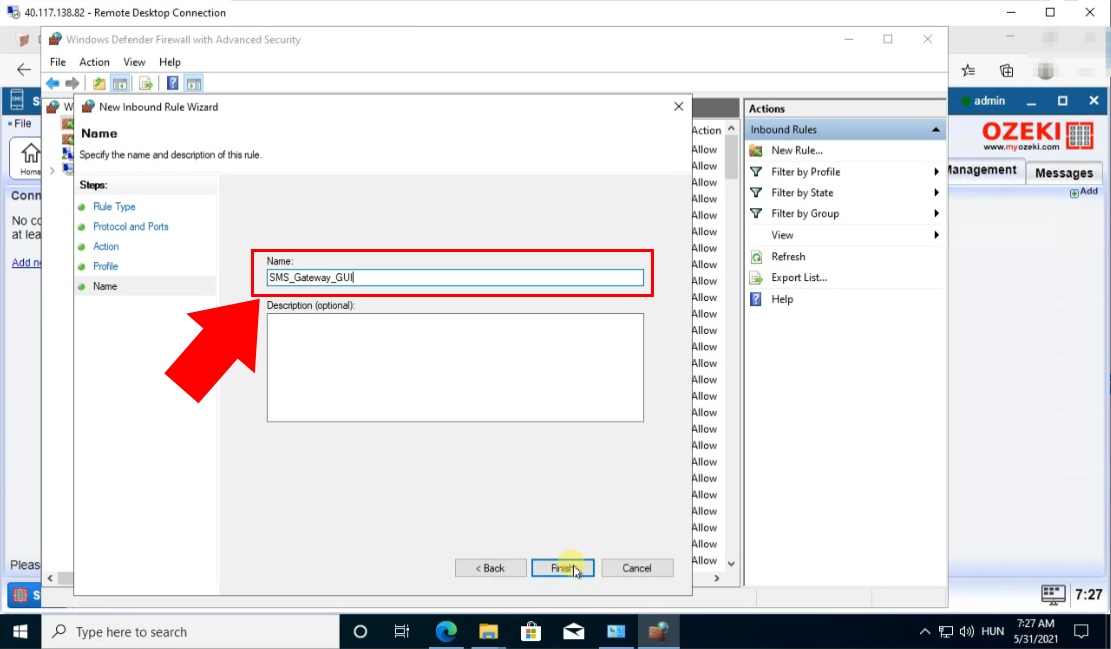
The last step of creating a new rule is to give it a name. In the Name section, type your desired name into the first textbox (Figure 28). This textbox is located below the text that reads "Name:" in the middle of the window. Click the Finish button found at the bottom right of the window to create the rule.
Connect remotely to the SMS Gateway
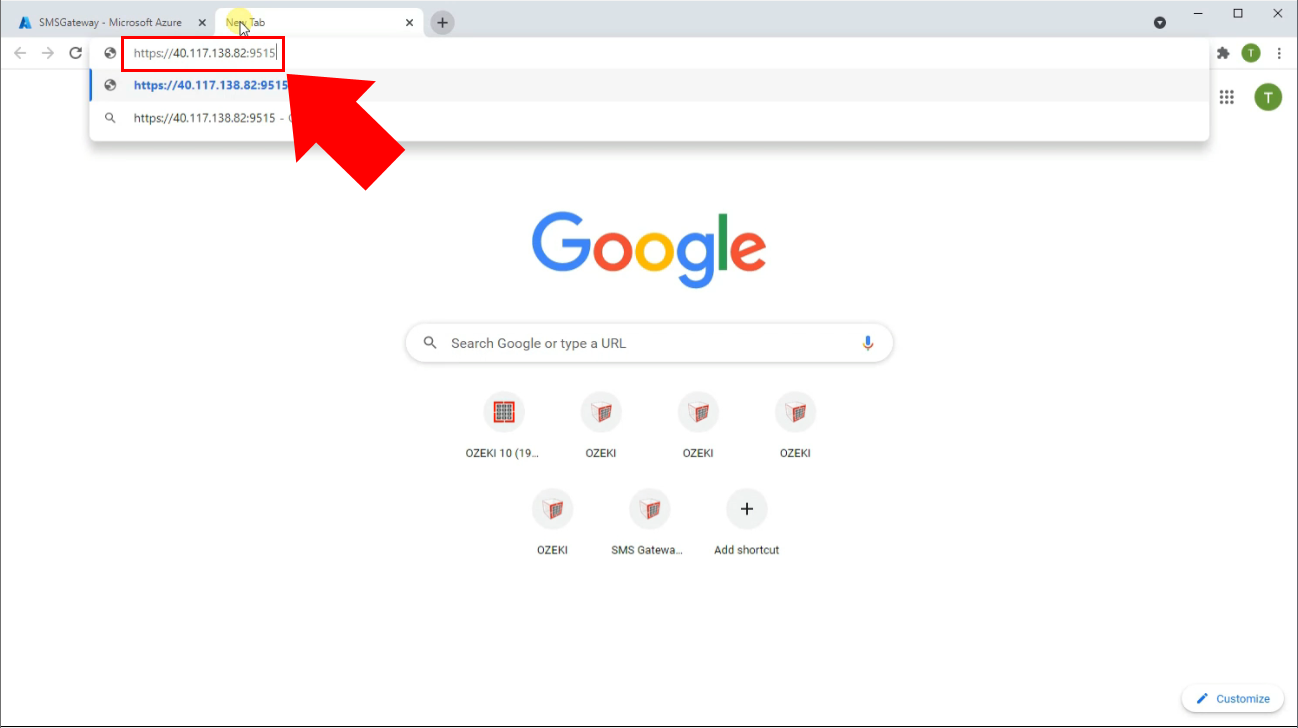
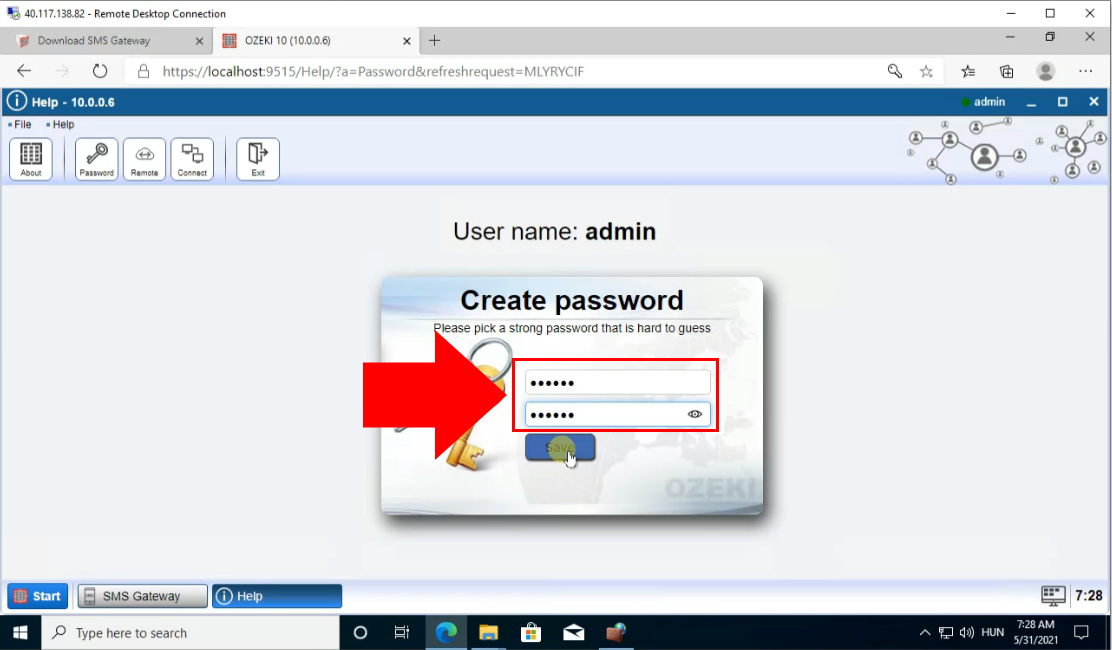
First, open your browser once again outside of the Remote Desktop Connection application. Then, copy the IP address provided in Microsoft Azure again. In our case this is 40.117.138.82. Paste this into the url bar of your browser, then add a port to it in your port range followed by ":". For our example, this is :9515. The final address looks like this 40.117.138.82:9515 (Figure 29). To access it, hit the enter key.
Remote access not allowed screen
With the current settings remote access will not yet be allowed. You are then shown a screen displaying "Remote Access is Not Allowed" (Figure 30).
Change default admin password
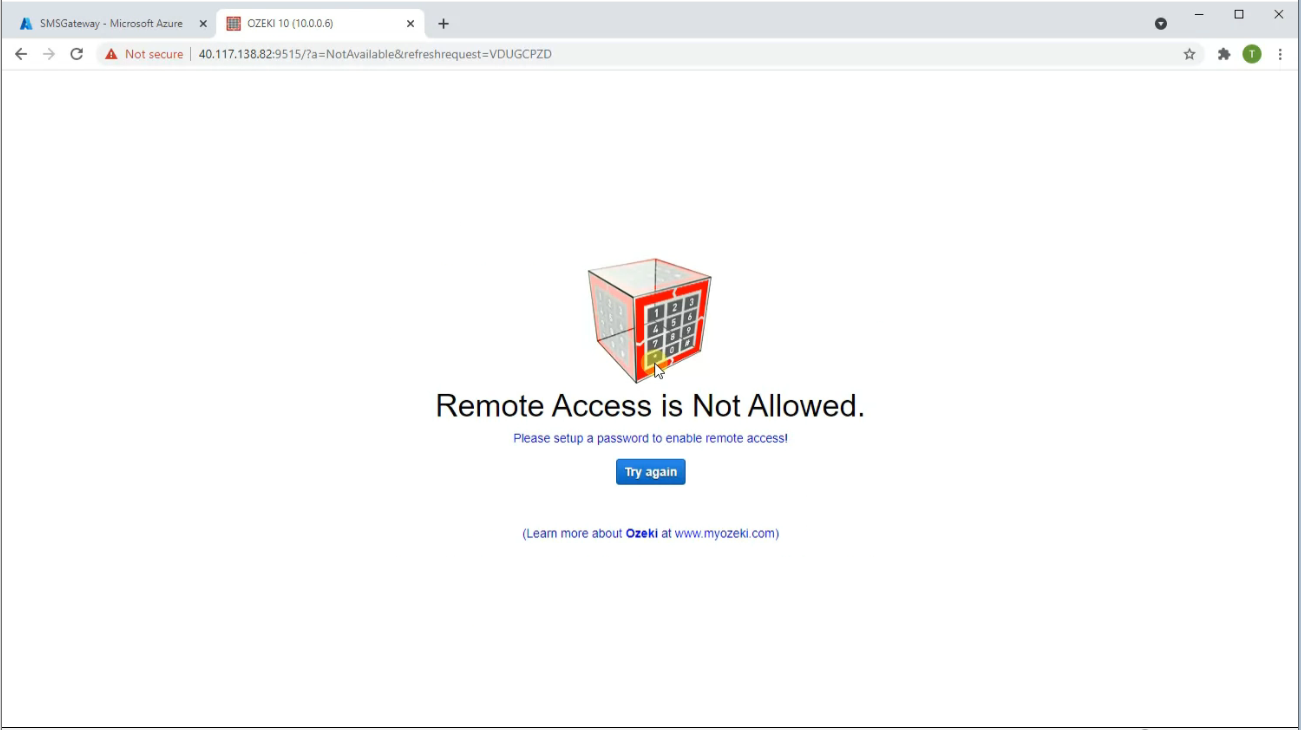
First, go back to the SMS Gateway application inside the Remote Desktop Connection application. Next, click on the Start button at the bottom left of your screen (Figure 31). A menu then pops up where you need to hover your cursor over Help. Then another menu pops up where you need to click on Change password. Clicking on this option will bring you to another page where you are able to change your admin password.
Create new admin password
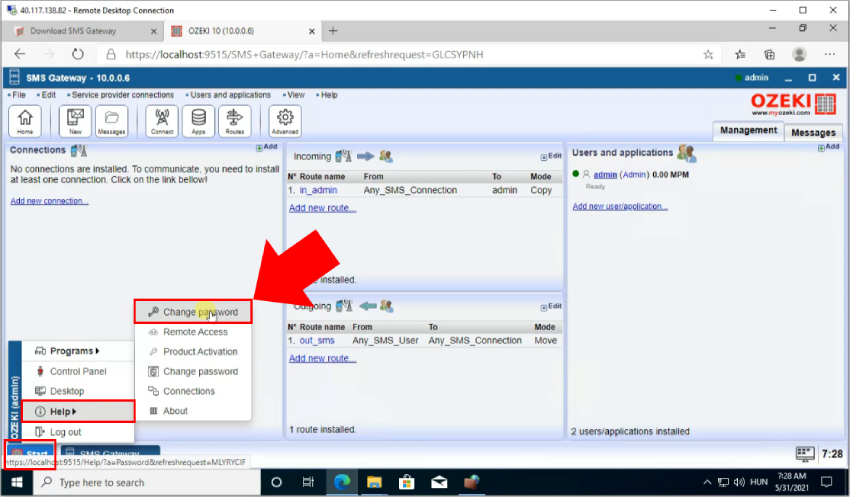
On the create a new password screen you are able to assign a new password to admin access. Type your desired password into both of the textboxes shown in the middle of the screen (Figure 32). Make sure the passwords you have entered are the same. This is to assure that the user is not able to enter their password incorrectly. When you have entered your password click on the blue Save button below the textboxes. You will be brought to a login screen, but you can continue from your browser outside of the Remote Desktop Connection application.
Remote login to SMS Gateway
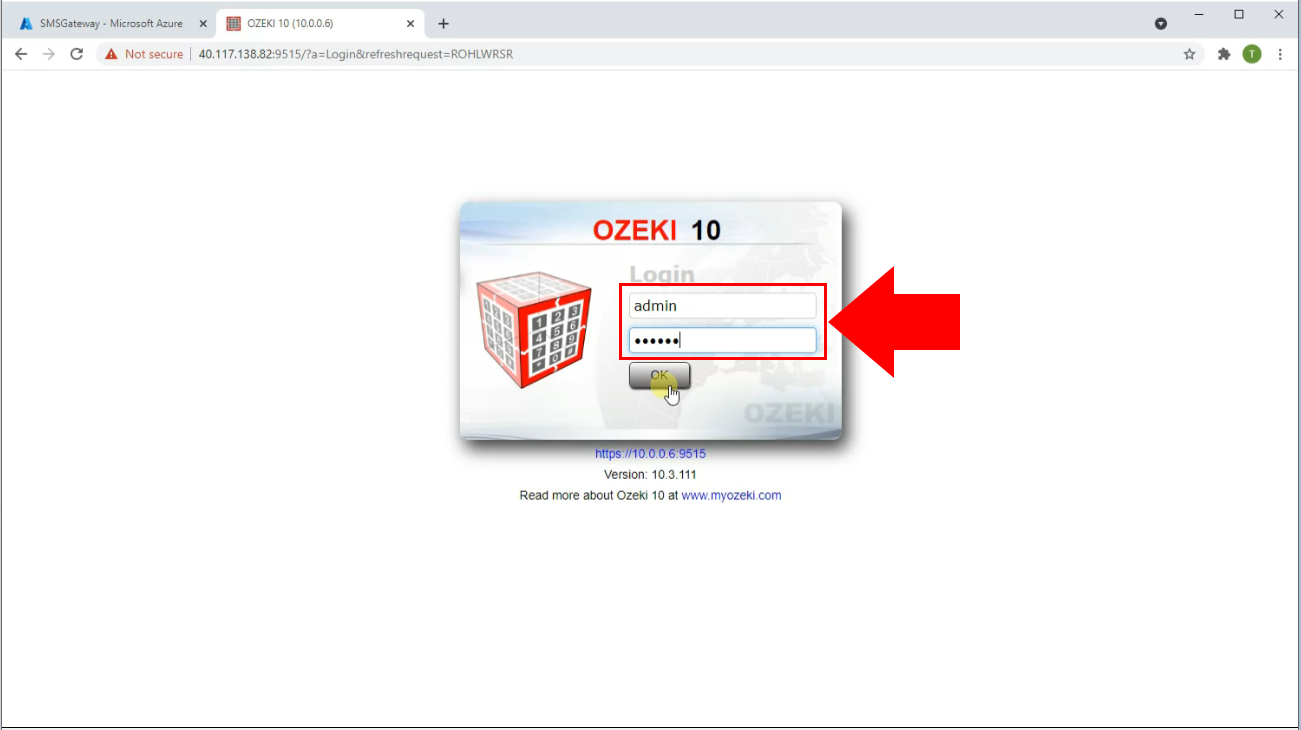
Now that you have created a new admin password you can log into the SMS Gateway from outside of the Remote Desktop Connection program. Start by typing the address followed by the port into the URL bar of your browser. In our example it is 40.117.138.82:9515. Then hit the Enter key. You are then shown a login screen with two textboxes in the middle of the screen (Figure 33). Type "admin" into the first textbox. Then type your newly created admin password into the second textbox. Click on OK to log in.
SMS Gateway GUI is now accessible
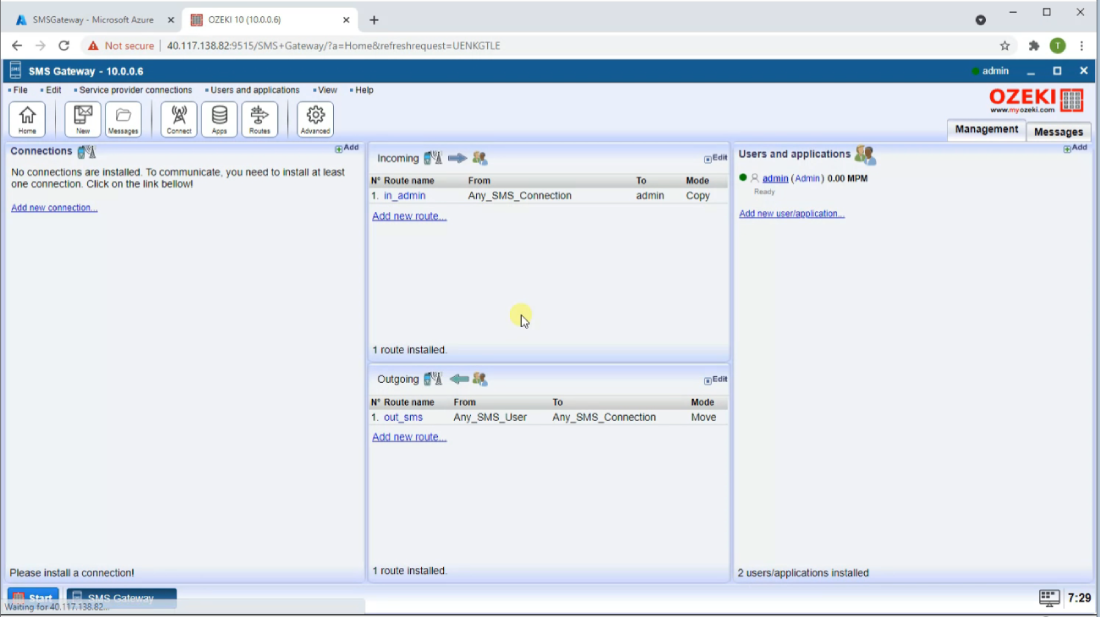
After successfully logging in you are able to access the SMS Gateway GUI from your browser (Figure 34).
Summary
As you could see in the guide, Microsoft Azure provides you a virtual machine with Windows OS without owning an actual new device. This public cloud computing platform allows you to use the Microsoft servers in order to create a new working system. We showed you how to use Ozeki SMS Gateway with this innovation.
Now you can install and use Ozeki SMS Gateway in virtual machines and the resources are provided by Microsoft, so you don't have to buy expensive hardwares to be up-to-date, you only need a Microsoft Azure account and to pay the subscription of the virtual machine.
Make sure to check out our other guides, like Ozeki installation on Android and Ozeki installation on Windows 10.
Your next thing to do is to download Ozeki SMS Gateway and start working now!
