How to install Ozeki SMS Gateway in Alibaba Cloud
Installing Ozeki SMS Gateway in Alibaba Cloud offers businesses efficient SMS communication capabilities, allowing them to send and receive messages seamlessly. Businesses may gain high availability by utilizing Alibaba Cloud's cloud-based infrastructure, providing dependable SMS services. Alibaba Cloud's extensive global presence enables businesses to connect with a diverse audience and efficiently deliver SMS messages to multiple countries. Ozeki SMS Gateway is a convenient choice that boosts client interaction and simplifies communication thanks to its simple to use interface and integration capabilities.
What is Alibaba Cloud
Cloud computing makes data storage and backup easier and cheaper. It ensures disaster recovery and business continuity as data can be mirrored across multiple redundant locations in the cloud provider's network.
Install Ozeki SMS Gateway in Alibaba Cloud (Easy to follow)
To install Ozeki SMS Gateway in Alibaba Cloud:
- Start new Alibaba Cloud instance
- Set up an Instance Type
- Select an Alibaba Cloud Image
- Look over Instance Launch
- Create an admin user
- Save private key
- Connect to the instance with private key
- Decrypt the generated password
- Connect to the instance through remote desktop
- Provide username and password
- Setup Ozeki SMS Gateway
- Add new security group rule
- Define new Windows firewall inbound rule
- Check remote access connection
- Change the admin password to get SMS Gateway GUI accessible
Enhancing SMS Communication with Ozeki SMS Gateway on Alibaba Cloud
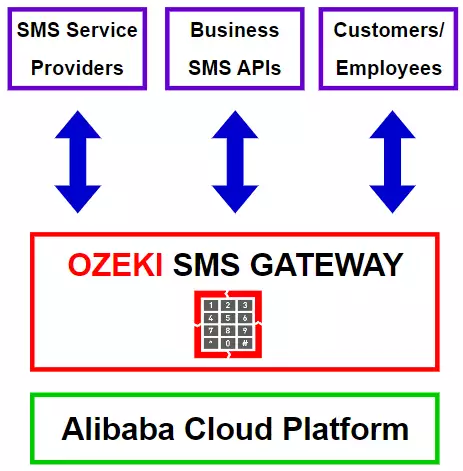
Improving SMS Communication with Ozeki SMS Gateway on Alibaba Cloud provides an effective solution for managing SMS communication. The process involves installing Ozeki SMS Gateway on Alibaba Cloud and configuring connections to various service providers using API credentials provided by Alibaba. Users can connect to different service providers and utilize user-friendly SMS client software to streamline text message management. By interfacing with Alibaba Cloud's business SMS APIs, businesses can access specific features to cater to their needs. Once properly set up and configured, the Ozeki SMS Gateway enables easy sending and receiving of SMS messages on Alibaba Cloud, making it ideal for promotional content, notifications, and critical alerts.
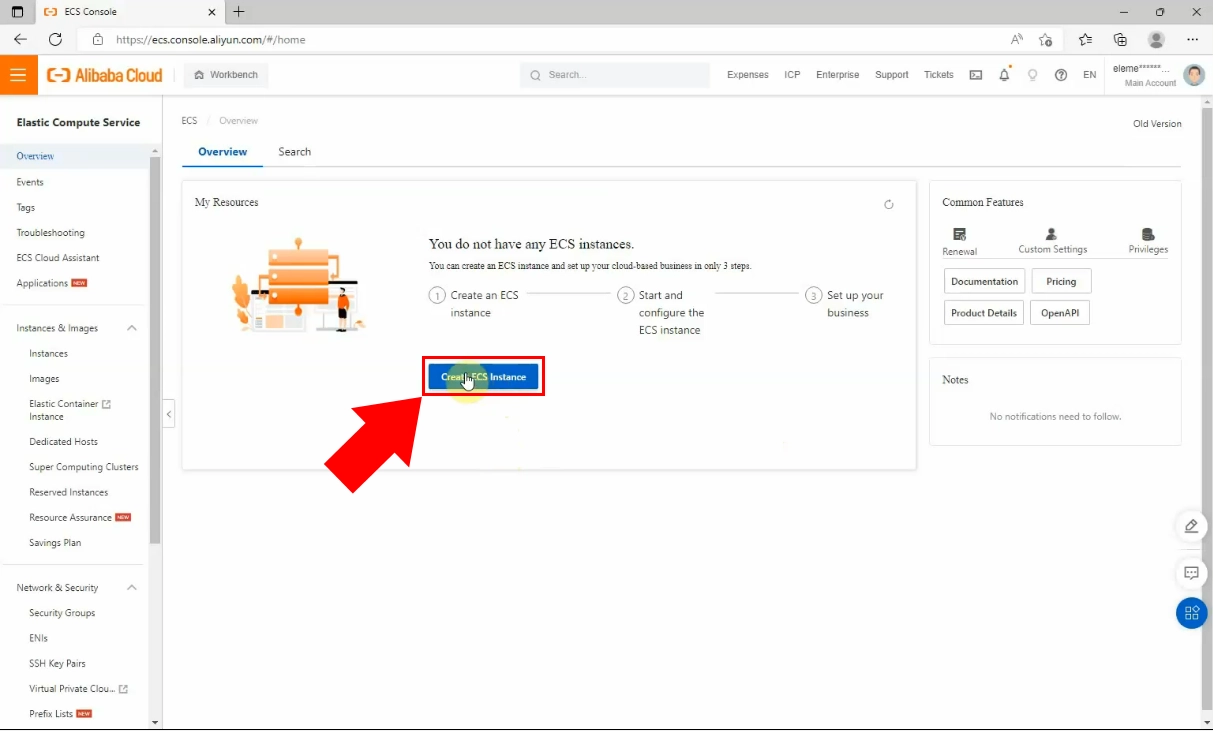
How to create ECS instance
For the first of all steps, load the Alibaba.com
on your PC's browser and log into your account. If you do not have any Elastic
Compute Service, then you have the possibility to create one by following the
instructions.
Click on the "Create ECS Instance" button to start the process.
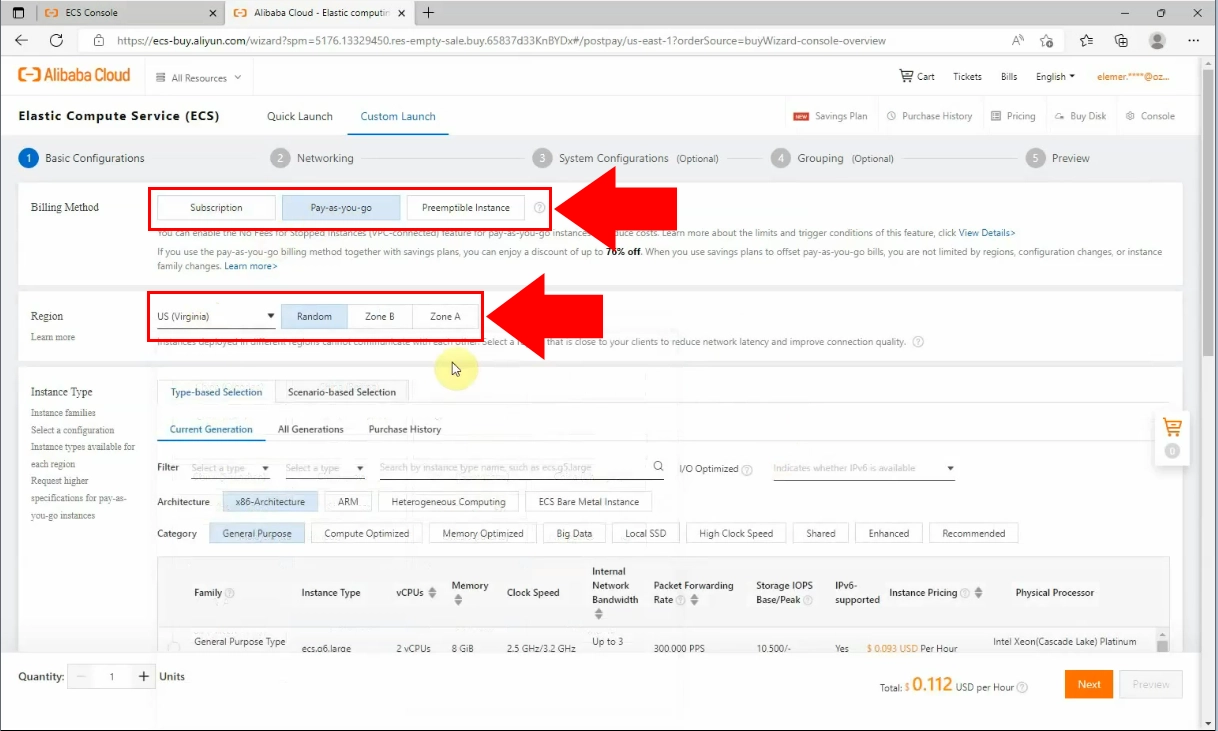
Now, it is needed to submit some data that is required. You need to choose a billing
method from the given ones. You can choose a subscription fee which means you pay
the same amount of money during the period of enrolment. There is a pay-as-you-go
option within you pay only when you use the service. Preemptible instances are
a sort of demand occurrences that are advertised at low cost compared to
pay-as-you-go instances, you can pay hourly with this option, so it may save you
a lot of money.
Set up your region, in order to avoid network delays.
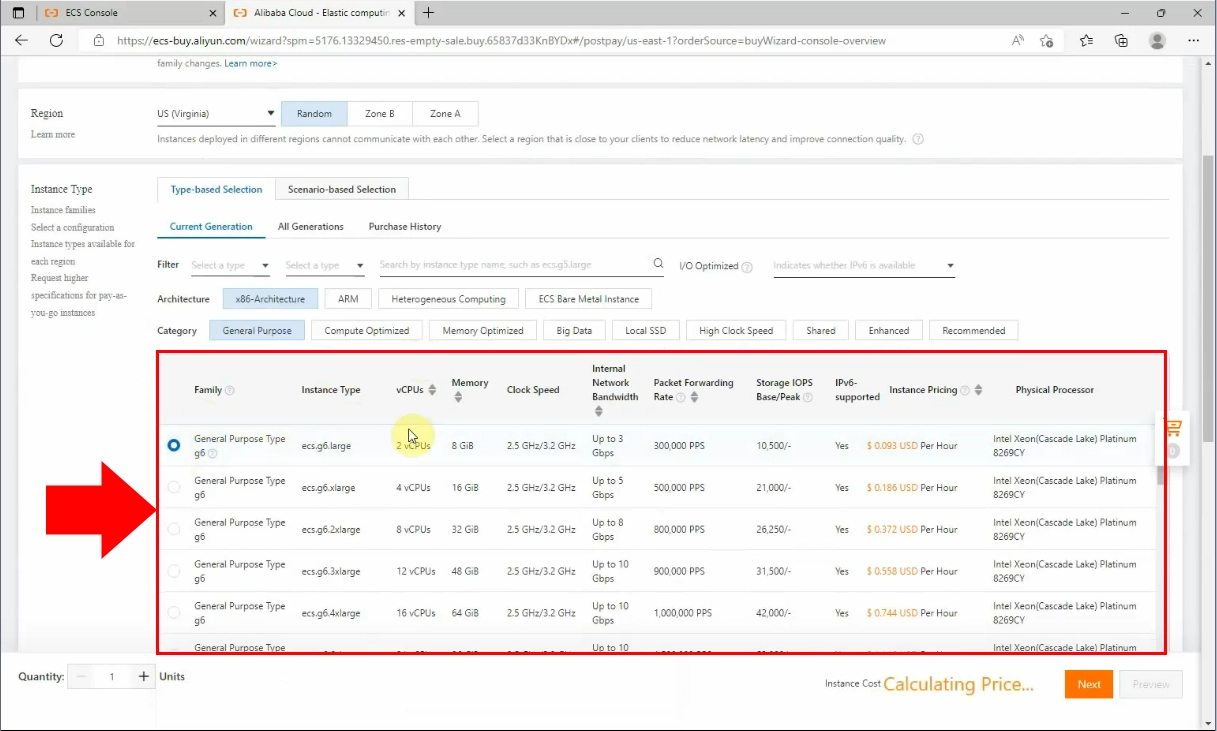
You need to choose instance type, choose from "General Purpose Type g6" family the "ecs.g6.large" Instance type. This instance type typically offers a balance of compute, memory, and networking capabilities.
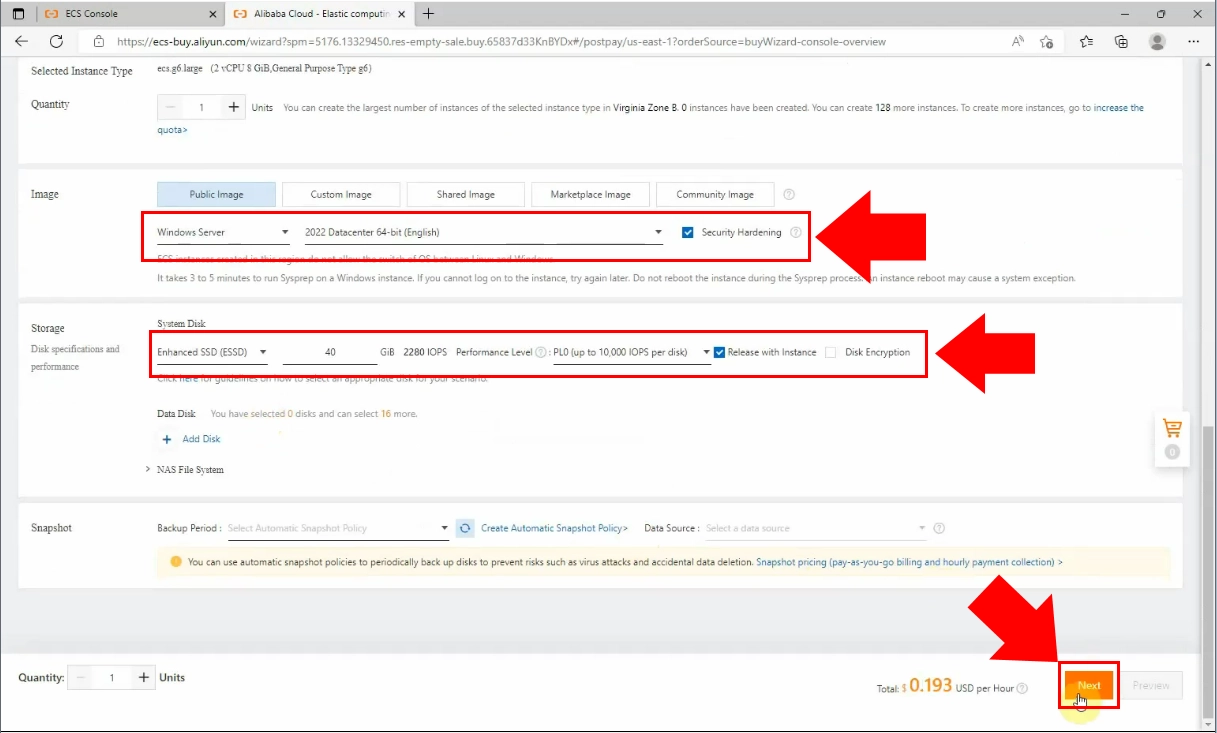
Now, set OS image and storage, by scrolling down on the page. In the Image section,
you need to select the "Windows Server" as Public Image, "2022. Datacentre 64-bit
(English)" as the Custom Image from the drop-down list.
At the Storage section you need to choose "Enhanced SSD (ESSD)" "40 GB" and
"PL0,(up to 10000 IOPS per disk)" options. Then click on the "Next" button.
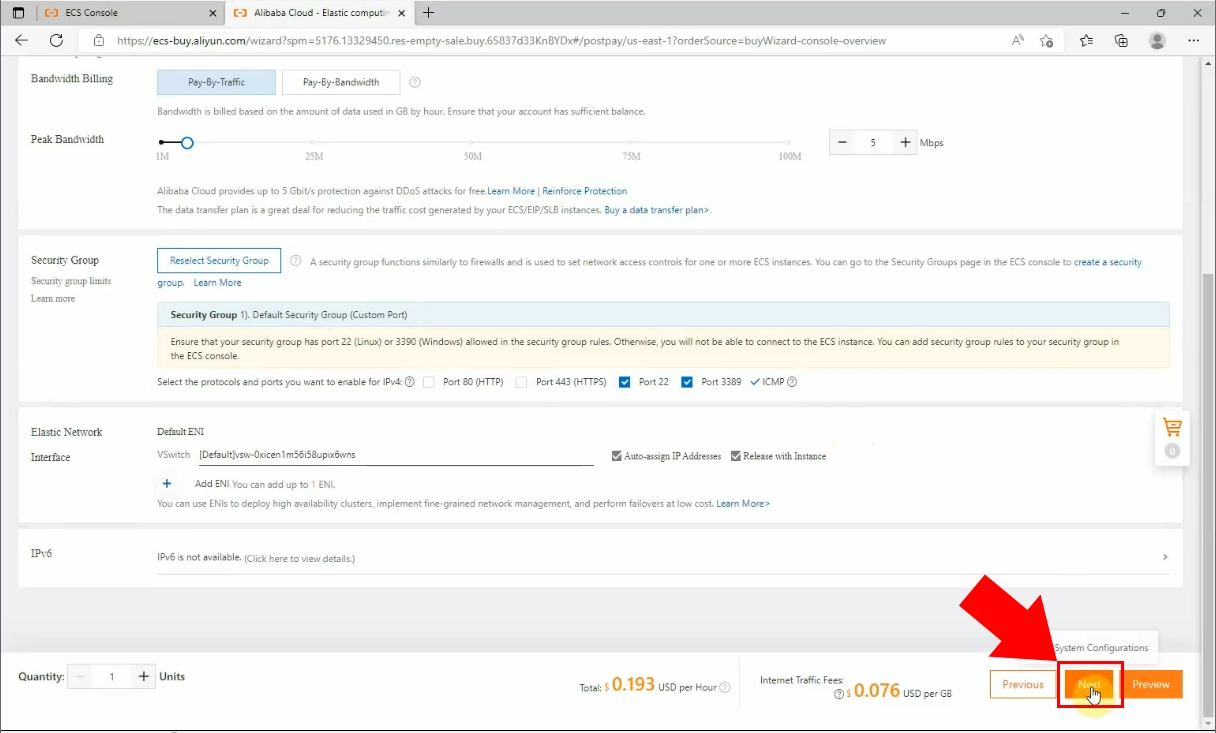
Just double-click the Security Group to have access to more networking information. Before continuing, carefully check the accuracy of each detail displayed on the page. When you have checked the data, click on the "Next" button to proceed.
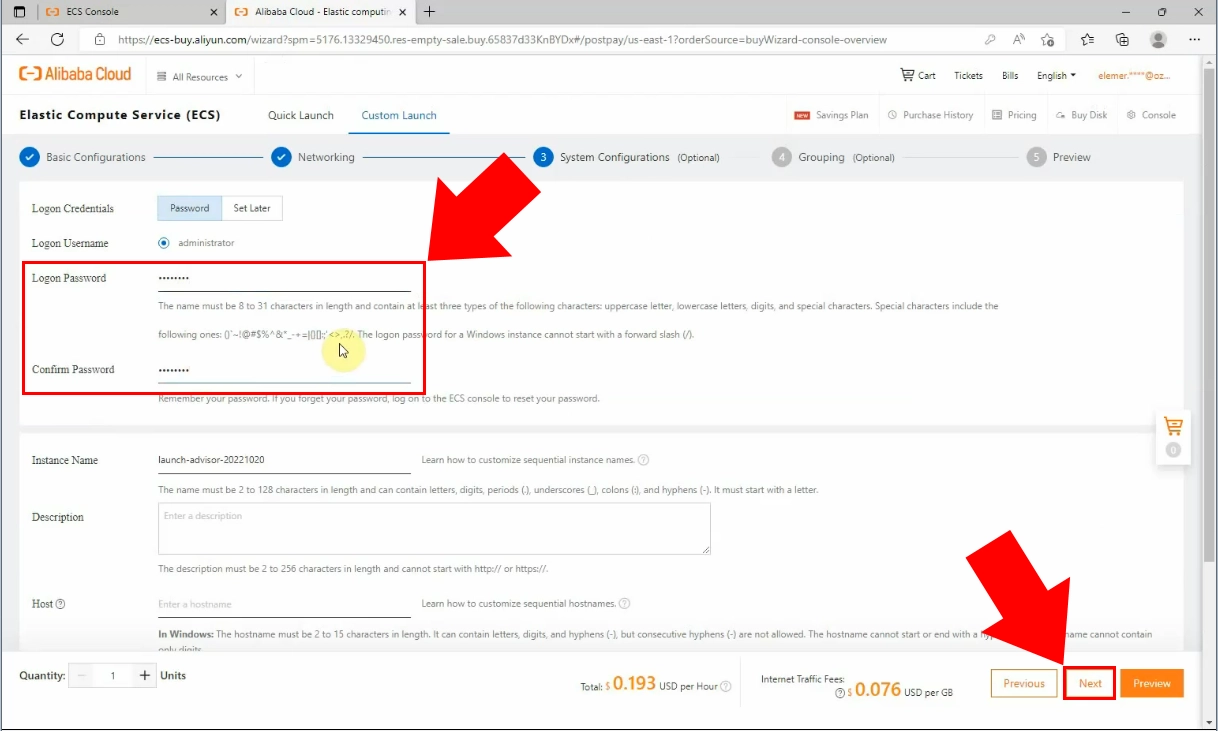
It is required to enter a unique password to your username. The password must be at least 8 characters long and three types of characters. Confirm the password, then click on the "Next" button.
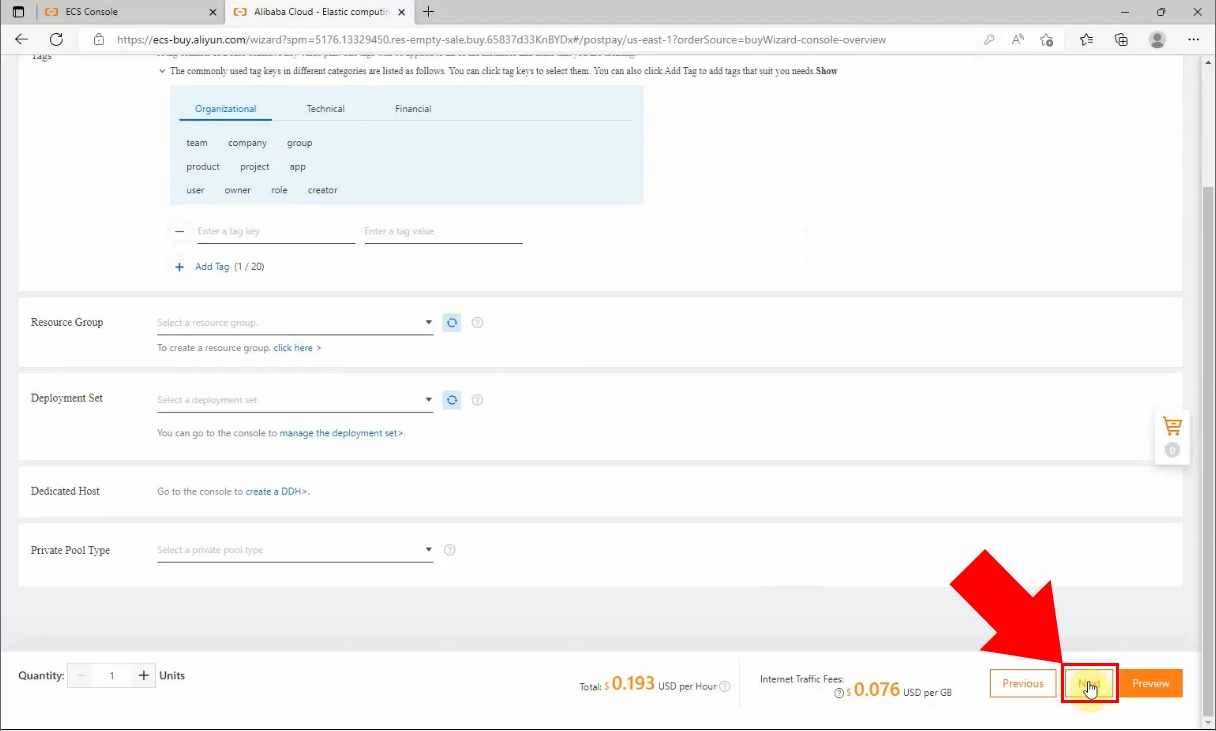
At the Grouping page you need to type nothing, so click on the "Next" button.
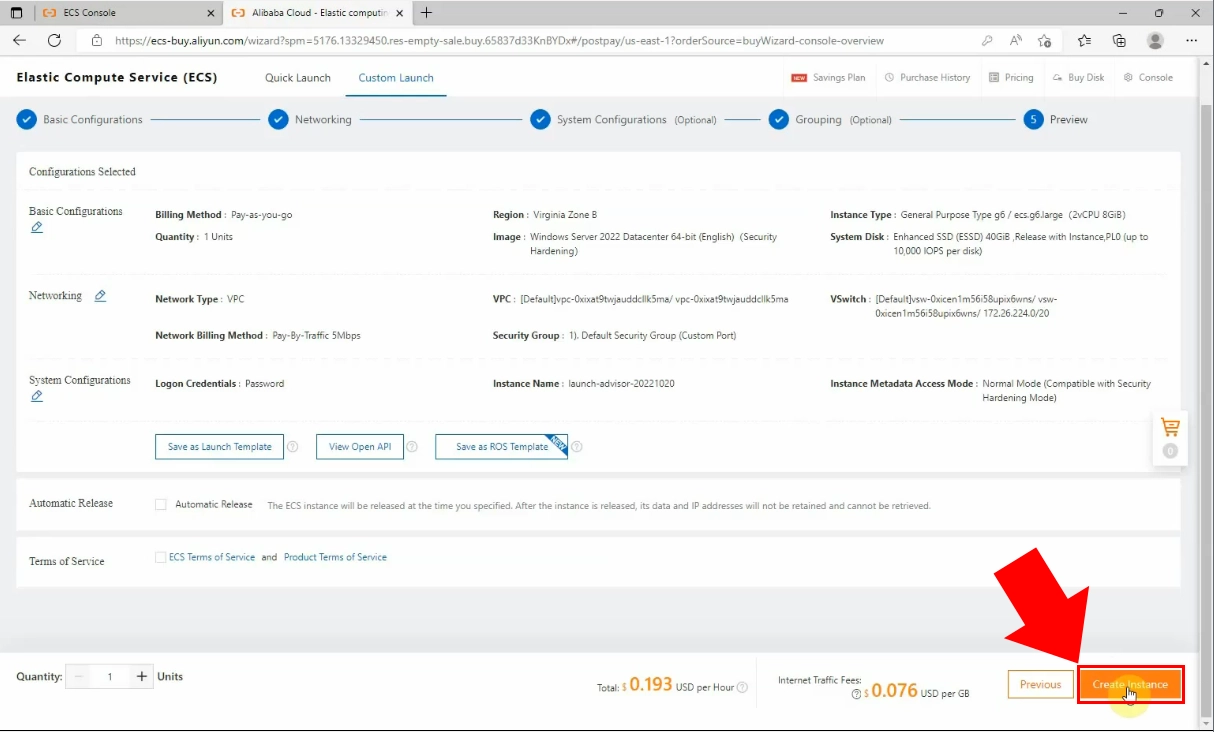
At the Preview page you can see the main details about the ECS that is created.
If you accept the conditions, click on the "Create Instance" button, at the
bottom right corner.
After that, choose "Sign and Purchase" if you do not want any changes. Your
Instance is created, so select the "Console" option from the given ones.
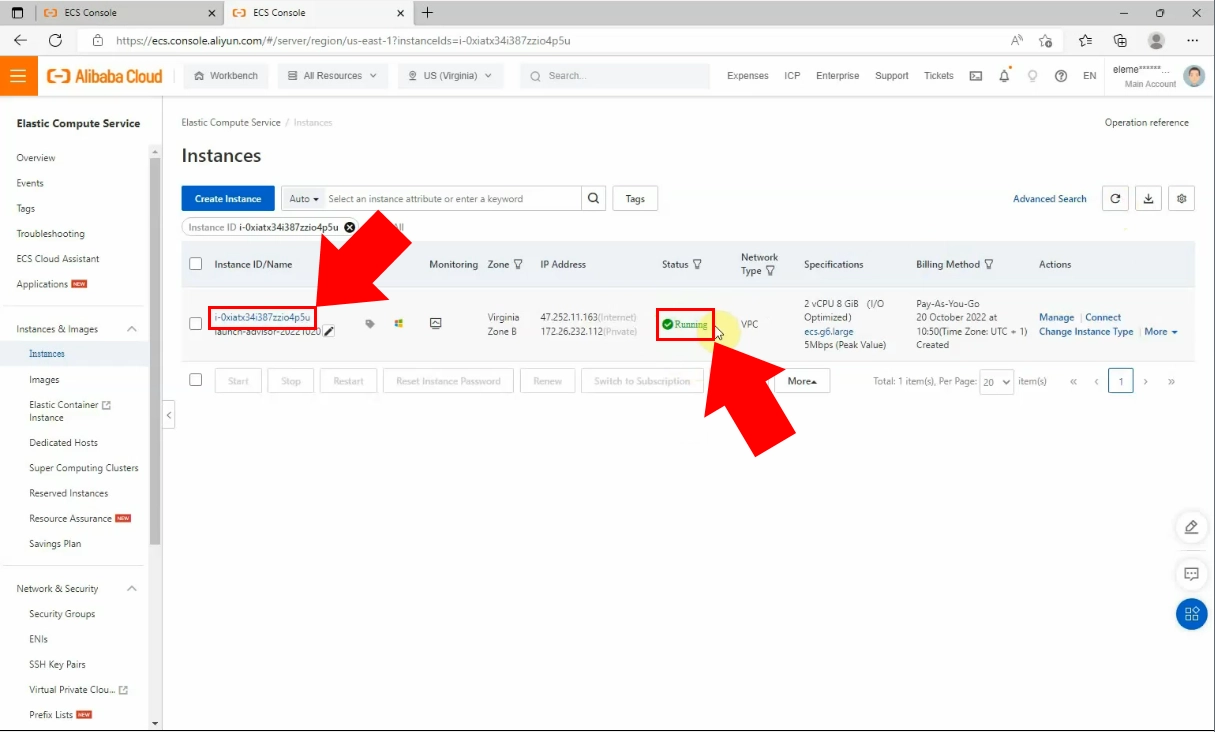
By clicking on the "Console" option, the Instance start to run if the setup was successful. If it is not do it automatically, then you can start with the refresh icon at the right side of the page. If it works well, the status of the Instance turns into green. At the beginning of the array, you can see the ID of the Instance.
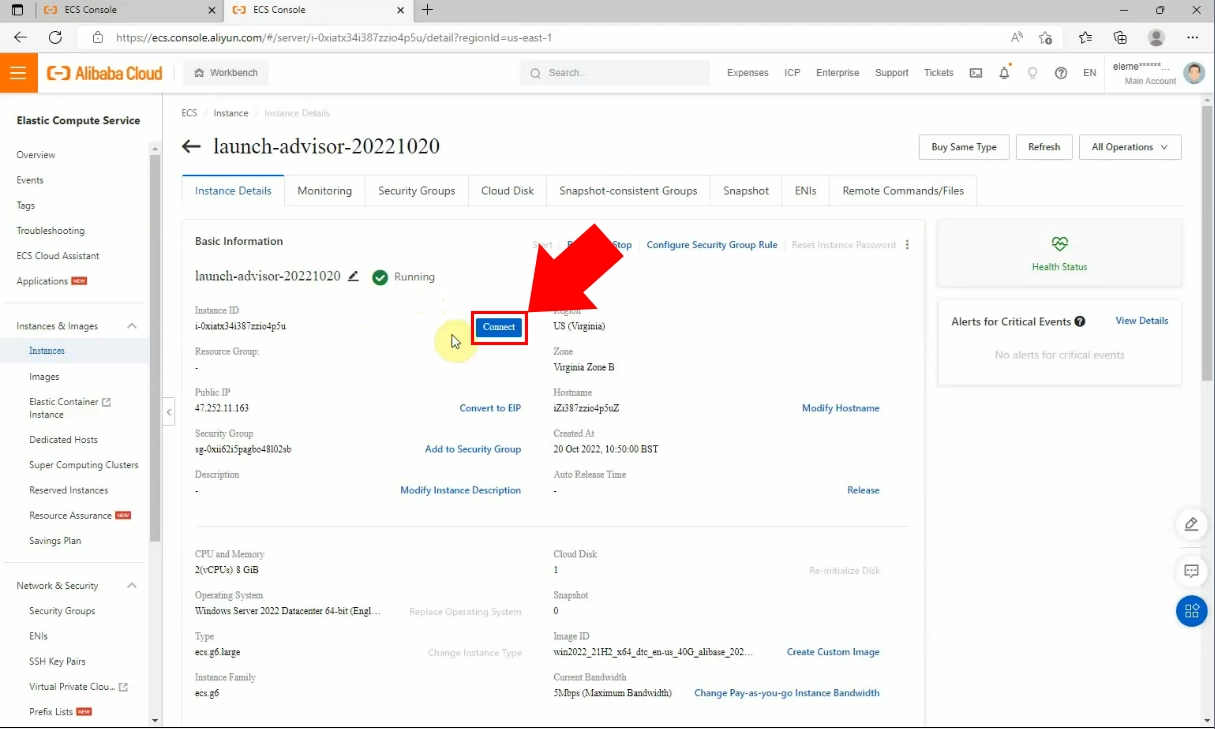
Click on the Instance ID, so the basic information will appear. There, find the "Connect" button, highlighted in blue.
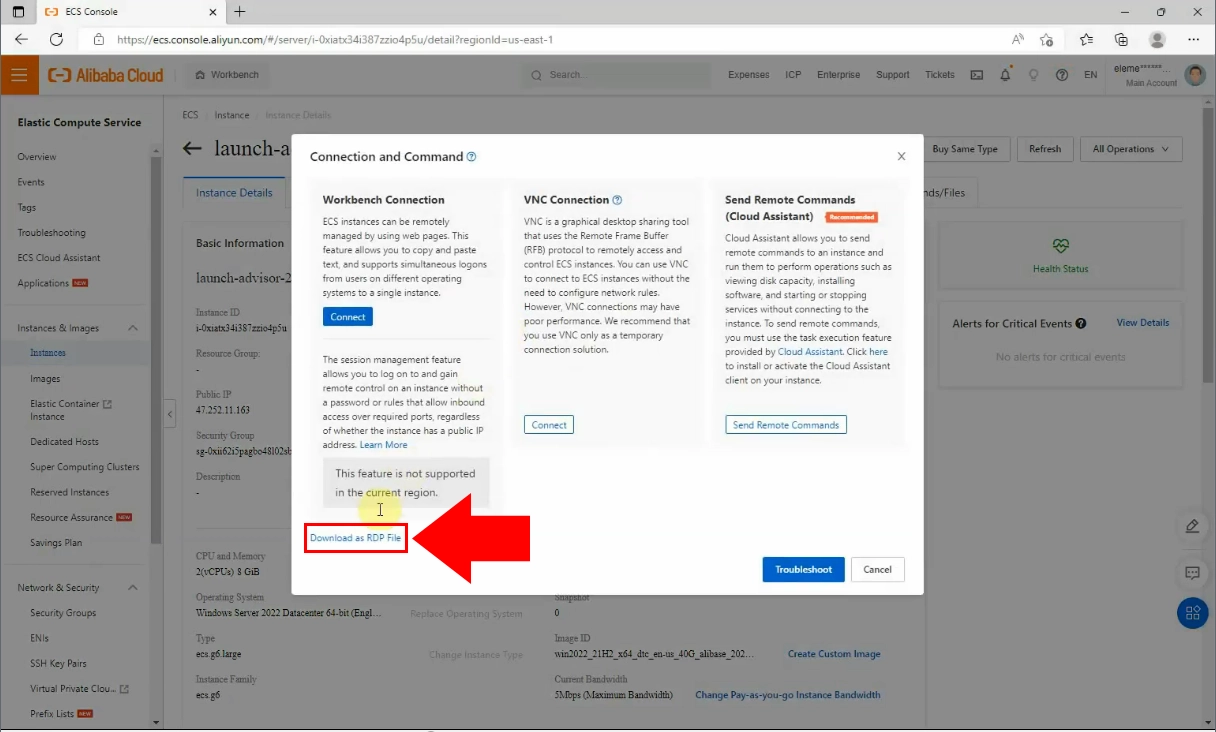
Click on the "Download as RDP file" link then check your PC's downloads map.
Open the file and click on the "Connect" button.
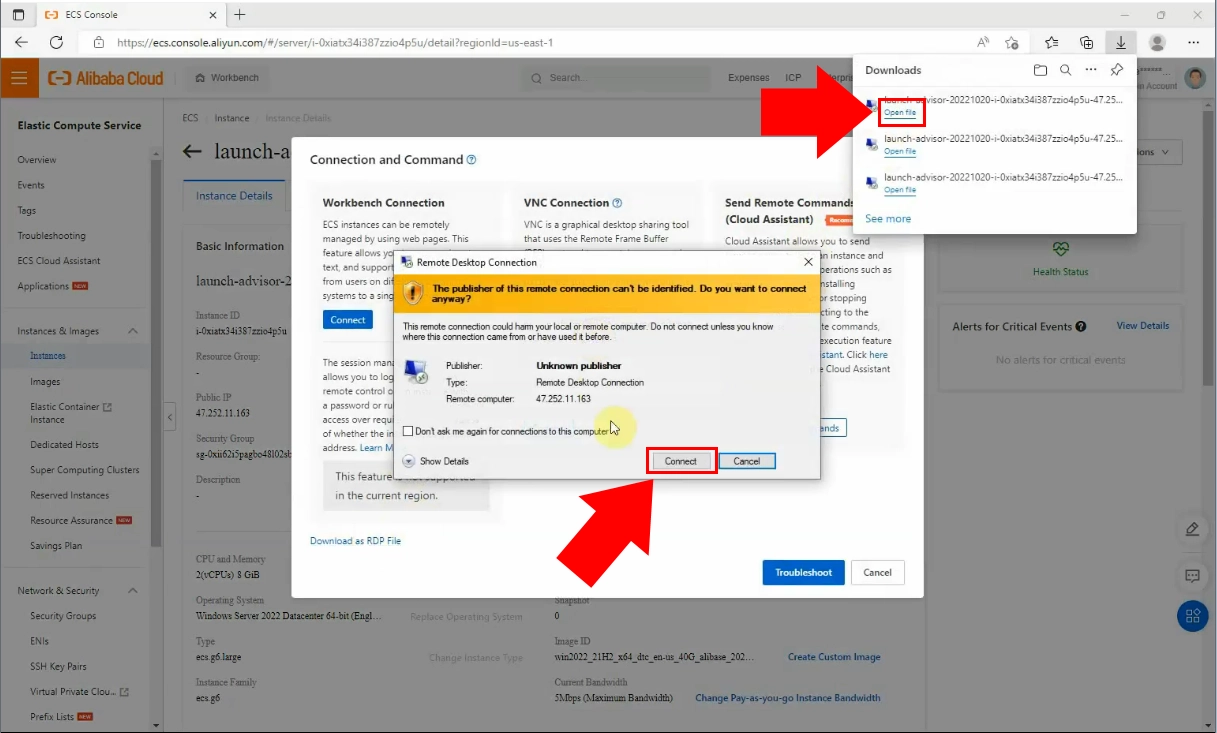
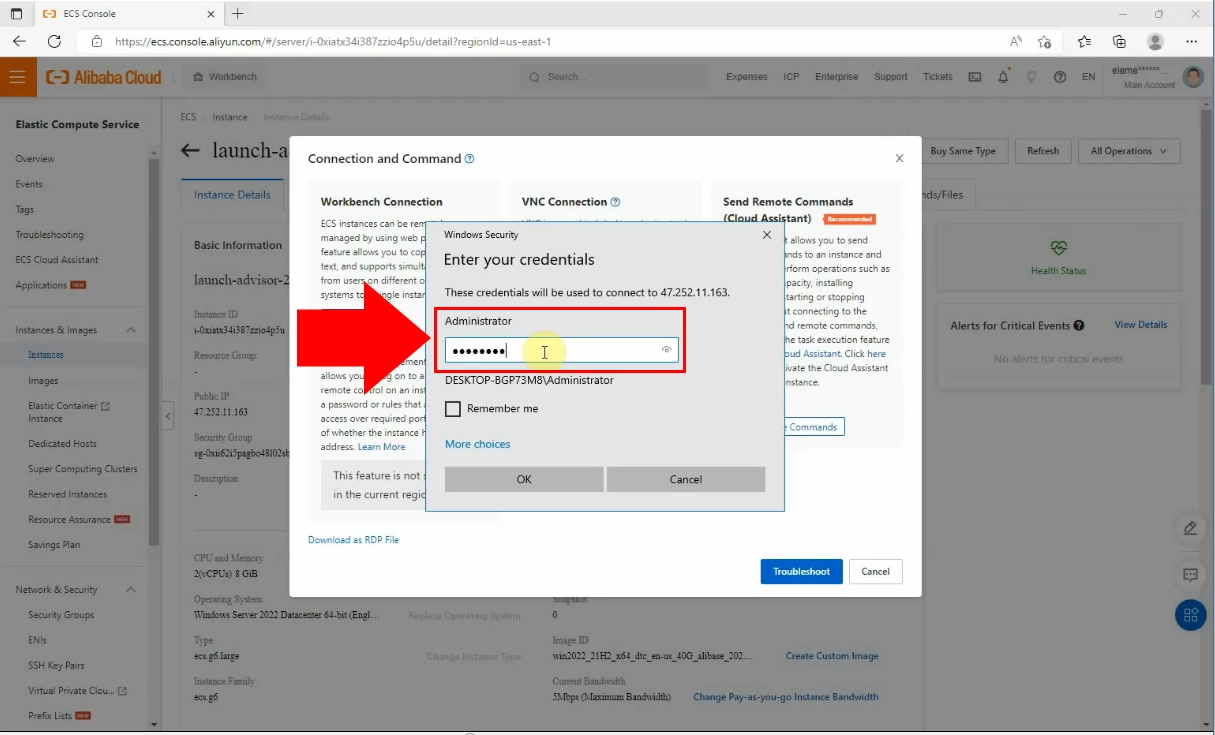
Enter your login information into the certain box then click on "OK". Allow all the stipulations and set up the connection. you need to wait to load the ECS on at your PC.
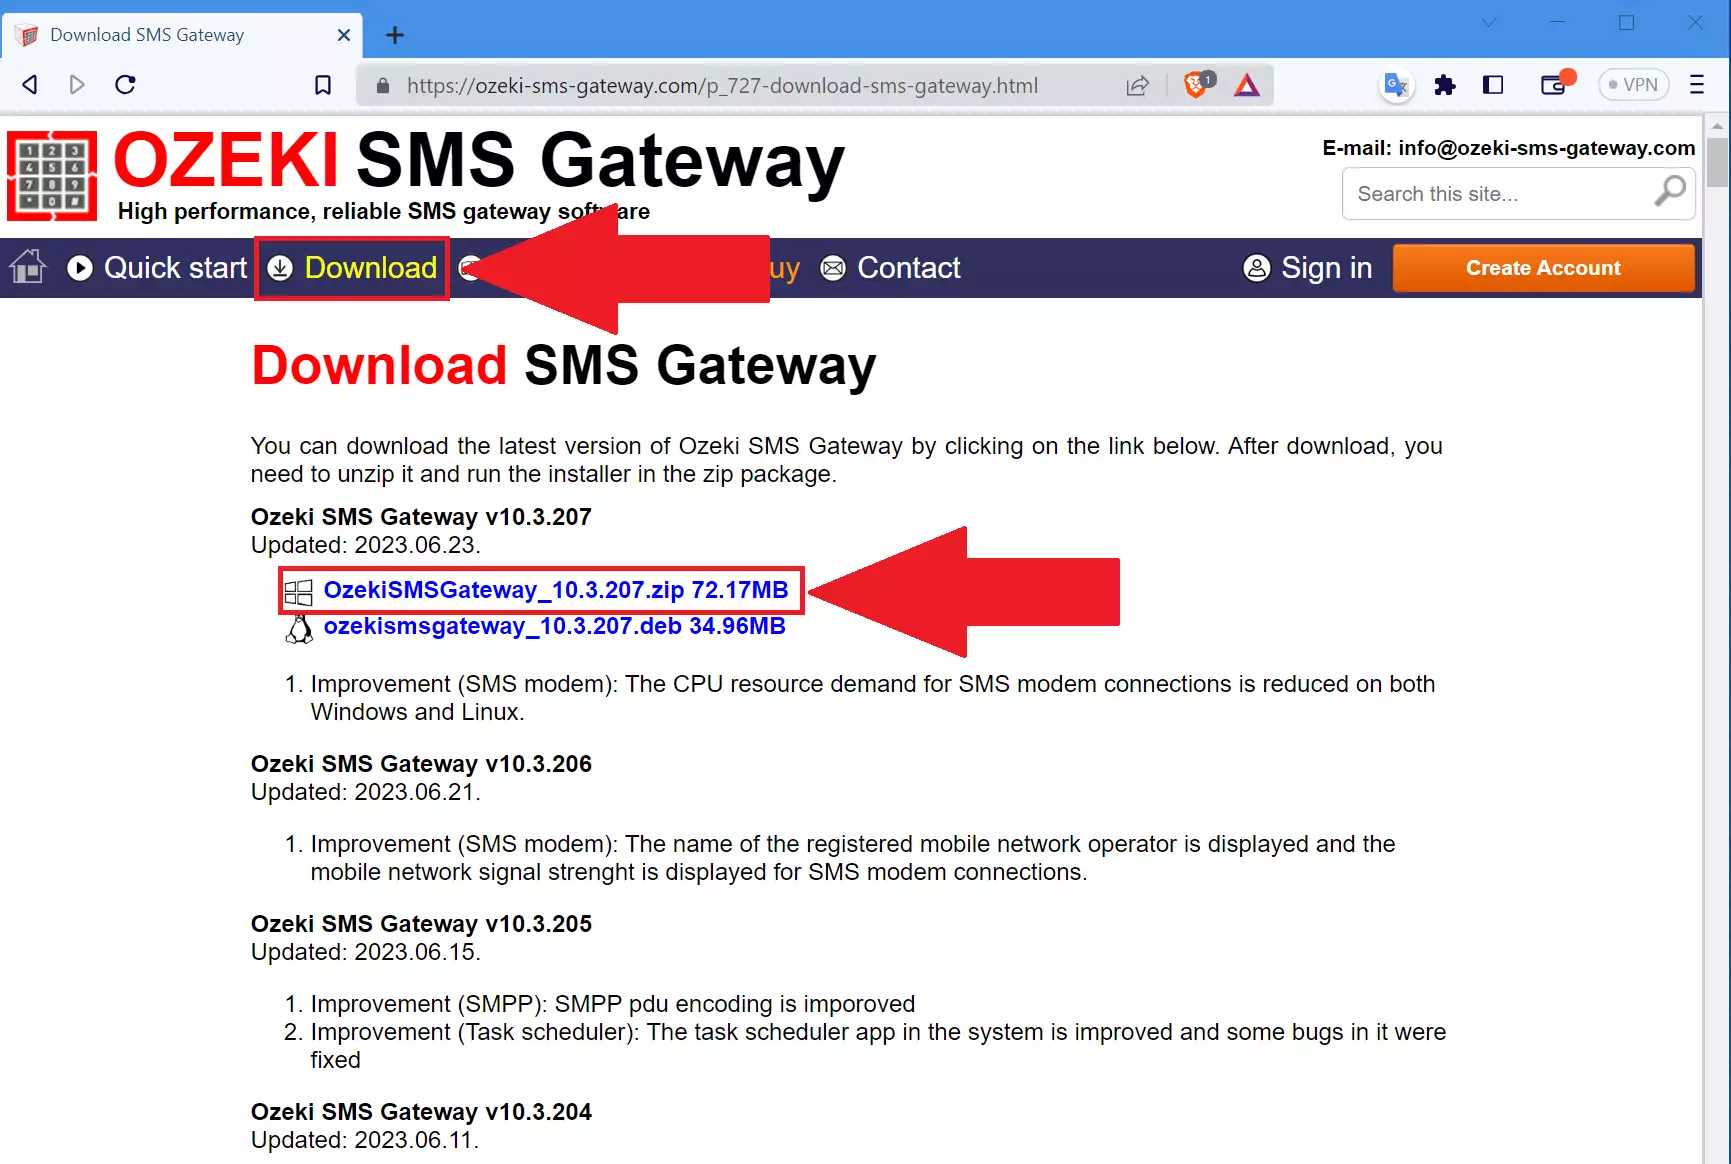
The following part of the process, load the ozeki-sms-gateway.com page at your browser and download the Ozeki SMS Gateway. Choose the download option from the enumeration of headlines. Then click on the "OzekiSMSGateway" link for Windows.
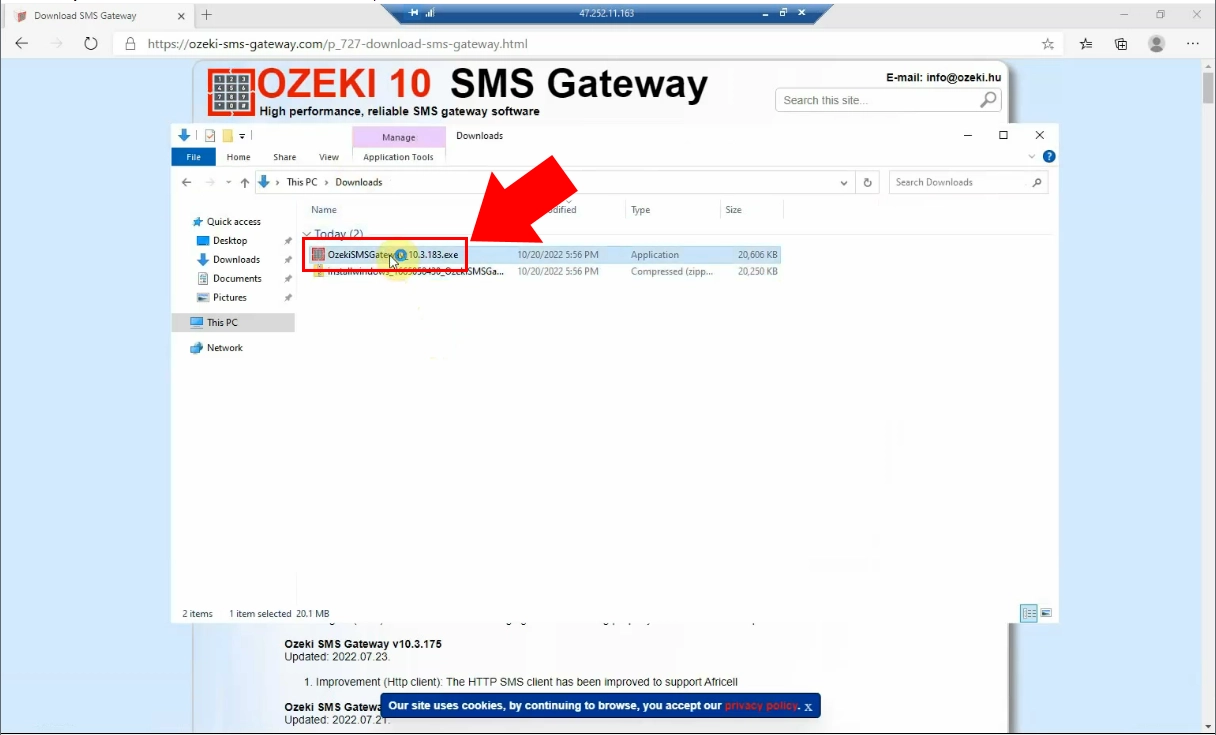
To start the Ozeki SMS Gateway installation, open your downloads folder. At the folder extract the compressed .zip file then run the Ozeki SMS Gateway application.
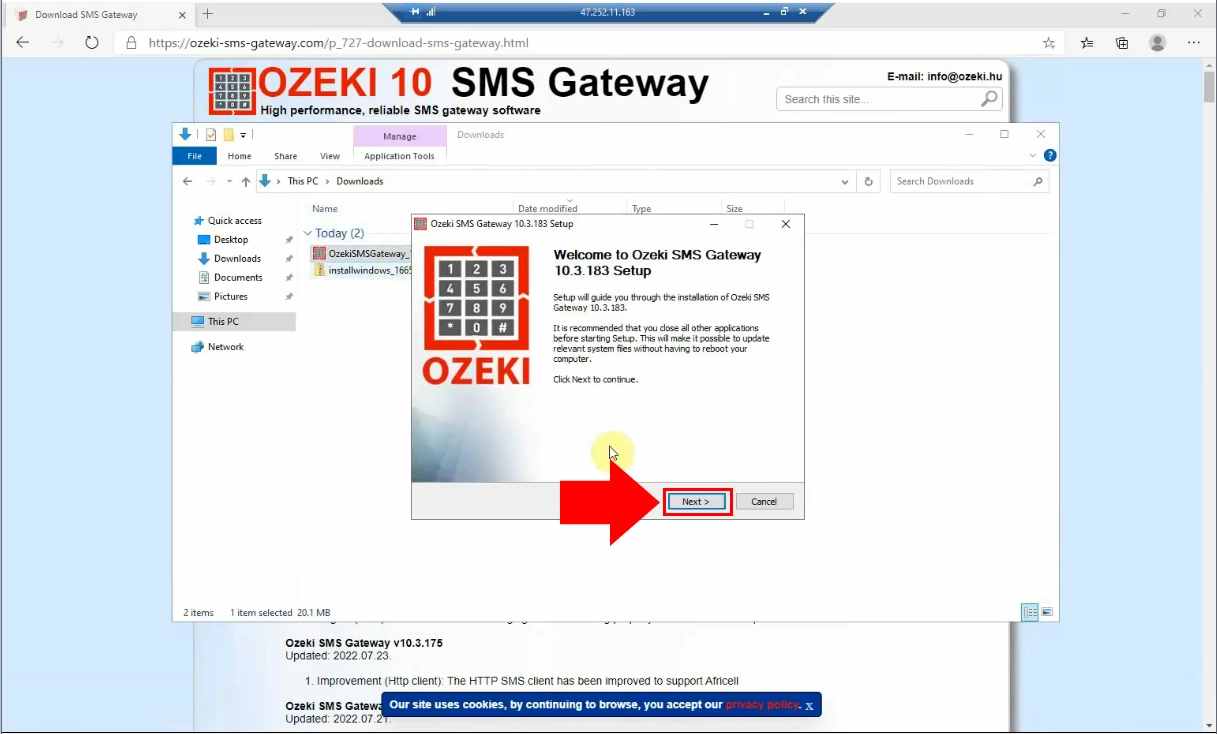
For finishing the installation, allow the terms about changes by clicking on the "Yes" button. The Welcome page of the Ozeki SMS Gateway will show up. There, you need to click on the "Next" button.
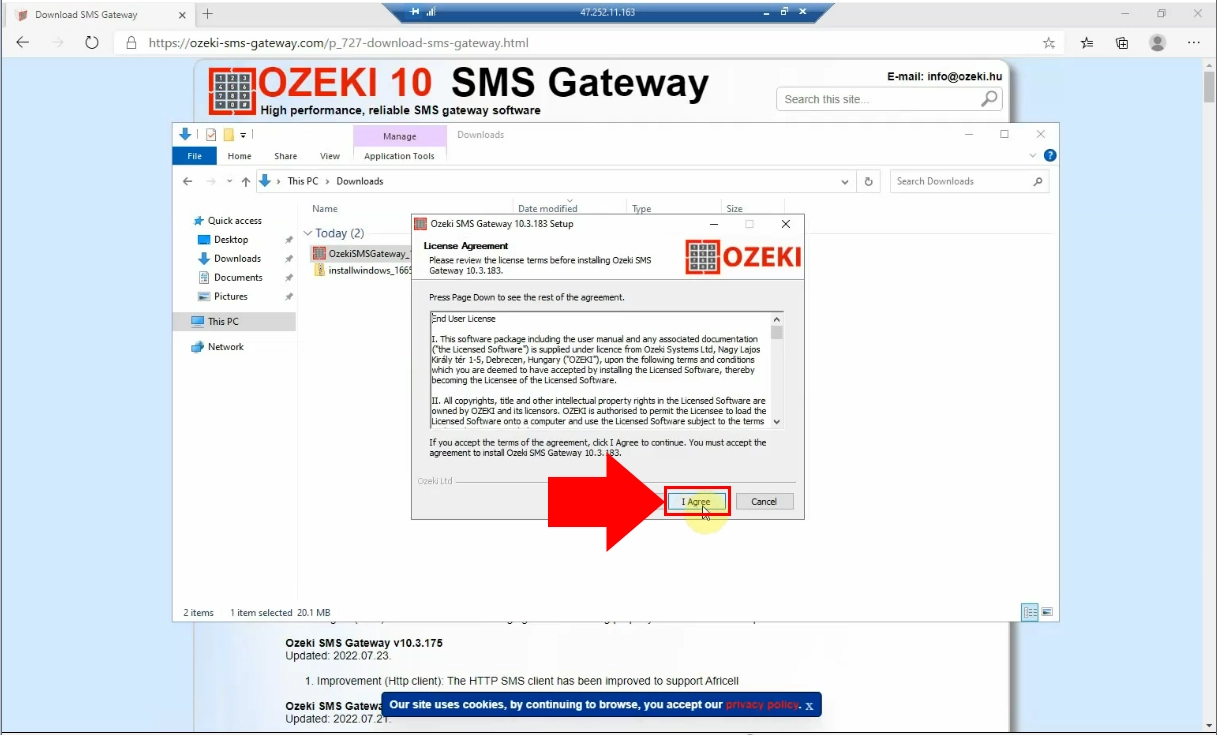
Accept the terms and policies by clicking on the "I Agree" button at the bottom of the window.
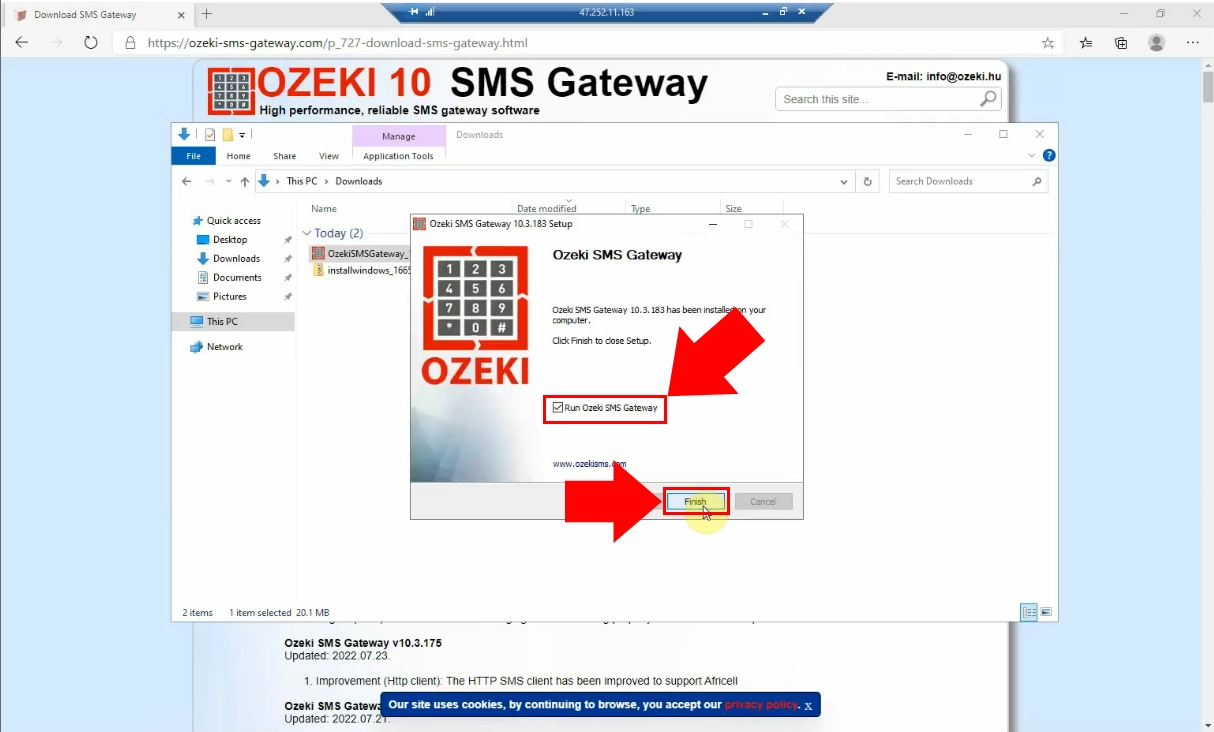
Finish the process of installation by clicking on the "Finish" button. When the installation is ready, the Ozeki SMS Gateway starts to run. (https://localhost:9515)
To get started, choose the SMS Gateway icon from the desktop.
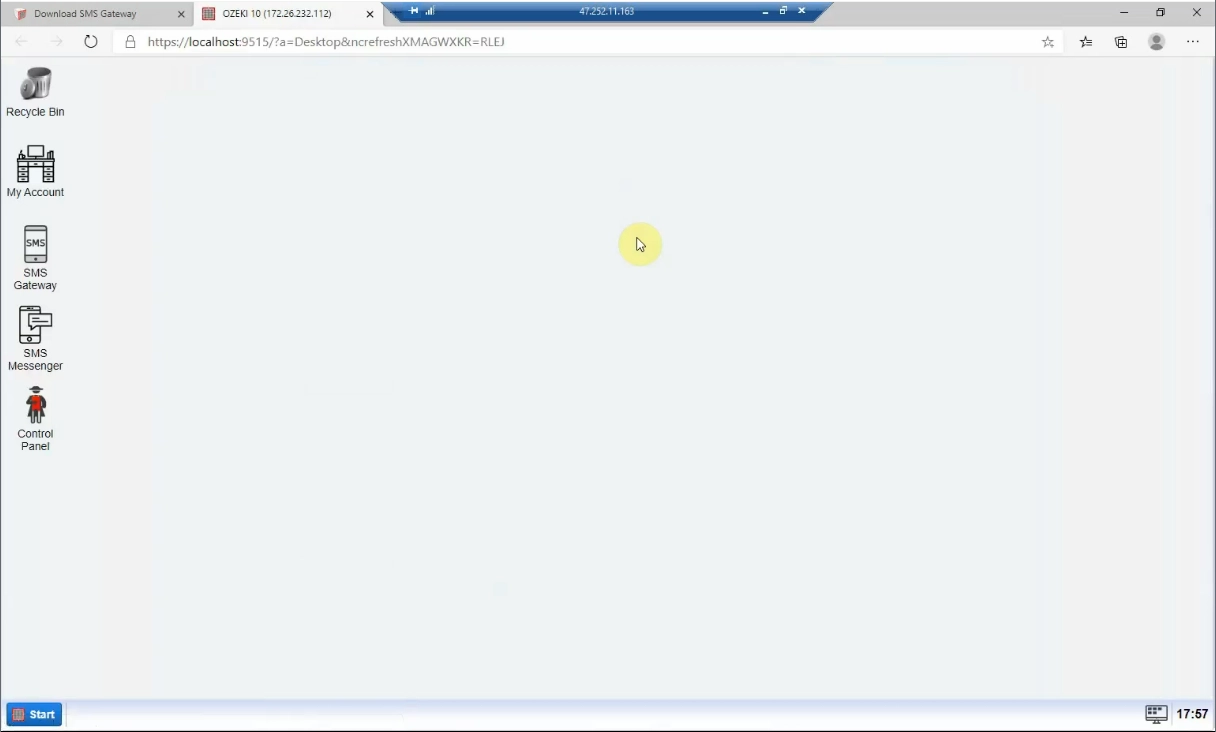
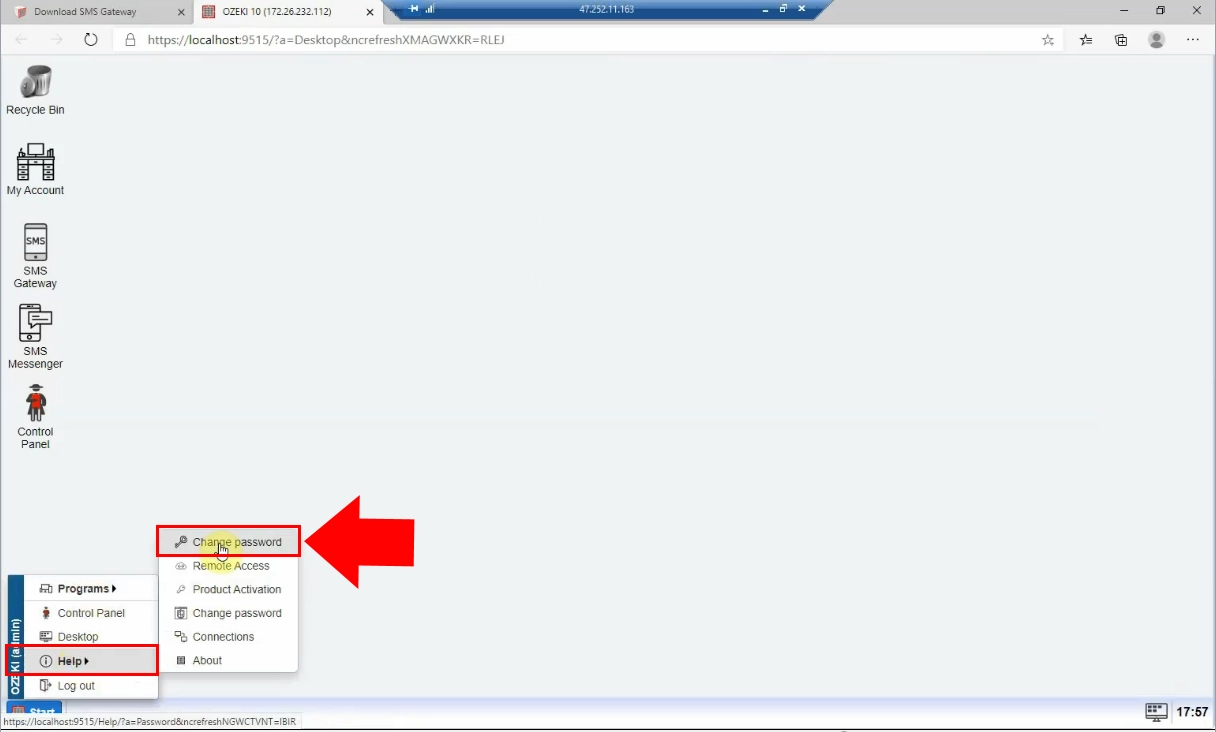
The Ozeki SMS Gateway home screen will appear. There you must change your password. At the Ozeki Start Menu choose the "Change Password" option from the "Help" menu item.
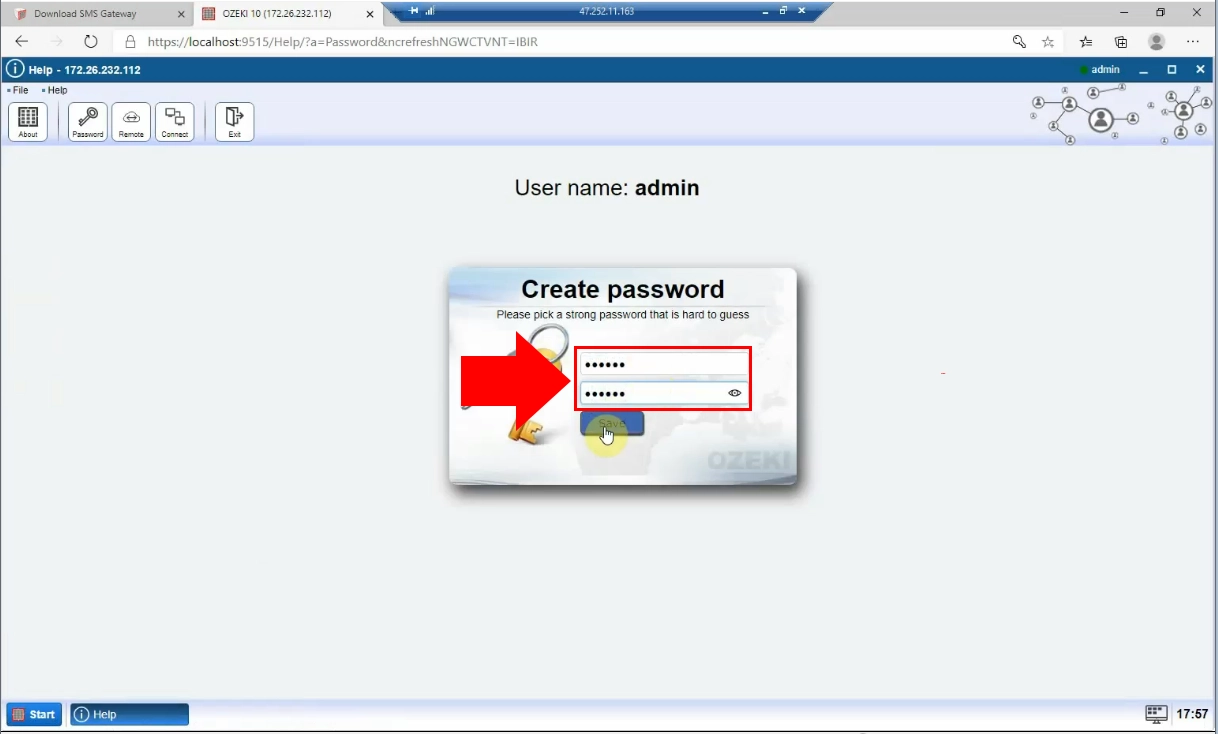
It is needed to create a password to your user profile. Enter a unique password
that is hard to figure out. In order to make sure that it is correct, you need
to confirm the new password. If you are ready with entering it, click on the
"Save" button.
Now, you need to log in to your Ozeki SMS Gateway account, by using the name and
password that has been set previously.
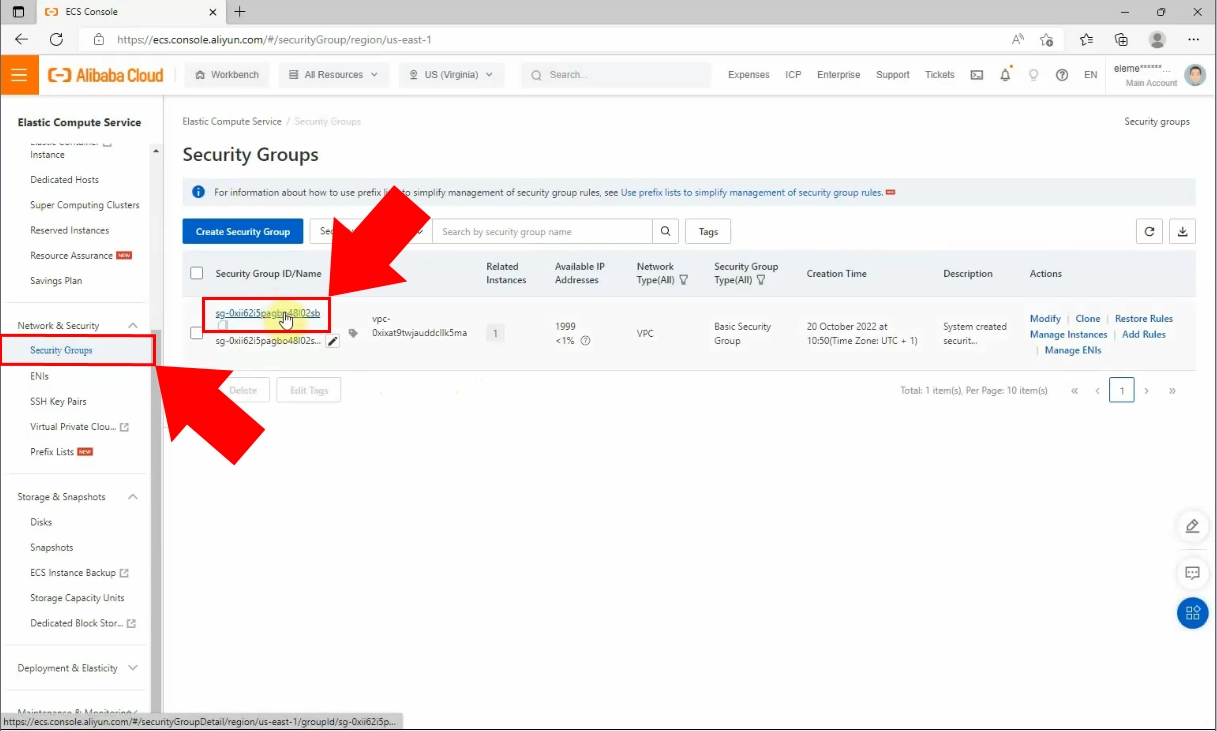
In the following part of the process, you need to load your Alibaba ECS profile.
There you must to find the Security Groups option from the control panel at the
left side of the page.
In this menu, click on the Instance ID, in order to load all the basic information.
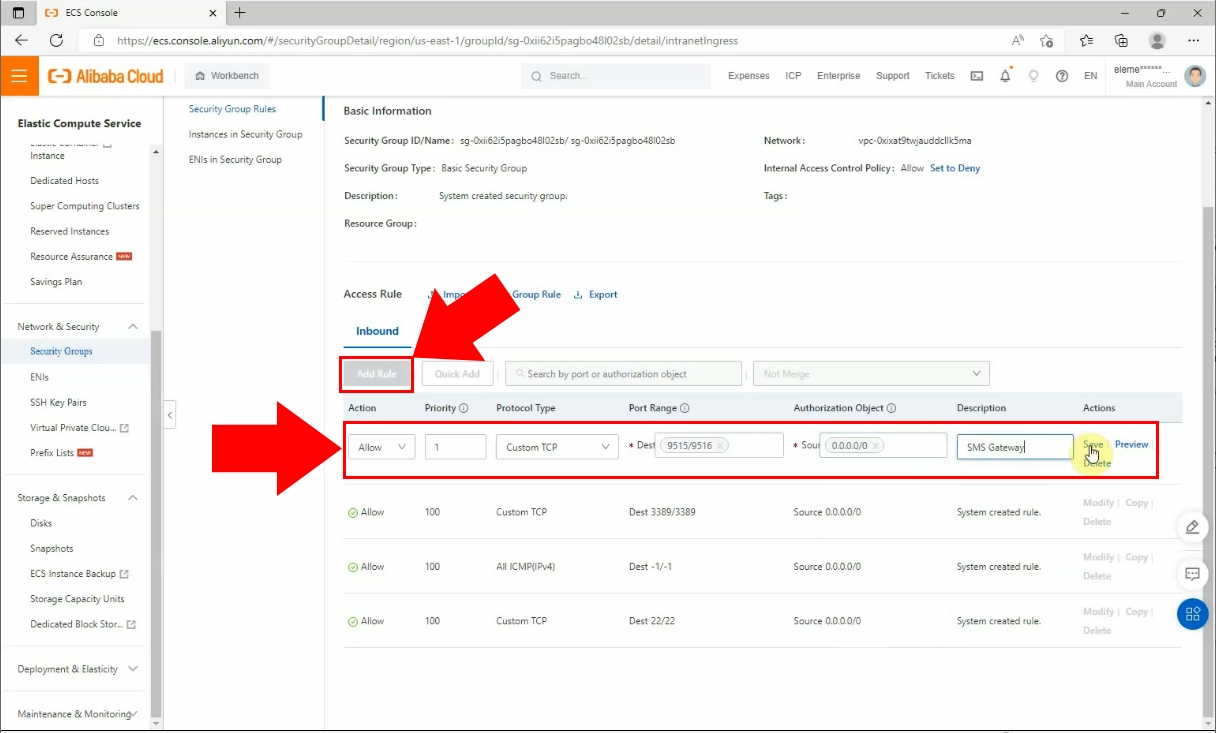
There, you must add new rule for SMS Gateway. Scroll down and click on the "Add Rule" button, highlighted in blue. Customize the SMS Gateway following these parameters: Protocol Type: "Custom TCP", Port range: "9515/9516", Authorization object: "0.0.0.0/0". Then click on "Save" button at the right.
Find the Instances from the control panel at left side, then click on the Instance
ID at the page that has been showed up.
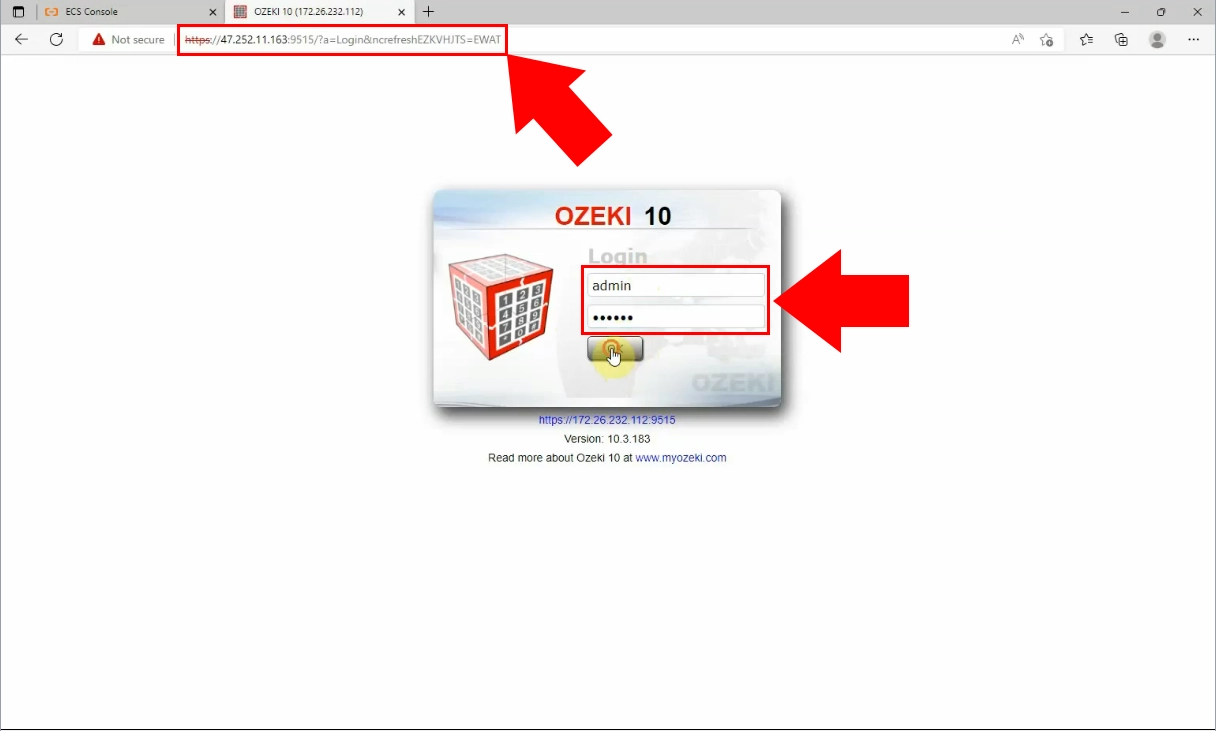
Copy the Public IP Address then paste into the browser's search field.
Enter in front of it the "https://" expression and after the ":9515" numeric code.
Click on the "Advanced" option then the "Continue" link to the Ozeki SMS Gateway.
After that, log into your Ozeki SMS Gateway account using your admin login
information.
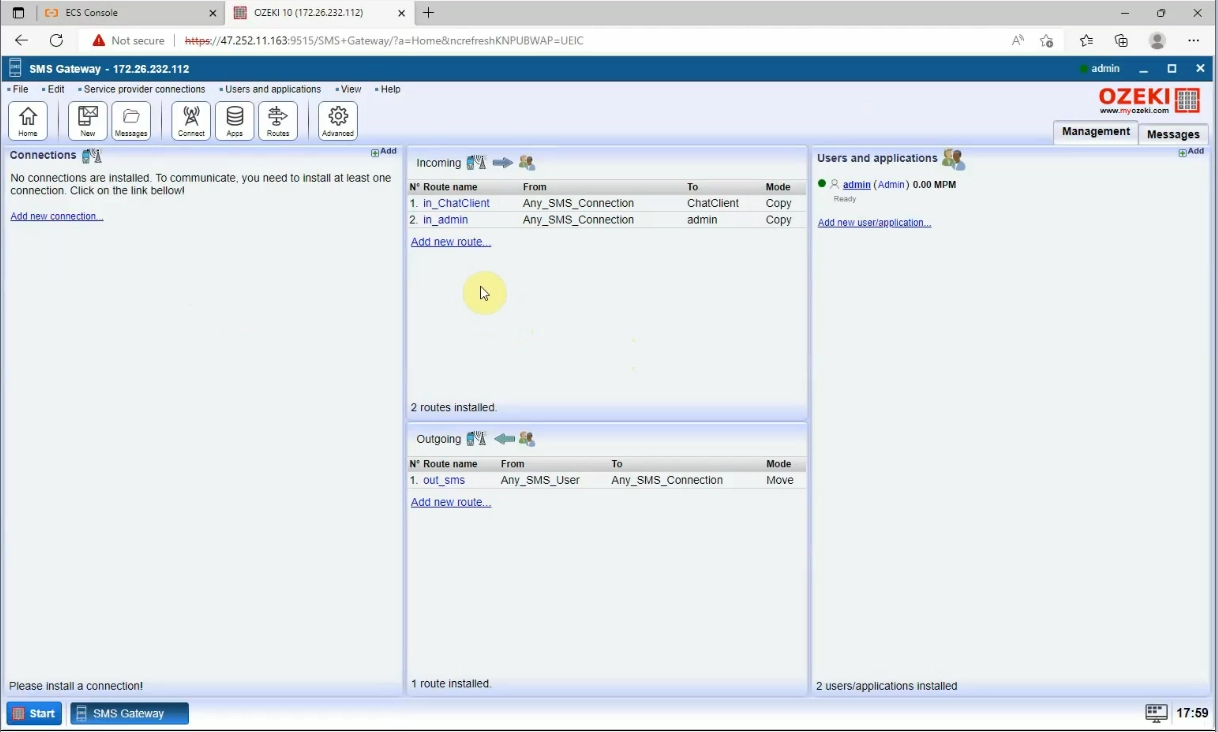
Finally, when you log into your account you will see that you can access the Ozeki SMS Gateway page.
Final thoughts
The attached step-by-step guide provides comprehensive instructions to install Ozeki SMS Gateway on Alibaba Cloud, and different configurations of connections to various service providers using API credentials. Ozeki SMS Gateway on Alibaba Cloud enable businesses to connect with a diverse audience and efficiently deliver SMS messages to multiple countries. The integration with different service providers through APIs enables businesses to cater to their specific needs, making them ideal for promotional content, notifications, and critical alerts. These instructions provide valuable assistance to businesses seeking to enhance their SMS communication in Ozeki SMS Gateway via Alibaba Cloud.
More information
- How to install Ozeki SMS Gateway on Microsoft Azure
- Google Cloud SMS
- How to install the SMS gateway into Alibaba Cloud
