How to send silent SMS on GSM modem
This article will focus on sending Silent SMS messages from a GSM modem. To send SMS from a GSM modem, you will need a computer that can connect to the modem with Ozeki SMS Gateway installed. The article includes a video tutorial for the easiest setup process with screenshots on the main steps.
What is Silent SMS?
Silent SMS is a specific type of text message that can be utilized in tracking solutions. It is also called Stealth SMS or Ping SMS because it can be used to check if a device is connected to a cellular network. Silent SMS is a specially encoded text message, which does not leave a notification or alert on the user's mobile device, does not get stored, but the user device will send an acknowledgement of receiving the message back to the sender. From this information, you can find out if a user is connected to a mobile network, their approximate location and availability.
What is a 4G modem?
A 4G modem is a hardware device that connects to a cellular network using 4G (LTE) technology. It requires a SIM card to establish a data connection with a service provider's network. This type of modem is commonly used for various purposes, including sending out automated or bulk SMS messages. It provides a reliable and efficient way to establish a network connection and send data, such as SMS messages, over the cellular network.
How sending SMS through a 4G modem works
The Ozeki SMS Gateway acts as the intermediary between the computer and the service provider, facilitating the process of composing, submitting, and delivering SMS messages. This solution streamlines the process of sending SMS messages from a computer and ensures that the messages are properly delivered to the recipient's mobile phone through the service provider's network. (Figure 1)

How to send SMS with a 4G modem (Clear steps)
To send SMS with a 4G modem:
- Insert the SIM card into the modem
- Plug the antenna into the modem
- Connect the modem to your PC with USB cable
- Launch the Ozeki SMS Gateway
- Run the sms modem autodetection
- Specify the sms phone number
- Write the text of the SMS message
- Click on Send to send the SMS
- Review the test SMS message you sent
Ozeki 4G LTE SMS Modem setup (video tutorial)
In the video, you'll discover the process of configuring an Ozeki 4G LTE SMS Modem to send SMS messages using a USB cable. This setup requires the modem, a SIM card, an antenna, and a USB cable. Initially, you'll insert the SIM card into the modem, followed by attaching the antenna. Connect the modem to the computer using the USB cable. Once the connection is established, the power LED on the modem will illuminate, signifying that it's turned on.
More information about the product
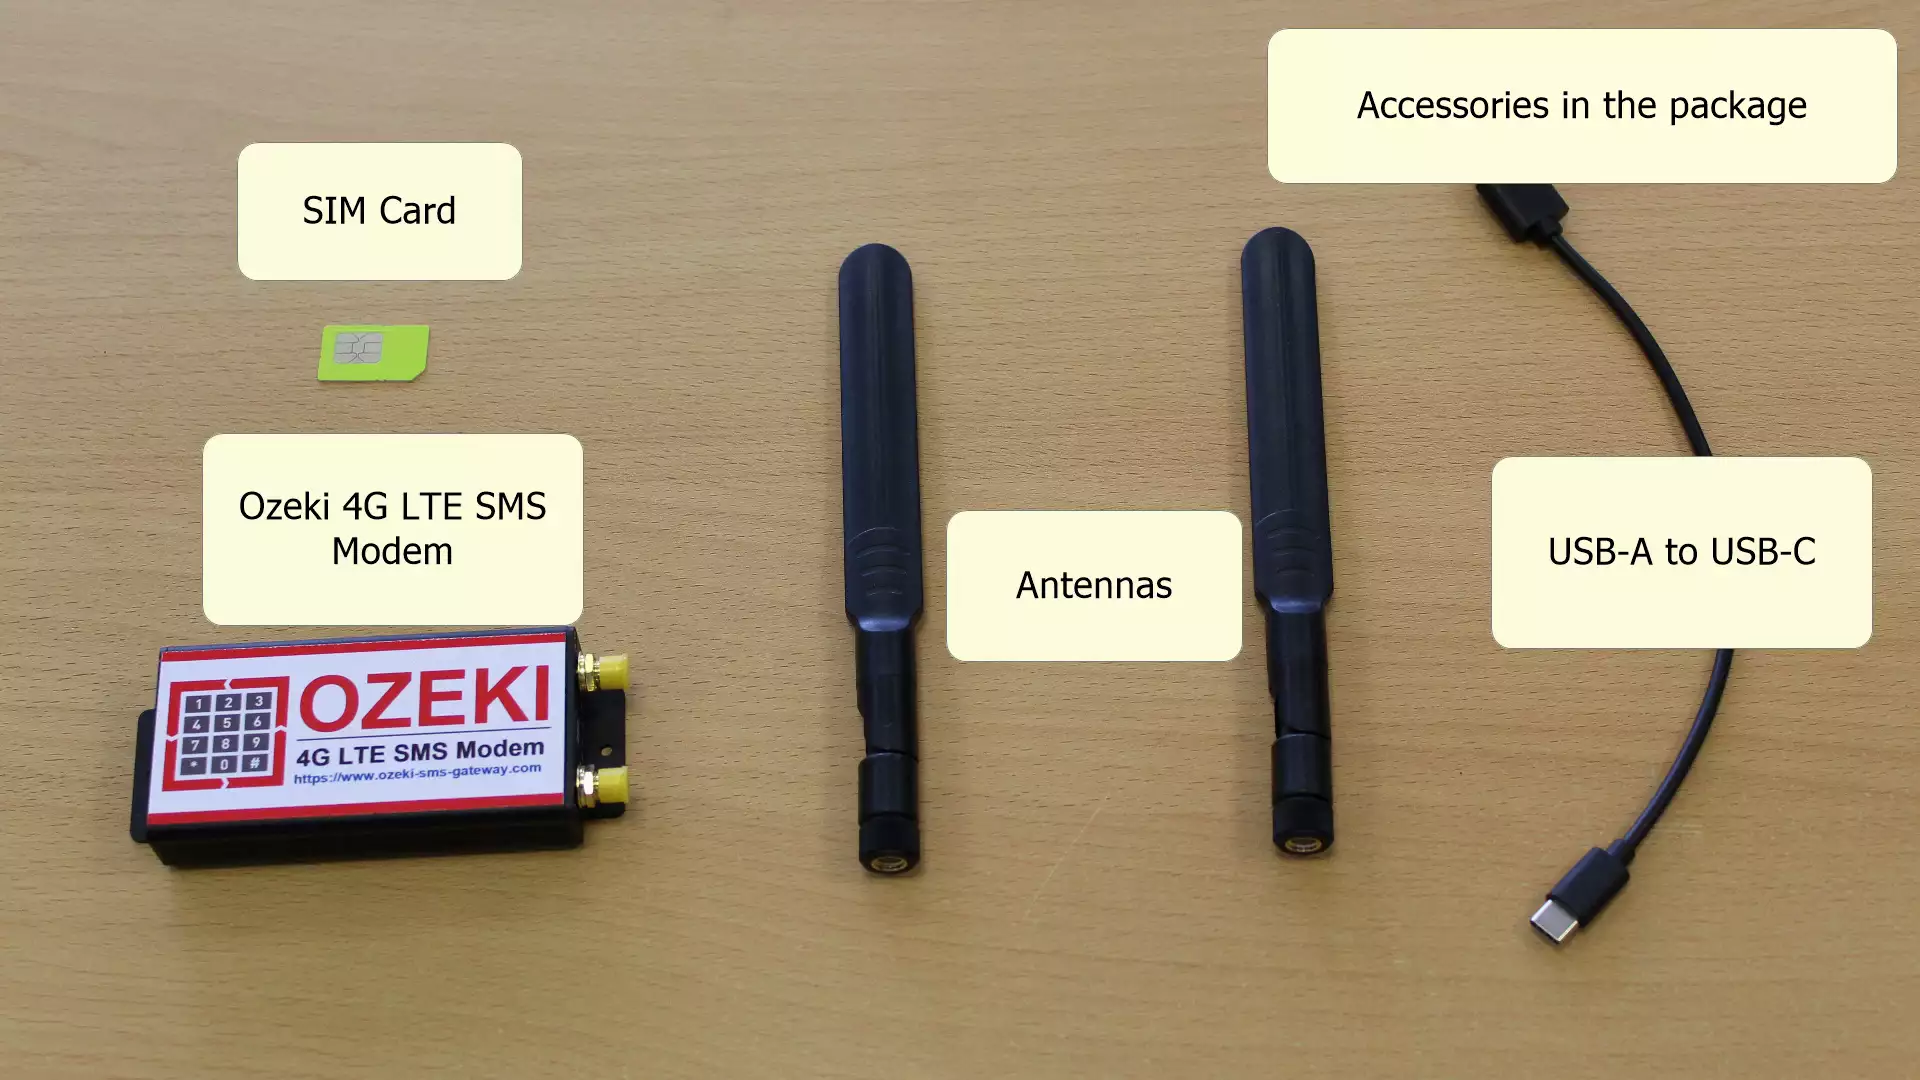
Get the parts that you need to connect the modem successfully
For a successful modem connection, you'll require the following components: a SIM card, an antenna, a USB cable, and the modem itself. Ensure that you have all these hardware elements ready for the setup process. Every detail is crucial for proper functioning. (All components are depicted in Figure 2)
Insert the SIM card into the modem
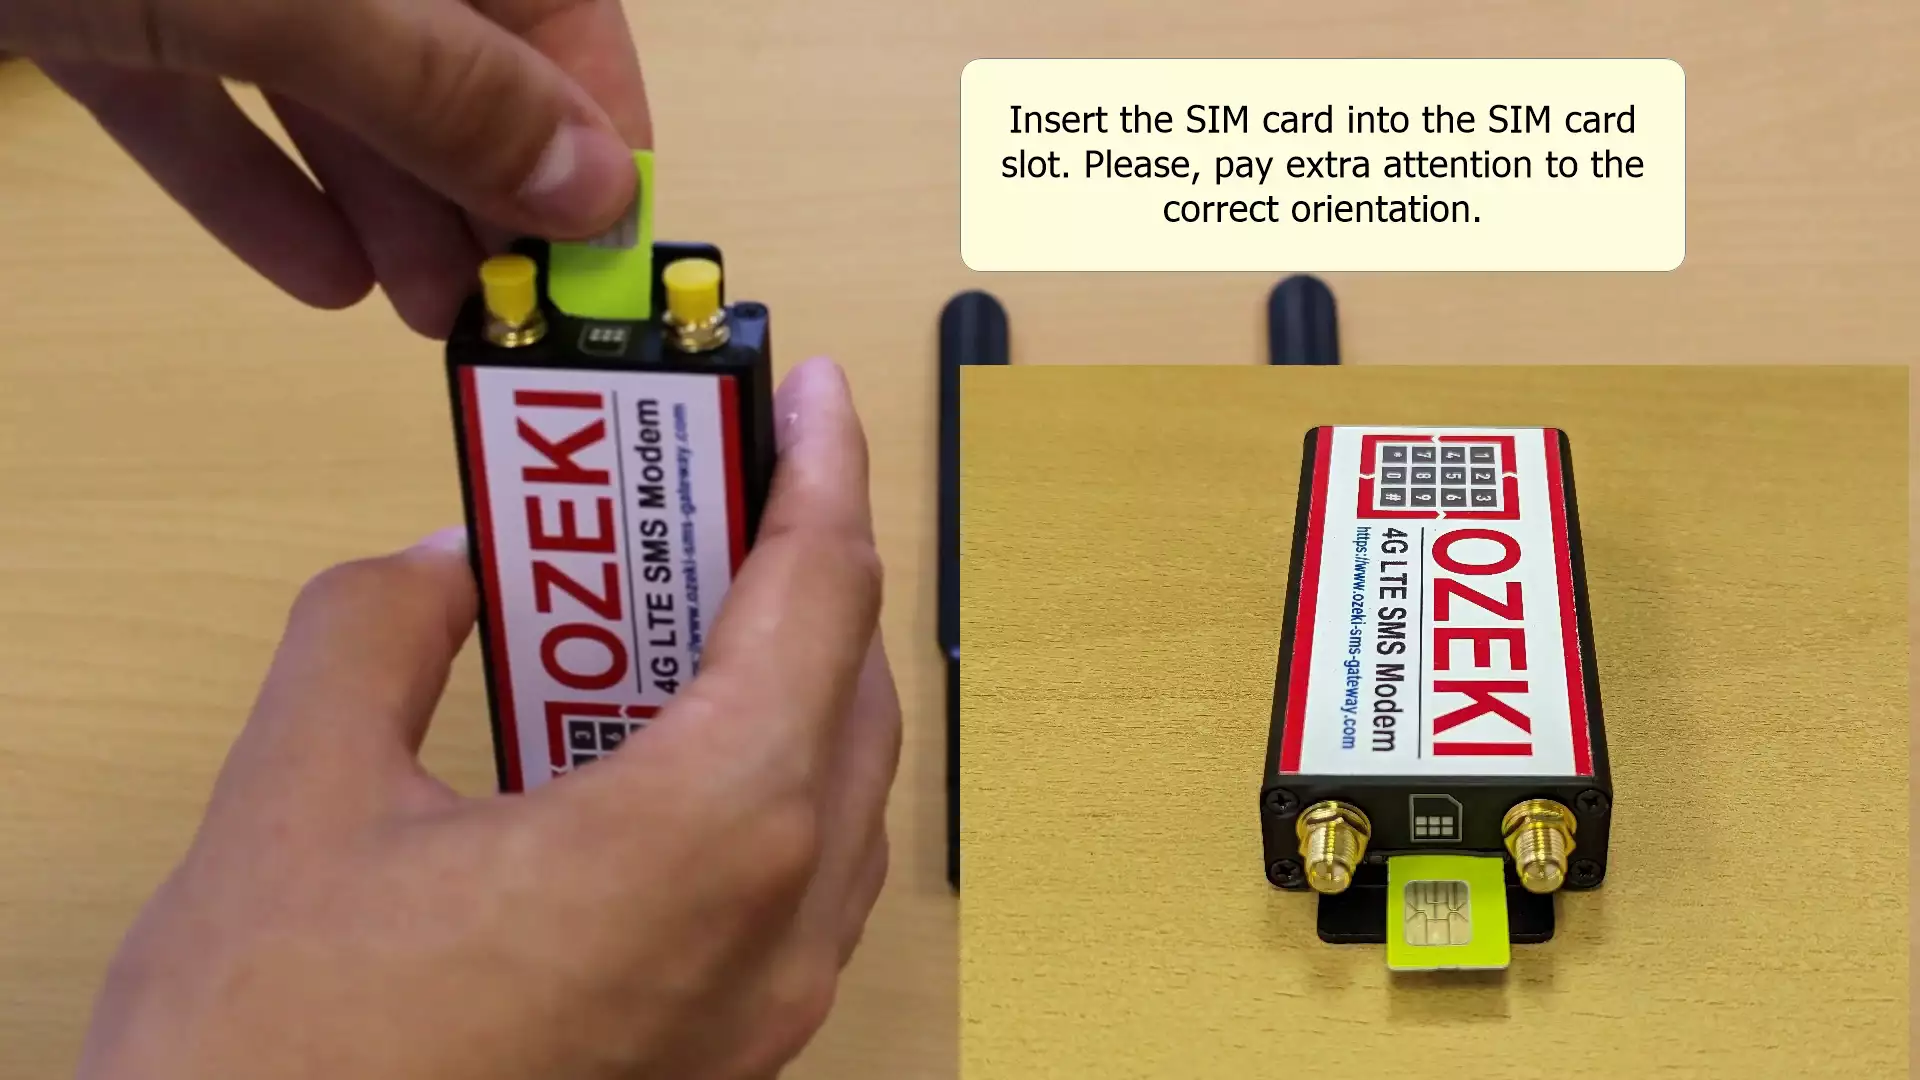
Begin by inserting the SIM card into the modem. This process closely resembles inserting a SIM card into a mobile phone. The SIM card serves as the bridge connecting the modem to the network. (The procedure is illustrated in Figure 3.)
Important settings for SIM card
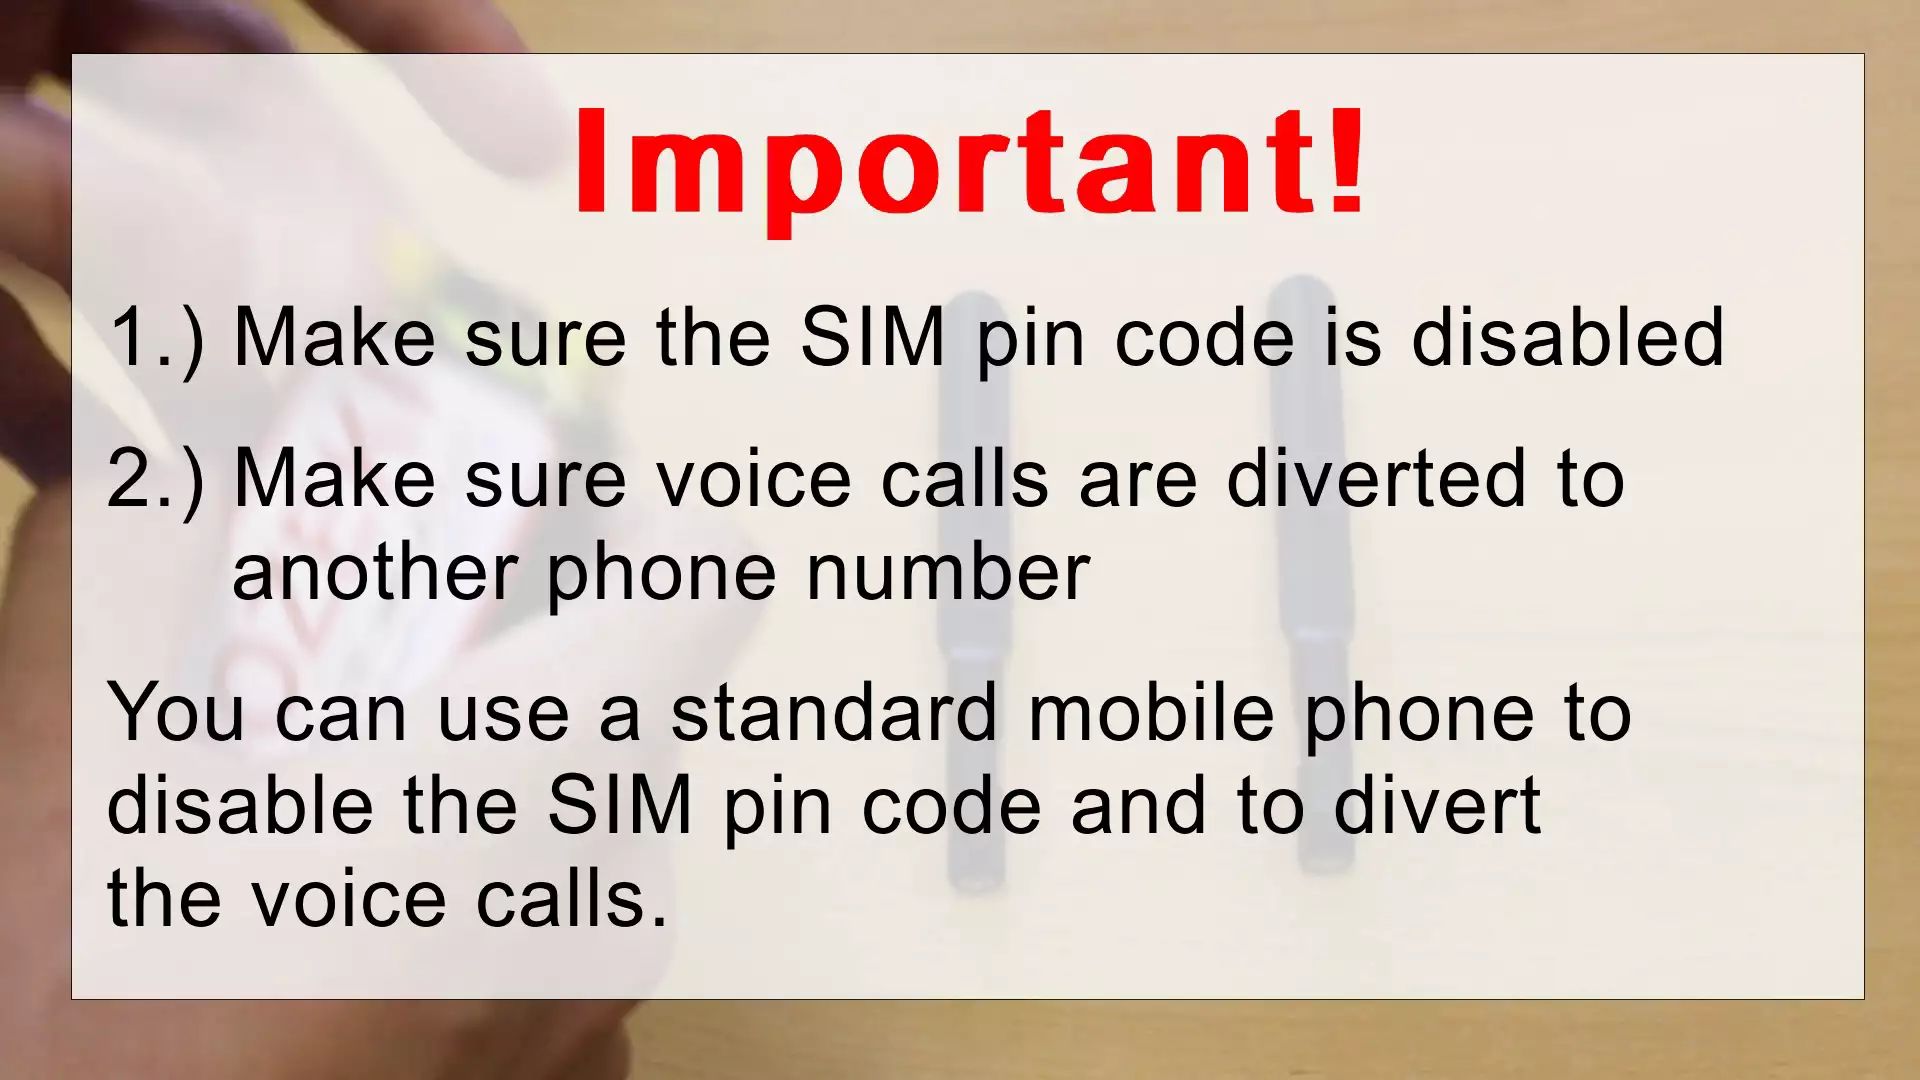
These settings are very important. If left incomplete, your SIM card will not function with the Ozeki 4G Modem. It is essential to both disable your PIN code and redirect phone calls to another phone number. You can perform these steps on a regular mobile phone. (Depicted in Figure 4.)
Connect the antenna to the modem
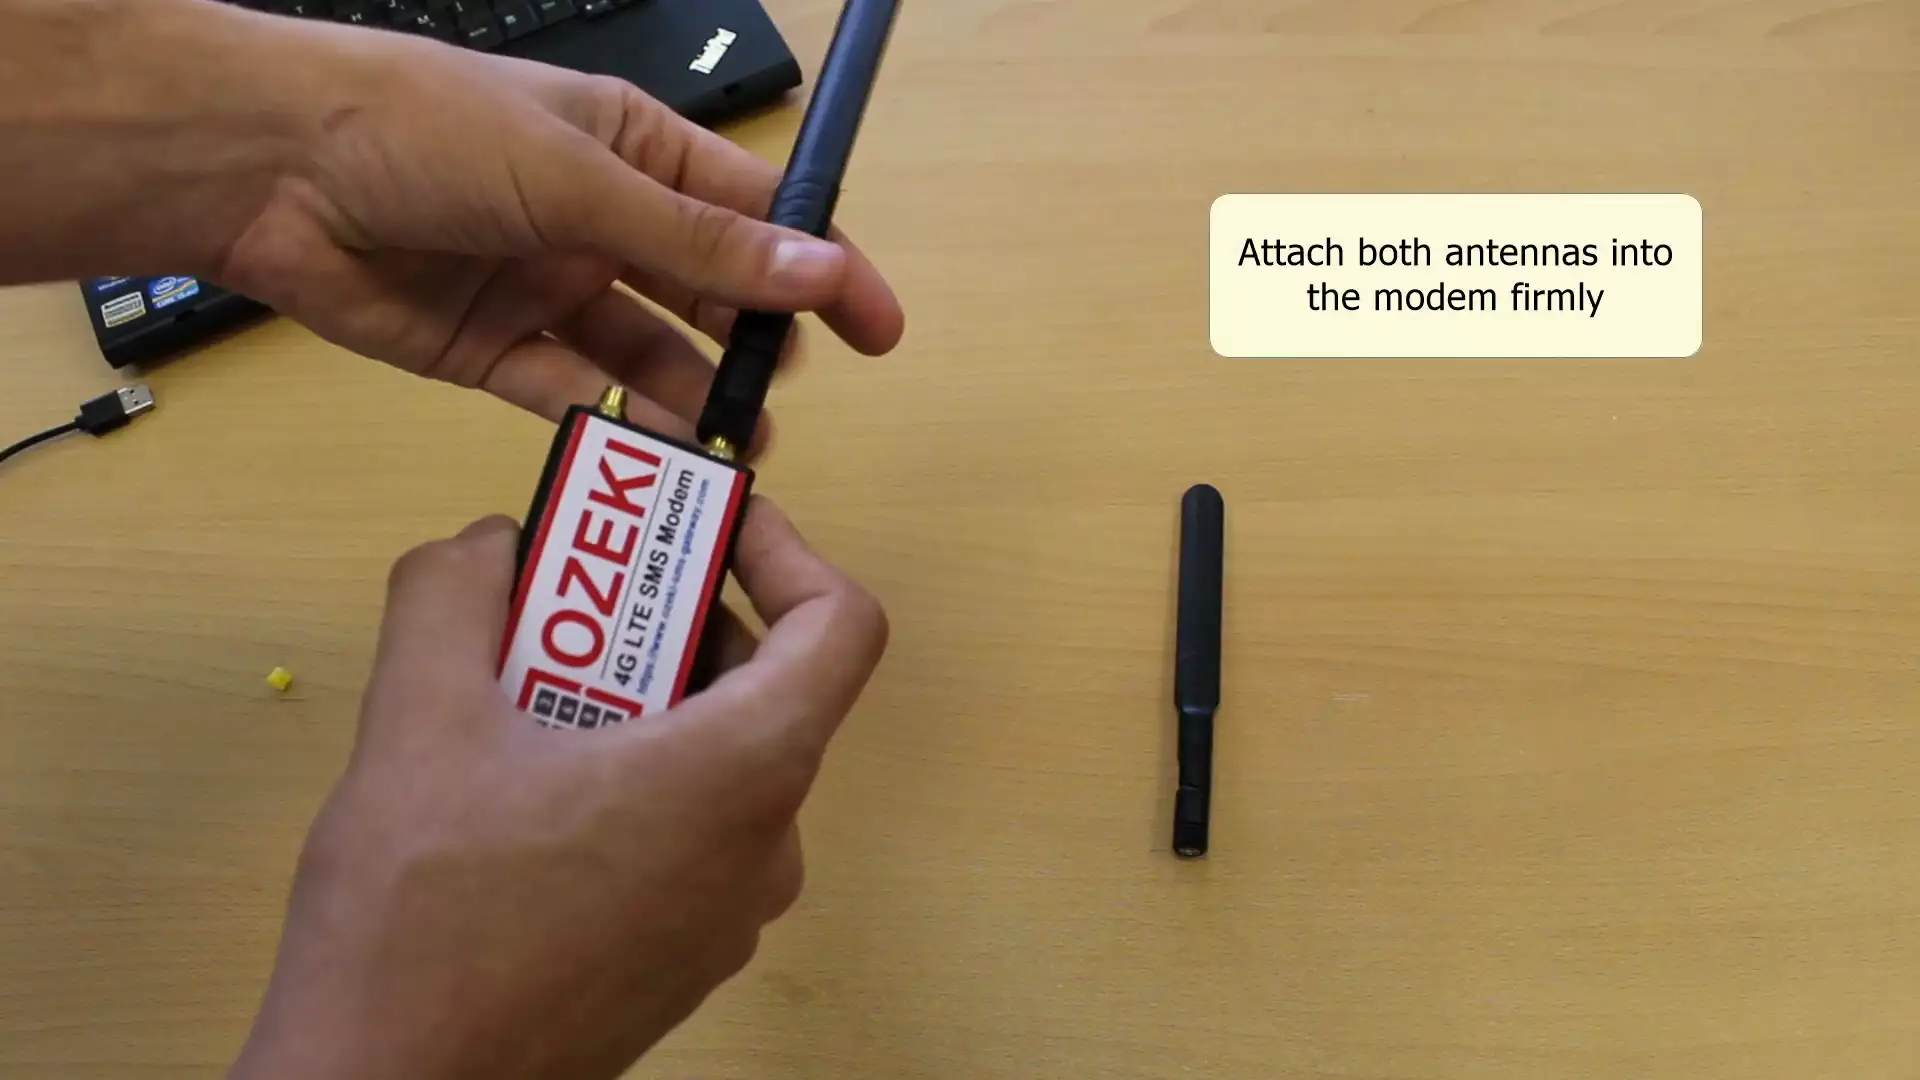
Following the SIM card insertion, it's crucial to properly connect the modem to its antennas. Ensuring a correct connection guarantees optimal performance. The antenna serves the purpose of both transmitting and receiving signals. (Illustrated in Figure 5.)
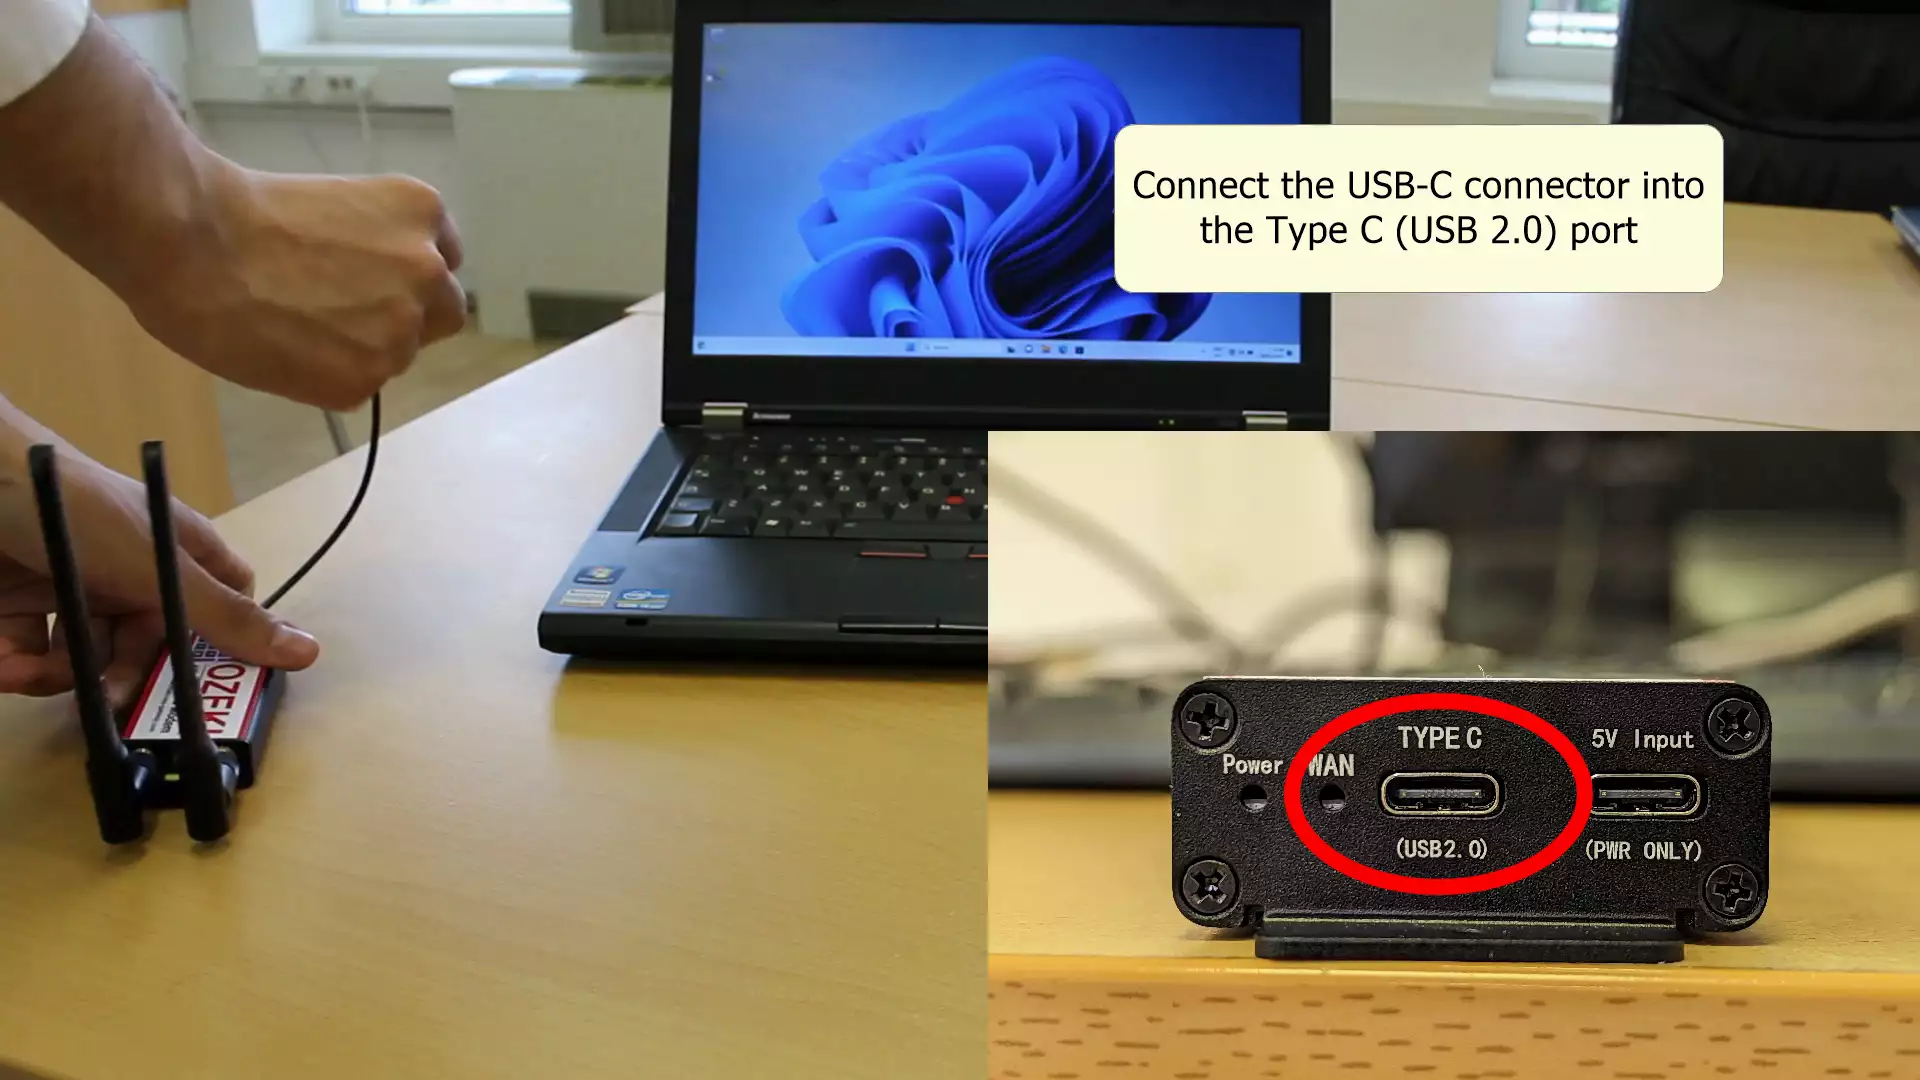
Insert the USB cable into the modem
Subsequently, insert the USB cable into the modem. This action establishes a connection between the modem and your computer. It's essential to employ a functional cable to prevent any potential disconnections. (Depicted in Figure 6.)
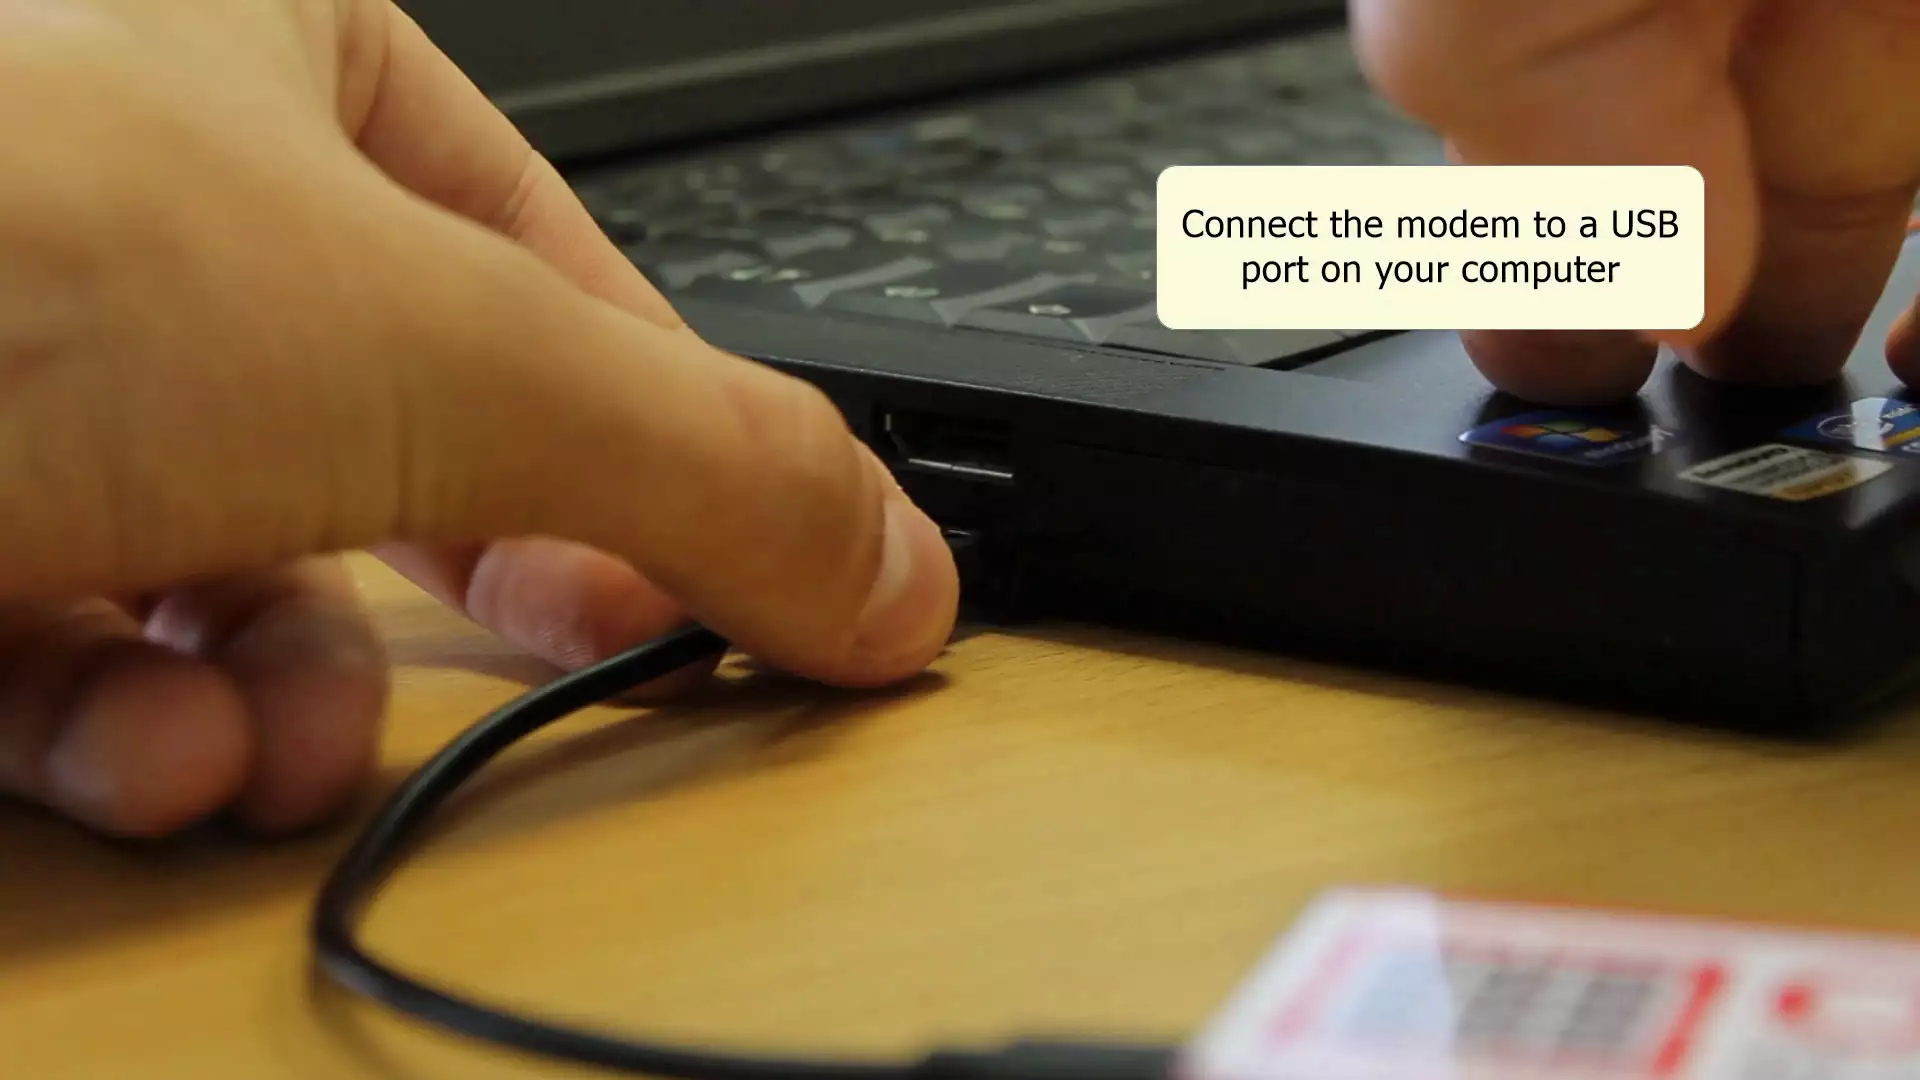
Plug the USB cable into your computer
Lastly, connect the other end of the USB cable to your PC. Insert the USB cable into one of the available ports on your computer. (Illustrated in Figure 7.)
Ozeki 4G LTE SMS Modem Software setup (video tutorial)
In this instructional video, you will gain insight into the process of setting up an Ozeki 4G LTE SMS Modem to send text messages (SMS) using a USB cable. To initiate this setup, ensure that you have an operational Ozeki 4G Modem and the Ozeki Software Platform installed on your system. The procedure starts with the driver installation, utilizing Ozeki SMS Gateway to configure a new SMS Modem, and finally, sending a test message and verifying its arrival on the recipient device.
Install the Ozeki Modem Driver
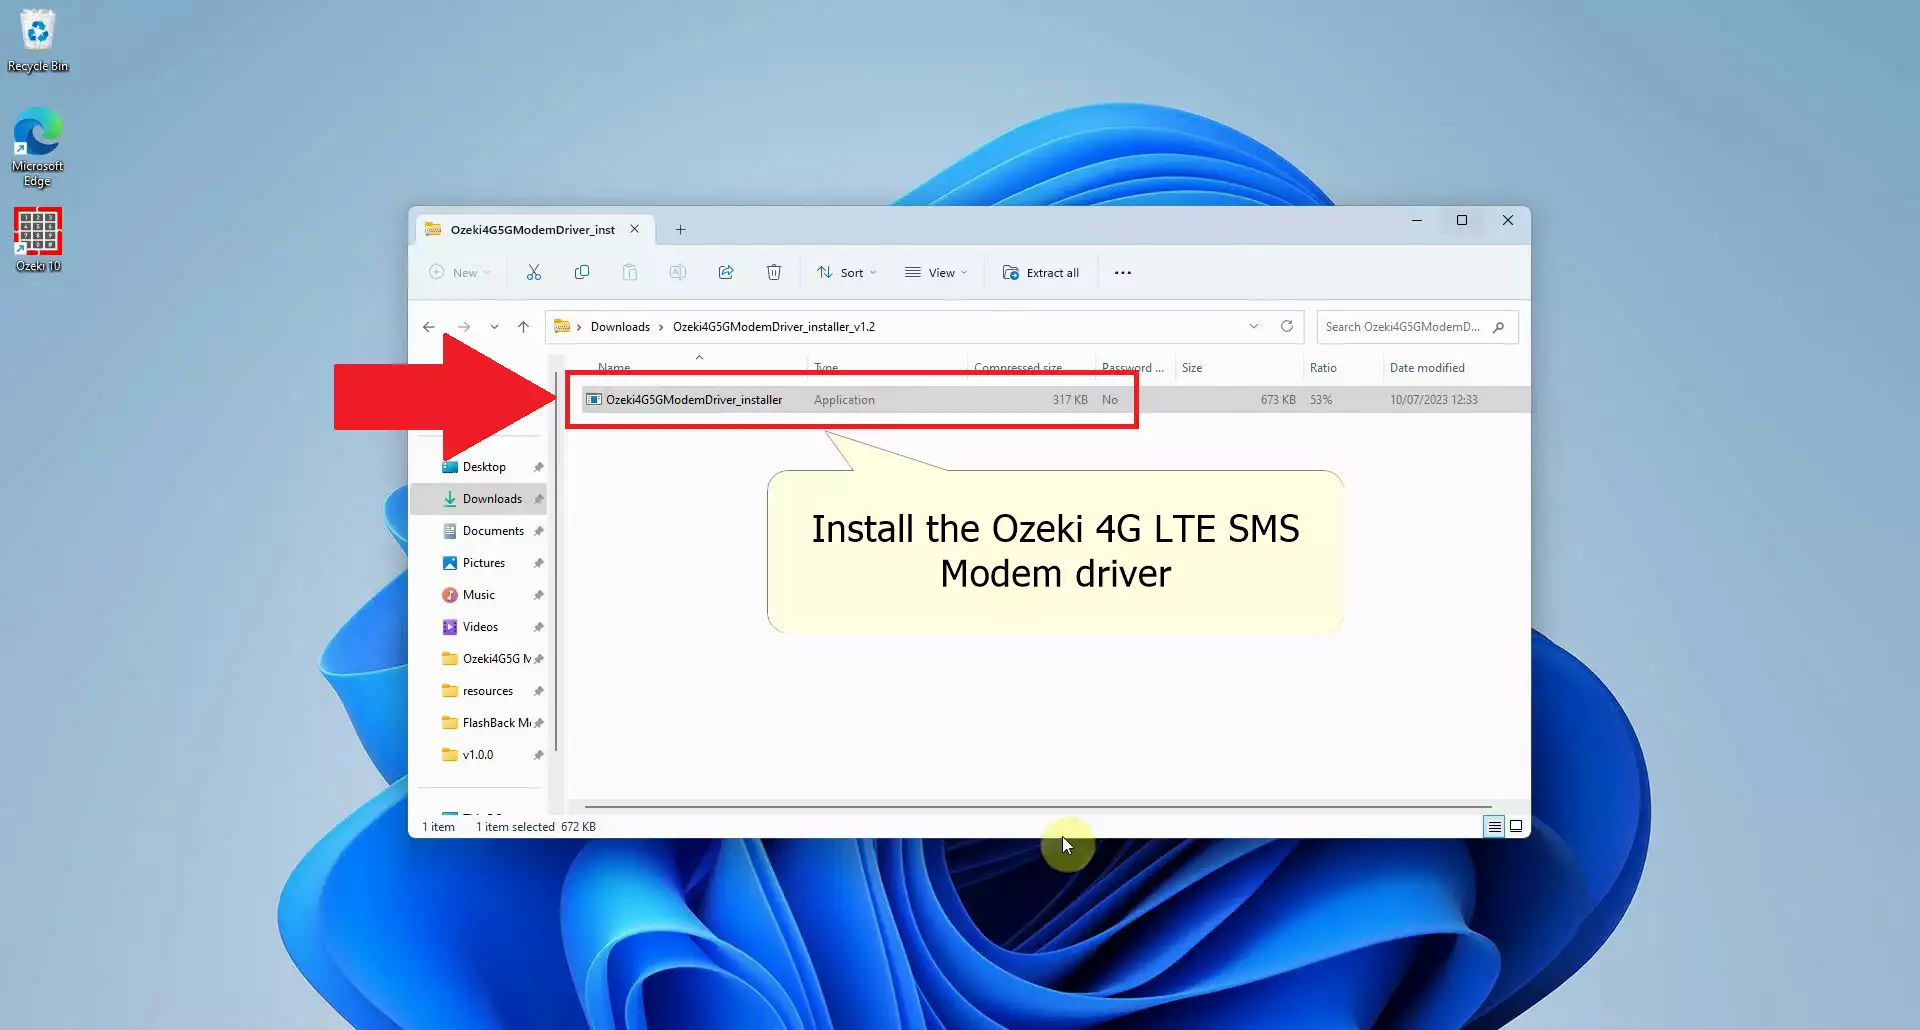
To install the Modem Driver, first open the folder where the downloaded file is located. Then, extract the downloaded files into a new folder and find the Driver Executable File within. Double-click on this file to initiate the installer. If prompted to grant Administrator rights, click on Allow. (This process is exemplified in Figure 8.)
Proceed with Installing
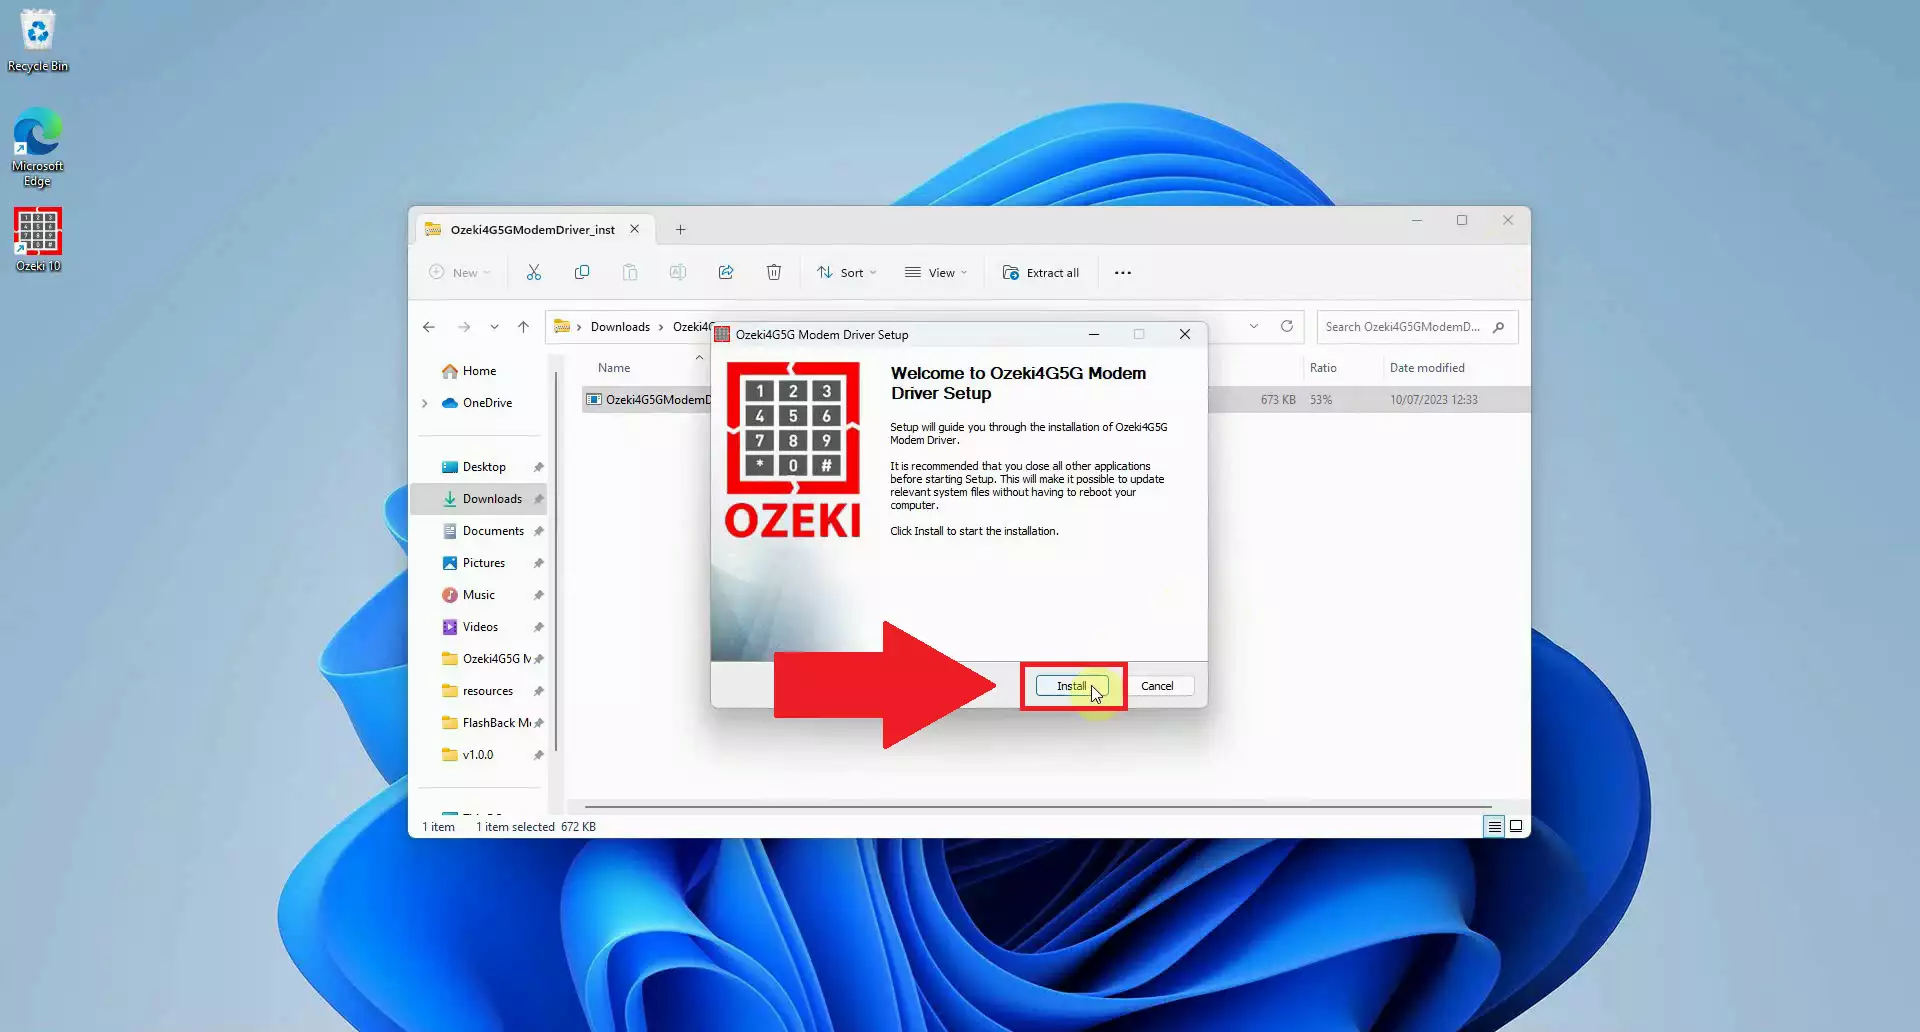
To begin the driver installation process, once the installer window is open, click on the Install button and patiently wait for the process to complete. Once the installation is finished, click on the Finish button to conclude the setup procedure. (This is demonstrated in Figure 9.)
Open Ozeki SMS Gateway App in Ozeki Software Platform
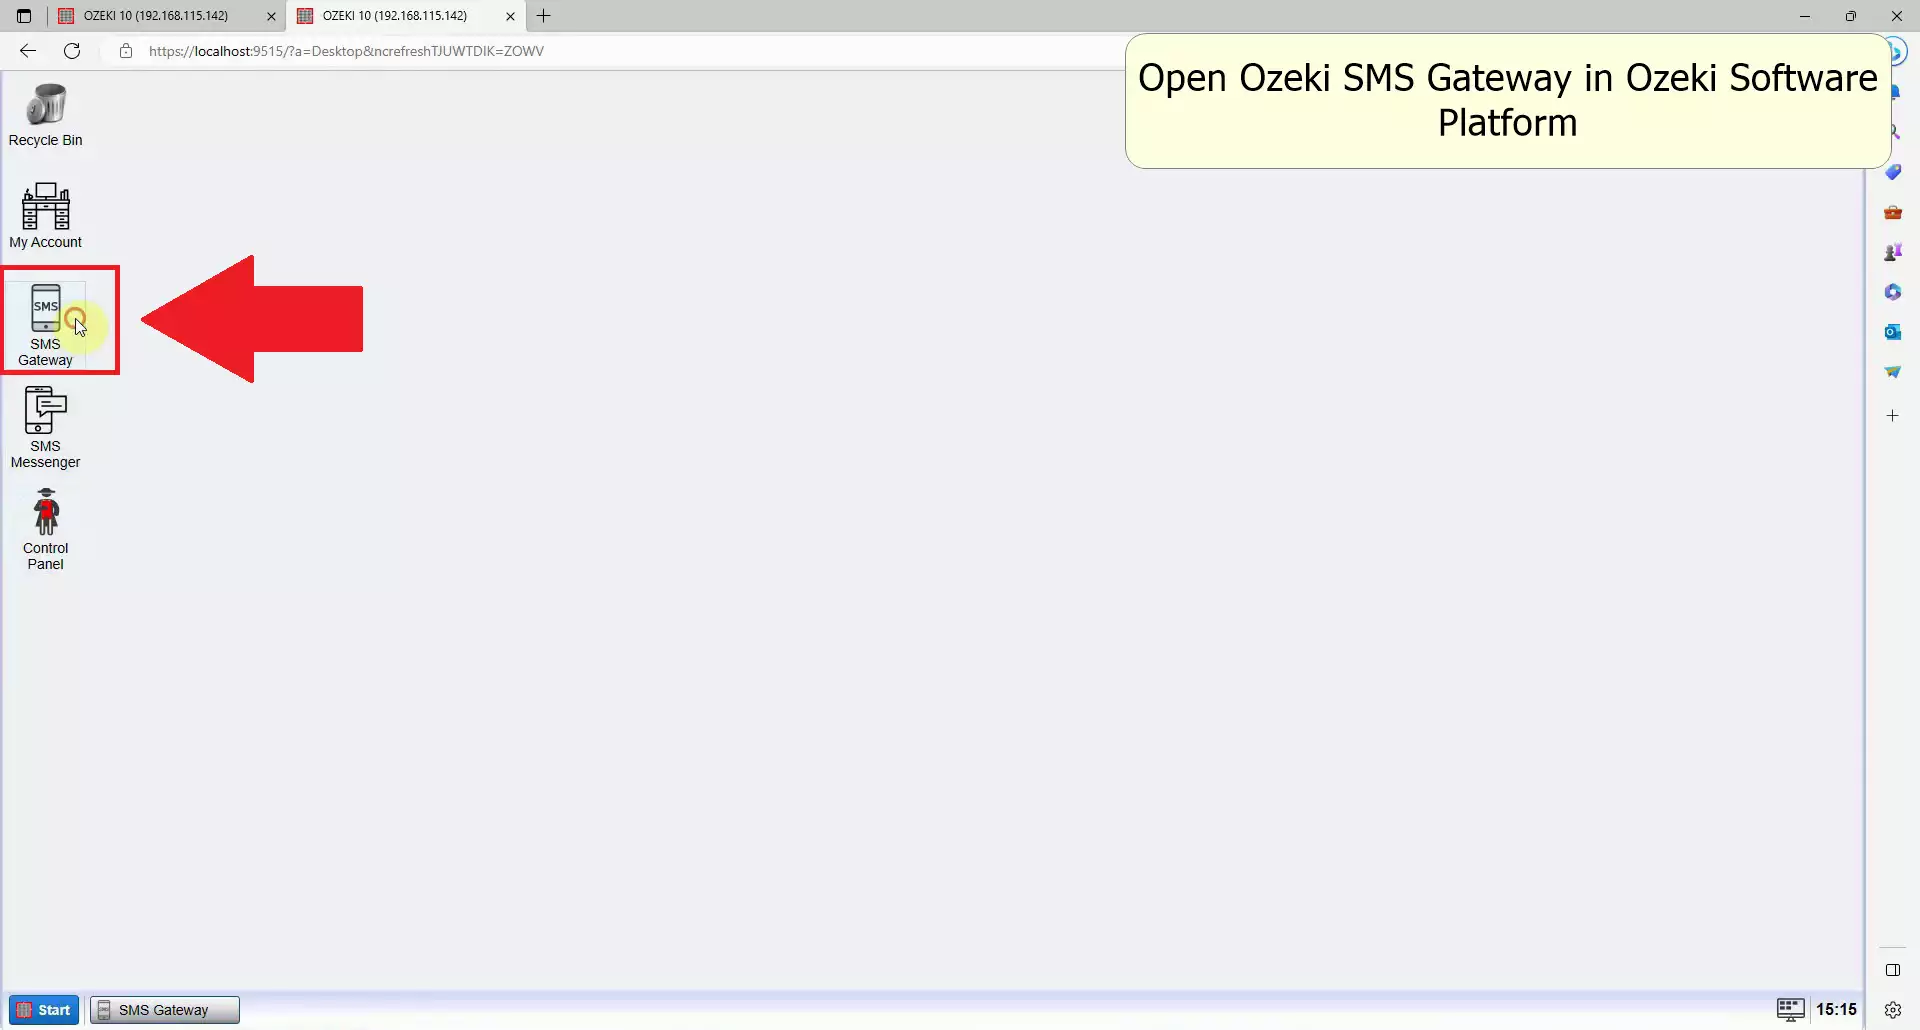
To access the Ozeki Software Platform, you need to click on the search element in the Windows Taskbar. Type in Ozeki 10 and select the application from the search results. The software should launch within a few seconds. Once the Ozeki Software Platform is open, find and open the Ozeki SMS Gateway application. You'll typically find it among the default apps on the left side of the platform interface. Look for the icon with a phone symbol and the text SMS written inside. Clicking on this icon will open the SMS Gateway Application. (Figure 10)
if you have not yet downloaded Ozeki Software Platform, you can download it here: Ozeki Installer Download Page
Add a new connection
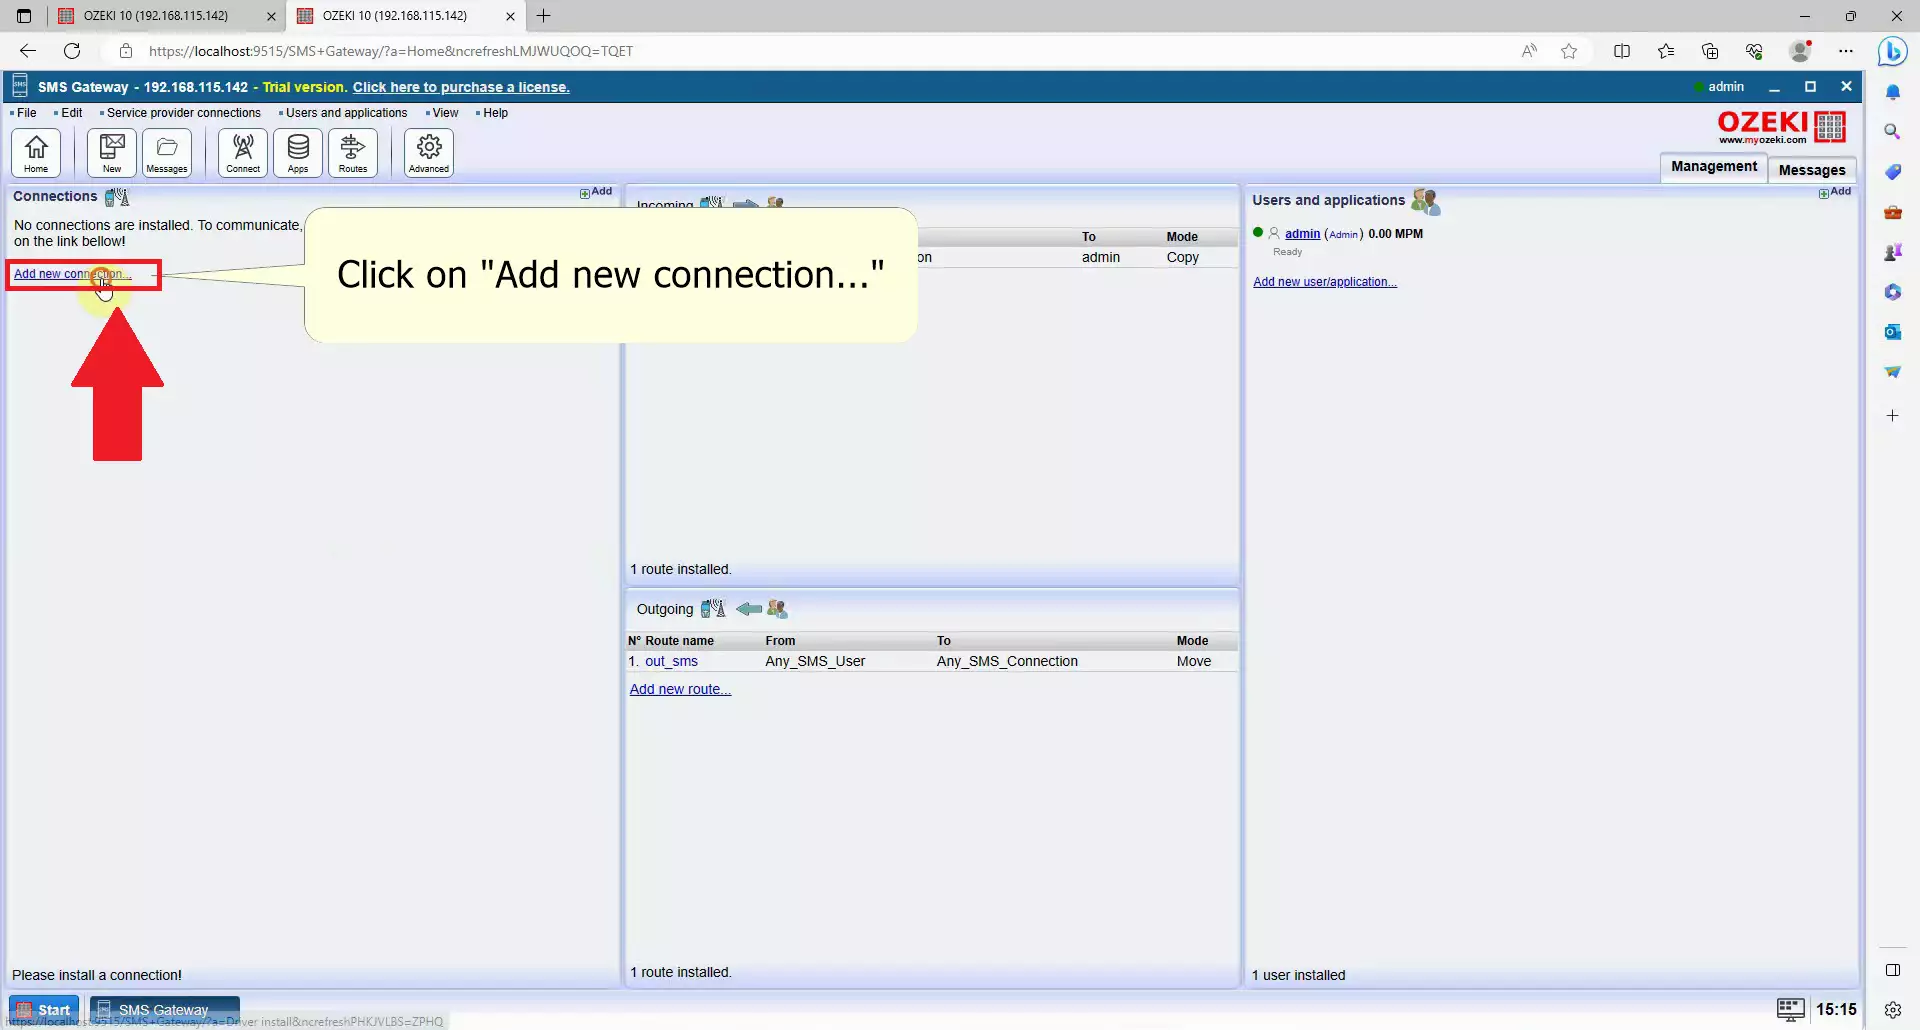
To create a new connection in Ozeki SMS Gateway, locate the add new connection link in the left-side Connections panel. Click on this link, which will open the connection list page. Here, you'll have the option to set up an SMS modem connection. (As you can see on Figure 11)
Install a new SMS Modem
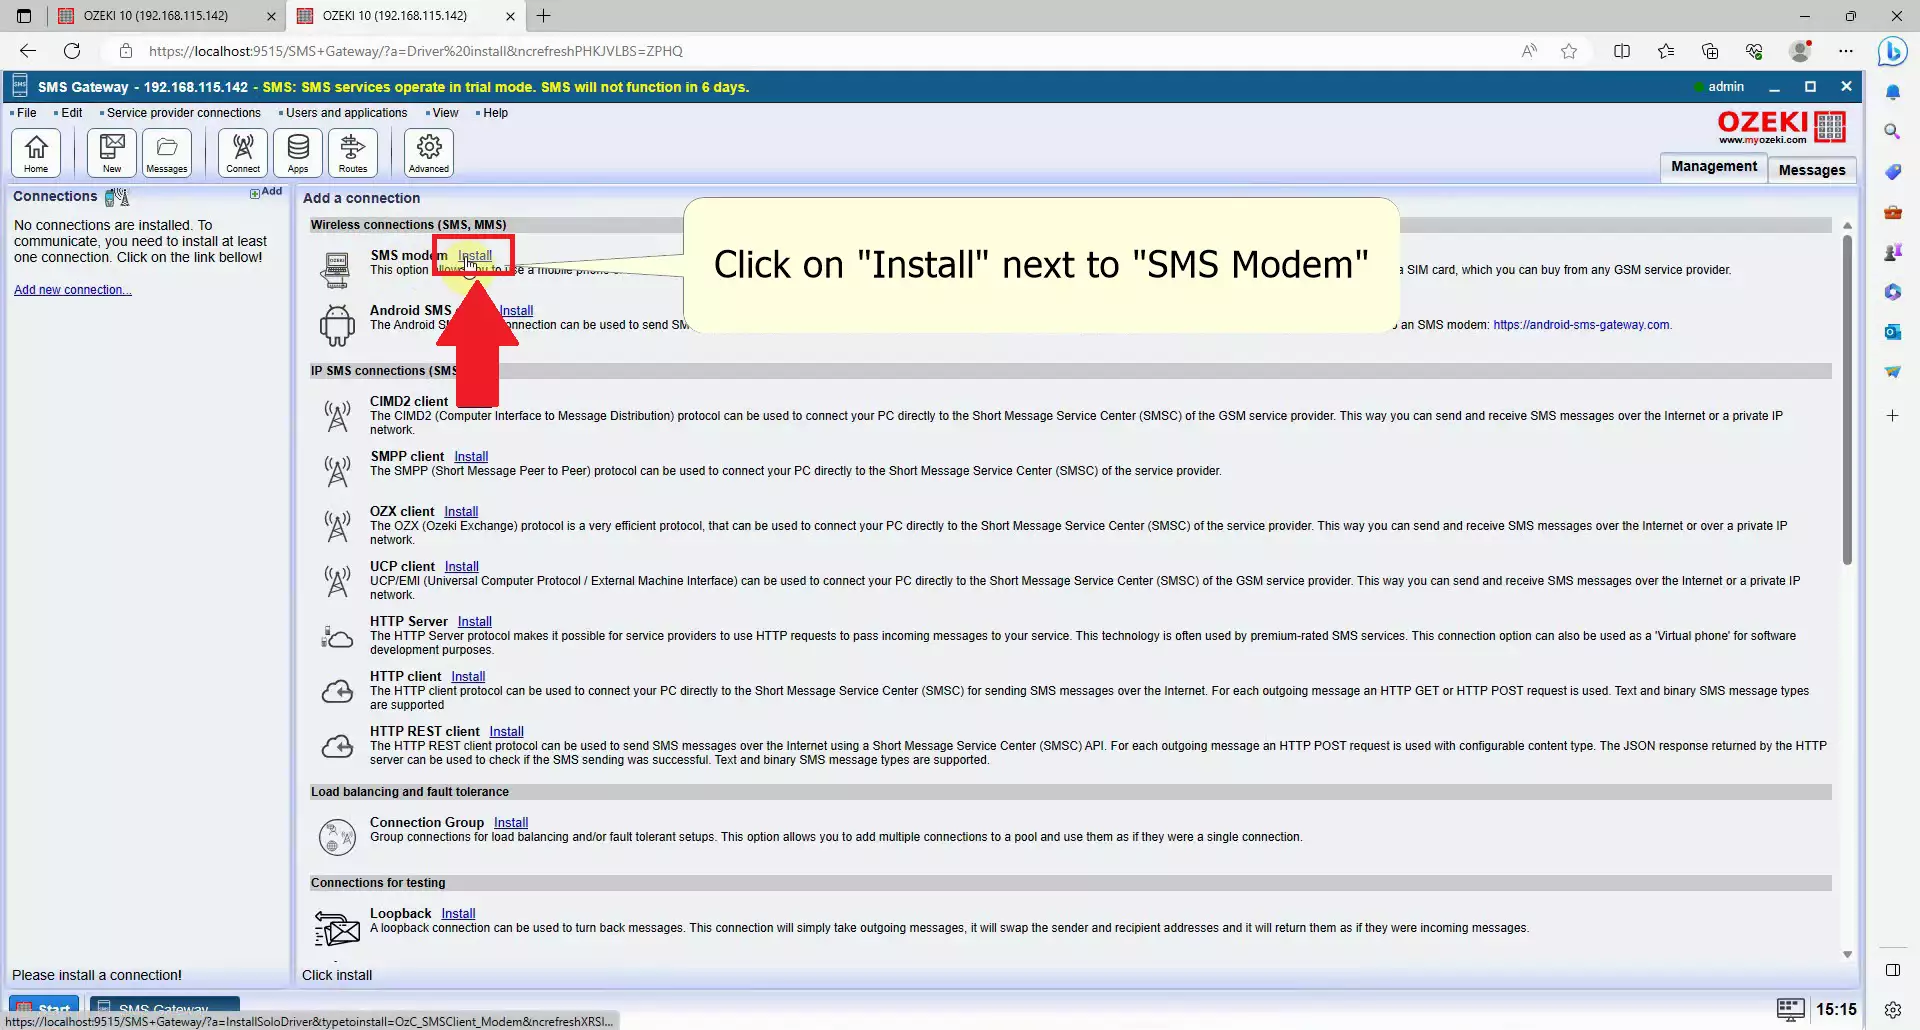
In the following window, you will see a list of available connections that you can create within the SMS Gateway application. Look for the section related to wireless connections and find the SMS modem install item. Click on the Install link next to it. This action will enable you to use the selected modem with Ozeki SMS Gateway. (Demonstrated in Figure 12)
Select the Port
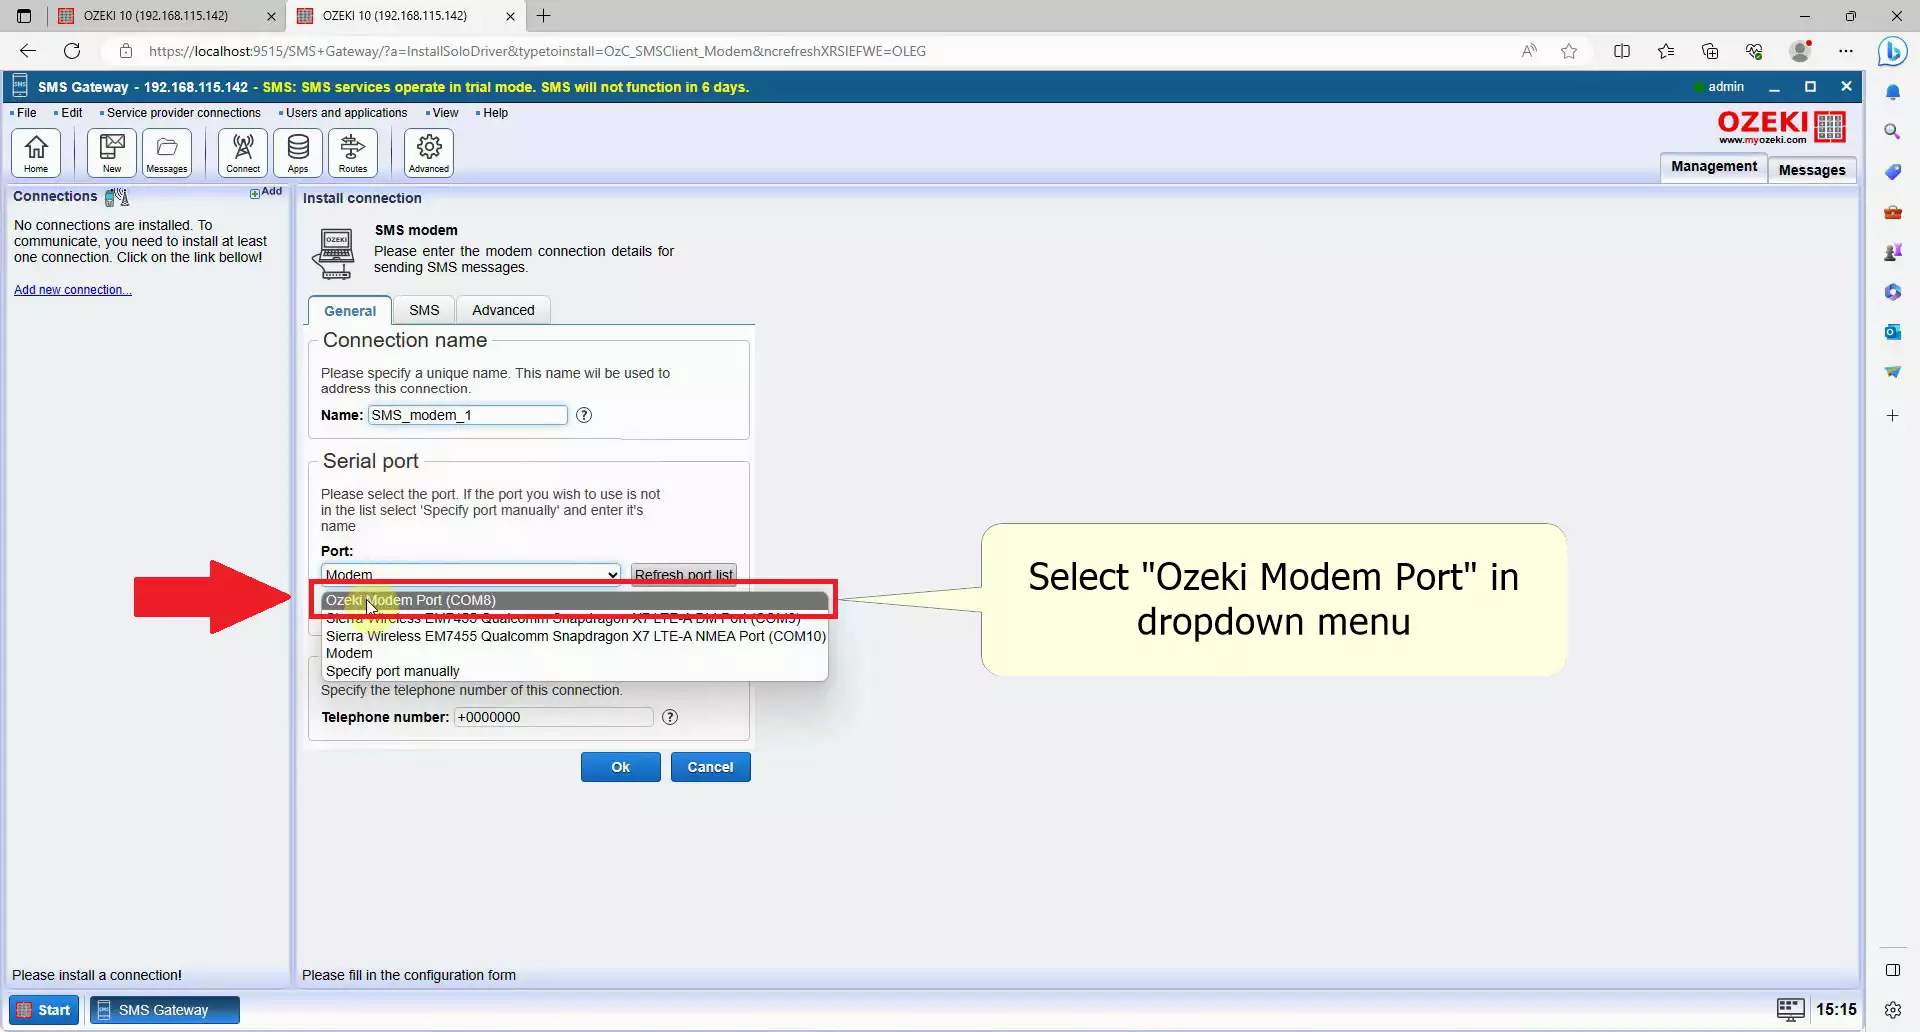
In the Serial port section, open the Port dropdown menu and locate the entry labelled Ozeki Modem Port. Select this option to initiate the configuration process for the modem, allowing you to send messages via the 4G network. (Figure 13)
Autodetect properties
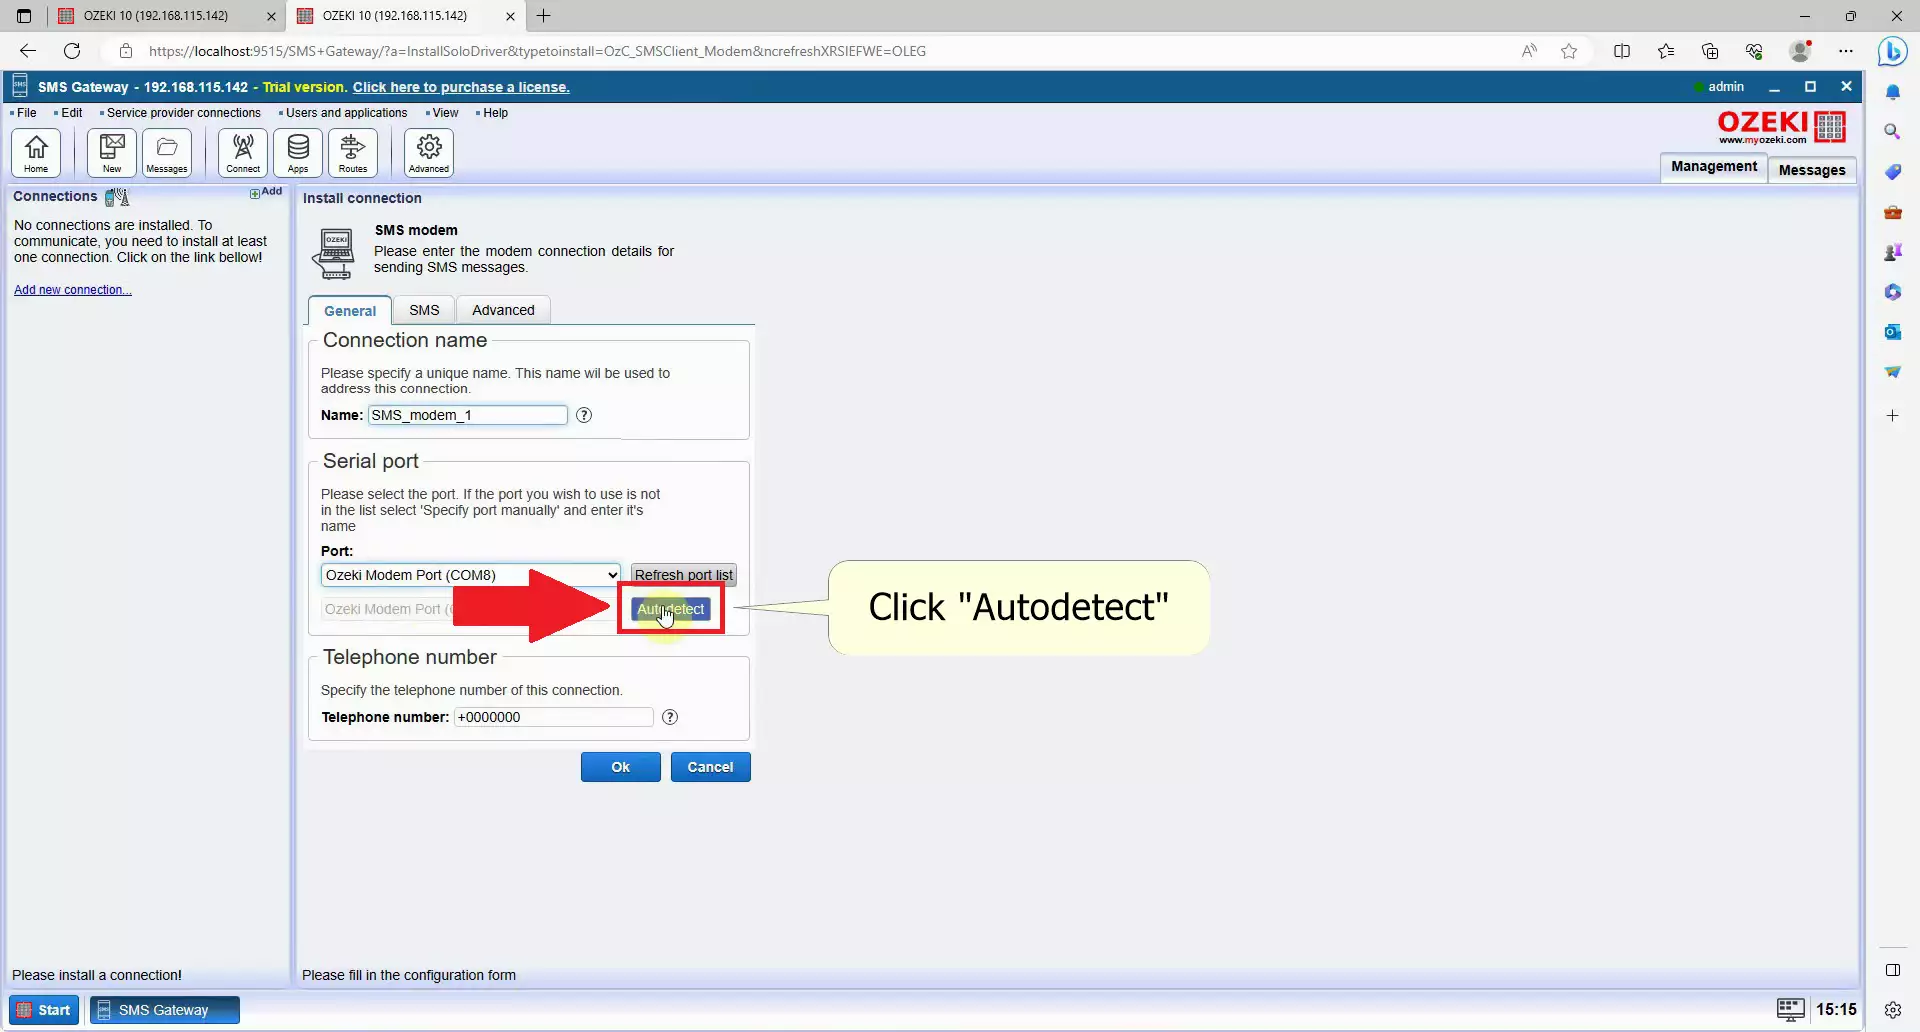
Located next to the dropdown menu, there is a blue button with the text Autodetect. Click on this button to trigger an automatic data retrieval process from your SIM card. This process includes obtaining information such as your phone number and configuring it for use. Please note that this process may take a few seconds to complete. (Figure 14)
Check the information
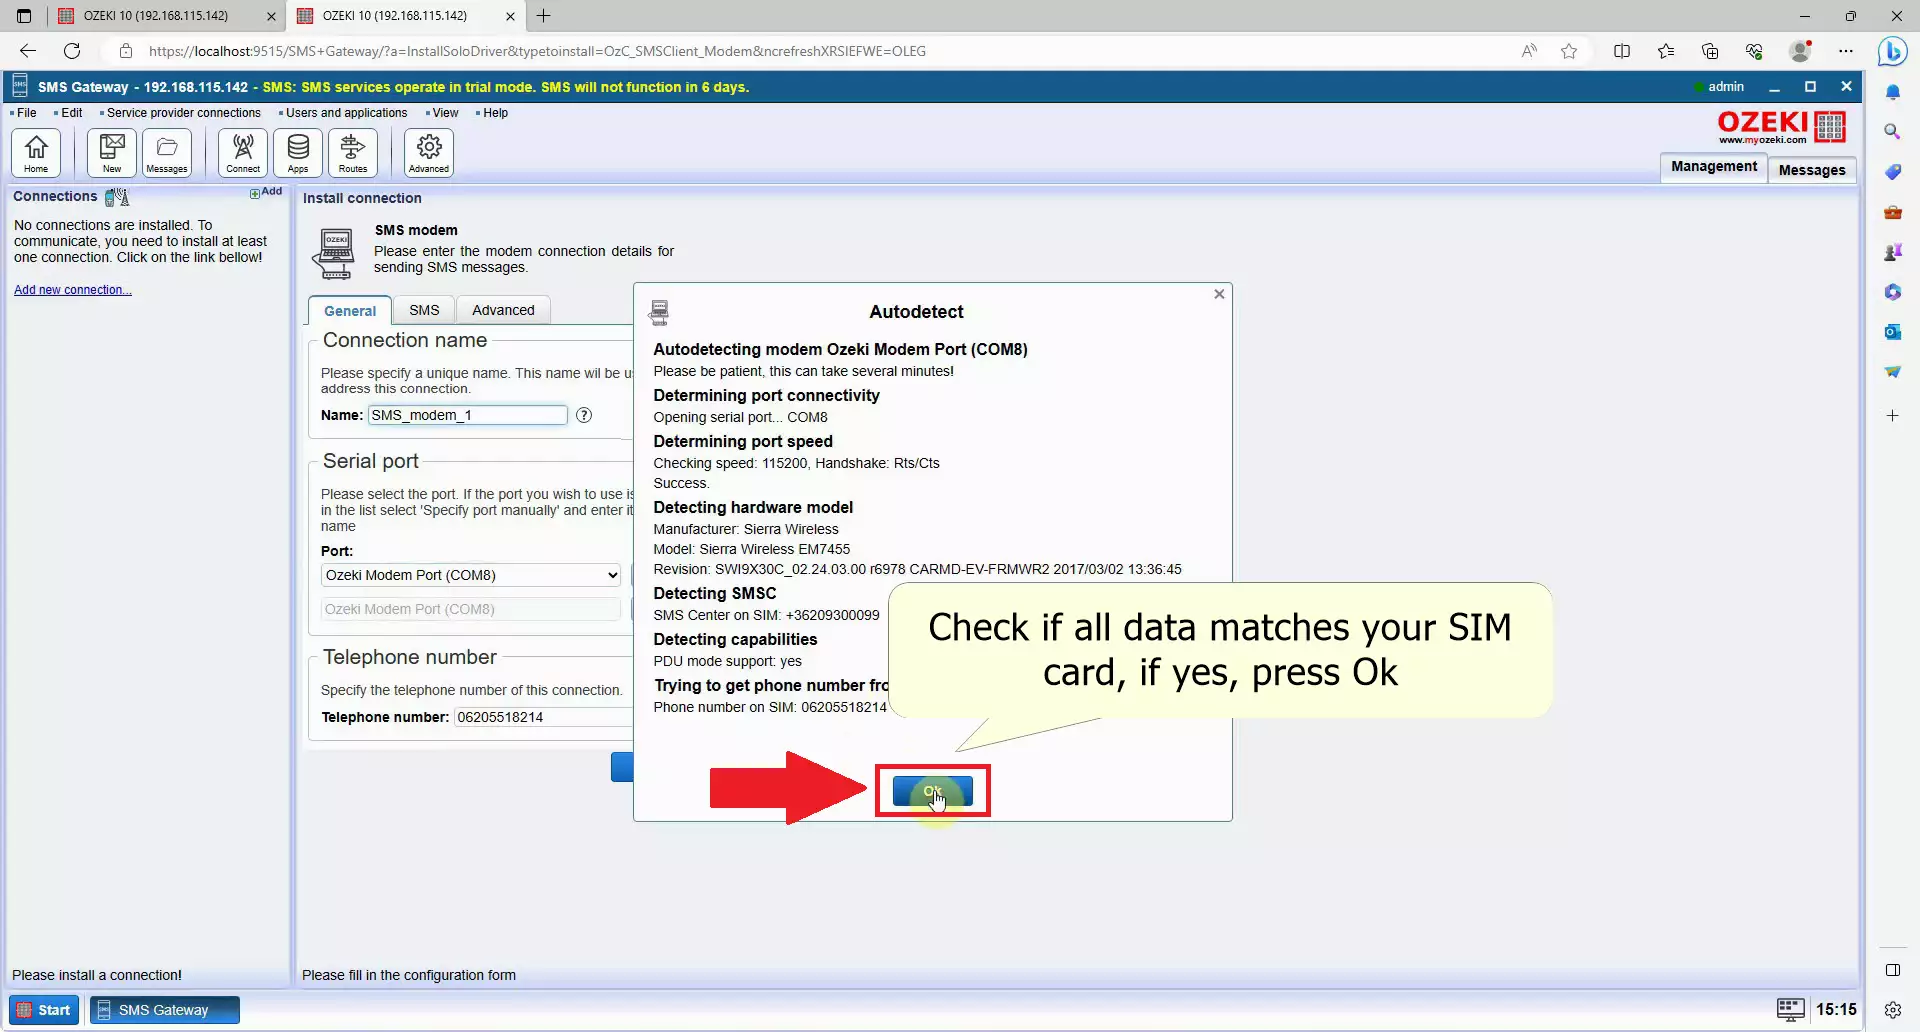
After clicking on the Autodetect button, a window named Autodetect will appear. In this window, carefully review all the details to ensure that they match the information from your SIM card. You can also find the details of the modem displayed here. Once you have verified everything, click on the Ok button located at the bottom of the window. This action concludes the Autodetect procedure and prepares your modem for sending SMS messages from your computer. (Figure 15)
Finish setting up your modem
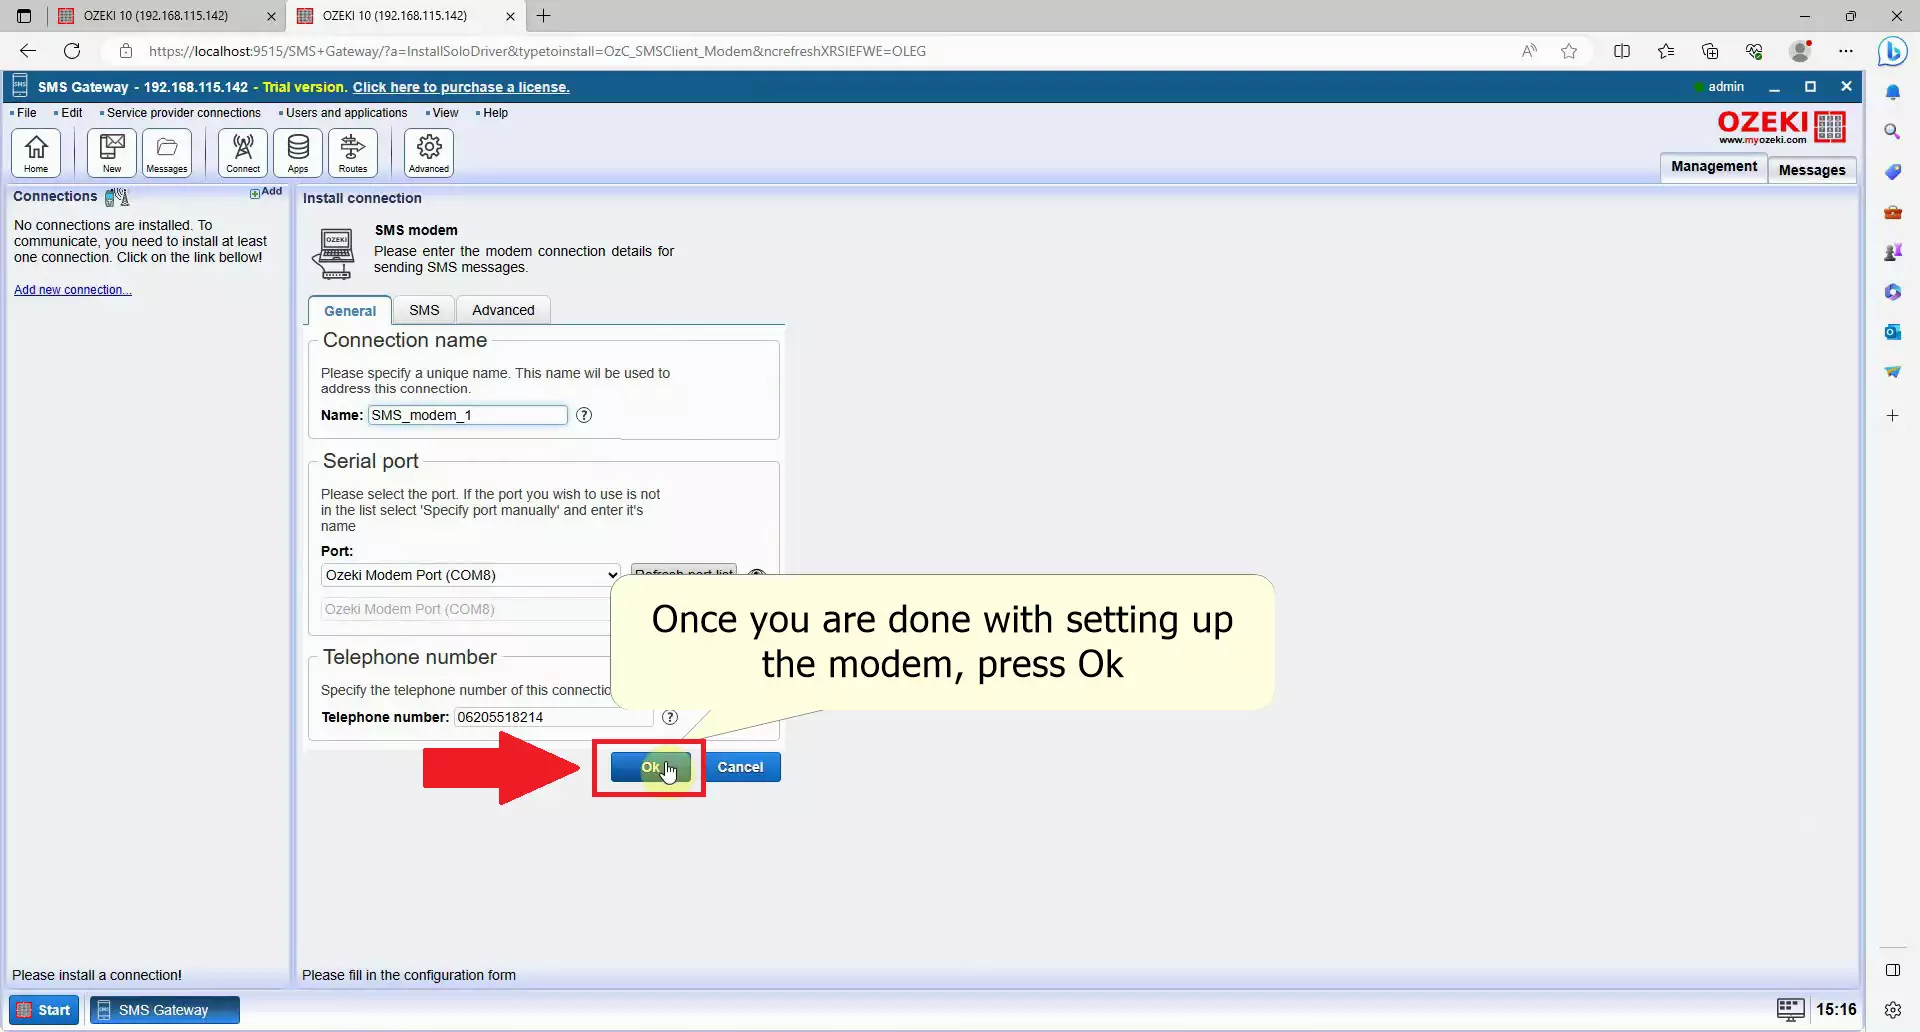
To complete the setup process for your modem, locate the blue Ok button at the bottom of the screen and click on it. If you have any additional changes you want to make to your modem settings, you can do so under the SMS tab or the Advanced tab. Alternatively, you can return to this tab later on by pressing Ok and then accessing the Configure tab. (Can be seen on Figure 16)
Enable SMS Modem Connection
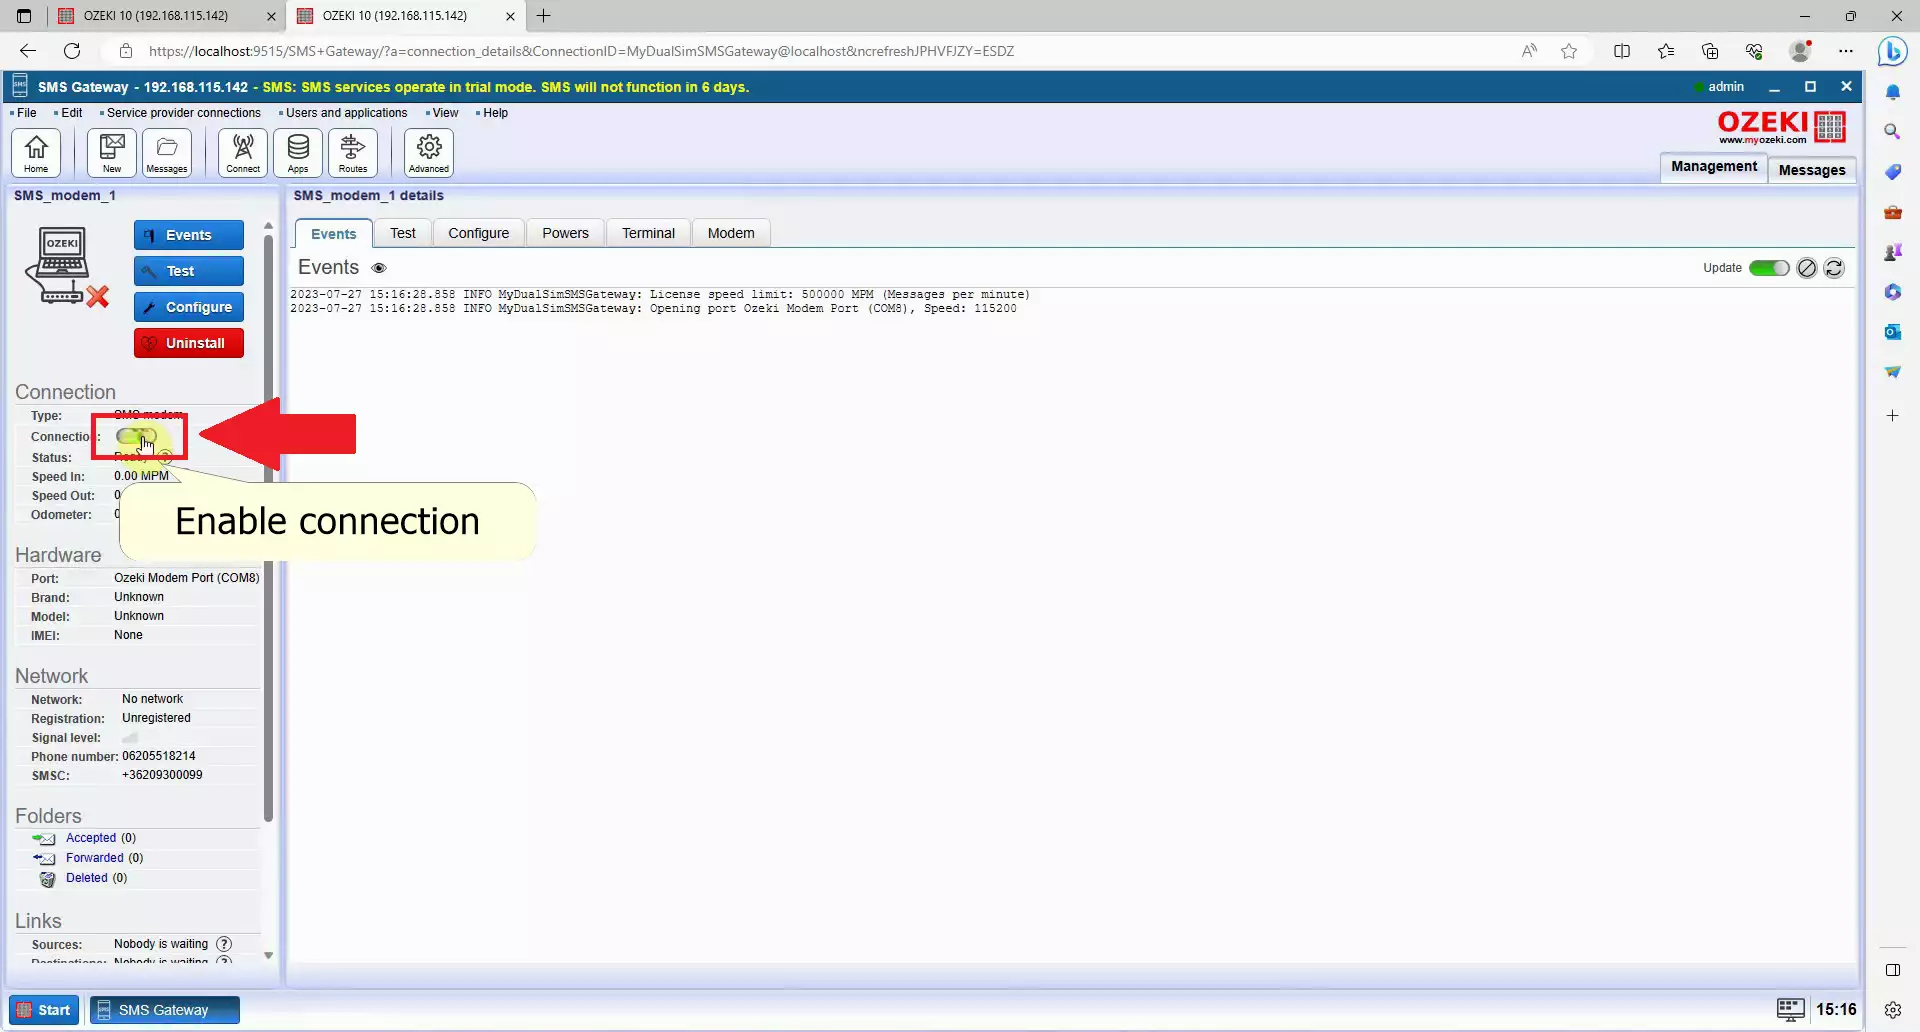
To activate the SMS modem connection, navigate to the Connection group on the left side of the screen. Locate the Connection switch, which is the second option in the group. Click on the switch to turn it on and make it green. This action will initiate the connection process between your modem and the service provider. (Figure 17)
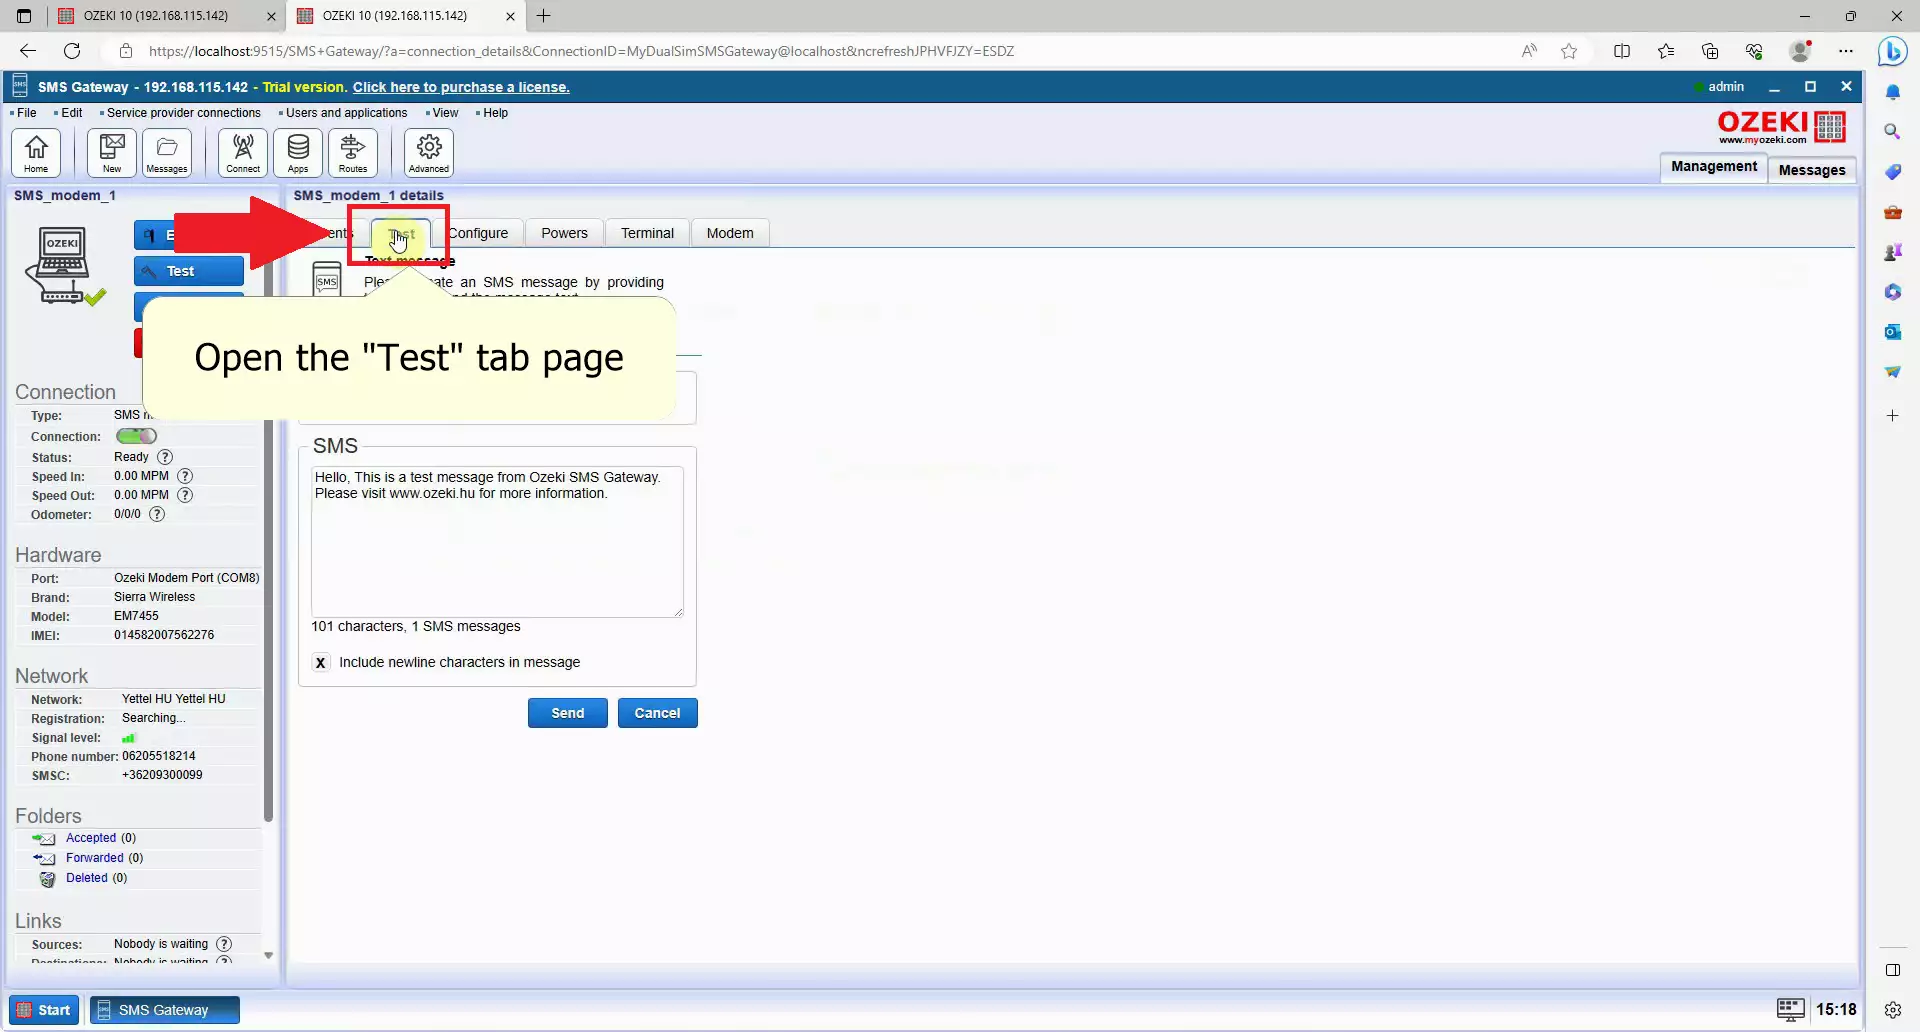
Navigate to the Test panel
To access the Test tab page, navigate to the navigation bar located in the right panel of the screen. Click on the Test option to open the Test tab page, where you can access the Test SMS sending page. From this page, you can send test messages to anyone with custom content. (Seen on Figure 18)
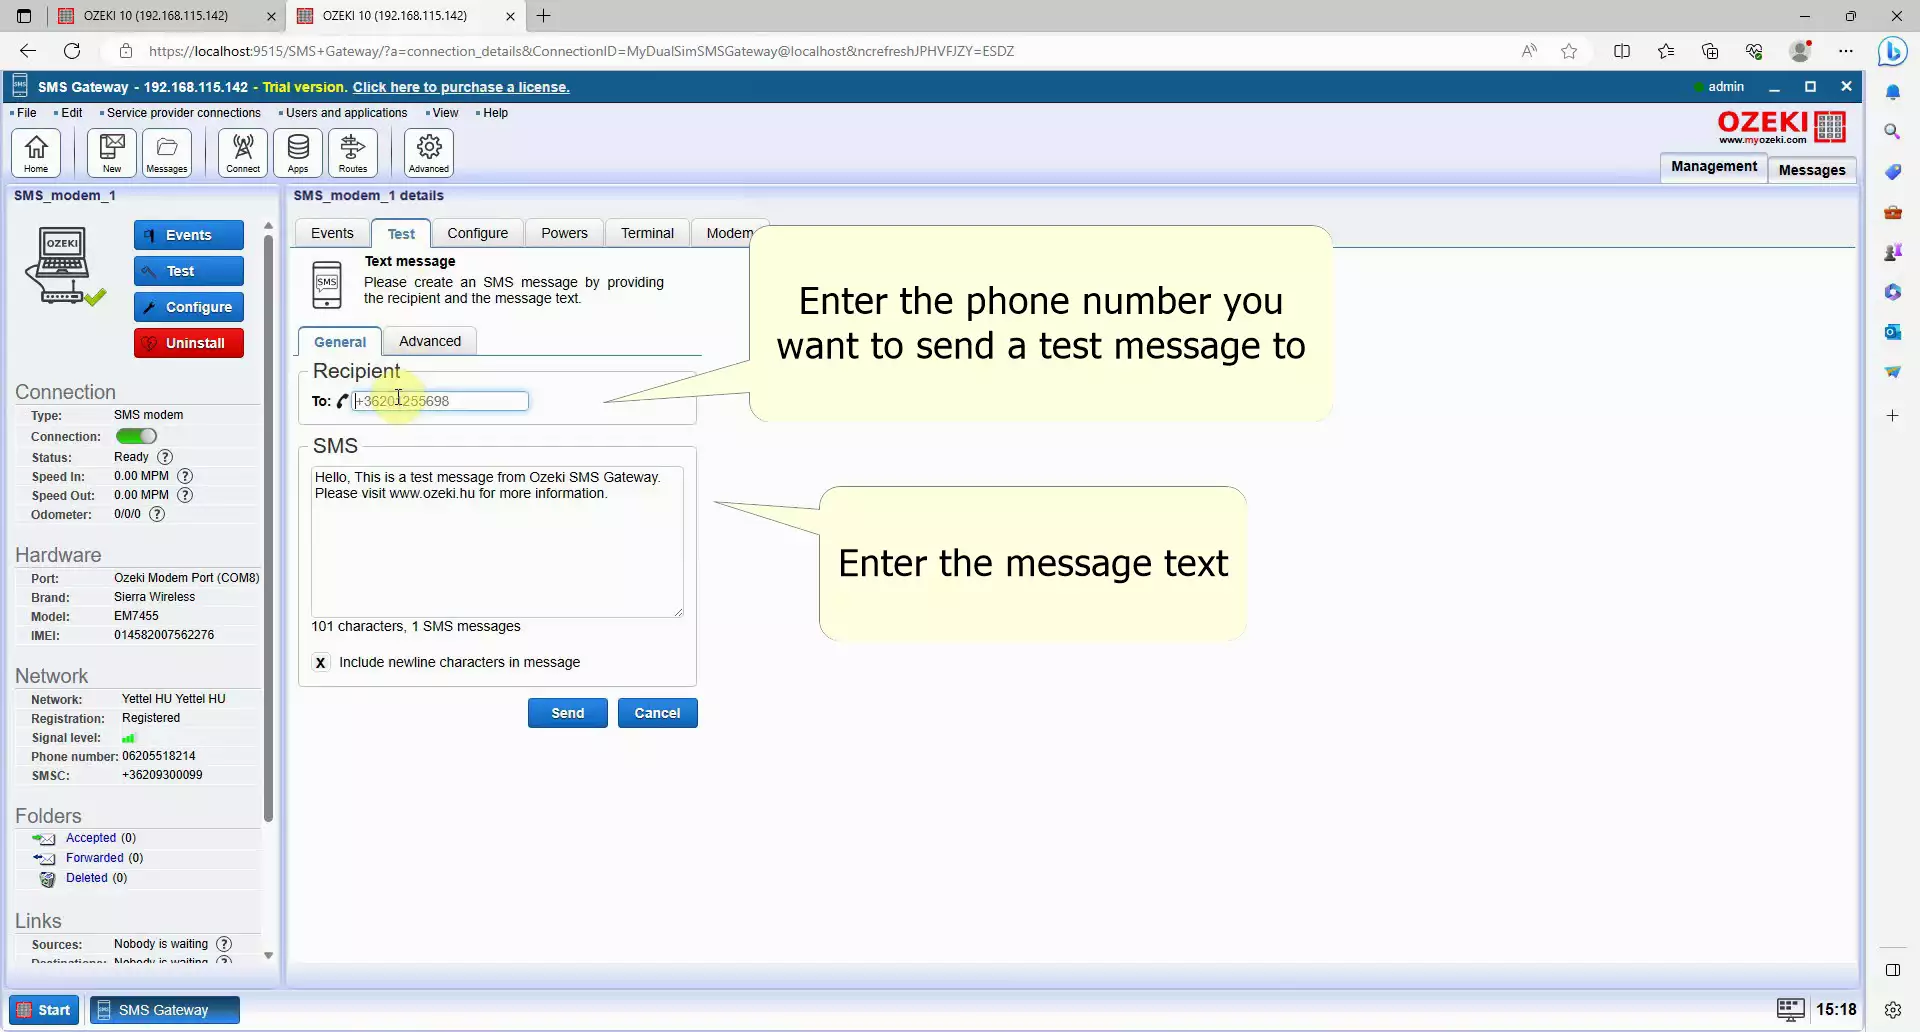
Fill the recipient's address and test message
To proceed, fill in the recipient's address and enter the test message. Locate the To field within the Recipient group, where you can input the recipient's phone number. Additionally, type your desired content into the SMS text field. Feel free to compose any message you prefer in this field. (Figure 19)
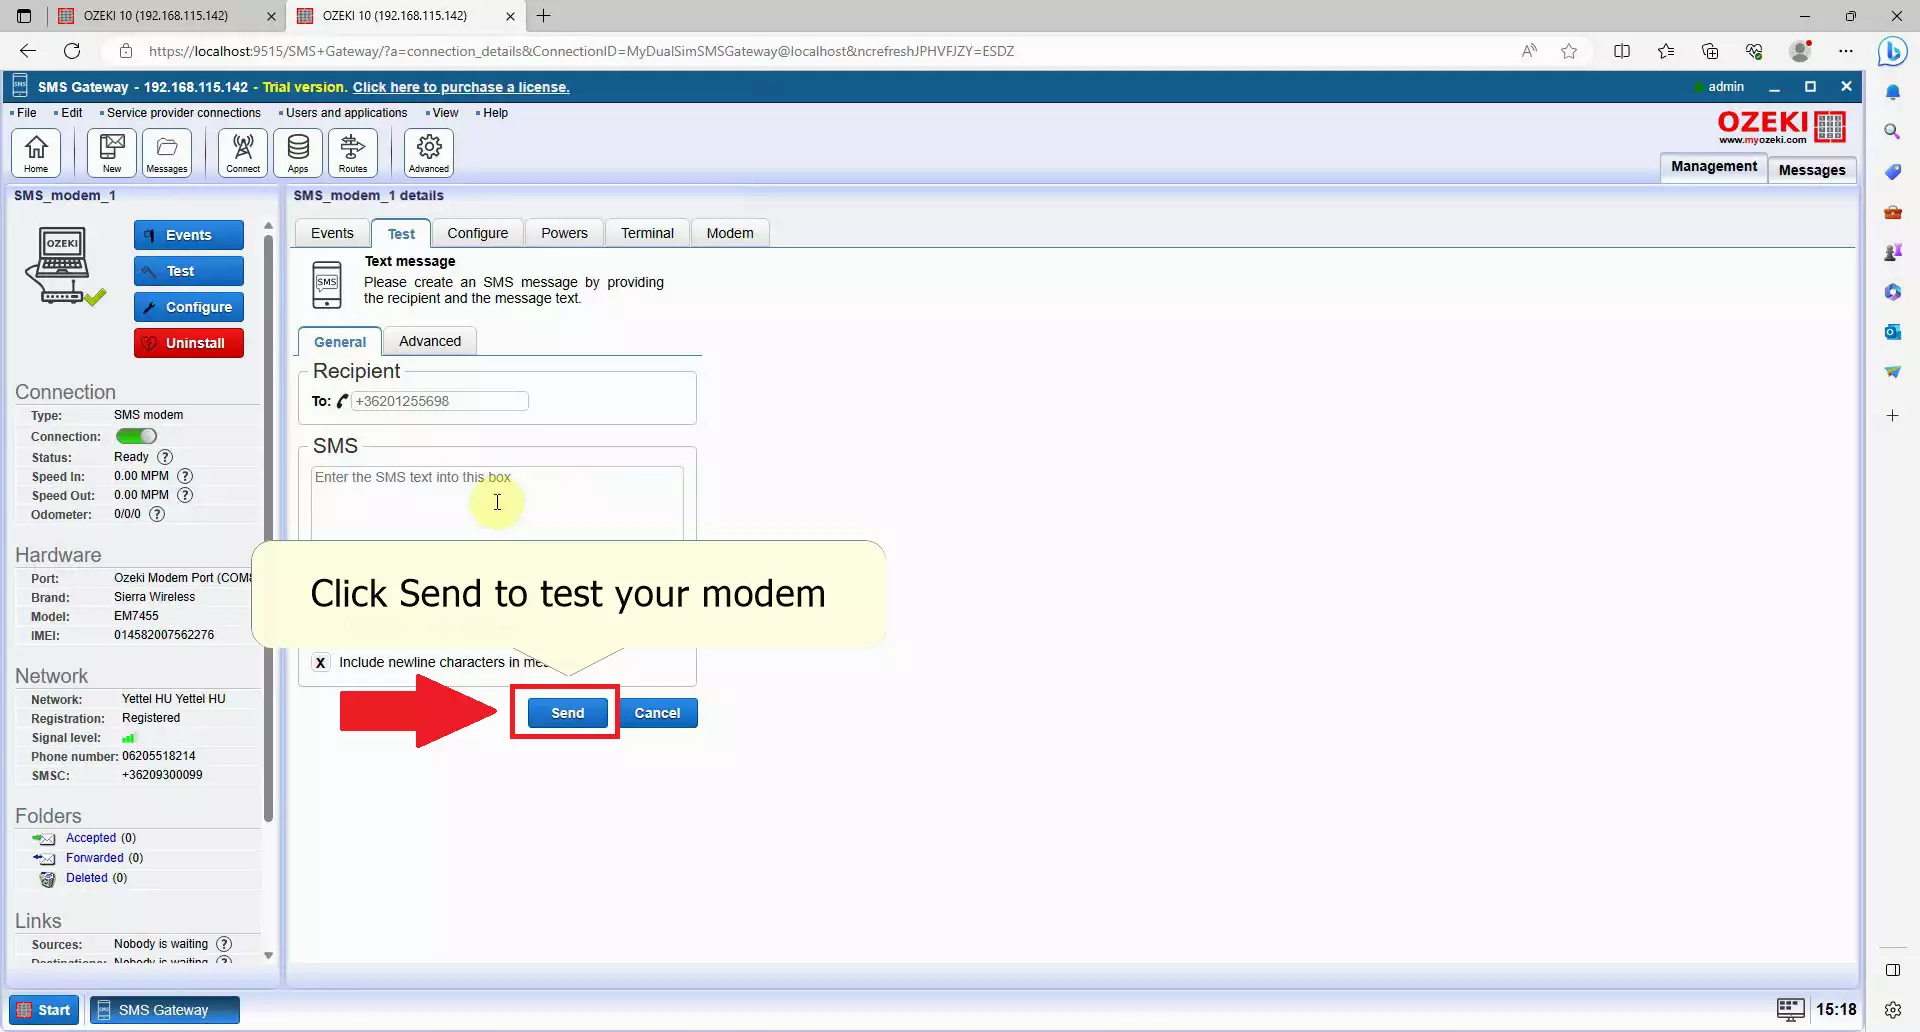
Send the SMS
Once you have completed the message composition, you can proceed to send the SMS. Locate the blue Send button situated at the bottom of the screen. Click on this button to initiate the sending process. You can expect to receive the SMS on the specified phone number shortly after sending. (Figure 20).
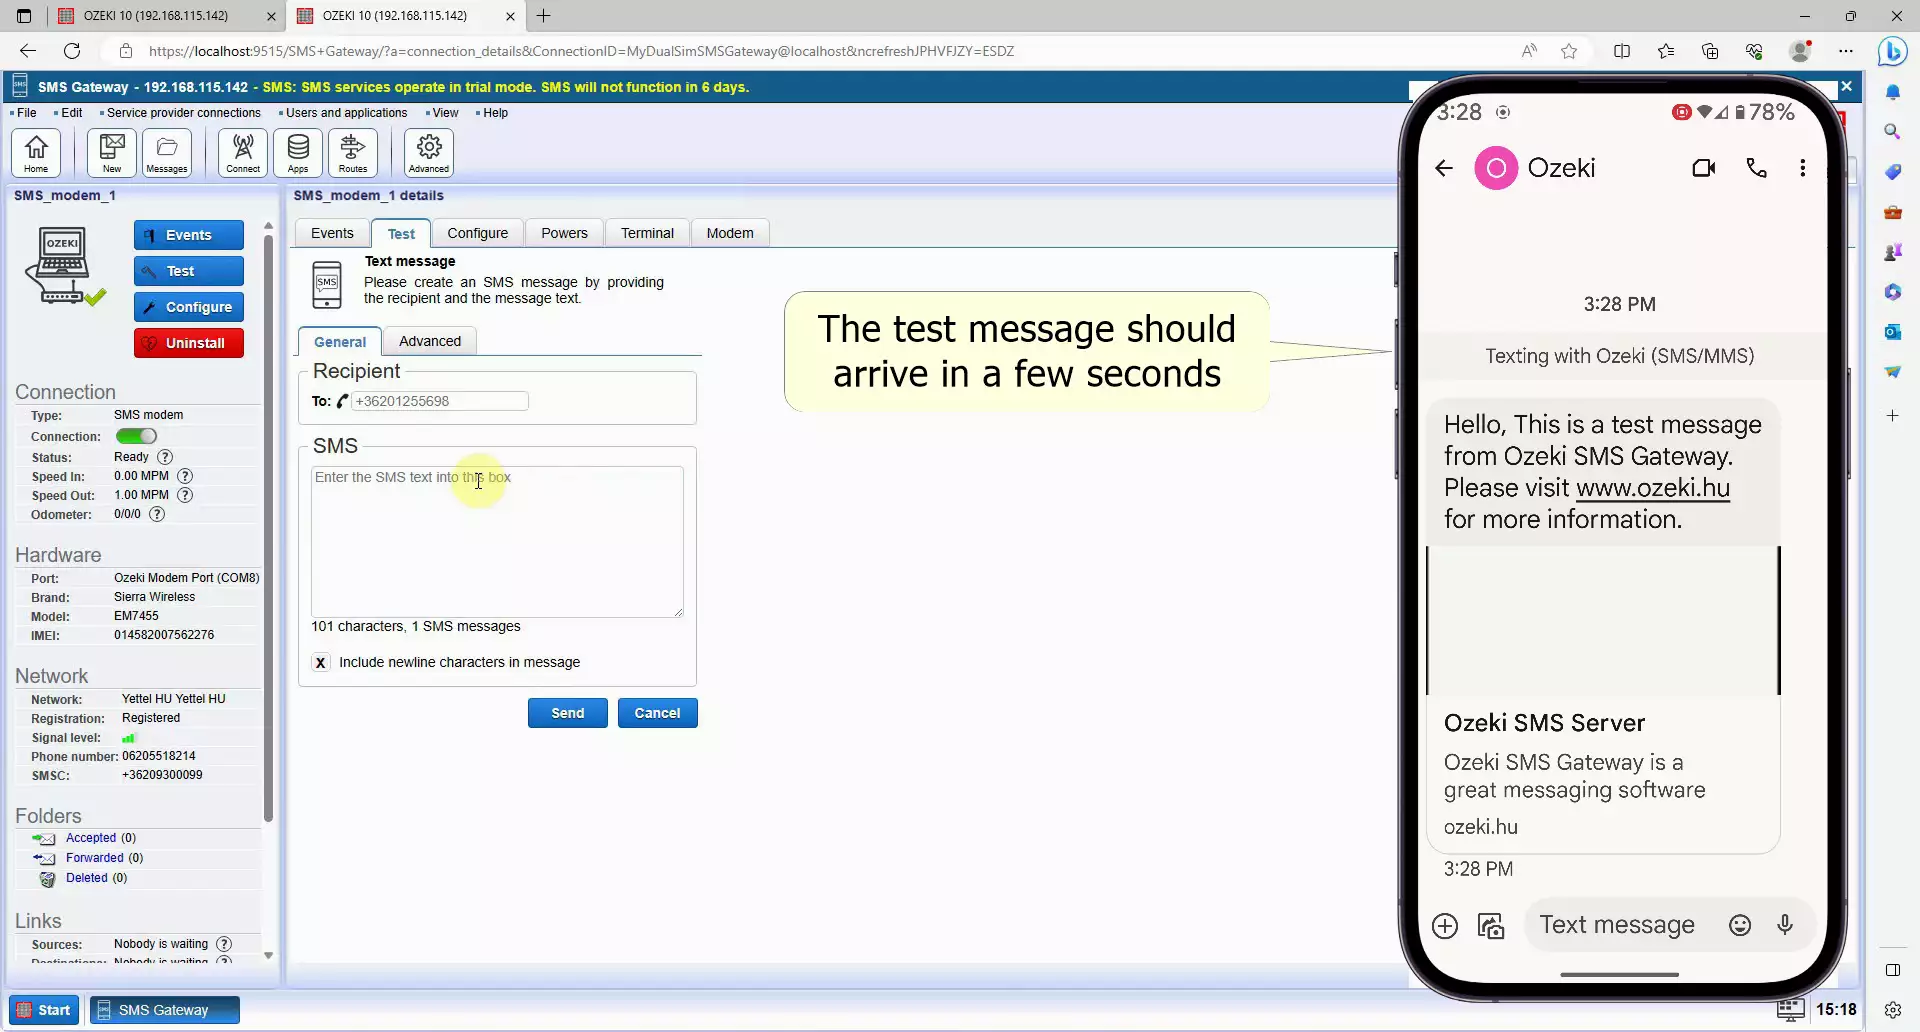
Check the test message
To ensure the successful delivery of your test message, access the SMS handling application on your mobile device. Open the application that manages SMS messages and look for the received test message. If the test message appears with the correct content, you can confidently conclude that your SMS modem is functioning as expected. Congratulations on your successful setup! (Figure 21)
Summary
The combination of Ozeki SMS Modem and Ozeki SMS Gateway offers a seamless and effective solution for sending SMS messages from your computer. This powerful setup can greatly assist your company's growth by enabling you to send automated or bulk messages. By following the provided steps, acquiring the necessary hardware and software, you'll have the capability to send SMS messages conveniently from your computer. This flexibility and efficiency can enhance your communication strategies and contribute to the expansion of your business.
