How to send multiple sms from Javascript
The simplest way to send multiple SMS from JavaScript is to use the built in HTTP/Rest SMS api of Ozeki SMS Gateway. When you use this API, you will send SMS messages by issuing a HTTP Post request to the SMS gateway. The HTTP Post request will contain a message formatted in json format. The SMS gateway will send this SMS to the recipient phone, and it will return a HTTP 200 OK response to your request.

JavaScript code to send multiple sms to mobile
The JavaScript sms code sample below demonstrates how you can send multiple SMS messages using the http rest sms api of Ozeki SMS Gateway using the JavaScript Ozeki.Libs.Rest library. This library is provided to you free of charge, and you may use it and modify it in any of your projects.
SendMultipleSms.php
<?php
    header("Access-Control-Allow-Origin: *");
    header('Access-Control-Allow-Credentials: true');
    header('Access-Control-Max-Age: 86400');
    header("Access-Control-Allow-Headers: Authorization, Accept, Content-Type");
    header("Access-Control-Allow-Methods: GET, POST, OPTIONS");
?>

<!DOCTYPE html>
<html lang="en">
    <head>
        <meta charset="UTF-8">
        <meta http-equiv="X-UA-Compatible" content="IE=edge">
        <meta name="viewport" content="width=device-width, initial-scale=1.0">
        <title>Send Multiple SMS with Ozeki SMS Gateway</title>
        <link href="https://cdn.jsdelivr.net/npm/bootstrap@5.0.2/dist/css/bootstrap.min.css" rel="stylesheet" integrity="sha384-EVSTQN3/azprG1Anm3QDgpJLIm9Nao0Yz1ztcQTwFspd3yD65VohhpuuCOmLASjC" crossorigin="anonymous">
        <link rel="stylesheet" href="SendMultipleSms.css">
    </head>
    <body style="height: 100vh; width: 100vw; padding: 0; margin: 0;">

        <div class="form-group form-container">
            <b>ToAddress:</b>
            <input class="form-control" type="text" id="ToAddress" placeholder="+36201111111">
            <b>Text:</b>
            <input class="form-control" type="text" id="Text" placeholder="Hello world!">
            <button class="btn btn-primary" id="btnAdd">
                <b>ADD</b>
            </button>
            <div class="card messages-container">
                <ul class="list-group log" id="message_container">
                    <li class="list-group-item"><b>Messages:</b></li>
                </ul>
            </div>
            <button class="btn btn-primary" id="btnSend">
                    <b>SEND</b>
            </button>
        </div>

        <div class="card log-container">
            <ul class="list-group log" id="container">
                <li class="list-group-item"><b>Logs:</b></li>
            </ul>
        </div>

        <script type="module">
            import { Configuration, Message, MessageApi } from "./Ozeki.Libs.Rest.js";

            var messages = new Array();

            var btnSend = document.getElementById("btnSend");
            var btnAdd = document.getElementById("btnAdd");

            var configuration = new Configuration();
            configuration.Username = 'http_user';
            configuration.Password = 'qwe123';
            configuration.ApiUrl = 'http://127.0.0.1:9509/api';

            var api = new MessageApi(configuration);

            btnAdd.addEventListener("click", function() {
                if (document.getElementById("ToAddress").value != '' && document.getElementById("Text").value != '') {

                    var msg = new Message();
                    msg.ToAddress = document.getElementById("ToAddress").value;
                    msg.Text = document.getElementById("Text").value;

                    document.getElementById("ToAddress").value = '';
                    document.getElementById("Text").value = '';

                    messages.push(msg);

                    document.getElementById('message_container').innerHTML += `<li class="list-group-item">${msg}</li>`;
                }
            });

            btnSend.addEventListener("click", async function() {
                let result = await api.Send(messages);

                messages = new Array();

                document.getElementById('message_container').innerHTML = `<li class="list-group-item"><b>Messages:</b></li>`;

                document.getElementById('container').innerHTML += `<li class="list-group-item">${result}</li>`;
            });
        </script>
    </body>
</html>
How to use the JavaScript sms example:
This JavaScript sms example can be used in any web application. To use it, you must add the Ozeki.Libs.Rest.js to your project. After it is added to your project, you must put the import {MessageApi, Message, Configuration} from './Ozeki.Libs.Rest.js'; directive into the header section of your JavaScript source code. This will allow you to use the classes provided by the Ozeki.Libs.Rest library. You can use the Message class to create the SMS. You can use the MessageApi class to send the SMS to the SMS gateway. The SMS gateway will forward your message to the mobile network either through a wireless connection or through the Internet.
Download SendMultipleSms.js
The source code explained in this article can be downloaded and used and modified free of charge.
Download: SendMultipleSms.js.zip (5.62Kb)
What is in the SendMultipleSms.js.zip file?
The SendMultipleSms.js.zip file contains the Ozeki.Libs.Rest library, which gives you all the tools necessary to send and receive SMS messages. You will also find the SendMultipleSms project in the zip, which contains the example code to show you how to send an SMS. This example code is listed below.

How to send SMS from JavaScript (Simple guidelines)
To send SMS from JavaScript:
- Install a HTTP API user
- Enable Log communication events on the Advanced tab
- Setup WampServer
- Download then extract the SendMultipleSms.js.zip file
- Put the contents of the zip file into the \www\ folder of the wampserver: C:\wamp64\www
- Launch Ozeki SMS Gateway app
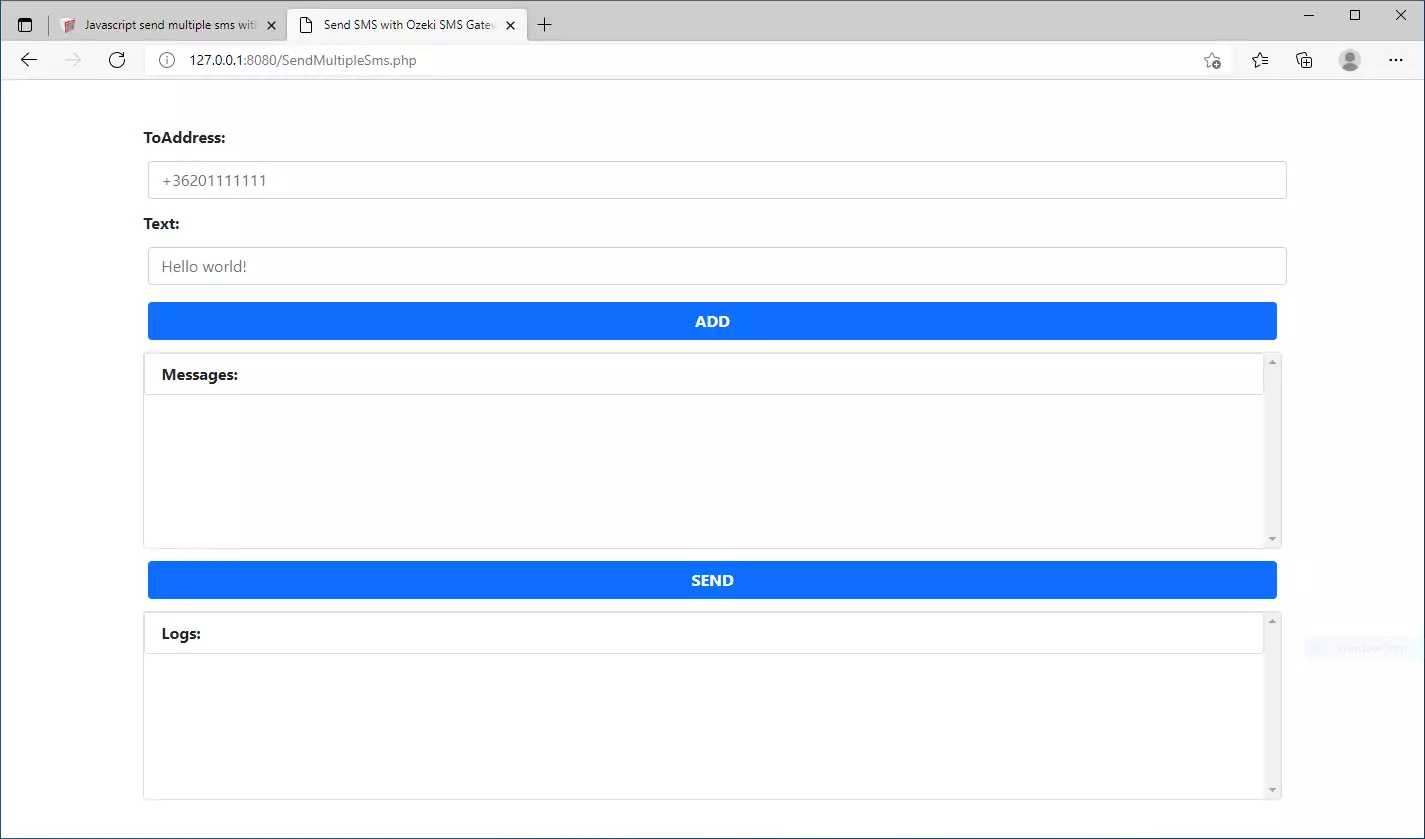
- Open the website by typing http://localhost/SendMultipleSms.php into your browser
- After you have opened the website, you can send an SMS by clicking on the Send button
- Check the logs to see if the SMS sent
Install Ozeki SMS Gateway and create an HTTP API user
To be able to send SMS from JavaScript, first you need to install Ozeki SMS Gateway. The SMS gateway can be installed on the same computer, where you develop your JavaScript code in Visual studio. After installation, the next step is to connect Ozeki SMS Gateway to the mobile network. You can send a test sms from the Ozeki GUI to verify, that your mobile network connection works. The final step to prepare your environment is to create a HTTP sms api user. Create a user with a username of "http_user", and with a password of "qwe123" to make the example work without modification.
After the environment is setup, you can run your JavaScript code.
HTTP API url to use send sms from JavaScript
To send SMS from JavaScript, your JavaScript will have to issue an HTTP request to the SMS gateway. The API url is shown below. Note that the IP address (127.0.0.1) should be replaced to the IP address of your SMS gateway. If Ozeki SMS Gateway is installed on the same computer where the JavaScript sms application is running, this can be 127.0.0.1. If it is installed on a different computer, it should be the IP address of that computer.
http://127.0.0.1:9509/api?action=rest
HTTP authentication to use send sms from JavaScript
To authenticate the JavaScript sms client, you need to send the username and password in a base64 encoded string to the server in a HTTP request. The format used is: base64(username+":"+password). In JavaScript you can use the following code to do this encoding:
// You can find the Base64 encoder in the Ozeki.Libs.Rest.js file
var usernamePassword = username + ":" + password;
return `Basic ${Base64.encode(usernamePassword)}`;
For example, if you encode the username 'http_user' and the password 'qwe123', you will get the following base64 encoded string: aHR0cF91c2VyOnF3ZTEyMw==. To send
HTTP request header to send SMS from JavaScript
To send the SMS messages, you need to include the following lines as headers in the HTTP request. Note that we include a content type and an Authorization header.
Content-Type: application/json
Authorization: Basic QWxhZGRpbjpvcGVuIHNlc2FtZQ==
HTTP request to send SMS from JavaScript
To submit the SMS, your JavaScript application will send an HTTP request similar to the one below. Note, that this request contains a HTTP header part and a http body part. The HTTP body is a JSON encoded data string. It contains the recipient's number and the message's text.
POST /api?action=sendmsg HTTP/1.1
Connection: close
Content-Length: 1028
Content-Type: text/plain;charset=UTF-8
Accept: */*
Authorization: Basic aHR0cF91c2VyOnF3ZTEyMw==
Host: 127.0.0.1:9509
User-Agent: node-XMLHttpRequest

{
	"messages": [
		{
			"message_id":"647a34a9-a852-f5e5-8a14-0619b6ddad1d",
			"to_address":"+36201111111",
			"text":"Hello world 1",
			"create_date":"2021-07-30T11:57:10",
			"vaild_date":"2021-08-06T11:57:10",
			"time_to_send":"2021-07-30T11:57:10",
			"submit_report_requested":true,
			"delivery_report_requested":true,
			"view_report_requested":true
		},
		{
			"message_id":"d918770b-c87b-8ba5-9a4a-b01e4d0f71d0",
			"to_address":"+36202222222",
			"text":"Hello world 2",
			"create_date":"2021-07-30T11:57:21",
			"vaild_date":"2021-08-06T11:57:21",
			"time_to_send":"2021-07-30T11:57:21",
			"submit_report_requested":true,
			"delivery_report_requested":true,
			"view_report_requested":true
		},
		{
			"message_id":"9c1375ae-9295-44d9-b79a-1b661f724741",
			"to_address":"+36203333333",
			"text":"Hello world 3",
			"create_date":"2021-07-30T11:57:34",
			"vaild_date":"2021-08-06T11:57:34",
			"time_to_send":"2021-07-30T11:57:34",
			"submit_report_requested":true,
			"delivery_report_requested":true,
			"view_report_requested":true
		}
	]
}
HTTP response received by the JavaScript sms example
Once the SMS gateway receives this request, it will generate a HTTP response. The HTTP response will contain a status code, to indicate whether the SMS submit request was successful or not. It will also return a JSON encoded structure to provide you useful details about the message's submission.
HTTP/1.1 200 OK
User-Agent: OZEKI 10.3.123 (www.myozeki.com)
Content-Type: application/json; charset=utf8
Last-Modified: Fri, 30 Jul 2021 11:51:13 GMT
Server: 10/10.3.123
Transfer-Encoding: chunked

{
	"http_code": 200,
	"response_code": "SUCCESS",
	"response_msg": "Messages queued for delivery.",
	"data": {
	  "total_count": 3,
	  "success_count": 3,
	  "failed_count": 0,
	  "messages": [
	    {
	      "message_id": "647a34a9-a852-f5e5-8a14-0619b6ddad1d",
	      "from_station": "%",
	      "to_address": "+36201111111",
	      "text": "Hello world 1",
	      "create_date": "2021-07-30 11:57:10",
	      "valid_until": "2021-08-06 11:57:10",
	      "time_to_send": "2021-07-30 11:57:10",
	      "submit_report_requested": true,
	      "delivery_report_requested": true,
	      "view_report_requested": false,
	      "tags": [
	        {
	          "name": "Type",
	          "value": "SMS:TEXT"
	        }
	      ],
	      "status": "SUCCESS"
	    },
	    {
	      "message_id": "d918770b-c87b-8ba5-9a4a-b01e4d0f71d0",
	      "from_station": "%",
	      "to_address": "+36202222222",
	      "to_station": "%",
	      "text": "Hello world 2",
	      "create_date": "2021-07-30 11:57:21",
	      "valid_until": "2021-08-06 11:57:21",
	      "time_to_send": "2021-07-30 11:57:21",
	      "submit_report_requested": true,
	      "delivery_report_requested": true,
	      "view_report_requested": false,
	      "tags": [
	        {
	          "name": "Type",
	          "value": "SMS:TEXT"
	        }
	      ],
	      "status": "SUCCESS"
	    },
	    {
	      "message_id": "9c1375ae-9295-44d9-b79a-1b661f724741",
	      "from_station": "%",
	      "to_address": "+36203333333",
	      "to_station": "%",
	      "text": "Hello world 3",
	      "create_date": "2021-07-30 11:57:34",
	      "valid_until": "2021-08-06 11:57:34",
	      "time_to_send": "2021-07-30 11:57:34",
	      "submit_report_requested": true,
	      "delivery_report_requested": true,
	      "view_report_requested": false,
	      "tags": [
	        {
	          "name": "Type",
	          "value": "SMS:TEXT"
	        }
	      ],
	      "status": "SUCCESS"
	    }
	  ]
	}
}
How to send multiple SMS from JavaScript using the JavaScript sms api (Video tutorial)
This video shows you how to download the SendMultipleSms.js.zip file from this page. If watch the video, you will notice, that the contents of the SendMultipleSms.cs zip are placed into the \www\ folder of the WampServer. You will also see that we run the WampServer by clicking on its Icon twice, and after this we type http://localhost:8080/SendMultipleSms.js into the web browser.
JavaScript sms example: SendMultipleSms.js
The example code below is part of the SendMultipleSms.php PHP file.
Besides that you will see a two other files called SendMultipleSms.css, and Ozeki.Libs.Rest.js.
- The Ozeki.Libs.Rest.js file contains all the necessary tools to send, delete, mark, and receive SMS messages.
- The SendMultipleSms.php contains the javascript code, and some headers that will allow us to send HTTP requests without CORS errors.
- The SendMultipleSms.css contains the stylesheet for the webpage.
How to check that the SMS has been accepted by the HTTP user (Video tutorial)
After the SMS has been submitted, it is a good idea to check your SMS gateway, to see what it has received. You can check the log by opening the HTTP user's details from the Ozeki SMS Gateway management console. The following video shows you what to look for. The video will start with the opened code and will end with the details of the sent message. You will learn how to launch the project, what the project looks like during running and how the log file looks after it. The video is only 42 seconds long and easy to understand. You will have no problem following it.
Conclusion
This guide offers all the essential information on how to send multiple SMS messages from Javascript using the HTTP user of the Ozeki SMS Gateway. Now you can use the shown SMS API for your Javascript application and to set up an HTTP user connection in the Ozeki SMS Gateway. The created solution will be reliable and high-speed. This service can make your message sending more efficient because it allows you to deliver valuable information to more than one coworker at once.
You find many more articles to help you set up a messaging system on the Ozeki website. Make sure that you continue reading to find out how you can use Javascript SMS API for other purposes, start with How to schedule an SMS in Javascript.
Download the Ozeki SMS Gateway now. Put in practice what you have learned!