How to send SMS messages from Excel
The following guide is about to demonstrate how you can send multiple SMS messages by just one click from an Excel spreadsheet using the SMS Gateway. The guide provides a step-by-step guide which shows what components you need to set up this solution. It presents how you can establish an HTTP API connection in Ozeki SMS Gateway that can forward the messages received from the Excel document. The guide takes about ten minutes to be successfully completed and does not require any specific knowledge. So, let's get started.
Podcast
Why Send SMS from Excel?
Sending SMS messages directly from Excel can streamline your communication processes, whether for business marketing, customer notifications, or personal use. With Ozeki SMS Gateway, you can automate and manage bulk SMS sending without leaving your spreadsheet.
Requirements
- Microsoft Excel 2010 or later
- Ozeki SMS Gateway installed on your computer
- An active account with an SMS service provider
Download
Ozeki Excel Client (.xls + macro):
Download Ozeki Excel client (Ozeki.xls)
(This file contains the Excel Macro to send the SMS messages using a HTTP request to the SMS gateway)
Example message list (.xls):
Download example message list (Messages.xls)
(This is a sample Excel file with a list of phone numbers and messages to send)
How to send SMS from Excel
- Install Ozeki SMS Gateway
- Configure Ozeki SMS Gateway
- Setup Excel for Sending
- Prepare your Excel Spreadshhet
- Send SMS messages from Excel
Video tutorial on how to send SMS from Excel
In this quick video, you can learn how to send SMS messages from Excel with ease in Ozeki SMS Gateway. By following the instructions, you can send SMS messages from an Excel document with just one click. We'll walk you through the entire process from setting up the HTTP User connection to making your Excel message list to send SMS. With this step-by-step guide you will be able to send SMS messages easily.
Step 1 - Install Ozeki SMS Gateway
To get started, download and install Ozeki SMS Gateway from our official website. Follow the installation wizard to set it up on your system.
Installation instructions for Ozeki SMS Gateway on Windows
Purchase an Ozeki SMS Gateway license
Step 2 - Configure the SMS Gateway
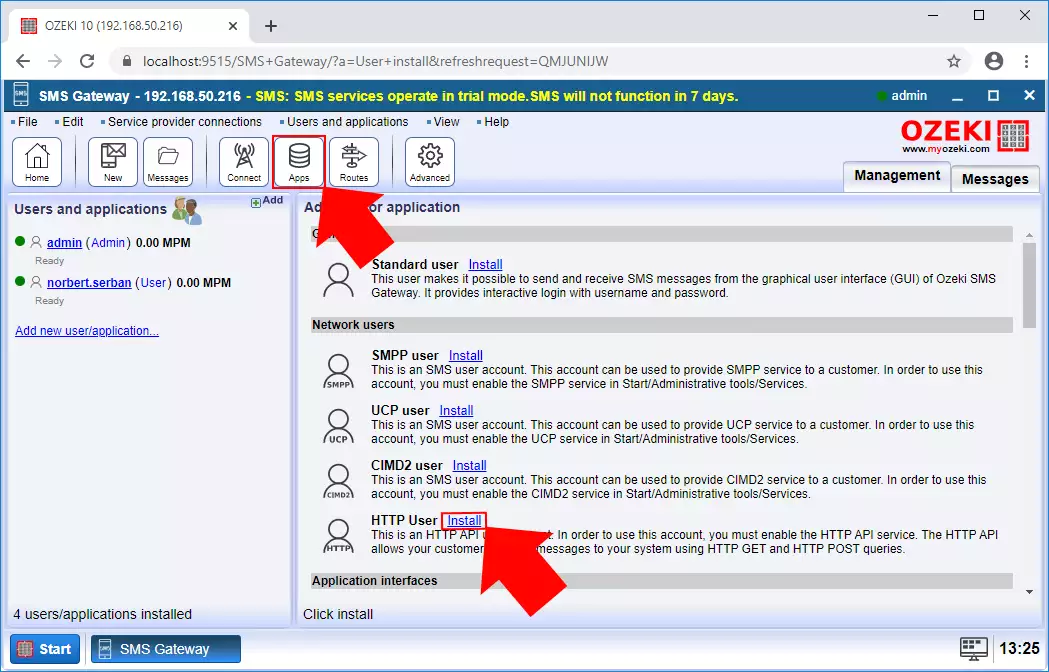
The first step after the the Installation of Ozeki SMS Gateway is to create an HTTP user connection that will be able to handle the SMS messages from the Excel file. So, to create this connection, first open SMS Gateway from your Ozeki desktop. Here, click on the Apps icon on the toolbar and select the HTTP User option as you can see it in Figure 1.
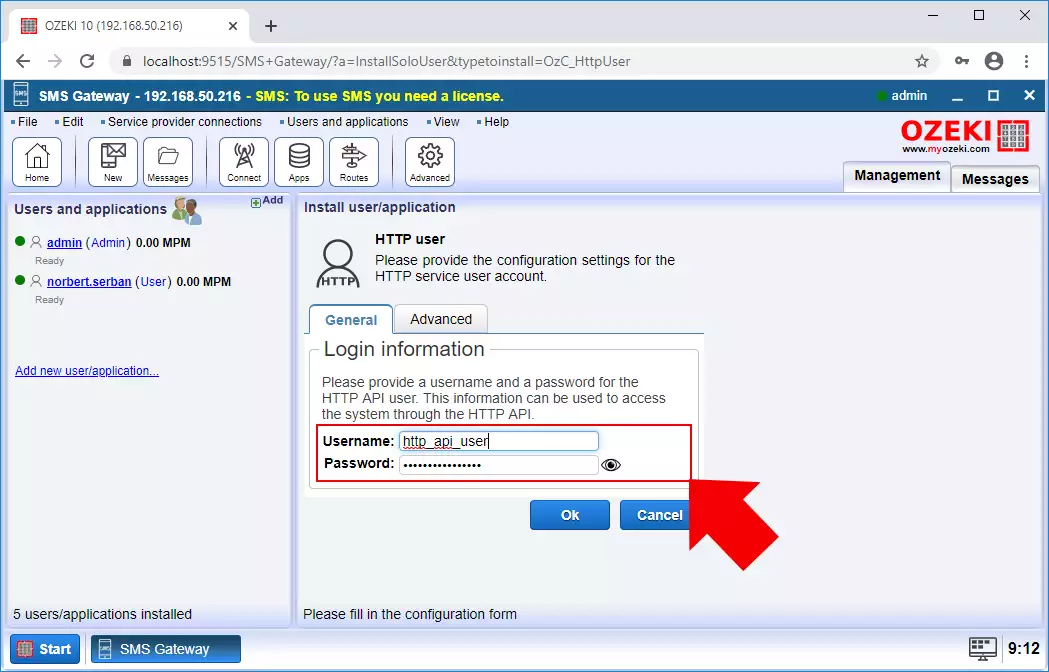
In the configuration menu, you need to specify some identifiers for the HTTP User connection to be able to handle messages from the Excel file. So, just type a username and a password for the connection (Figure 2), but remember, you need to provide these details for the Ozeki Excel Client as well. If you filled all the required fields, just click on Ok to create the HTTP User connection.
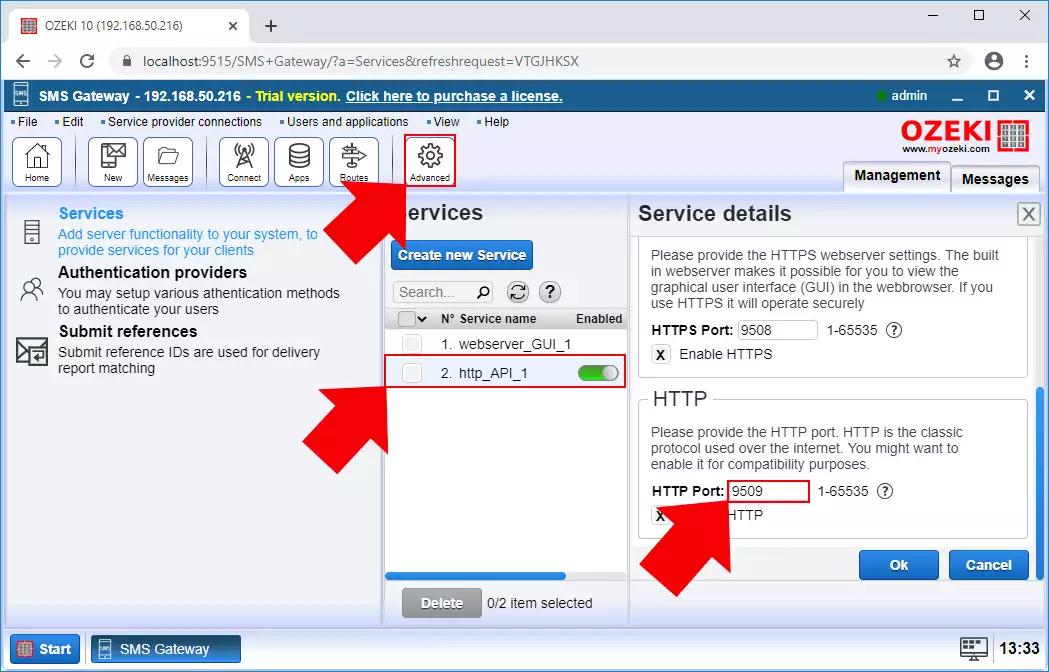
By creating the HTTP User connection, the SMS Gateway also created an HTTP API service. This service can be viewed in the Advanced menu (Figure 3). If you click on the HTTP API service, you can modify the port for the HTTP and the HTTPS as well. To follow the guide, change the port of the HTTP to 9509 and click on OK.
Step 3 - Set Up Excel for SMS Sending
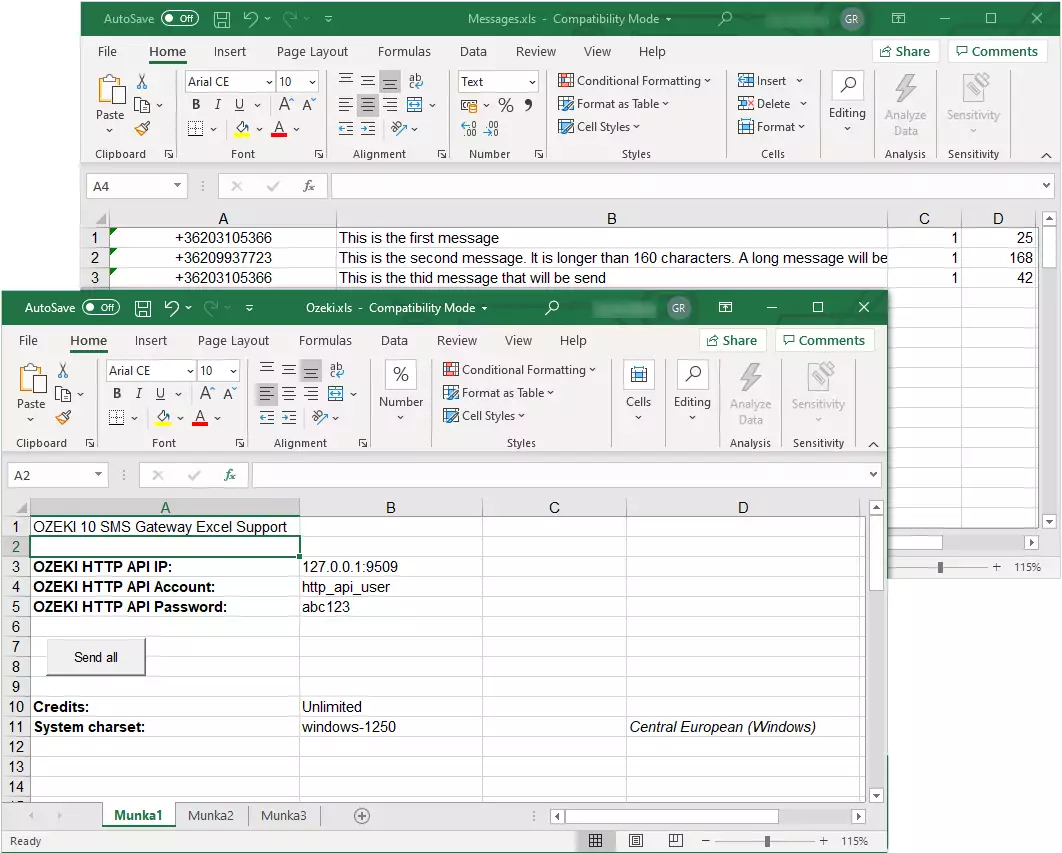
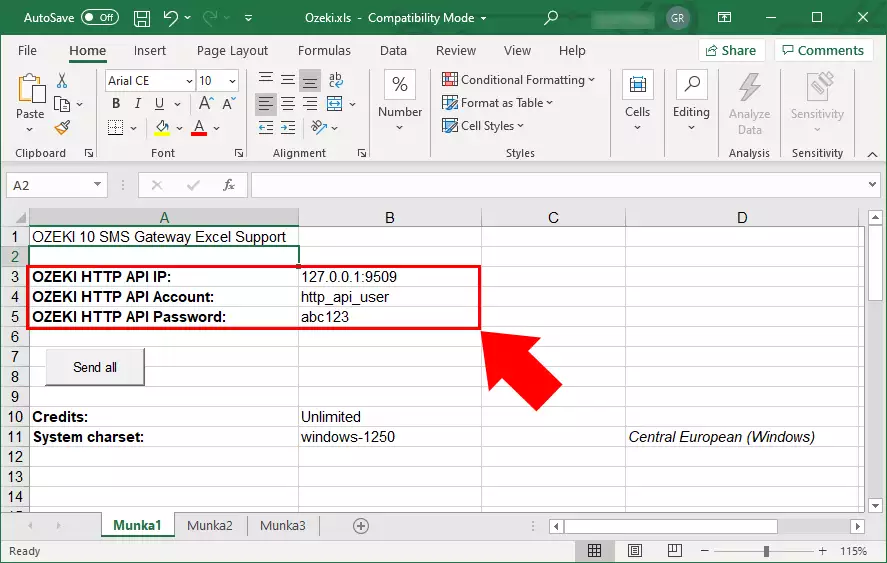
Next, you need to open the downloaded Ozeki Excel example spreadsheat. Here, you have to provide the details of the HTTP API service and the HTTP User connection, that you created in the SMS Gateway. So, for the Ozeki HTTP API IP field, enter the IP of the localhost (127.0.0.1) and the port number of the HTTP API service separated by a ':' sign. Next, type the username and the password of the HTTP User connection as Figure 5 demonstrates it.
Step 4 - Prepare Your Excel Spreadsheet
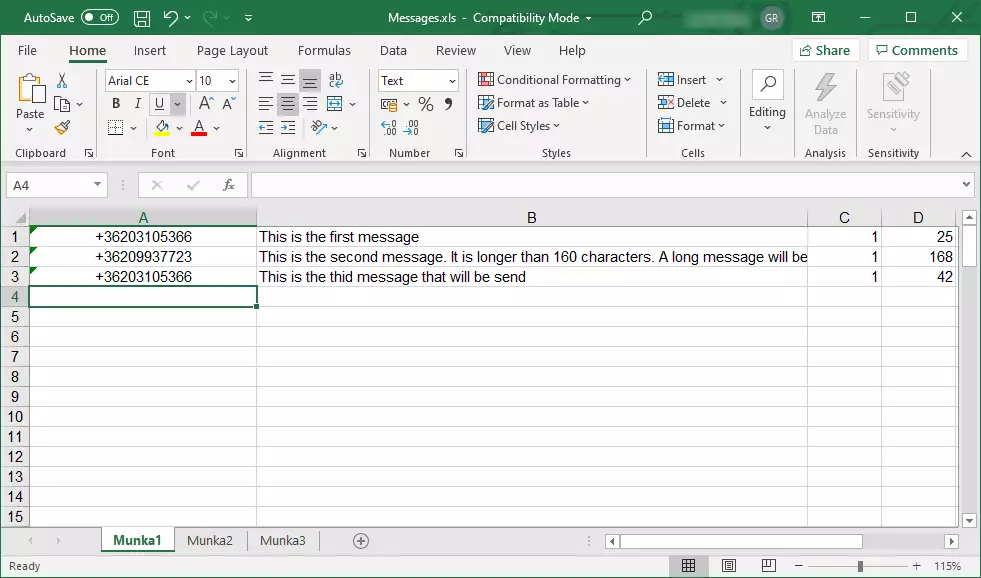
After setting up all connections and services that needed to handle SMS messages from Excel, now you can set up the Excel itself. For testing, you can use the provided Excel file above, but you can easily create a new file for the messages. In this file, each row represents the details of a message. The first column in each row is dedicated to the phone number of the recipient and the second column is for the message itself (Figure 4). If you have done writing the messages, just save the modifications.
Step 5 - Send SMS from Excel
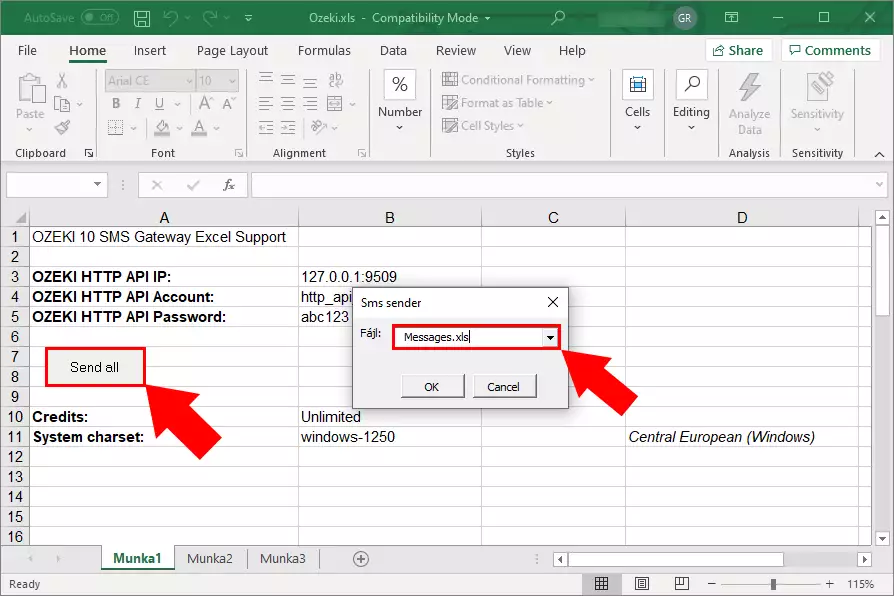
After you set up all details that needed, you can just click on Send all button to send all the messages from the Excel file. If the Excel file of the SMS messages opened as well, Ozeki Excel Client automatically detects it, and you can select it from the pop-up window (Figure 6). All you need to do here, is to click on OK.
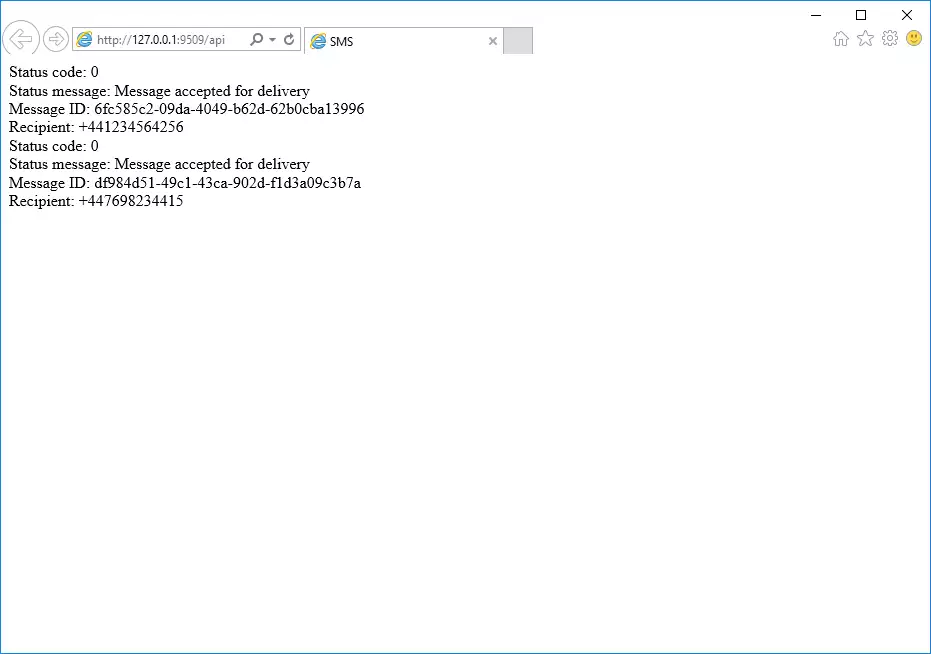
When Ozeki Excel Client finished with sending all the message from the selected Excel file, a delivery report shows up in the browser (Figure 7). Here, you can check if the messages sent successfully, or a problem occurred during the sending process.
Delivery Reports
After sending, Ozeki SMS Gateway will display a delivery report in your browser. This report shows the status of each SMS (sent, delivered, failed). Verify that all messages are marked Sent or Delivered. If any message failed, check the error details in the report and adjust your setup as needed (e.g. correct number format or connection settings).
You may also check the status of each SMS message in the Ozeki SMS Gateway GUI.
Troubleshooting Common Issues
If you encounter any problems while trying to send SMS from Excel, check the following:
- Ensure the Ozeki SMS Gateway is running and connected to the internet.
- Verify your SMS service provider credentials are correctly entered.
- Check that phone numbers in your spreadsheet are formatted properly (e.g., +1234567890).
- Confirm that your SMS service provider account has sufficient credit or is active.
Conclusion
By following this step-by-step guide, you can now efficiently send bulk SMS messages directly from Excel using Ozeki SMS Gateway. The process simplifies mass communication by leveraging an HTTP API connection, allowing you to send messages with just one click. Whether for business notifications, marketing campaigns, or personal use, this method saves time and eliminates manual effort. Download the provided Excel templates, configure the HTTP User connection, and start sending SMS messages seamlessly. With Ozeki SMS Gateway, managing bulk SMS from Excel has never been easier.
Final Thoughts on Using Ozeki Excel SMS
By following the steps outlined in this guide, you can efficiently send SMS messages directly from an Excel spreadsheet using the Ozeki Excel Client. The process begins with configuring the HTTP API service and user credentials, followed by opening the Excel file containing your SMS messages. Once the setup is complete, sending messages is as simple as clicking the "Send all" button and verifying the delivery report. This method provides a seamless way to manage bulk SMS campaigns, ensuring quick and reliable message delivery. Whether for business communications or personal use, Ozeki Excel SMS simplifies the process while offering real-time feedback on message status.
With its intuitive interface and automated detection of Excel files, Ozeki Excel Client minimizes manual input, reducing the risk of errors. The delivery report feature allows you to confirm successful transmissions or identify any issues promptly. By integrating SMS capabilities into Excel, Ozeki provides a powerful yet user-friendly solution for mass messaging. This approach saves time, enhances productivity, and ensures that your messages reach their intended recipients efficiently.
