Setup your On-premise SMS Marketing System
This guide explains how you can setup an on-premise SMS Marketing System using the MyOzeki Customer Platform and Ozeki SMS Gateway. First, a brief overview is provided to help you understand the system components, then the installation steps are given.
Overview
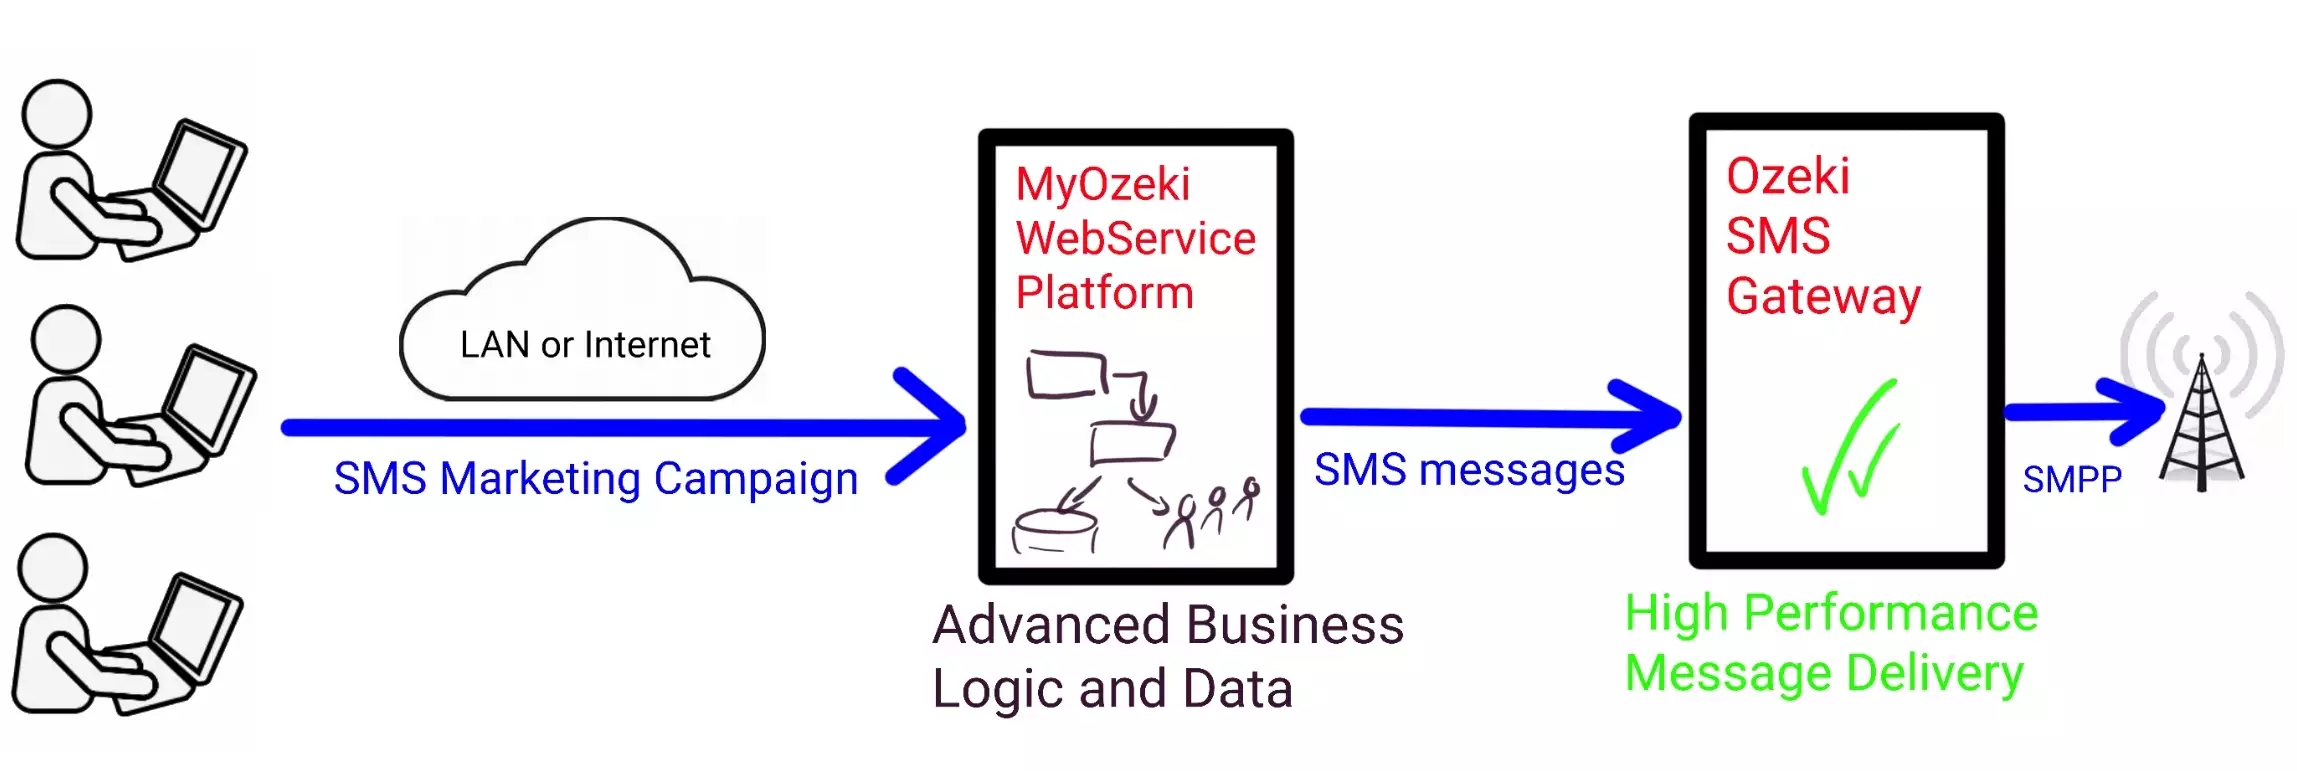
To provide content services, such as SMS marketing, QR codes or Digital business cards from your own premises you need to install the MyOzeki WebService Platform and Ozeki SMS Gateway. The two major components can be installed on the same sever or on different servers.
The MyOzeki WebService Platform was designed to serve a large number of users and to keep their data safe. It is based on PHP and uses the Apache Web Server for serving customers. It can be installed on both Linux and Windows.
Ozeki SMS Gateway is a high-performance message delivery system. It was designed to maintain long lasting communication channels, such as SMPP, UCP, CIMD2 and can delivery messages at high capacity 24/7. It uses .NET and performs best on Windows.
In this guide we will explain how to install these two components on the same Windows Computer. You will need to use either Windows 10 or Windows 11 or a later Windows edition.
Download
To setup the system, you have to download and install 3 components: Ozeki SMS Gateway, Apache Webserver and MyOzeki. The following links will take you to the pages providing download locations and installation steps.
1. Download and Install Ozeki SMS Gateway
2. Download and Install WAMP (Windows Apache + MySQL + PHP)
3. Download and Install MyOzeki
Configuration
After all components have been installed, you need to setup an HTTP API user account in your Ozeki SMS Gateway. This HTTP API user account will be used by the MyOzeki SMS marketing app.
Next, you need to setup a password for the admin account in the MyOzeki service and you need to install the SMS app. Finally, you have to configure the HTTP API user of the SMS gateway in MyOzeki
Step 1 - Create an HTTP API user in Ozeki SMS Gateway
To create an HTTP API user in Ozeki SMS Gateway, you access your Ozeki SMS Gateway account and load the SMS Gateway Home page. In this interface, find the "Add new user application..." link and click on it. It will bring up an application installation list where you have to choose the "HTTP User" option to create HTTP User account, which will allow you to send messages to your system using HTTP GET and HTTP POST requests. Enter some configuration information, like Username and Password for HTTP User, to be able to access the system through HTTP API. Save the settings with the "Ok" button. By navigating to the Ozeki Home page, you can see the new HTTP User on the Users and applications part of the page.
Step 2 - Create your admin account in MyOzeki
By following these steps, you can create your admin user account in MyOzeki. First, load the Ozeki Admin Setup page at the http://localhost/ozeki/index.php webpage. Enter an admin e-mail address and a password. Confirm the password, then click on the "Create admin account" button to save. After that login with these data into your MyOzeki admin account.
Step 3 - Install the SMS service for all users in MyOzeki
Now, in this subsequent stage of the process, you need to install SMS service in
MyOzeki. Find the wamp64 folder on the Local disk of your computer and open the "www"
root. There, choose the "ozekiconfig" folder. Inside this folder select the "services"
notes option. Copy the appropriate part of the note document and with the help of it,
create a new service command. Save the changes, then load MyOzeki.com webpage again.
Refresh the page to let the "SMS" feature appear in the Favourites menu.
Enter this:
include_once("$servicesdir/sms/_include.php";
Testing
Once the system is configured properly you are ready to test it. For testing, you need to register a user account in your MyOzeki system, then you need to create and send a test campaign. After the test campaign is sent you can check the logs in Ozeki SMS Gateway and understand the procedure.
Step 1 - Register a user account in MyOzeki
In order to be able to send SMS messages through Ozeki SMS Gateway, you have to register a user account in MyOzeki. To start the process, load the MyOzeki.com in your browser. Click on the "Create an account" button, then fill the forms with the necessary details. Enter your name, e-mail address, phone number, and provide a unique password to your user account and its confirmation. Agree on the terms and policies, then complete the process by clicking on the "Register" button.
Step 2 - Send a test campaign in MyOzeki
To send a test campaign in MyOzeki, open the "SMS" feature from Favorites menu. Choose "Send" option from the left-handed Dashboard of the page, then fill out the fields. Choose "Excel" option from the drop-down list, to be able to use Excel document database to send SMS messages. Choose your file from the library, then click on the "Add" button to let the data appear. Check the recipient list, then enter your Sender ID, that will show when the audience receives the SMS messages. After that form your SMS message in the "Message" field of the page. Insert dynamic data, to make your SMS messages more personal. Click on the "Next" button, if you are done with composing the messages. A details page will appear, where you can see all the essential data about your SMS messages and recipients. You can edit if it is needed, or by clicking on the "Send" button, you can start delivery. If the SMS delivery was successful, you will receive a notification about your SMS messages have been submitted to Ozeki SMS Gateway for delivery.
Step 3 - Open the logs in Ozeki SMS Gateway
You can view the logs in the Ozeki SMS Gateway, by loading the Ozeki Homepage at Ozeki SMS Gateway. Choose the "Scheduled jobs" option from the "View" menu, where you can see the message details about your SMS. Click on the "Details" button to see the Events tab. The Events tab shows you accurate data about the delivery process.
Step 4 - See the report in MyOzeki
In MyOzeki you can get SMS reports with some click. Open the "Outbox" from the Dashboard, then click on the "Open" button, highlighted in blue. This will bring up a details page, where you can see the Jobb information about the message delivery. By clicking on the purple "Reports" button, the Reports page will appear, containing the SMS delivery results. If the delivery was successful, you will see the "Sent successfully" notification.
Summary
In this guide, you have seen the steps need to setup an SMS marketing system. Once this system is created your users can access the MyOzeki system installed on your computer. They can register user accounts and can send out SMS marketing campaigns. If you like this system check out how you can purchase an Ozeki SMS Gateway License.