How to use ChatGPT to answer Whatsapp messages
In this article, we will guide you through the process of setting up ChatGPT to automatically answer WhatsApp messages using the Ozeki SMS Gateway. This integration allows you to create a powerful AI-driven chatbot capable of providing instant, intelligent responses, improving customer service and enhancing communication efficiency.
What is ChatGPT?
ChatGPT is an advanced artificial intelligence language model developed by OpenAI. It uses deep learning techniques to generate human-like text responses based on user input. ChatGPT is widely used for chatbots, customer support systems, content generation, coding assistance, and more. Its ability to understand natural language and provide contextually relevant replies makes it a powerful tool for various applications.
What is WhatsApp?
WhatsApp is a popular instant messaging platform owned by Meta. It allows users to send text messages, voice messages, photos, videos, and files, as well as make voice and video calls over the internet. Available on smartphones, desktops, and web browsers, WhatsApp is widely used for personal and business communication worldwide due to its end-to-end encryption, reliability, and user-friendly interface.
What is Ozeki AI Server?
Ozeki AI Server is a robust software platform designed to integrate artificial intelligence (AI) with various communication systems. It allows businesses to create, deploy, and manage AI-powered applications for tasks such as chatbots, automated messaging, voice calls, and machine learning processes. Ozeki AI Server helps enhance workflow efficiency, customer interactions, and data processing by providing seamless integration between AI models and communication networks.
What is Ozeki SMS Gateway?
Ozeki SMS Gateway is a software solution that enables businesses to send and receive SMS messages through various communication channels. It supports integration with applications, databases, and APIs, allowing automated messaging, two-way communication, and bulk SMS sending. It is widely used for notifications, alerts, marketing, and customer support.
How to configure ChatGPT AI chatbot in Ozeki SMS Gateway (Quick Steps)
- Open Ozeki AI Server
- Create a New ChatGPT AI Model
- Provide ChatGPT API Key
- Open SMS Gateway
- Add a New User/Application
- Install AI Chatbot
- Select ChatGPT AI Model
- Enable the Chatbot
How to configure Whatsapp account connection for AI messaging (Quick Steps)
- Open SMS Gateway
- Add New Connection
- Install WhatsApp Account
- Configure WhatsApp Credentials
- Configure Default Template
- Set Telephone Number
- Enable WhatsApp Connection
- Create New Incoming Route
- Create New Outgoing Route
Send Whatsapp test message what is answered by AI chatbot (Quick Steps)
- Open AI Chatbot
- Configure System Prompt
- Send WhatsApp Message
- Receive AI Response
How to configure ChatGPT AI chatbot in Ozeki SMS Gateway (Video tutorial)
In this video, we will guide you through the process of creating a ChatGPT AI chatbot in Ozeki AI Server and setting it up to function seamlessly with the Ozeki SMS Gateway. You will learn how to configure the AI model, establish a connection between the chatbot and the SMS system, and ensure that incoming messages are processed and responded to automatically.
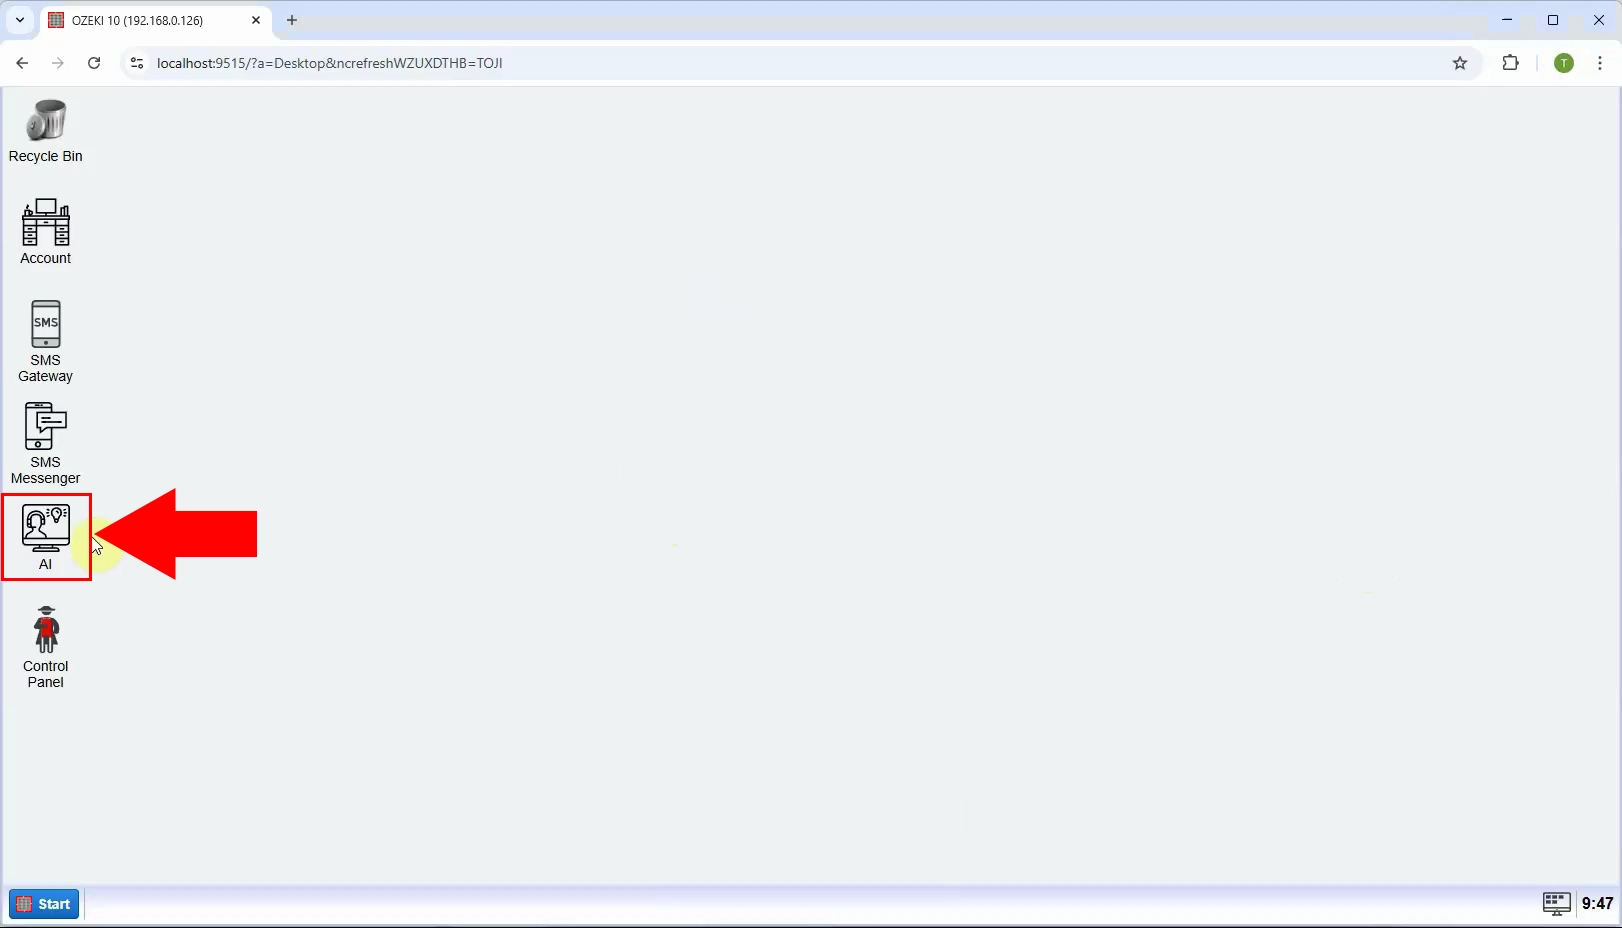
Step 1 - Open Ozeki AI Server
Start the Ozeki 10 application. If it is not yet installed, you can download it from the provided link. After launching the application, locate and open the Ozeki AI Server (Figure 1).
Step 2 - Create new ChatGPT AI model
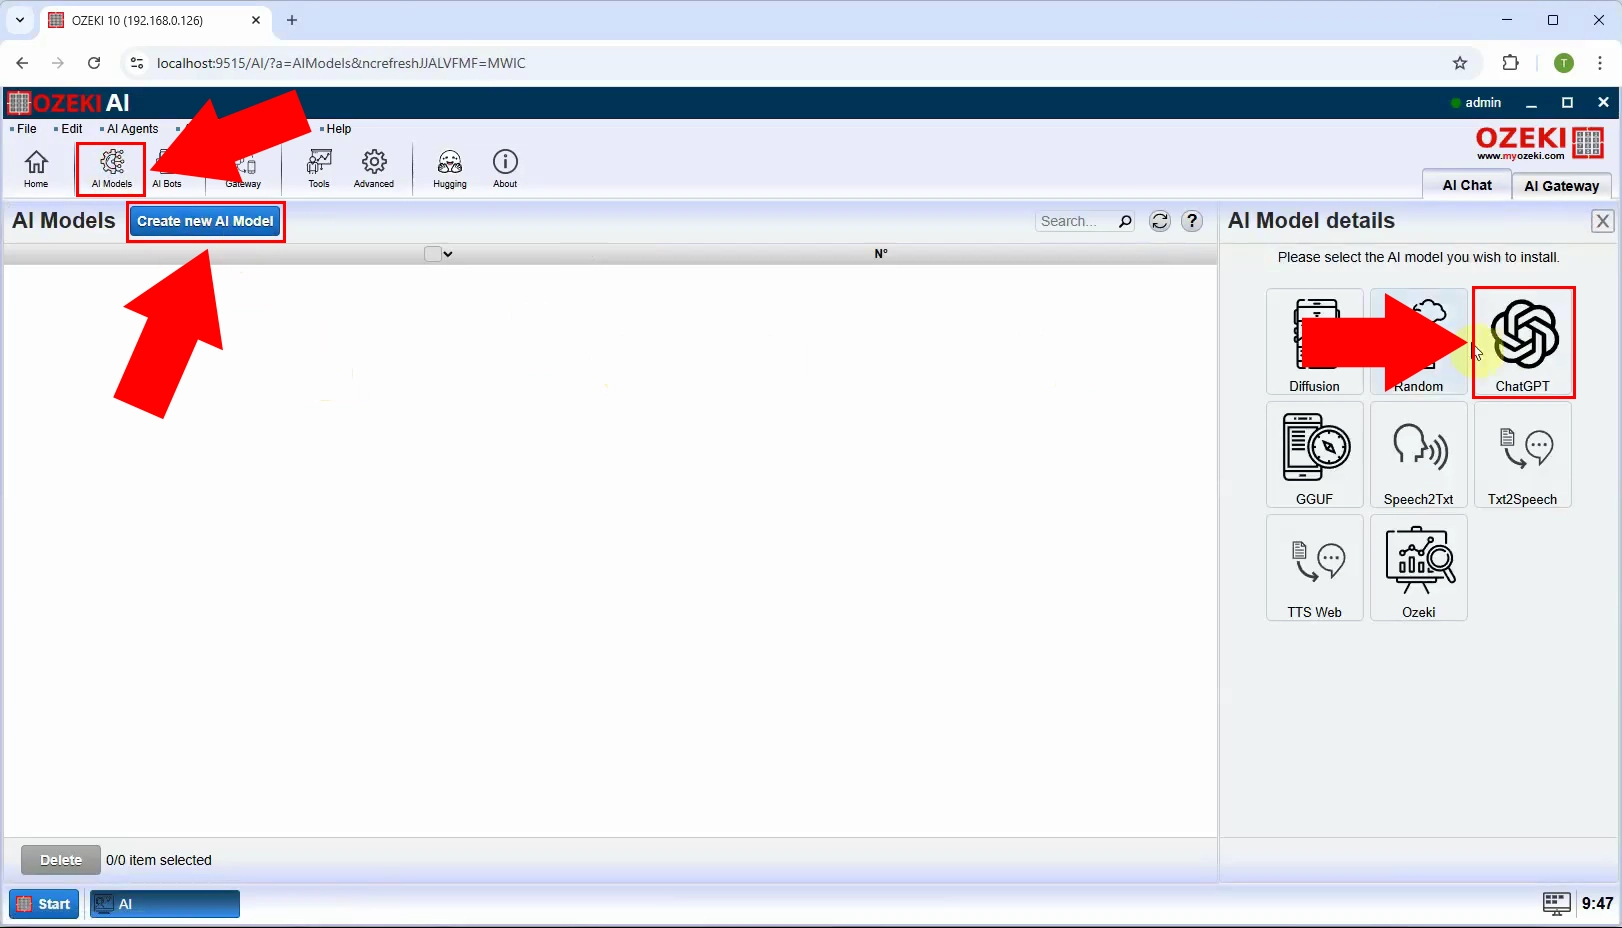
The Ozeki AI Server interface is now displayed on the screen. Click on "AI Models" at the top of the interface. Then, select the blue "Create a New AI Model" button. On the right side, you will find multiple options, choose the "ChatGPT" menu (Figure 2).
Step 3 - Provide ChatGPT API key
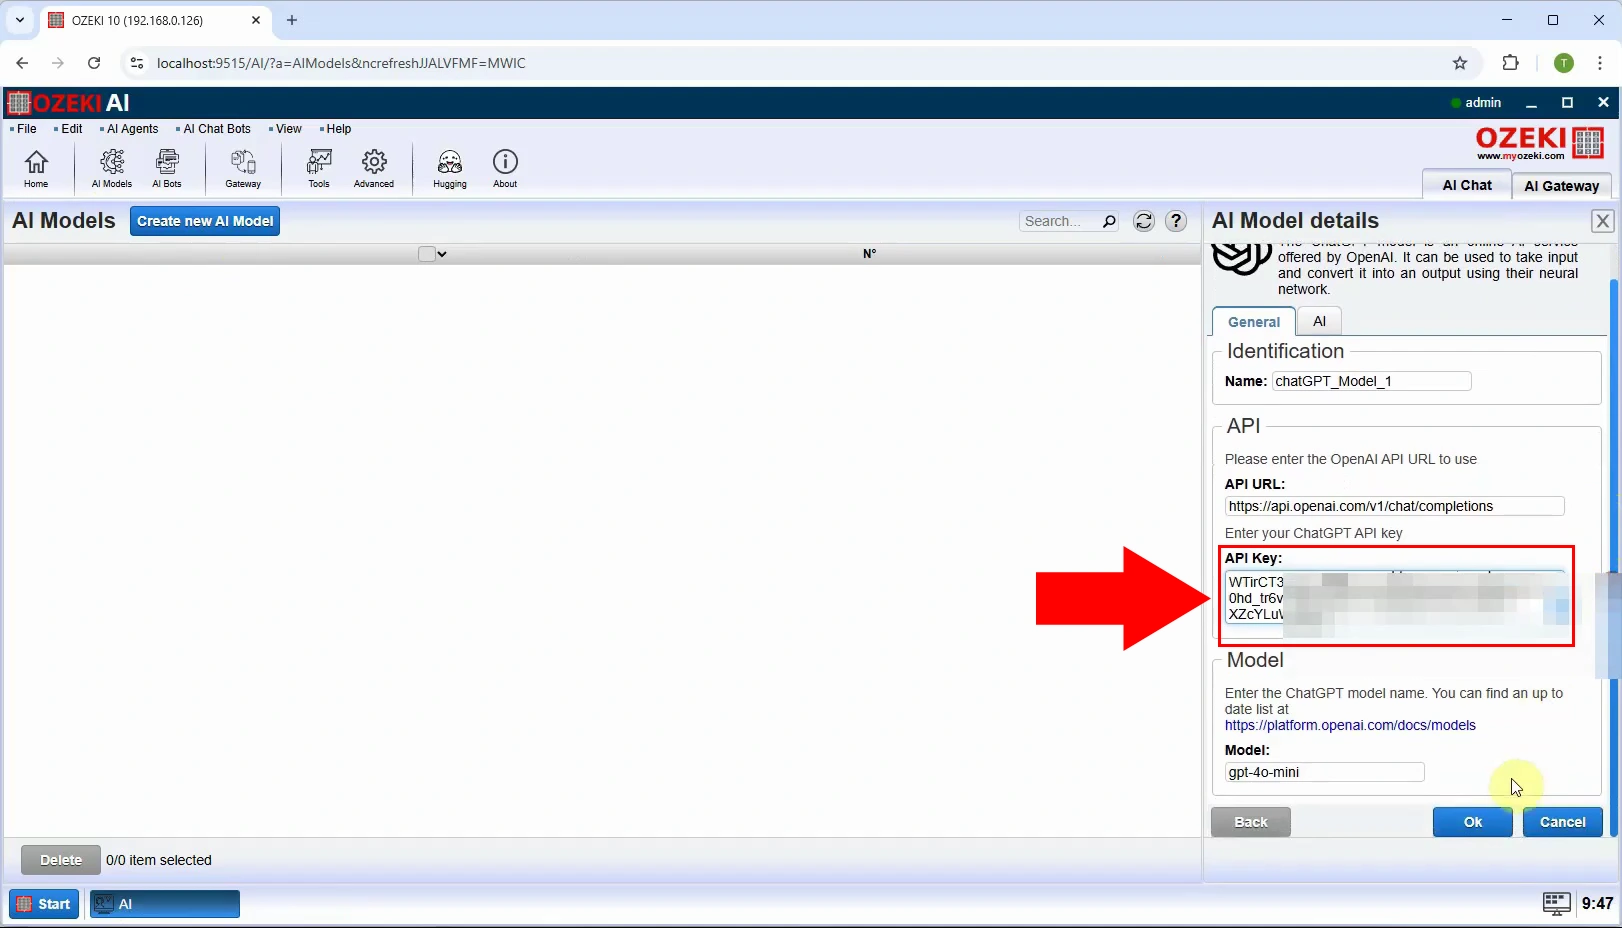
After selecting the "ChatGPT" menu, navigate to the "General" tab. In this section, you will find a field labeled "API Key:". Paste your API Key into this input field to establish a connection between the Ozeki AI Server and ChatGPT. Once you have entered the key, click "OK" to save the settings (Figure 3).
Step 4 - Open SMS Gateway
Launch Ozeki SMS Gateway in Ozeki 10 (Figure 4).
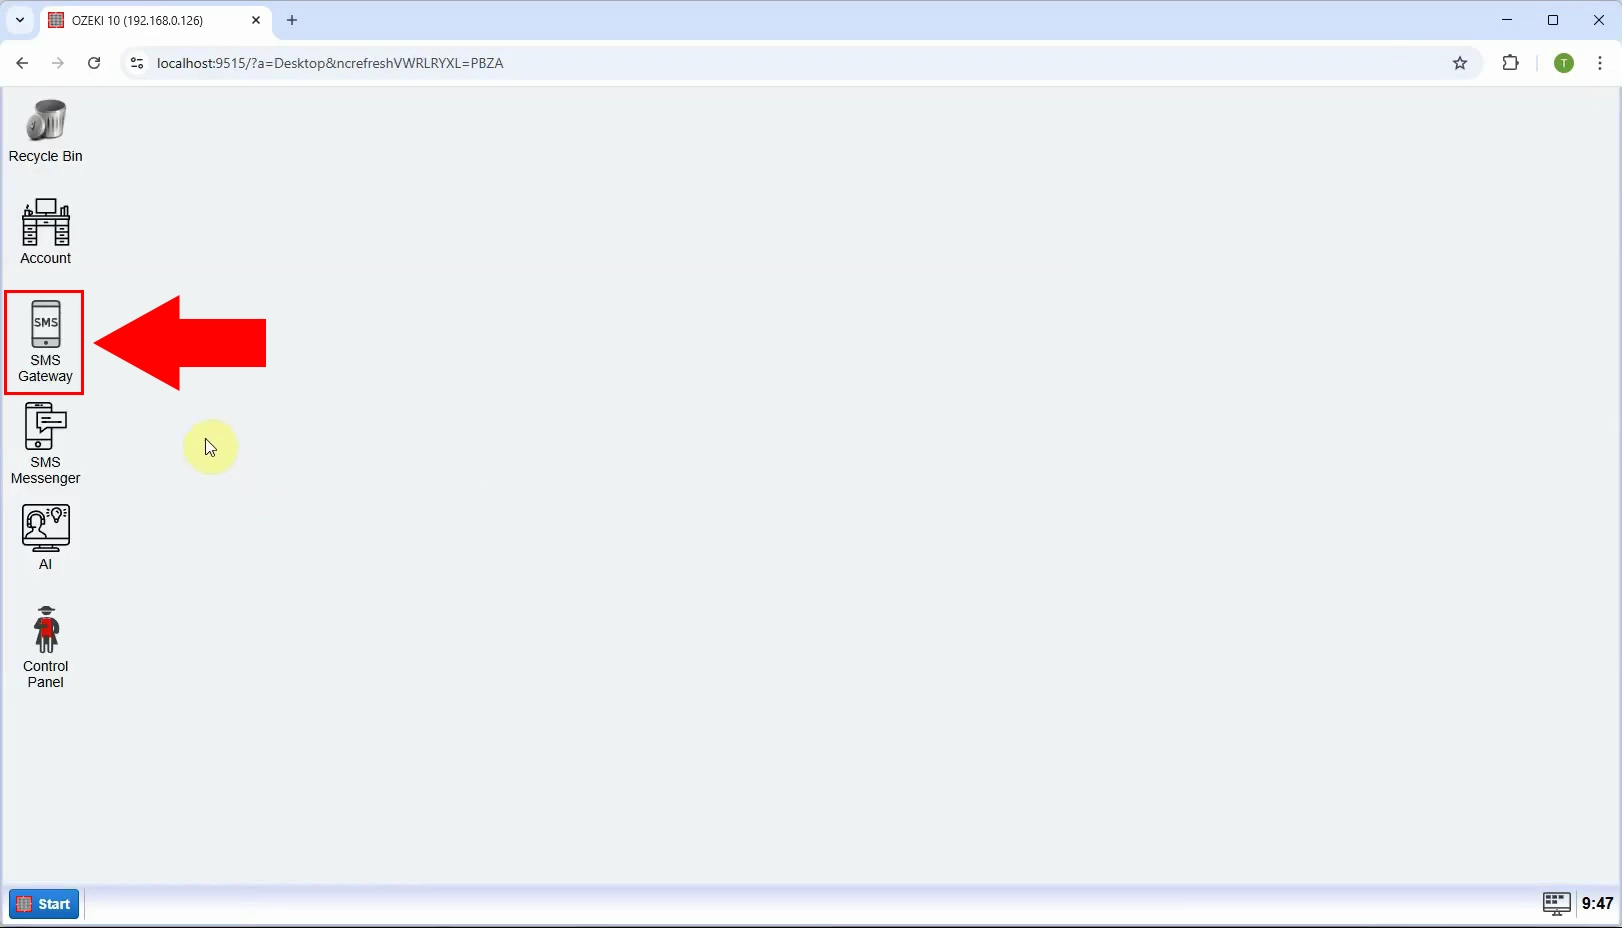
Step 5 - Add new user/appilcation
After opening Ozeki SMS Gateway, on the right side under "Users and applications", create a new application by clicking on "Add new user/application..." (Figure 5).
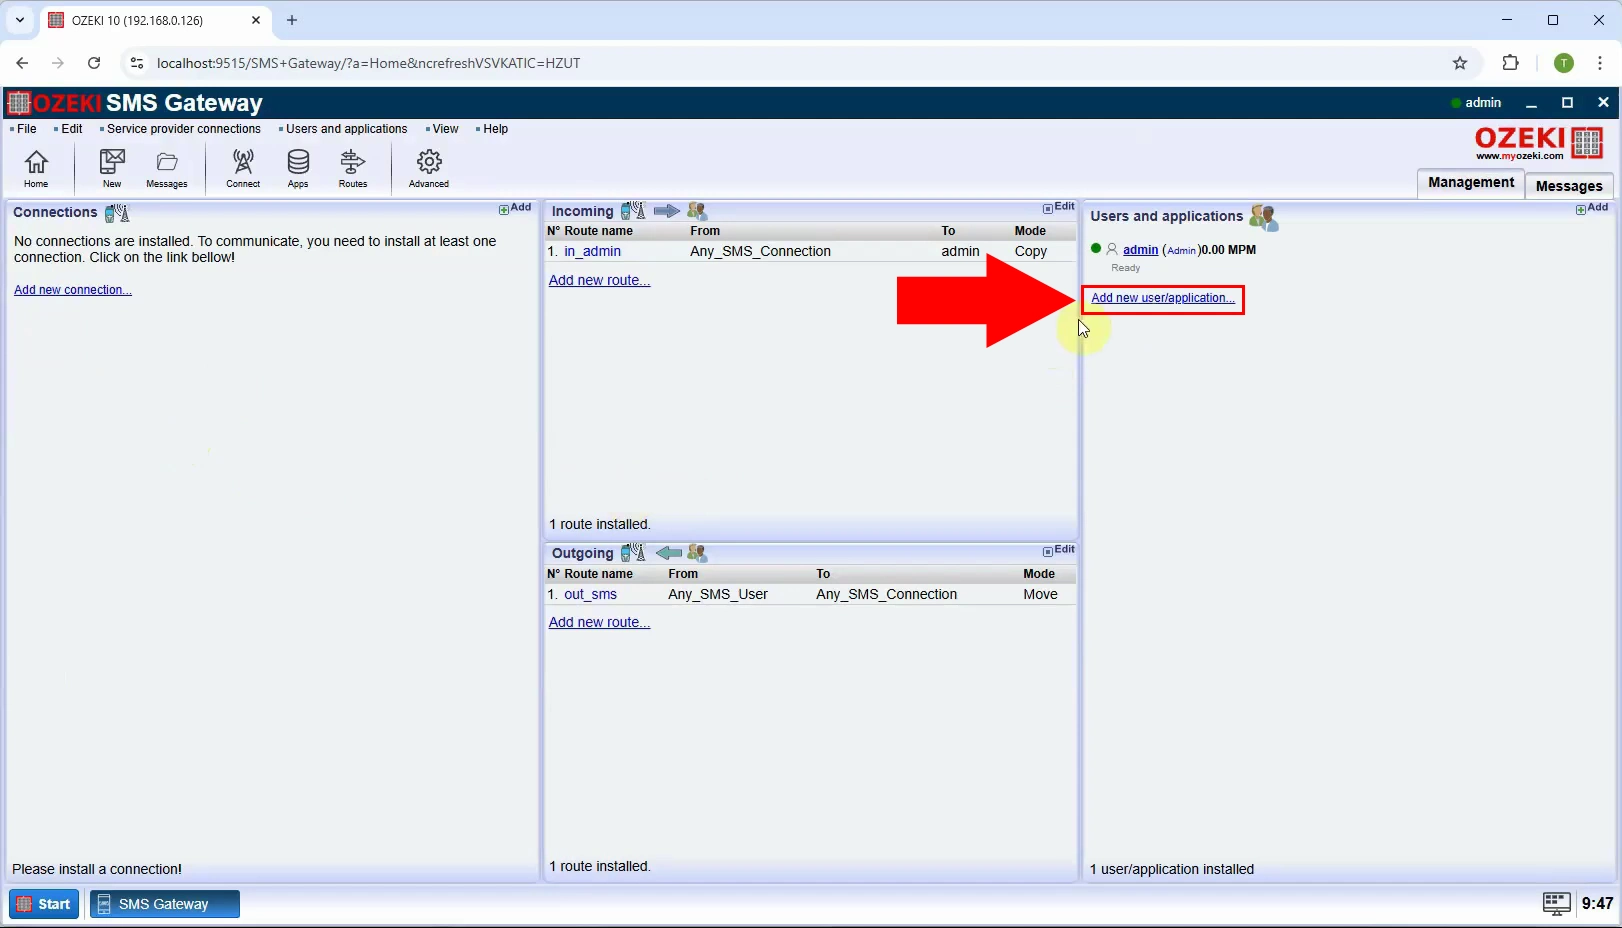
Step 6 - Install AI chatbot
Among the many options, under "Chat bots" we need "AI Chat Bot", click on "Install" (Figure 6).
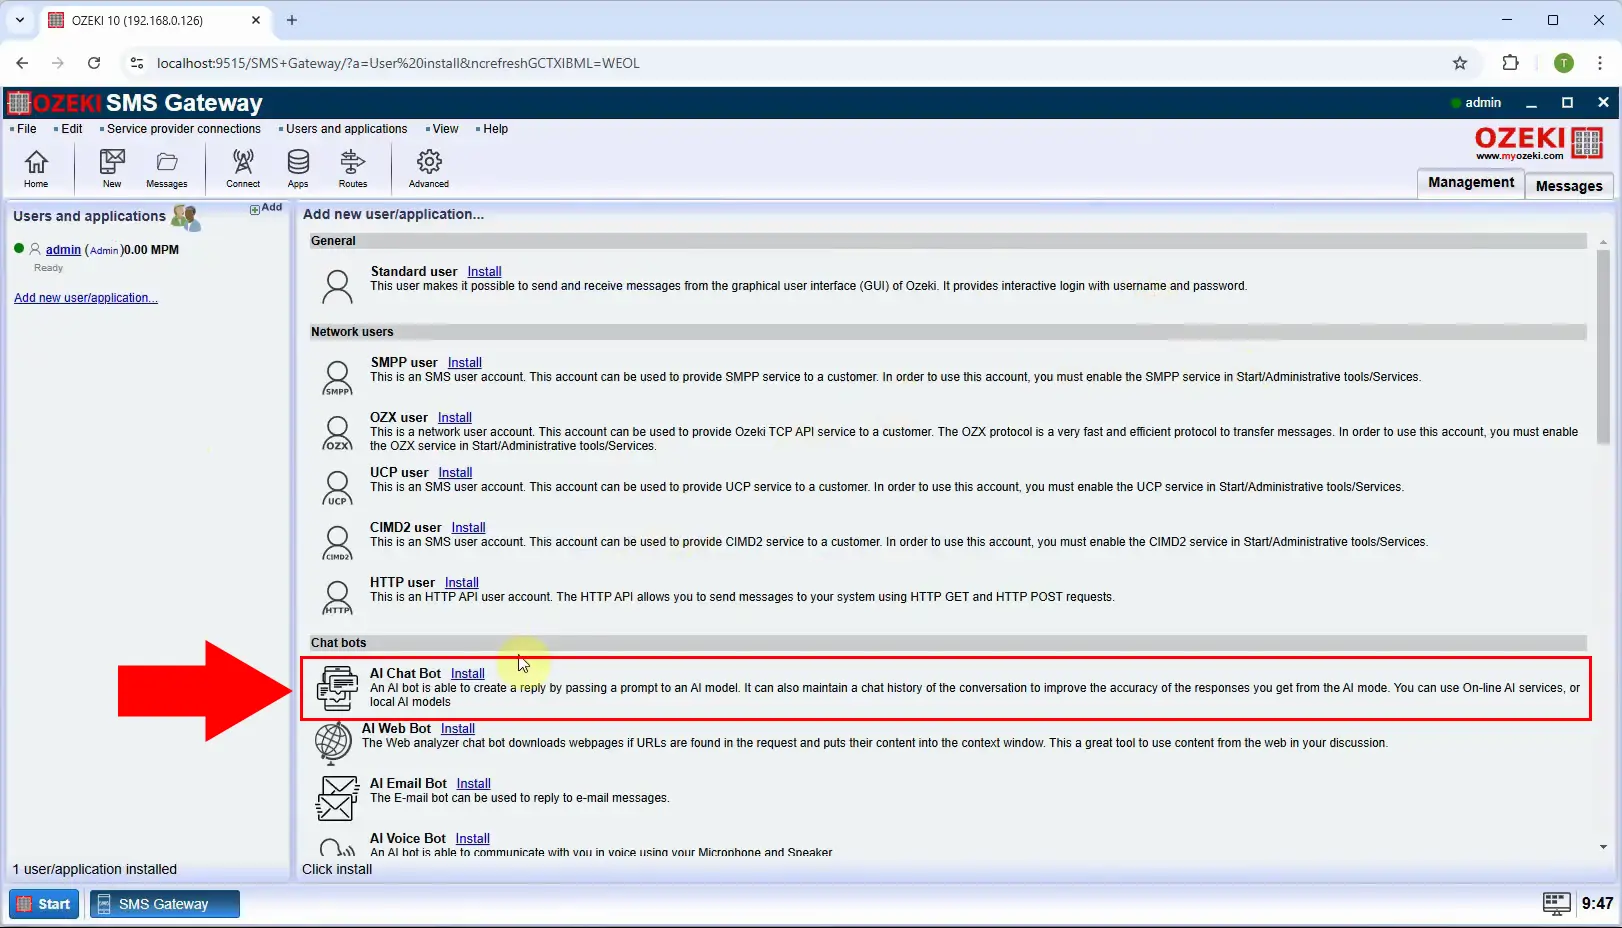
Step 7 - Select ChatGPT AI model
Under the "General" tab, uncheck "Send welcome message" and then select the right model in this case "chatGPT_Model_1", then click "Ok" (Figure 7).
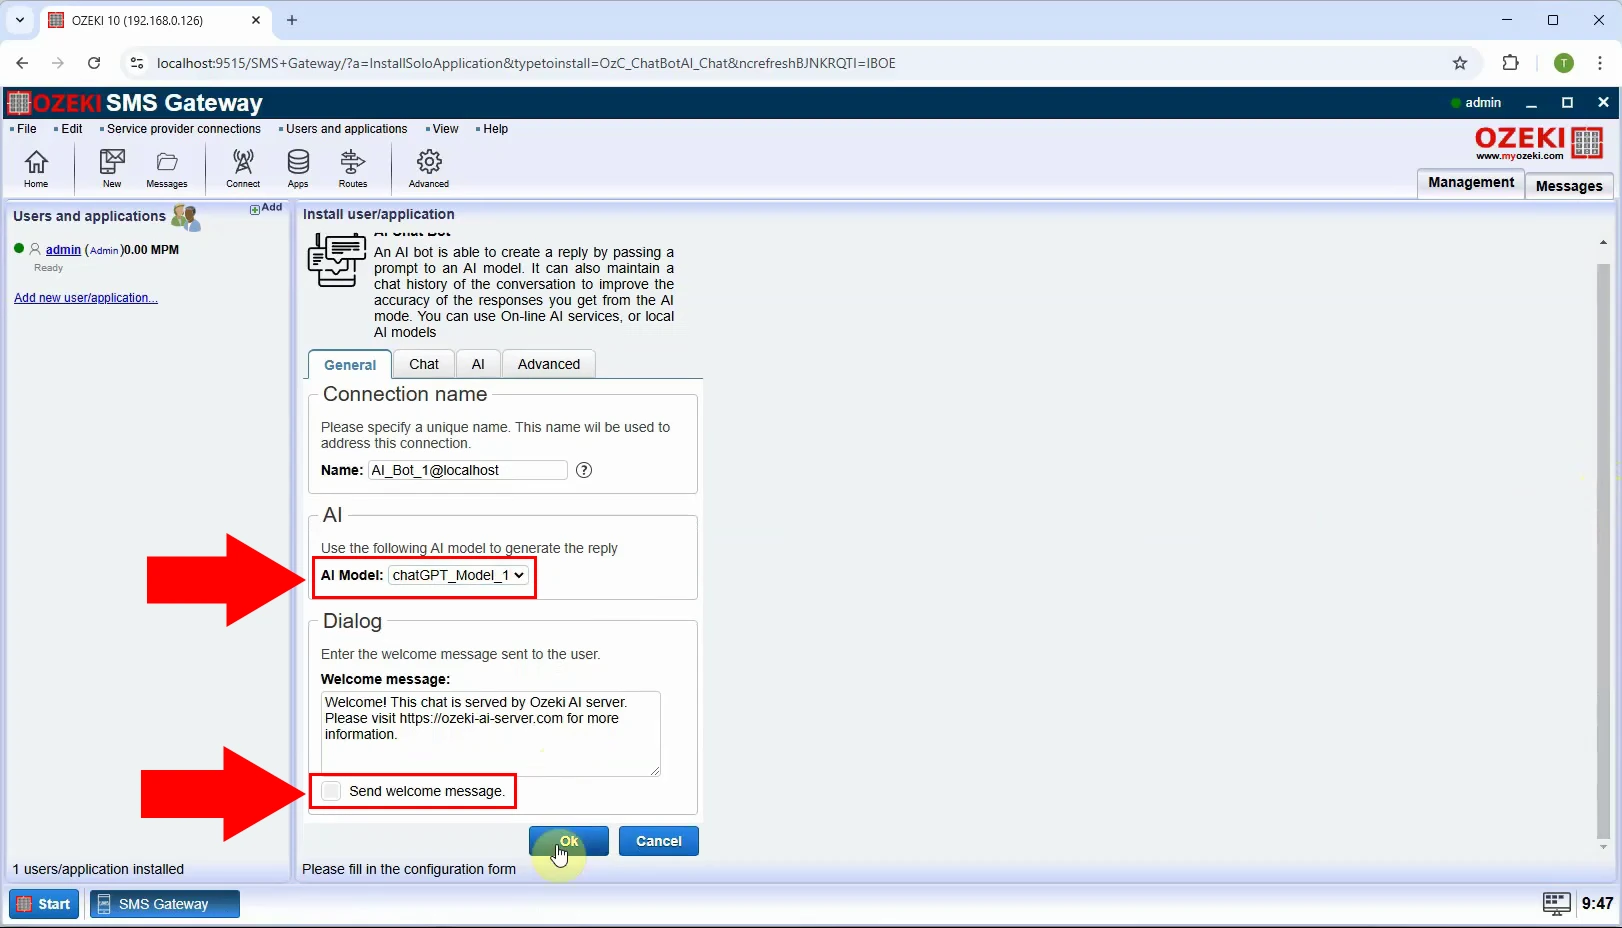
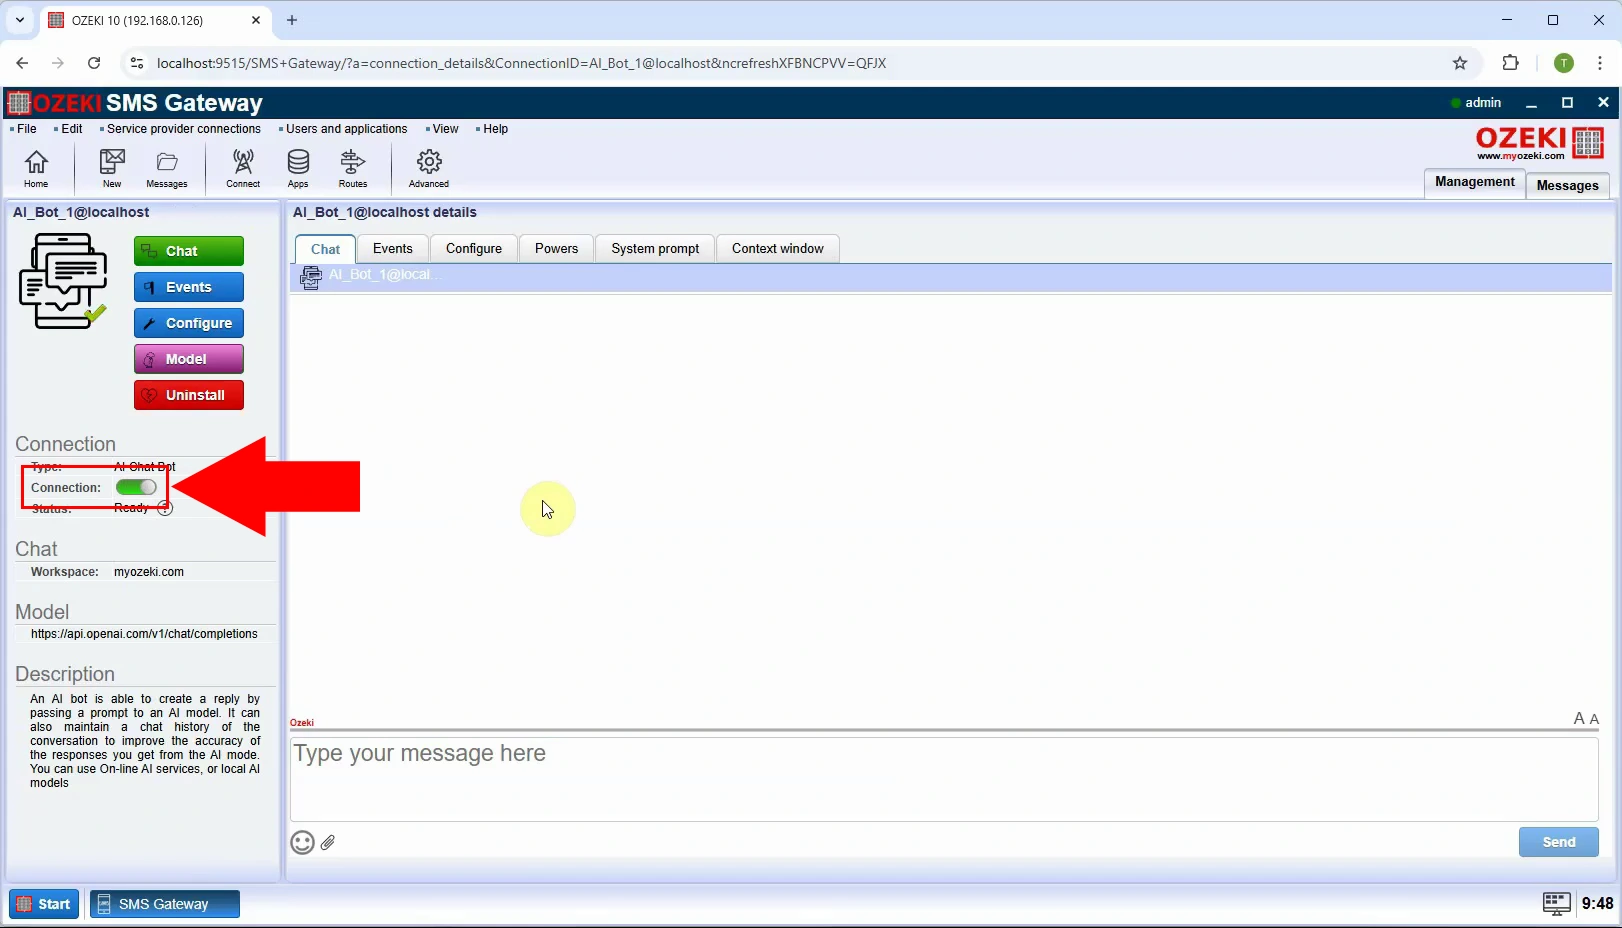
Step 8 - Enable Chat bot
To connect, toggle the switch to green on the left (Figure 8).
How to configure Whatsapp account connection for AI messaging (Video tutorial)
In this video, you will learn how to configure a WhatsApp account connection for AI messaging using the Ozeki SMS Gateway. This step-by-step guide will show you how to set up a WhatsApp message connection, allowing you to seamlessly receive and respond to messages using AI technology.
Detailed Whatsapp configuration:
How to setup a WhatsApp message connection
Receive WhatsApp messages in SMS Gateway
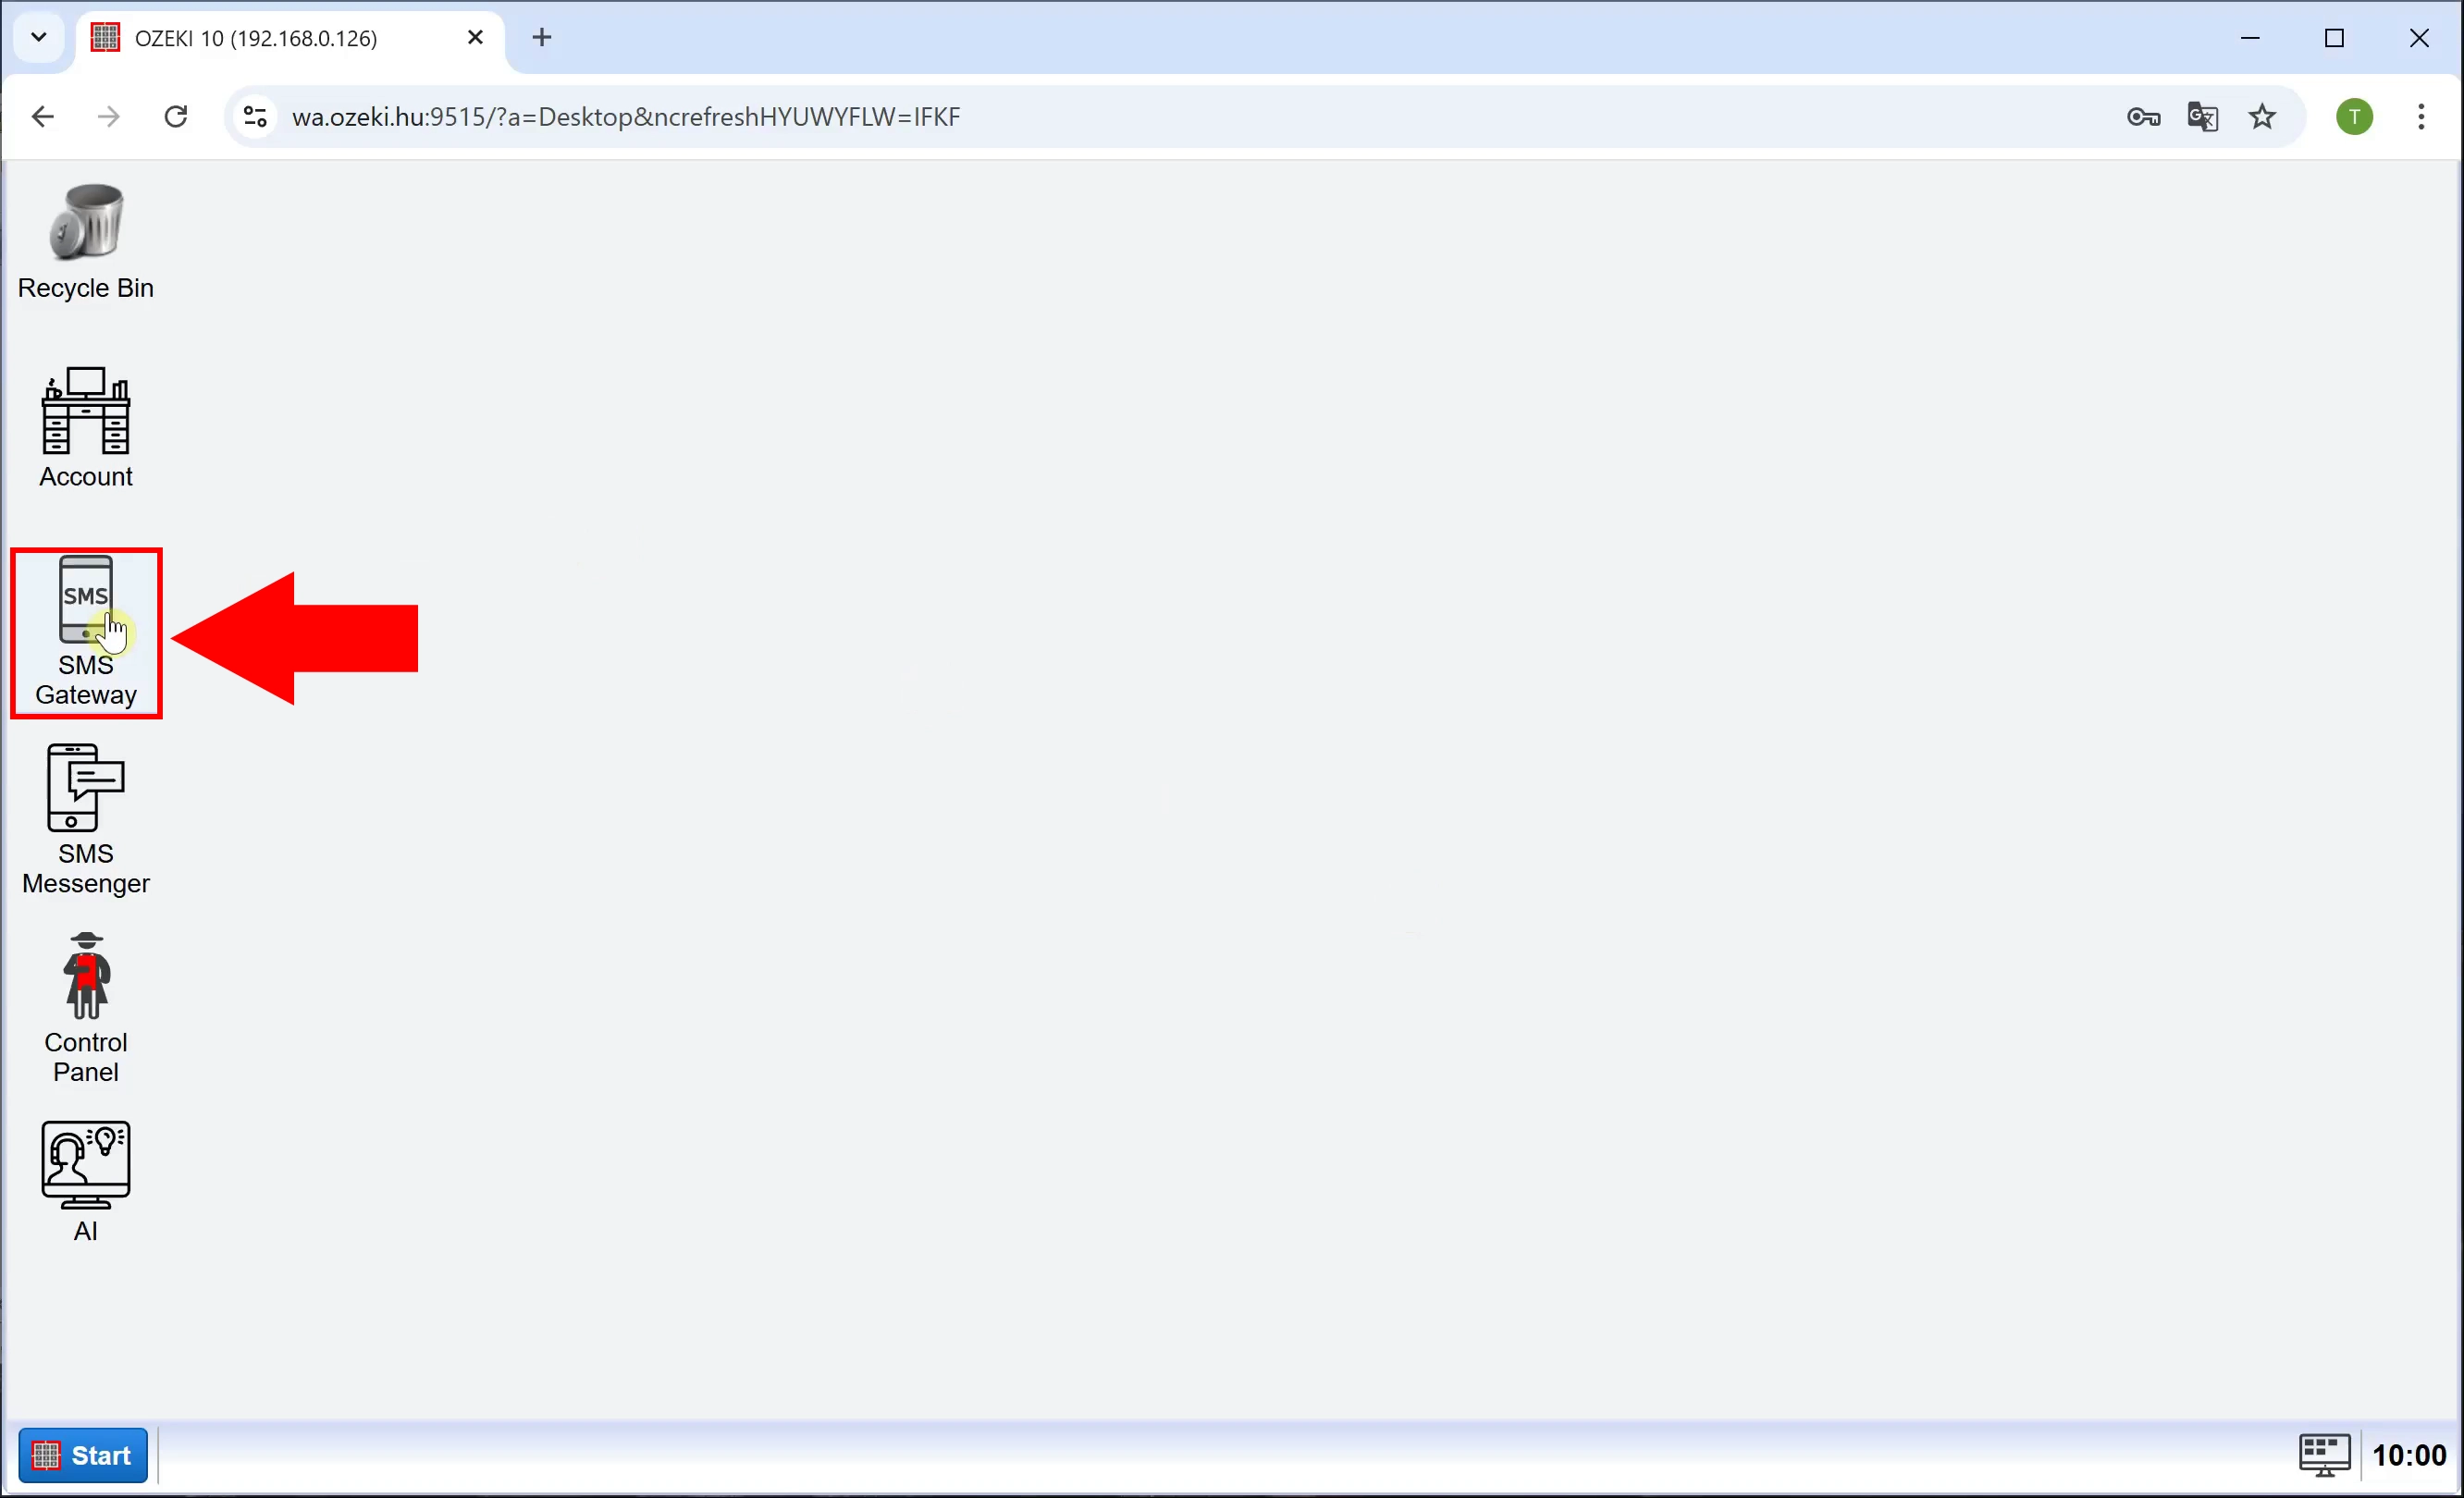
Step 9 - Open SMS Gateway
Launch Ozeki SMS Gateway in Ozeki 10 (Figure 9).
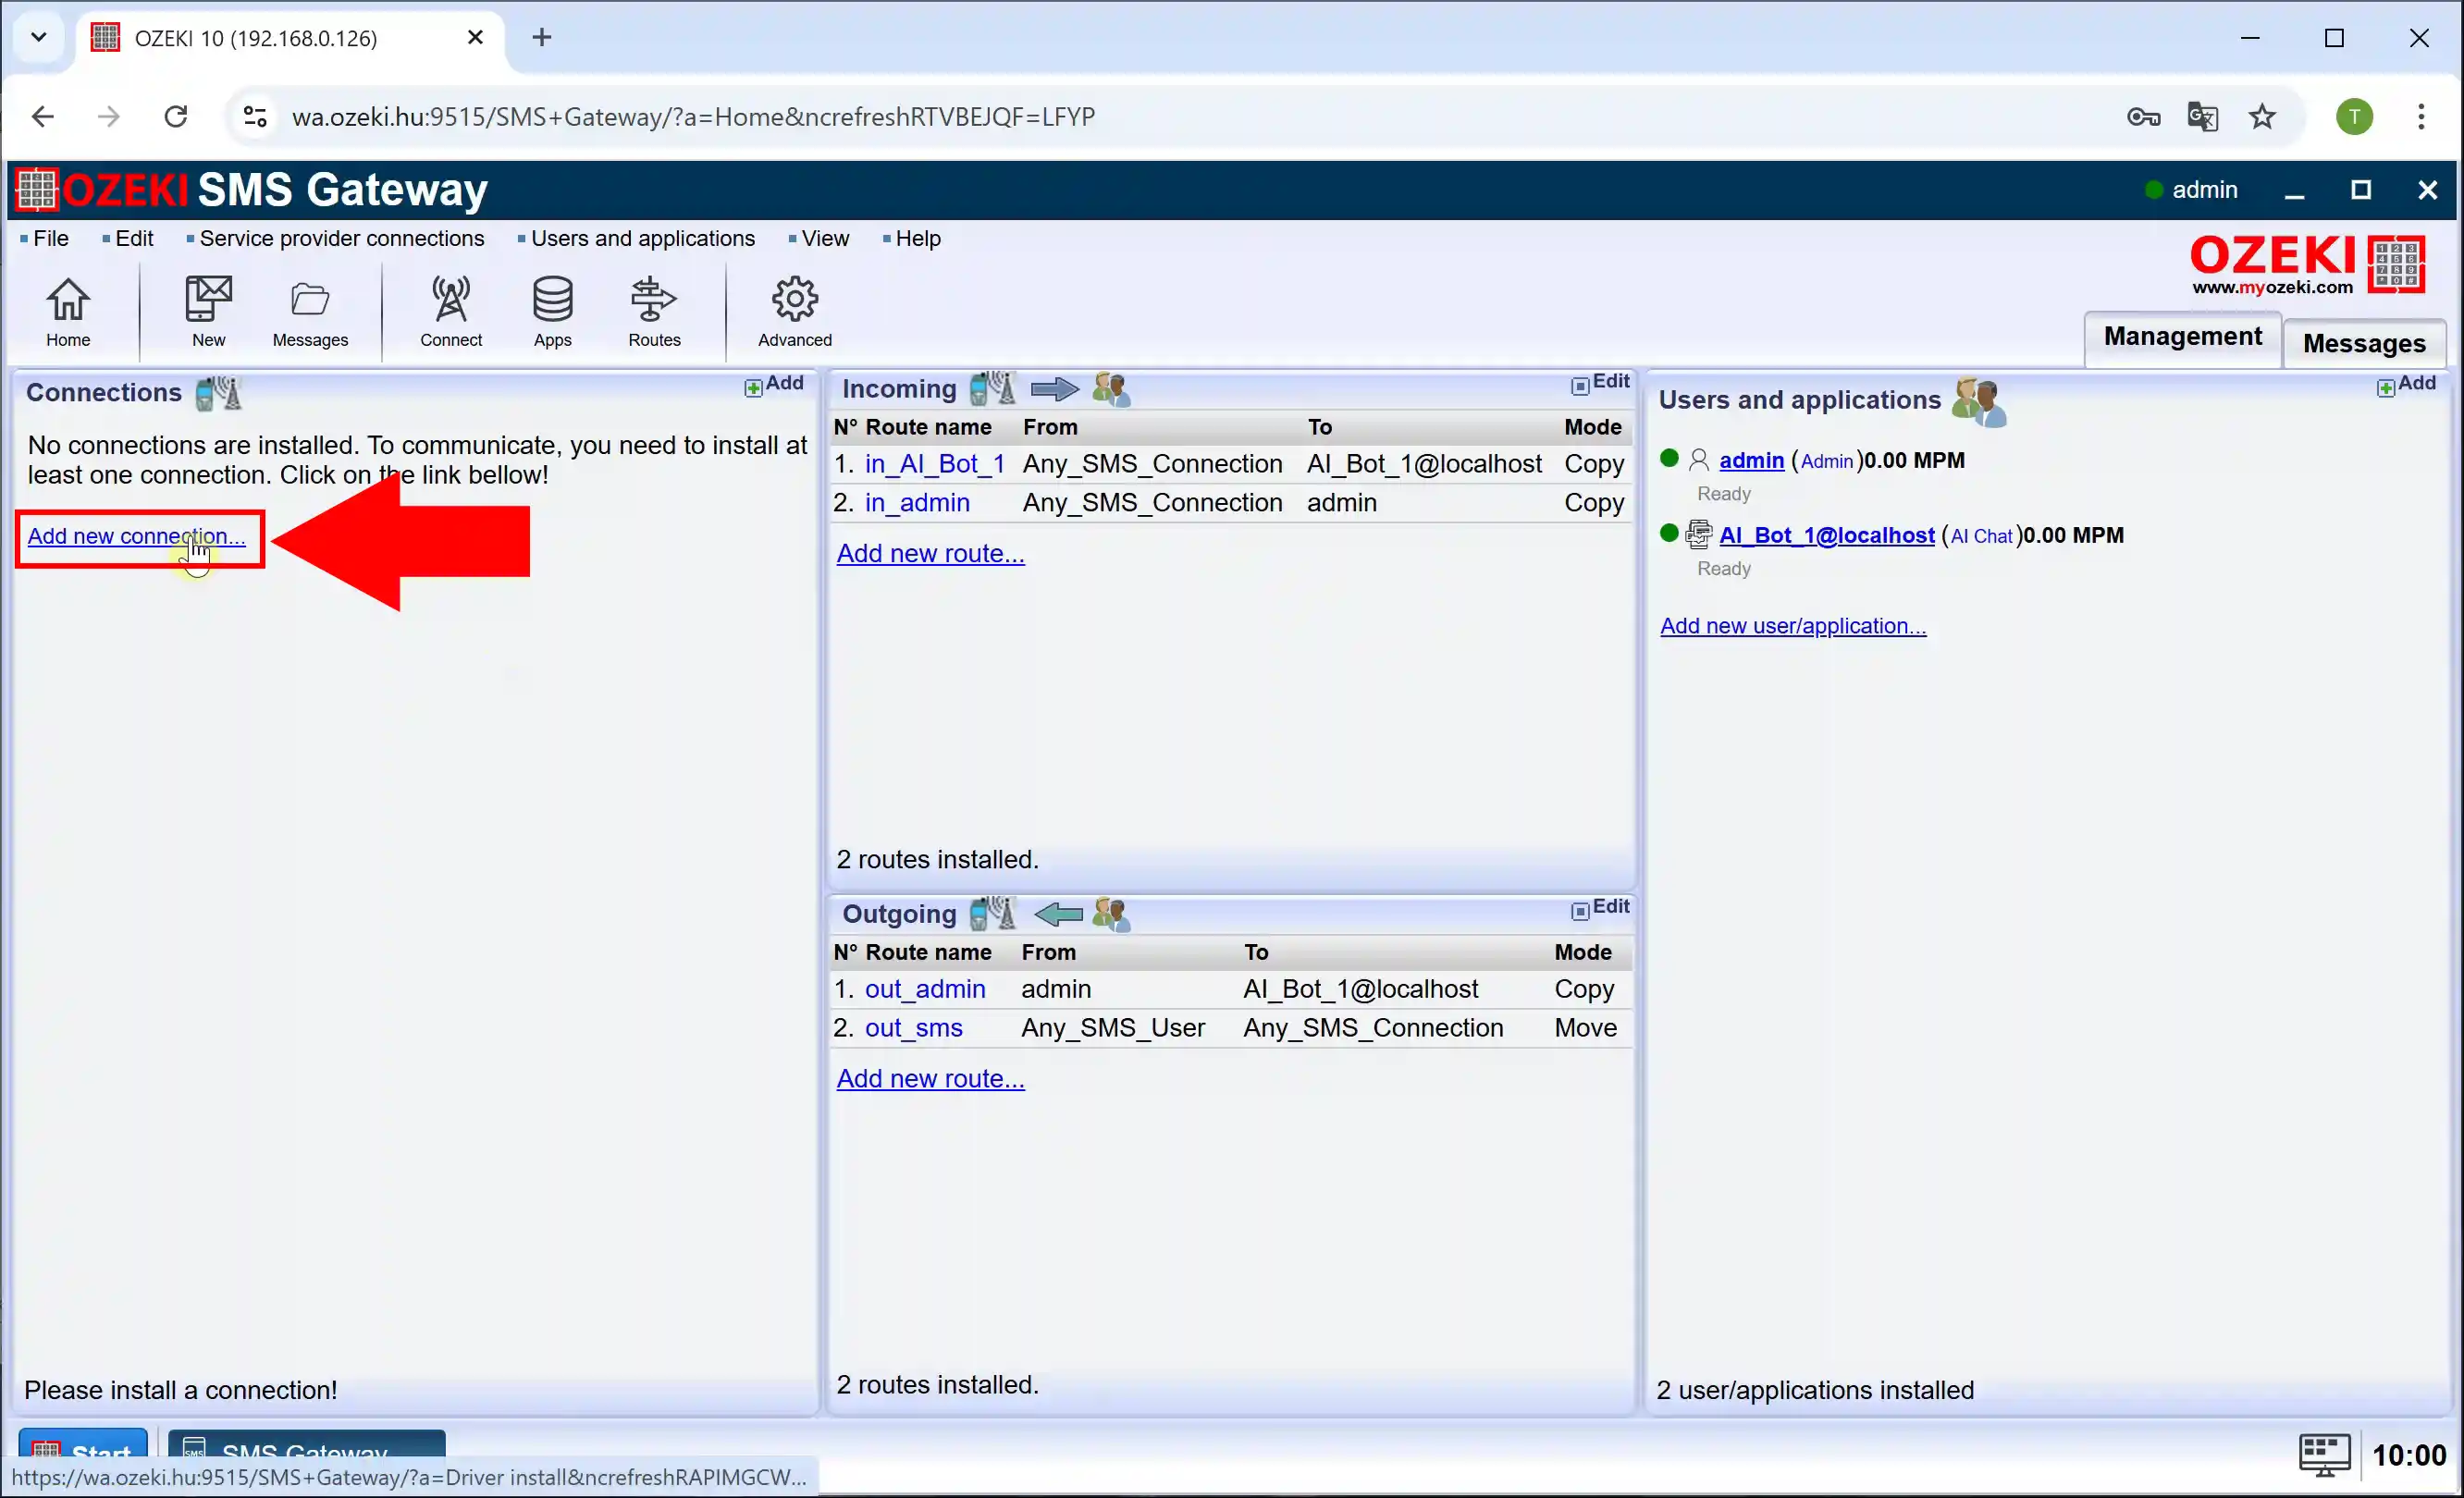
Step 10 - Add new connection
To create a new connection, click on "Add new connection..." on the left, in the "Management" tab (Figure 10).
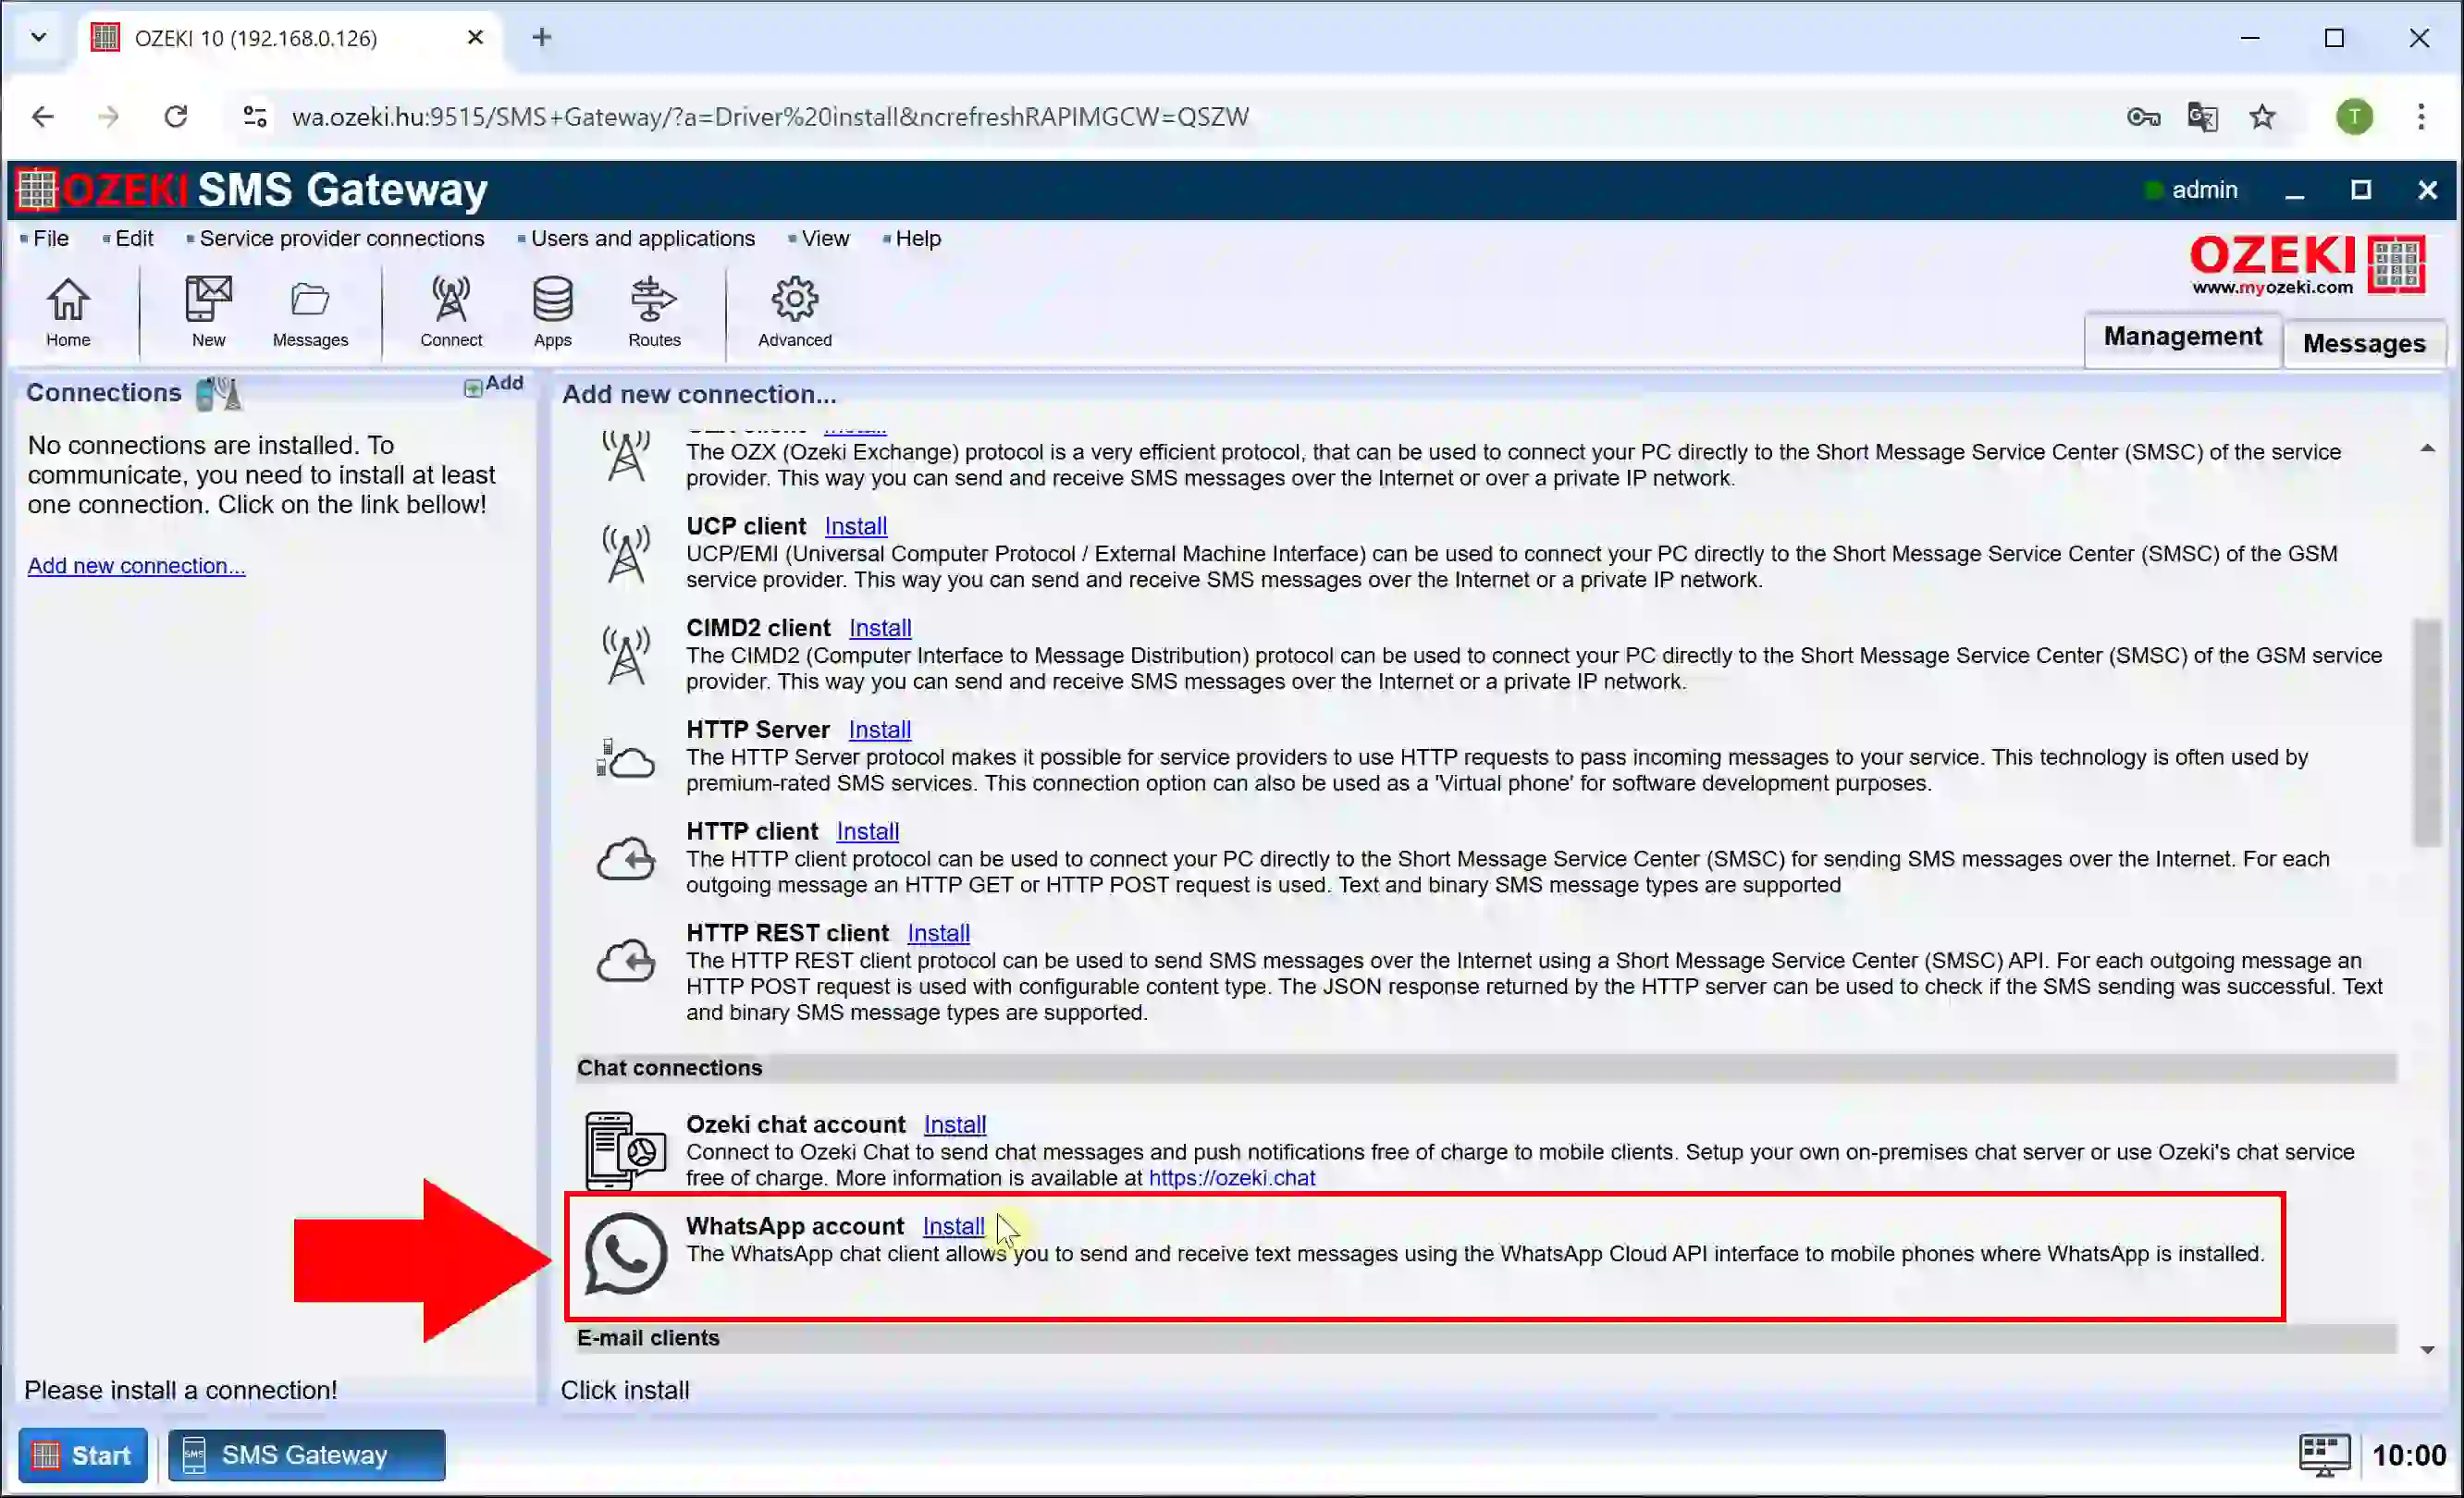
Step 11 - Install Whatsapp account
Under "Chat connections", select "WhatsApp account" and click on "Install" to install the service (Figure 11).
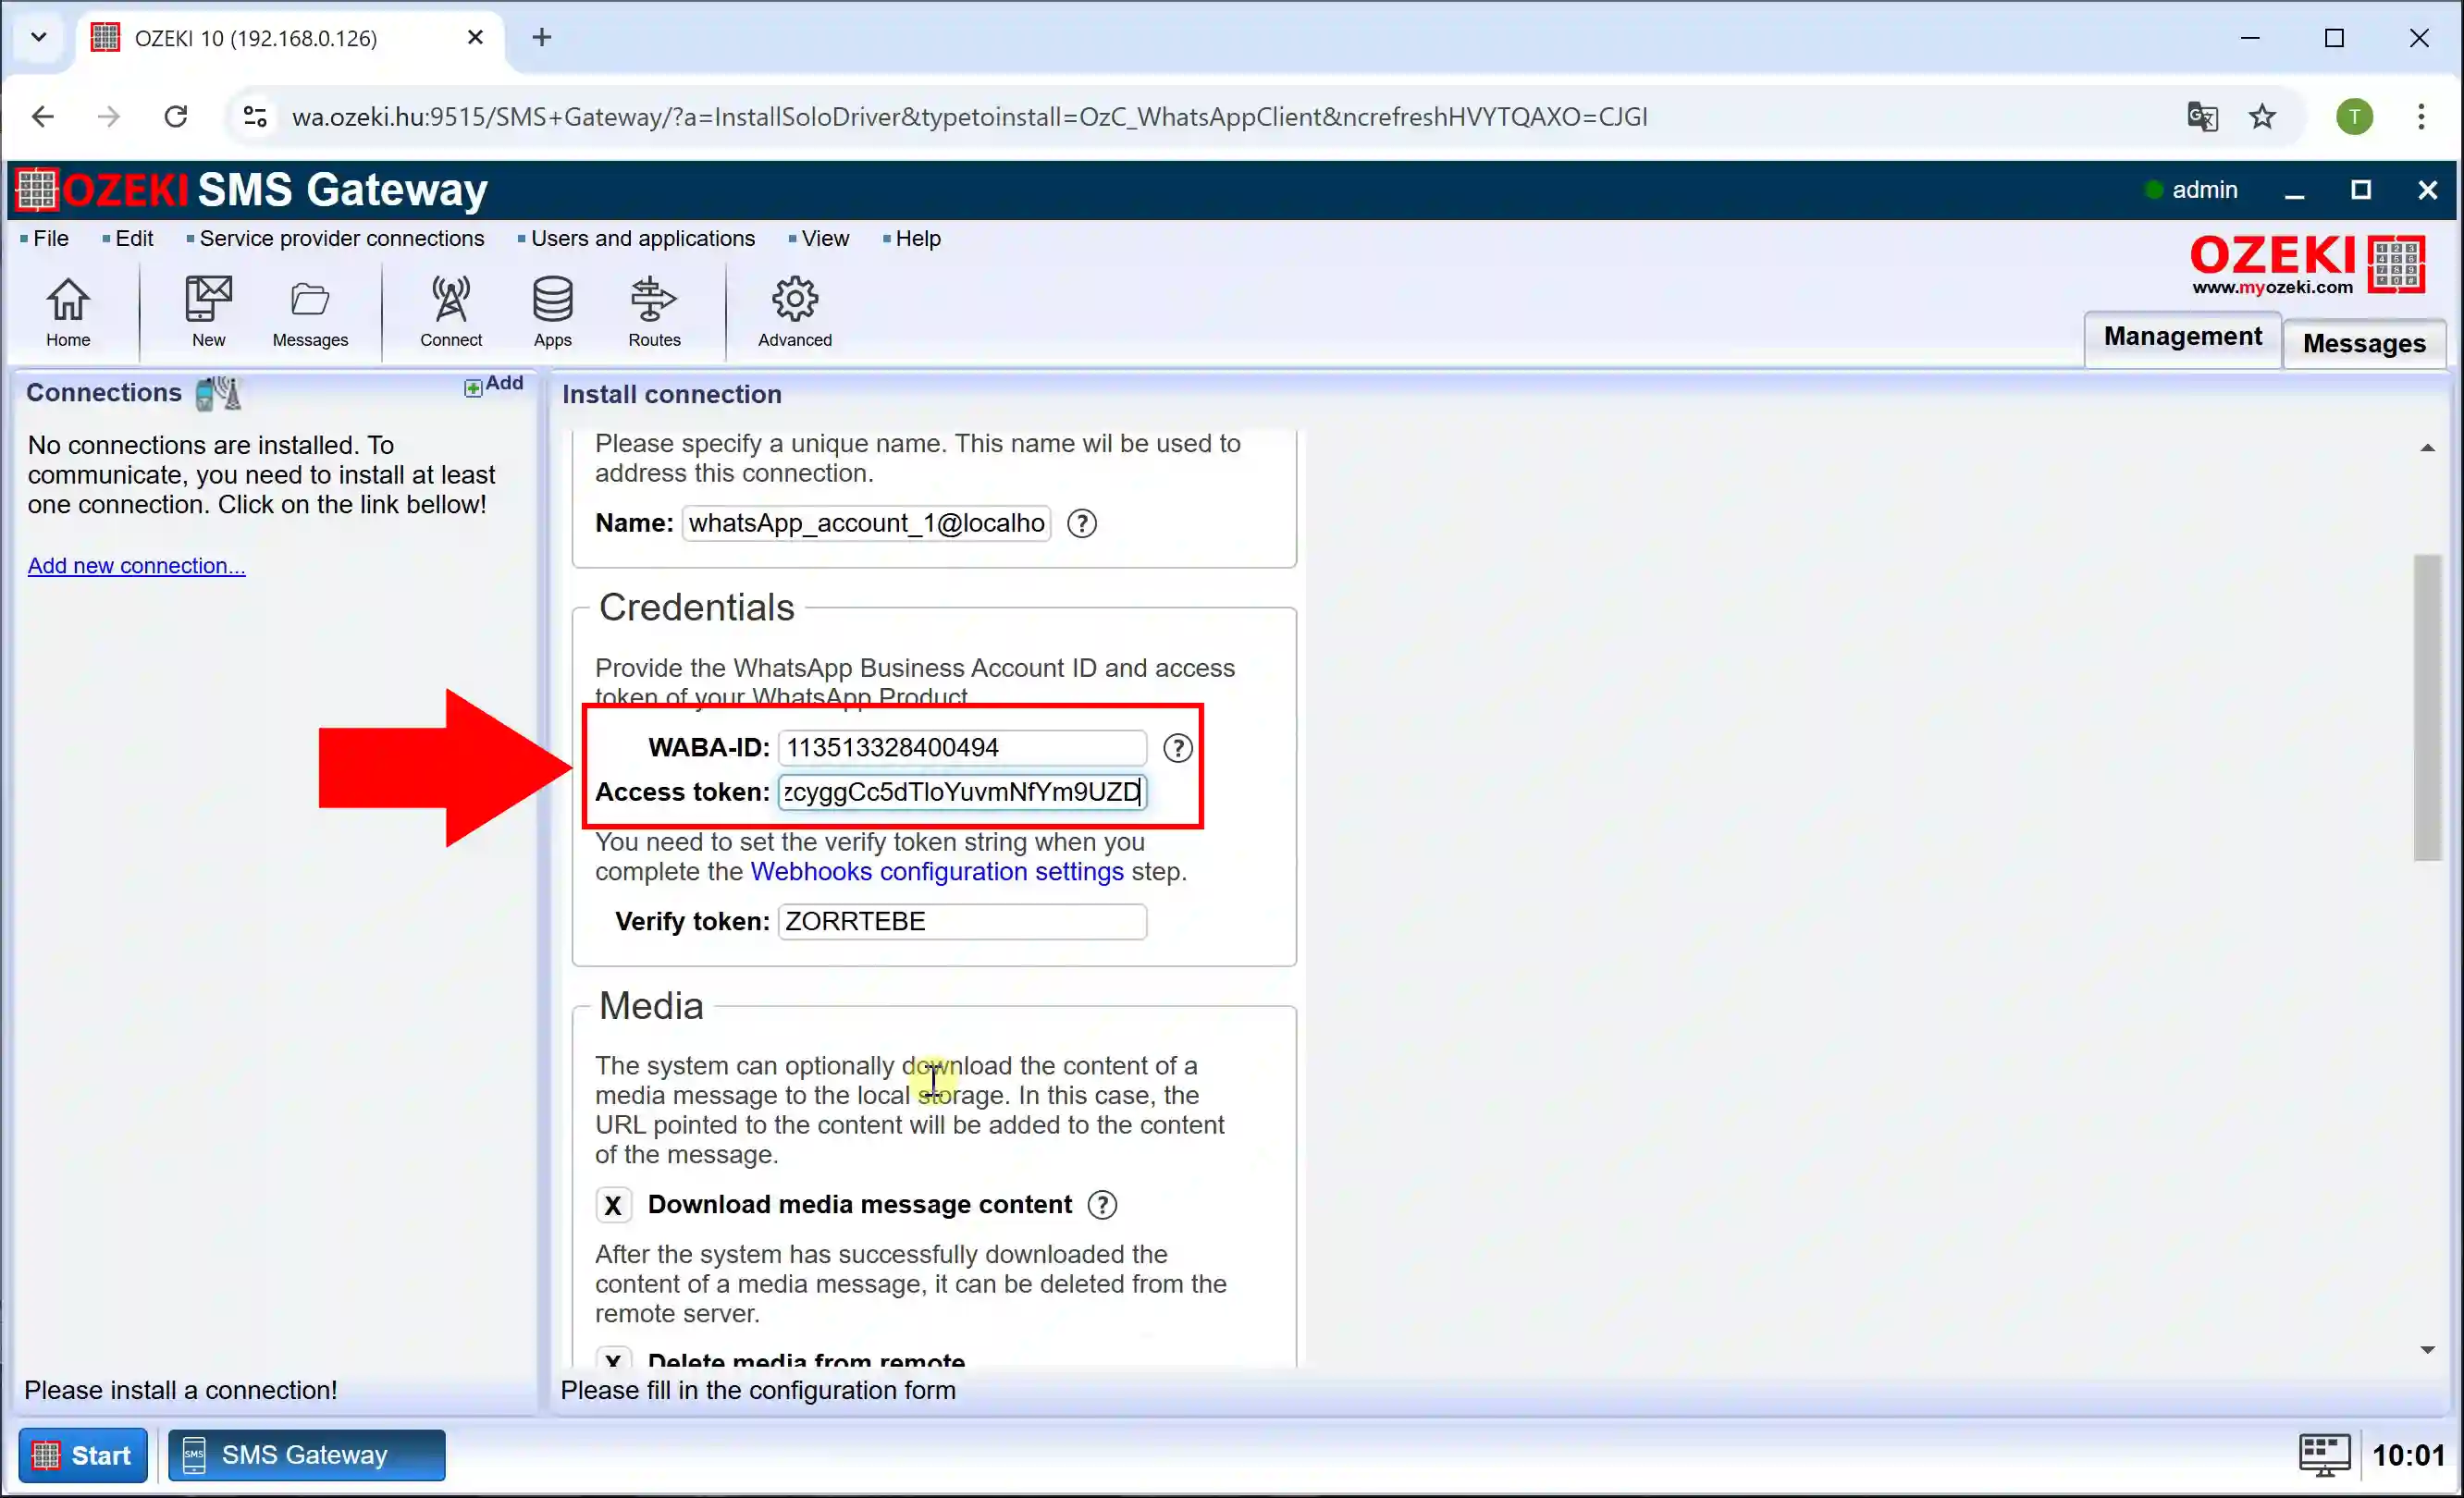
Step 12 - Configure Whatsapp credentials
Configure WhatsApp connection, under "Credentials", set "WABA-ID" and "Access token", then scroll down for more settings (Figure 12).
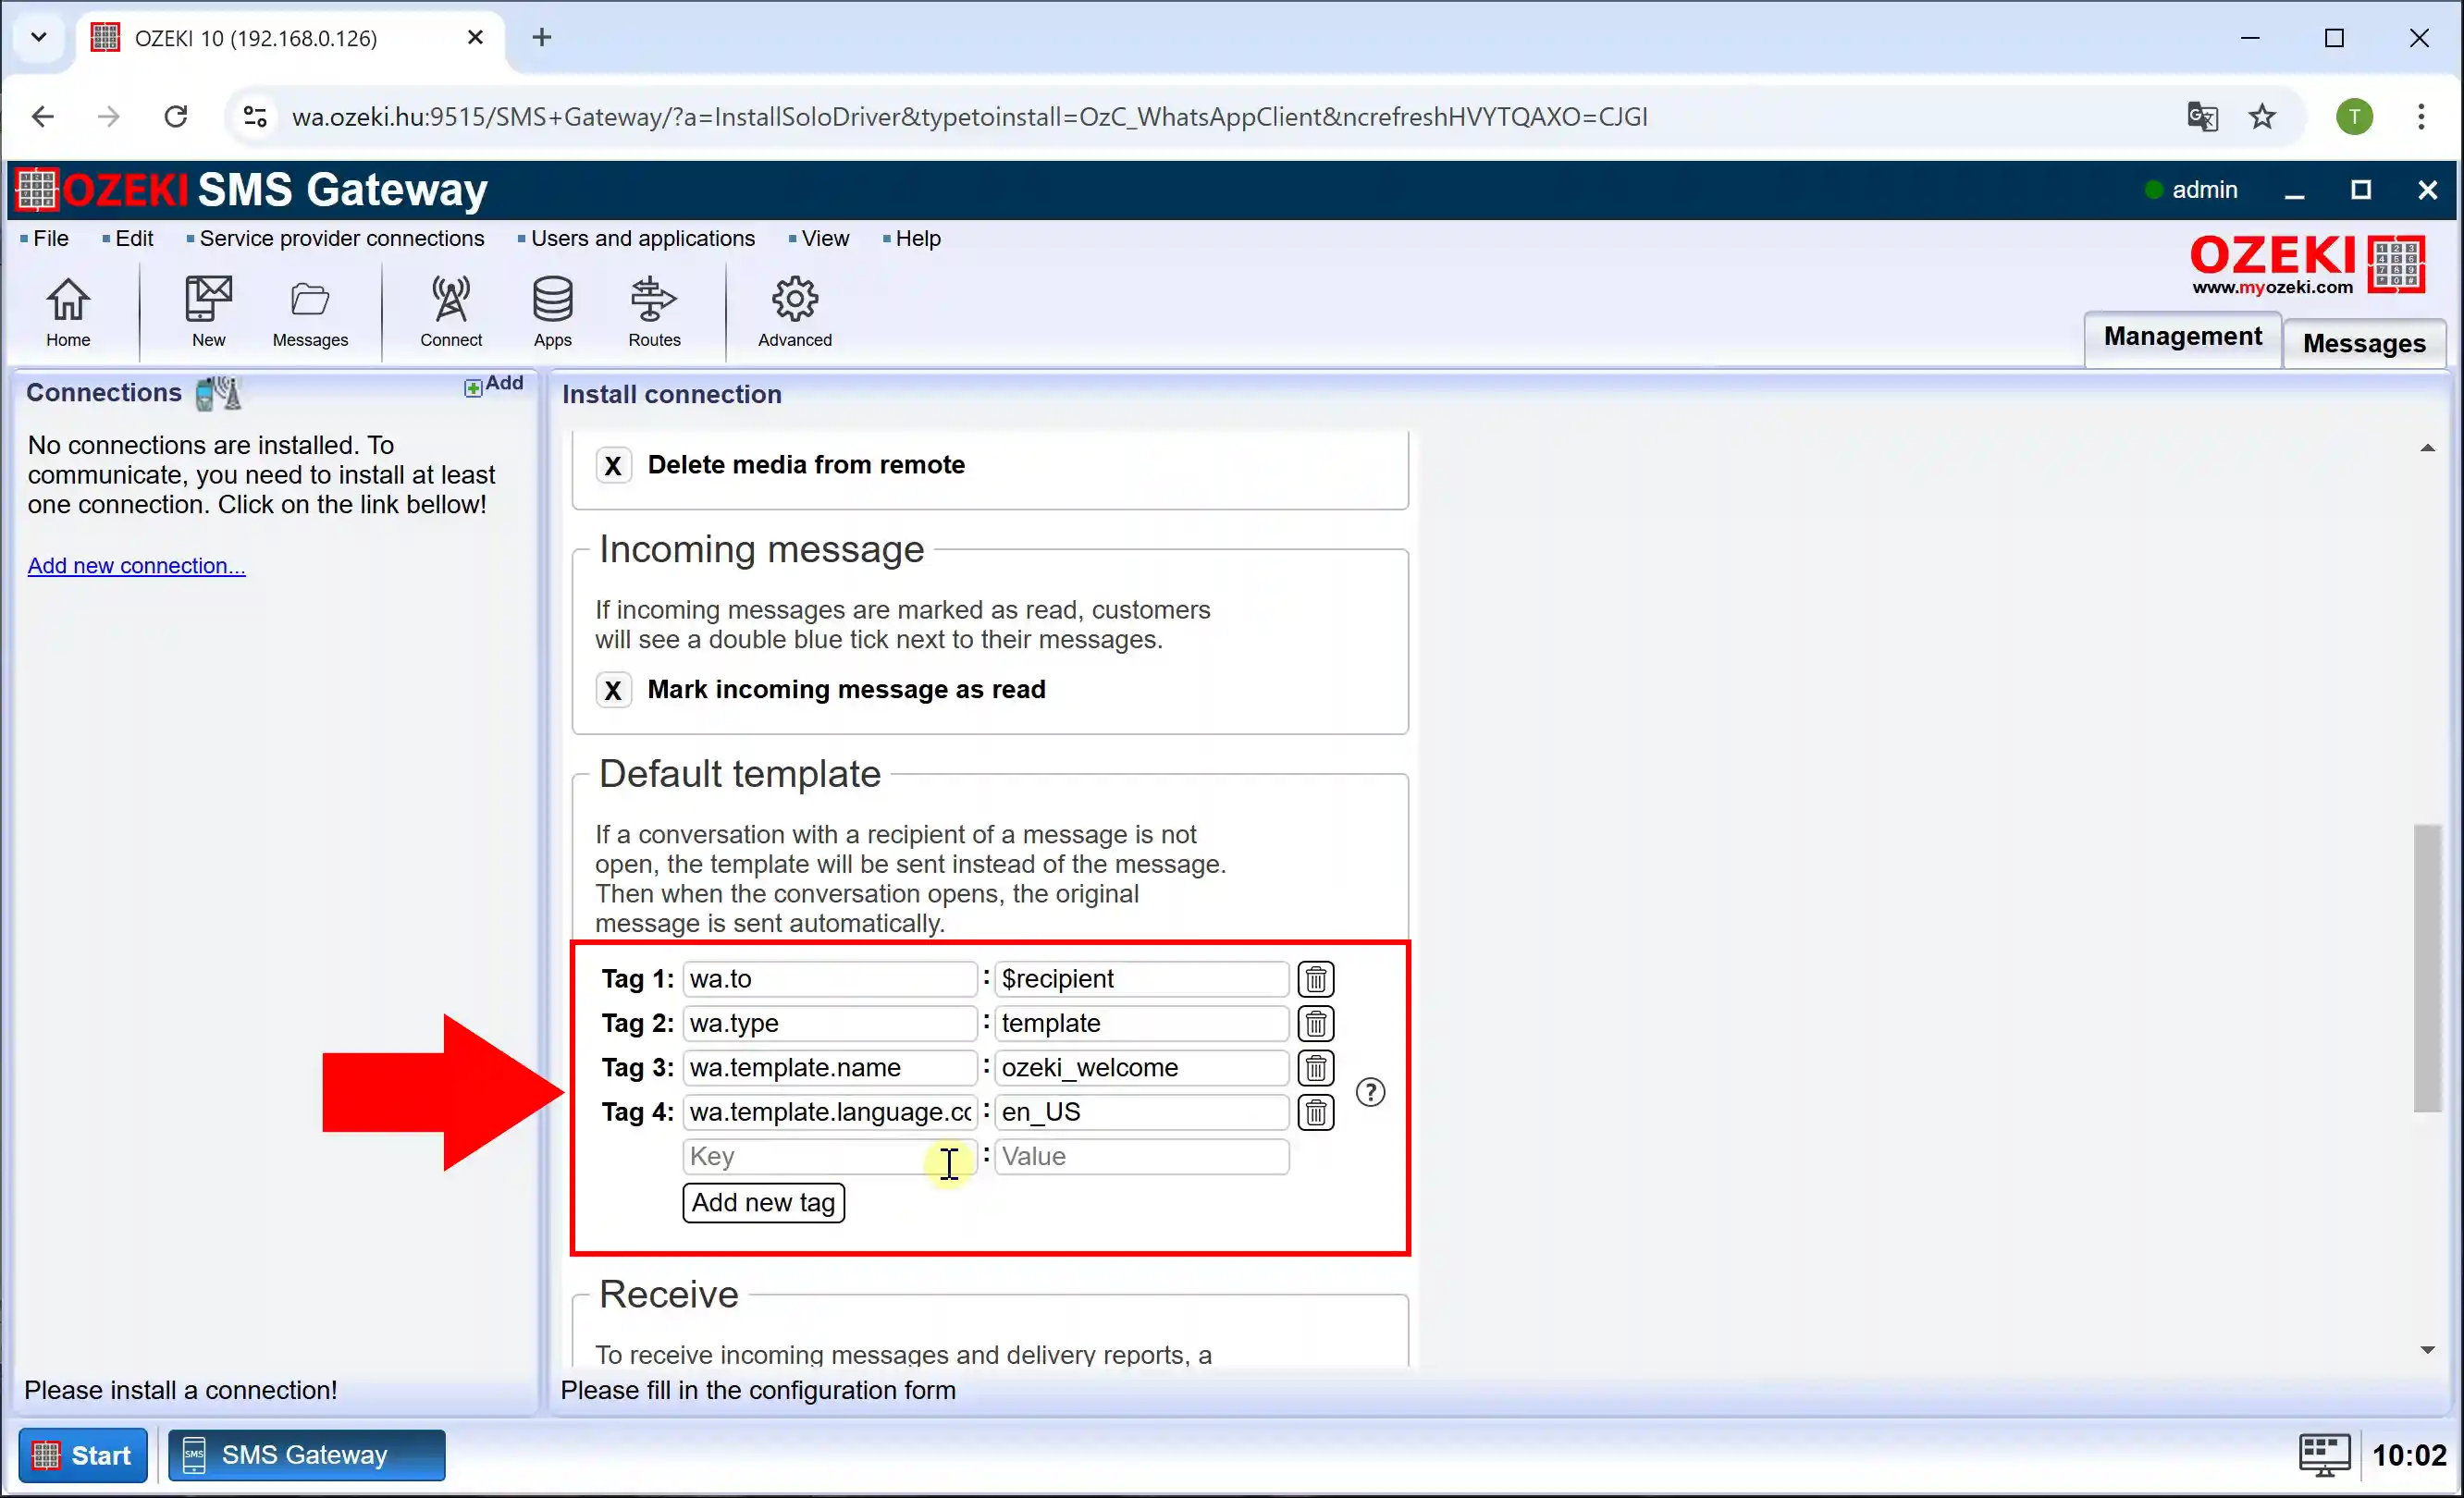
Step 13 - Configure defalt template
The "Default template" is responsible for defining the standard message structure and formatting used when responding to incoming WhatsApp messages. By setting Tag 1 to Tag 4, you specify predefined message elements (Figure 13).
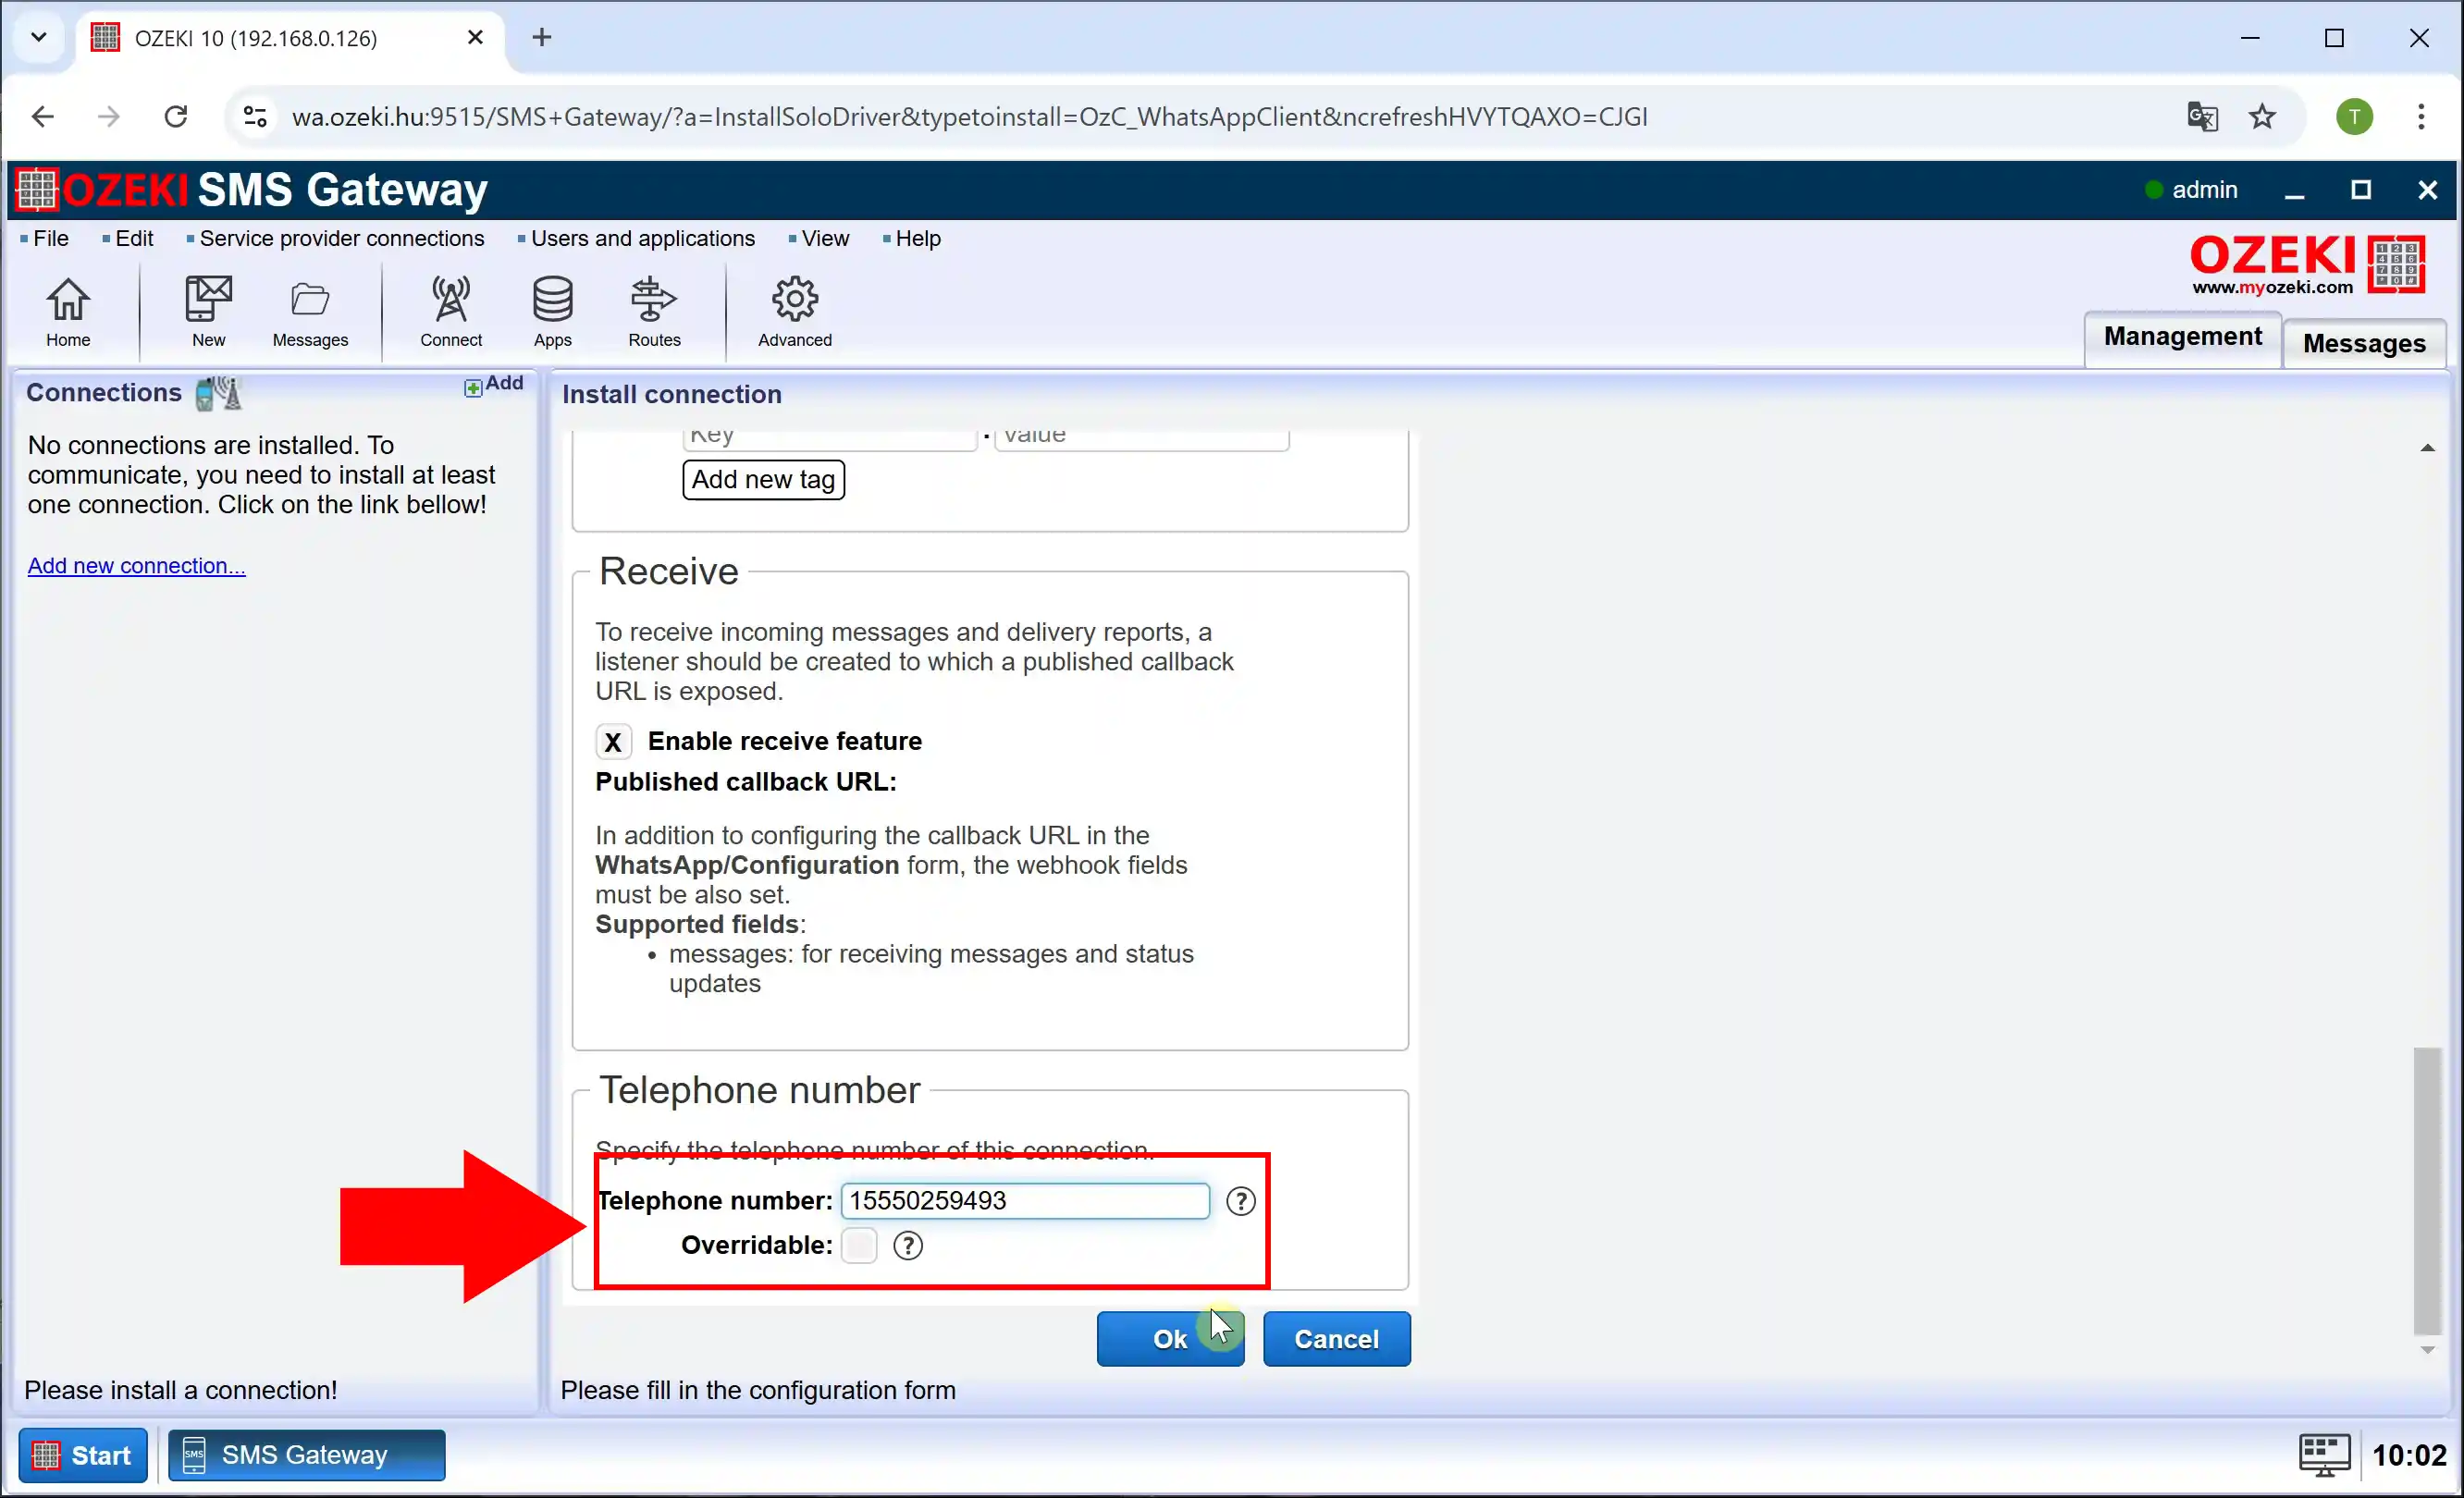
Step 14 - Set telephone number
Then scroll down again to the bottom of the page, set the "Telephone number" and click "Ok" (Figure 14).
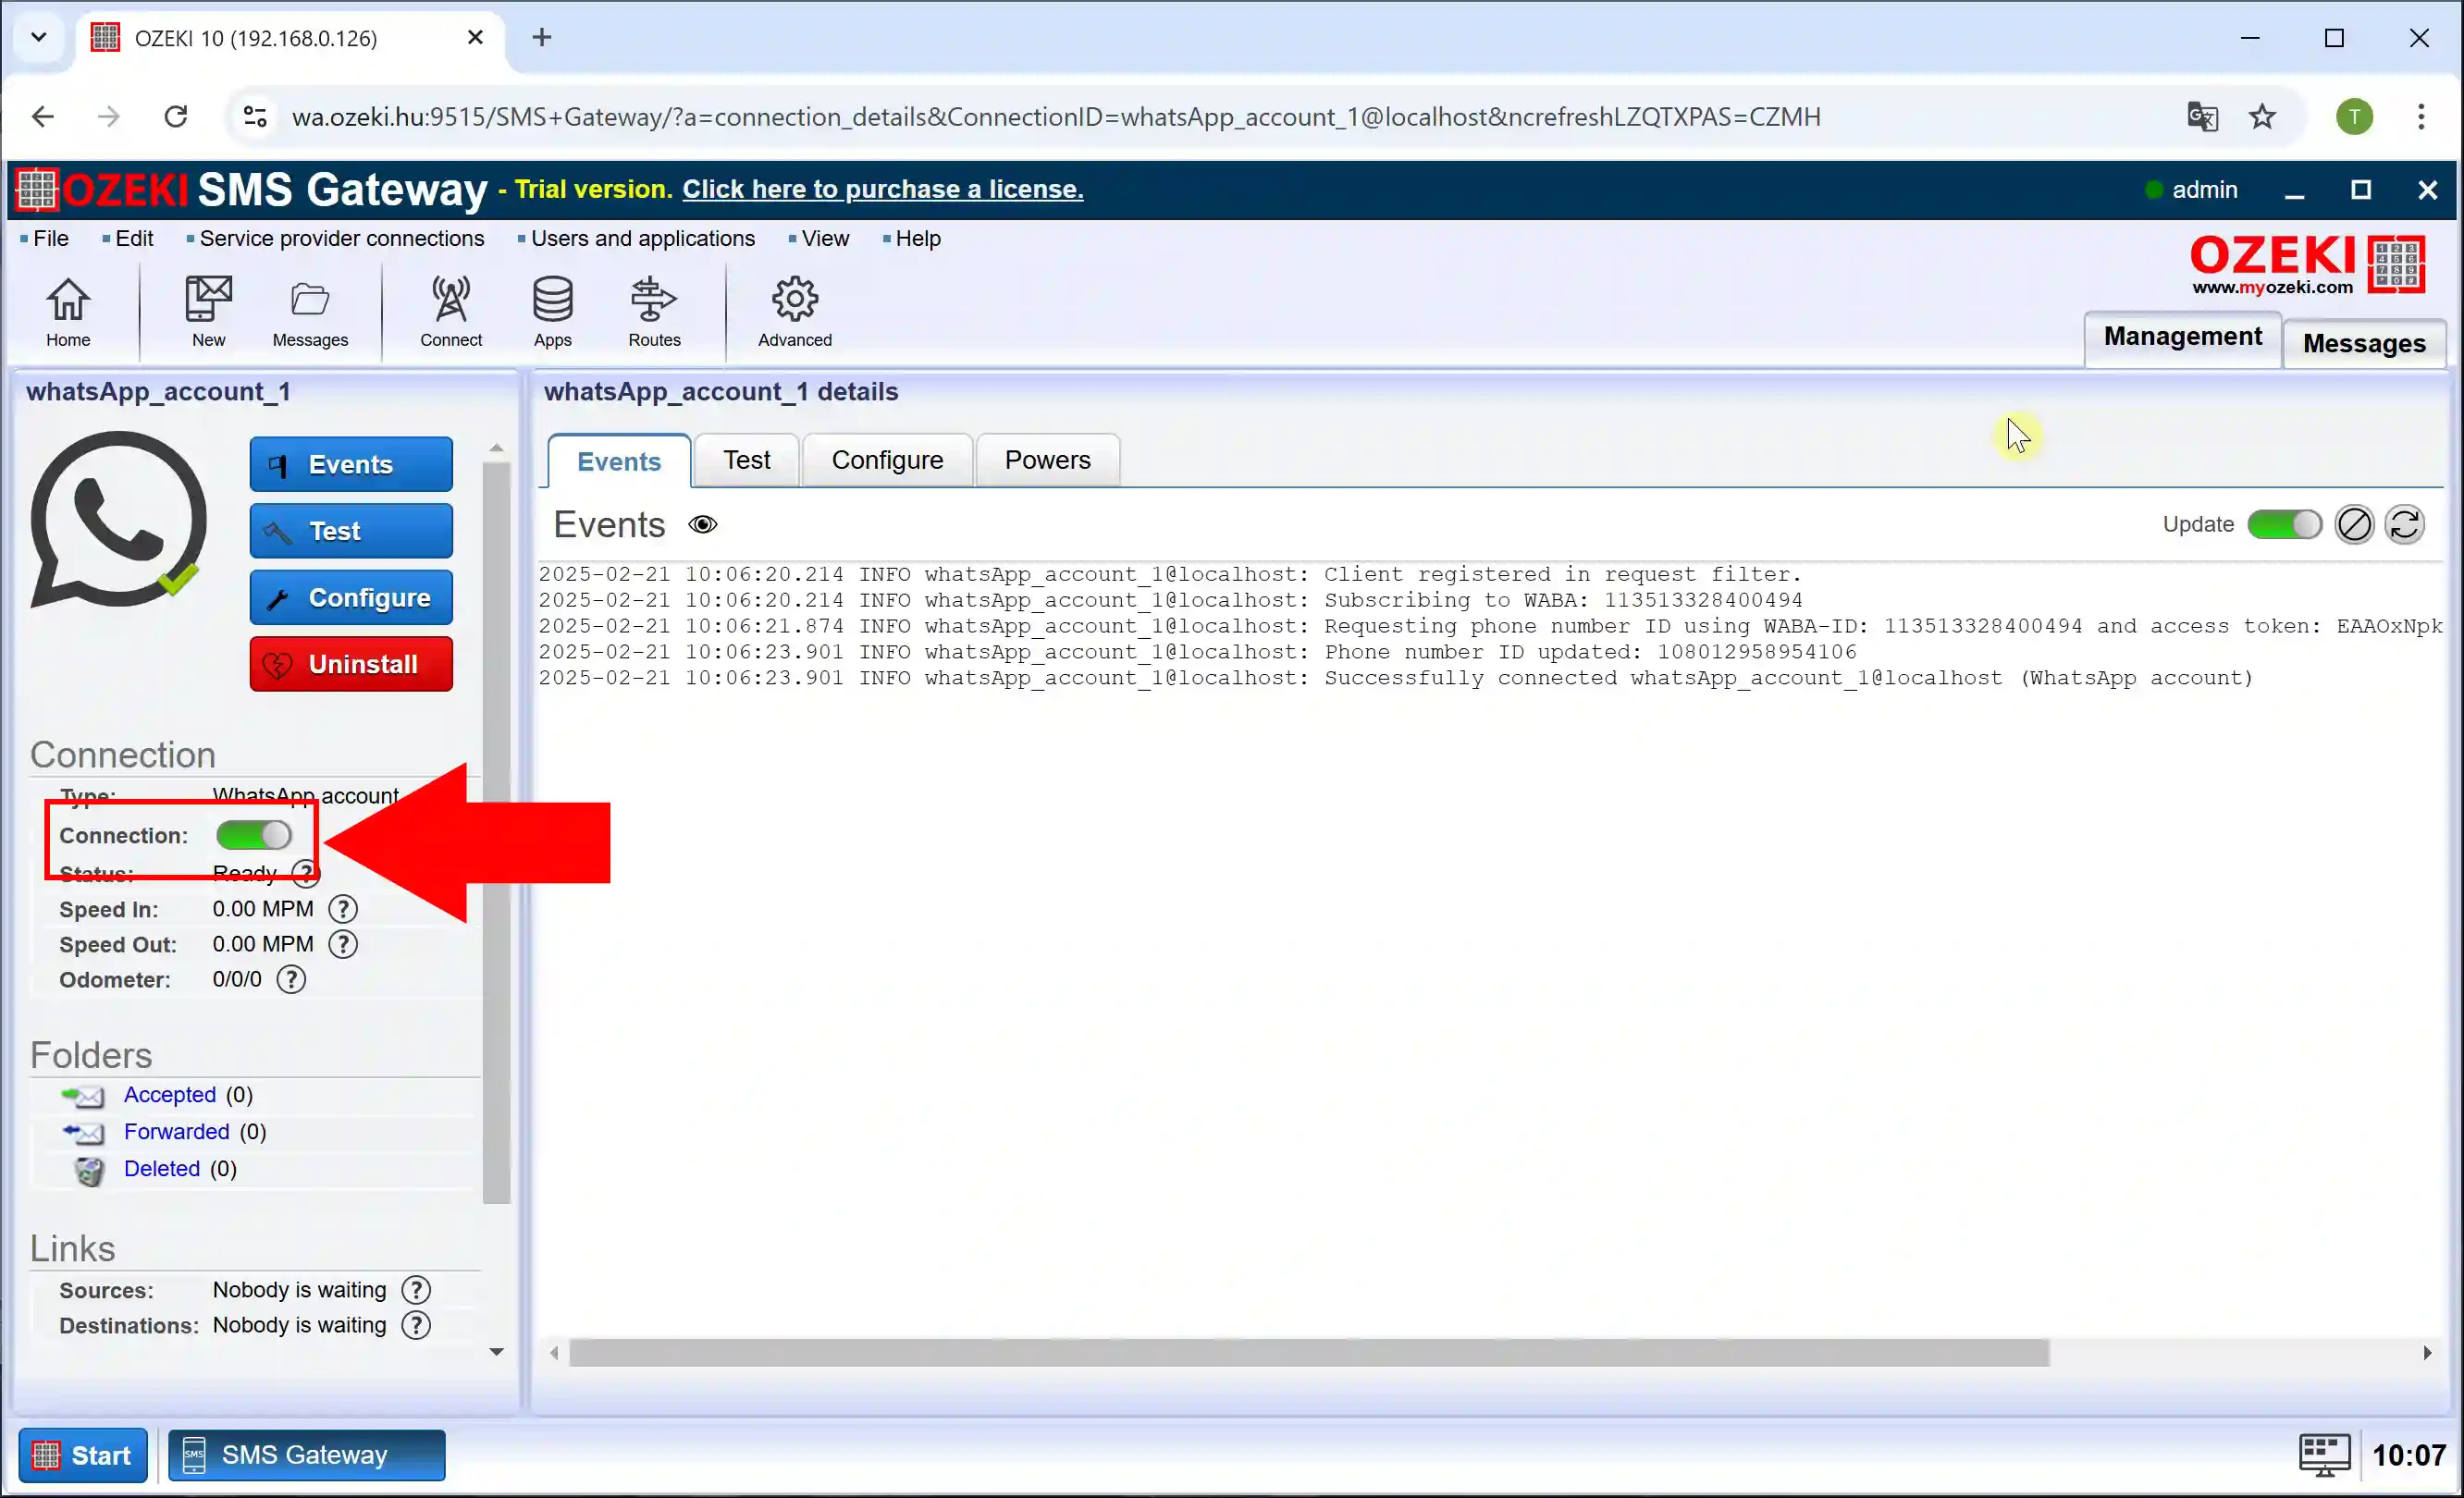
Step 15 - Whatsapp account connected
After setting up Ceredentials, Default template, Phone number, make sure that "Connection" is enabled (Figure 15).
Step 16 - Create new incoming route
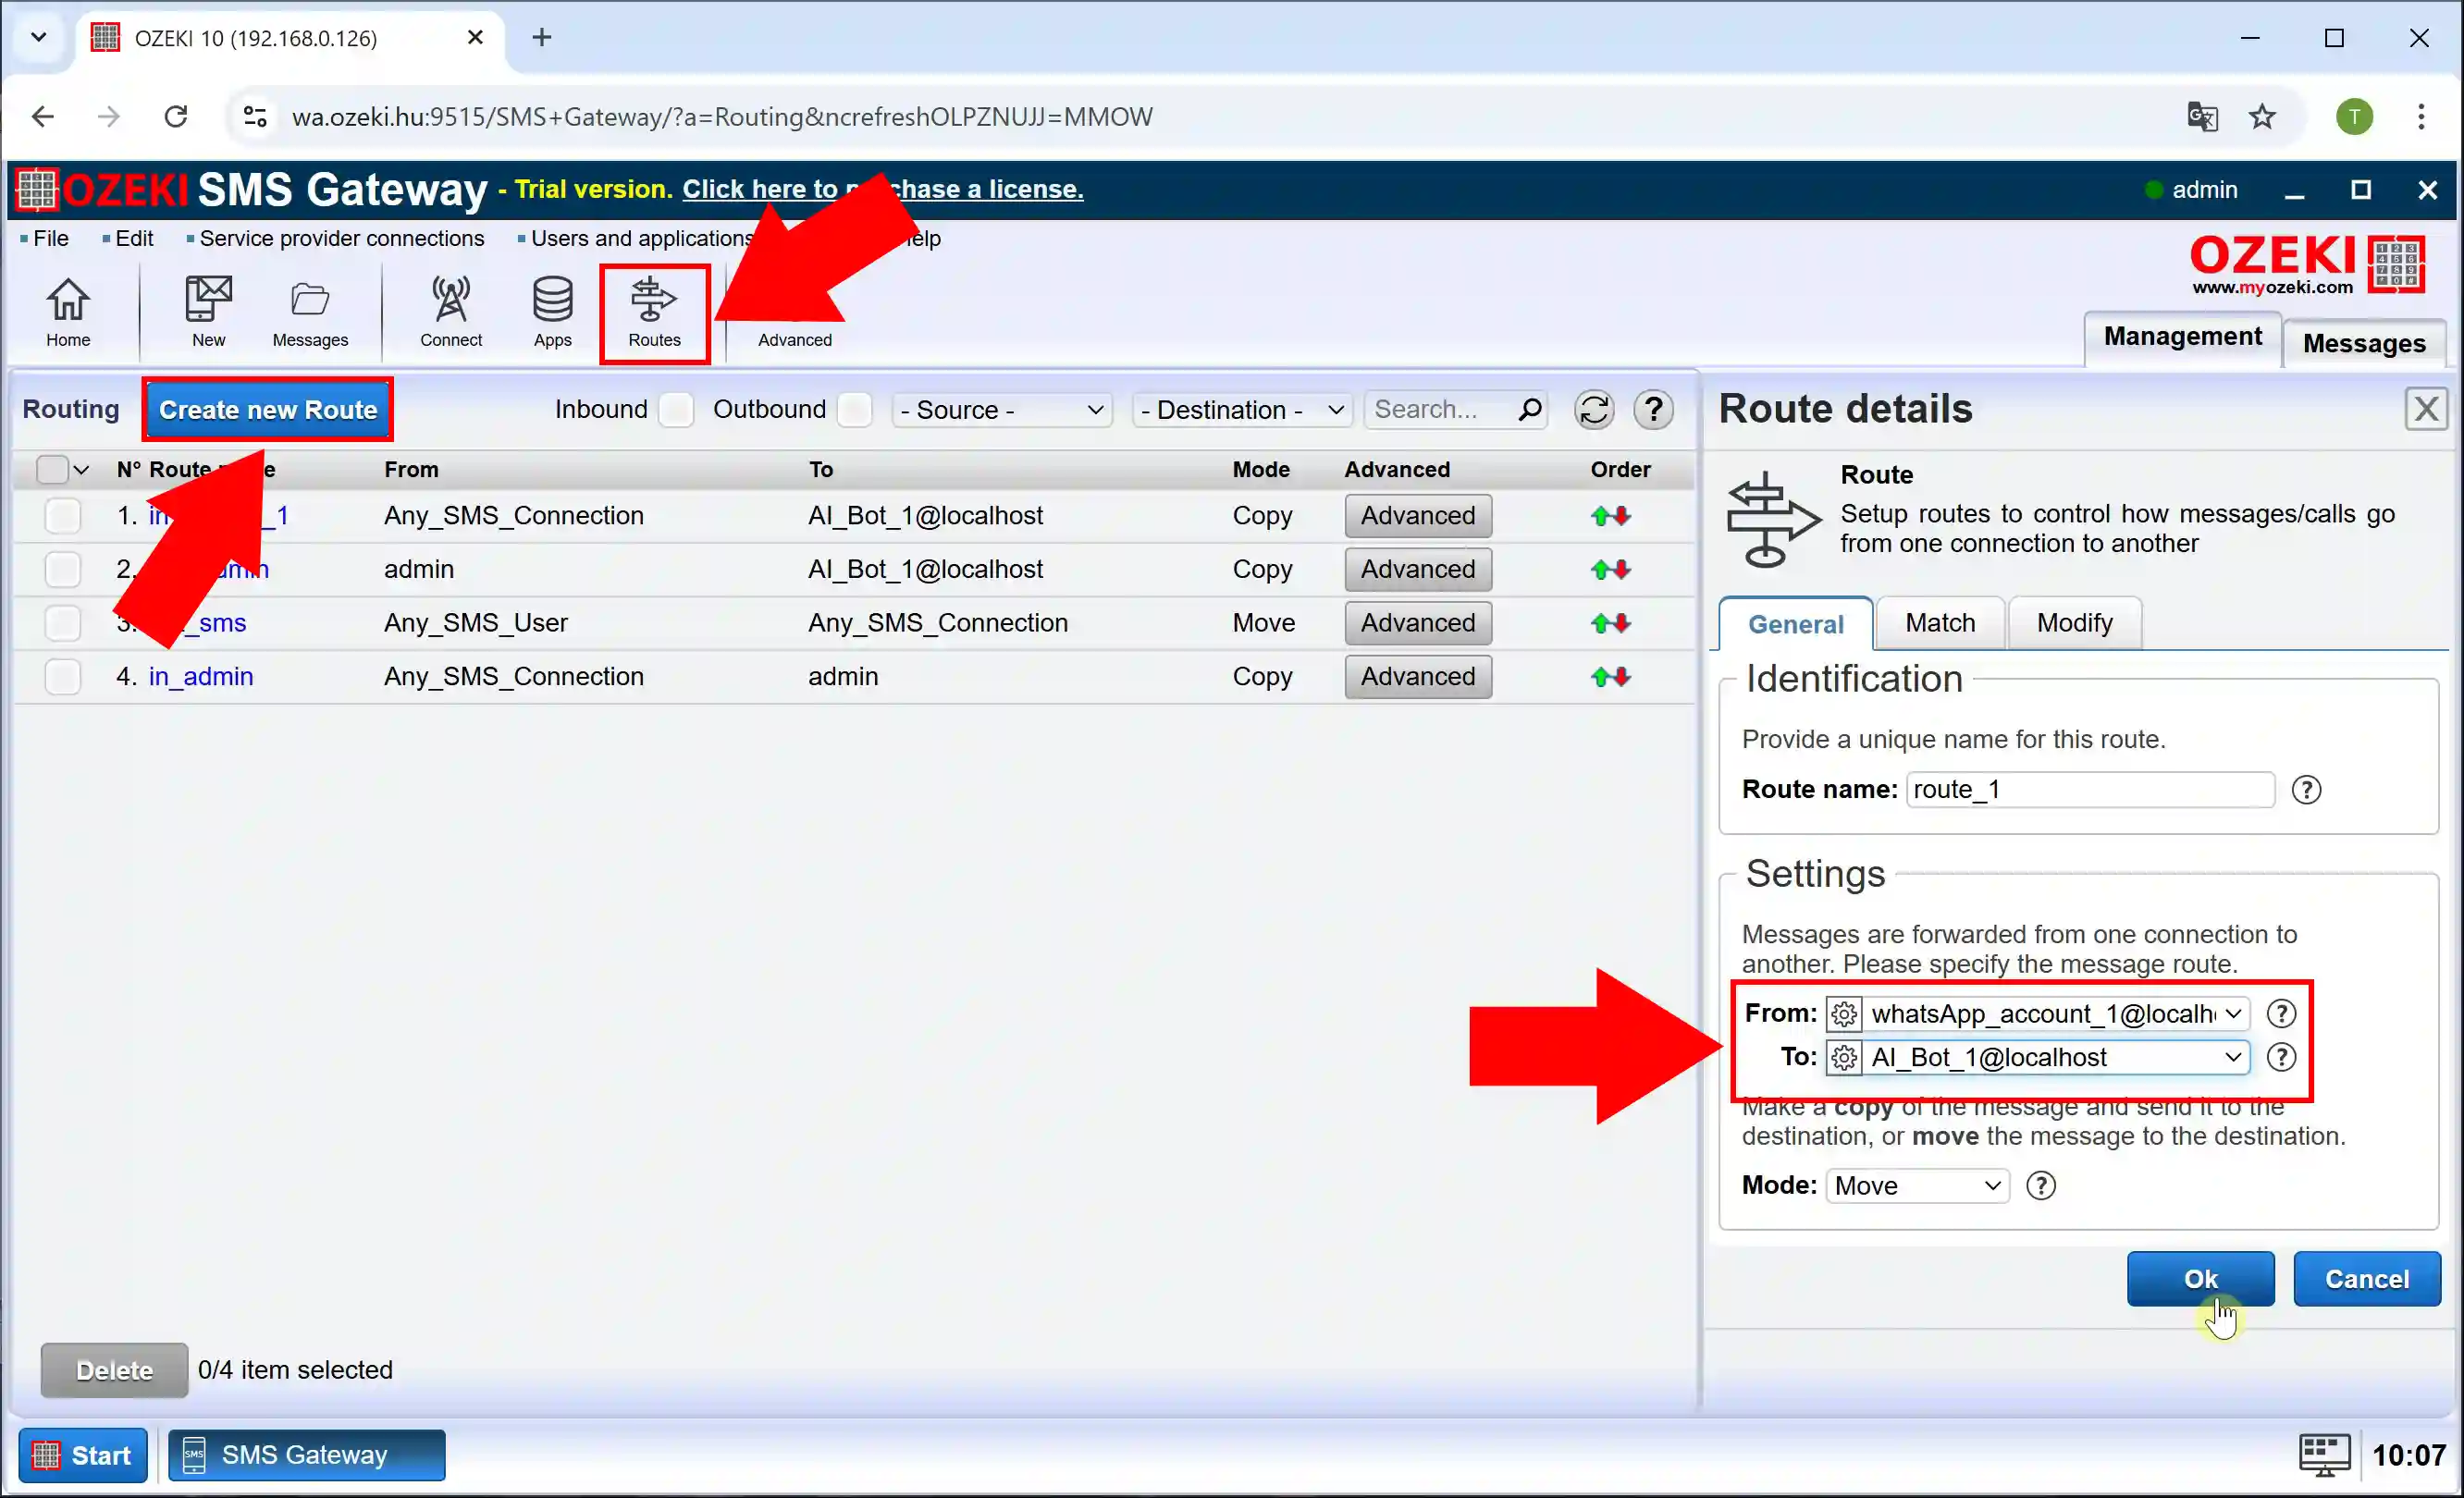
To create a new incoming route, click on the "Routes" button at the top of the screen, then "Create new Route" and set the sender and receiver routes on the right (Figure 16).
Step 17 - Create new outgoing route
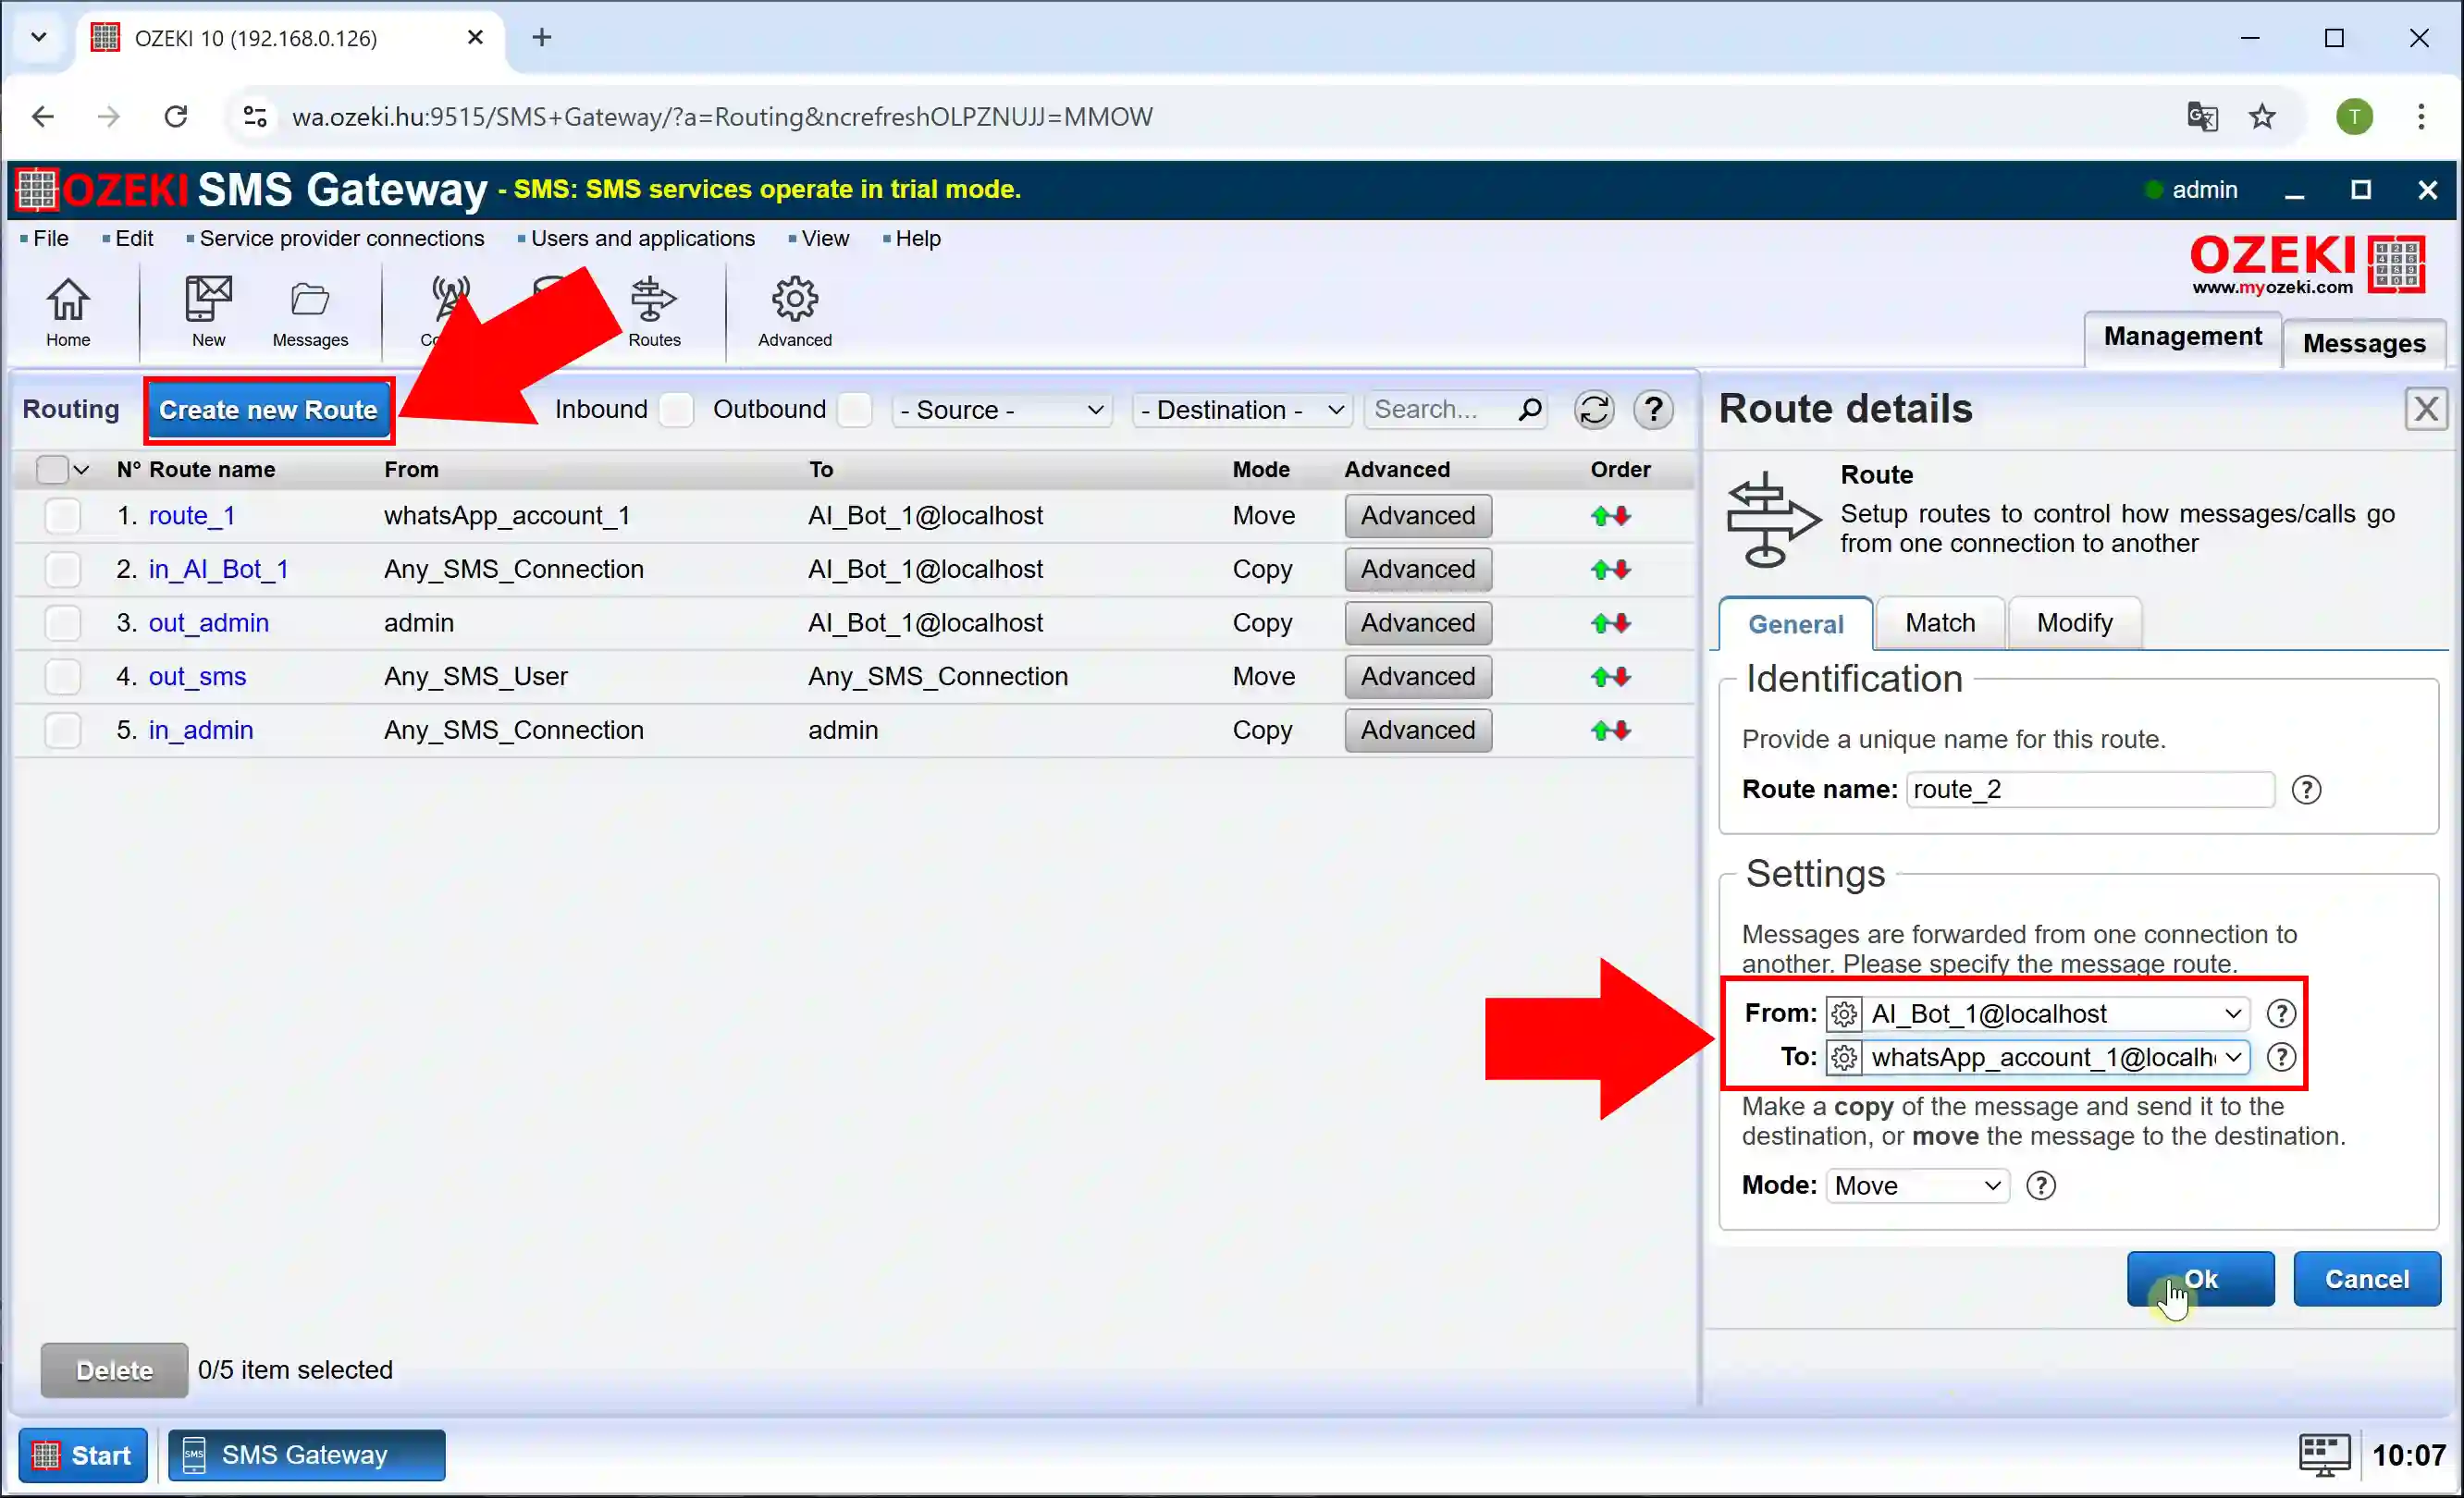
To create a new outgoing route, let's create a new route again, only this time swap the sender and the receiver (Figure 17).
Send Whatsapp test message what is answered by AI chatbot (Video tutorial)
In this video, we will demonstrate how to test your AI chatbot’s connection and response handling in the Ozeki SMS Gateway by sending a WhatsApp message and verifying the AI-generated reply. This process ensures that your setup is correctly configured and capable of processing incoming messages efficiently.
Step 18 - Open AI chatbot
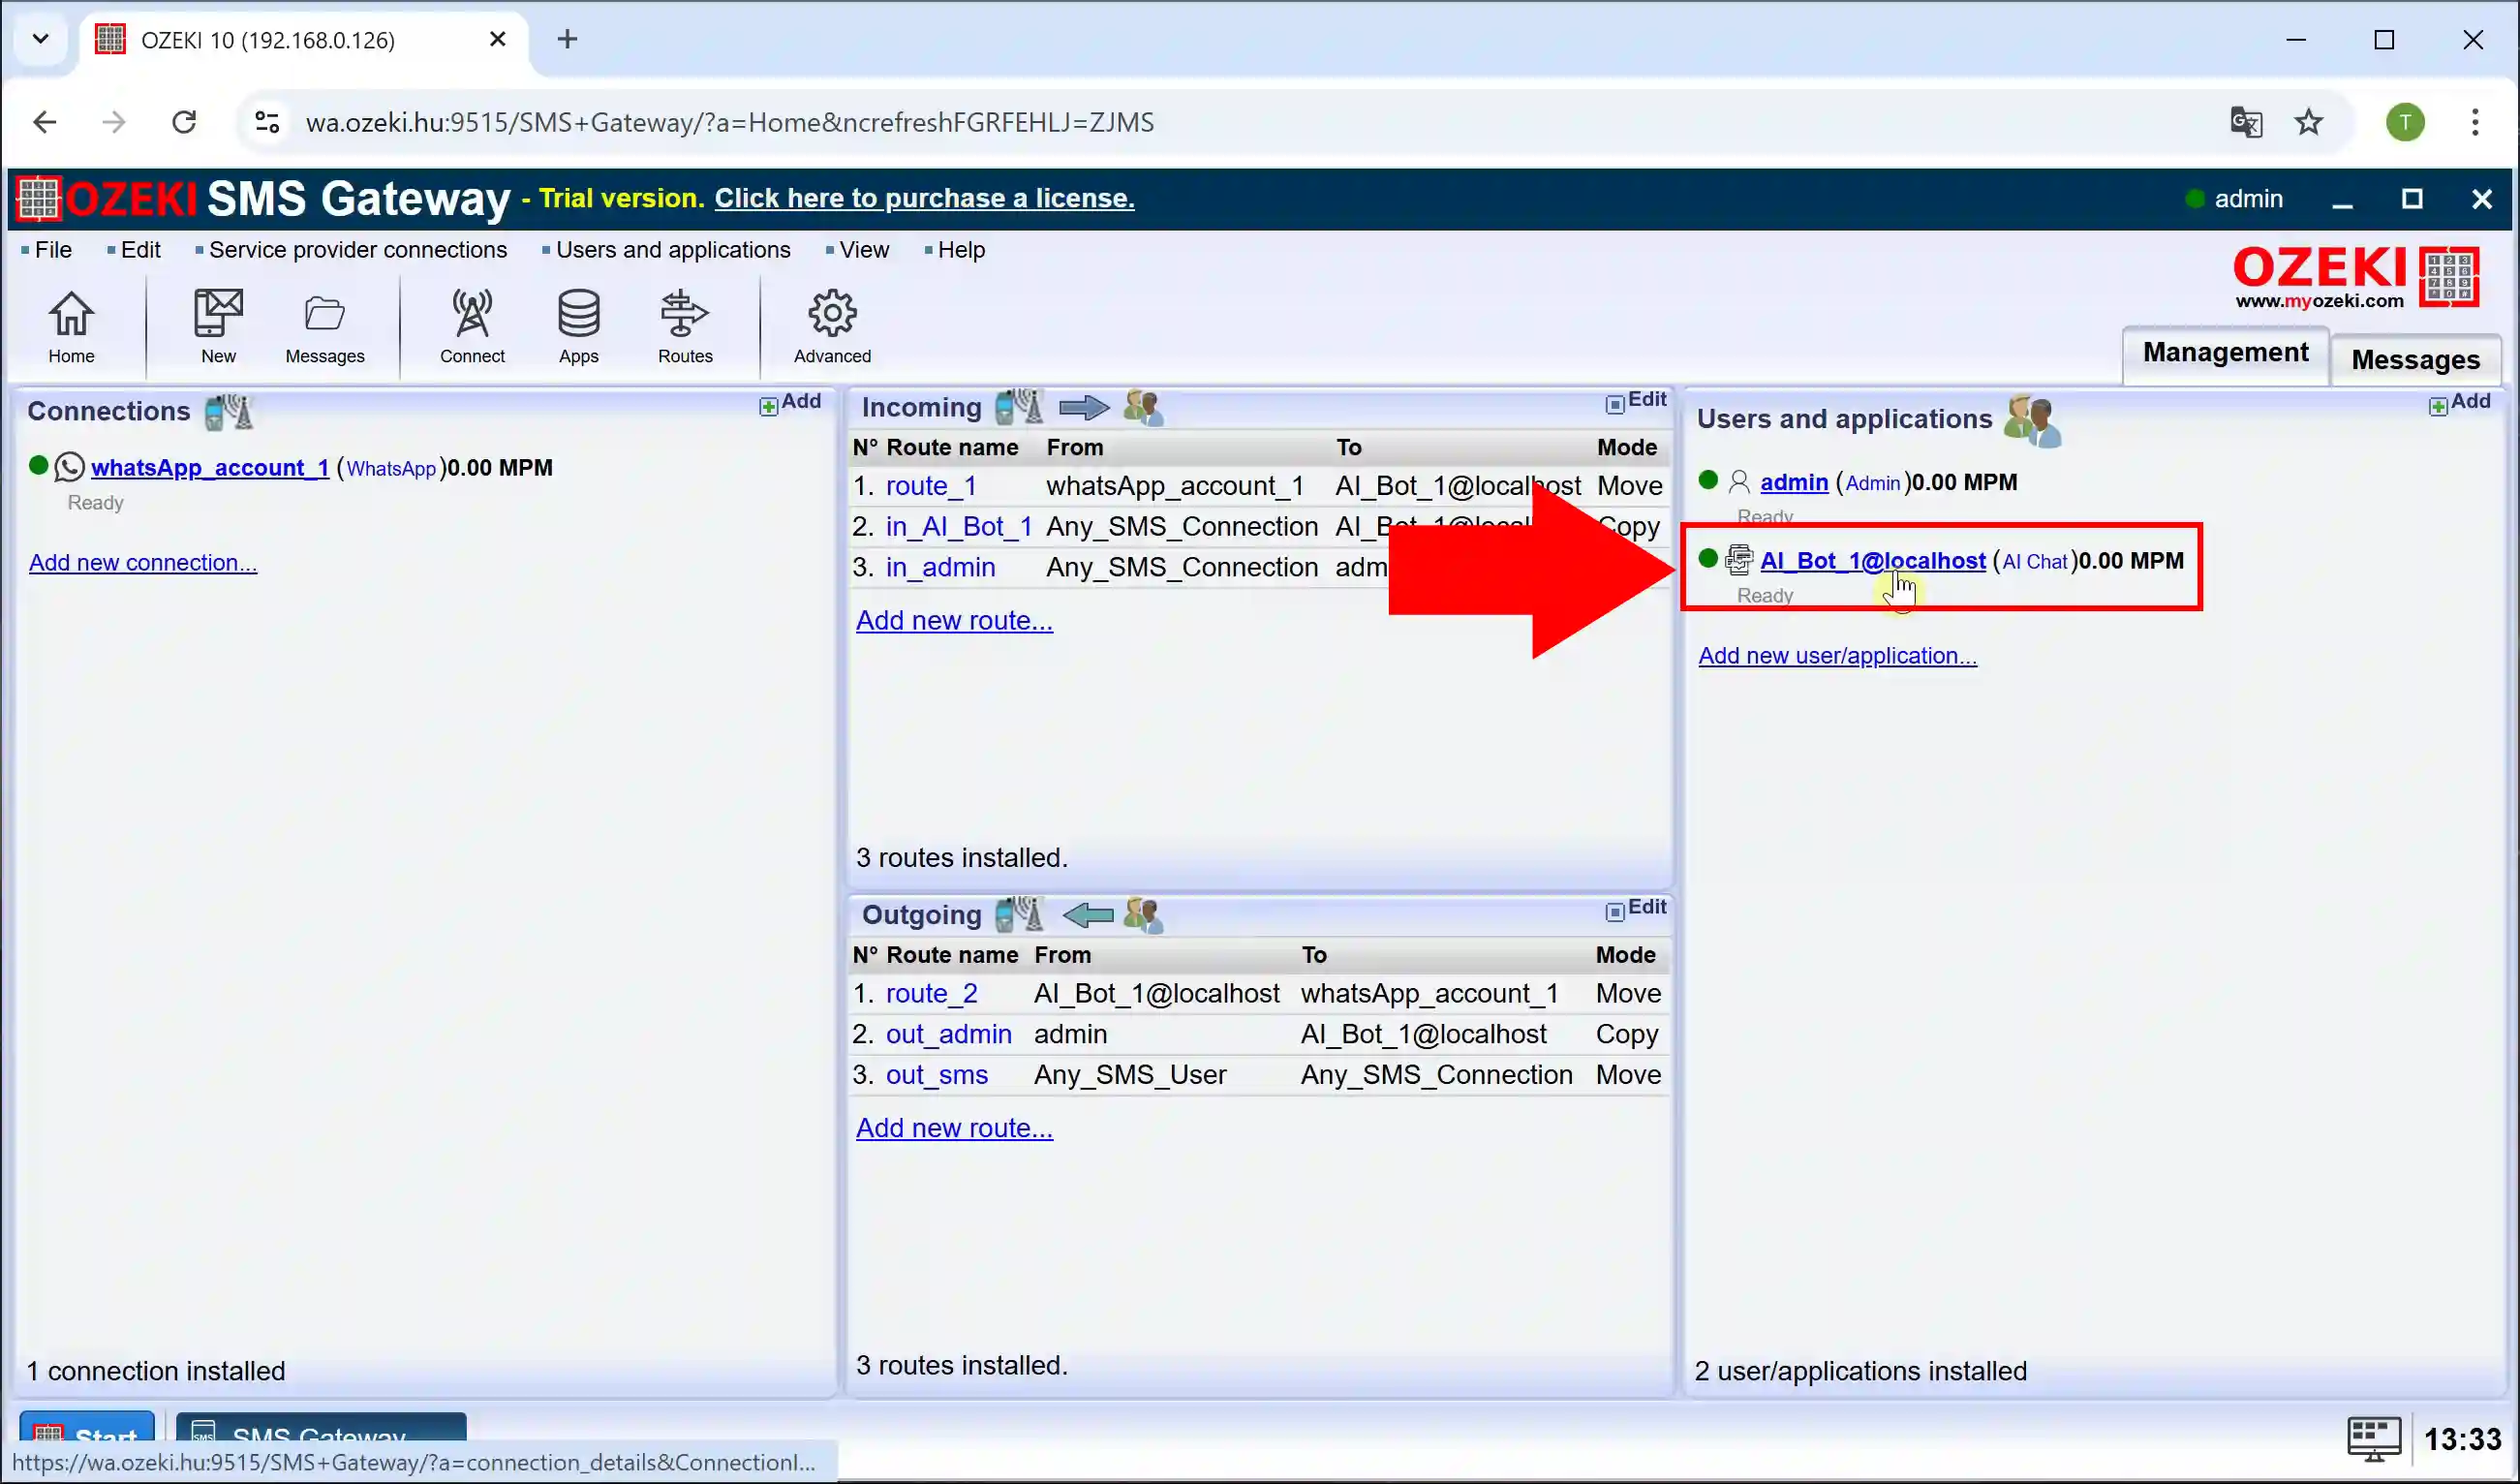
To set up the chatbot, select AI_Bot_1 on the right and click on it (Figure 18).
Step 19 - Configure system prompt
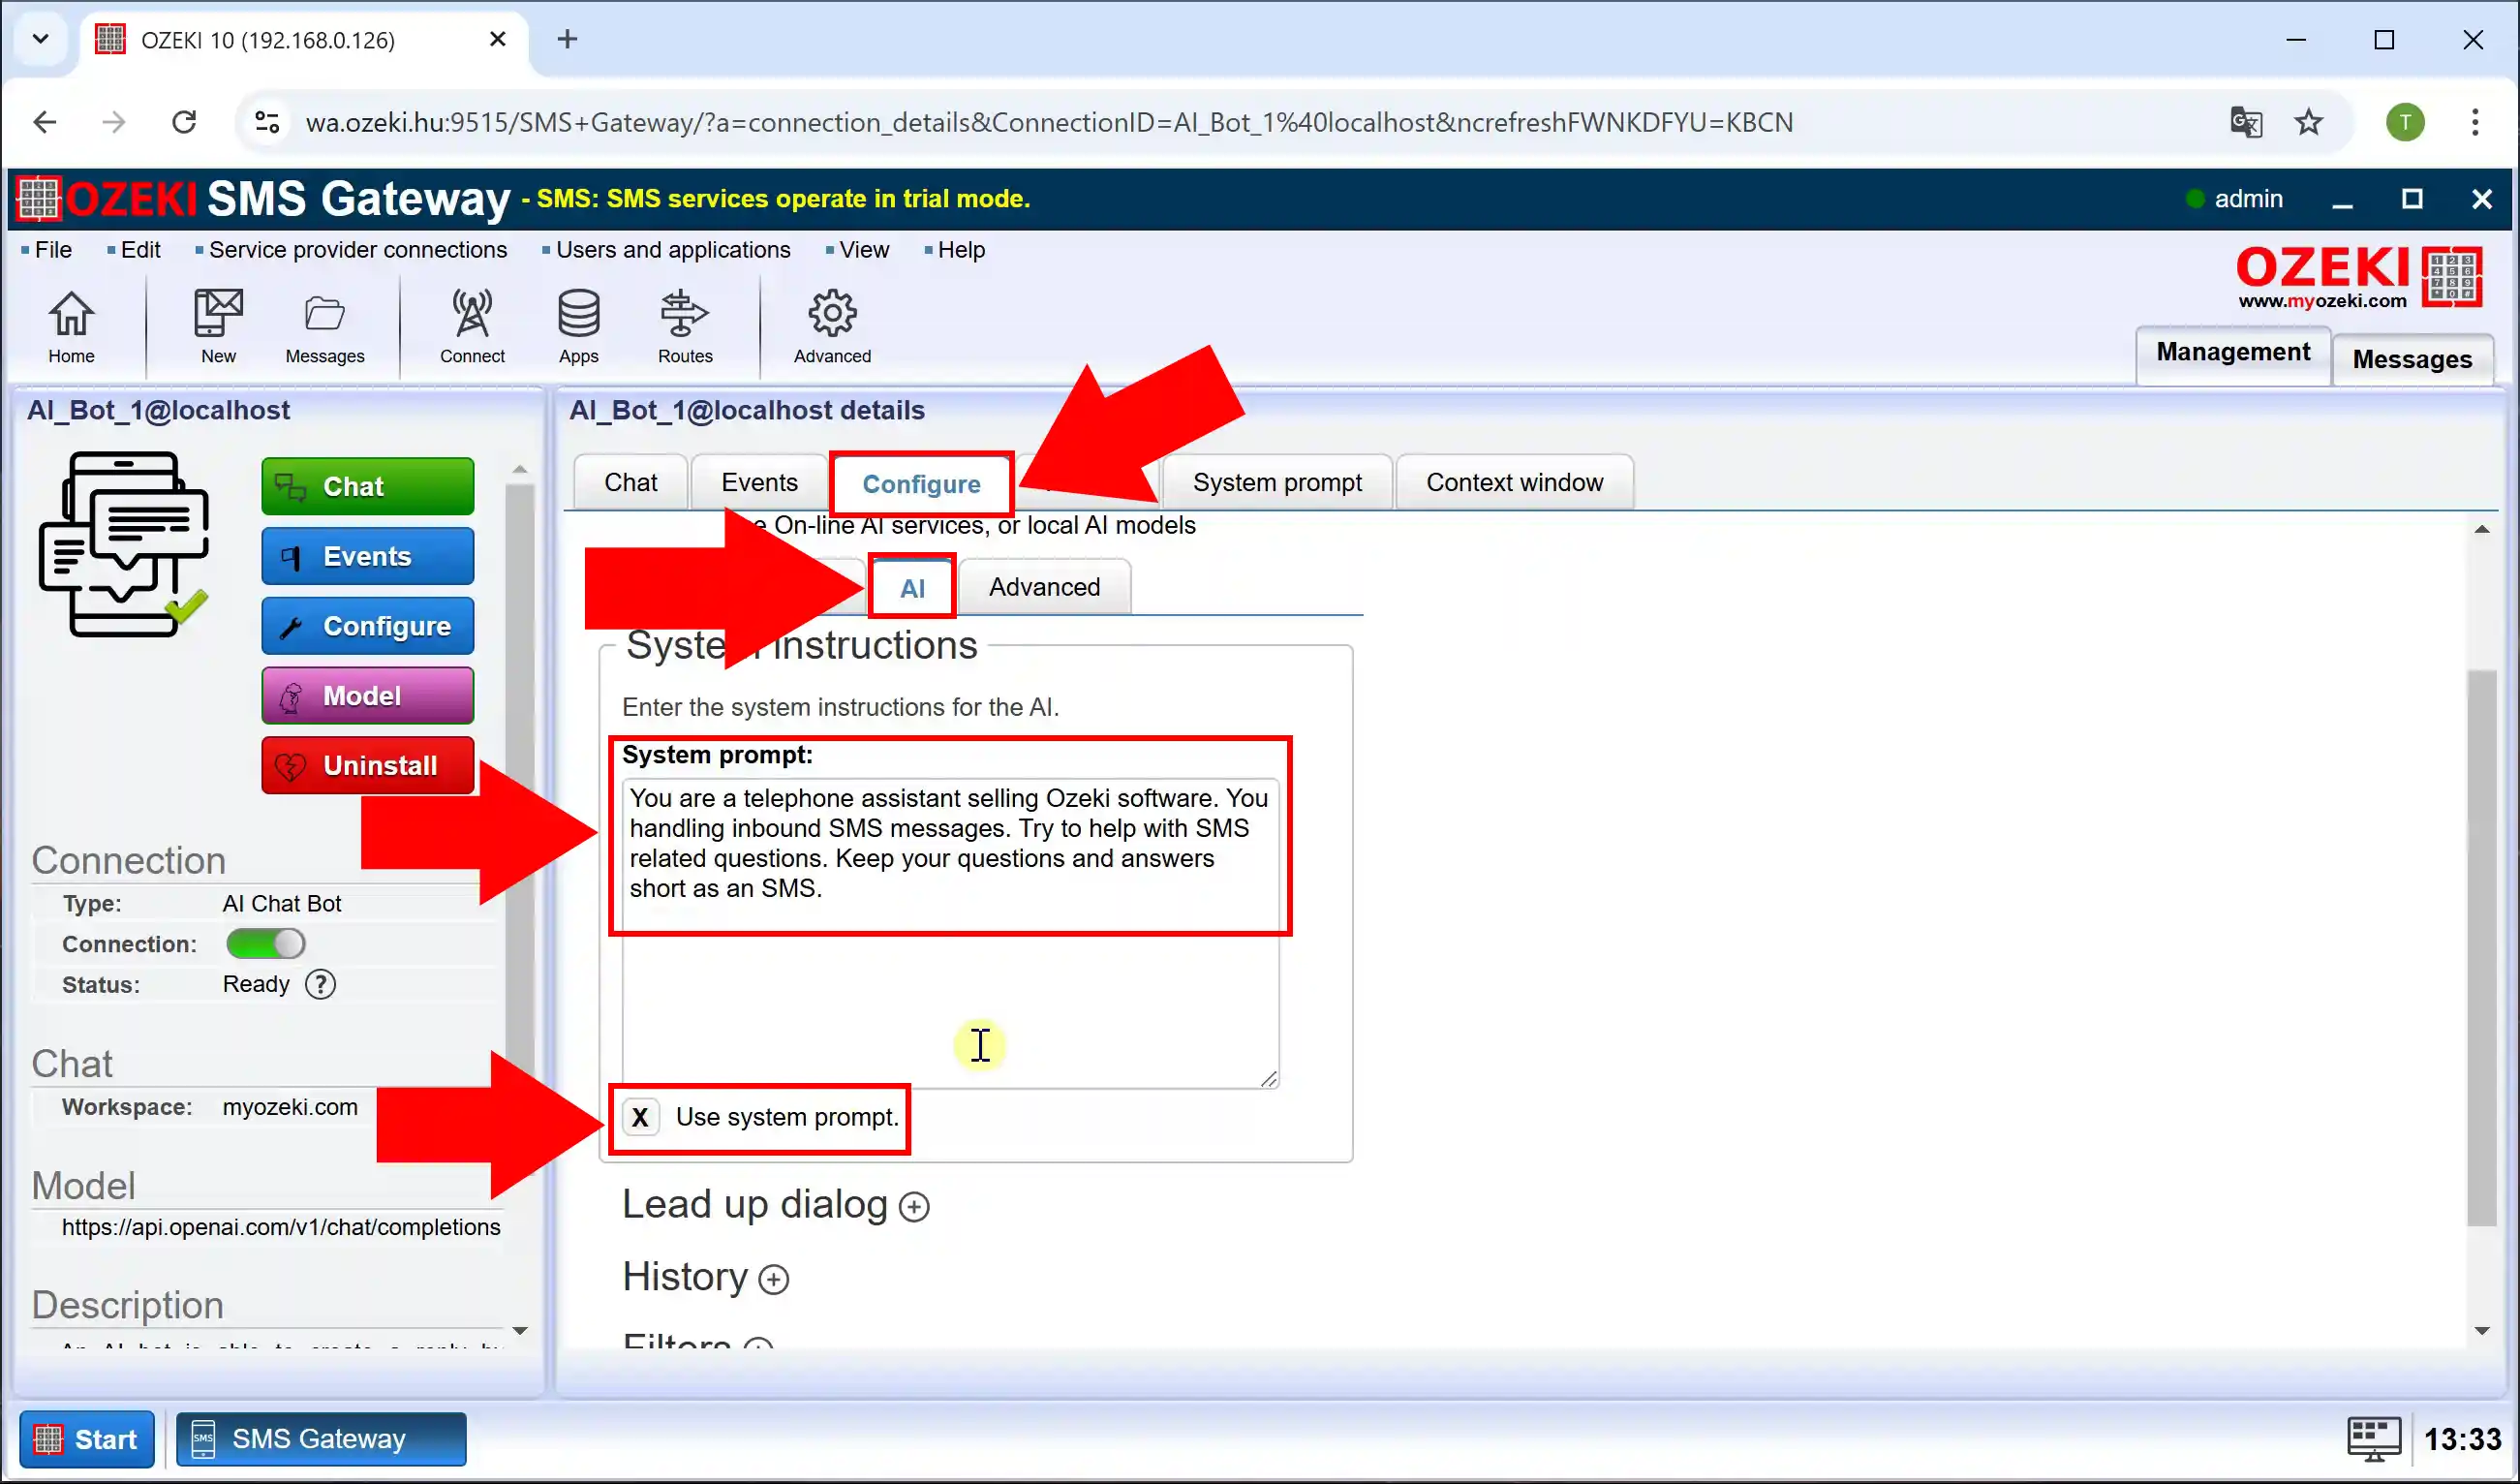
To configure the chatbot, navigate to the "Configure" tab and select the "AI" section. In the "System Prompt" field, enter the desired prompt that will guide the chatbot's responses and check the "Use system prompt" (Figure 19).
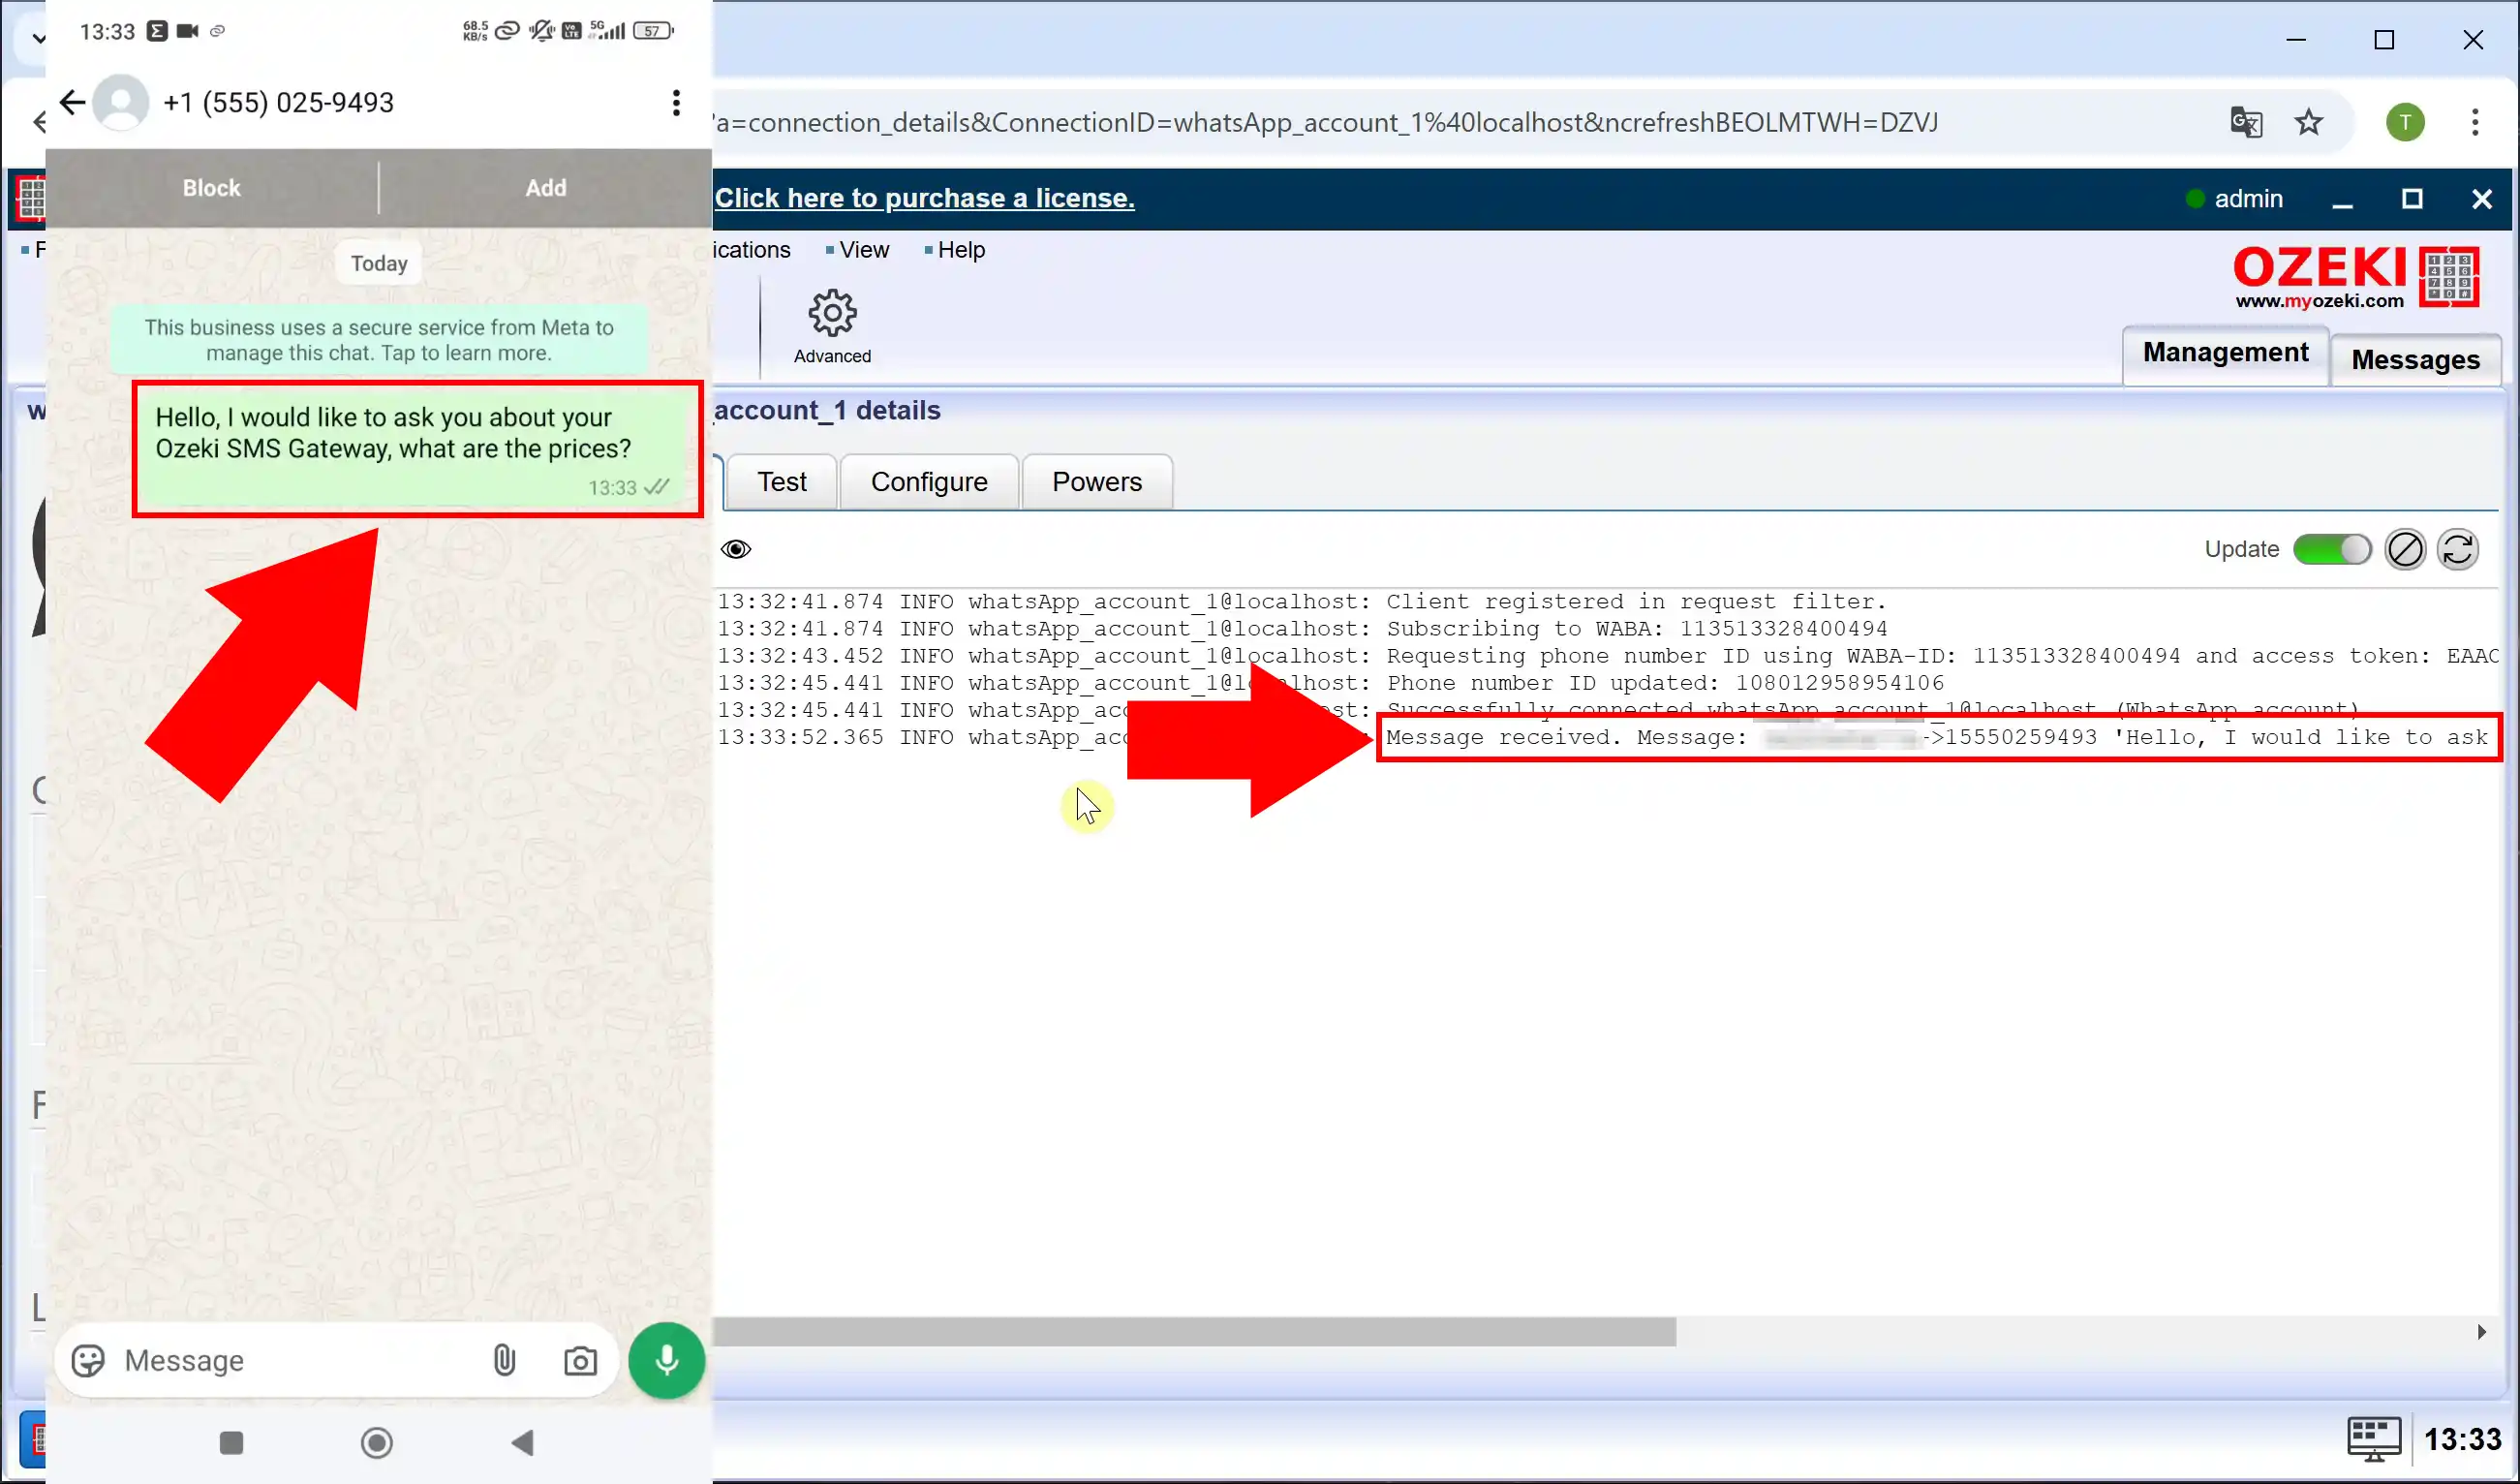
Step 20 - Send Whatsapp message
If you've done all the steps so far, let's test it. Send a message or ask via WhatsApp. You can see the message you sent in the log (Figure 20).
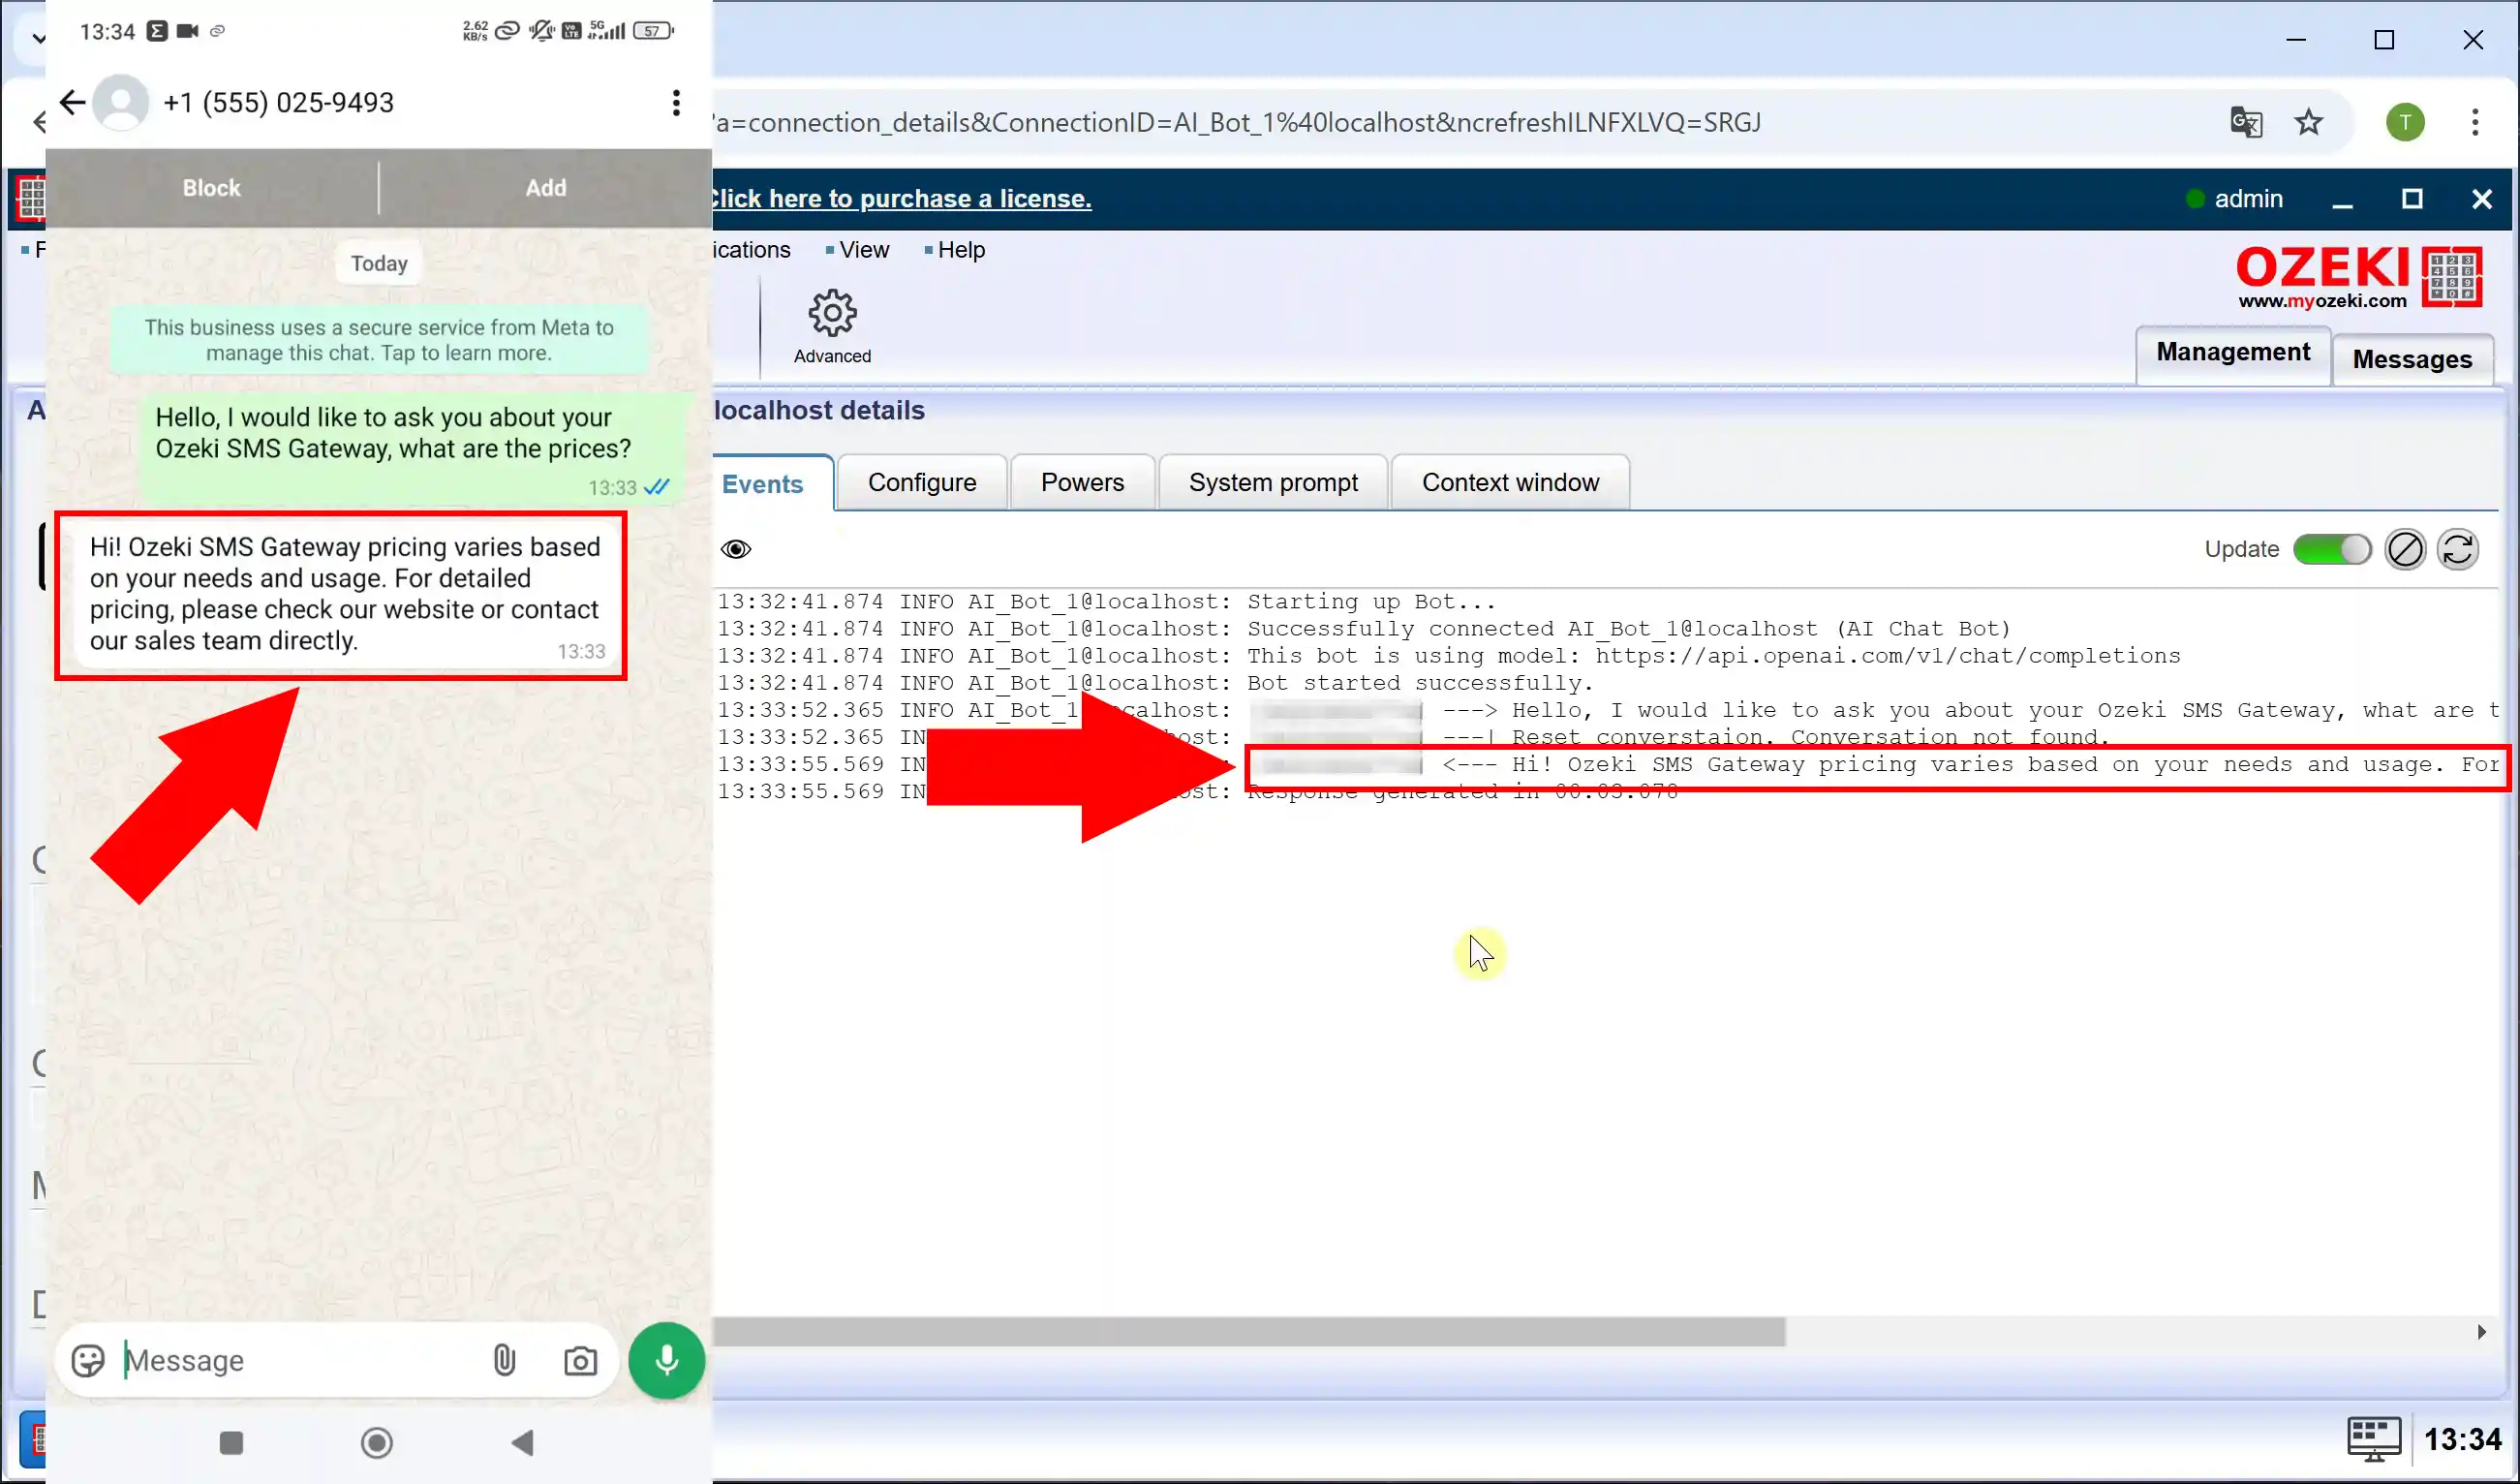
Step 21 - Generated response received
After you send your message, you can see the reply the chatbot sent you and you can track it in the log (Figure 21).
