How to setup e-mail to SMS forwarding using a POP3 client
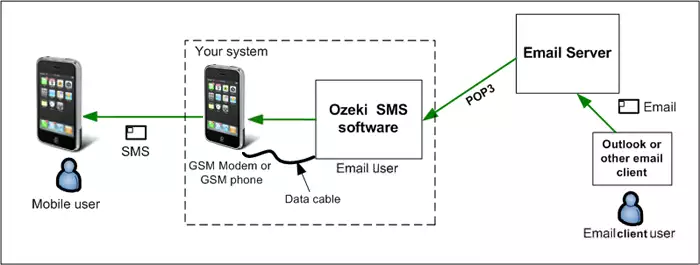
Let's start by setting up e-mail to SMS forwarding. The following configuration steps will show how the system should be configured to collect the incoming e-mails from an e-mail account using a POP3 client connection. You will also see how these emails are converted into SMS and how they are sent as SMS (Figure 1).
How to setup e-mail to SMS forwarding using a POP3 client
To setup e-mail to SMS forwarding using a POP3 client:
- Launch Ozeki SMS Gateway
- Install POP3 client
- Modify Gmail settings
- Write test e-mail
- Check POP3 logs
- Configure SMTP server
- Type from and to e-mail addresses
- Send test SMS
- Inspect the logs
Step 1 - Create a POP3 client connection
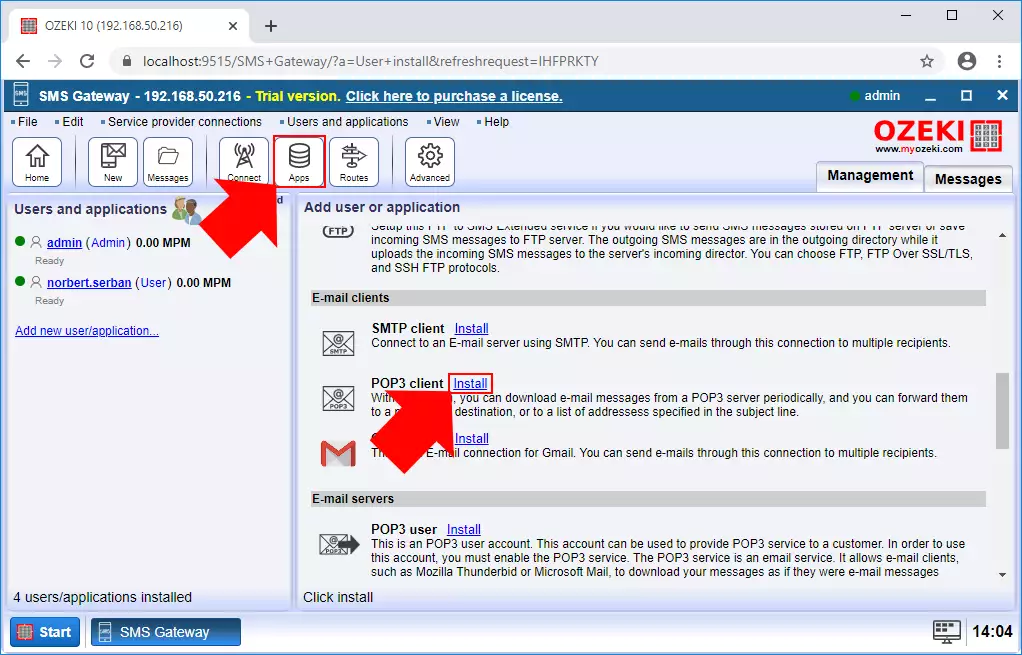
The first step of this guide is to create the POP3 client connection. For that, you need to open the SMS Gateway application, and here, select the Apps menu from the toolbar. In this menu, like in Figure 2, select the POP3 client from the E-mail clients section by clicking on the Install button.
Step 2 - Configure the POP3 server details
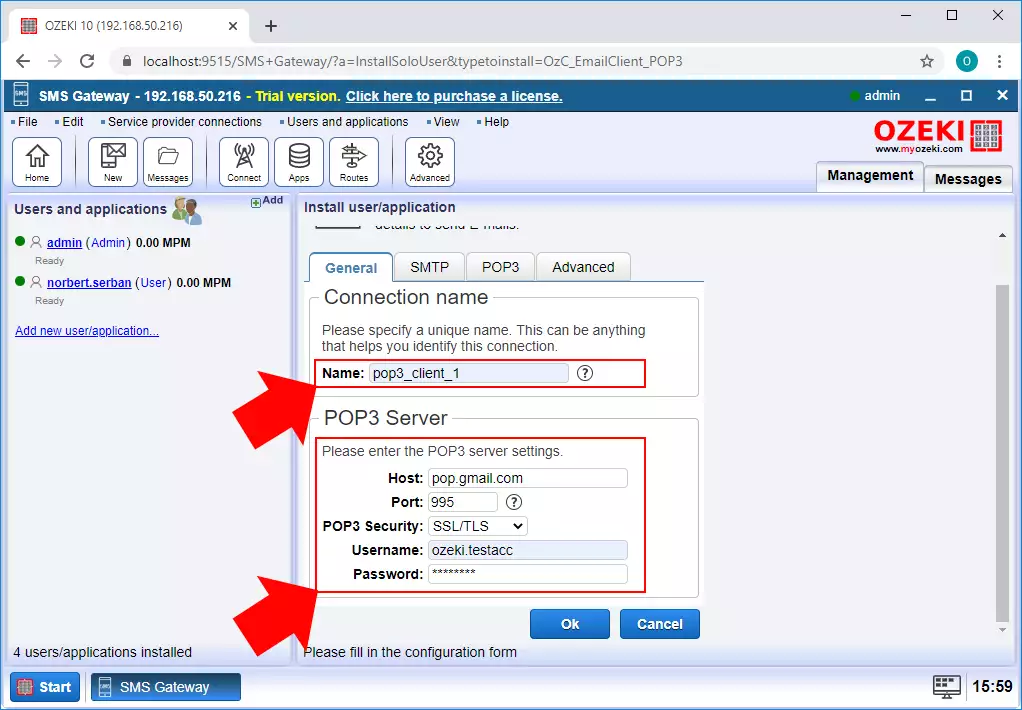
The first step of the configuration of the POP3 client connection is to provide the details of the POP3 server. This guide uses Gmail to demonstrate the process, so here, you need to enter the details of Gmail's POP3 server. As you can see it in Figure 3, type 'pop.gmail.com' as Host and type 995 as Port number. Then, select SSL/TLS as POP3 Security and lastly, provide the username and password of your e-mail account, which is in that case, a Gmail account.
Step 3 - Configure the advanced details of the connection
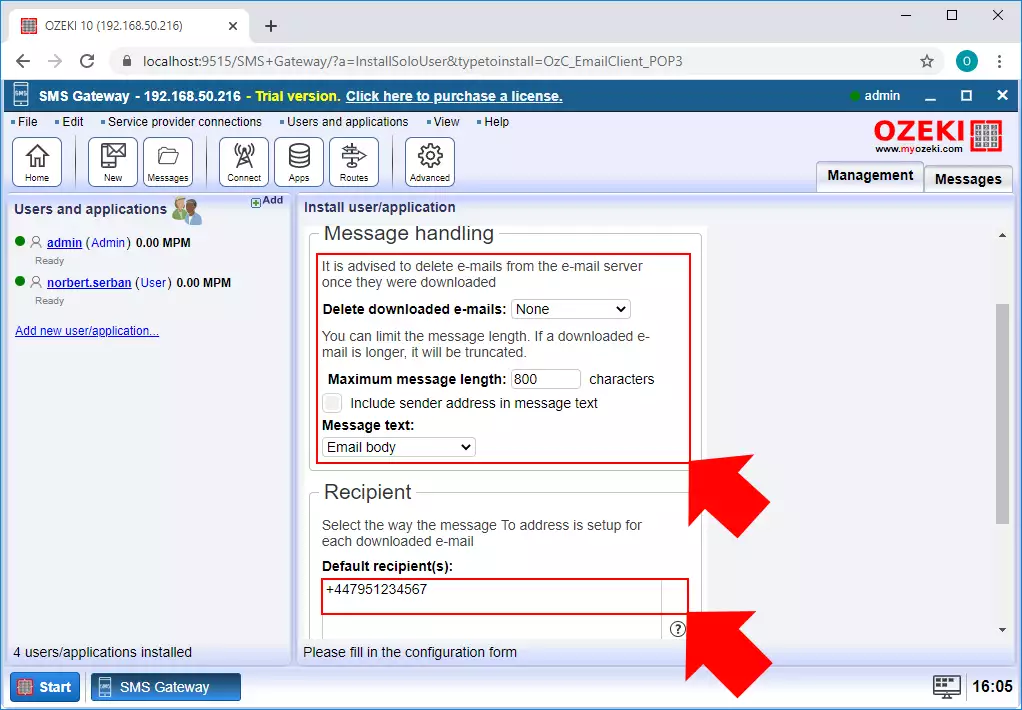
In the next step, you need to configure the way, that the connection is going to forward the messages. For that, first, click on the POP3 tab. Here, in the 'Message handling' section, you can set the maximum length of the message and select the way, how the e-mail will be forwarded. Next, as Figure 4 demonstrates, you can set the recipients for the e-mail. The addresses, that you type here will get the forwarded e-mails. If you finished with the configuration, you could just click on OK.
Step 4 - Configure the security settings of Gmail account
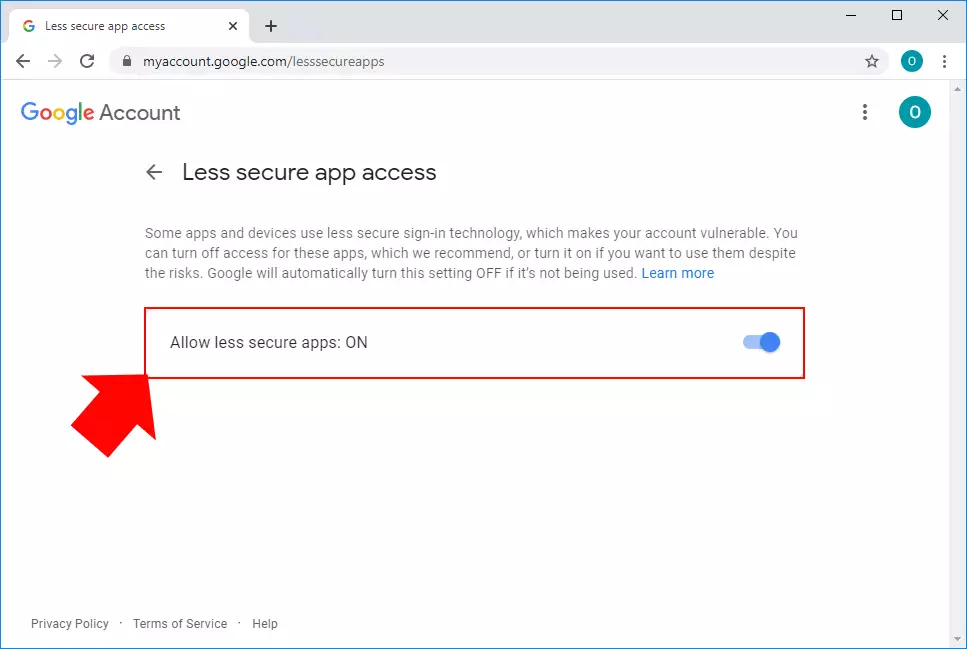
After you created the POP3 client connection, you need to do some modifications to the security settings of your Gmail account. For that, just type 'https://myaccount.google.com/lesssecureapps' in your browser and hit Enter. Here (Figure 5), you just need to turn the 'Less secure apps access' on. This will ensure that SMS Gateway is going to have access to download the e-mails.
Step 5 - Modify the Gmail POP3 settings
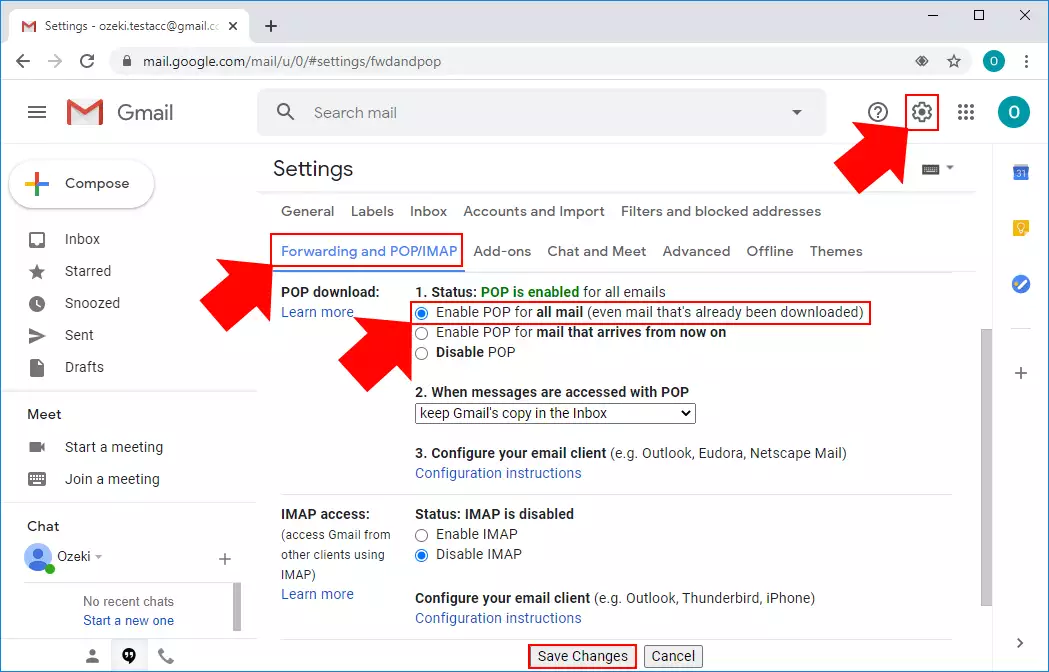
In this step, you need to modify the forwarding setting of your Gmail account. For that, open Gmail and here, click on Settings. In the Settings menu, you need to select the Forwarding and POP/IMAP tab. Here, like Figure 6 shows that, select 'Enable POP for all mail' and finally, click on Save Changes.
Step 6 - Send a test e-mail
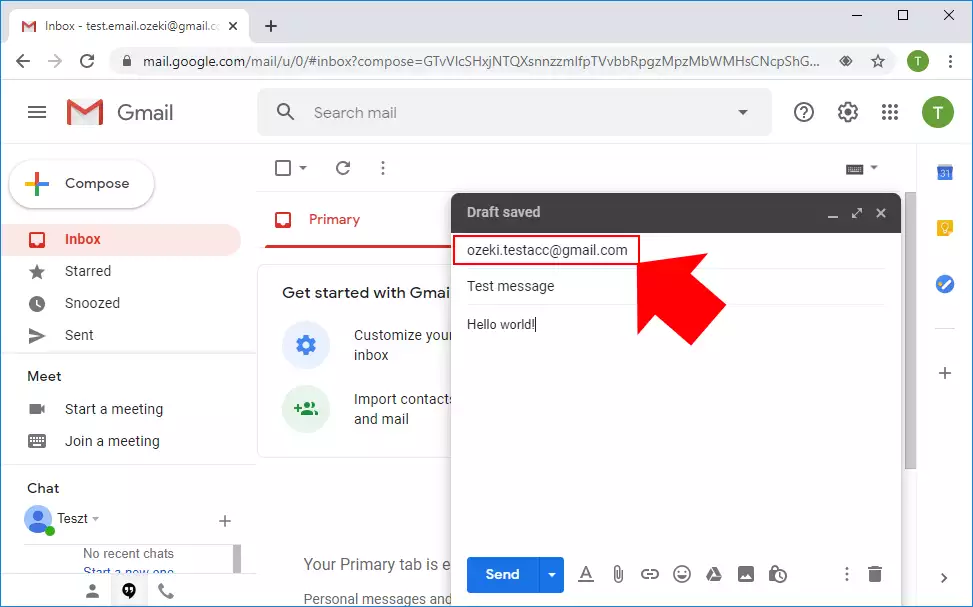
At this point, you can write an e-mail message to the Gmail account to test the solution. As you can see it in Figure 7, all you need to do is to write a simple 'Hello world!' to the e-mail address of the Gmail account that you set in the POP3 client connection.
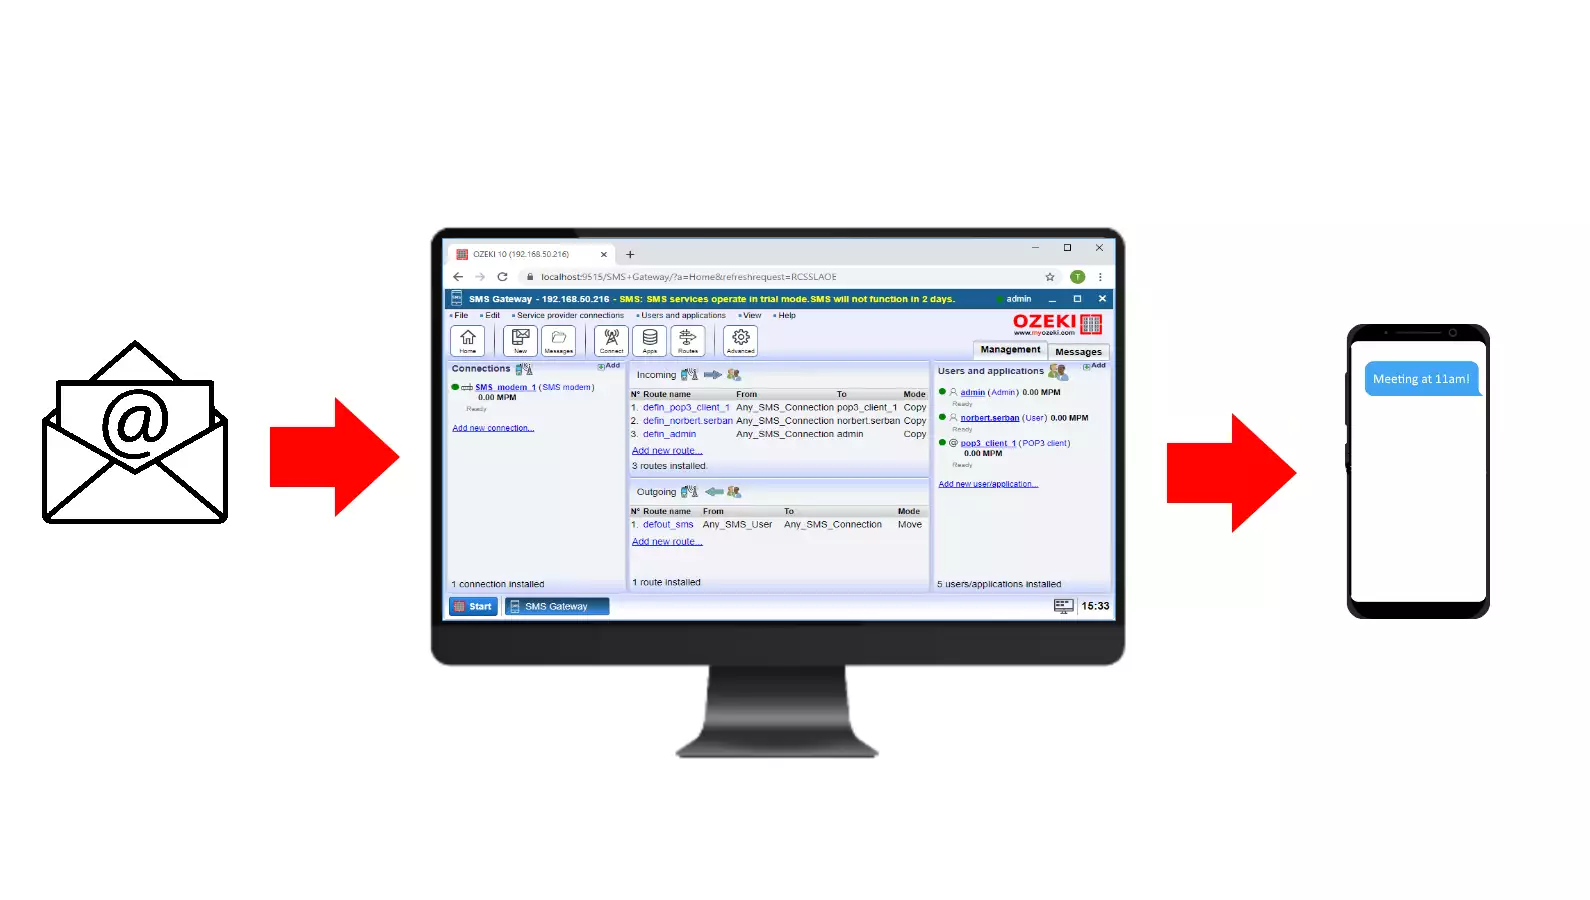
With everything is set up correctly, all you need to do now is to wait for the incoming e-mail to your Gmail account. In case of an incoming e-mail, the POP3 client connection is going to download the e-mail and forward it instantly to the specified recipient address. Figure 8 demonstrates the procedure of forwarding an incoming e-mail by using the POP3 client connection.
Step 7 - Check the POP3 logs
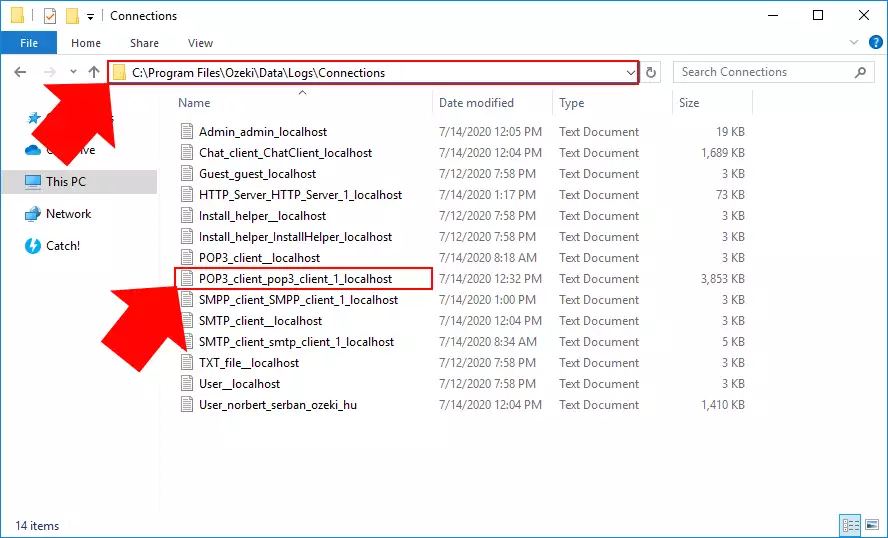
You can easily check the logs of the POP3 client on your computer. These logs store every event that occurred with your POP3 client connection. Figure 9 shows the path, you need to follow in File Explorer to open the log file of the POP3 client connection. If you open that log file, you will be able to see all events of the POP3 client connection.
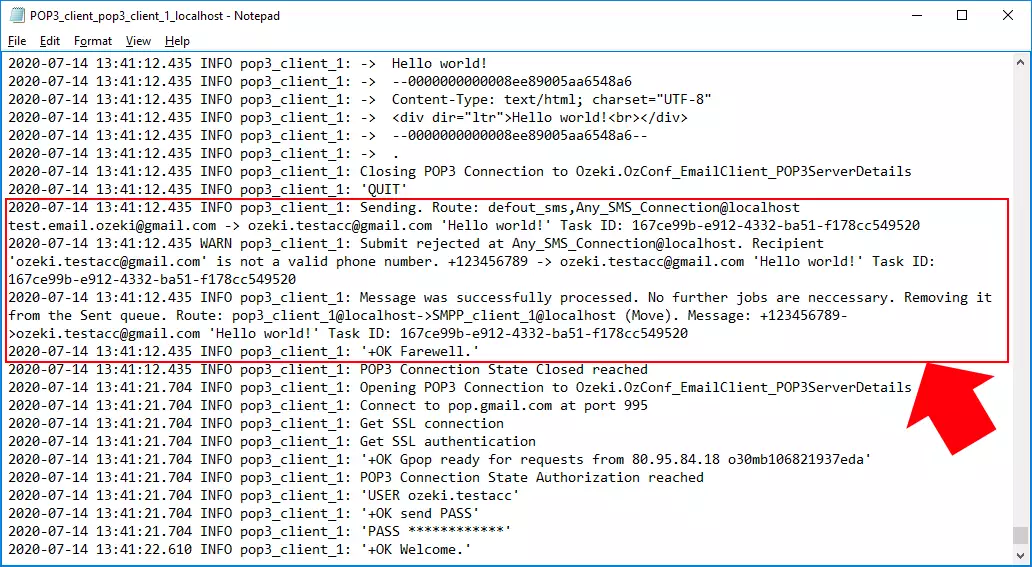
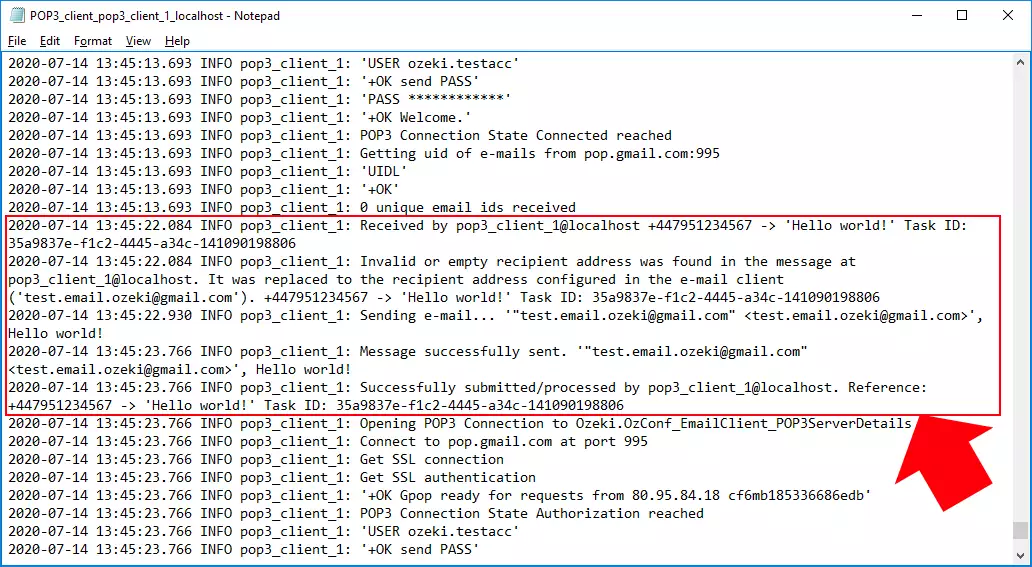
The log file contains details of every event that occurred with your POP3 client connection. Here you can see a timestamp that shows the date of each event and the name of the connection. Lastly, each event has got a message that describes the event. Figure 10 shows the event messages of downloading an e-mail from the Gmail account and forward it to the given recipient address.
How to configure SMS to E-mail forwarding
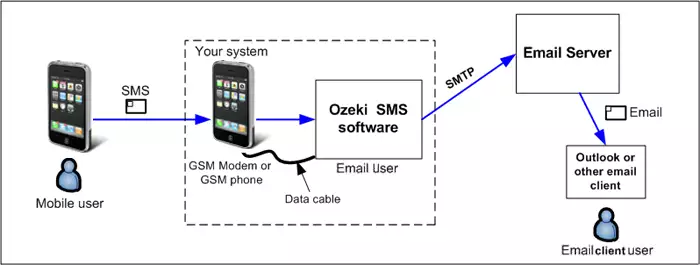
After E-mail to SMS is working, you should configure the other direction: SMS to E-mail forwarding. On Figure 11, you will see the steps that will allow you to configure the SMTP server details, and on Video 2 you will see how incoming SMS messages are forwarded to an e-mail address.
Step 8 - Configure the SMTP server
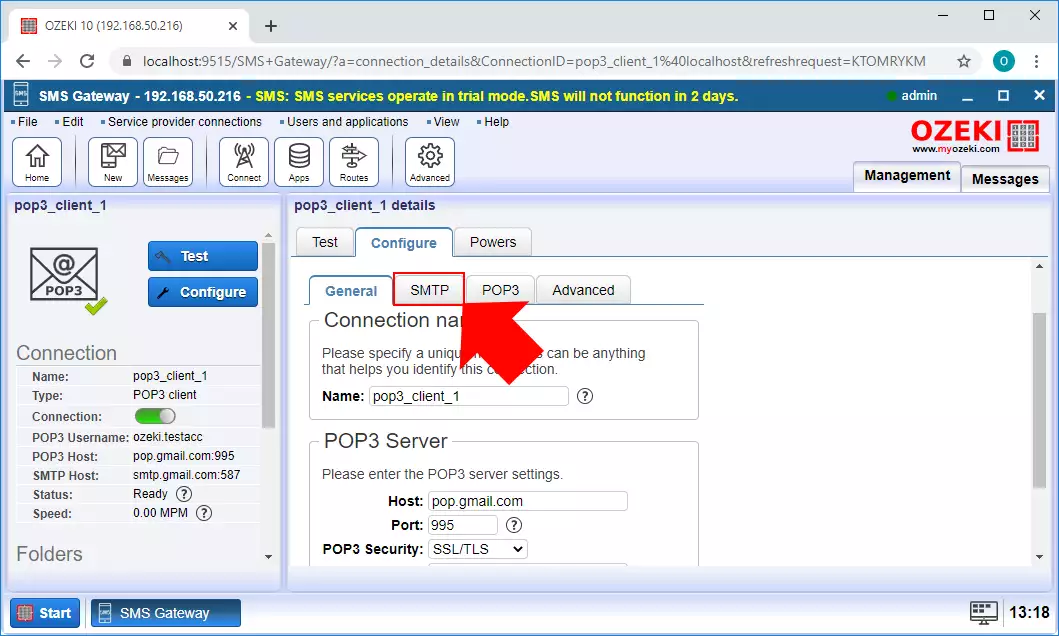
To be able to forward SMS messages as an e-mail, you need to configure an SMTP server that can send the e-mail message. This configuration can be done with the POP3 client connection. If you have created this connection before, you can just open it in SMS Gateway, but if you haven't created the connection, check Step 1, how you can do that. As Figure 12 shows that you need to click on the SMTP tab to be able to configure the details of the SMTP server.
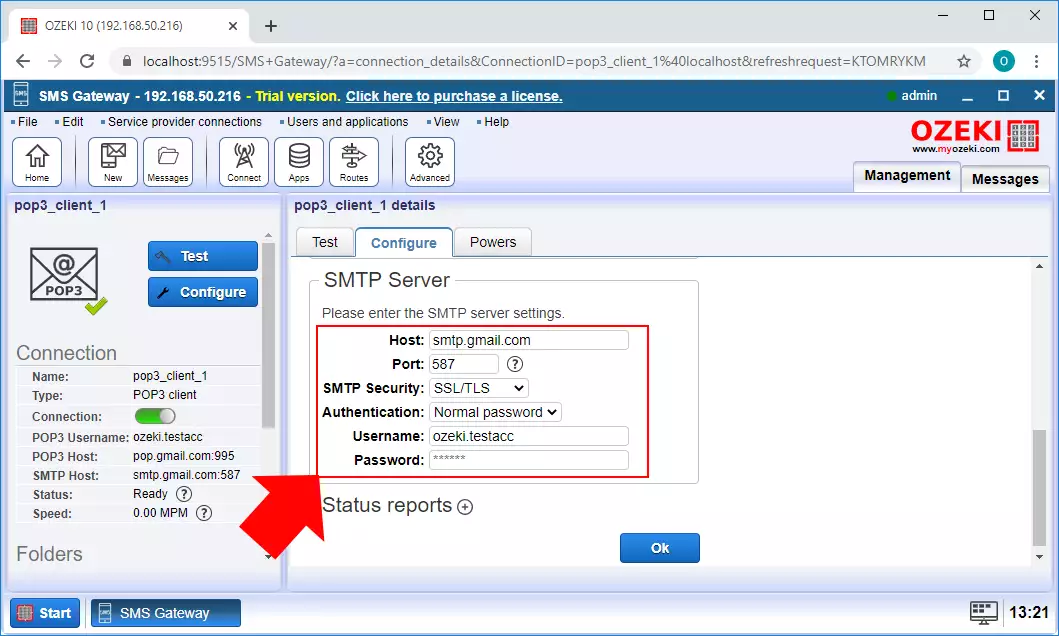
In the SMTP menu, you can configure the details of the SMTP server. Figure 13 shows what settings you need to do to use the Gmail SMTP server. So, type 'smtp.gmail.com' as Host and 587 as the port number. For SMTP security, select 'SSL/TLS' and also select the 'Normal password' option for Authentication. Lastly, just type the username and password of your Gmail account.
Step 9 - Configure the recipient e-mail address
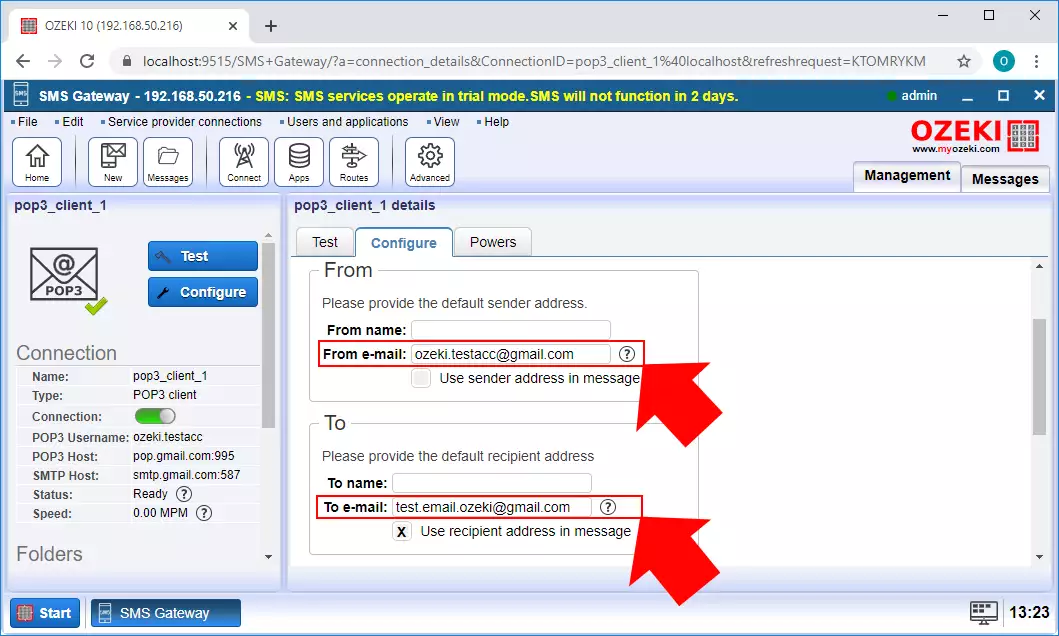
The next configuration that you need to perform is to set up a recipient address which will receive the forwarded message. In the SMTP menu, type the recipient e-mail address to the 'To e-mail' field, as Figure 14 shows that. To the 'From e-mail' field, you can type the e-mail address of your Gmail account as well. This ensures that this address will show up as a sender address when the recipient gets the forwarded message. If you finished with all configurations, you can just click OK.
Step 10 - Send a test SMS
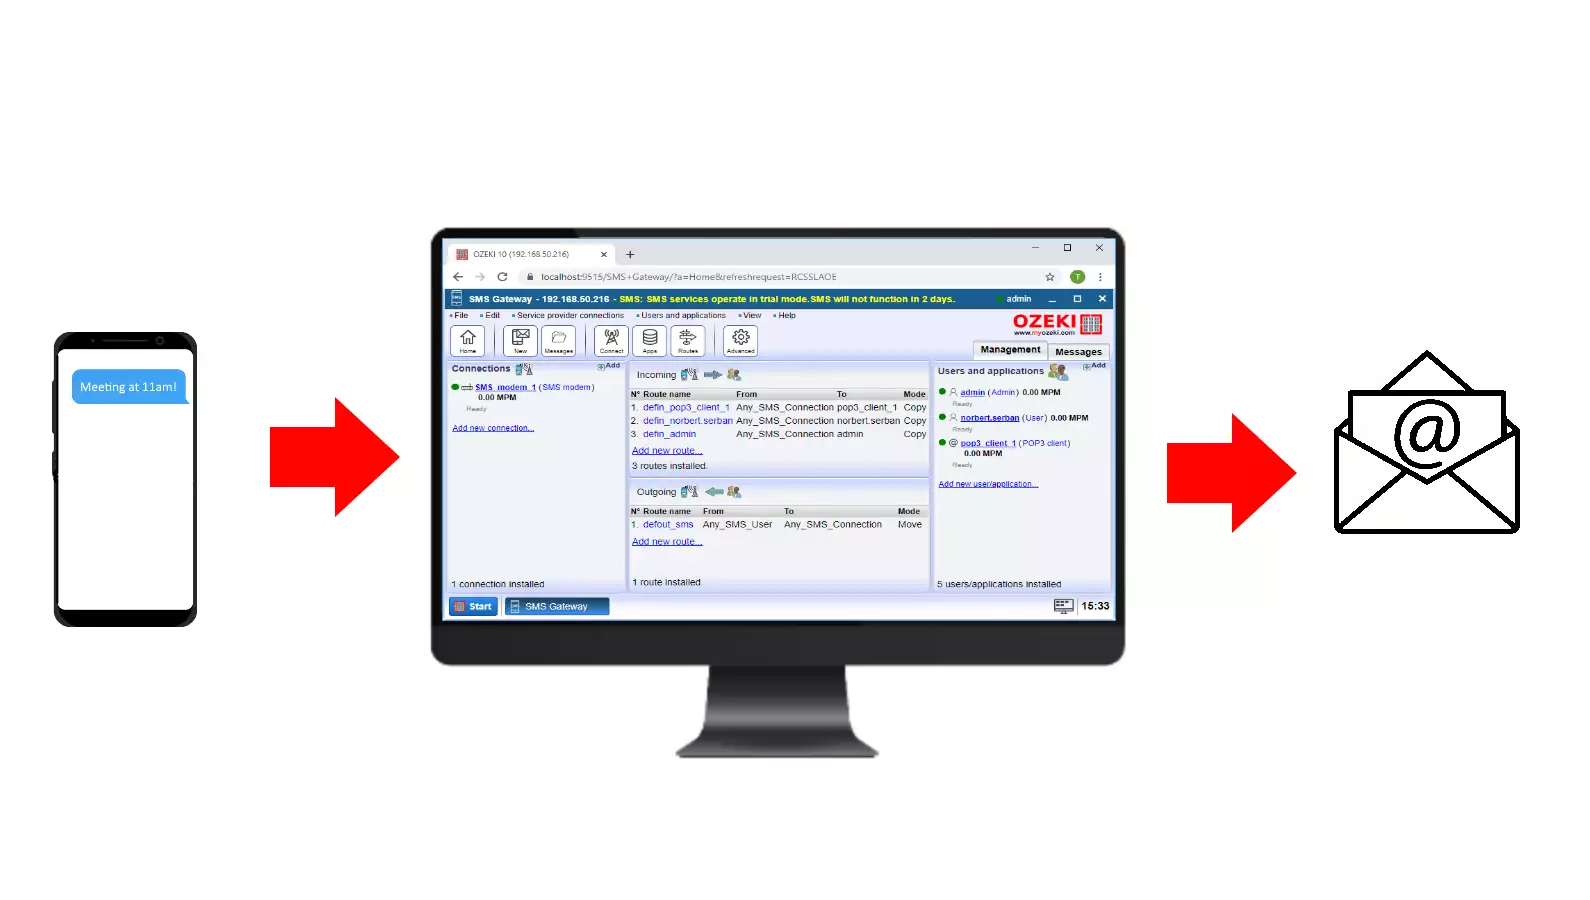
With the configured SMTP server, now your system is capable of receive SMS message and forward it as an e-mail message. Figure 15 demonstrates how the solution works. The SMS arrives at your system using a service provider connection. If you don't have that kind of connection you can check how to create an SMPP client connection. Then, the message routed to the POP3 client connection, which uses its SMTP server and the given details to forward the message to the recipient e-mail address.
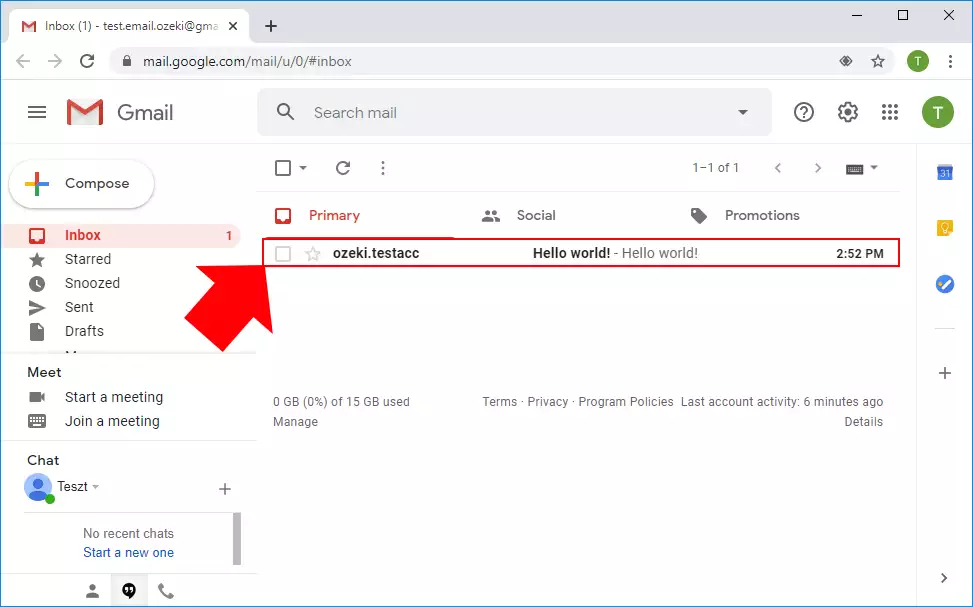
Here on Figure 16, you can see the configured SMTP server in the everyday work. It sends the message to the POP3 client connection, so the recipient’s browser-based email provider will receive it, so it will show up in the recipients inbox. It sends the same text you sent from your mobile phone, so it behaves as a regular e-mail sent from a computer. It It will work with any e-mail provider with a POP3 client.
Step 11 - Check the logs
To check if your POP3 client connection works as expected, you can open its log file. Since you are using the same connection, the log file is located in the same folder that was described in Step 7. If you open the log file, you will be able to see every event of the connection. Figure 17 demonstrates that what events logged in case of a successful SMS to e-mail forwarding.
Conclusion
To summarize article we can conclude, that setting up e-mail to SMS forwarding using a POP3 client is quite easy. If you have already completed the steps, I am sure, if you let your girlfriend (or boyfriend) know, you will be rewarded. If you would like to read more useful insights about the benefits of other similar solutions, please open ozeki-sms-gateway.com.
