How to setup e-mail to SMS forwarding using an IMAP client
This tutorial will guide you through the step you need to take to have a working two-way system which forwards your e-mails to SMS messages and vice versa, with the help of an IMAP client. IMAP stands for Internet Mail Access Protocol. Simply it is a protocol, that describes, how to access messages in an email mailbox. Some E-mail apps use this to download messages from your email account to the desktop application. Please note, that this setup uses an e-mail account that can be access through IMAP on an E-mail server.
What is forwarding?
Forwarding is the process off sending an email or other messages to a further destination without changing it.
What is an IMAP client?
The Internet Message Access Protocol (IMAP) is a standard protocol used by email clients to retrieve email messages from a mail server.
How to setup e-mail to SMS forwarding using an IMAP client
To setup e-mail to SMS forwarding using an IMAP client:
- Launch Ozeki SMS Gateway
- Select Add new user or application
- Install IMAP client
- Configure IMAP server
- Modify IMAP settings
- Set up SMTP server
- Send e-mail to test SMS forwarding
- Check logs
Email to sms using IMAP (video tutorial)
This video will show you how you can setup a system which will send all the incoming email to a predefined phone number as an SMS message with the help of an IMAP client. It will start with creating a new user/application and will take you all the way to checking the log containing your first sent SMS. The video is only 3:33 long, but very detailed. In this video we are using the Ozeki SMS Gateway which is a very powerful and easy to use SMS gateway, so you will have no problem following the steps.
Step 1 - Create an IMAP client connection
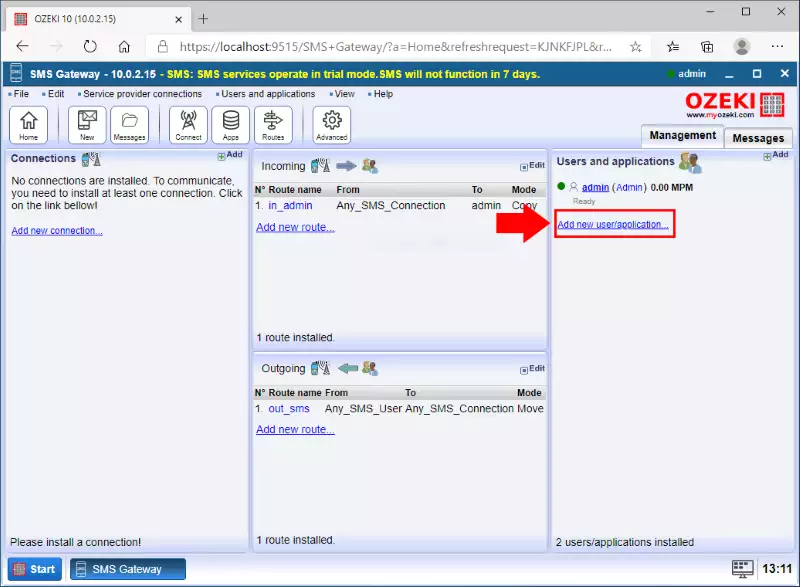
First, you need to have a connection between the SMS client and the E-mail client. To do that, please click the Add new user/application button, which is located on the right side of the window on the Users and application panel. Click it and proceed to the next step. You can find the button on Figure 1.
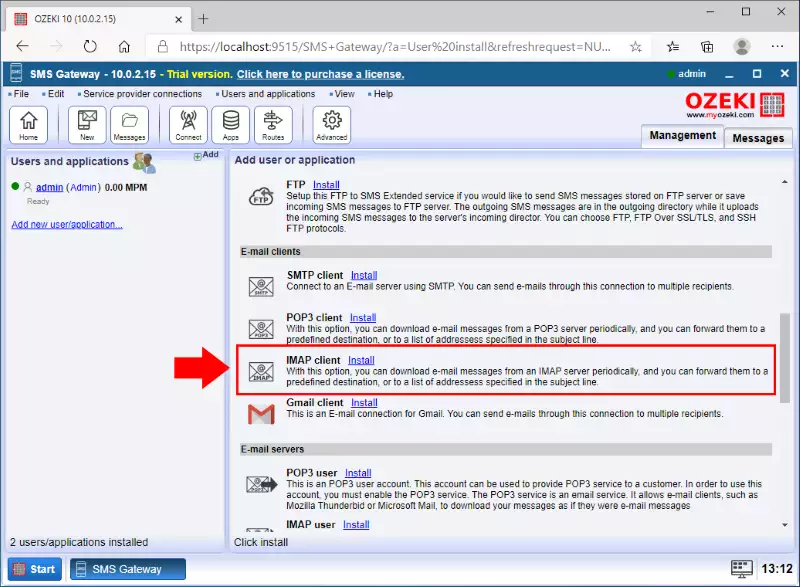
Here, please search for the IMAP client option. Here you can find a shot summary of this option under the title. Next to it, there is the blue Install button. Click it and it will take you to the next step. You can Install button on Figure 2.
Step 2 - Configure the IMAP server details
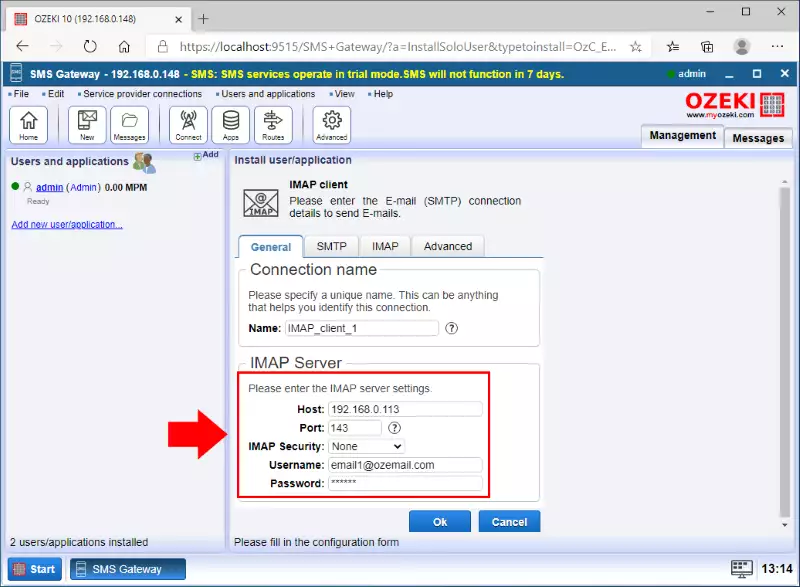
The next step is to configure your IMAP connection and make sure that it reaches your e-mail account. To do that, please provide the IP address of the host and the port number. You can get help with the ? icon next to the field for the port number. In the username and password field, please type in the login credentials of your e-mail account. You can see all the required data on Figure 3.
Step 3 - Configure the advanced details of the connection
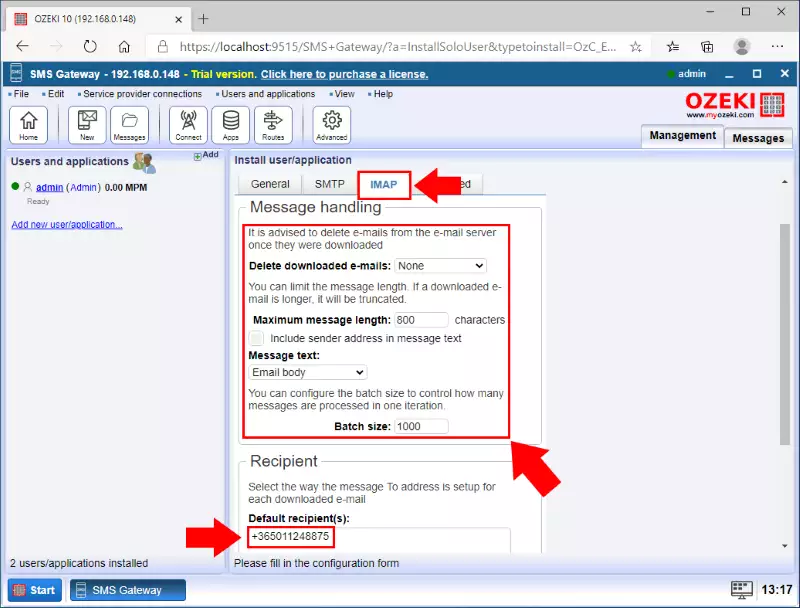
Now you need to set up your message handling. To do that, please head over to the IMAP settings tab. It is located in the top tabs. Click it and start customizing your message handling. You could set up, if you would like to delete the messages after handling, which messages you would like to handle, how long should a message be, what should the IMAP forward from the emails or the batch size. If you have everything setup here, proceed down to the Recipient panel. Here you can tell the IMAP connection, where to send the downloaded e-mails. You can see the example fill-in on Figure 4.
Step 4 - Configure the SMTP server
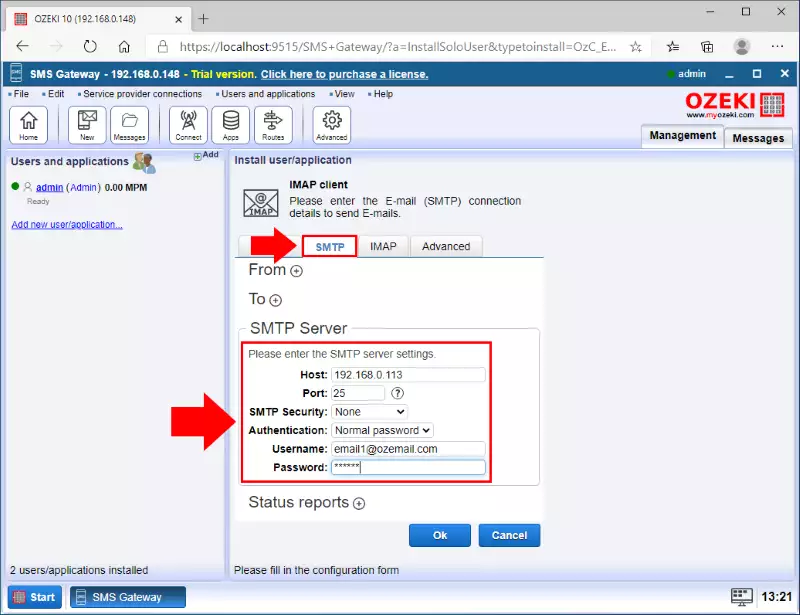
To be able to forward SMS messages as an e-mail, you need to configure an SMTP server that can send the e-mail message. This configuration can be done with the IMAP client connection. As Figure 5 shows that you need to click on the SMTP tab to be able to configure the details of the SMTP server. Figure 5 shows what information you need to provide to the SMTP server in order to work. So, type in the Host IP address and the port number, set the Authentication to normal password and provide the username and password of your E-mail account.
Step 5 - Configure the recipient e-mail address
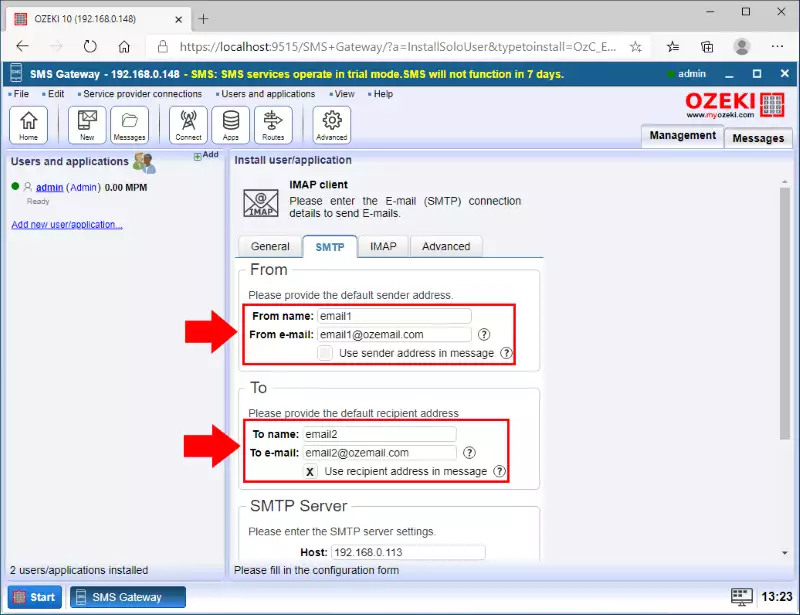
The next configuration that you need to perform is to set up a recipient address which will receive the forwarded message. In the From section, provide the information of the default sender address. In the To section, provide the default recipient address. This ensures that this address will show up as a sender address when the recipient gets the forwarded message. If you finished with all configurations, you can just click OK. On Figure 6, you can see the example data we provided.
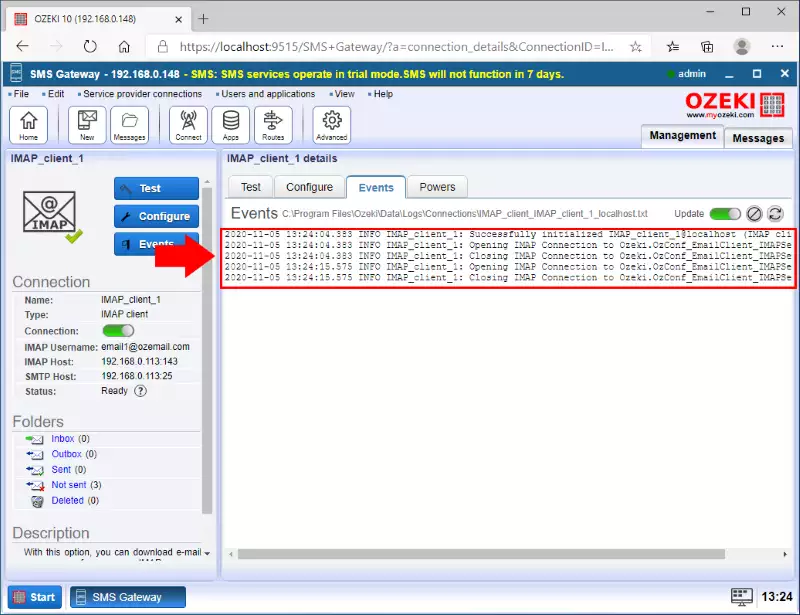
If you click the Events tab, you can see that the connection was set up properly. You can see your new connections properties in the connection section on the left side of the window. If the connection indicator switch is green, it means that the connection is active and ready to use. You can see all the data on Figure 7.
Step 6 - Send test E-mail to SMS
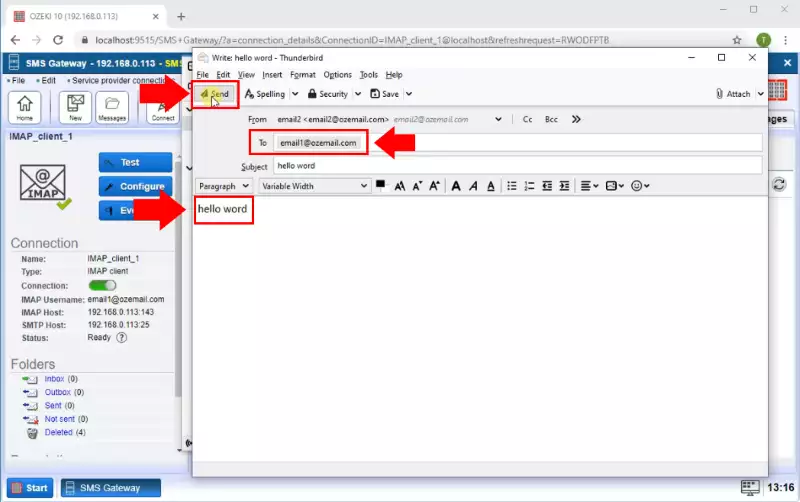
At this point, you can write an e-mail message to the E-mail account to test the solution. As you can see it in Figure 8, all you need to do is to write a simple message to the e-mail address on the configured E-mail account that you set in the IMAP client connection. With everything is set up correctly, all you need to do now is to wait for the incoming e-mail to your E-mail account. In case of an incoming e-mail, the IMAP client connection is going to download the e-mail and forward it instantly to the specified recipient address.
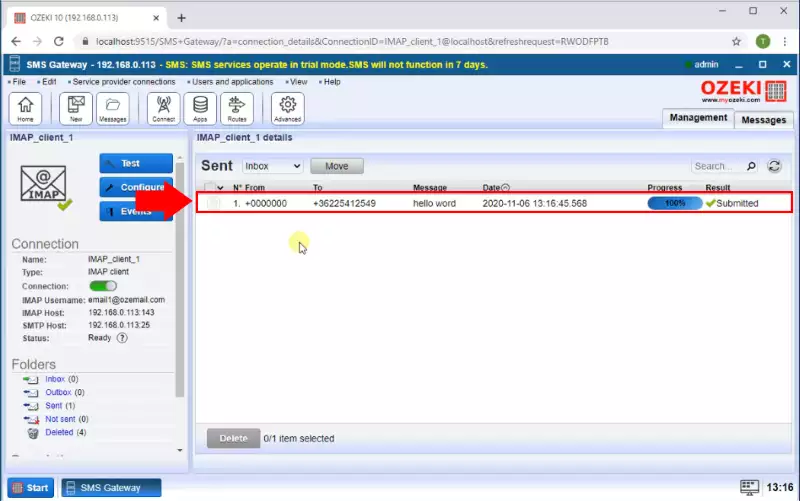
You can see the forwarder SMS message in the IMAP client sent folder as the Figure 9 show.
Step 7 - Send test SMS to E-mail
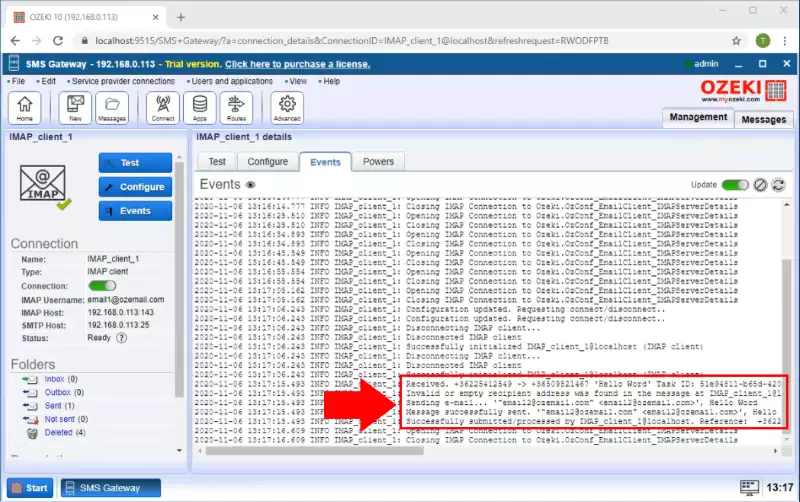
With the configured SMTP server, your system is capable of receiving SMS messages and forward it as an e-mail message. The SMS arrives at your system using a service provider connection. Then, the message routed to the IMAP client connection, which uses its SMTP server and the given details to forward the message to the recipient e-mail address. To check if your IMAP client connection works as expected, you can check its logs in the Events tab. You will be able to see every event of the connection. Figure 10 demonstrates that what events logged in case of a successful SMS to e-mail forwarding.
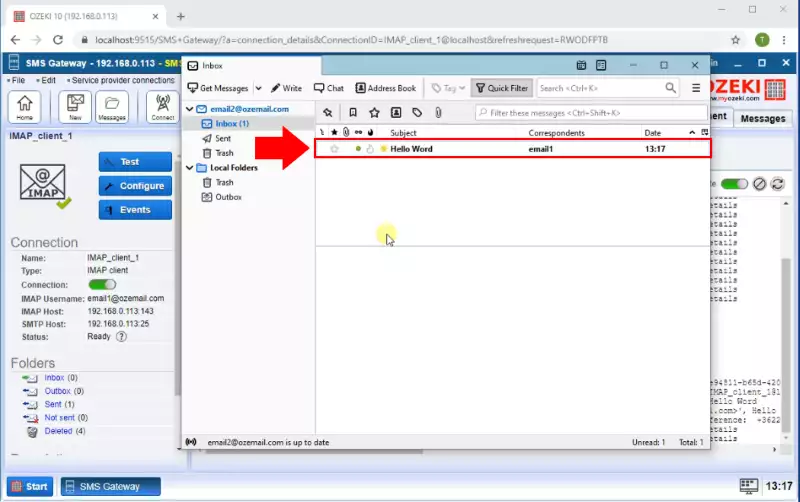
You can see in the Figure 11 the SMS forwarded to the recipient E-mail address and appeared in the E-mail accounts mailbox.
Final thoughts
Now, you can pause and catch your breath. We hope you didn’t get lost in the explanations. We did our very best to make it simple and to walk you through all the details as painlessly as possible. To summarize the procedure we can conclude, that setting up e-mail to SMS forwarding using an IMAP client is quite easy. If you have already completed the steps, you can enjoy a well-deserved mocha or some other treat you have in mind. If you would like to receive more information about the advantages of other similar solutions, please open ozeki-sms-gateway.com.
