Email to SMS from Windows mail
The following document is about to demonstrate how you can configure your Ozeki SMS Gateway and Windows Mail to be able to send or receive SMS messages. By performing this configuration on your system, you will be allowed to use e-mail to SMS and SMS to e-mail forwarding. The step-by-step guide on this page shows you what connections that you need to create in SMS Gateway and how you need to configure Windows Mail to be able to forward e-mails and SMS messages. The guide does not take more than 10 minutes to complete, so let's start right now!
How to send E-mail to SMS from Windows mail
To send E-mail to SMS from Windows mail:
- Launch Ozeki SMS Gateway
- Install HTTP Server
- Select SMTP user to install
- Add POP3 user connection
- Click on the Advanced toolbar icon
- Configure SMTP service Details
- Add Internet and e-mail account in Windows mail
- Write test e-mail
- Send SMS to test SMS to e-mail forwarding
- Check the logs
Email to SMS from Windows mail (Video tutorial)
In this video, we are going to show you how to forward email to SMS using Windows mail. The video will start with the home page of the Ozeki SMS Gateway. The video will end with receiving the first sent message. In the video, you will learn how to add a new POP3 user and how to add a new Windows mail account. The video is only 5:40 long and it features all the important information you need to complete the process. It is shown very detailed and easy to follow. You will have no problem with following it.
Step 1 - Create HTTP server connection
The first step of this guide is to create a HTTP Server connection. This connection is going to help us to send and receive SMS messages to test if the forwarding working well to both directions. So, after you opened SMS Gateway, click on the icon of Connect on the toolbar (Figure 1), and here from the list, click on the Install button of the HTTP Server connection.

Next, you will be able to see the configuration menu of the HTTP Server connection as you can see it in Figure 2. Here, you can set a name for the connection, set up the URL for the HTML form of the connection. You will need to use this form to handle the SMS messages. Lastly, you can specify a phone number for this connection. If you finished with the configuration, just click on OK to create the HTTP Server connection.

Step 2 - Install SMTP User connection
Next, you need to set up a SMTP user connection in Ozeki SMS Gateway in order to receive the e-mail messages from the Windows Mail application. To create a new user connection in SMS Gateway, first, you need to open the Apps menu by clicking on its icon on the toolbar. Next, scroll down to the SMTP user connection, and like in Figure 3, click on the Install button.

The configuration of the SMTP User connection does not require any specific knowledge from your side. All you need to do here is to specify a username and a password for the SMTP user connection as Figure 4 demonstrates it. After you finished with the configuration, just click Ok to create the SMTP user connection.

Step 3 - Install POP3 User connection
The next step of the guide is to install a POP user connection on your SMS Gateway. This POP3 user connection allows you to send the SMS messages received by the SMS Gateway to the Windows Mail application. To install this connection, open the Apps menu by clicking on its icon on the toolbar, and next, as you can see it in Figure 5, select the POP3 user from the list, by clicking on the Install button.

After you clicked on the Install button, the next windows that shows up, is the configuration menu of the POP3 user connection. Here, you need to enter a unique username in the Username field and a password for the user in the Password field like in Figure 6. Lastly, just click on Ok to create the POP3 user connection.

Step 4 - Configure the SMTP service
Before connecting and configuring the Windows Mail with Ozeki SMS Gateway, you need to configure the SMTP service in the SMS Gateway by turning on the SMTP authentication. This SMTP service is created automatically when you created the SMTP user connection. To find that service, just select the Advanced menu from the toolbar, and as you can see it in Figure 7, and then, click on the Details button of the SMTP service.

In the Details menu of the SMTP service, you can perform some modifications on the service. To turn on the 'Require SMTP authentication' option, first, select the Configure tab as you can see it in Figure 8. Here, in the User authentication submenu, just check the 'Require SMTP authentication' option. If you finished, click on OK to save the modifications of the SMTP service.

Step 5 - Create new account in Windows mail
At this point, you configured every connection and service in Ozeki SMS Gateway to be able to handle the e-mail and SMS forwarding. Now, you need to create an account in Windows mail that connects to the SMTP and POP3 servers integrated in SMS Gateway. First, open Windows mail on your computer. This application is installed on every Windows computer by default, and you can open it by clicking on its icon on the taskbar (Figure 9).

After you opened the Windows mail application, you will be able to see the main menu, where you can check the incoming and outgoing e-mail messages. To create a new account, first, click on the Settings icon in the bottom left corner as Figure 10 shows that, and on the right-hand side, select the 'Manage accounts' option. After opening this menu, you need to select the 'Add account' option to be able to create a new account.

Step 6 - Select Internet e-mail account
In the list of accounts, you can create or connect many types of e-mail accounts to Windows mail. Now, you need to select the 'Advanced setup' option to be able to configure the SMTP and POP3 servers. As you can see it in Figure 11, you need to select the 'Internet email' option.

Step 7 - Configure Internet e-mail account
The next step is to specify the details of the account to be able to send and receive e-mails and SMS messages. First, type an e-mail address that you would like to use for this account. Next, in the Username and Password fields, type the username and password of your POP3 user connection that you created in SMS Gateway. Then, type an Account name, that Windows mail uses to identify the account and to the next field, type a name that you would like to use as a sender name when you send an e-mail. (Figure 12)

Next, you need to specify the details of the SMTP and POP3 servers. The incoming e-mail server will be a POP3 server. Here, you need to type 'localhost:110' to use the built-in POP3 server of SMS Gateway. Next, select the POP3 option as an 'Account type'. Then, in the field of 'Outgoing (SMTP) email server', type 'localhost:25' to connect to the SMTP server of the SMS Gateway (Figure 13). In the next step, disable the 'Use the same name and password for sending email' and here, type the username and password of the SMTP user connection. Lastly, disable SSL for both incoming and outgoing messages, and click on 'Sign in'.

Step 8 - Send e-mail to test e-mail to SMS forwarding
In the previous steps, you configured both the SMS Gateway and Windows mail, so now, it is ready to forward the e-mail and SMS messages. First, let's try the e-mail to SMS forwarding. For that, open Windows mail, and click on the 'Plus' button to write a new e-mail. Here, you need to enter the recipient in phone number@domain form, where the phone number is the recipient's phone number, and the domain is the SMS Gateway domain name. Then, just type the subject and the body to the message. Lastly, click on Send to send the e-mail. (Figure 14)

After you sent the e-mail message, you can check if the solution works by seeing the logs of the SMTP User connection. You can open it, by opening the menu of the connection in SMS Gateway, and here, select the Events option as Figure 15 shows that. Here, you can see that the e-mail was received by the connection, and it forwarded to the HTTP Server connection which can send the SMS message.

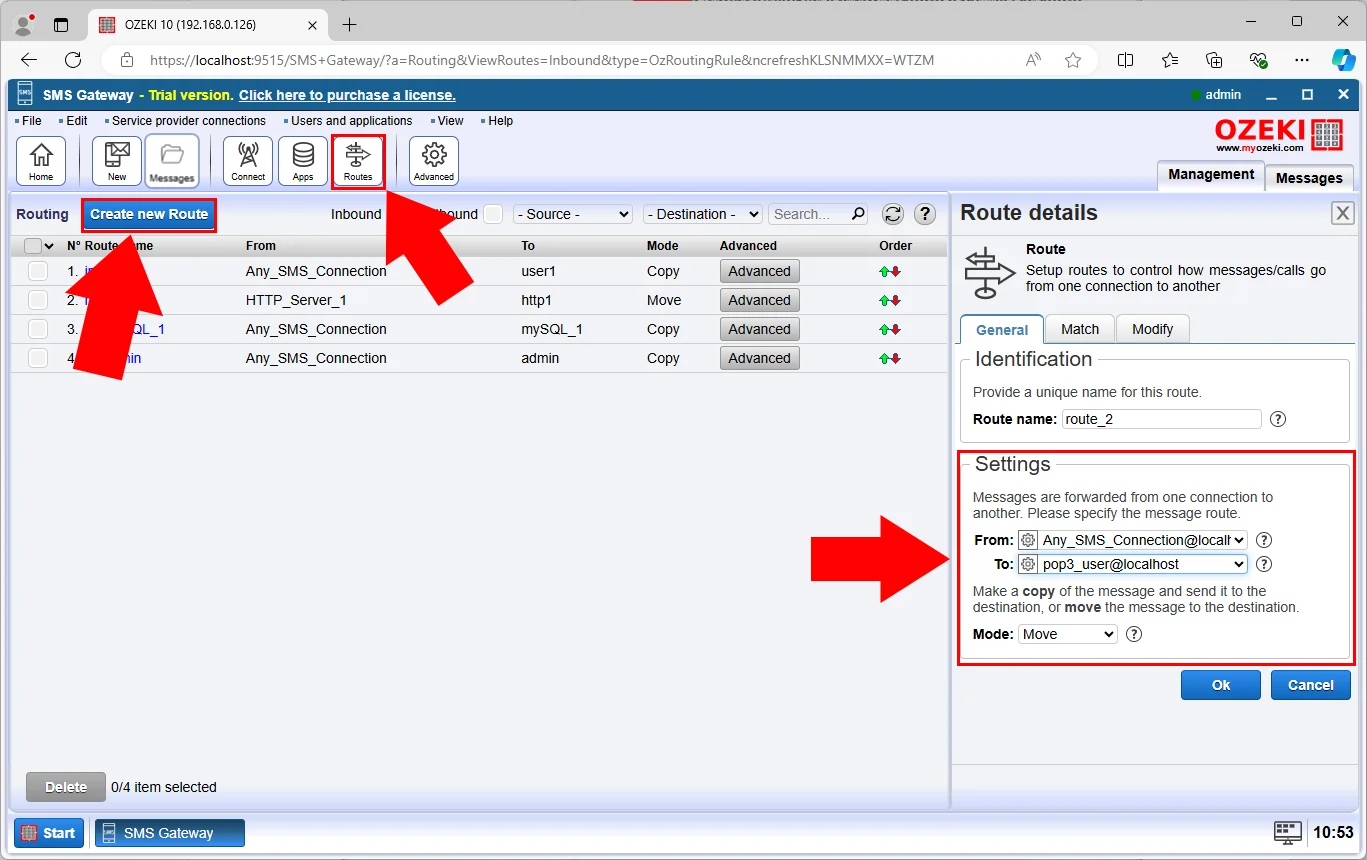
Step 9 - Set up route to POP3 user connection
Before testing the SMS to e-mail forwarding, you need to do one more configuration to make sure, the solution works perfectly. At this point, you need to create a routing rule from any SMS connection to the POP3 user connection. This allows the POP3 user connection to collect all incoming SMS messages and send them to the connected Windows mail account. So, open the Routes menu from the toolbar and select 'Create new Route'. Here, as Figure 16 shows that, select 'Any SMS connection' for the 'From' field, and the POP3 user connection for the 'To' field. To create the route, just click OK.
Step 10 - Send SMS to test SMS to e-mail forwarding
You can test your solution in the other way as well and see if it can forward SMS messages as e-mails. For that, open the HTML form of the HTTP Server connection. Here, you can send an SMS message (Figure 17). Just type the phone number of the recipient, and the message itself. If you are ready, just click on 'Submit' to send the SMS message.

As soon as you sent the SMS message, the SMS Gateway uses the created routing rule to help the POP3 user connection to receive the SMS message. After the POP3 user connection received the SMS message, it forwards the message to the connected Windows mail account as a new e-mail. As you can see it in Figure 18, the message arrives as a new e-mail in the Inbox folder.

Summary
This article explained how to configure an E-Mail to SMS and SMS to E-Mail connection using Ozeki SMS Gateway and Windows Mail. If you have followed the steps above carefully, you are now able to set up a route between SMS and E-Mail messages, making your communication more convenient. If you need to send messages to E-Mail address and mobile phone numbers, this solution is definitely for you because you can reach both destinations with the simple delivery solution offered by Ozeki SMS Gateway.
Ozeki SMS Gateway is the perfect link between SMS and E-mail, and it offers more. Learn what else you can achieve with E-mail to SMS forwarding by opening the following pages: IMAP to SMS forwarding and POP3 to SMS forwarding.
Now your next thing to do is to download Ozeki SMS Gateway and configure this solution immediately! Everything is there to get it up and running in less than 10 minutes.
FAQs
Does the software run as a Windows Service?
This software operates conveniently as a background service on Windows. This means two key benefits:
- Always Running: You don't need to be logged in for the software to function. It will keep running in the background.
- Automatic Startup: If the computer restarts, the service will automatically launch the software again, ensuring uninterrupted operation.
The software runs as a windows service by default. Is there a way to run it as an application?
Yes, there is.
Instead of running as a service, you can choose to launch Ozeki SMS Gateway
manually. To do this, open a command prompt (search for "cmd.exe") and navigate
to the program's directory (usually "C:\Program Files\Ozeki\OzekiNG"). Then,
execute the following command to start the software in application mode:
OzekiNG.exe /run