Ozeki SMS Gateway One
This article is about the Ozeki SMS Gateway One Device, it's compatibility with Ozeki SMS Gateway Software and features of it. The Ozeki SMS Gateway One is a small form factor Hardware SMS Gateway. It features a high-speed modem so you can utilize it in most of your solutions.
What is a hardware SMS Gateway?
A hardware SMS Gateway is used in cases where you need to have the computer and the cellular modem in one device. It only requires an external power supply and a SIM card to send SMS messages with plenty of software customizations available. Ozeki SMS Gateway One Device comes with Ozeki SMS Gateway Software pre-installed on a Linux operating system. It is responsible for compiling the message to send as an SMS. It needs an address and a message text to create the SMS message, which it will submit to your Service Provider. The Service Provider will send your SMS to the recipient's phone. (Figure 1)

Compatibility with Ozeki SMS Gateway
The Ozeki SMS Gateway One is a great, cost-effective solution for an all-in-one Hardware SMS Gateway with a small dimension, high speed and other extra features. When building the device, we paid extra attention to compatibility with Ozeki SMS Gateway and our other Services. We also provide up to date information and setup guides for all our devices.
Ozeki SMS Gateway One (Quick setup)
To send SMS with an Ozeki SMS Gateway One:
- Insert the SIM card into the computer
- Plug the antennas into the computer
- Connect the computer to a power supply
- Launch the Ozeki SMS Gateway
- Run the sms modem autodetection
- Specify the recipient's phone number
- Write the text of the SMS message
- Click on Send to send the SMS
- Check the test SMS message you sent
Ozeki SMS Gateway One hardware setup (video tutorial)
The following video guide will help you set up Ozeki SMS Gateway One Device to send SMS (text messages) natively, from the computer itself. The Guide will start with all accessories and by the end, you should be able to power on your device and have Ethernet connectivity, peripherals and display connected. This tutorial video is about 2 minutes long and to actually finish the setup, it should take about 5-10 minutes if you follow our easy-to-understand guide with explanations. First, we have to connect the power supply to its mains adapter. Connect it to the device via the DC port. After that, insert the SIM card into the SIM tray of the computer. Connect all antennas to the computer and connect it to mains electricity. Once the power is connected to the computer, it should power on with a blue led light visible that indicates the computer is up and running
Ozeki SMS Gateway One software setup (video tutorial)
In the following video guide, we will show you how to prepare your Ozeki SMS Gateway One Computer for SMS Messaging. The guide starts from your first power on and by the end of the video, you will be able to send text messages on demand. The tutorial is about 2 minutes long and the setup process requires about 10-15 minutes to complete if you follow our clear, easy to understand step-by-step guide. The Ozeki SMS Gateway One PC runs Linux and you will have to install a new SMS modem connection on the Ozeki Software Platform that is pre-installed on the device. Once the modem setup is done, you have to specify the target phone number and the message text, so you can send SMS to the address. This tutorial is useful for knowledge on how to use your Ozeki SMS Gateway One and Ozeki SMS Gateway software for bulk messaging or other automates messages.
More information about the product
Get the parts that you need to setup the computer correctly
You need a SIM card, two antennas, power supply with mains cable, the computer itself and an HDMI cable (All included with Ozeki SMS Gateway One). (All shown in Figure 2) Make sure that you have all the hardware that you need to use the modem because every little detail is important.

Connect the power supply
The Ozeki Gateway One operates with a 12V DC external power supply. To establish the power connection, you'll require its mains adapter. Connect these two components to enable the connection of your power supply to the mains network. (Depicted in Figure 3).

Connect the computer to the power supply
Connect your computer to the power supply. Locate the DC plug on the power supply unit and insert it into your computer's 12V DC port, positioned adjacent to the Ethernet connectors. (Illustrated in Figure 4).

Insert your SIM card
To insert your SIM card, it needs to be adjusted to the proper format. The Ozeki Gateway One employs micro-SIMs. If your SIM card isn't pre-cut appropriately, you can visit your service provider or a local GSM shop for resizing. In case your SIM card is smaller than a micro-SIM, you might need to acquire an adapter if you've lost the original one. Insert the SIM card beside the antennas, ensuring the contacts face towards the white print on the case. (The correct positioning is illustrated in Figure 5).

Important settings for SIM card
These settings are very important, and if you do not finish these, your SIM card won't work with Ozeki Gateway One. You must disable your PIN code and redirect phone calls to another phone number. You can do these steps on a normal mobile phone (Figure 6).

Attach antennas
To attach your antennas, locate the two ports situated adjacent to the SIM slot. Once identified, securely fasten the two antennas by screwing them in tightly. This ensures a stable connection and prevents any potential loosening. The provided antennas should deliver superb and high-speed connectivity, though you also have the option to utilize your own antennas. (Depicted in Figure 7).

Connect Peripherals
To continue with the setup of your Ozeki SMS Gateway One, you'll need to link your peripherals such as your keyboard and mouse. The device provides four USB ports, enough for most scenarios. However, if additional ports are required, you can easily employ a USB hub. (Illustrated in Figure 8).

Connect your Display
To set up a link between your computer and a display, you can choose between the included HDMI cable or a DisplayPort cable. If your device doesn't have these particular ports, don't worry – you can always get an adapter that fits. Just plug your chosen cable into the USB area. (Figure 9).

Connect your computer to your Ethernet network
For everything to work smoothly, you need to link your computer to the internet. You can make this happen using the 4 Ethernet ports located at the back of your computer. (See Figure 10).

Connect your computer to electricity
You must connect your computer to electricity, look for a mains connector near where you want to use your Ozeki Gateway One and connect it. (Figure 11)

Turn your computer on
Once you've plugged in your computer, it should fire up automatically. But if it doesn't, you might need to press the power button (You can find it on Figure 12) positioned among the USB ports. If the button lights up in blue, your computer is up and running, and you should see your system booting up on your display.

Log in to Linux
To log in to Linux, just click on user, located in the middle. Then enter the default password, which is qwe123. This will give you access to the computer, allowing you to set up your SMS Gateway and use your Ozeki SMS Gateway One. (Check out Figure 13).

Open your Browser
To launch your browser in Linux, locate the browser icon on the Linux Desktop, usually positioned on the left side. Click on it, and your browser will open. From there, you can access the Ozeki Software Platform. (Refer to Figure 14).

Open Ozeki 10
To access the Ozeki Software Platform, enter https://localhost:9515 at the top of your browser. This will open up the Ozeki Software Platform, where you can configure the built-in SMS Modem within the Ozeki SMS Gateway One. (Shown in Figure 15).

Open SMS Gateway
Launch the Ozeki SMS Gateway within the Ozeki Platform Software. You'll spot a lineup of default apps, typically located on the left side. Look for and open the SMS Gateway app – it's marked with a phone icon and "SMS" written inside. This will open the SMS Gateway Application. (Refer to Figure 16).

Add a new connection
To add a new connection in Ozeki SMS Gateway, locate the add new connection link positioned in the left Connections panel. Click on it, and this action will show the connection list page, allowing you to configure an SMS modem. (See Figure 17).

Install SMS Modem
Within the connection list, locate the SMS modem entry. Adjacent to it, you'll find an Install link. This entry is positioned at the top of the list within the Wireless Connections (SMS, MMS) category. Click this link to initiate the setup of your SMS Gateway and start sending messages. (See Figure 18)

Set the modems name
In the settings section, under the General tab, you have the option to assign a custom name to your modem. However, avoid using special characters such as question marks or asterisks. Adding a custom name is strongly advised to prevent any confusion, especially when dealing with multiple connections. (Refer to Figure 19).

Select the Modem Port
Under Serial port, you have to open the Port dropdown menu and look for /dev/ttyUSB1, select it to start configuring the built in modem of the Ozeki SMS Gateway One and send messages via 4G, if ttyUSB1 does not work later on, try the other ports. (See Figure 20)

Click Autodetect
Beside the dropdown menu, you'll spot a blue button labelled Autodetect. Click on this button to automatically retrieve all the data from your SIM card, including your phone number, and configure it accordingly. This process might take a few seconds to complete. (Check out Figure 21).

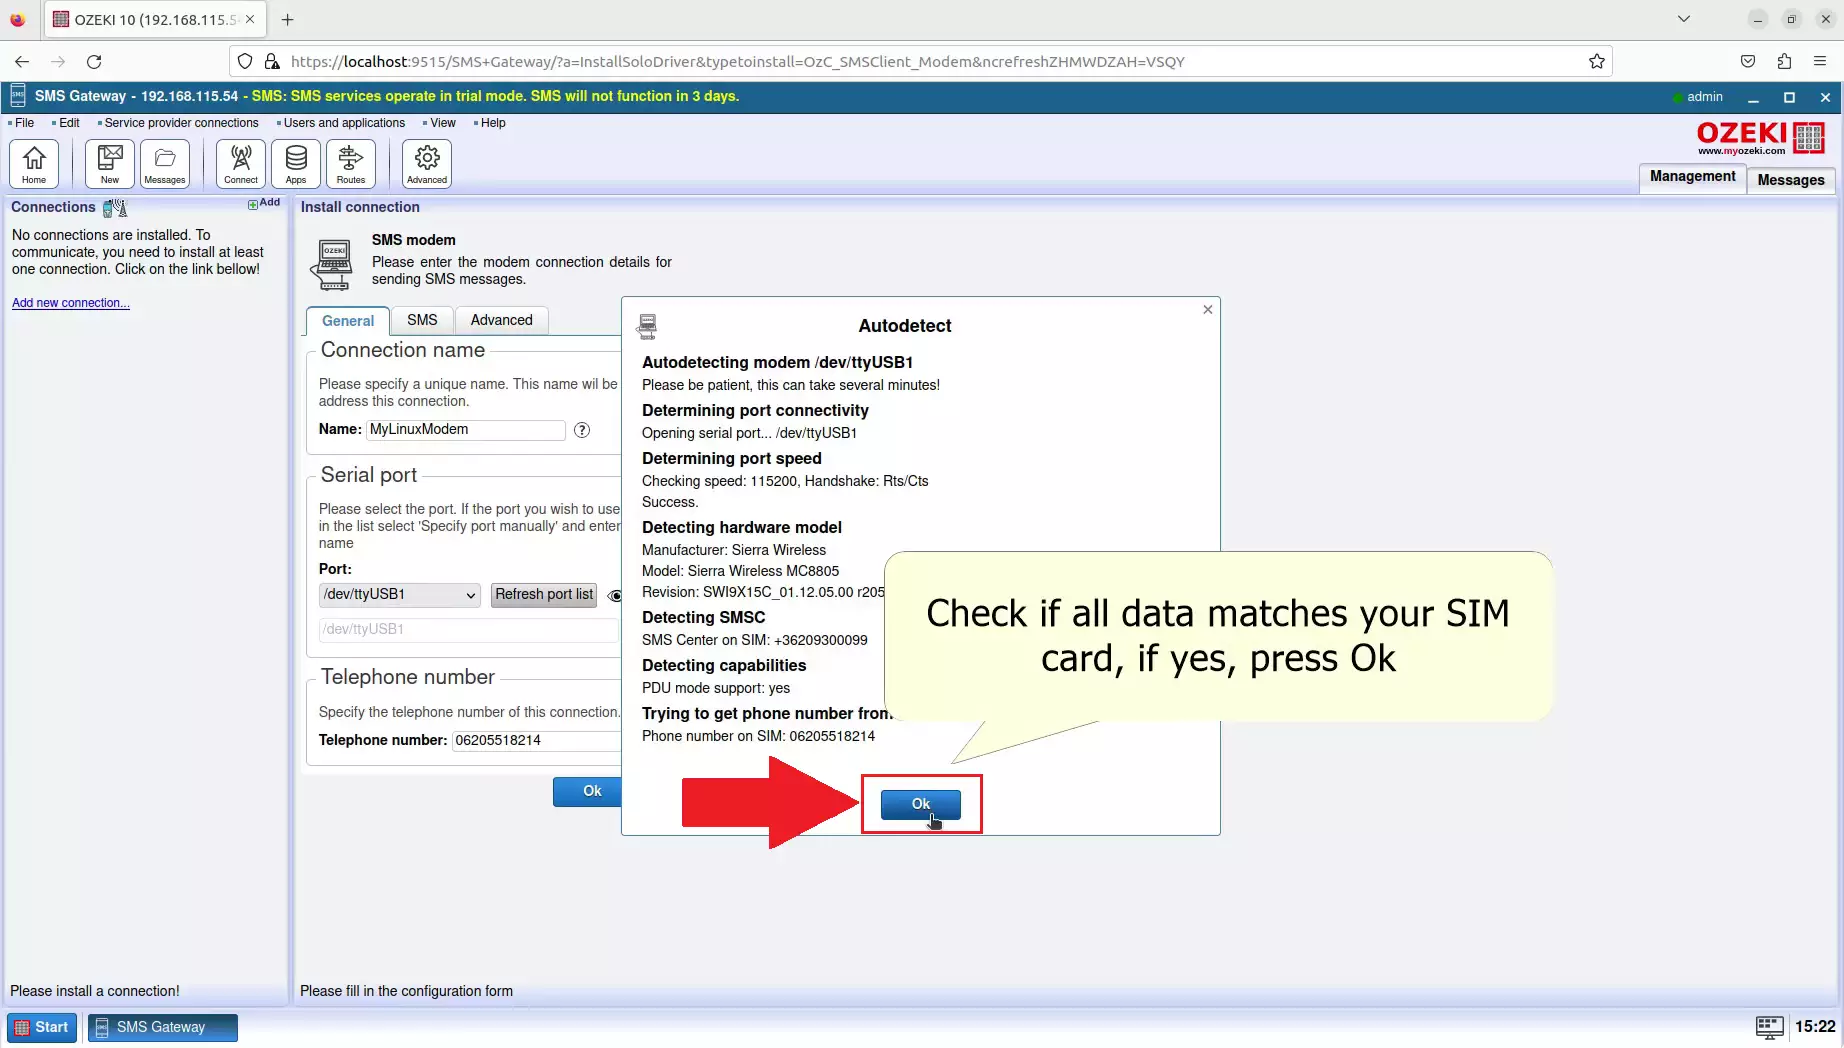
Check if your details are correct
Review your details carefully. A window labelled Autodetect will appear, presenting the opportunity to verify if all the information matches your SIM card. This window also displays the modem details. Once you've confirmed everything, click on the Ok button located at the bottom. This will conclude the Autodetect procedure, ensuring your modem is prepared to send SMS messages from your computer. (Refer to Figure 22).
Finish setting up your modem
To complete the setup for your modem, locate the blue Ok button at the bottom. If you want to make additional adjustments to your modem settings, you can do so now by navigating to the SMS tab or the Advanced tab. Alternatively, you can return to this tab after clicking Ok and access the Configure tab at a later time. (Refer to Figure 23).

Enable SMS Modem Connection
To activate the SMS modem connection, navigate to the Connection group on the left. Look for the Connection switch, which is the second option in the group. Click on it to turn it on (it will turn green), and your modem will initiate the connection process with your service provider. (Refer to Figure 24).

Wait for the connection to establish
Be patient while your connection sets up properly; this might take a few seconds. Keep an eye on the Events tab. Once you see "GSM Modem polling started," that's your cue – your modem is good to go. You're now ready for the next step to start sending messages from your modem. (Check out Figure 25).

Navigate to the Test tab page
In the right panel, head to the navigation bar and click on Test to access the Test tab page. From there, you can enter the Test SMS sending page. This is where you can send test messages to anyone with customized content. (Refer to Figure 26).

Fill the recipient's address and test message
Provide the recipient's address and compose your test message. Locate the To field within the Recipient group. In this field, enter the recipient's phone number. Then, use the SMS text field to type the content of your message. You're free to write whatever you'd like in this field. (Refer to Figure 27).

Send the SMS
If you've finished composing your message, go ahead and send it. Find the blue Send button located at the bottom of the screen. Click on this button to initiate the sending process. You can expect to receive the SMS on the specified phone number shortly after sending. (Refer to Figure 28).

Check the test message
Retrieve the test message on your mobile device. Locate an application designed for handling SMS messages and open it. If you observe your test message displayed with the accurate content, you can rest assured that your SMS modem is functioning properly. Congratulations! (Refer to Figure 29).
