Setup your SMTP server in Ozeki SMS Gateway
This guide explains how you can configure the built in SMTP server of Ozeki SMS Gateway. You will see the steps to take to create the default SMTP service. This service is responsible for accepting e-mail messages from the Internet or LAN and converting it into SMS messages.
How to setup SMTP server in Ozeki SMS Gateway
To setup SMTP server in Ozeki SMS Gateway:
- Launch Ozeki SMS Gateway
- Open Advanced menu from toolbar
- Click on the Create new Service button
- Select E-mail service
- Choose SMTP service
- Name SMTP server
- Go to the Advanced tab
- Tick Log level check box
- Enable SMTP service
Look for the advanced menu
After launching Ozeki SMS Gateway, you can start configuring the SMTP server.
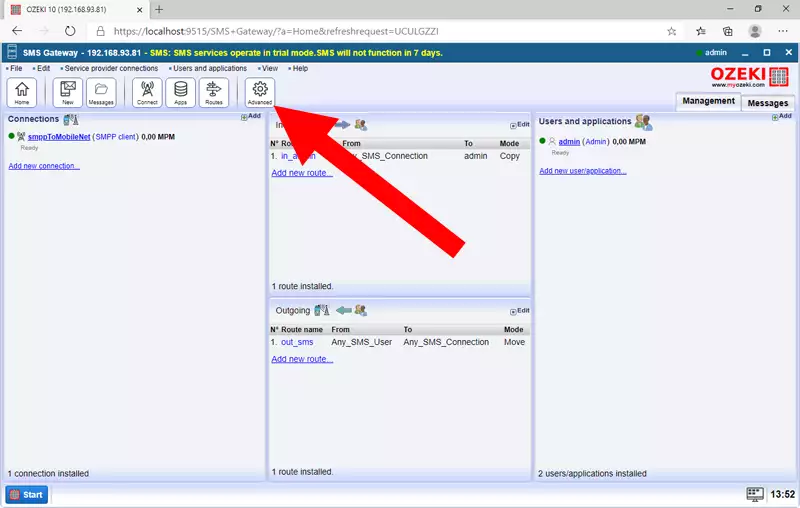
Select the Advanced button in the Toolbar.
This will open the advanced settings of the Ozeki SMS Gateway where you can start the configuration.
(Figure 1)
Create new service
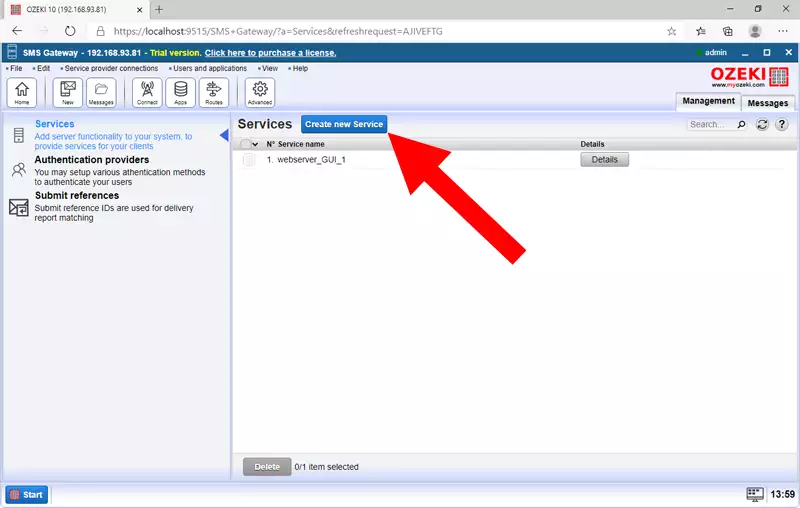
To have a working SMTP server, you need to create a new service. You can do that by selecting the Services option in the left panel and use the Create new Service button. It is located on the top of the Services panel, under the toolbar. This step is inevitable in providing services for the clients. (Figure 2)
Select the E-mail service
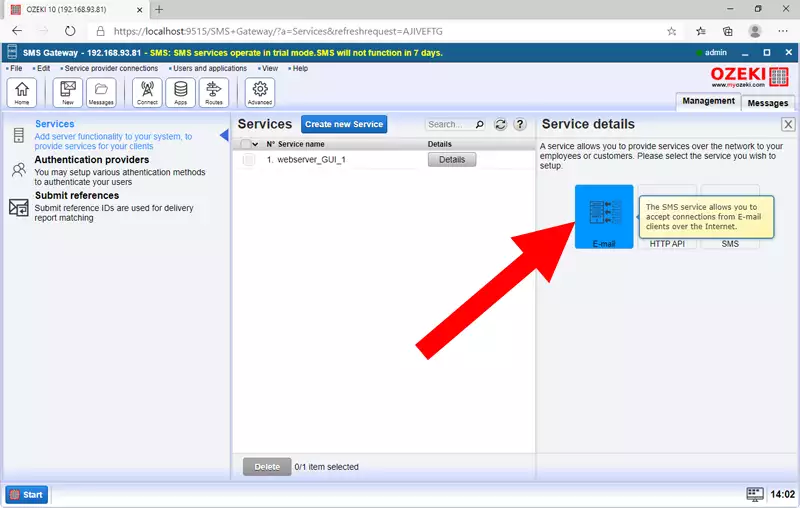
In the Ozeki Dashboard you need to select the Details button next to the name of the service. You have three options. E-mail, HTTP API and SMS. Now you need to choose the E-mail option. This will allow you to communicate with other e-mail servers and clients. Selecting the E-Mail will take you to the next step. (Figure 3)
Choose the SMTP service
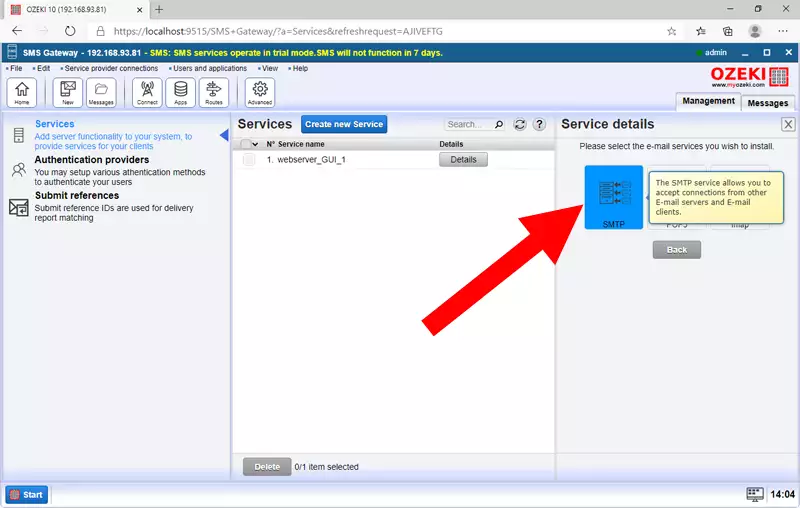
On the Service details panel, you need to choose the e-mail service you wish to install. There are three of them, SMTP, POP3 and IMAP. Please choose the SMTP option, and you can start the configuration process of the SMTP service. (Figure 4)
Set up the SMTP service
You are now in the SMTP service configurator. In the General tab you need to provide a service name (this has to be a unique name),
a port number and enable user authentication. It is optional, but we advise
you to enable it, for protecting
your SMTP service from unwanted messages. To save the details, click the blue 'Ok' button.
(All shown in Figure 5)
Go to the Advanced tab
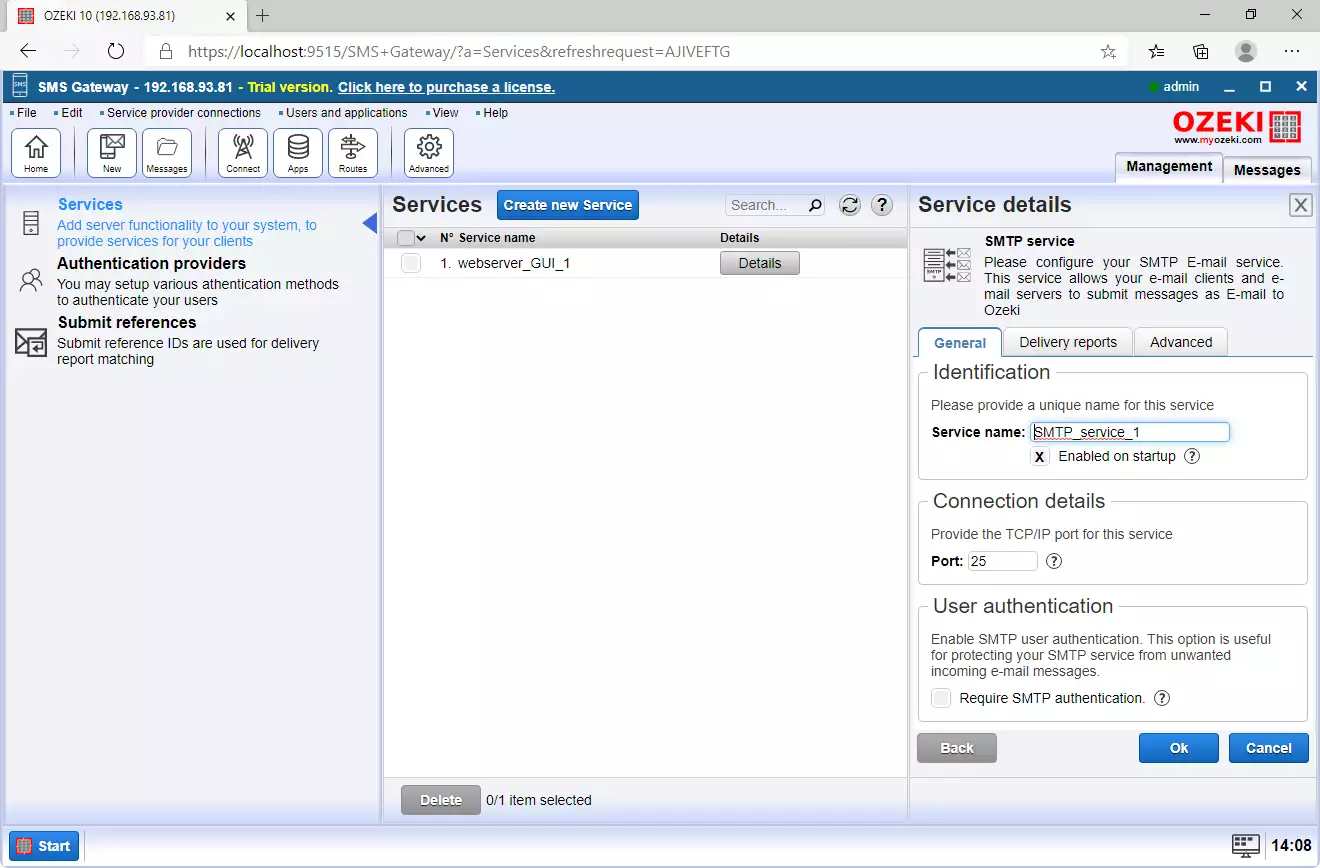
Additional options are available in the Advanced tab. You can go there by selecting the 'Advanced' tab button in Service details panel next to the Delivery reports tab button. There you can make several adjustments on the SMTP E-mail service, so it is recommended to visit this tab and browse the extra functions. (You can see tab that you need to select in Figure 6)
Enable SMTP service log
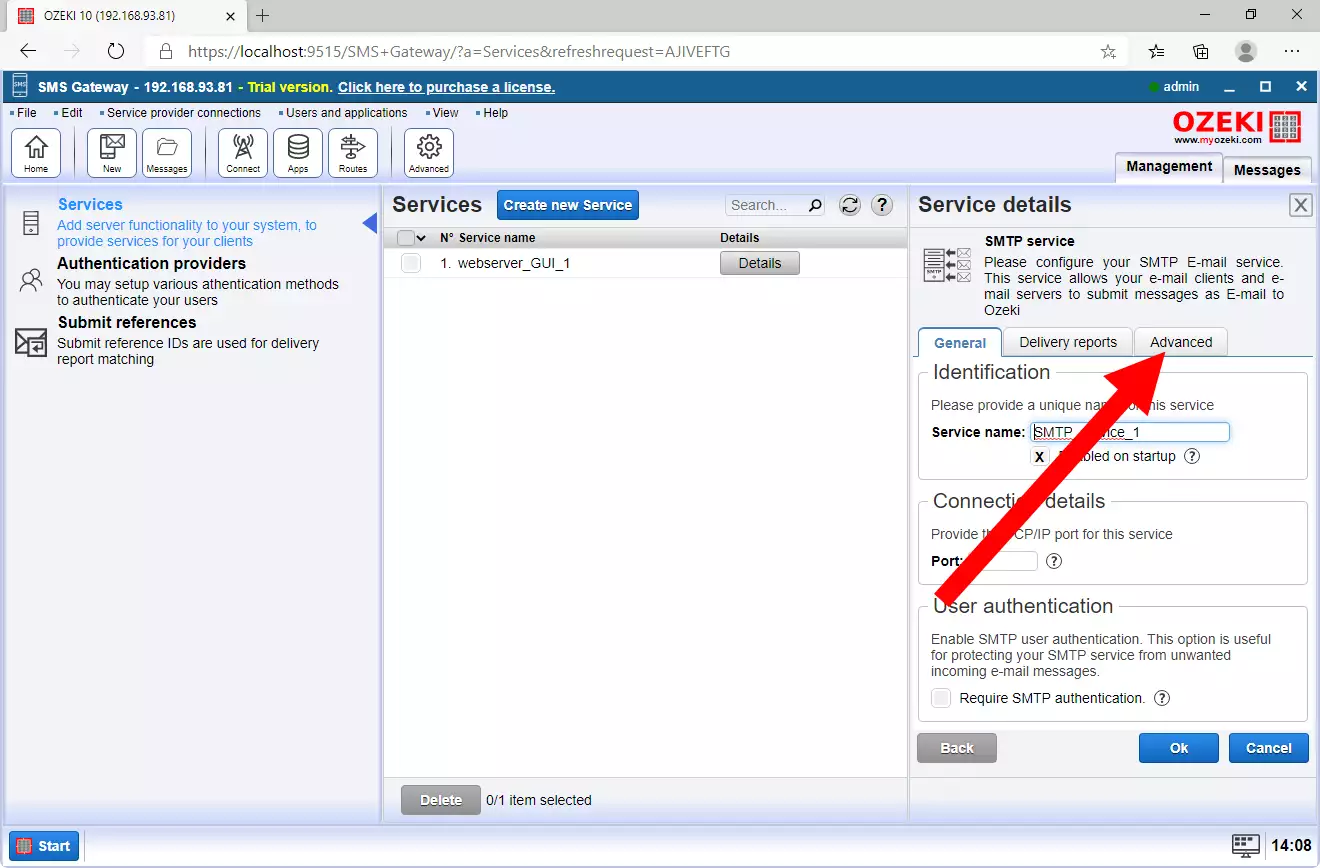
Communication logs help you to track all your communication activities within your server,
so you have a formal record of all the events occurred. To enable this function
on your SMTP server, look at the Log level group box and click the Log communication at SMTP protocol layer tick box.
(Highlighted on Figure 7)
Press the Ok button to proceed.
Turn on the SMTP service
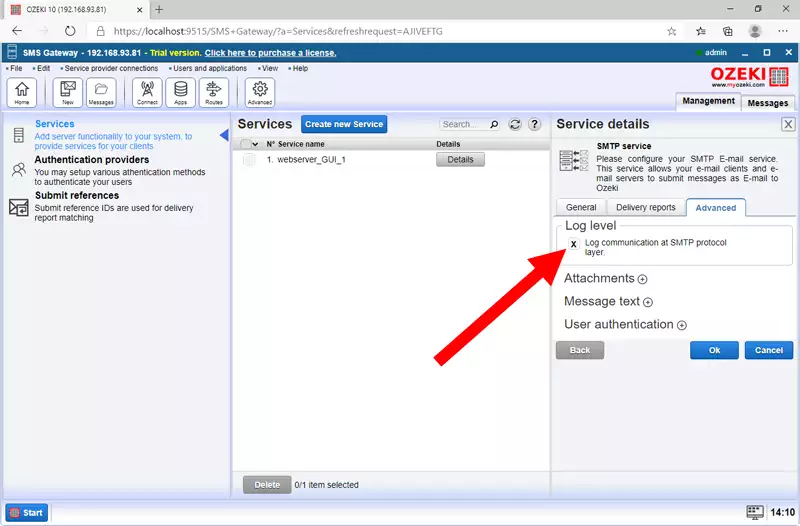
If you are finished with the setup procedure, you can go back to the Services tab. Here you will see all your existing services and you can turn them on or off with the 'Enabled' button. This is a switch button which will be green if you decided to turn it on. Now please turn on the SMTP_service_1 to enable the service. (The optimal state shown on Figure 8)
Check the service status
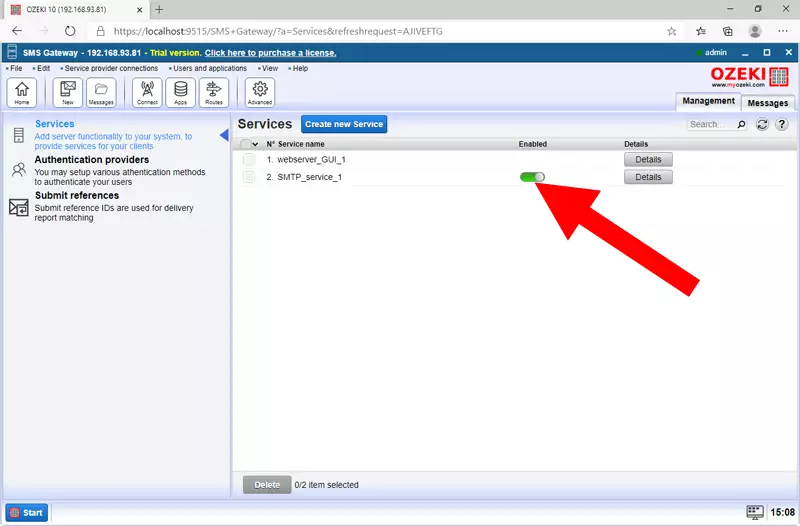
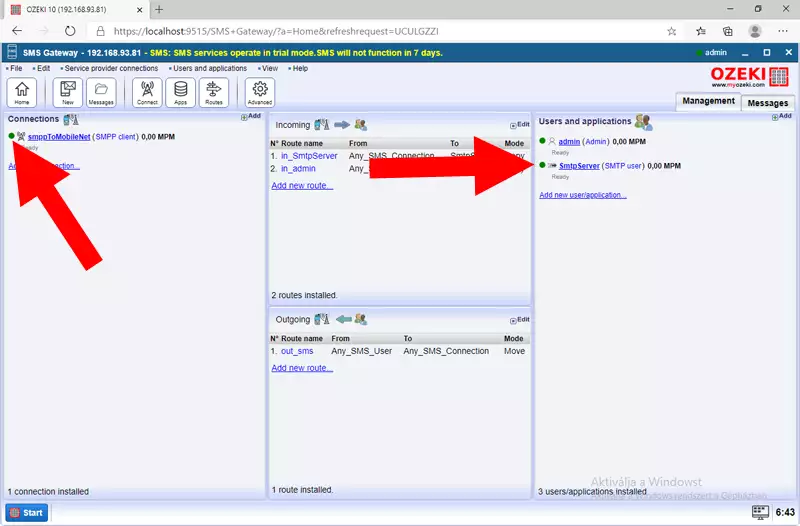
You can make sure that the service is running as intended by checking the Users and applications and the Connections panel. If you see that the indicators for SMPP client and the SMTP User are green, you have a working connection. It is important to have everything set up because the procedure only works when Ozeki SMS Gateway shows that both parties are ready. (Figure 9)
Summary
By reading this article, you have learned how to set up your SMTP server in Ozeki SMS Gateway. Setting up the SMTP server helps you get email messages from the email network. These messages can be converted to sms and sent out to mobile. This service can be put into use and can make your organization more efficient because it allows you to deliver key information available in email to mobile phones.
You may find out more information about this technology and Ozeki SMS Gateway, so make sure that you don't finish your work here. Ozeki has other articles in this topic: Exchange Server setup for e-mail to SMS sending and SMTP firewall configuration guide.
If you need e-mail to sms forwarding and you have not already done so, Download Ozeki SMS Gateway now and create this setup!
What is an SMTP connection?
The Simple Mail Transfer Protocol (SMTP) is the cornerstone of email communication
on the internet. Established by the Internet Engineering Task Force (IETF), it
dictates the exchange of email messages between email clients and servers.
How it Works:
- Client and Server: SMTP relies on two key components: an email client (sender) and an email server (receiver).
- Email Client: Your email program, like Microsoft Outlook, acts as an SMTP client. It utilizes the protocol to transmit email messages to designated recipients.
- Server Configuration: Most email clients allow you to configure the SMTP server address provided by your internet service provider (ISP).
- Message Delivery: When you send an email, your email client connects to the specified SMTP server and leverages SMTP to communicate and deliver the message.
