E-mail to SMS using SMTPS (STARTTLS)
To create a solution to send texts from email we need 25 minutes. This guide presents steps and the necessary information to help you complete this procedure efficiently. Maybe the biggest benefit of this email solution is that all you have to do is perform some simple configuration and you will be ready to send SMS through a secured SMTPS protocol. This solution uses Ozeki SMS Gateway, so you can benefit from the fact that it is an on-premises system that results in excellent data protection. We presume you are familiar with the basics of mobile messaging technology. You will be presented with some valuable information and well-structured step-by-step instructions. We hope you will find the presented instructions beneficial.
How to send E-mail to SMS using SMTPS (STARTTLS)
To send E-mail to SMS using SMTPS (STARTTLS):
- Launch Ozeki SMS Gateway
- Install SMTP user
- Provide username and password
- Open SMTP service Details
- Modify SMTP settings
- Configure STARTLS connection
- Send encrypted e-mail to SMS message
- Check the logs
E-mail to SMS using SMTPS (STARTTLS)
The following easy to follow and detailed video explains how to forward Emails to SMS messages with a STARTTLS connection. You will start with setting up a new SMTP user in the Ozeki 10 SMS Gateway and takes you all the way to forwarding your first email in a form of an SMS message. This 3-minute-long video will teach you how to setup an SMTP user, how to connect the Ozeki 10 SMS Gateway with the Thunderbird email client using a secure STARTTLS connection.
Setup a new SMTP user
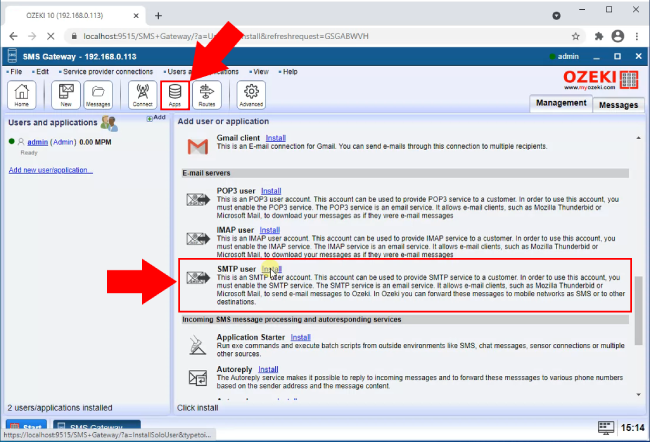
To setup a new SMTP user, you need to select the Apps icon from the Toolbar of the Ozeki 10 SMS Gateway (Figure 1). If you click the button, you will be presented with the Add user or application list, where you can select what type of application you wish to configure. Look for the SMTP user install item in the Email servers section. Click the blue Install link to access the Install user/application panel.
Provide the login credentials
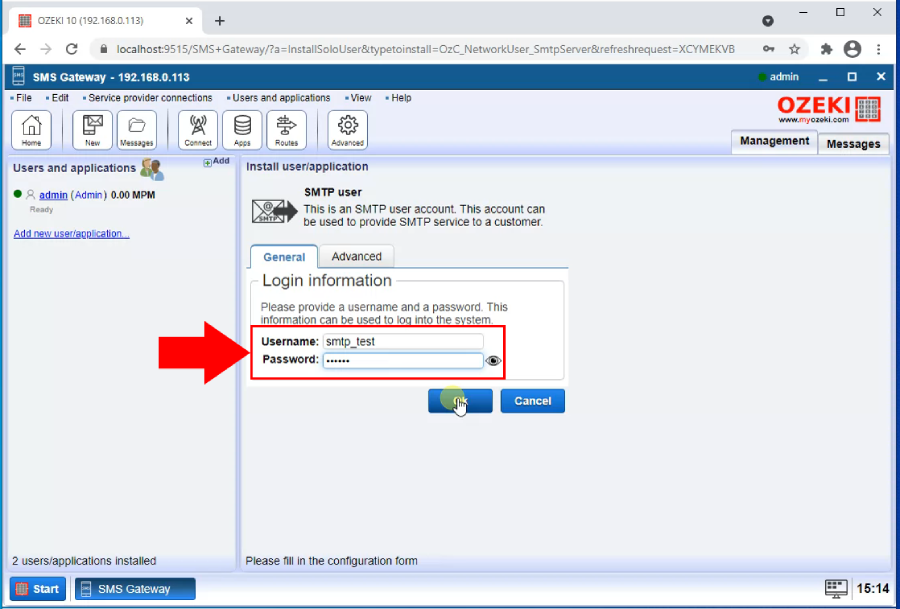
To provide the login credentials, look for the General tab page of the SMTP user (Figure 2). In the Login information group box, you can see two textboxes. Provide the login credentials of your choice and click the Ok button located under the group box.
Open the Details
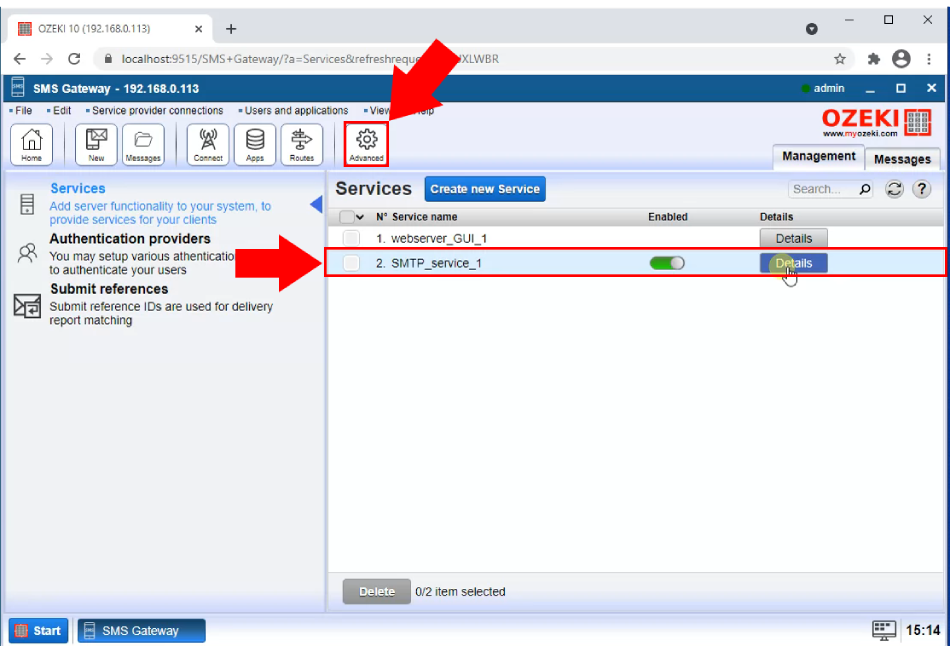
Now you created an SMTP service. To provide more security details, look for the Advanced icon on the toolbar, next to the Routes button. Click it to access the Services page. To modify the security settings of the service, click the grey Details button located next to the Enabled switch button (Figure 3). Now you will see the Details page of the service.
Specify the security settings
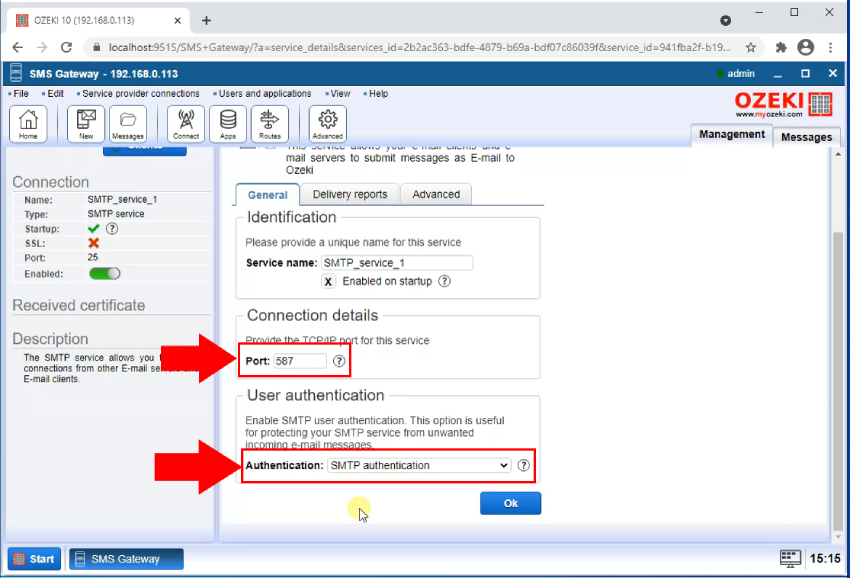
To specify the security settings, look for the Connection details group box, where you will find the Port input field. Change the default port number to 857 (Figure 4), to work with your email client. This number will also be required to change when you configure the server details in the email client. This way the Ozeki 10 SMS Gateway and the email client establishes connection. Below the Connection details group box, you will find the User authentication group box. Here you can set the Authentication method which will be SMTP authentication in this case. With this method, the service could only accept messages from a secure source.
Select a security method and enable SSL connection
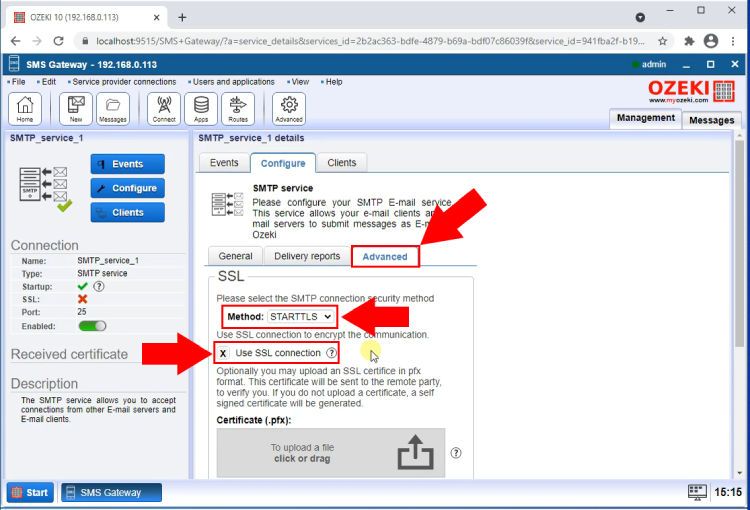
To select a security method, look for the Advanced tab page (Figure 5), next to the Delivery reports tab. Here you will see the SSL group box. The Method combo box is for changing the security method of the connection. In this case, choose the STARTTLS method. The STARTTLS method could encrypt the channel in use, with the help of TLS or SSL protocol. It could make a secure connection out of an unsecured one. Below the combo box, you will see a Use SSL connection checkbox. Make sure to check it, because an SSL certificate will encrypt your data before sending it to the receiver and the message could only be decrypted by the target server. These two settings will result in a highly secure connection.
Enable logging
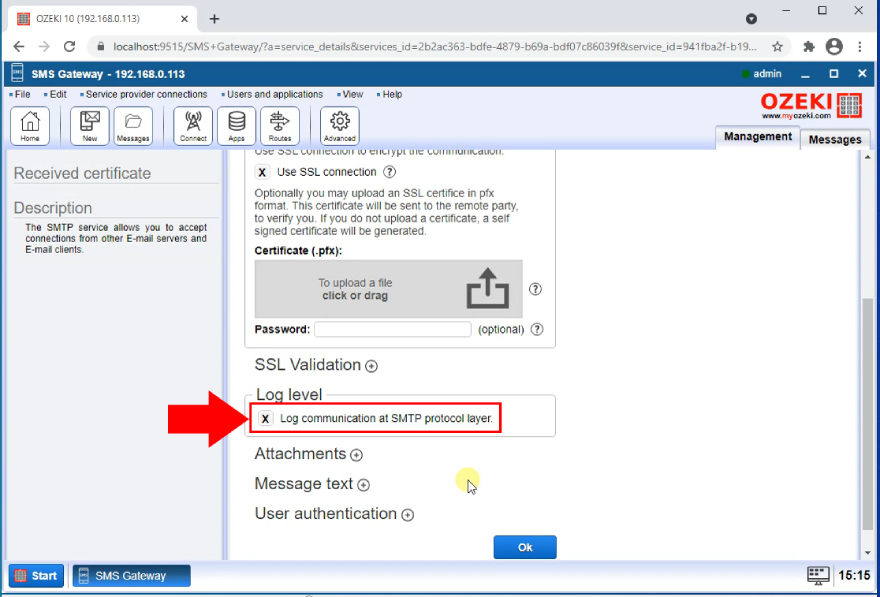
To enable logging, scroll down to the Log level group box, where you can see the Log communication at SMTP protocol layer checkbox (Figure 6). Check it to enable logging on this connection. Log files are automatically created to store all the events on the connection. The log file holds essential information about the error in case of one. It speeds up the process of correcting the error.
Open Thunderbird and configure the server
After you have configured the Ozeki 10 SMS Gateway, open Thunderbird and setup a STARTLS connection.
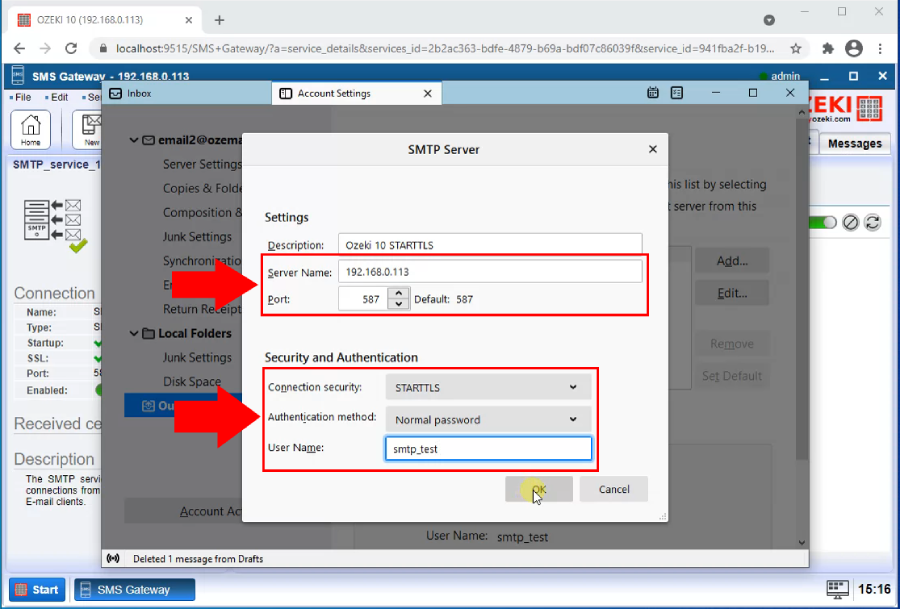
To do that, open the SMTP server details window (Figure 7) and provide a server name in the proper input field.
You could open the details window by clicking the three stripes icon located on the upper left corner of the Thunderbird client and find the Account settings option.
Now find the Outgoing server menu point which is at the bottom of the list.
Here you can manage all the outgoing servers you currently have. Click the add button to open the SMTP server configurator.
Next, you need to set the port number (857) that the server will use.
Below the Port field, you will see the Security and Authentication group box.
Here, you will need to set the Connection security to STARTTLS,
the Authentication method to Normal password and provide a username for the server.
This way, the server and the client side of the connection will have the same
security properties, which means maximum security.
Click the OK button located under the Username input field to finalize the setup.
Send encrypted email message
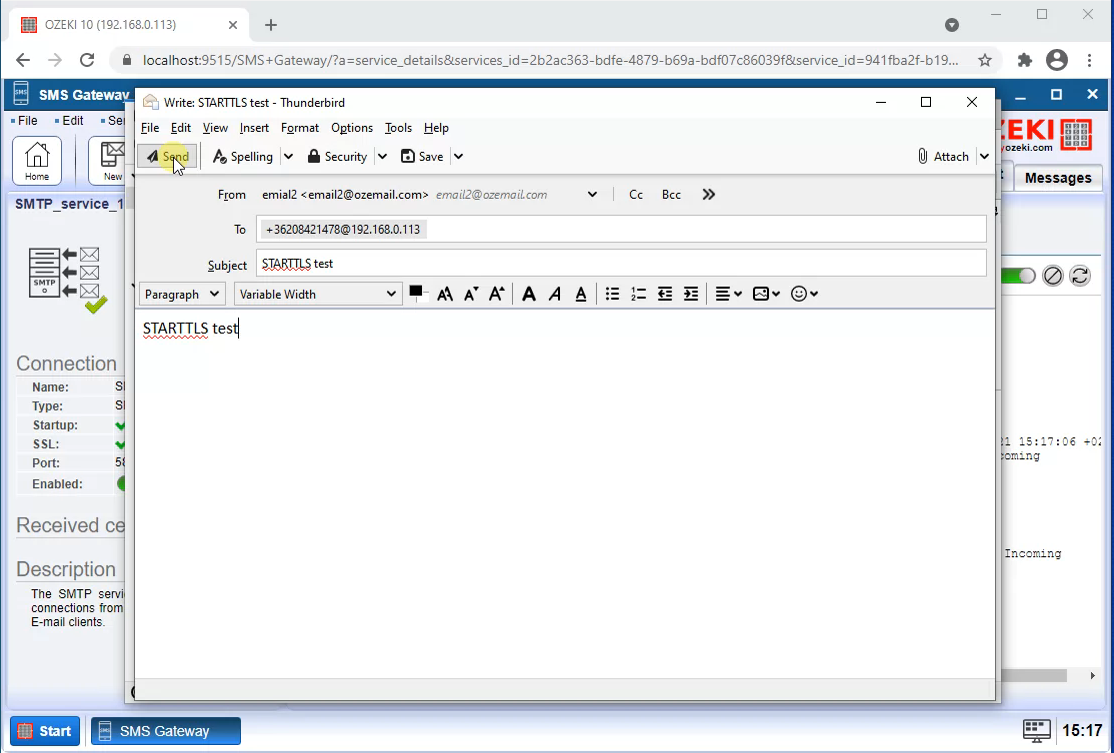
Now you have the STARTTLS connection between the email client and the Ozeki 10 SMS Gateway. On Figure 8, you could see that in the To input field, located under the sender address, you need to type in the phone number you wish to send the SMS to, and the server name provided before. Write a subject that will be visible for the receiver, and the body of the email. The email client will send the message to the data through the secured port to the Ozeki 10 SMS Gateway. The Ozeki gateway will then forward it to the telephone number in the To textbox.
FAQs
Is there filtering capability by specific keyword on incoming email?
Want to prioritize certain emails for SMS delivery? No problem! This software lets you set up keyword filters. Here's how:
- Go to the "Email user configuration" form.
- Click on the "Filter" tab.
- In the "Keywords in Subject" box, enter the specific word(s) you want to track.
Need more details? The E-mail to SMS Configuration page has additional information at E-mail to SMS Configuration page.
Is there filtering capability by specific keyword on incoming SMS?
You can customize where SMS notifications are sent. This software allows you to:
- Forward to one email address: Perfect for receiving all important SMS messages in a central location. Simply set the "Mode" to "Move" when configuring the route.
- Forward to multiple email addresses: Need to keep different teams informed? No problem! Use the "Copy" mode and create separate routing rules for each recipient.
- Keyword filtering is handled in the "Inbound routing" table. Access it by clicking "View/Routing/Inbound" in the menu.
- Click "Add" to create a new route.
- Select the source (your service provider) and enter your keyword in the "Condition 3. (Keyword)" field.
- Choose the destination email user(s).
- Set the "Mode" to "Move" for one recipient or "Copy" for multiple.
Can I submit non-text messages such as VCard using an e-mail to SMS configuration?
You can use this software to send vCards (and other things!) through email. There's a specific format to follow: Leave the subject line empty. Copy and paste a special code into the email body.
SMS:VCARD
BEGIN:VCARD
VERSION:2.1
N:family name;given name
TEL;VOICE;HOME:home landline phone number
TEL;VOICE;WORK:work landline phone number
TEL;CELL:mobile phone number
TEL;CELL;WORK:work mobile phone number
TEL;FAX:fax number
EMAIL:e-mail address
URL:homepage address
BDAY:date of birthday
NOTE:note text
END:VCARD
This code acts like a secret instruction for the software. You can find the exact code and instructions in the software's documentation (or the Inbound Routing guide, if available). Basically, the software can recognize emails with this special format and convert them into the desired message type (like a vCard in this case).
When the built in SMTP server is used, which user account will send the messages?
The admin account
Option 1: Utilizing the Administrative Account (Unauthenticated)
The most straightforward approach is to leverage the administrative account. In
this scenario, all SMS messages will be transmitted under the identity of the
administrative user. This method offers ease of setup but may not be suitable for
scenarios requiring a more specific sender identification.
Option 2: Implementing a Dedicated User Account with SMTP Authentication
For situations demanding greater control over the sender identity, a dedicated
user account with SMTP authentication can be established. Here's the recommended
procedure:
- Enabling SMTP Authentication: Within the built-in SMTP server's configuration settings, locate the "Server Preferences" form. Activate the checkbox labelled "SMTP Authentication."
- Creation of a Standard User Account: Establish a new standard user account specifically for sending SMS messages. This account should possess a unique username and password.
- Configuration of the External Email Client (SMTP Client): Access the settings of your external email software (SMTP client). Locate the SMTP authentication options and provide the username and password credentials associated with the standard user account created in step 2.
How can I configure an SMS gateway for best performance?
Achieving optimal system performance requires a focus on minimizing disk-intensive functionalities. Here are key strategies to consider:
- Deactivate Persistent Message Queues: Disabling persistent message queues reduces disk writes associated with storing messages for later processing.
- Disable Detailed Logging: Logging provides valuable information, but detailed logs can generate significant disk activity. Consider filtering or minimizing logging levels to strike a balance between data and performance.
- Streamline Routing Configuration: Restrict the number of incoming and outgoing routes to the minimum necessary for your specific use case. This helps to streamline message processing and reduce resource utilization.
- Disable Unused Features: Evaluate and disable any functionalities that are not essential for your current operations. This may include accounting modules, inactive user accounts, and superfluous application configurations.
Note: I removed the sales-oriented closing sentence about purchasing specific services.
Final thoughts
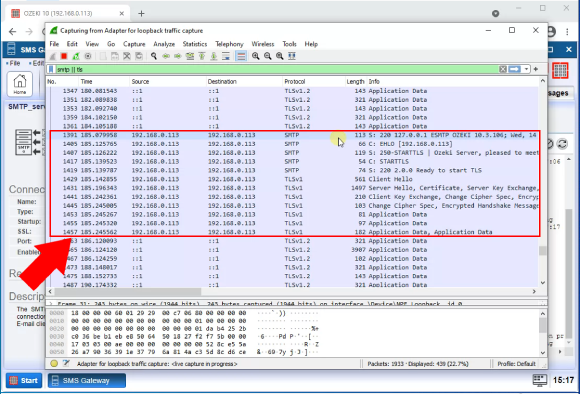
Wireshark is an analysis tool that captures traffic on the local networks. With the help of that software, you could see the incoming and outgoing data packages in detail. On Figure 9, you could see that the highlighted records are from the encrypted message that was sent from the email client.
Default SMTP ports for secure E-mail to SMS (SMTPS)
When you setup a secure E-mail to SMS service using the SMTPS protocol, you have to configure the port used by the E-mail client. The default ports are:
- Non encrypted SMTP: 25
- STARTTLS: 587
- SSL/TLS: 465
