Email to SMS DNS setup
This guide gives you instructions on how to setup an e-mail to SMS gateway that allows you to send SMS messages from the Internet by sending e-mails to a domain and using the username part of the e-mail as the recipient phone number. E.g. 0123456798@emailtosms.ozeki.hu.
Step 1: Create a DNS zone called emailtosms.ozeki.hu.
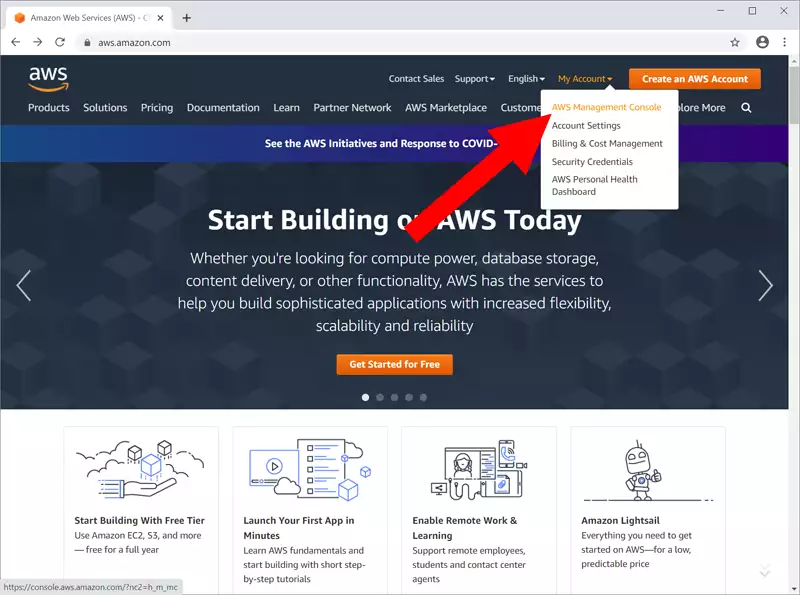
In order to accept e-mails in the emailtosms.ozeki.hu subdomain, a new DNS zone should be created for this subdomain. In our example we use Amazon web services to create this subdomain. You can also use Amazon web services, even if you host your main domain at a different DNS provider. Amazon Web Service (AMS) is a massive global cloud infrastructure provider, that will innovate your company’s development. It will lift the weight off of your shoulders by handling the hardware need of the infrastructure, which instantly grows as you scale up the workload on it. On Figure 1, you can see how you can start using the AWS.
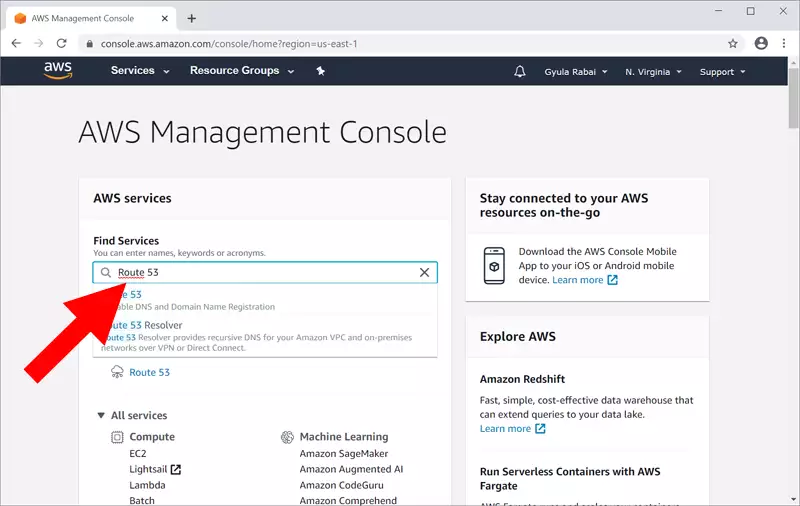
Next step is to choose you service. Amazon offers countless service options. Now please choose "Route 53", as you can see on Figure 2. Route 53 is an extremely reliable and cost effective connection, which can be used to route users to infrastructures outside of the AWS
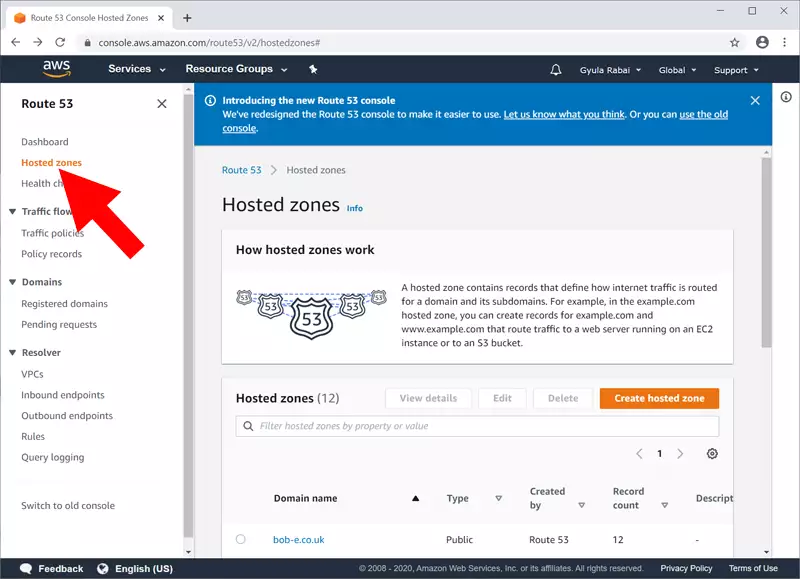
Now you need to set up the connection between AWS and Ozeki SMS Gateway. To do that, please look for a "Hosted Zone option on the left side of the AWS website. You can find it with the help of Figure 3. Click on it to start setting up a new Hosted Zone.
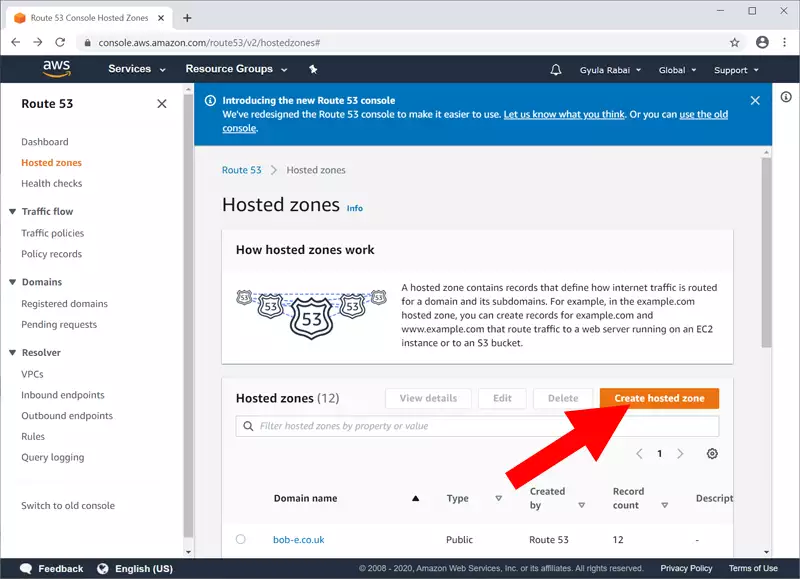
Now you are on the Hosted Zones window (Figure 4). Search for a “Create hosted zone” button to start setting up a new connection. It will take you to the hosted zone configuration panel.
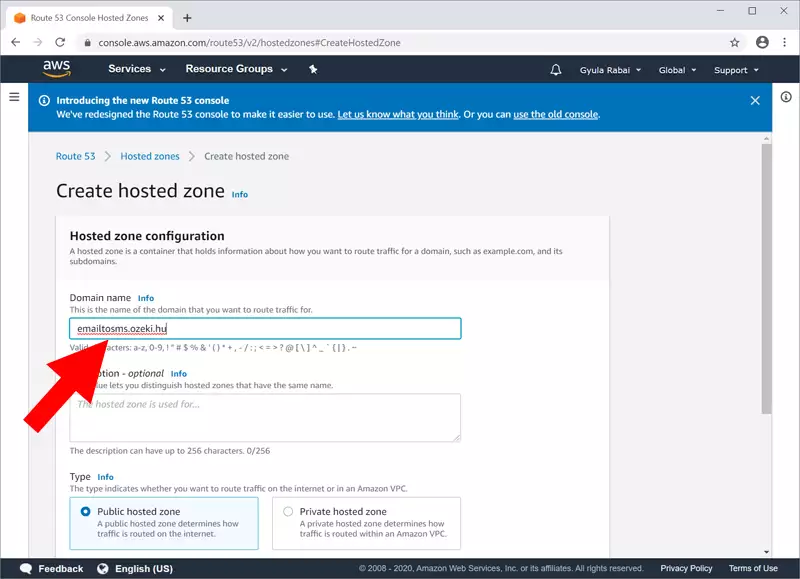
Now you need to configure the hosted zone. The important step here is to type "emailtosms.ozeki.hu" to the “Domain name” field. This way the AWS will connect with the Ozeki SMS Gateway and work as one system. You can find the filed with the help of Figure 5.
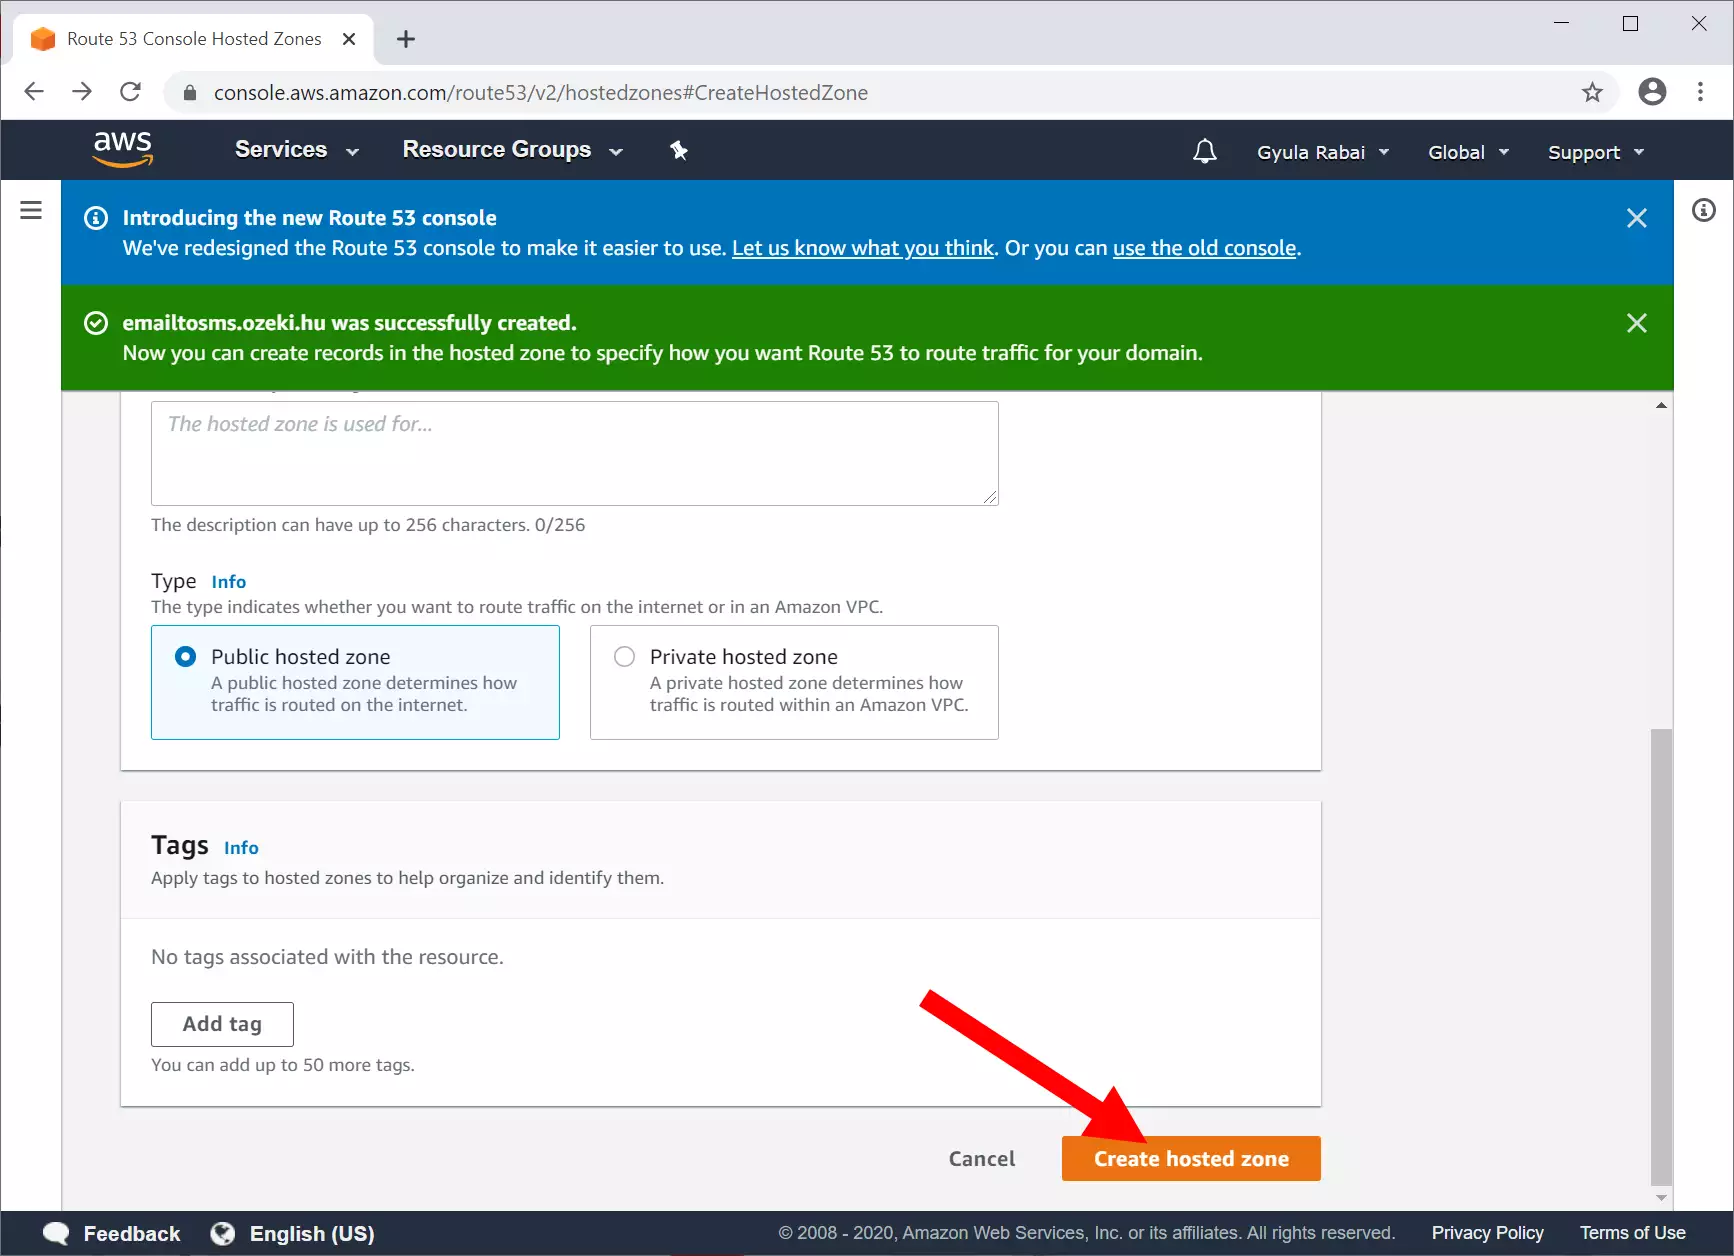
Now to finish the configuration, click “Create hosted zone”. After you clicked the button, the AWS will try to connect with the Ozeki SMS Gateway, the green pop-up banner on the top of Figure 6 will be visible if the connection was successful.
Step 2: Create an MX record pointing to your SMS gateway
This step is about creating two records in your newly created domain. One should be an A record pointing to your sms gateway, the other should be an MX record telling the email servers to forward emails to your sms gateway. The way the system works, is that email servers on the Internet will look up the MX record, which point to your mail.emailtosms.ozeki.hu A record which points to the IP address of your SMS gateway. After the email servers found out the IP address of your SMS gateway, they will forward the e-mail messages to its SMTP port (25).
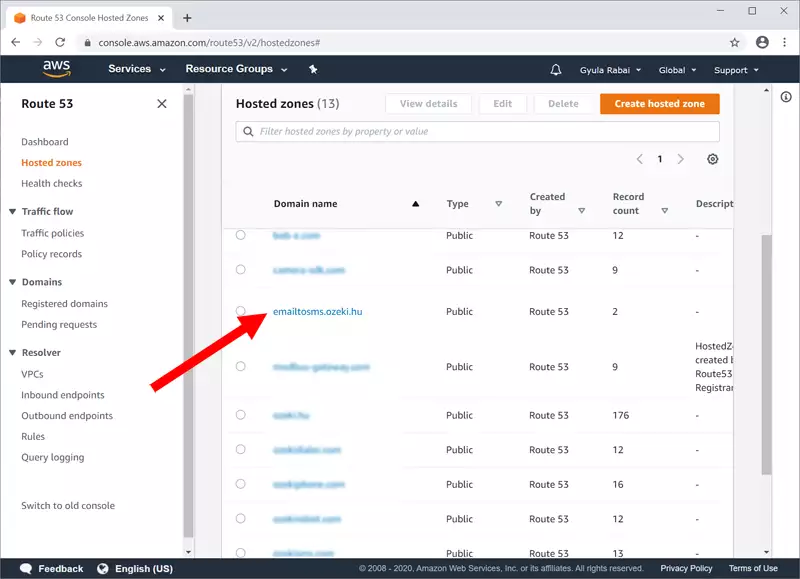
Now you have the connection activated, you can start creating an MX record pointing to your SMS Gateway. You can see the working Route 53 connection in the hosted zones list in AWS (Figure 7). Please click the blue title of the connection to start adding a record point.
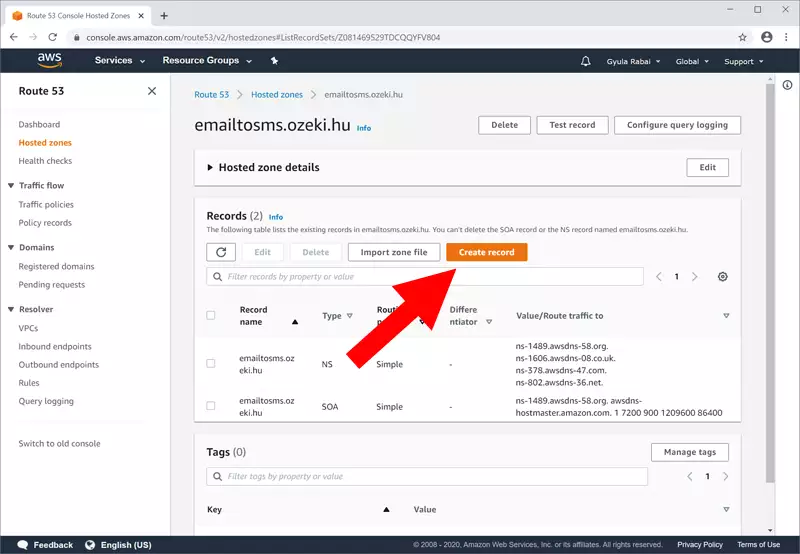
Here you will be presented with the “Hosted zone details” panel, as you can see on Figure 8. Here you can import files, manage tags, edit, and delete records, but most importantly create new records. Click on the “Create record” button to start the procedure.
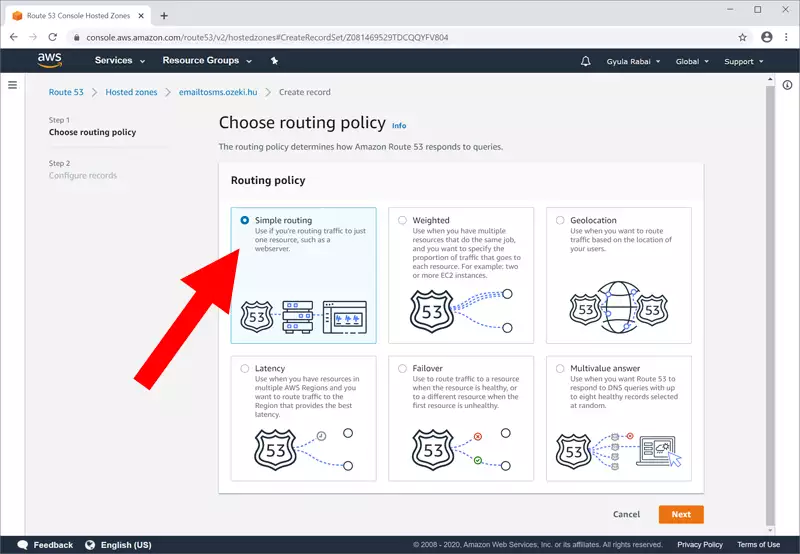
Now you will be presented with the routing policy options, which you can find on Figure 9. AWS can handle most customer needs, so it has multiple routing policy to choose from. Now you need the “Simple routing” option. Click it and then click “Next”.
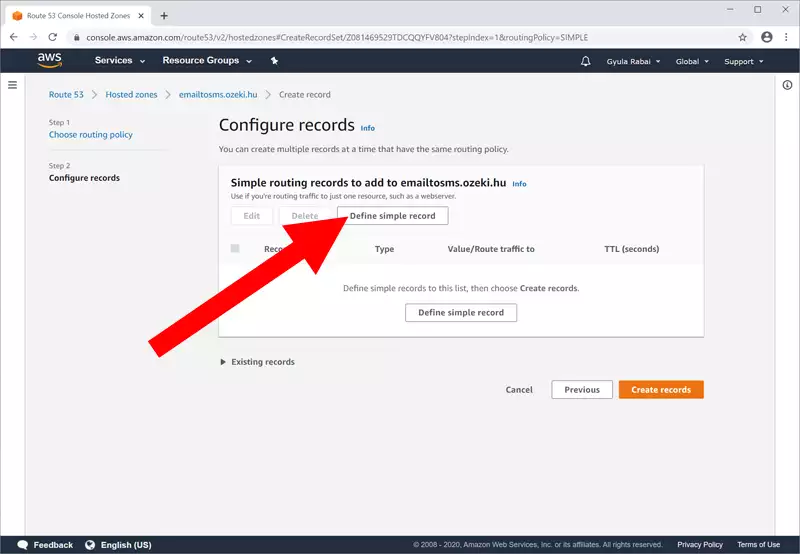
Now you are on the “Configure records” panel. Here you can create new, form or delete existing records. To add new routing records to emailtosms.ozeki.hu find the “Define simple record” button and click it. Figure 10 will help you with that.
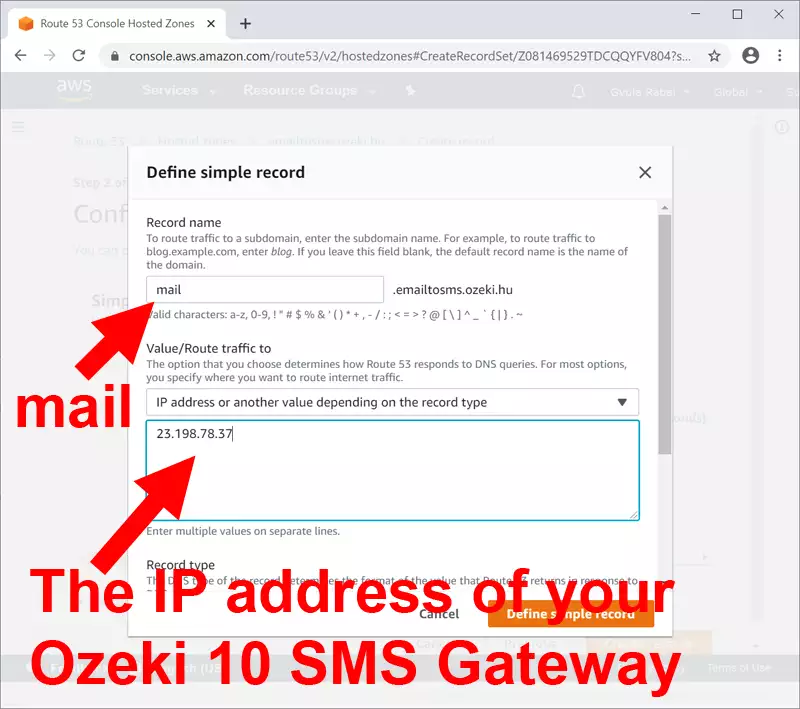
The next step is to define the record. To do that, we give you a hand with Figure 11. As you can see, the first field must contain “mail”. The second field needs the IP address of your Ozeki 10 SMS Gateway. It will tell the Route 53, what to answer to DNS queries.
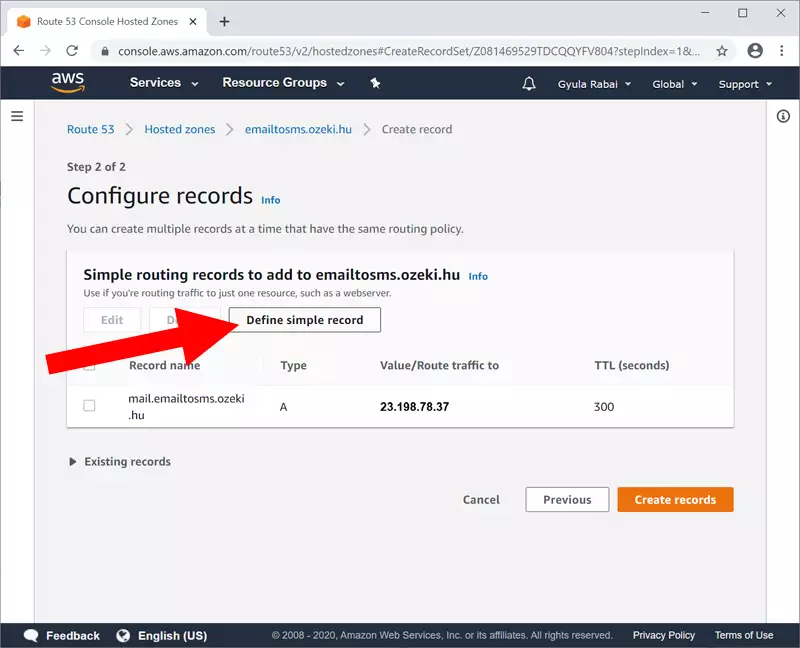
You must make another simple record. Click the “Define simple record” button again to start the procedure one more time. You can find the button on Figure 12.
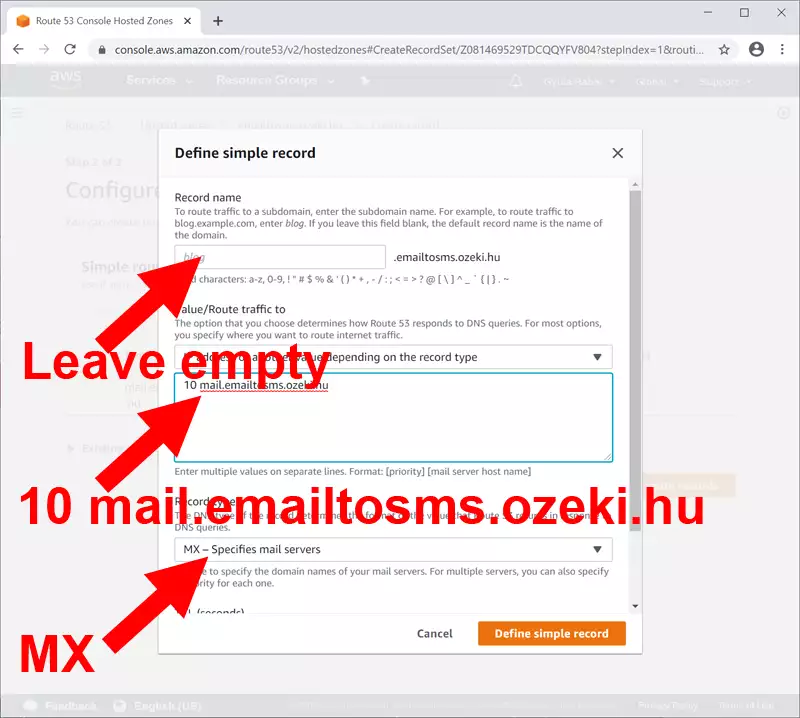
Now you have to configure your second simple record. It is rather difficult, but we give you help with “Figure 13”. the first field, called subdomain need to be left empty. The “Value/Route traffic to” field must contain only the following: “10 mail.emailtosms.ozeki.hu”. Below it, there is a drop-down menu. You need to find the option called: “MX-specifies mail servers”. If you have successfully typed in all the required data, please click the “Define simple record” button.
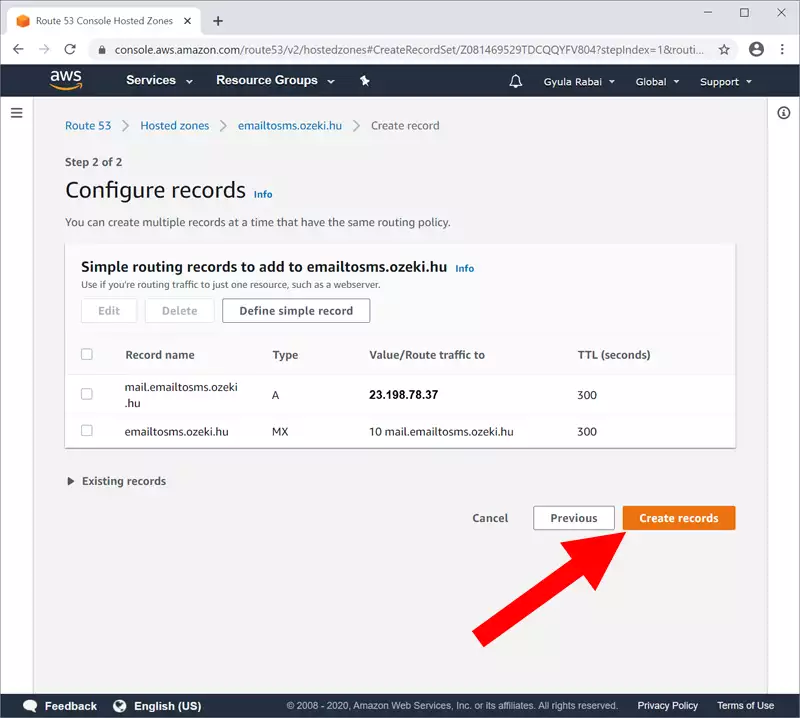
You now have all the needed records set up. The “Simple routing records to add to emailtosms.ozeki.hu” panel should contain the two records which we just made. You can see how it should look like on Figure 14. Click the “Create records” to create the records.
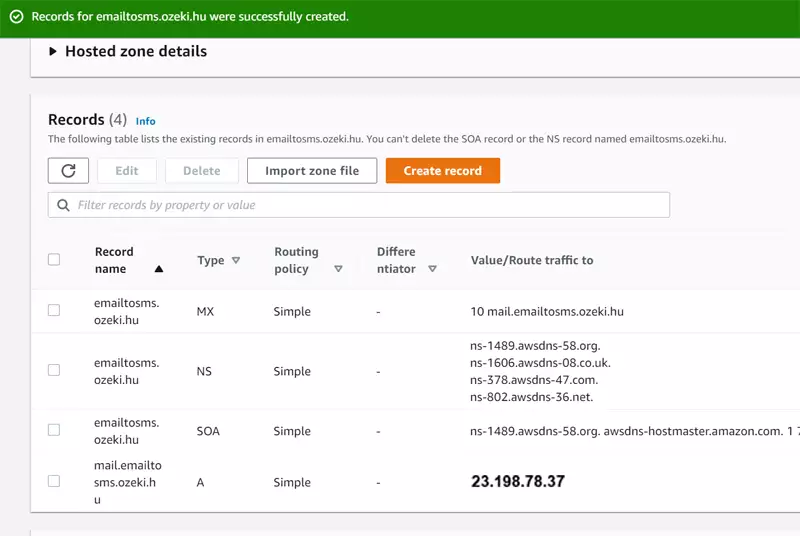
On Figure 15, you can see how your configured DNS zone should look like on the records panel. You are finished with the record making. You should proceed to the next step.
Step 3 - Create an NS record pointing to your DNS zone
When your subdomain is created, the next step is to point to it from your main domain. In our example we have create a subdomain called emailtosms.ozeki.hu, so we have to setup an NS record in the domain ozeki.hu to point to it.
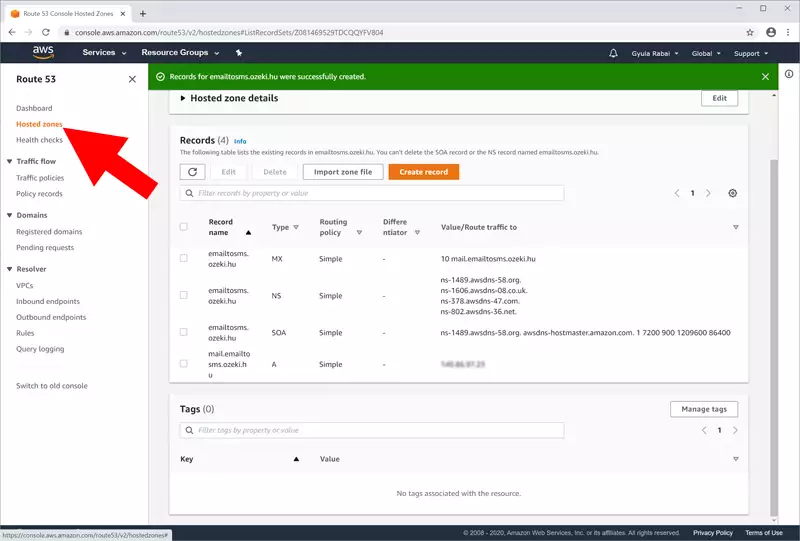
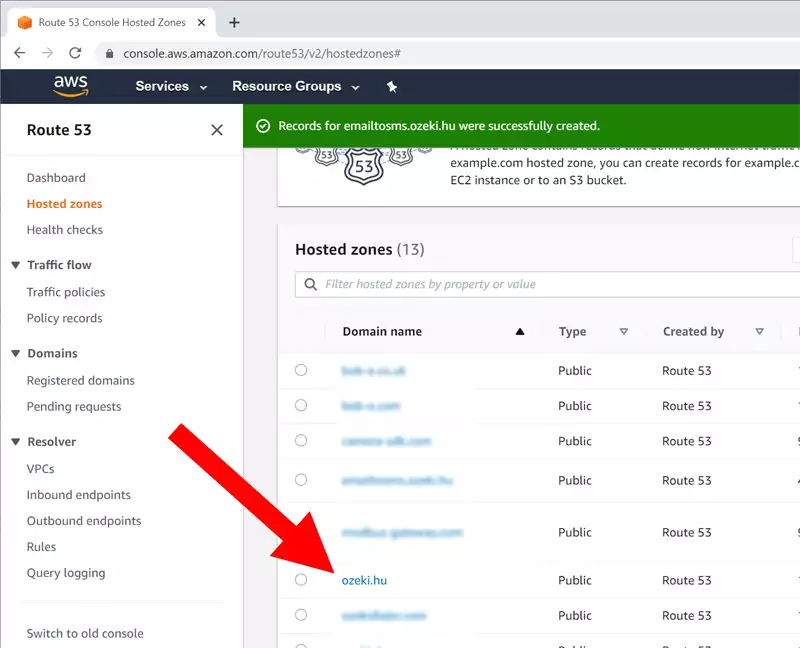
Now that you have the records created, you should head back to the “Hosted zones” panel. Search for it on the left side of the window. You can find it with the help of Figure 16.
Here, you need to search for your main domain. Figure 17 shows you that our example domain is ozeki.hu. Click on it to get to the options menu of that domain.
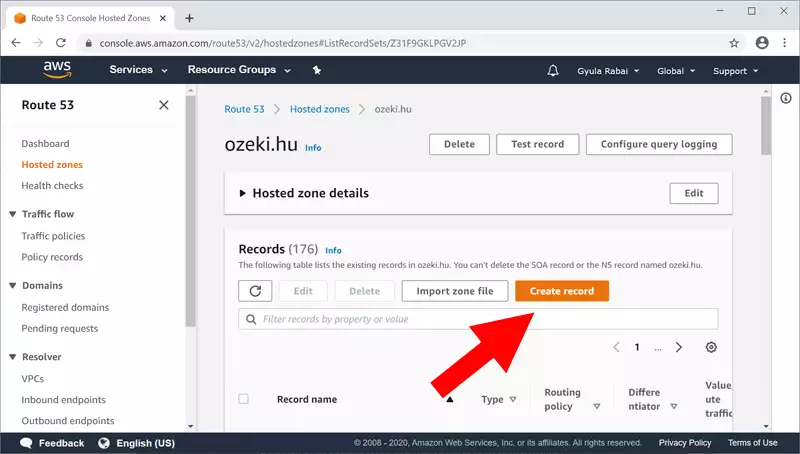
You need to create a new record once again. This time it is on the domain of “ozeki.hu”. Search for the “Create record” and click it. You can find it easily on Figure 18.
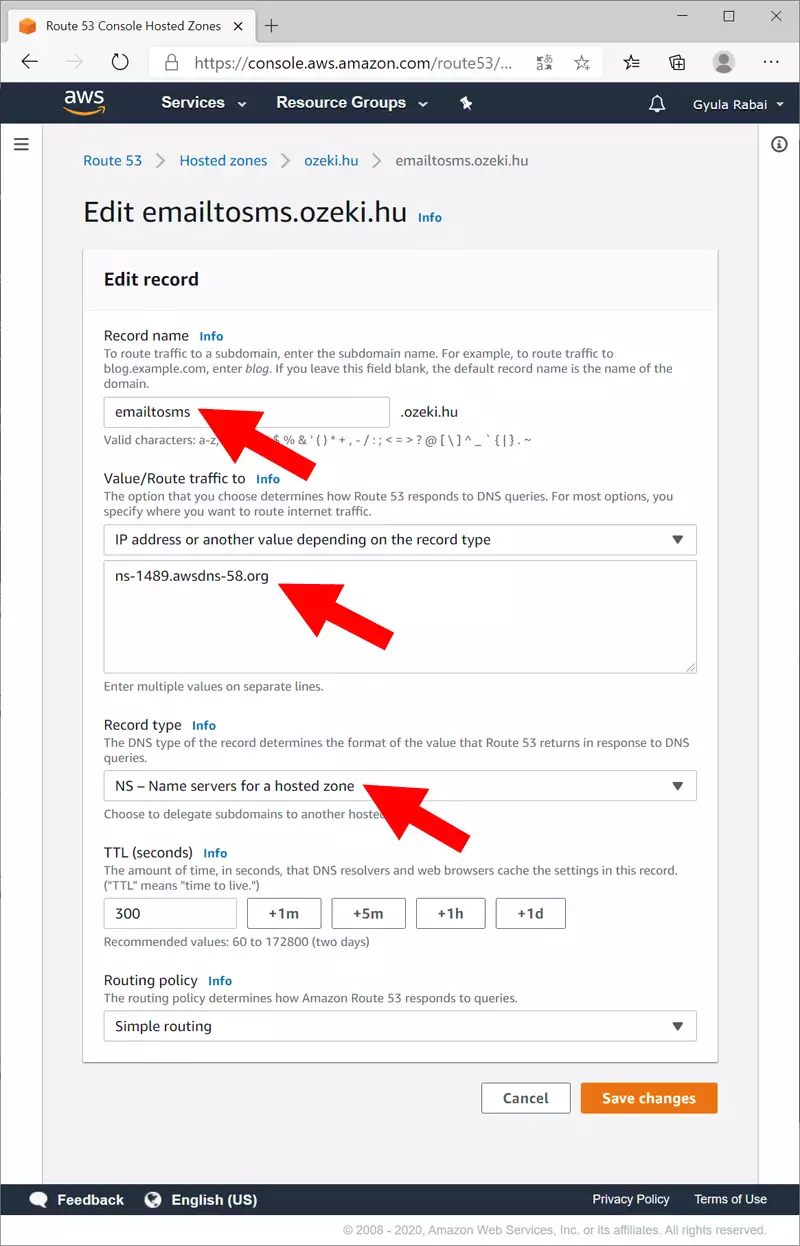
The next step is to create the NS record that points to your newly created zone. Note, that the DNS server you provide in this step must match the DNS server serving your new zone. In our example you will see if you look at Figure 16, that the DNS server of emailtosms.ozeki.hu is ns-1489.awsdns-58.org. This is why we provided this value in the created zone. (Of course, your DNS server for your subdomain will be different, just make sure it matches.)
You must also note that the domain name emailtosms is used in the Record name of the NS record. This will ensure, that queries coming to the zone emailtosms.ozeki.hu will be directed to the appropriate DNS server serving the emailtosms.ozeki.hu subdomain.
To configure this new record, please follow Figure 19. The first field needs to contain your DNS server name. The second field needs to be set on “IP address or another value depending on the record type” and contain your subdomain's DNS server. The Record type needs to be “NS”. The others are up to you, but we recommend the settings you can see on Figure 19.
The final step is to click the “Create records” button on the bottom of the page (Figure 20).
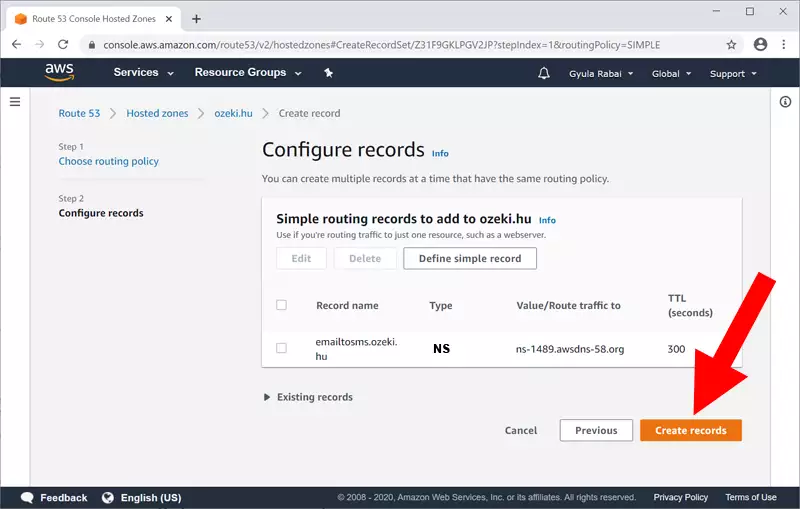
The final step is to click the “Create records” button on the bottom of the page. After these settings your DNS system will forward e-mails coming to phonenumber@emailtosms.ozeki.hu to your SMS gateway's (23.198.78.37 in our example) SMTP port, which is the TCP/IP port 25.
