Configure SMTP authentication in the E-mail to SMS setup
This document explains how you can setup E-mail client authentication on Ozeki SMS Gateway. Ozeki provides a built in SMTP server for sending e-mails as SMS and a built in IMAP server for downloading incoming SMS messages as E-mails. When you setup these servers, you have the option to create user accounts for each email client in your organization. For example, if your office users use Windows Mail, you can create a separate e-mail account (IMAP user) in Ozeki for every office user. In case you use an exchange to SMS configuration, you can setup multiple e-mail connectors with separate usernames and passwords.
How to configure SMTP authentication
To configure SMTP authentication:
- Launch Ozeki SMS Gateway
- Install SMPP client
- Create new E-mail Service
- Select SMTP service
- Configure new E-mail Service
- Select IMAP service
- Add three new IMAP user
- Modify Outlook Account Settings
- Send test e-mail
- Check the logs
The default setup
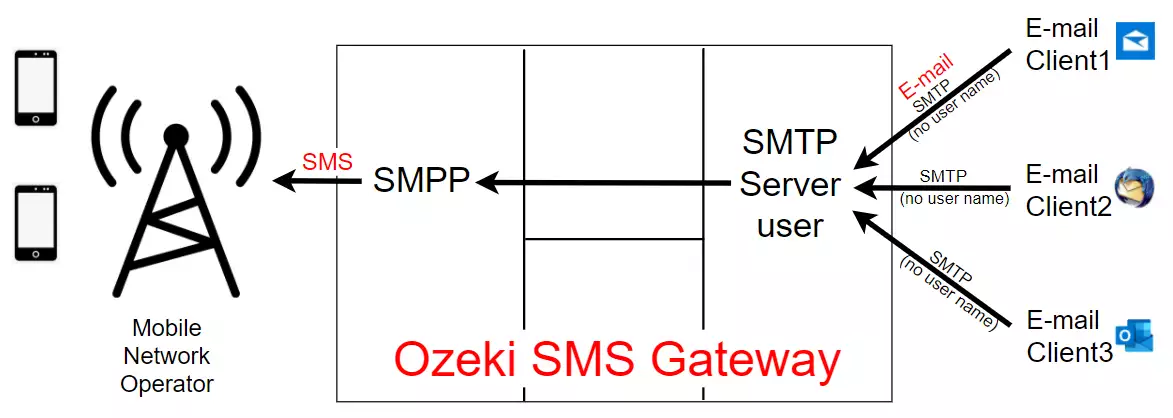
When you setup the built in SMTP server of Ozeki 10 SMS gateway, by default e-mail client authentication is not enabled. Instead, a single user is created called "SMTP Server User", and this user account will handle all e-mail messages you wish to send as SMS (Figure 1).
Authenticating e-mail clients
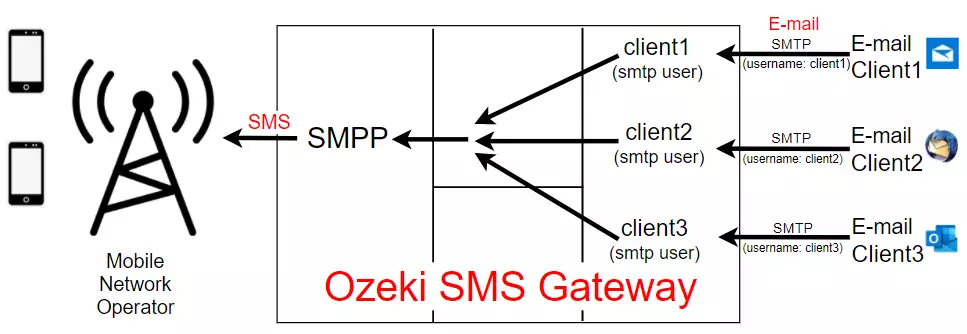
To have a better system, you can create individual user accounts for each e-mail client. In this case, your e-mail clients will have to login to the SMTP server built into Ozeki 10 using the username and password you have configured. In this setup if an E-mail client sends an E-mail to the system, the e-mail will be accepted by the corresponding e-mail user you have created. You can see the e-mail in its logs, it will be registered under this username in the SQL reporting database, and you can use this user account to creating custom rules for routing and modifying the messages. Figure 2 shows the setup, where you have a username and password created for each e-mail client.
SMTP vs IMAP user accounts
When you create e-mail client accounts, you may choose simple SMTP user accounts, or you can choose IMAP user accounts. SMTP user accounts can only be used for sending E-mail to SMS. IMAP is a better choice, because it also offers receiving SMS. In this case the e-mail clients can not only send SMS through SMTP, but they can also download incoming SMS messages as e-mails from the Ozeki SMS Gateway. Note that an IMAP user account provides access to both Ozeki services: the built in SMTP server and to the built in IMAP server.
How to create IMAP user accounts
Video 1 presents the steps to take to setup IMAP users. The steps are similar if you need SMTP users only. In that case simply select SMTP user instead of IMAP user when you create the user account. (If you want to use both SMTP and IMAP, you only need to create IMAP users. In this case you don't have to create two accounts: one for SMTP and one for IMAP access.)
Sending your first SMS from Outlook
After the IMAP user accounts are created, you are ready to setup your e-mail client to send and receive SMS messages. In our example we use Outlook 365 to send our first SMS. To connect to the SMS Gateway in Outlook, you need to setup the e-mail account in Outlook. Start by clicking on the File Menu in Outlook and follow the steps in Video 2. When you configure your e-mail client you will be asked to enter the IP address of the IMAP server and the IP address of the SMTP server. In both cases, provide the IP address of your Ozeki SMS Gateway. Make sure you open port 25 in your firewall for SMTP traffic and open port 143 in the firewall for IMAP traffic on the server, where Ozeki SMS Gateway is installed.
At the end of this video, you will see how to include the mobile phone number you wish to send you SMS to as an E-mail address in the message's To field. You will note that you must provide the phone number as +441234567@domain, where the domain can be anything you like.
Checking the logs
To see what happens in the background, you may check the logs of Ozeki 10 SMS Gateway. Video 3 presents you the steps to take to find your SMS in the logs. You can see the SMS in the logs of the mobile network connection, and you can also see it in the logs of the E-mail client user.
Video 3 - Checking the logs of your E-mail to SMS service